BOMANN GSPE 882 User manual

B
BB
B
UILT
UILTUILT
UILT
-
--
-
IN
IN IN
IN
D
DD
D
ISHWASHER
ISHWASHERISHWASHER
ISHWASHER
GSP
GSPGSP
GSPE
EE
E
88
8888
882
22
2
Instruction Manual
Instruction ManualInstruction Manual
Instruction Manual

2
Contents
ContentsContents
Contents
Introduction ……………………..………….……………………………………………………………..... Page 3
General Notes …...…………………………………………..…………………………………...……..…. Page 3
Special safety information for this Unit ……………………..………………………………...…............ Page 4
Unpacking the Appliance …...………………………………..…………………………………………… Page 5
Appliance Equipment ……………………..………………………………………………….………….... Page 5
Installation …...………………………………………………..…..……………………………………..…. Page 6
Prior Using for the first Time ………………………..…………………..…………….……………......... Page 9
Loading the Dishwasher Baskets …………………………………..………………………...……......... Page 12
Starting a Rinse Program ……………………………..……………………………….……………......... Page 14
Cleaning and Maintenance …...………………………………..………….………………………………
Page 17
Troubleshooting ……………………..………………...…………………..……….…………………….... Page 19
Technical Data …...……………………………………………………………………....……………..…. Page 20
Disposal ………………………………………..……………………………….....………………….......... Page 22

3
Introduction
IntroductionIntroduction
Introduction
Thank you for choosing our product. We hope you will enjoy using the appliance.
Symbols in these Instructions for Use
Symbols in these Instructions for UseSymbols in these Instructions for Use
Symbols in these Instructions for Use
Important information for your safety is specially marked. It is essential to comply with these instructions in
order to avoid accidents and prevent damage to the machine:
WARNING:
WARNING:WARNING:
WARNING:
This warns you of dangers to your health and indicates possible injury risks.
CAUTION:
CAUTION:CAUTION:
CAUTION:
This refers to possible hazards to the machine or other objects.
NOTE
NOTENOTE
NOTE:
::
: This highlights tips and information.
General Notes
General NotesGeneral Notes
General Notes
Read the operating instructions carefully before putting the appliance into operation and keep the instructions
including the warranty and the receipt. If you give this device to other people, please also pass on the operat-
ing instructions.
NOTE
NOTENOTE
NOTE:
::
: The illustrations in this instruction manual can deviate from the original appliance.
•The appliance is designed exclusively for private use and for the envisaged purpose. This appliance is not
fit for commercial use.
•The appliance is only to be used as described in the user manual. Do not use the appliance for any other
purpose. Any other use is not intended and can result in damages or personal injuries.
•Operate the appliance only properly inst
properly instproperly inst
properly installed
alledalled
alled.
•Do not use it outdoors. Keep it away from sources of heat, direct sunlight and humidity.
•Do not operate the appliance without
withoutwithout
without supervision.
•When not in use, for cleaning, user maintenance works or with disruption, switch off the appliance and
disconnect the plug (pull the plug itself, not the lead) or turn off the fuse.
•The appliance and if possible the mains lead have to be checked regularly for signs of damage. If damage
is found the appliance must not be used.
•For safety reasons, alterations or modifications of the appliance are prohibited.
•In order to ensure your children’s safety, keep all packaging (plastic bags, boxes, polystyrene etc.) out of
their reach.
WAR
WARWAR
WARNING
NINGNING
NING:
::
:
Do not allow small children to play with the foil. There is a danger of suffoc
danger of suffocdanger of suffoc
danger of suffocation!
ation!ation!
ation!

4
Special safety Information for this Unit
Special safety Information for this UnitSpecial safety Information for this Unit
Special safety Information for this Unit
•The maximum number of place settings to be washed is 12.
•This unit is intended to be used in household and similar applications
such as
-staff kitchen areas in shops, offices and other working environ-
ments;
-by clients in hotels, motels and other residential type environments;
-in farm houses.
•The appliance is to be connected to the water mains using new hose
sets and that old hose-sets should not be reused.
•The maximum permissible inlet water pressure is 1 Mpa.
•The minimum permissible inlet water pressure is 0.04 Mpa.
•In the appliance bottom are located ventilation openings (depending on
model). These may not be clogged e.g. by carpet.
•Pay attention to a proper loading of the appliance. Follow the instruc-
tions in the chapter “Loading the Dishwasher Baskets”.
•Knives and other utensils with sharp points must be loaded with their
points down in the cutlery basket (depending on model) or placed in a
horizontal position in the dishwasher basket.
•The door should not be left open, since this could increase the risk of
tripping.
•This appliance can be used by children
childrenchildren
children aged from 8 years and above
and persons with reduced physical, sensory or mental capabilities or
lack of experience and knowledge if they have been given supervision
or instruction concerning use of the appliance
use of the applianceuse of the appliance
use of the appliance in a safe way and under-
stand the hazards involved.

5
•Children
ChildrenChildren
Children who are younger than 8 years must be kept away from the
device.
•Children
ChildrenChildren
Children shall not play with the appliance.
•Cleaning and user maintenanc
user maintenancuser maintenanc
user maintenance
ee
e shall not be made by children,
children,children,
children, unless
they are older than 8 years and are supervised.
•Do not try to repair the appliance on your own. Always contact an au-
thorized technician. If the supply cord is damaged, it must be replaced
by the manufacturer, its service agent or similarly qualified persons in
order to avoid a hazard.
Unpacking the Appliance
Unpacking the ApplianceUnpacking the Appliance
Unpacking the Appliance
•Remove the appliance from its packaging.
•Remove all packaging material, such as foils, filler and cardboard packaging.
•To prevent hazards, check the appliance for any transport damage.
•In case of damage, do not put the appliance into operation. Contact your distributor.
NOTE
NOTENOTE
NOTE:
::
:
Production residue or dust may have collected on the appliance. We recommend cleaning the appliance ac-
cording to chapter “Cleaning and Maintenance”.
Appliance
ApplianceAppliance
Appliance
Equipment
EquipmentEquipment
Equipment
Appliance overview
Appliance overviewAppliance overview
Appliance overview
1
11
1
Upper basket
2
22
2
Inner pipe
3
33
3
Lower basket
4
44
4
Salt container
5
55
5
Detergent / Rinse aid dispenser
6
66
6
Cup shelf
7
77
7
Spray arms
8
88
8
Filter system

6
Delivery scope
Delivery scopeDelivery scope
Delivery scope
cub shelf (2 pcs), cutlery basket, salt funnel tube, drain hose suspension, inlet hose, installation material
Installation
InstallationInstallation
Installation
WARNING:
WARNING:WARNING:
WARNING:
The unit must not be connected to the mains during installing. Otherwise there is danger to life
danger to lifedanger to life
danger to life or electric
electric electric
electric
shock ha
shock hashock ha
shock haz
zz
zard
ardard
ard!
CAUTION
CAUTIONCAUTION
CAUTION:
::
:
For a correct operation the appliance must be connected properly. The specifications for water supply and
drain as well as the electrical connection must fulfill the required criteria.
Installation location
Installation locationInstallation location
Installation location
•The site should be located near the water inlet and outlet, as well as near a properly grounded power
socket. Arrange a place in the cabinet under the sink for the cable and hoses.
•Consider the necessary installation dimensions (see “Installation steps”).
•Take care of a solid and horizontal position of the appliance. If the appliance is not horizontally leveled,
adjust the feet accordingly.
•Power cable and water hoses may not kinked or squashed.
•Avoid the installation:
Avoid the installation:Avoid the installation:
Avoid the installation:
-near heaters, next to a stove, direct sunlight or any other heat sources;
-at locations with high humidity (e.g. outdoors), as metal parts would be susceptible to corrosion under
such circumstances;
-in rooms where the temperature could drop below freezing. Do not expose the appliance any weather.
-near volatile or flammable materials (e.g. gas, fuel, alcohol, paint, etc.).
Installation steps
Installation stepsInstallation steps
Installation steps
Attach the condensation strip
Attach the condensation stripAttach the condensation strip
Attach the condensation strip
Attach the strip under the wooden worktop to prevent it from damages of ascending water vapor.
•First clean and dry the concerned area of the worktop thoroughly.
•Remove the protective foil from the condensation strip and stick it flush
with the worktop edge.
Cabinet opening and appliance dimension
Cabinet opening and appliance dimensionCabinet opening and appliance dimension
Cabinet opening and appliance dimension
Prepare the cabinet opening according to the dimensional drawing.
Unit: mm

7
If the appliance is installed at the corner of the cabinet, there must remain enough space to
open the door.
1 Kitchen furniture 2 Dishwasher 3 Appliance door
Unit: mm
Dimension and preparation of the decoration panel
Dimension and preparation of the decoration panelDimension and preparation of the decoration panel
Dimension and preparation of the decoration panel
Prepare the wooden decorative panel according to the dimen-
sional drawing.
Unit: mm
Using the spacer bar
Using the spacer barUsing the spacer bar
Using the spacer bar
With this accessory you can compensate the gap between the control panel and decorative panel.
The spacer bar consists of several layers, which are connected with a click-
mechanism. Adjust the height of the spacer to the gap. To do this, remove the appro-
priate number of layers.
Fixing the decoration panel
Fixing the decoration panelFixing the decoration panel
Fixing the decoration panel
•Drehen Sie die beiliegenden langen Schrauben (4 x s2) ein.
•Separate the supplied Velcro strips A and B from each other.
•Glue the Velcro strip A on the wooden panel (at the top and bottom) and the felt
strip B in the same heights on the appliance door.
•Align the panel and the appliance front against each other and fix the panel on the
appliance door.
•First remove the factory-mounted short screws (4 x s1) from the door inside.
•Screw the supplied long screws (4 x s2).
Adjusting of the door spring tension
Adjusting of the door spring tensionAdjusting of the door spring tension
Adjusting of the door spring tension
After fixing the decoration panel, the door spring tension must be adjusted accordingly.
•Turn the adjusting screws as needed in the clockwise or counterclockwise
direction. The steel cable tightens or loosens.
•Check the door spring tension. If the door remains fully open horizontally
and can still be easily closed, the tension is correct. Otherwise do the ad-
justing again.
Connection to the water supply
Connection to the water supplyConnection to the water supply
Connection to the water supply
Connect the water inlet hose as well as the water drain hose properly. Follow the instructions that we give you
under "Water connection".

8
Installation to the power supply
Installation to the power supplyInstallation to the power supply
Installation to the power supply
Consider the instructions that we give you under "Electrical connection".
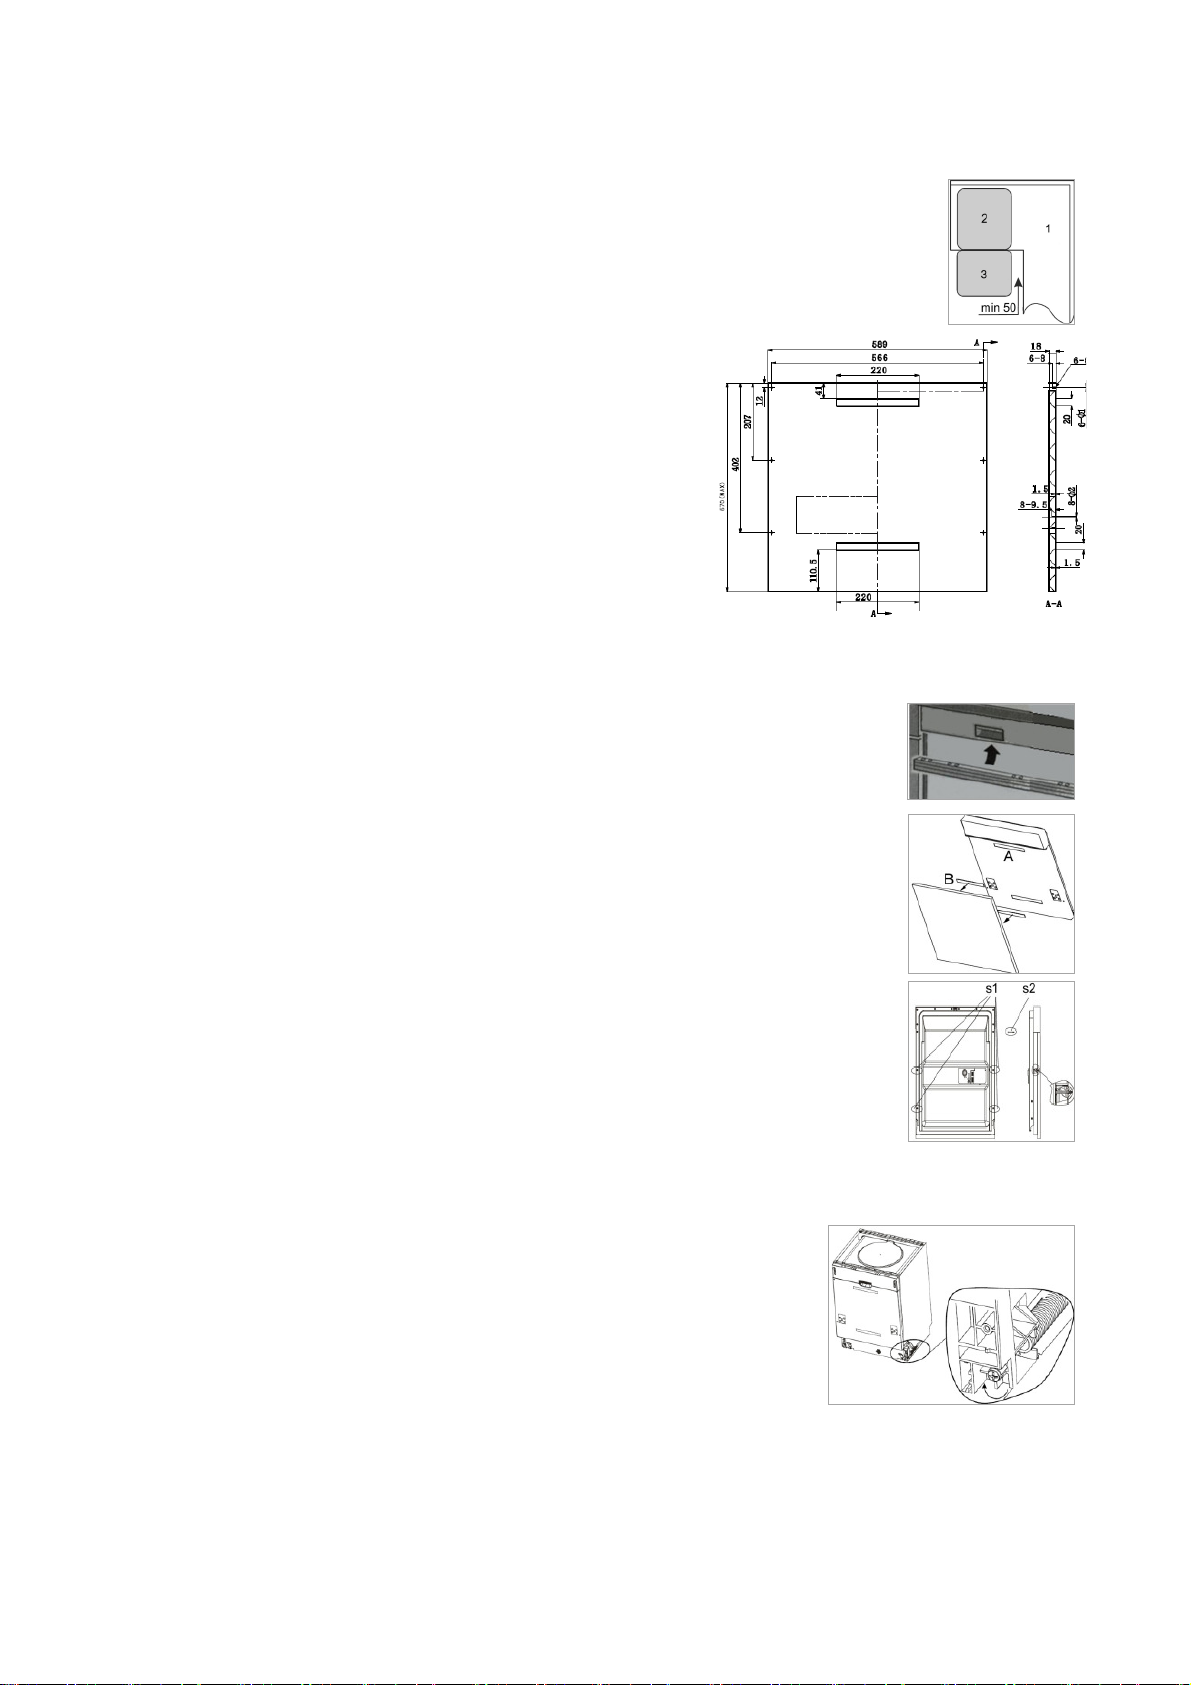
Adjusting the feet
Adjusting the feetAdjusting the feet
Adjusting the feet
Place the appliance in its proper position and take care that it is leveled solid and horizontal. Check this with a
spirit level.
•You can adjust the back foot by the adjusting screw (a) at the center of the
appliance plinth front with an Allen key.
•Adjust the front feet (b) with a screw-wrench until the dishwasher is leveled.
The maximum adjustment height of the feet is 50 mm.
Fixing the dishwasher
Fixing the dishwasherFixing the dishwasher
Fixing the dishwasher
Fix the appliance by tighten the screws from the appliance inside to the provided holes accordingly.
1
11
1If the worktop made of wood, fasten the appliance to the work top.
2
22
2If the worktop made of marble or granite, fasten the appliance sideways with
the housing unit. Put the screw covers on.
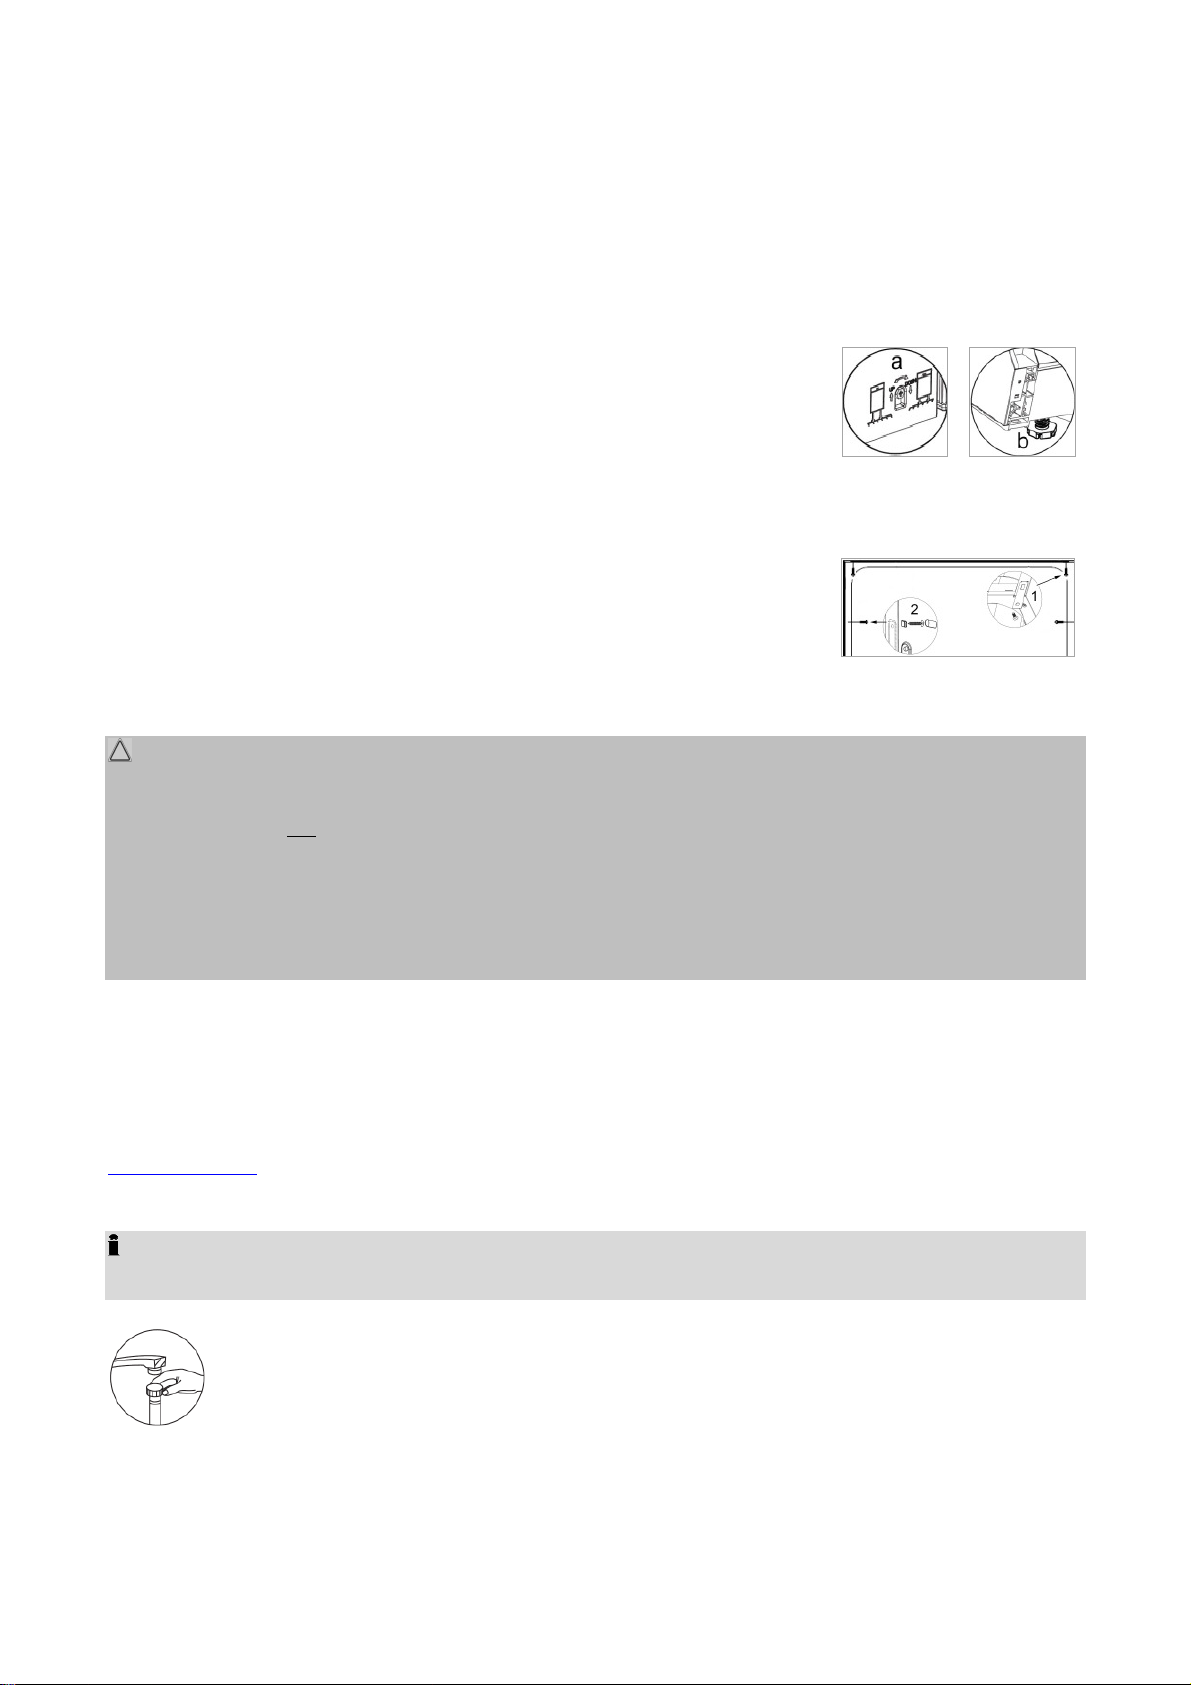
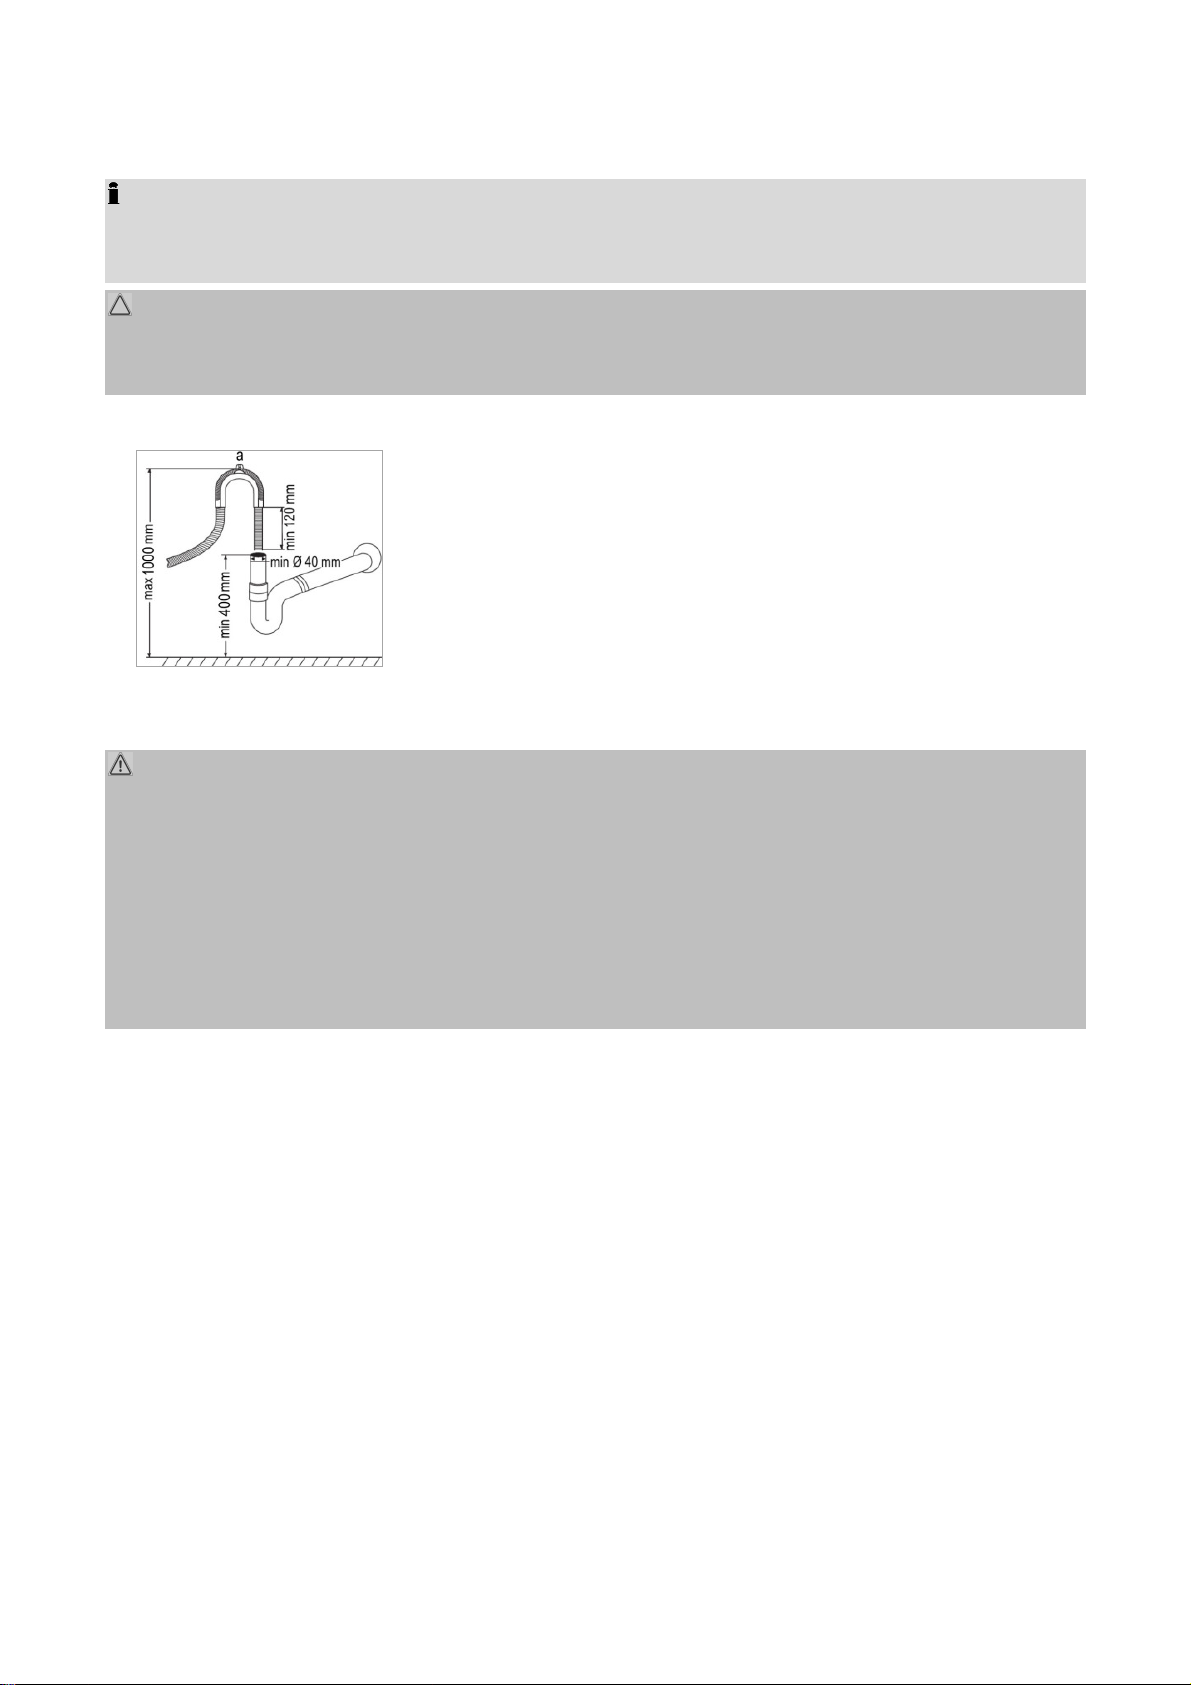
Water connection
Water connectionWater connection
Water connection
CAUTION:
CAUTION:CAUTION:
CAUTION:
•The Installation of the water supply must conform to the local laws and regulations.
•The appliance is not
notnot
not suitable for hot water supply.
•Use the new supplied hose set to connect the appliance to the water supply. Do not reuse old or used
connection sets.
•If the water pipe is new or long time not used, ensure before connecting to the water system, that the water
is clear and free from contamination.
Notes on inlet hose safety system (not included in delivery)
Notes on inlet hose safety system (not included in delivery)Notes on inlet hose safety system (not included in delivery)
Notes on inlet hose safety system (not included in delivery)
The safety system consists of a double-walled inlet hose. This system guarantees to cut off the water supply
when leakage of the inner hose. Switching off the water supply leads over an electronic contact.
If necessary, you can order an inlet hose safety system from your dealer or in our online accessories shop,
www.bomann.de
www.bomann.dewww.bomann.de
www.bomann.de. To order, use the reference number found under “Technical Data”.
Connect the water
Connect the water Connect the water
Connect the water inlet
inletinlet
inlet
hose (cold water connection)
hose (cold water connection)hose (cold water connection)
hose (cold water connection)
NOTE
NOTENOTE
NOTE:
::
:
The water pressure must be between 0.04 and 1 MPa. With higher pressure: use a pressure regulator.
•Connect the water inlet hose to a water thread with ¾“. Screw the hose firmly in the direction
of the screw thread; pay attention for a tight fit.
•Connect the other end of the inlet hose to the inlet valve on the appliance back; pay attention
for a tight fit too.

9
Connect the water drain hose
Connect the water drain hoseConnect the water drain hose
Connect the water drain hose
NOTE
NOTENOTE
NOTE:
::
:
The drain hose has a length of approx. 1.5 m and can extend with a suitable hose and connecting piece to a
length of max. 4 m.
CAUTION
CAUTIONCAUTION
CAUTION:
::
:
In order to prevent backflow of contaminated water, the free end of the hose must not come under the water
level of the drain.
•Connect the drain hose to a drain pipe with a minimum diameter of 40 mm; alternatively the drain hose
can be fixed to a sink or directly to the drainage.
•Always make sure that the hose is not bent or squeezed. Use the sup-
plied drain hose suspension (a).
•The hose must be installed at a height of min. 400 mm and max.
1000 mm above the rinsing floor.
•Attach the drain hose securely in order to avoid a change in position and
with it a water leakage.
El
ElEl
Electrical connection
ectrical connectionectrical connection
ectrical connection
WARNING:
WARNING:WARNING:
WARNING:
•The installation to the mains supply must conform to the local standards and regulations.
•Improper connection may cause to an electric shock
electric shockelectric shock
electric shock!
•Do not use multiple sockets or extension cords.
•It is not allowed to modify the plug provided with the appliance. If the plug does not fit properly to the outlet,
let install a proper outlet by an authorized specialist.
•The accessibility of the power plug must always be ensured in order to disconnect the device from the
power supply in case of an emergency.
•Ensure that your mains power corresponds with the specifications of the appliance. The specifications are
printed on the rating label.
•Connect the mains cable to a properly installed and earthed wall outlet.
•If the plug after installation is not accessible, a corresponding disconnect device must be available to meet
the relevant safety regulations.
Prior Using for the first Time
Prior Using for the first TimePrior Using for the first Time
Prior Using for the first Time
Before using your dishwasher for the first time:
Before using your dishwasher for the first time:Before using your dishwasher for the first time:
Before using your dishwasher for the first time:
A. Filling salt into the salt container (water softener)
B. Fill the rinse aid dispenser
C. Fill in detergent

10
CAUTION:
CAUTION:CAUTION:
CAUTION:
•Use only salt, rinse aid and detergent for dishwashers. Other products may damage the appliance.
•Always consider the dosage and storage recommendations on the sales packaging.
WARNING:
WARNING:WARNING:
WARNING:
Keep salt, rinse aid and detergent out of reach for children.
A
AA
A. Filling salt into the salt container
. Filling salt into the salt container. Filling salt into the salt container
. Filling salt into the salt container
(water softener)
(water softener)(water softener)
(water softener)
Water softener
Water softenerWater softener
Water softener
The water hardness varies regionally. If hard water is used in the dishwasher, deposits form on the dishes and
kitchen utensils. The appliance is equipped with a water softener, that removes lime and minerals from the
water by using water softening in the salt container. Your local water authority can advise you on the hardness
of the water in your area.
Adjusting the salt con
Adjusting the salt conAdjusting the salt con
Adjusting the salt consumption
sumptionsumption
sumption
The salt consumption can be adjusted according to your water hardness and therefore optimally regulated.
•Switch on the appliance using the Power- button.
•In the next 60 seconds after switch on the appliance, press the “Start/Pause”-button and hold down for 5
seconds.
•To change the water hardness, press again the “Start/Pause”-button.
•By repeatedly pressing the “Start/Pause”- button, the water hardness can be changed accordingly:
H1->H2->H3->H4->H5->H6.
•Pressing the “An/Aus”-button or no changing for 5 seconds, saves the water hardness.
The following settings (benchmarks) are recommended:
Water hardness
Water hardnessWater hardness
Water hardness
Settings / Display
Settings / DisplaySettings / Display
Settings / Display
°Clark*
°Clark*°Clark*
°Clark*
mmol/l
mmol/lmmol/l
mmol/l
0 – 6 0 – 0.94 H1
7 – 14 1.0 – 2.0 H2
15 – 21 2.1 – 3.0 H3
22 – 28 3.1 – 4.0 H4 (factory setting)
29 – 42 4.1 – 6.0 H5
43 – 69 6.1 – 9.8 H6
NOTE
NOTENOTE
NOTE:
::
: *°Clark: British degree
Fill in the salt
Fill in the saltFill in the salt
Fill in the salt
CAUTION:
CAUTION:CAUTION:
CAUTION:
•Only refill the salt container when the salt warning lamp is lighting.
•During filling the salt container, salt and water can escape. Start a program immediately after you have
filled the container to prevent corrosion.

11
•Remove the lower basket and unscrew the lid of the salt container.
•Add about 1.2 kg of salt by using the supplied funnel tube.
•Full fill the salt container with water (just before the first use).
•Screw the lid firmly on again after filling the container.
•Depending on salt resolution, the warning lamp usually disappears immediately after filling.
B
BB
B.
. .
.
Fill the rinse aid dispenser
Fill the rinse aid dispenserFill the rinse aid dispenser
Fill the rinse aid dispenser
Function of rinse aid
Function of rinse aidFunction of rinse aid
Function of rinse aid
The rinse aid is automatically added during the final rinse, ensuring thorough rinsing and a spot and streak
free drying.
When to refill the rinse aid dispenser
When to refill the rinse aid dispenserWhen to refill the rinse aid dispenser
When to refill the rinse aid dispenser
As long as the corresponding message does not light up in the display, you can estimate
the amount of remaining rinse aid to the optical level indicator (D
DD
D) next to the dispenser.
When the rinse aid dispenser is full, the indicator is completely dark. If the rinse aid diminishes, the size of the
black dot changes as shown below. In order to avoid spotting, the rinse aid level must not drop below ¼.
full ¾ full ½ full ¼ full – refill empty
Fill in the rinse aid
Fill in the rinse aidFill in the rinse aid
Fill in the rinse aid
•To open the dispenser screw the lid counterclockwise to the open posi-
tion (left arrow) and remove the lid.
•Add the rinse aid into the dispenser, being careful not to overfill.
The dispenser contains approx. 140 ml.
•Before closing the appliance door, put on the lid in the open position back and turn it clockwise to the
closed position (right arrow).
NOTE
NOTENOTE
NOTE:
::
:
Remove spilled rinse aid with an absorbent cloth to avoid excessive foaming during the next rinse.
Adjusting the rinse aid dosage
Adjusting the rinse aid dosageAdjusting the rinse aid dosage
Adjusting the rinse aid dosage
When forming spots and the dishes dries poorly, increase the added amount of rinse aid. You can set the
amount of addition between level 1 (min.) and level 6 (max.).
Take off the lid of the rinse aid dispenser and adjust the dial to the desired level.
The factory setting is 5.
NOTE
NOTENOTE
NOTE:
::
:
Increase the dosage if there are drops of water or lime spots on the dishes after rinsing. Reduce the dosage if
there are sticky whitish stains on dishes or a bluish film on glassware or knife blades.

12
C
CC
C.
. .
. Fill in detergent
Fill in detergentFill in detergent
Fill in detergent
Function of detergent
Function of detergentFunction of detergent
Function of detergent
Detergents with its chemical ingredients are necessary to remove dirt, crush dirt and transport it out of the
dishwasher. The most commercially, high-quality cleaning agents are suitable for this purpose.
Detergent
DetergentDetergent
Detergent
Normally new pulverized detergent is without phosphate. Thus the water softener function of phosphate is not
given. In this case we recommend to fill salt in the salt container even when the hardness of water is only
6°dH. If detergents without phosphate are used in the case of hard water often white spots appear on dishes
and glasses. In this case add more detergent to reach better results. Detergents without chlorine do only
bleach a little. Strong and colored spot will not be removed completely. In this case choose a program with a
higher temperature.
Detergent tablets (
Detergent tablets (Detergent tablets (
Detergent tablets (T
TT
Tabs
absabs
abs)
))
)
Dishwasher tablets from different manufacturers dissolve at different rates. It is possible that they will not fully
dissolve in programs with short running time and low water temperature and thus does not reach their full
productive efficiency. To ensure the complete removal of detergent residues, we recommend choosing rinse
programs with long running times and high water temperature. Always follow the manufacturer's instructions!
Fill in the detergent
Fill in the detergentFill in the detergent
Fill in the detergent
NOTE
NOTENOTE
NOTE:
::
:
•Always add the detergent just before starting the rinse cycle, otherwise it could get damp and will not dis-
solve properly.
•You’ll find information about the amount of detergent for the respective programs in the „Rinse cycle table“.
Note that depending on the degree of soiling and water hardness differences are possible.
•At the end of the rinse cycle the detergent dispenser must be empty.
The dispenser must be refilled before the start of each rinse cycle according to the instruc-
tions in the "Rinse cycle table".
Press the release button to open the dispenser.
1
11
1Chamber of detergent in powder form for the main rinse
2
22
2Chamber of detergent for the pre-rinse / Chamber for detergent in tablet form
The main rinse chamber must be filled at least up to the marking MIN (about 20 g). Add with heavily soiled
dishes an additional dose of detergent (about 5 g) in the chamber for the pre-rinse. Close the dispenser.
Make sure that the lid locks into place.

13
Loading the Dishwasher Baskets
Loading the Dishwasher BasketsLoading the Dishwasher Baskets
Loading the Dishwasher Baskets
CAUTION:
CAUTION:CAUTION:
CAUTION:
Only rinse such dishes and cutlery in the dishwasher, which is expressly marked as "dishwasher resistant".
NOTE
NOTENOTE
NOTE:
::
:
•Remove gross scraps of food and soak burnt leftovers. Pre-rinse under running water is not necessary.
•Do not overload! This is important for adequate cleaning results and reasonable energy consumption.
•Very small items should not be rinsed in the appliance, as they could easily fall out of the baskets.
For
ForFor
For
rinsing in the dishwasher the following c
rinsing in the dishwasher the following crinsing in the dishwasher the following c
rinsing in the dishwasher the following cutlery and
utlery and utlery and
utlery and dishes..
dishes..dishes..
dishes..
..
....
..are not suitable
are not suitableare not suitable
are not suitable:
::
:
- Cutlery with hand pieces of wood, porcelain
mother of pearl
- Plastic items that are not heat resistant
- Older cutlery with glued parts that are not tem-
perature resistant
- Bonded cutlery items or dishes
- Pewter or cooper items
- Crystal glass
- Steel items subject to rusting
- Wooden platters
- Items made from synthetic fibres
..
....
..are limited suitable
are limited suitableare limited suitable
are limited suitable:
::
:
- some types of glasses can become dull after a
large number of washes
- silver and aluminum parts have a tendency to
discolor during washing
- Glazed patterns may fade if machine washed
frequently
Recommendations for loading
Recommendations for loadingRecommendations for loading
Recommendations for loading
•Arrange sensitive, light tableware items such as glasses, coffee and tea cups in the upper basket.
•Place large items that are most difficult to clean in the lower basket.
•Make sure that the tableware is placed securely and cannot tip over.
•Place all items so, that the spray arms can rotate freely during rinsing.
•Arrange all items with openings facing down.
•Curved items, or ones with recesses, should be loaded aslant so that water can drain off.
•Make sure that glasses do not touch each other.
•Set the dishes and cutlery not into each other or covering each other.
•Arrange cutlery in the cutlery basket.
•Store long as well as sharp cutlery horizontally in the dishwasher basket.

14
M
MM
Method
ethodethod
ethods for
s fors for
s for
loading n
loading nloading n
loading normal
ormal ormal
ormal d
dd
dishware
ishwareishware
ishware
Loading the upper basket
Loading the upper basketLoading the upper basket
Loading the upper basket
Loading the lower basket
Loading the lower basketLoading the lower basket
Loading the lower basket
On the upper basket only small
and medium items should be
loaded. Load e.g. glasses,
cups, saucers and small
bowls.
Because of the particularly
intense cleaning action of the
lower spray arm the lower
basket is suitable for heavily
soiled dishes. Load e.g. pots
and plates.
A
AA
A
Cups C
CC
C
Saucers E
EE
E
Bowl G
GG
G
Soup plates I
II
I
Dessert plates
B
BB
B
Glasses D
DD
D
Bowl F
FF
F
Bowl H
HH
H
Dinner plates J
JJ
J
Platter
Cup shelf
Cup shelfCup shelf
Cup shelf
If necessary, fold the cup shelf in the upper basket downwards or remove it.
Cup and plate holders
Cup and plate holdersCup and plate holders
Cup and plate holders
In order to create a better arrangement for bulky dishes, the cup holders (upper
basket) and the plate holders (lower basket) can be folded.
Lift the racks slightly and fold them down.
Adjusting the upper basket
Adjusting the upper basketAdjusting the upper basket
Adjusting the upper basket
The height of the upper basket can be adjusted by placing the wheels on rails of different heights. This will
create more space for large items in the upper as well as in the lower basket.
•Pull out the basket guides.
•Remove the basket out of the guides.
•Depending on the desired setting, insert the upper or lower pair of wheels into
the guide; the left and right side should always be located at the same height.
Cutlery basket
Cutlery basketCutlery basket
Cutlery basket
WARNING: Risk of injury!
WARNING: Risk of injury!WARNING: Risk of injury!
WARNING: Risk of injury!
•Cutlery must not protrude above the cutlery basket base.
•Knives and other utensils with sharp points must be placed with the tip down in the cutlery basket or in a hori-
zontal position in the dishwasher basket.
NOTE
NOTENOTE
NOTE:
::
:
If necessary, remove the basket in order to create more space for large dishware.
The basket is equipped with grid inserts in which the cutlery is arranged uniformly and
with the handles downwards.

15
Starting a Rinse Program
Starting a Rinse ProgramStarting a Rinse Program
Starting a Rinse Program
Rinse cycle tab
Rinse cycle tabRinse cycle tab
Rinse cycle table
lele
le
Select a suitable program depending on dishes and degree of soiling.
Pr
PrPr
Pro
oo
ogram
gramgram
gram
Program
ProgramProgram
Program
selection
selectionselection
selection
information
informationinformation
information
Program
ProgramProgram
Program
sequence
sequencesequence
sequence
Detergent
Detergent Detergent
Detergent
pre/main
pre/mainpre/main
pre/main
(g)
(g)(g)
(g)
Running
Running Running
Running
time
time time
time
(Min)
(Min)(Min)
(Min)
Energy
EnergyEnergy
Energy
(kWh)
(kWh)(kWh)
(kWh)
Water
WaterWater
Water
(
((
(l
ll
l)
))
)
Intensiv
(Intensive)
heavily soiled dishes and
dried leftovers
Pre-rinse (50°C)
Main rinse (60°C)
Rinse 1
Rinse 2
Hot rinse (65°C)
Drying
5/25
(or Tab)
160 1.5 18.5
Normal
normal soiled dishes, daily
use
Pre-rinse (45°C)
Main rinse (55°C)
Rinse 1
Rinse 2 (65°C)
Drying
5/25
(or Tab) 180 1.25 15
ECO
ECOECO
ECO
(*EN 50242)
standard program for nor-
mally soiled dishes, daily
use
Pre-rinse
Main rinse (45°C)
Hot rinse (65°C)
Drying
5/25
(or Tab) 185 1.02 11
Glas
(Glass)
low adhesive, fresh
leftovers
Pre-rinse
Main rinse (40°C)
Rinse
Hot rinse (60°C)
Drying
5/25
(or Tab) 120 0.85 14.5
90 Min for lightly soiled dishes
Main rinse (65°C)
Rinse 1
Rinse 2 (65°C)
Drying
30
(or Tab) 90 1.35 12.5
Rapid
rapid rinse cycle for lightly
soiled dishes without dry-
ing
Main rinse (45°C)
Rinse 1
Rinse 2 (55°C)
20 40 0.75 11.5
NOTE
NOTENOTE
NOTE:
::
:
*EN 50242: this program is the test program and of combined energy and water consumption most efficient.
The information for comparability:
Capacity: 12 settings; Position of the upper basket: upper wheels on rails; rinse aid setting: 5
Delay time
Delay timeDelay time
Delay time
The program start can be delayed by 3, 6 or 9 hours. Select and start a program, that will start automatically
with the previously set operating conditions after the pre-selected lead time has elapsed.

16
Control panel
Control panelControl panel
Control panel
1
11
1POWER- button: to switch on/off the power supply. The power control lamp shows the power supply.
2
22
2Program button: to select the rinse program.
3
33
3Start delay: to select the delay time.
4
44
4½ load function: to select the ½ load function.
5
55
5START/PAUSE-button: to start/pause the selected or running program.
6
66
6Power indication: lights up when the dishwasher is switched on.
7
77
7Program indication: indicates the selection.
8
88
8Start delay indication: shows the delay time (3, 6, 9h)
9
99
9Warning lights:
Rinse aid warning lamp: lights up when the rinse aid dispenser needs to be refilled.
Salt warning lamp: lights up when the salt container needs to be refilled for water softening.
½ load function lamp: lights up when the ½ load function is active.
Starting a
Starting a Starting a
Starting a rinse
rinserinse
rinse
program
programprogram
program
•The water supply must be opened up to the maximum pressure.
•Load the dishwasher baskets.
•Fill in the detergent.
•Press the POWER- button to switch on the appliance.
•Select the desired rinse cycle.
•Set available options (depending on model), if required.
•Press the START/PAUSE- button and the dishwasher starts.
Program
ProgramProgram
Program
change
changechange
change
CAUTION:
CAUTION:CAUTION:
CAUTION:
A program change should be done only a short time after starting the program. Otherwise, maybe detergent
has been released and already drained rinse water.
•To do a program change, the appliance must be switched off and on again.
•Select the desired program and start the new operation.

17
Forgot to add a dish?
Forgot to add a dish?Forgot to add a dish?
Forgot to add a dish?
WARNING:
WARNING:WARNING:
WARNING:
Open the door very carefully during operation, there is a risk of water squirting out.
Dishware can be added any time before the detergent dispenser opens.
•Press the START/PAUSE- button to stop the operation. Once the spray arms have stopped, you can open
the door completely.
•Add forgotten dishware and close the appliance door.
•Press the START/PAUSE- button, after approx. 10 seconds the operation will be continued.
At the
At the At the
At the e
ee
end of program
nd of programnd of program
nd of program
CAUTION:
CAUTION:CAUTION:
CAUTION:
Allow the appliance to cool down a bit after the program has ended, before you open it. This avoids that steam
escapes that causing long-term damages to your furniture.
At the end of the rinse cycle will sound a series of signals; then the unit goes into standby mode.
Switch off
Switch offSwitch off
Switch off
•Switch the appliance off by pressing the POWER- button.
•Close the water supply!
•Remove the dishes after cooling (see "Unloading the dishwasher baskets").
•Leave the appliance door slightly open until the next rinse cycle to avoid odors.
•If the appliance is not in use for an extended period:
-
disconnect it from the power supply!
Unloading the dishwasher baskets
Unloading the dishwasher basketsUnloading the dishwasher baskets
Unloading the dishwasher baskets
CAUTION
CAUTIONCAUTION
CAUTION:
::
:
Let the dishware cool down for about 15 minutes before unloading. Hot dishes are sensitive to knocks.
NOTE
NOTENOTE
NOTE:
::
:
At the end of program there could be still water drops inside the appliance.
•Open the appliance door and pull out the basket.
•To avoid water dripping from the upper basket onto the dishes in the lower basket, it is advisable to unload
the appliance from the bottom up.
Energy saving tips
Energy saving tipsEnergy saving tips
Energy saving tips
•Always try to operate the dishwasher when it is fully loaded.
•Do not rinse the dishes in advance under running water.
•Use for each type of load the most appropriate rinse program.
•Do not perform a pre-rinse (depending on model), if not absolutely necessary.

18
Cleaning
CleaningCleaning
Cleaning
and Maintenance
and Maintenanceand Maintenance
and Maintenance
WARNING:
WARNING:WARNING:
WARNING:
•Always switch off the appliance and disconnect it from the power supply before cleaning and user mainte-
nance.
•Allow the appliance to cool down sufficient before cleaning.
•Do not use steam cleaners for cleaning the appliance; moisture could enter electrical components. Risk of
Risk of Risk of
Risk of
electric shock!
electric shock!electric shock!
electric shock! Hot steam could damage the plastic parts. The appliance must be dry before restarting op-
eration.
CAUTION
CAUTIONCAUTION
CAUTION:
::
:
•Do not use a wire brush or other sharp, abrasive items.
•Do not use any acidic or abrasive detergents.
NOTE
NOTENOTE
NOTE:
::
:
Dirty filters and clogged spray arms degrade the rinsing. Regularly check the filter and spray arms and clean
them if necessary.
Filter
FilterFilter
Filter
system
systemsystem
system
The three-part filter system prevents larger amounts of food or other objects from getting inside the pump.
1: Main filter: food and soil particles trapped in this filter are pulverized by a special jet on
the lower spray arm and washed down to drain.
2: Coarse filter: filters out larger items such as pieces of bone or glass shards that could
block the drainage.
3: Micro filter: filters dirt and food residues in the sump area and prevents it from being redeposited on the
dishware during rinse cycle.
Cleaning the
Cleaning theCleaning the
Cleaning the
filter system
filter systemfilter system
filter system
CAUTION:
CAUTION:CAUTION:
CAUTION:
•The dishwasher must never be used without the filter.
•Improper replacement of the filter can reduce performance and damage the appliance.
•Do not knock out the filter for cleaning to avoid possible deformations of the filters.
N
NN
NOTE
OTEOTE
OTE:
::
:
Check after each rinsing the filter for residues.
•Turn the filter unit (coarse/micro filter) counterclockwise and remove it.
•Loosen the coarse filter from the micro filter by gently pushing the side levers and take it up-
wards.
•Take out the main filter to the front.
•Remove leftover food and clean the filter under running water. Use a soft brush for the coarse
and micro filter, if necessary.
•Put the filter system properly in reverse order together and reinstall in its provided position.
Fix the entire system, by tightening the filter unit clockwise.

19
Cleaning the spray arms
Cleaning the spray armsCleaning the spray arms
Cleaning the spray arms
Lime and impurities from the rinsing water can block nozzles and bearings of the spray arms. Check the outlet
nozzles of the spray arms regularly for blockages.
•Unscrew the securing nut of the upper spray and pull off the arm downwards.
•Pull off the lower spray arm upwards.
•Clean the arms under running water; if necessary use a soft brush for the nozzles.
•Insert the spray arms again until they clicks into place and tighten the nut of the upper spray
arm.
Maintenance of the dishwasher
Maintenance of the dishwasherMaintenance of the dishwasher
Maintenance of the dishwasher
CAUTION
CAUTIONCAUTION
CAUTION:
::
:
Never use spray cleaners to clean the door panel, this may damage the door lock and electrical components.
•Clean the appliance outer surfaces and the door sealing thoroughly with a soft, damp cloth. Use only mild
cleaning agent.
•Use to remove stains inside the appliance a dampened cloth with a little white vinegar or a special deter-
gent for dishwashers. If necessary, fill detergent in and start the appliance without dishware in the program
with the highest rinse temperature.
•Dry the outer surfaces thoroughly before taking in operation again.
A
AA
Antifreeze
ntifreezentifreeze
ntifreeze
protection
protectionprotection
protection
If the unit is out of operation and exposed to temperatures below zero, observe the following precautions:
•Disconnect the mains plug.
•Close the water supply and remove the inlet hose from the water valve.
•Drain the water from the inlet hose and the water valve.
•Reconnect the inlet hose to the water valve.
•Turn off the lid of the salt container and take off the filter system. Remove the remaining water in the sump
with an absorbent sponge.
Troubleshooting
TroubleshootingTroubleshooting
Troubleshooting
Before you contact an authorized specialist
Before you contact an authorized specialistBefore you contact an authorized specialist
Before you contact an authorized specialist
Problem
ProblemProblem
Problem
Possible cause / Action
Possible cause / ActionPossible cause / Action
Possible cause / Action
Appliance is not working /
starting
Check the power supply.
Is the appliance switched on and the door securely closed?
Is a program selected?
Is the water supply properly connected and the water supply opened?

20
Problem
ProblemProblem
Problem
Possible cause / Action
Possible cause / ActionPossible cause / Action
Possible cause / Action
Water is not drained off Check the drain hose.
Are the filters or the kitchen sink clogged?
Noises A clicking sound on opening of the detergent container is normal.
Make sure that all dishes are secured in the dishwasher.
Place the parts so that the spray arms can rotate freely.
Foaming Use only special dishwasher detergent to avoid foaming. If this occurs, open the
door and let suds evaporate. Add approx. 4 liter cold water to the tub. Start a
short rinse cycle to drain out the water.
Always wipe up spilled rinse aid immediately.
Plates and other flat table-
ware are not clean
Select a stronger program.
Make sure that the action of the detergent dispenser and spray arm is not
blocked by large dishes.
Spots and filming on glasses
and flatware
Extremely hard water / low inlet temperature / overloading the baskets, improper
loading / old or damp detergent / empty rinse dispenser / incorrect dosage of
detergent
Cloudiness on glassware Use less detergent if you have soft water and select a shortest cycle to rinse anc
clean glassware.
Black or grey marks on
dishware
Aluminum utensils have rubbed against dishware. Use a mild abrasive cleaner to
eliminate those marks.
Stains on the inner surface Only use detergents without colorants.
Yellow or brown film on in-
side surface
Tea or coffee stains: Using a solution of ½ cup of bleach and 3 cups of warm
water to remove the stains by hand.
Iron deposits in water can cause an overall film. Call a water softener company
for a special filter.
White film on inside surface Hard water minerals: clean the interior by using a damp sponge with dishwasher
detergent. Wear rubber gloves.
Detergent dispenser doesn’t
close properly
Clogged detergent residue is blocking the catch. Clean the catch.
Detergent left in dispenser Improper loaded dish is blocking the dispenser.
Unsatisfactory drying result Improper loading / too less rinse aid / dishes are removed too soon / wrong pro-
gram has been selected / use of cutlery with a low-quality coating
Error
Error Error
Error codes
codescodes
codes
With some malfunctions the appliance indicates the following error codes to warn you:
C
CC
Control lamps are flashing
ontrol lamps are flashingontrol lamps are flashing
ontrol lamps are flashing
Possible
PossiblePossible
Possible
causes
causescauses
causes
Rapid Faucets is not opened, water inlet malfunction, water pressure is too low
Glass Possible overflow / leakage occurs
Table of contents
Other BOMANN Dishwasher manuals

BOMANN
BOMANN GSPE 7413 TI User manual

BOMANN
BOMANN TSG 5701 User manual

BOMANN
BOMANN TSG 707 User manual

BOMANN
BOMANN GSP 853 User manual

BOMANN
BOMANN GSP 855 User manual

BOMANN
BOMANN GSPE 7416 VI User manual

BOMANN
BOMANN TSG 7402.1 User manual

BOMANN
BOMANN GSP 7409 User manual

BOMANN
BOMANN GSPE 892 User manual

BOMANN
BOMANN GSP 861 User manual

BOMANN
BOMANN GSP 7408 User manual

BOMANN
BOMANN GSP 7410 User manual

BOMANN
BOMANN GSPE 7416 VI User manual

BOMANN
BOMANN GSPE 786 User manual

BOMANN
BOMANN GSPE 887 User manual

BOMANN
BOMANN GSP 7411 IX User manual

BOMANN
BOMANN GSP 7407 User manual

BOMANN
BOMANN GSP 7412 IX User manual

BOMANN
BOMANN GSP 5703 User manual

BOMANN
BOMANN GSP 864 User manual