Bona Bona Belt AMO110001.3 User manual

Operating Manual
Bona Belt by
AMO110001.3 - AMO110000.3

2bona.com
Bona Belt Manual
bona.com
Bona Belt Manual
Foreword
For a new manual contact:
Bona AB
Murmansgatan 130
P.O. Box 21074
SE-200 21 Malmö, Sweden
Tel +46 40 38 55 00
www.bona.com
ATTENTION:
This manual contains important information on the safe use and operation
of this machine.
Carefully read through the entire user manual before you begin working
with the machine. This machine is intended for professional or commercial
use.
Failure to read this manual before operating, adjusting or servicing this
machine could cause injury or damage to persons or objects.
Anybody operating the machine should understand how to use and operate
it before starting it up.
If anything is unclear, turn to your reseller with confidence or directly to
Bona AB. Keep this manual for future reference.
This manual is an English translation of the original version in Italian.

33
Table of Contents
Machine Specifications 4
Machine Symbols Key 5
Operator Safety 5
Storage 7
Introduction 8
Safe and correct use 8
Machine data plate 8
Commencing Operation 9
Instructions for assembly 9
Dismantling the machine 10
Instructions for electrical connection 11
Cables, extensions and plugs 11
Instruction on removing sawdust generated during use 12
Prevention Measures for Users 12
Personal safety measures 12
Compliance with safety measures and warnings 12
Instructions on Correct Machine Use 13
Machine Warnings 13
Prohibited use 13
The Machine's Field of Application 14
Usage technique 14
Starting the Machine 14
Machine Adjustment Procedures 15
Regulation drum pressure 15
Changing the sanding belt 15
Adjusting the sanding belt 16
Setting the drum lever 18
Setting the height of the handle shaft 18
Changing the sanding drum 19
Dust collection 20
Routine Maintenance 21
Troubleshooting (for the user) 23
Safety Regulation when using Bona Belt 24
Service, Maintenance and Spare Parts 26
Service and maintenance 26
Spare Parts 26
Warranty 27
Declaration of Conformity 28
Disposal 29

4bona.com
Bona Belt Manual
Machine Specifications
Motor Type:
Voltage (±10%):
Frequency:
Power:
Rated Current:
Recommended fuses:
Insulation class:
Protection class:
Abrasive Drum Speed:
Weight Machine Frame:
Weight Motor:
Condensers:
Drum Width:
Hour Counter:
Total Weight:
Dust Emission:
Format Sanding Belt:
Height/Width/Length:
1 phase
230 V
50 Hz
2.2 kW
12.9 A
Class C 16 A
F
IP54
1750 rpm normal load
48 kg
23.5 kg
Start 25 µF, operation 50 µF
250 mm, alt. 200 mm
99 999 hours
74 kg
<2 mg/m³ air
250 mm x 750 mm or 200 mm x 750 mm
1000 mm/360 mm/960 mm

55
Machine Symbols Key
Read the instructions
contained in this user
and maintenance manual
before using the machine.
Hearing protection during
use is recommended.
Protection of the airways
during use
is recommended.
Hazard due to
moving parts.
Hazard due
to electricity.
HAZARD means: Serious injury or death may occur to the operator or others if 'HAZARD' warnings on the
machine or in this manual are ignored or not kept to. Read and follow all 'HAZARD' warnings on this machine
or in this manual.
WARNING means: Injury may occur to the operator or others if 'WARNING' notices on the machine or in this
manual are ignored or not kept to. Read and follow all 'WARNING' notices on this machine or in this manual.
CAUTION means: Damage may occur to the operator or others if 'CAUTION' alerts on the machine or in this
manual are ignored or not kept to. Read and follow all 'CAUTION' alerts on this machine or in this manual.
Operator Safety
Failure to read the Bona Edge machine manual before operating, adjusting or performing maintenance
operations on the machine could cause injury or damage to persons or objects.
Anyone operating the machine should understand how to use and operate it before starting it up.
KEEP AWAY FROM CHILDREN
Children should be supervised to ensure that they do not play with the appliance. This machine is not
intended for use by persons (including children) with reduced physical, sensory or mental capabilities,
or lack of experience and knowledge unless they have received instructions regarding the use and are
supervised by a person responsible for their safety.

6bona.com
Bona Belt Manual
6
Operator Safety (Cont.)
Sanding may create an explosive environment. Cigarettes, cigars, pipes, lighters, pilot flames, or any other
source of fire may create an explosion, if lit during sanding operations. All sources of ignition should be
removed entirely from the work area.
Poorly ventilated work areas may create an explosive environment, when some combustible materials
(solvents, thinners, alcohol, fuel, some paints, wood dust, etc) are present in the atmosphere. Floor sanding
may cause various materials and fumes to ignite. Read the manufacturer’s instructions for each chemical
product used and establish its combustibility. Always keep the work area well-ventilated.
Striking nails when sanding may generate an explosion or fire. Always ensure all nails are sunk before
sanding surfaces.
Serious injury and/or death due to electrocution may occur, if the power supply circuit trips repeatedly or is
undersized. Have the fuses, safety circuit and power supply line checked by an authorized electrician.
Performing maintenance and/or repairing the machine, when it is not fully disconnected from the power
supply, may cause serious injury and/or death due to electrocution. Disconnect the power supply before
carrying out any maintenance and/or repair work.
The use of this machine on a circuit which is not grounded may cause serious injury and/or death due to
electrocution. Never disconnect or disable the grounding conductor. Consult an electrician, if the ground
conductor is missing or it is suspected that the circuit is not suitably grounded.
The use of this machine with a damaged power supply cable may cause electric shock. Check the
power supply cable regularly for damage, such as splitting or wear and tear. DO NOT use
the machine, if the power supply cable is damaged. DO NOT use the electric cable to move
the machine. DO NOT close a door on cord. DO NOT pull cord around sharp edges or corners.
DO NOT unplug by pulling on power supply cable. To unplug grasp the plug. DO NOT handle plug or operate
machine with wet hands. DO NOT put any objects into motor openings.
Serious injury and/or death due to electrocution may occur if the machine runs over the power supply
cable and it becomes damaged. Keep the cable away from the sanding tool. Always keep the power supply
cable raised above the machine and sand away from the power supply cable.
The moving parts on this machine may cause serious injury and/or damage. Keep hands, feet and loose
clothing away from all moving parts of the machine.
Operating the machine without all guards, doors, or covers in place can cause an injury or damage.
DO NOT pass with the machine on objects that are hot, burning or smoking, such as cigarettes, matches or
cinders.
7
Operator Safety (Cont.)
7
Performing maintenance or replacing the dust bag may cause injury to the operator or people nearby, if the
machine is connected to the power supply. Always unplug the machine when not in use.
DO NOT use solvents or other flammable products to clean this machine.
Dry use only. DO NOT use for liquid recovery, which could result in motor failure, electric shock,
and electrocution.
Never become distracted during sanding operations, check what is happening continually. Use common
sense. DO NOT use the machine, if you are tired, have consumed alcohol or have taken medication that may
aect your judgement or your body control.
DO NOT smoke during sanding operation.
DO NOT use this machine to sand steps or furniture. DO NOT ride on this machine.
DO NOT put any objects into openings. DO NOT use with blocked openings. Keep free from dust, lint, hair or
anything that may reduce airflow.
This equipment is for dry use only and must not be used or kept outside in wet conditions. Store the
machine in a dry building, otherwise the machine could be damaged.
Storage temperature from -20°C to 50°C.
Storage
It is advisable to store the machine in its original packaging. Doing so makes it possible to form a column of two packages maximum, with one on
top of the other.
If the machine is removed from the original packaging and is not used for some time ensure the wheels and drum are not in contact with the
ground.
8bona.com
Bona Belt Manual
Introduction
Safe and correct use
This instruction manual should be read carefully before using the Bona Belt wood flooring sander for the first time.
The instruction manual contains important information on safety and preventing improper use of the machine and will resolve any doubts
or questions, making possible to operate the machine safely and with ease. Removing safety features could cause death or physical injury.
Familiarize yourself with the machine before using it for the first time.
The Bona Belt wood flooring sander is suitable for the dry sanding of wood floors. Any other use without the consent of the manufacturer is
prohibited. DO NOT use on wet floors.
See ‘Machine Warnings’ on page 13.
Keep hands and clothing away from moving mechanical parts.
The work area is protected via the base frame and the mobile cover on the abrasive drum.
If a situation arises which has not been described in this manual, contact your distributor or Bona Representative.
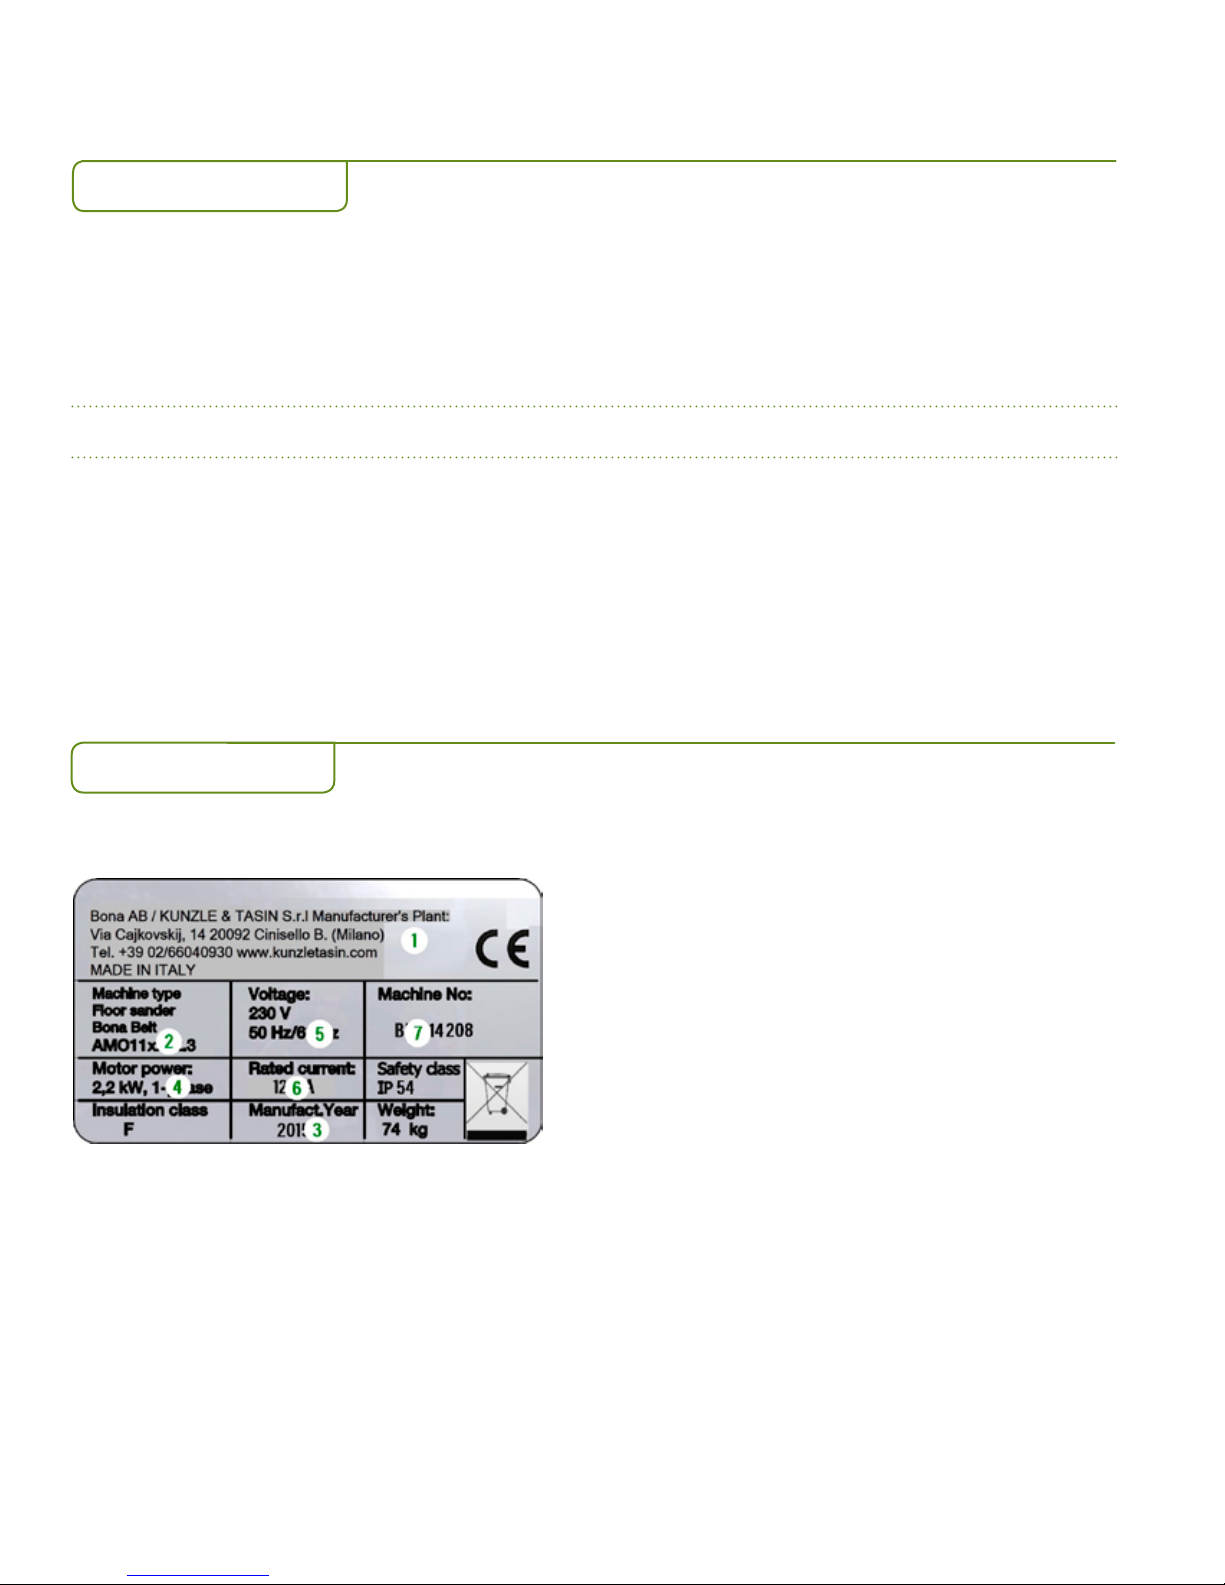
Machine data plate
1) Name of the manufacturer
2) Machine model
3) Year of manufacturer (see 7)
4) Motor power
5) Supply voltage and frequency
6) Rated current
The following information can be found on the machine data plate:
7)Serial number:
• The first two numbers refer to the year of manufacture (14 = 2014)
• The second group of three numbers indicates the day of the year the machine was manufactured (127 = May 7th)
• The last two numbers indicate the progressive number of machines produced that day of manufacture
(13 = 13th machine produced that day)
9
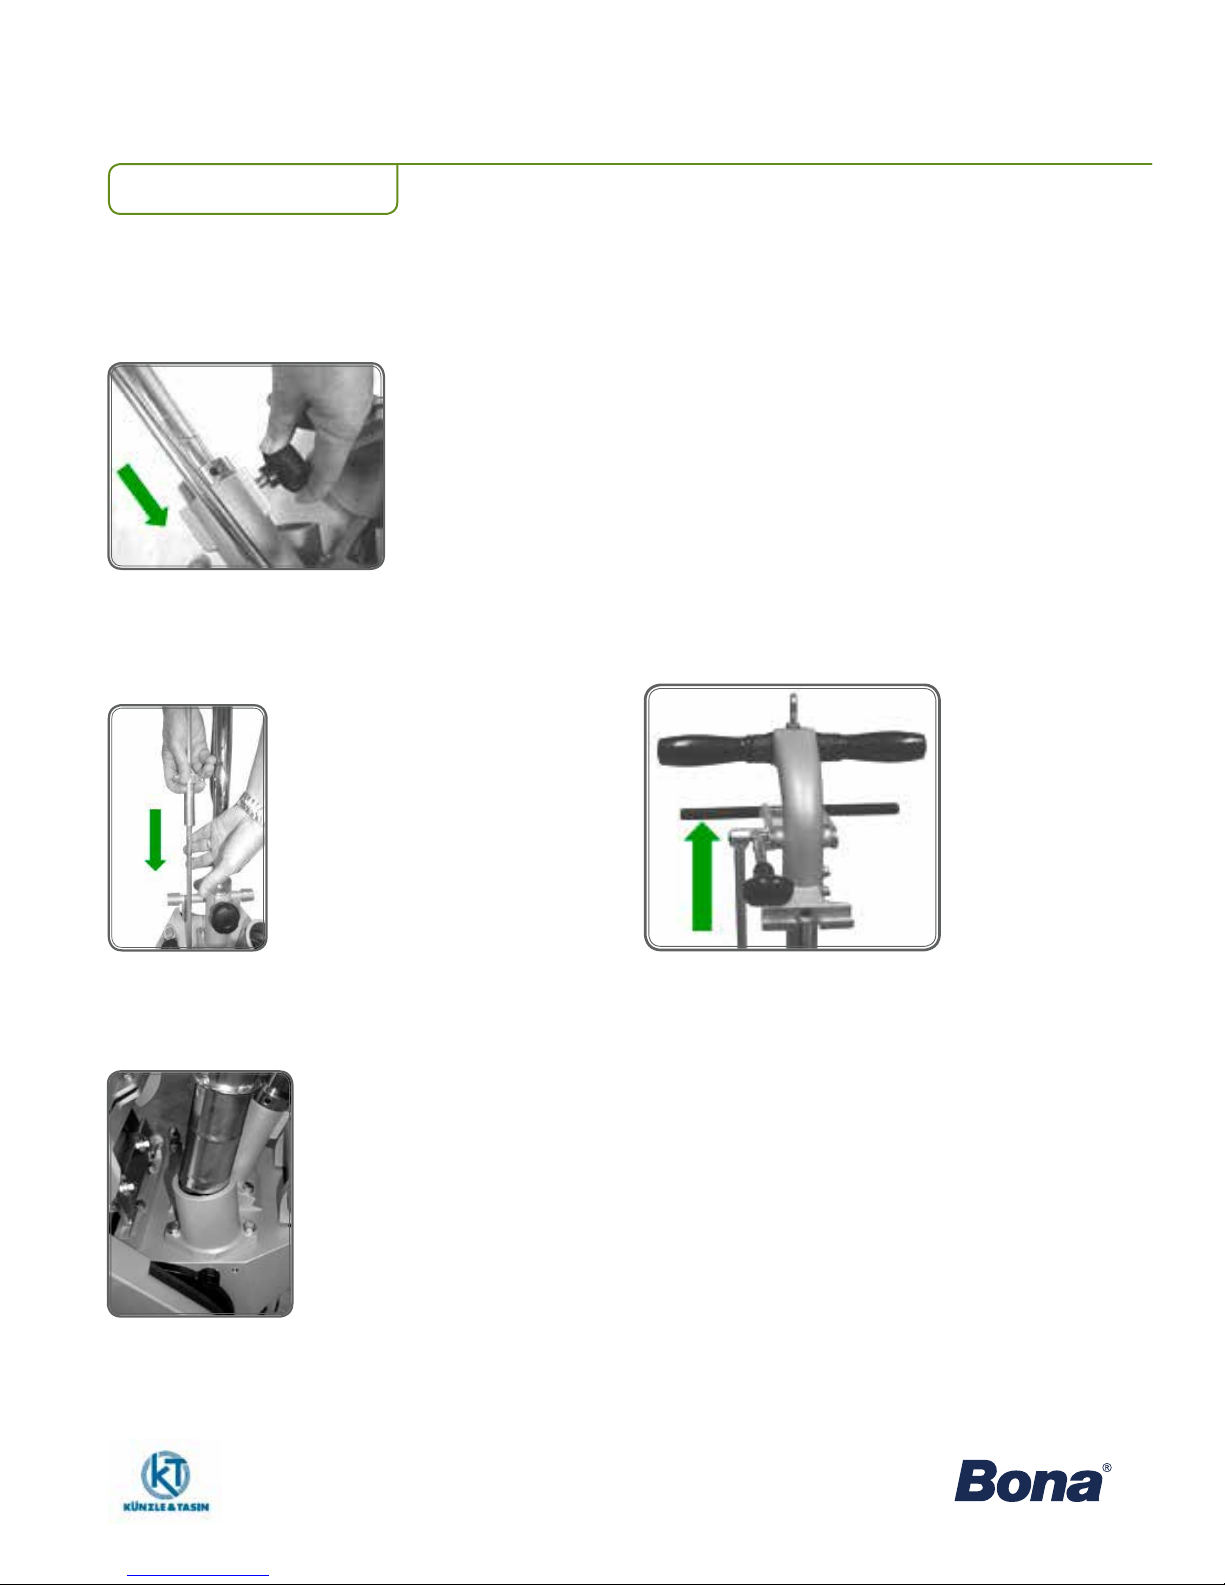
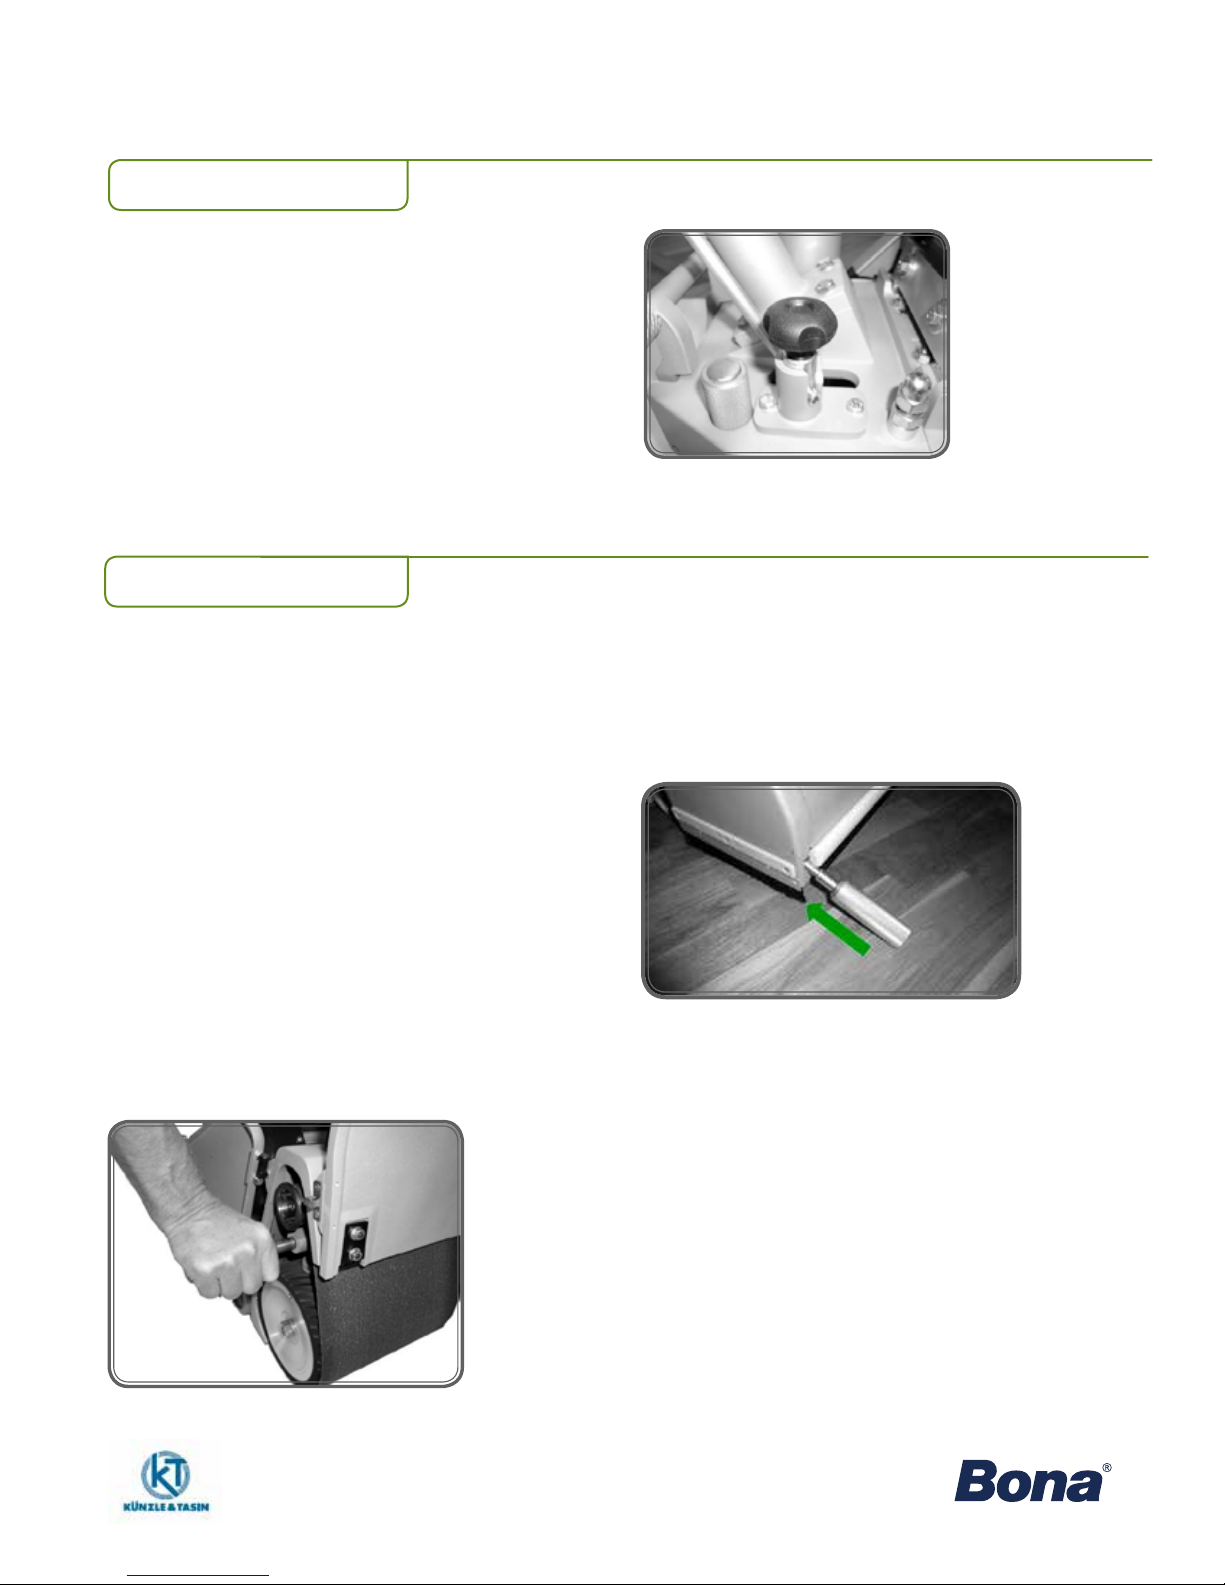
Instructions for assembly
Commencing Operation
Assembly a new machine
1) Push together the handle shaft with the shaft holder. 2) Screw and tighten the locking wheel.
3) Put together the upper and lower control rod and pass the sliding
sleeve over the lower control rod..
4) Lift the control lever to the uppermost position.
5) Push down the dust pipe in the pipe holder. 6) Then aix a dust bag to the dust pipe.

10bona.com
Bona Belt Manual
Commencing Operation (Cont.)
Instructions for assembly (cont.)
1) Grab hold of the motor's carry handle. Place the motor on the
machine frame and fasten the motor's hinge in the rear holder.
2) Roll on and tighten the driving belt using the eccentric tightener. Lift
up the belt protector. Mount the dust pipe with the dust bag in the
pipe holder.
Excessive belt tension may cause the premature failure of the ball bearings.
Using the machine when not fully assembled may cause injury or damage to people or objects. DO NOT
use the machine when it is not fully assembled. Keep all fittings tightly closed. Maintain machine settings in
accordance with the specifications.
If the machine has been disassembled before transport then assemble the motor as follows:
Dismantling the machine
1) The machine can be taken apart into four parts
for transport.
2) Put down the belt protector.
3) Reduce the tension on the driving belt by
loosening the eccentric tightener.
4) Roll o the driving belts.
5) Hold onto the motor handle and lift up the motor
from the rear motor bracket.
6) Push the control lever forward and down.
7)Pull up the sliding sleeve. 8) Loosen the locking wheel and pull up the handle shaft.
9) Lift up the dust bag together with the dust pipe
upward until it loosens from the pipe holder.
10) Carry the machine frame by holding the handle and the tilt support.

11
MACHINE WITH 230 V~50 Hz MOTOR 2.2 kW
For machines with a 230 V~50 Hz motor, a HO5VV-F-3x2,.5 mm2HAR-approved power supply cable must be used along with an approved SCHUKO
2P+E 16 A 200÷-250 V plug.
Commencing Operation (Cont.)
Instructions for electrical connection
Cables, extensions and plugs
Only use approved cables. The maximum recommended cable length is 10m; for greater lengths use cables with a larger
cross-section.
DO NOT expose the machine to rain. This machine is intended for dry use only.
Keep the machine in a dry building and DO NOT use it in damp or wet places.
If the machine is not connected correctly to the electricity network, death due to electrocution may
occur. To prevent electric shocks always use a grounded three wire electrical system. For maximum
protection against electric shocks use a circuit protected with a dierential cut-out switch.
Tampering with the grounding plug in any way may result in death from electrocution. DO NOT cut,
remove or break the grounding plug. If the socket does not match the plug consult a qualified electrician.
If the machine is used with a damaged plug or power supply cable, death may occur from electrocution.
If cables or plugs are worn or damaged in any way, have them replaced by the manufacturer or certified
machine repair center in order to prevent risks to safety.
This machine only operates with the voltage and frequency shown on the machine data plate. Before
connecting the cable to the power supply ensure the correct voltage and frequency are available.
Using the machine with unsuitable and/or excessively long cables may cause injury or damage to people or
objects.
The machine must never be moved using its cable and the cable must never be pulled when disconnecting
from the socket.
Keep the cable away from sources of heat, oil and sharp edges.
12bona.com
Bona Belt Manual
Commencing Operation (Cont.)
Personal safety measures
Compliance with safety measures and warnings
Sawdust can spread through the air and be inhaled when using the sanding machine. Always wear a dust
mask of at least class P2, when using the sanding equipment.
The eyes and/or body may suer injury if personal safety clothing is not used. It is adviceble to wear safety
goggles, protective clothing during sanding operations.
Lengthy exposure to noise levels during sanding operations may damage the hearing. Always use EN-ISO
approved ear protectors (earmus) during sanding operations.
Using the machine when not fully assembled may cause injury or damage to people or objects. DO NOT
use the machine when it is not fully assembled. Keep all fittings tightly closed. Maintain machine settings in
accordance with the specifications.
Failure to comply with instructions on this machine and in this manual may cause serious injury and/or
damage. Read and comply with all safety instructions. Ensure that all plates, labels,
warnings and instructions are secured to the machine. New plates can be obtained from an authorized
Bona dealer.
Injury or damage may occur if maintenance operations or repairs are carried out by any unauthorized
personnel.
Instruction on removing sawdust generated during use
Sawdust can ignite spontaneously and cause injury or damage. It must be disposed of appropriately. Always
empty the sawdust into metal containers which are located outside the building.
Sawdust can ignite spontaneously and cause injury or damage. Empty the contents of the dust bag when it
is 1/3 full. Empty the dust bag at the end of each machine use. Never leave the dust bag unattended when it
contains sawdust. Do not empty the contents of the dust bag above a fire.
For minimized dust environment use a vacuum cleaner intended for wooden dust.
Prevention Measures for Users

13
Instructions on Correct Machine Use
Read this manual carefully and become familiar with the machine.
The equipment is suitable for industrial use (e.g. in hotels, schools, hospitals, oices, factories and shops).
The following information highlights particularly hazardous situations for the operator and/or machine. Understand when these conditions may be
present. Removing safety features could cause death or physical injury. Take all steps necessary to instruct personnel who may use the machine.
Report any damage on the machine or incorrect operation immediately.
1) Keep hands and clothes away from rotating parts.
2) Keep hands on the handle when the motor is operating.
3) DO NOT leave the machine unattended when the motor is operating.
4) Always disconnect the power supply cable from the machine before performing maintenance.
5) Transport the machine with care, due to the heavy weight of the individual parts making up the machine..
6) Always use the machine in well-ventilated areas.
7) Always keep the work area well-lit.
8) Always dispose of the sanding dust appropriately.
9) DO NOT detach the dust bag when the motor is operating.
10) Always dispose of the sawdust appropriately.
11) Use the type and amount of abrasive specified in the instruction manual.
12) The use of accessories other than those recommended in this manual may cause injury.
13) The machine is for indoor use only.
Machine Warnings
Using the machine to move objects or moving on an incline may cause injury or damage. The machine
must only be used to sand dry floors which are level or have a maximum incline of 2%. DO NOT use the
machine to sand furniture.
Work surfaces may be seriously damaged if the machine is left turning on one point while the tool is in
contact with the surface. To avoid damaging the surface approach the cutting line carefully. DO NOT stop
when lowering and raising the equipment, keep moving at constant speed.
Prohibited use
Children should be supervised to ensure that they do not play with the appliance. This
machine is not intended for use by persons (including children) with reduced physical,
sensory or mental capabilities, or lack of experience and knowledge unless they have
received instructions regarding the use and are supervised by a person responsible for
their safety.
This equipment is not suitable for collecting hazardous dust.

14bona.com
Bona Belt Manual
1) Become familiar with the machine and read all instructions &
safety notices. Ensure that all operators read this manual.
To start the machine proceed as follows:
2) Start/Stop occurs via the I/O switch. Operating mode is obtained
directly after start. If the motor, e.g. if cold, or when the machine is
new, should be diicult to start button can be held in until the motor
has come up into its normal operating mode.
The motor is equipped with no volt release and overload protection.
If the protection has triggered, the motor can start normally after
several minutes.
Always use original cableage, 1-phase 3x2.5 mm² (ASO904014).
Starting the Machine
NOTE! Never lower the sanding drum before the motor is up in the correct running mode.
The machine is intended for sanding wooden floors, parquet flooring and cork floors. Either when the floor is newly laid and untreated or
when the floor is used and treated with finishes or oil.
The machine has been developed in accordance with the latest findings with respect to ergonomics, safety and eiciency. The machine is
thoroughly inspected and tested before it leaves the factory.
The Machine's Field of Application
Usage technique
1) Begin sanding by lifting the control handle up at the same time
as the control lever is moved forward/downward.
2) Then roll the machine forward at the same time as the control
handle is lowered to the lowest position, then lower the
sanding drum down to the floor and the sanding has begun.
Sanding can be carried out both when the machine is moved
forward and backward.
3) Lift the control handle slightly each time the sanding direction is
changed, then immediately lower the control handle again, as
soon as the new sanding direction has begun.
4) Finish the sanding while the machine is in motion by lifting up
the control handle, thus lifting the sanding drum from the floor.
5) Then move the control lever up/backward to the start position. 6) Stop the motor by pressing the stop button.
7) Keep the power cable away from the machine’s sanding area.
The sanding technique must be adapted to suit the floor type, pattern and the floor's condition.
15
Machine Adjustment Procedures
Regulation drum pressure
1) Using the control wheel, the drum pressure can be regulated at
high, medium and low in accordance with the following:
Highest position = low drum pressure ~23 kg
Medium position = medium drum pressure ~27 kg
Lowest position = high drum pressure ~32 kg
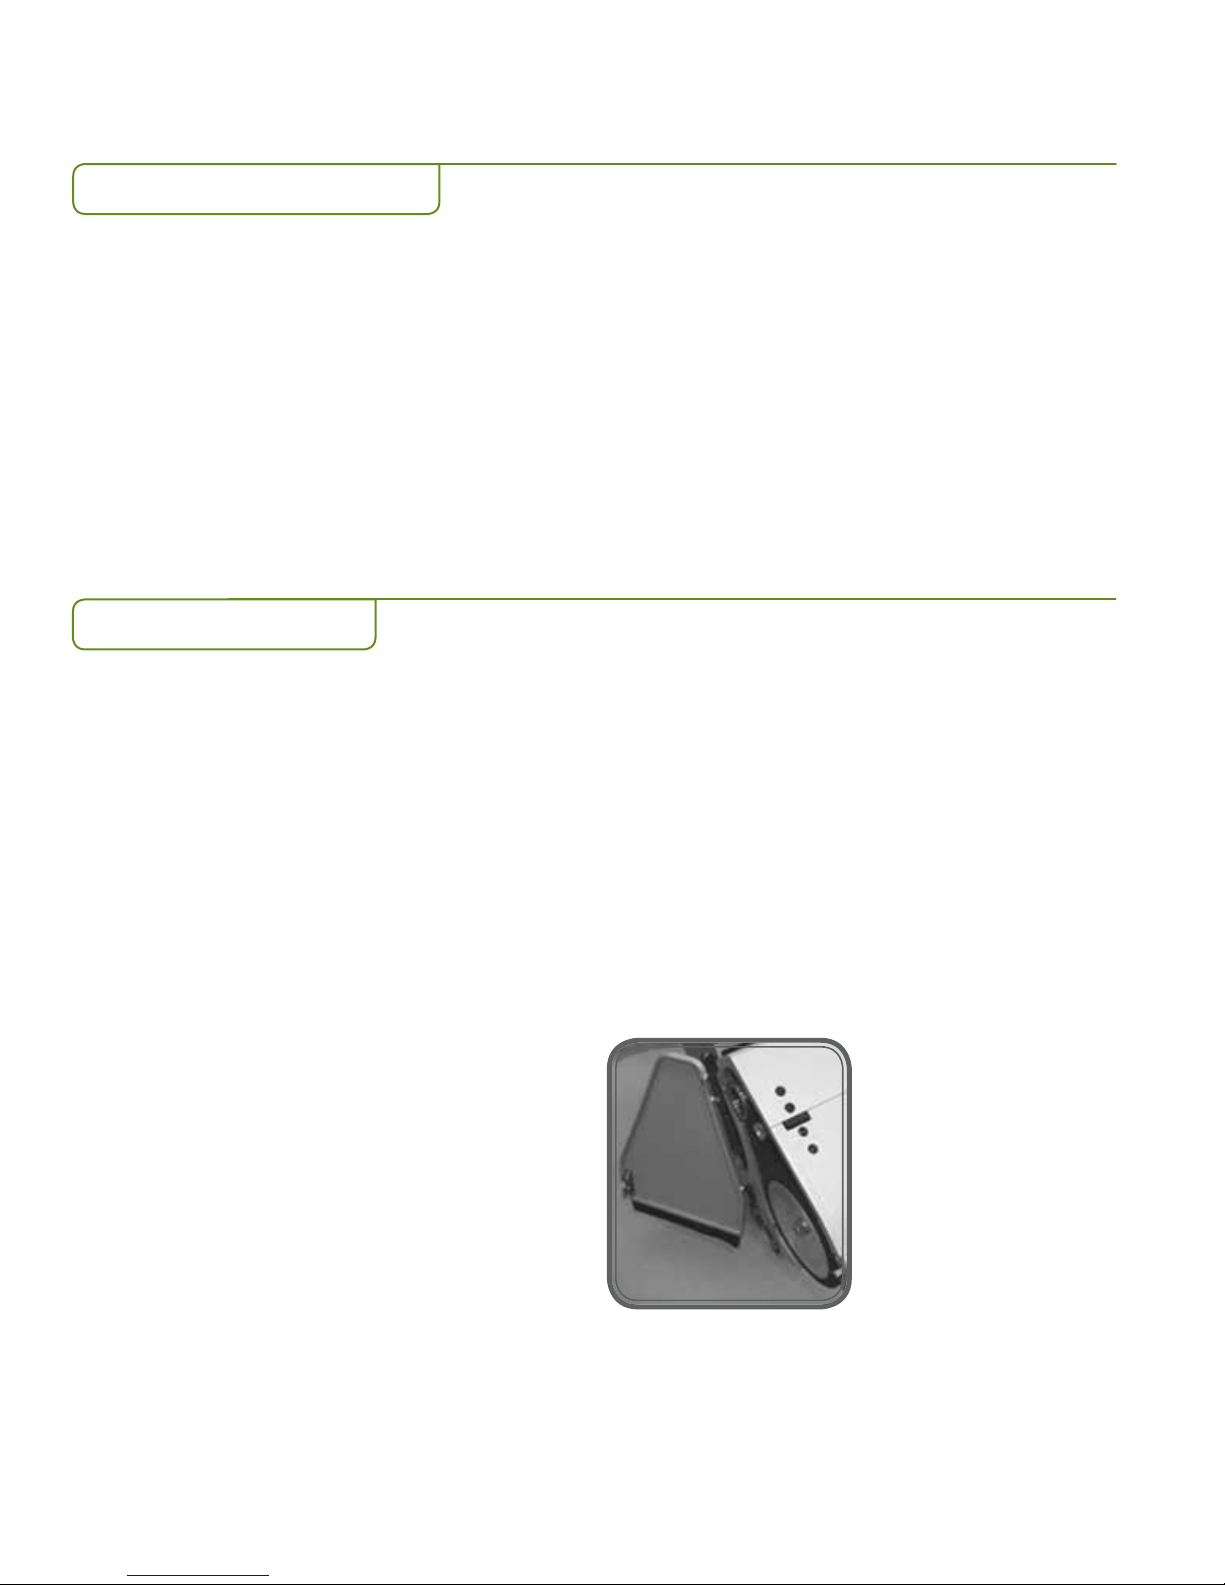
Changing the sanding belt
1) Remove the power cable from the motor. 2) Unlocking the side cover and open it.
A sanding belt is mounted upon delivery. When changing to another belt, do the following:
3) Push in the tool until it reaches the bottom of the
hole on the belt tensioner arm.
4) Press the tool directly down until the mechanism
locks in the bottom position.
16bona.com
Bona Belt Manual
Machine Adjustment Procedures (Cont.)
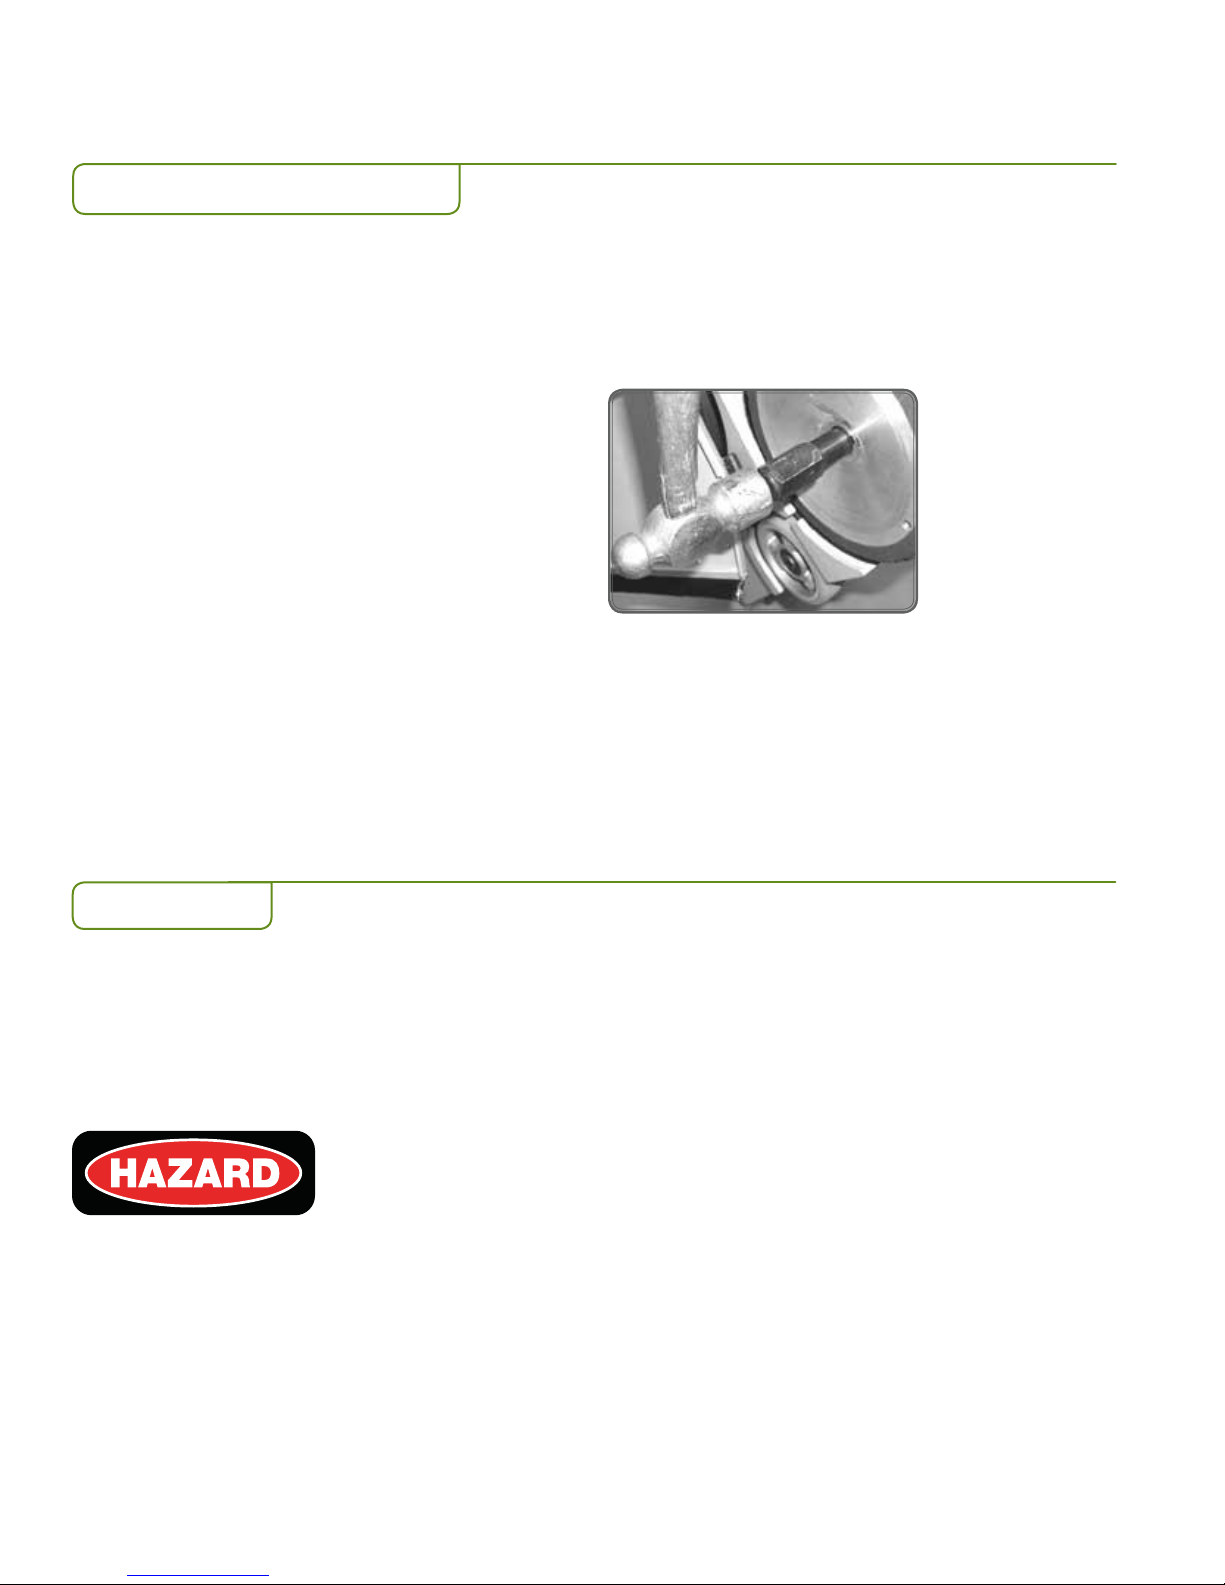
Changing the sanding belt (Cont.)
5) Remove the existing belt and insert the new belt
with the arrow marking in rotation direction
above the sanding drum and the belt tensioner
respectively.
6) Pull the tool out directly with a tug the sanding
belt will tighten automatically.
7) Ensure that the belt is centered in relation to the
belt tensioner and the sanding drum.
The control lever must always be in the rear raised position when the machine starts.
Adjusting the sanding belt
If the sanding belt does not center, after adjustment may be necessary:
1) In order to move the sanding belt outward toward
the machine’s side hatch, turn the fine adjustment
screw counter clockwise.
2) In order to move the sanding belt inward, turn the
fine adjustment screw clockwise.
If the sanding belt still is not centred, then do the following:
1) Stop the machine. 2) Open the side cover. Stand in front of the machine.

17
Adjusting the sanding belt (Cont.)
Machine Adjustment Procedures (Cont.)
3) Put on fine sanding paper (100-120). 4) Turn the fine adjustment screw counter clockwise
until it stops.
6) Start the machine.
7)Turn the large adjustment screw counter
clockwise so that the sanding belt is moved
toward to outer edge control.
Then turn an additional ½ turn.
8) Then adjust using the fine adjustment screw clockwise so that the
sanding belt only lies slightly against the outer edge control.
5) Remove the plastic plug protecting the large
adjustment screw; stick a screwdriver in the
hole in the machine frame.
9) Replace the plastic plug.

18bona.com
Bona Belt Manual
Machine Adjustment Procedures (Cont.)
Setting the drum lever
When correctly set, the sanding drum grinds equally across the drum width. If this is not the case, then do the following:
Setting the height of the handle shaft
1) Loosen the lock nut on the threaded rod. 2) Then turn the domed nut clockwise and the drum will grind more on
the right side.
3) Turn the domed nut counter clockwise and the
drum will grind more on the left side.
4) Fix the new level by screwing the locking nut into place.
The height of the handle shaft can be adjusted:
1) Push the control lever forward and down. Pull up
the sliding sleeve.
2) Loosen the locking wheel.
3) Loosen the Allen screws using a 4 mm Allen
wrench.
4) Pull up the handle shaft to the higher position. Tighten the Allen
screws.

19
Machine Adjustment Procedures (Cont.)
Setting the height of the handle shaft (Cont.)
5) Put the machine backward so that it rests on the
tilt support.
6) Loosen the nut that holds the control rod against the slewing
bracket using a wrench.
7)Thread up the control rod to the corresponding
level, tighten the nut, put together the control
rods, and tighten the slewing bracket.
8) Lift up the control lever.
Changing the sanding drum
If the sanding drum needs to be removed for cleaning or replacement, then do the following:
1) Put the machine backward so that it rests on the
tilt support and handle.
2) Put down the belt protector.
3) Lock the sanding drum by pushing the steel
pin into the hole in the pulley and into the
corresponding hole in the machine frame.
4) Remove the sanding belt.
20bona.com
Bona Belt Manual
Changing the sanding drum (Cont.)
Machine Adjustment Procedures (Cont.)
5) Unscrew the nut and remove the plate. 6) Screw on the removal tool to the bottom of the axle. Then use a
plastic club or hammer directly on the tool, loosen the tool. The
drum will now loosen from the conical axle and can be pulled out
for cleaning or replacement.
7)Thoroughly clean the drum axle and the drum
cone on the drum axle before putting the drum
back on again.
8) Turn the drum so that the wedge shaped groove passes over the
groove on the axle and push on the drum.
9) Thread on the washer and tighten the nut. 10) Remove the lock pin from the sander belt plate and lift up the belt
protector.
Dust collection
Once sanding is complete, the dust bag must be emptied and the contents stored outdoors due to
explosion risk and fire hazard.
1) For minimal dust discharge Bona's original dust
bags shall always be used. The dust bag must be
emptied when it is filled to max 1/3.
This manual suits for next models
1
Table of contents
Other Bona Sander manuals

Bona
Bona Scorpion Instructions for use

Bona
Bona Edge UX Operating instructions

Bona
Bona Edge AM0003135 Operator's manual

Bona
Bona Dual Edge Operating instructions

Bona
Bona Flexidrum Operator's manual

Bona
Bona Mini Edge Instruction manual

Bona
Bona FlexiSand AMO310000 Operator's manual

Bona
Bona Belt Lite User manual

Bona
Bona Power Drive User manual

Bona
Bona FlexiSand 1.5 Operator's manual


