BoomToneDJ BOOMASTER1000 User manual

1
MODE D’EMPLOI – USER MANUAL
–HANDLEIDING - MANUAL DE USO
ACTIVE SPEAKER WITH LEDS
F R O N T 1000W
WITH USB, BLUETOOTH & MIC
ENCEINTE ACTIVE A FAÇADE LEDS 10
00W
AVEC USB, BLUETOOTH et MICRO
ACTIEVE LUIDSPREKER MET LED
FRONT 1000W
MET USB, BLUETOOTH & MICROFOON
ALTAVOZ ACTIVO CON LED FRONTAL
1000W
CON USB, BLUETOOTH Y MICRO
BOOMASTER1000

2
TELECOMMANDE –REMOTE CONTROL –AFSTANDSBEDIENING –CONTROL REMOTO
PANNEAU DE COMMANDE –CONTROL PANEL –CONTROLPANEEL –PANEL DE CONTROL

3
FR –MODE D’EMPLOI
Lire attentivement le manuel et le conserver pour référence ultérieure.
L’éclair dans le triangle attire l’attention sur un danger physique (due à une
électrocution p.ex.).
Le point d’exclamation dansle triangle indique un risque dans la
manipulation ou l’utilisation de l’appareil
ATTENTION:
Ne pas placer de petits objets tels que des pièces ou des trombones sur l’appareil
car ils risquent de tomber
à l’intérieur de l’appareil. Vous risquez de provoquer un
incendie ou une électrocution. Si un liquide ou un objet
pénètre dans l’appareil,
débranchez immédiatement la prise secteur et contactez votre revendeur.
Pour débrancher la fiche secteur, tirez toujours sur la fiche, jamais sur le
cordon.
Ne jamais brancher ou débrancher la fiche secteur avec des mains mouillées.
Tenirdesappareils électriques hors de laportée desenfants.Soyez
particulièrement vigilants enprésence
d’enfants. Les enfants ne sont pas
conscients du danger d’un appareil électrique. Ils pourraient essayer d’insé-
rer un
objet à l’intérieur de l’appareil ce qui représente un grave danger
d’électrocution.
Ne jamais placer l’appareil sur une surface instable ou mobile. L’appareil risque de
blesser une personne ou
de s’abîmer en tombant.
Toutes les personnes impliquées dans l’utilisation, l’installation et la maintenance
de cet appareil doivent être
formées et qualifiées et respecter ces consignes
Remplacer les câbles secteur défectueux uniquement par un spécialiste. Risque
d’électrocution!
Sivous n’êtes pas sûr de la bonne connexion ousi vousavez desquestions
auxquellesle moded’emploi ne répond pas, n’hésitez pas à demander conseil à
un spécialiste ou votre revendeur.
Débranchez l’adaptateur et éteignez l’appareil en cas d’une non-utilisation
prolongée afin d’éviter des dom
mages causés par des surtensions.

4
L’appareil en operation ne peut pas être exposé à des temperatures extremes (pas en
dessous de 5°C et pas au-dessus de 35°C)
L’appareil peut seulement être utilisé à l’intérieur
Ne pas placer de flamme ouverte telle qu’une bougie sur ou à côté de
l’appareil.
Ne pas exposer les batteries à une chaleur excessive telle que le soleil, le feu ou
autre.
Lorsque le cordon d'alimentation ou un coupleur d'appareil est utilisé comme
dispositif de déconnexion, ce
dispositif doit rester facilement accessible
Utilisation de la Télécommande
Utilisezlatélécommandeàune distance maximale de 3metun rayon de30°parrapportà l’appareil.Pointez la
télécommandeendirectionducapteur.Ilnedoit pas yavoird’obstacle entre latélécommandeetlecapteur.
Latélécommande risqué de nepas fonctionner lorsque le capteur est soumis à une forte lumière.Si la
télécommande ne fonctionne pas, vérifiez les piles
NOTE IMPORTANTE : Les produits électriques ne doivent pas être mis au rebut avec les ordures ménagères.
Veuillez les faire recycler là où il existe des centres pour cela. Consultez les autorités locales ou votre revendeur
sur
la façon de les recycler.
En conformité avec les exigences de la norme CE
Les produits recyclés sont recyclables
Utilisation uniquement à l'intérieur

5
RECOMMANDATIONS POUR LES BATTERIES
Ce pictogramme indique que les piles et batteries usagées ne doivent pas être jetées avec
les ordures ménagères, mais déposées dans des points de collecte séparés pour être recyclées.
Tenir les piles à l'abri d'une chaleur excessive telle que le soleil, le feu ou similaires.
Lorsque les piles ne sont pas utilisées, retirez-les pour éviter les dommages causés par des fuites ou la
corrosion de la pile.
ATTENTION
Danger d'explosion si la pile n'est pas remplacée correctement. Ne remplacer que par le même type ou
un type équivalent.
AVERTISSEMENT
Ne pas ingérer la pile. Danger de brûlure chimique. En cas de doute concernant le fait que les piles
pourraient avoir été avalées ou introduites dans une partie quelconque du corps, consulter
immédiatement un médecin. Conserver les piles neuves et usées hors de portée des enfants.
Si le compartiment à pile ne se ferme pas correctement, cesser d'utiliser le produit et tenir hors de
portée des enfants
TELECOMMANDE
1- Bouton Mute
Coupe ou réactive le son
2- Bouton SKIP arrière
Pour revenir en arrière au morceau précédent
3- Bouton Mode
Une pression courte permet de sélectionner la source d’entrée désirée.
Bluetooth / Radio / Entrée Ligne / USB
Une pression longue permet de désactiver la voix commentaire.
4- Bouton REC (Enregistrement)
Permet l’enregistrement des micros sur la clé USB. Pour cela, insérer une clé USB dans le lecteur USB et connecter
vos micros. Appuyez sur le boutons REc et régler le volume. Appuyez de nouveau sur REC pour arrêter
l’enregistrement.
5- Bouton ECHO -
Pour diminuer l’écho des microphones
6- Boutons BASS + -
Pour augmenter ou diminuer les basses
7- Bouton EQ
Permet de sélectionner différent préréglage d’égaliseur en fonction du type de musique écouté.
Pop / Rock / Jazz / Vocal / Flat / Classic
8- Réglage du niveau de volume des micros
9- Interrupteur Standby
10-Bouton Play / Pause
Pression courte pour play/pause. Pression longue pour connexion TWS (voir plus loin). En mode FM radio, pression
pour scanner les stations automatiquement.
11-Bouton SKIP avant
Pour sauter en avant au morceau suivant
12-Bouton Light (réglage des effets de lumière)
Chaque pression sur ce bouton change l’effet lumineux autour de l’enceinte.
Rouge / Jaune / Vert / Cyan / Bleu / Rose / Blanc

6
Une pression de 3 secondes éteindra la lumière ou changera de mode (Fondu de couleur, mode musical)
13-Bouton Repeat
Pour la lecture en boucle d’un titre ou de toute la playlist
14-Bouton REC PLAY
Pour écouter le dernier enregistrement sur la clé USB
15-Bouton REC DEL
Pour effacer le dernier enregistrement sur la clé
16-Bouton ECHO +
Pour augmenter l’écho des microphones
17-Bouton M-Prio
Met le son du micro prioritaire sur la musique lorsque vous parlez dans le micro (uniquement en mode USB/BT)
18-Boutons TREBLE + -
Pour augmenter ou diminuer les aigus
19-Réglage du volume général
20-Boutons accès direct
PANNEAU DE COMMANDE
1. Bouton ON / OFF pour allumer ou éteindre l’appareil
2. USB pour y connecter une clé USB pour la lecture de musique ou l’enregistrement
3. TF pour y connecter une clé USB pour la lecture de musique
4. LINE IN pour y connecter un appareil avec une sortie audio en Jack 3.5mm (tablette, laptop, etc)
5. Entrée micro MIC IN pour y connecter un micro Jack 6.35mm dynamique
6. Entrée guitare GUITAR IN pour y brancher une guitare (Attention, la guitare doit être équipée d’un micro
intégré et d’un sortie Jack 6.35mm
7. Bouton KARAOKE. Atténue la voix sur le morceau pour permettre de chanter dessus.
8. Bouton MIC Priority. Pour mettre le son du micro en priorité sur la musique
9. Bouton REC pour enregistrer les micros sur clé USB
10. Bouton Repeat pour répéter une ou tous les morceaux sur clé USB ou carte TF (pas de fonction en mode
Bluetooth ou Line In)
11. Bouton MODE. Pour sélectionner les différents MODE d’entrée (Bluetooth / USB / TF / LINE IN)
Une pression longue sur MODE active / désactive la voix de prompteur
12. Bouton LIGHT pour sélectionner les différents mode d’animation lumineuse de la face avant à LED
13. Bouton MEGA BASS pour accentuer les basses fréquences
14. Bouton EQ pour sélectionner les différents egaliseur pré-réglé (Pop / Rock / Jazz / Vocal / Flat / Classic)
15. Bouton morceau précédent (En mode USB/TF). Pression longue pour avancer dans le morceau
16. Bouton morceau suivant (En mode USB/TF). Pression longue pour reculer dans le morceau
17. Bouton MENU. Chaque pression permet le réglage de fonctions / volume différents :
MENU
tr
Treble volume / réglage des aigus
-7 à +7
bA
Bass volume / réglage des basses
-7 à +7
n
Mic volume / volume du micro
0 à 16
nt
Mic Treble / aigus du micro
-7 à +7
nb
Mic Bass / basses du micro
-7 à +7
EC
MIC echo / echo du micro
0 à 16
Gt
Guitar Volume / volume entrée guitare
0 à 16

7
Tableau 1
18. Bouton Play/Pause et couplage TWS pour coupler 2 enceintes BOOMASTER1000 sur la même source
bluetooth. Voir procédure dans la suite du manual.
19. Bouton Main Volume pour régler le volume des différentes fonction (Tableau 1)
CONNEXION ET UTILISATION DU BLUETOOTH
1.
Mettez l’appareil sous tension et appuyez sur latouche MODE (11) sur l’appareil oula télécommande pour
sélec
tionnerlafonctionBLUETOOTH ‘’BLUE’’ et l’appareil commuteen mode de recherche.
2.
Activez la fonction Bluetooth sur l’appareil externe à synchroniser.
3.
Lancez la recherche d’appareil. L’enceinte s’affiche sous le nom " BOOMASTER1000 ".
4.
Sélectionnez-la et entrez le mot de passe « 0000 » si nécessaire.
5.
Appuyez sur la touche de lecture sur l’appareil surlatélécommandepourcommencerla lecture.
Sélectionnez les titres avec les touches NEXT et PREV et le Volume avec le bouton rotatif en s’assurant que le
volume de la source Bluetooth (mobile, tablette) soit bien actif.
MODE TWS
Le mode TWS permet d’utiliser 2 enceintes BOOMASTER1000 en stéréo. Vous devez pour cela disposer de 2
enceintes.
Se connecter d’abord en bluetooth sur l’une des 2 enceintes avec l’appareil. (La seconde enceinte est éteinte)
Une fois appairé avec la 1ère enceinte, allumer la seconde, se mettre en mode Bluetooth à l’aide du bouton MODE
(11). Appuyer longuement sur le bouton Play/Pause TWS (18) de la 2ème enceinte jusque SLAU apparaissent sur l’écran
en clignotant.
Une fois connectée à la 1ère enceinte, SLAU arrête de clignoter sur la 2ème enceinte et elles sont maintenant connectée
ensemble.
Après l’appairage, une enceinte sera le canal gauche et l’autre le canal droit (Stéréo)
Appuyer longuement sur le bouton Play/Pause TWS (18) annulera la fonction.
ENREGISTREMENT DES MICROS
En mode de lecture USB/TF et après insertion d’un clé USB (2 ou 3):
Maintenir la touche RECappuyée sur la télécommande (4) ou REC sur l’enceinte (9) pour commencer l’enregistrement des
microphones ur la clé USB. Appuyer sur REC pour arrêter.
La fonction REC n’enregistre uniquement le son des micros et jamais le son de l’entrée ligne ou du Bluetooth.
Pour écouter le dernier enregistrement, appuyer sur la touche REC play (14) de la télécommande.
MODE LINE IN
Pour utiliser ce mode, appuyer sur le bouton mode (11) jusqu’à ce que LINE soit affiché sur l’écran.
Brancher ensuite un appareil compatible à l’aide d’un câble mini-jack sur l’entrée LINE IN (4) et régler le
volume à l’aide de (19).
U
Main volume / Volume général
0 à
32(max)

8
UTILISATION DU LECTEUR USB
Fichiers de musique compatibles: MP3, WMA
Appuyer sur la touche MODE (11) pour passer les sources audio à USB.
1.
Lecture/pause: Appuyez pour la lecture, mettre en pause et reprendre la lecture.
2.
Retour/suivant: Pendant la lecture, appuyez une fois pour revenir au début du titre en cours ou du titre sui-
vant.
UTILISATION DES MICROS
Brancher le micros dans l’entrée micro prevue (5) et/ou (6). Ajuster le volume avec le bouton MENU (1) et (7)
CARACTÉRISTIQUES TECHNIQUES
Alimentation électrique
AC100-240V 50/60Hz
Haut-parleurs
2 x 10’’ (25cm) + Tweeter 2’’
Puissance musicale Maximale
1000W
Consommation électrique
60W max
Réponse en fréquences
50Hz –20KHz
Puissance d’émission Bluetooth max
2.18dBm
Plage de fréquence Bluetooth
2402 –2480MHz
Dimensions du carton
893 x 375 x 335mm
Dimensions du produit
830 x 330 x 300mm
Poids brut / Poids net
12.05KG / 10.3KG
La declaration UE de conformité est disponible sur notre site internet www.msc-distribution.om

9
GB –USER MANUAL
Please read the manual carefully and keep it for future reference.
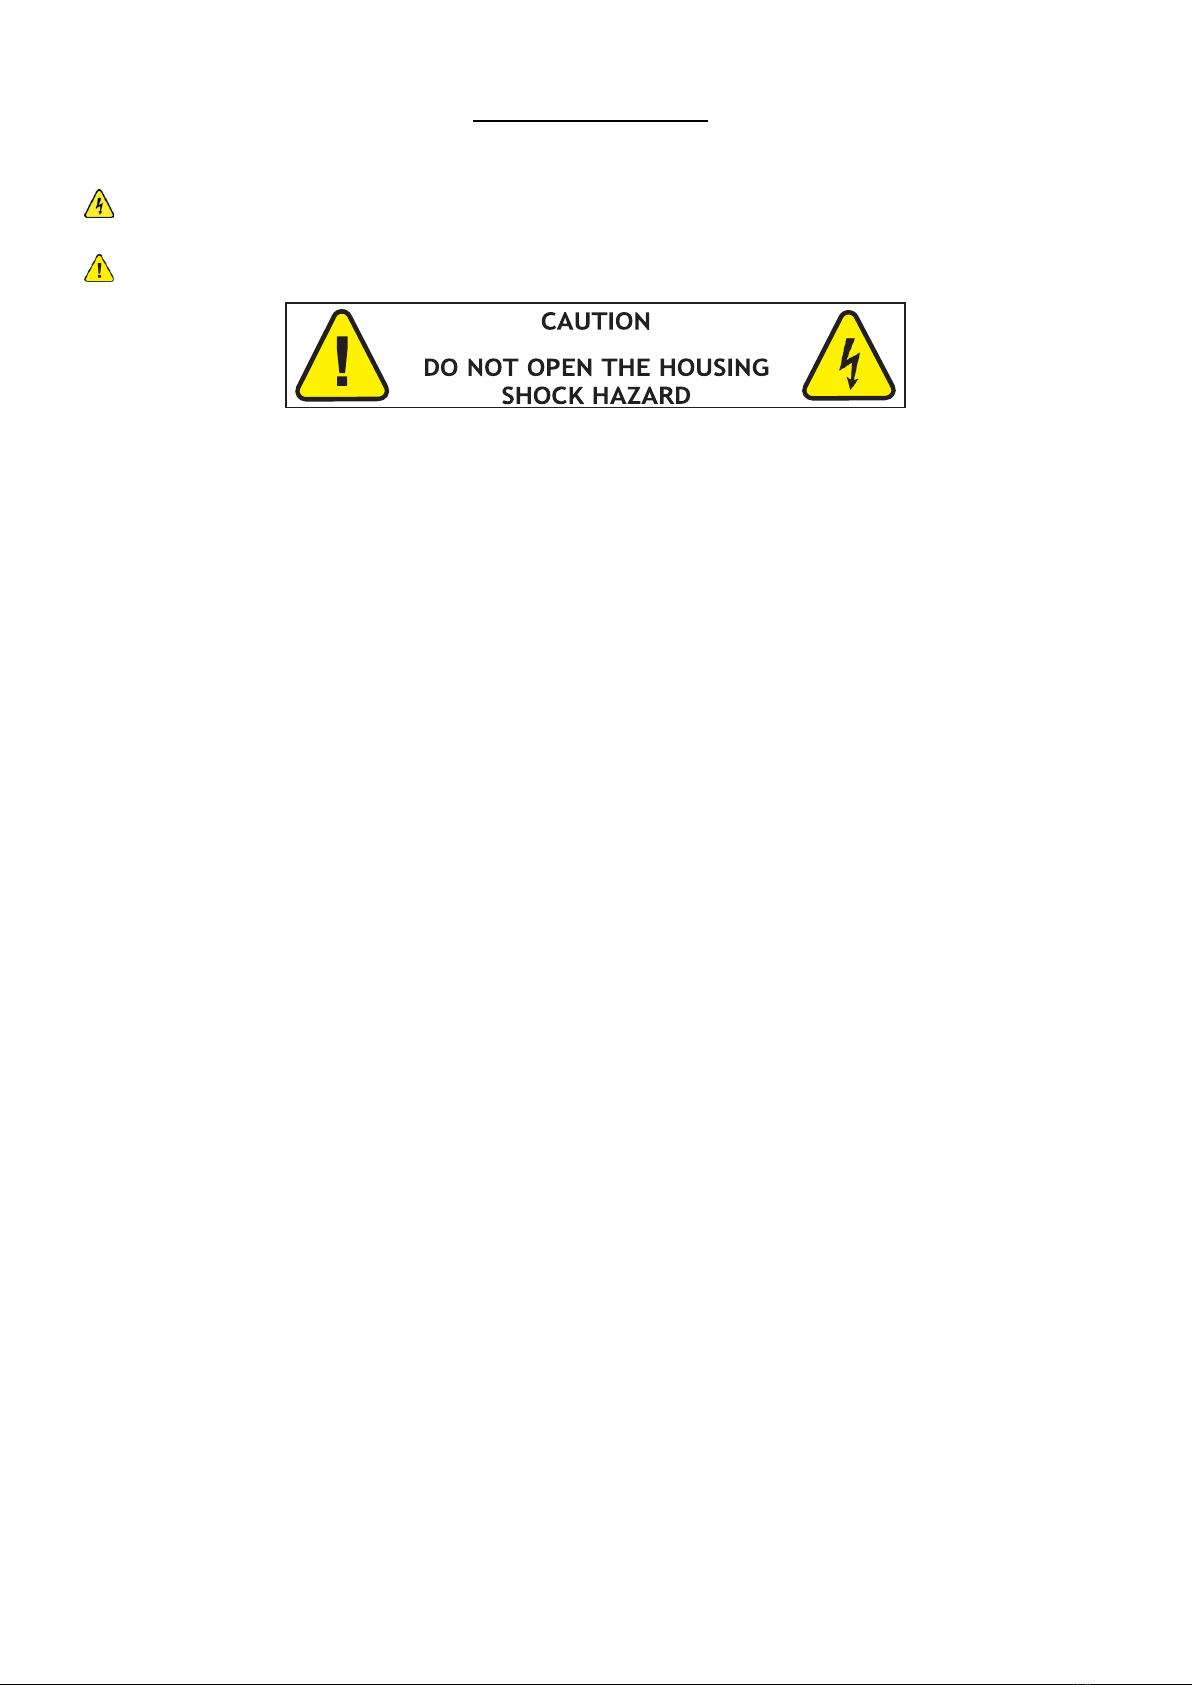
The lightning flash with arrow head symbol, within an equilateral Triangle,is intended to alert the user to the
presence
of notinsulated dangerous voltages within the product’senclosurethat maybeofsufficient
magnitude to constitute a risk of electric shock to persons.
The exclamation point within an equilateral triangle is intended to alert the user to the presence ofimpor
tant
operatingandmaintenance(servicing)instructionsintheliteratureaccompanyingtheappliance.
CAUTION:
⠗
Do not placeany recipients filled with liquids,suchasglasses orvases,ontopofordirectlynext to the appliance.
They could fall over,causing watertoenter the appliance.Neverput liquidsoverthe appliance. Donotplacesmall
objects,suchascoinsorpaperclips,ontheappliancesincetheycouldfallinsidethe applianceandcausefireora
shockhazard!If any liquid or objects enterthe appliance,pull immediatelythe mains plug out of the socket and
contact a specialist.
⠗
0nly pull the mains plug out of the socket by the intended gripping surface. Do not pull it by the cable.
⠗
Never plug the mains plug in or out with damp or wet hands
⠗
Electricalappliancesmustbekeptoutofthereachofchildren.Beparticularlycarefulifchildrenarepresent.Children
arenotawareofthehazardsinvolvedinhandingelectricalappliancesimproperly.Childrencould attemptto poke
objectsintotheappliance.Thereisalife-threateningdangerofelectrocution.
⠗
Neverplacetheapplianceonanunstableormobilesurface.Personscouldbeinjuredortheapplianceda-maged by
it fallingdown.
⠗
AIIpersons involved in operating,installingandservicing the applianceand putting it into service must be
trained and qualified accordingly and observe these operating instructions.
⠗
Defective mains cables may only be replaced by specialists. Danger of shock hazard!
⠗
If you are not sure about the correct connection or if questions arise which are not answered by the operating
instructions,pleasedonothesitateto contactsupportoraspecialist ofyourchoice.Consultaspecialistifyou
arein doubt
about the operating principle or the safety of the product.
⠗
Pleaseunplugtheadaptorandswitchtheunitoffifyoudon’tuseitforalongtime,toavoiddamagedueto
voltage surges.
⠗
No naked flame sources such as lighted candles should be placed on the apparatus.
⠗
Awarningthatbatteries(batterypackorbatteriesinstalled)shallnotbeexposedtoexcessiveheatsuchassunshine,
fire or thelike.
Where theMAINS plugoranappliancecouplerisusedasthe disconnect device,the disconnect deviceshall remain
readily operable.
The device in operation cannot be exposed to extreme temperatures (not below 5 ° C and not above 35 ° C)
The device can only be used indoors
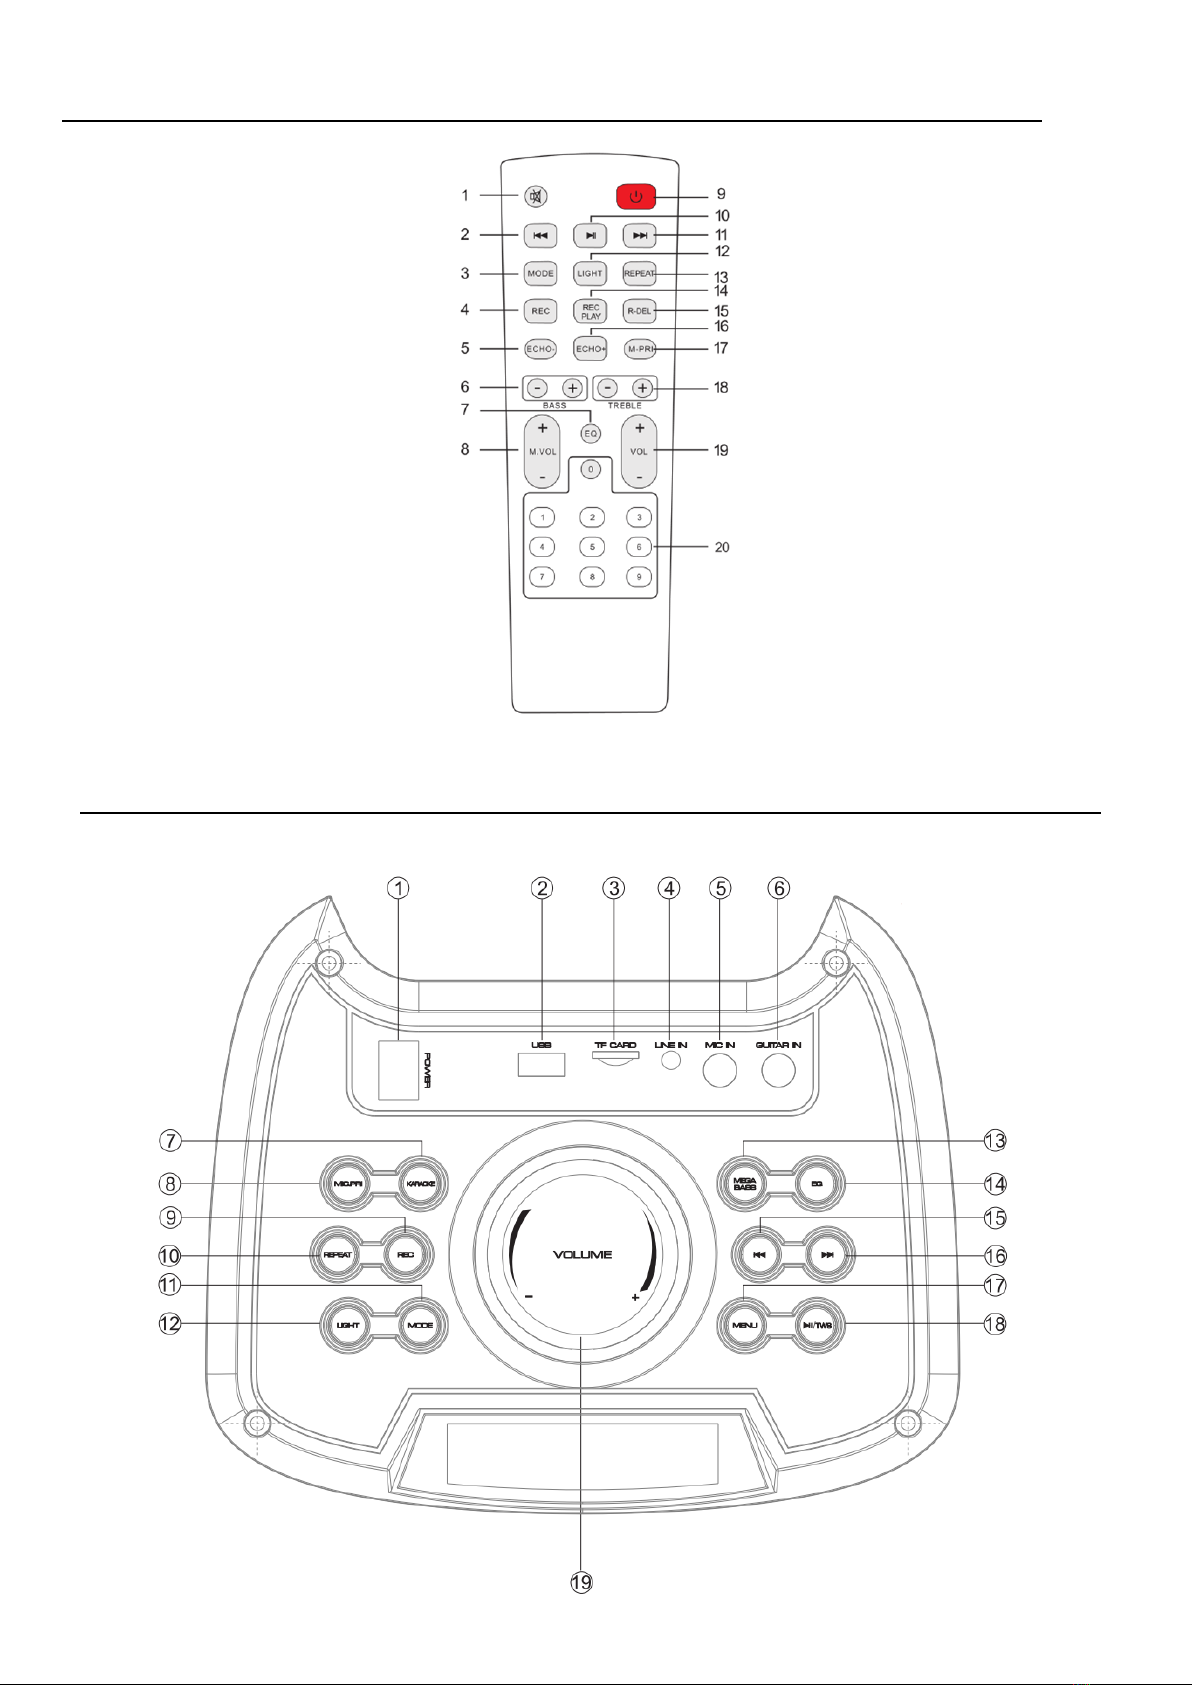
Use of the Remote Control
Pleaseoperate the remotecontrolwithin adistance of 3mand30° betweentheremoteandthe appliance.Aim the
remote at the sensor. Remove all obstacles between the remote and the sensor.
Theremote controlmightnot work properlyifthe sensor is exposedto strongsunshine.
Ifthe remotecontroldoesn’t work
properly,please checkthebatteries

10
RECOMMENDATIONS FOR BATTERIES
This symbol indicates that used batteries should not be disposed of with household waste but
deposited in separate collection points for recycling.
ATTENTION
Danger of explosion if batteryisincorrectlyplaced.Only replace by thesame or equivalenttype. Keep new and old batteries out of
the reach of children.
Ifthe battery compartment doesn’t close properly, stop using the product and keep itout ofthe reach ofchild
ren.
Batteries shall not be exposed to excessive heat such as sunshine, fire or the like.
Whentheinternalbatteriesarenottobeused,removethemtoavoiddamagecausedbybatteryleakageor
corrosion.
WARNING
The supplied remote controlcontains abattery. In case of ingestion,it might cause serious internal burns within
only 2 hours that might lead to death.
If you are indoubt whether the batteries have been swallowedorintroducedintoanyother part of the body,
contact immediately a doctor.
Electric products must not be put into household waste. Please bring them to a recycling centre. Ask your local
authorities or your dealer about the way to proceed.
Accordance with the requirements of CE standard
Recycled products can be recycled
The product is suitable for indoor use
REMOTE CONTROL
1. Mute button. Mute or unmutes the sound
2. Rear SKIP button. To go back to the previous track
3. Mode button. A short press selects the desired input source Bluetooth / Radio / Line In / USB. A long press
deactivates the commentary voice.
4. REC button (Record). Allows recording of microphones on the USB key. To do this, insert a USB key into the
USB drive and connect your microphones. Press the REc buttons and adjust the volume. Press REC again to
stop recording.
5. ECHO button. To decrease the echo of microphones
6. BASS + - buttons. To increase or decrease the bass
7. EQ button. Allows you to select different equalizer presets depending on the type of music you are listening
to. Pop / Rock / Jazz / Vocal / Flat / Classic
8. Adjusting the microphone volume level
9. Standby switch
10. Play / Pause button. Short press for play / pause. Long press for TWS connection (see below).
11. Front SKIP button. To skip forward to the next track
12. Light button (adjustment of light effects). Each press of this button changes the light effect around the
speaker. Pressing 3 seconds will turn off the light or change mode (Color fade, music mode)
13. Repeat button. For loop playback of a track or the entire playlist
14. REC PLAY button. To listen to the last recording on the USB stick
15. REC DEL button. To erase the last recording on the key
16. ECHO + button. To increase the echo of the microphones
17. M-Prio button. Puts microphone sound priority over music when speaking into microphone (only in USB/BT
mode)
18. TREBLE + - buttons. To increase or decrease the treble

11
19. Adjusting the general volume
20. Direct access buttons
CONTROL PANEL
1. ON / OFF button to turn the device on or off
2.USB to connect a USB stick for music playback or recording
3.TF to connect a USB stick to it for music playing
4. LINE IN to connect a device with a 3.5mm jack audio output (tablet, laptop, etc.)
5. MIC IN microphone input to connect a dynamic 6.35mm jack microphone
6. Guitar input GUITAR IN to connect a guitar (Please note, the guitar must be equipped with a built-in microphone
and a 6.35mm jack output
7. KARAOKE button. Attenuate the vocals on the song to allow singing over.
8. MIC Priority button. To put the microphone sound in priority over the music
9. REC button to record microphones on USB stick
10. Repeat button to repeat one or all songs on USB key or TF card (no function in Bluetooth or Line In mode)
11. MODE button. To select the different input MODE (Bluetooth / USB / TF / LINE IN)
A long press on MODE turns the prompter voice on / off
12. LIGHT button to select the different light animation modes of the LED front panel
13. MEGA BASS button to boost low frequencies
14. EQ button to select the different preset equalizers (Pop / Rock / Jazz / Vocal / Flat / Classic)
15. Previous song button (In USB / TF mode). Long press to advance in the song
16. Next song button (In USB / TF mode ). Long press to go back in the song
17. MENU button. Each press allows the adjustment of different functions / volume:
Table 1
MENU
tr
Treble volume
-7 to +7
bA
Bass volume
-7 to +7
n
Mic volume
0 to 16
nt
Mic Treble
-7 to +7
nb
Mic Bass
-7 to +7
EC
MIC echo
0 to 16
Gt
Guitar Volume
0 to 16
U
Main volume
0 to
32(max)

12
18. Play / Pause button and TWS pairing to pair 2 BOOMASTER1000 speakers to the same bluetooth source. See
procedure in the rest of the manual.
19. Main Volume button to adjust the volume of the different functions (Table 1)
BLUETOOTH OPERATION
1. Turn on the unit and press the MODE button (11) on the unit or the remote control to select the BLUETOOTH
function "BLUE" and the unit will switch to search mode.
2. Activate the Bluetooth function on the external device to be synchronized.
3. Start the device search. The loudspeaker is displayed as "BOOMASTER1000".
4. Select it and enter the password “0000” if necessary.
5. Press the play button on the device on the remote control to start playback.
Select the titles with the NEXT and PREV keys and the Volume with the rotary button, making sure that the volume of
the Bluetooth source (mobile, tablet) is active.
TWS MODE
TWS mode allows 2 BOOMASTER1000 speakers to be used in stereo. You need 2 speakers for this.
First connect via bluetooth on one of the 2 speakers with the device. (The second speaker is switched off)
Once paired with the 1st speaker, turn on the second, switch to Bluetooth mode using the MODE button (11). Long
press the TWS Play / Pause button (18) on the 2nd speaker until SLAU appears on the screen flashing.
Once connected to the 1st speaker, SLAU stops flashing on the 2nd speaker and they are now connected together.
After pairing, one speaker will be the left channel and the other the right channel (Stereo)
Long pressing the TWS Play / Pause button (18) will cancel the function.
MICROPHONE RECORDING
In USB / TF reading mode and after inserting a USB key (2 or 3):
Press and hold the REC button on the remote control (4) or REC on the speaker (9) to start recording microphones on
the USB stick. Press REC to stop.
The REC function only records sound from microphones and never sounds from line input or Bluetooth.
To listen to the last recording, press the REC play button (14) on the remote control.
LINE IN MODE
To use this mode, press the mode button (11) until LINE is displayed on the screen.
Then connect a compatible device using a mini-jack cable to the LINE IN input (4) and adjust the volume using (19).
USB/TF OPERATION
Compatible music files: MP3, WMA
Press the MODE button (11) to switch the audio sources to USB.
1. Play / Pause: Press to play, pause and resume play.

13
2. Back / next: During playback, press once to go back to the beginning of the current title or the next title.
USE OF MICROPHONES
Connect the microphone to the microphone input provided (5) and / or (6). Adjust the volume with the
MENU button (1) and (7)
Technical Specification
Power supply
AC100-240V 50/60Hz
Speakers
2 x 10’’ (25cm) + Tweeter 2’’
Maximum musical power
1000W
Power consumption
60W max
Frequency response
50Hz –20KHz
Bluetooth frequency range
2.18dBm
Max BT RF emission
2402 –2480MHz
Packaging dimension
893 x 375 x 335mm
Product dimension
830 x 330 x 300mm
Gross weight / Net weight
12.05KG / 10.3KG
The EU declaration of conformity is available on our website www.msc-distribution.om

14
NL –HANDLEIDING
Aandachtig de handleiding lezen en bewaren.
De driehoek met een bliksemschicht wordt gebruikt om aan te geven wanneer uw gezondheid gevaar
loopt (bijvoorbeeld door elektrocutie).
Een uitroepteken in een driehoek wijst op bijzondere risico's bij het hanteren of bedienen van het appa-
raat.
BELANGRIJKE VEILIGHEIDS- EN RISICOWAARSCHUWINGEN:
1.
Plaats geen ontvangers gevuld met vloeistoffen, zoals glazen of vazen, op of direct naast het apparaat. Ze
kunnen omvallen, waardoor water in het apparaat binnendringt. Giet nooit vloeistoffen uit boven het toestel.
Plaats geen kleine voorwerpen, zoals munten of paperclips, op het toestel, aangezien zij zou kunnen vallen in
het apparaat. Zij kunnen brand of stroomslag veroorzaken! Als er vloeistof of voorwerpen in het apparaat drin-
gen, trek dan onmiddellijk de stekker uit het stopcontact en raadpleeg een deskundige.
2.
Trek de stekker alleen uit het stopcontact via de ervoor bepaalde oppervlak. Niet aan het kabel trekken.
3.
Nooit de stekker met vochtige of natte handen aanraken.
4.
Elektrischeapparaten buiten het bereikvan kinderen houden. Weesvooral voorzichtig wanneer er kinderen
aanwezig zijn. Kinderen zijn zich niet bewust van de gevaren die betrokken zijn bij elektrische apparaten. Kinde-
ren kunnen proberen voorwerpen in het apparaat te stekken. Er is een levensbedreigend gevaar van stroomslag.
5.
Plaats het apparaat nooit op een instabiele of beweegbare ondergrond. Mensen kunnen gewond raken of het
apparaat wordt beschadigd door het vallen.
6.
Alle personen die dit apparaat gebruiken, installeren of onderhouden moeten gekwalificeerd zijn en deze
gebruiksaanwijzing naleven.
7.
Defecte stroomkabels mogen enkel vervangen worden door specialisten. Gevaar van elektrische schok!
8.
Als u niet zeker bent over de correcte aansluiting of als er vragen zijn die niet worden beantwoord door de
gebruiksaanwijzing, contacteer een specialist. Raadpleeg een specialist indien u twijfel heeft aan het werkings-
principe of de veiligheid van het product.
9.
Adapter afkoppelen en toestel uitschakelen als het voor langere tijd niet wordt gebruikt om beschadiging door
overspanningen te vermijden.
10.
Plaats geen open vlammen, zoals brandende kaarsen op of naast het apparaat.
11.
De batterijen mogen niet worden blootgesteld aan overmatig warmte zoals zon of vuur.
12.
Indien het toestel via het stopcontact wordt uitgeschakeld, moet de contactdoos altijd gemakkelijk be-
reikbaar zijn.
13.
Het apparaat in werking kan niet worden blootgesteld aan extreme temperaturen (niet lager
dan 5 ° C en niet hoger dan 35 ° C)
14.
Het apparaat kan alleen binnenshuis worden gebruikt
ADVIES VOOR HET GEBRUIK VAN DE AFSTANDSBEDIENING
De afstandsbediening heeft een bereik van 6m in een hoek van 30° ten opzichte van de ontvanger en moet
altijd precies op de ontvanger worden gericht. Nooit voorwerpen tussen de ontvanger en de afstandsbediening
plaatsen. Wanneer de ontvanger of de afstandsbediening onder een sterke lichtbron staan, kan de transmissie
verstoord worden. Als de transmissie niet langer goed is, de batterij vervangen.

15
ADVIES VOOR BATTERIJEN in de afstandsbediening
Dit symbool geeft aan dat gebruikte batterijen en accu’s niet bij het huisvuil mogen worden
weggegooid, maar moeten worden gedeponeerd in gescheiden inzamelpunten voor recycling.
WAARSCHUWINGEN VOOR HET GEBRUIK VAN BATTERIJEN
Er is explosiegevaar als de batterij verkeerd is geplaatst. Alleen vervangen door hetzelfde of een vergelijkbaar
type. Tegen hitte beschermen. Bij langere niet-gebruik batterijen uit het vak verwijderen.
Slik de batterij niet in. Gevaar voor chemische brandwonden. Als u twijfelt of de batterijen zijn ingeslikt of in een ander
deel van het lichaam zijn ingebracht, neem dan onmiddellijk contact op met een arts
Houd nieuwe en oude batterijen buiten het bereik van kinderen.
Als het batterijcompartiment niet goed sluit, stop dan met het gebruik van het product en houd het buiten het bereik
van kinderen.
BELANGRIJKE OPMERKING: Elektrische producten mogen niet samen met het huishoudelijk afval worden verwi -
jderd. Lever ze a.u.b. in bij een gespecialiseerd inzamelpunt. Raadpleeg de plaatselijke autoriteiten of uw ver-
koper over hoe de producten te recycleren.
Voldoet aan de europese CE richtlijnen
Ook hergebruikte materialen kunnen worden gerecycleerd
Geschikt voor gebruik binnenshuis
AFSTANDSBEDIENING
1- Mute-knop. Dempt of dempt het geluid
2- Achterste SKIP-knop. Om terug te gaan naar het vorige nummer
3- Modusknop. Een korte druk selecteert de gewenste ingangsbron. Bluetooth / Radio / Lijningang / USB. Lang
indrukken deactiveert de commentaarstem.
4- REC-knop (opname)
Maakt opname van microfoons op de USB-stick mogelijk. Om dit te doen, steekt u een USB-sleutel in de USB-drive en
sluit u uw microfoons aan. Druk op de REc-knoppen en pas het volume aan. Druk nogmaals op REC om de opname te
stoppen.
5- ECHO-knop. De echo van microfoons verminderen
6- BASS + - knoppen. De bas verhogen of verlagen
7- EQ-knop. Hiermee kunt u verschillende equalizer-presets selecteren, afhankelijk van het type muziek waarnaar u
luistert. Pop / Rock / Jazz / Vocal / Flat / Classic
8- Het microfoonvolume aanpassen
9- Standby-schakelaar

16
10- Afspelen / Pauze-knop. Kort indrukken voor afspelen/pauzeren. Lang indrukken voor TWS-verbinding (zie
hieronder). Druk in de FM-radiomodus op om automatisch naar zenders te zoeken.
11- SKIP-knop aan de voorkant. Vooruit naar het volgende nummer gaan
12- Lichtknop (aanpassing van lichteffecten). Elke druk op deze knop verandert het lichteffect rond de luidspreker.
Als u 3 seconden op drukt, wordt het licht uitgeschakeld of wordt de modus gewijzigd (kleurvervaging, muziekmodus)
13- Herhaalknop. Voor lusweergave van een track of de hele afspeellijst
14- REC PLAY-knop. De laatste opname op de USB-stick beluisteren
15- REC DEL-knop. De laatste opname op de toets wissen
16- ECHO + knop. Om de echo van de microfoons te vergroten
17- M-Prio-knop. Geeft prioriteit aan het microfoongeluid boven muziek bij het spreken in de microfoon (alleen in
USB/BT-modus)
18- TREBLE + - toetsen. De hoge tonen verhogen of verlagen
19- Het algemene volume aanpassen
20- Directe toegangsknoppen
CONTROLPANEEL
1. AAN / UIT-knop om het apparaat aan of uit te zetten
2.USB om een USB-stick aan te sluiten voor het afspelen of opnemen van muziek
3.TF om er een USB-stick op aan te sluiten voor het afspelen van muziek
4. LINE IN om een apparaat aan te sluiten met een audio-uitgang van 3,5 mm (tablet, laptop, enz.)
5. MIC IN microfooningang om een dynamische 6,35 mm jack-microfoon aan te sluiten
6. Gitaaringang GUITAR IN om een gitaar aan te sluiten (Let op, de gitaar moet zijn uitgerust met een ingebouwde
microfoon en een 6,35 mm jack-uitgang
7. KARAOKE-knop. Demp de zang op het nummer om over te zingen.
8. MIC Priority-knop. Om het microfoongeluid voorrang te geven op de muziek
9. REC-knop om microfoons op USB-stick op te nemen
10. Herhaalknop om een of alle nummers op een USB-sleutel of TF-kaart te herhalen (geen functie in Bluetooth- of
Line In-modus)
11. MODE-knop. Om de verschillende ingang MODUS te selecteren (Bluetooth / USB / TF / LINE IN)
Een lange druk op MODE zet de promptstem aan/uit
12. LIGHT-knop om de verschillende lichtanimatiemodi van het LED-voorpaneel te selecteren select
13. MEGA BASS-knop om lage frequenties te versterken
14. EQ-knop om de verschillende vooraf ingestelde equalizers te selecteren (Pop / Rock / Jazz / Vocal / Flat / Classic)
15. Knop Vorige nummer (in USB / TF modus). Lang indrukken om verder te gaan in het nummer
16. Knop Volgende nummer (in USB / TF modus). Lang indrukken om terug te gaan in het nummer

17
17. MENU-knop. Met elke druk kunnen verschillende functies / volume worden aangepast:
Tabel 1
18. Play / Pause-knop en TWS-koppeling om 2 BOOMASTER1000-luidsprekers aan dezelfde Bluetooth-bron te
koppelen. Zie procedure in de rest van de handleiding.
19. Hoofdvolumeknop om het volume van de verschillende functies aan te passen (tabel 1)
BLUETOOTH OPERATIE
1. Schakel het apparaat in en druk op de MODE-knop (11) op het apparaat of de afstandsbediening om de
BLUETOOTH-functie "BLAUW" te selecteren en het apparaat schakelt over naar de zoekmodus.
2. Activeer de Bluetooth-functie op het externe apparaat dat moet worden gesynchroniseerd.
3. Start het zoeken naar apparaten. De luidspreker wordt weergegeven als "BOOMASTER1000".
4. Selecteer het en voer indien nodig het wachtwoord "0000" in.
5. Druk op de afspeelknop op het apparaat op de afstandsbediening om het afspelen te starten.
Selecteer de titels met de NEXT- en PREV-toetsen en het Volume met de draaiknop, zorg ervoor dat het volume van
de Bluetooth-bron (mobiel, tablet) actief is.
TWS MODE
In de TWS-modus kunnen 2 BOOMASTER1000-luidsprekers in stereo worden gebruikt. Hiervoor heb je 2 speakers
nodig.
Verbind eerst via bluetooth op een van de 2 speakers met het toestel. (De tweede luidspreker is uitgeschakeld)
Eenmaal gekoppeld met de 1e luidspreker, zet u de tweede aan en schakelt u over naar de Bluetooth-modus met
behulp van de MODE-knop (11). Druk lang op de TWS Play / Pause-knop (18) op de 2e luidspreker totdat SLAU
knipperend op het scherm verschijnt.
Eenmaal verbonden met de 1e luidspreker, stopt SLAU met knipperen op de 2e luidspreker en zijn ze nu met elkaar
verbonden.
Na het koppelen is de ene luidspreker het linkerkanaal en de andere het rechterkanaal (Stereo)
Door lang op de TWS Play / Pause-knop (18) te drukken, wordt de functie geannuleerd.
MENU
tr
Treble volume
-7 to +7
bA
Bass volume
-7 to +7
n
Mic volume
0 to 16
nt
Mic Treble
-7 to +7
nb
Mic Bass
-7 to +7
EC
MIC echo
0 to 16
Gt
Guitar Volume
0 to 16
U
Main volume
0 to
32(max)

18
MICROFOON OPNEMEN
In USB / TF-leesmodus en na het plaatsen van een USB-sleutel (2 of 3):
Houd de REC-knop op de afstandsbediening (4) of REC op de luidspreker (9) ingedrukt om microfoons op de USB-stick
op te nemen. Druk op REC om te stoppen.
De REC-functie neemt alleen geluid op van microfoons en nooit geluiden van lijningang of Bluetooth.
Om de laatste opname te beluisteren, drukt u op de REC-afspeelknop (14) op de afstandsbediening.
LINE IN
Om deze modus te gebruiken, drukt u op de modusknop (11) totdat LINE op het scherm wordt weergegeven.
Sluit vervolgens een compatibel apparaat met een ministekkerkabel aan op de LINE IN-ingang (4) en pas het volume
aan met (19).
USB-/TF-POORTEN
Compatibele muziekbestanden: MP3, WMA
Druk op de MODE-knop (11) om de audiobronnen naar USB te schakelen.
1. Afspelen / Pauze: Druk om af te spelen, te pauzeren en het afspelen te hervatten.
2. Terug / volgende: Druk tijdens het afspelen eenmaal op om terug te gaan naar het begin van de
huidige titel of de volgende titel.
GEBRUIK VAN MICROFOONS
Sluit de microfoon aan op de daarvoor bestemde microfooningang (5) en/of (6). Regel het volume met de
MENU-knop (1) en (7)
SPECIFICATIES
Stroomvoorziening
AC100-240V 50/60Hz
Luidspreaker
2 x 10’’ (25cm) + Tweeter 2’’
Maximaal vermogen
1000W
Energieverbruik
60W max
Frequentierespons
50Hz –20KHz
Bluetooth frequentiebereik
2.18dBm
Max RF emissievermogen
2402 –2480MHz
Afmetingen doos
893 x 375 x 335mm
Afmetingen product
830 x 330 x 300mm
Gewicht
12.05KG / 10.3KG
De EU-conformiteitsverklaring is beschikbaar op onze website www.msc-distribution.com
ES - MANUAL DE USO
Lea atentamente el manual y conservelo para consultas posteriores.
El rayo dentro del triangulo avisa de un daño físico ( Por ejemplo, electrocución…).

19
El signo de exclamación dentro del triangulo indica un riesgo en la manipulación o uso del equipo
ATENCION:
1.
No coloque pequeños objetos encima o cerca del equipo. Corre el riesgo de que se introduzcan dentro del
equipo y puede producir daños al equipo, incendio y riesgo de descarga eléctrica a personas.
2.
Siun líquido u objeto penetra dentro del equipo, desenchúfelo y apáguelo inmediatamente y contacte con su
vendedor.
3.
Para desconectar el enchufe, estire siempre de la clavija, jamás del cable.
4.
Jamás enchufe o desenchufe el conector de corriente con las manos húmedas.
5.
Mantener los equipos eléctricos como este fuera del alcance de los niños. Sea particularmente atento en
presencia deniños, ya que estos noson conscientes de lospeligros deunaparato eléctrico y puedeintentar
introducir objetos en el interior con el consecuente peligro de electrocución, por ejemplo.
6.
Jamás coloque el equipo en una superficie inestable o móvil. El equipo sufre riego de caerse y dañar a una
persona o/y al propio equipo.
7.
Todas las personas implicadas en el uso, instalación y mantenimiento del equipo, deben de estar formadas y
cualificadas, para respetar estas instrucciones de seguridad
8.
Cambiar los cables de corriente defectuosos, solo ha de ser relaizado por un técnico cualificado y especialis-
ta. Riesgo de electrocución!
9.
Si usted no sabe conectarlo o hacerlo funcionar, pida ayuda a un profesional.
10.
Desenchufe eladaptador yapague el equipo en caso deuno noutilización prolongada, con elfin de evitar
daños por sobretensiones.
11.
No colocar una llama, como por ejemplo una vela, cerca del equipo.
12.
No exponga las baterías a un calor excesivo, como por ejemplo el Sol, el fuego u otros.
13.
Cuando el cable de corriente o el interruptor del equipo, sean utilizados como dispositivo de desconexión,
este dispositivo ha de permanecer fácilmente accessible
14.
El dispositivo en funcionamiento no puede exponerse a temperaturas extremas (ni por debajo de
5 ° C ni por encima de 35 ° C)
15.
El dispositivo solo se puede utilizar en interiores
Uso del mando a distancia
Utilice el mando a una distancia máxima de 6m y en un ángulo de 30° en relación al equipo. Apunte el mando
endirección al captador.Nodebe haber ningún obstáculo entre el mandoy el equipo. Esposible que el mando
no funcione, si el captador está bajo una fuente de luz muy intensa.
Si el mando a distancia, no funciona, verifique las pilas
NOTA IMPORTANTE: Los productos eléctricos no deben ser tirados a la basura normal, han de ser reciclados en
un lugar destinado a ello. Pregunte a las autoridades locales, por el punto más cercano a su domicilio.
Conforme con los requisitos de la norma CE
lente.
Mantenga las pilas nuevas y usadas fuera del alcance de los niños.
Sielcompartimientodelapilanosecierracorrectamente,dejedeusarelproductoymanténgalofueradel
alcance de los niños.
No ingiera la Pila. Peligro de quemaduras químicas.
Elcontrolremotosuministradoincluyeunadeestaspilas)Esteproductocontieneunapiladebotón.Sisetraga

20
Los productos reciclados, son
reciclables
Este producto, es adecuado solo para uso en interiores
MANDO A DISTANCIA
1- Botón de silencio. Silencia o reactiva el sonido
2- Botón SKIP trasero. Para volver a la pista anterior
3- Botón de modo. Una pulsación corta selecciona la fuente de entrada deseada.Bluetooth / Entrada de línea / USB
Una pulsación larga desactiva la voz del comentario.
4- Botón REC (Grabar). Permite la grabación de micrófonos en la llave USB. Para hacer esto, inserte una llave USB en
la unidad USB y conecte sus micrófonos. Presione los botones REc y ajuste el volumen. Presione REC nuevamente
para detener la grabación.
5- Botón ECHO. Para disminuir el eco de los micrófonos
6- Botones BASS + -. Para aumentar o disminuir los graves
7- Botón EQ. Le permite seleccionar diferentes preajustes de ecualizador según el tipo de música que esté
escuchando.
Pop / Rock / Jazz / Vocal / Flat / Classic
8- Ajuste del nivel de volumen del micrófono
9- Interruptor de espera
10- Botón de reproducción / pausa. Presione brevemente para reproducir / pausar. Mantenga pulsado para la
conexión TWS (ver más abajo)
11- Botón SKIP frontal. Para pasar a la siguiente pista
12- Botón de luz (ajuste de efectos de luz). Cada presión de este botón cambia el efecto de luz alrededor del altavoz.
Al presionar 3 segundos se apagará la luz o cambiará el modo (desvanecimiento del color, modo de música)
13- Botón de repetición. Para reproducción en bucle de una pista o de toda la lista de reproducción
14- Botón REC PLAY. Para escuchar la última grabación en la memoria USB
15- Botón REC DEL. Para borrar la última grabación de la tecla
16- Botón ECHO +. Para aumentar el eco de los micrófonos
17- Botón M-Prio. Pone prioridad al sonido del micrófono sobre la música al hablar por el micrófono (solo en modo
USB/BT)
18- Botones TREBLE + -. Para aumentar o disminuir los agudos
19- Ajuste del volumen general
20- Botones de acceso directo
Table of contents
Languages:
Other BoomToneDJ Speakers manuals

BoomToneDJ
BoomToneDJ TRAVELER 300 User manual

BoomToneDJ
BoomToneDJ BOOMASTER400 User manual

BoomToneDJ
BoomToneDJ MS-12A MP3 User manual

BoomToneDJ
BoomToneDJ MS10 User manual

BoomToneDJ
BoomToneDJ BOOMPAD 800 User manual

BoomToneDJ
BoomToneDJ BOOMASTER800 User manual

BoomToneDJ
BoomToneDJ M5 User manual

BoomToneDJ
BoomToneDJ BOOMASTER600 User manual
Popular Speakers manuals by other brands

mr. steam
mr. steam Linear SteamHead Installation, operation and maintenance manual

Audiodesign
Audiodesign Musway MG Installation notes

MP-Man
MP-Man T600CD instruction manual

Audiosystem
Audiosystem M10 EVO user manual

Audiosystem
Audiosystem R08 FLAT EVO BR user manual

TW Audio
TW Audio C12 Operation manual