Bootstrap Farmer DIY High Tunnel Plans User manual

DIY High Tunnel Plans
WWW.BOOTSTRAPFARMER.COM
PLEASE CHECK ALL LOCAL BUILDING CODES BEFORE
PURCHASING AND BUILDING ANY STRUCTURE OF
MAKING ANY IMPROVEMENTS
Table of Contents:
3- Identifying Structure Components
3- Tools Needed
4- Included Hardware List
4- What is Included in the Kit
5- Parts to Source Locally
5- Optional Accessories
5-Hoop Bender
6-Pre-Cut and Drilled Ground Posts
7- Hoop House Roll Up Side Curtain Kit
8- Shade Cloth and Ground Cover
8- Air Inflation Kit
9-Double Layer Hoop House Plastic
10- FAQ
11- Getting Started: The Build
11- Weed Barrier
12- Squaring your Hoop House
13- Pre-Cutting Hoop House Ground Posts
14- Installing Ground Posts
15- Bending Poles to Make Hoops
16- Connecting Poles to Form Hoops
18- Attach Base Boards
19- Installing Ridge Poles and Cross Connectors
21- Installing Hip Boards
22- Installing Spring Wire and Lock Channel
23- End Walls and Doors for Hoop Houses
24- Installing Door Frame
25- Wood Frame and End Wall
26- Adding a Door Header
27- Building your own Door
30- Installing Hoop House Plastic
32- Options for Side Walls
34- Install Roll Up Sides
35- Secure Hoop House Plastic with Spring Wire
36- Installing Hand Crank for Roll Up Side Walls

Hacksaw
Reciprocating Saw
Socket Wrench
Adjustable Wrench
Nut Drivers
Electric Drill with Extra Drill Bits
Sledge Hammer
Mason Line
Line Level
100' foot tape measure (if building 100' long get a 200'
tape measure)
Tools Needed
Identifying Structure Components
End Wall Base Board
Base Board
Hip Board
Ridge Pole
Hoop
End Wall
3

¾" Self Tap: U Channel and Connect Hoops
¼" Washers: Flat / Lock / Nut
¼" x 2" Hex Bolt: Ground Posts to Hoops
¼" x 4" Carriage Bolt: Hip and Base Boards to Hoops
Included Hardware List
2½" Phillips Flat Head Wood Screw: End Walls
What is included in Kit:
6 mil Plastic (SINGLE LAYER)
All Spring Wire and Lock Channel Including enough for
End Wall: Attaches Plastic to Structure
Cross Connectors: Attach Ridge Pole to Hoops
Ground Post Driver: To Install Ground Posts
All Nuts, Bolts, Washers, and Screws
1¼ " Phillips Flat Head Wood Screw: Lock Channel to
Hip and Base Boards
4
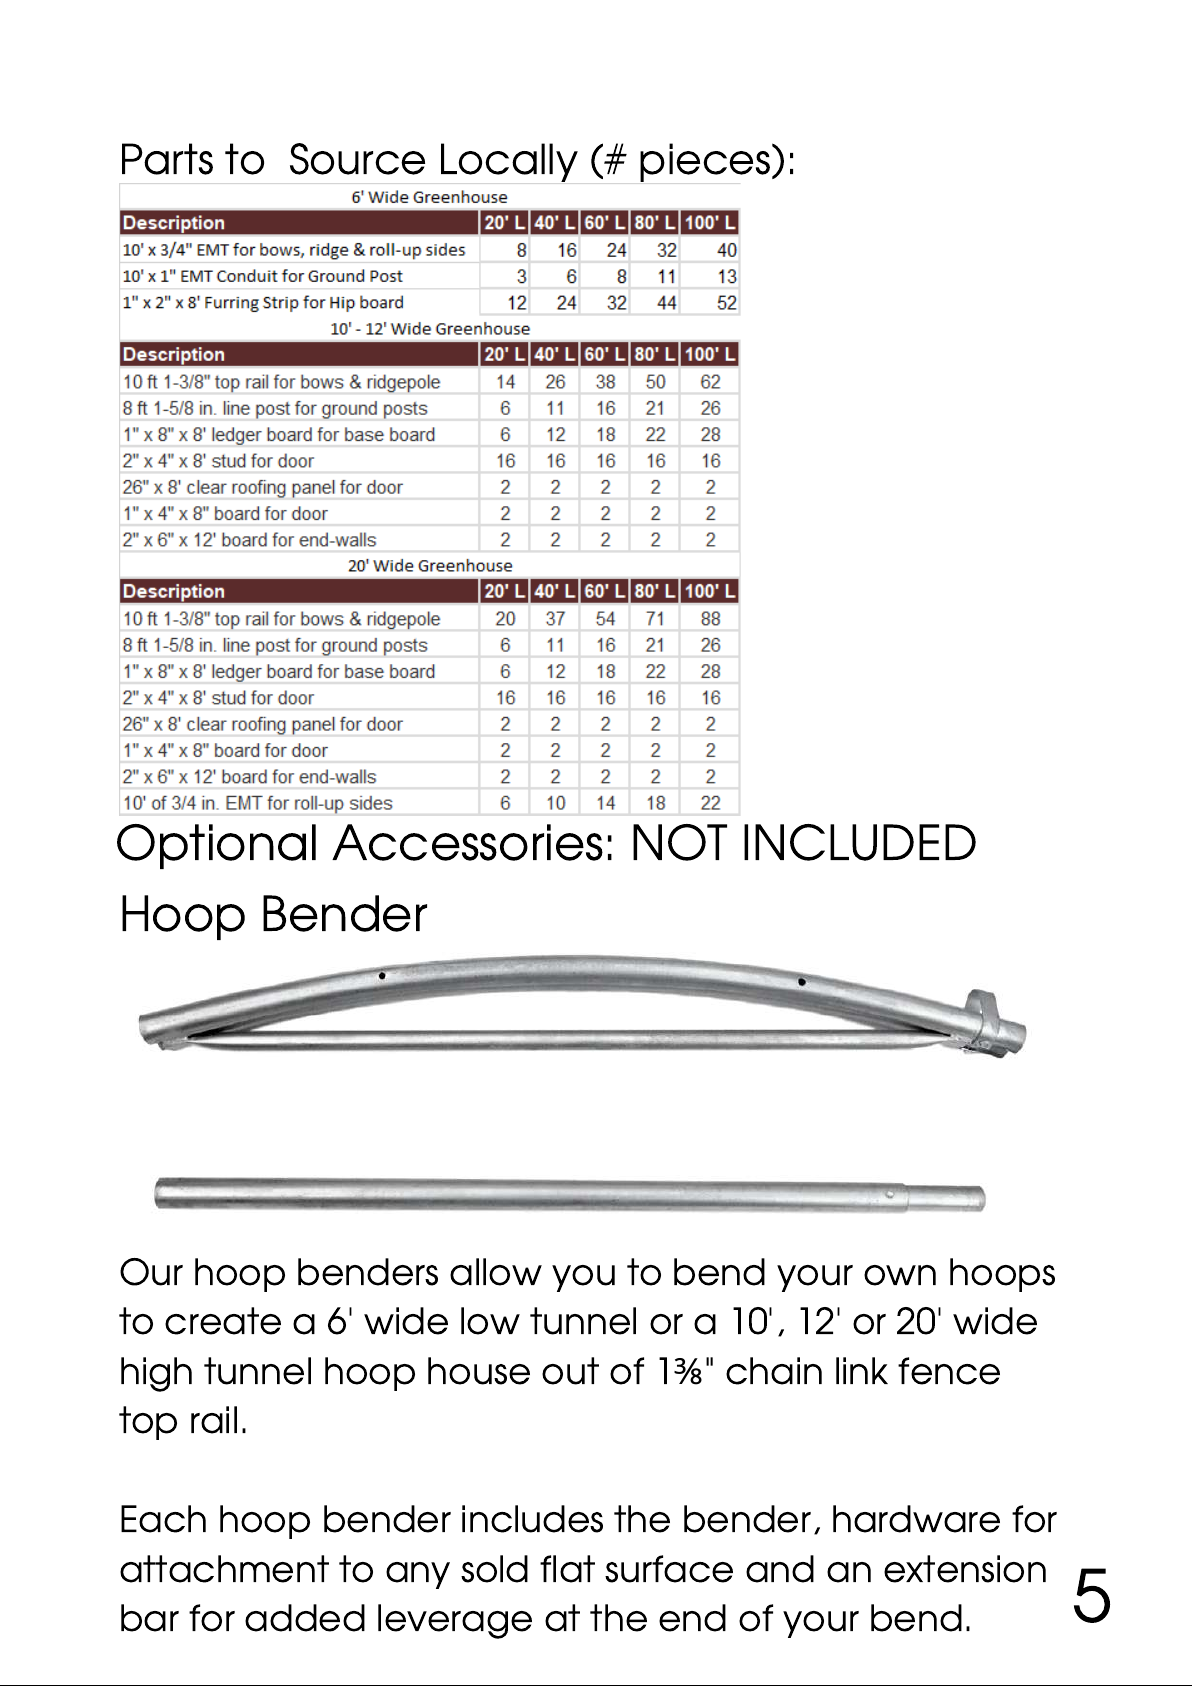
Parts to Source Locally (# pieces):
Optional Accessories: NOT INCLUDED
Hoop Bender
Our hoop benders allow you to bend your own hoops
to create a 6' wide low tunnel or a 10', 12' or 20' wide
high tunnel hoop house out of 1
⅜
" chain link fence
top rail.
Each hoop bender includes the bender, hardware for
attachment to any sold flat surface and an extension
bar for added leverage at the end of your bend. 5

Our ground posts save you time & make assembling
your high tunnel even easier! Ground posts come pre-
cut and pre-drilled for quick installation.
Each kit assumes 4 feet spacing. Made from 1
⅝
"
fence line posts pre-cut at 48" length pre-drilled for
easy hoop attachment 16-gauge (approx. 1.29mm
thick).
6' wide greenhouse - (1) 10' x ½" EMT per
10'-12' wide high tunnel hoop house - (2) 10' x 1
⅜
"
top rail per hoop
20' wide high tunnel hoop house - (3) 10' x 1
⅜
" top
rail per hoop
hoop
HOOP BENDERS ARE SOLD SEPARATELY BECAUSE MANY PEOPLE BUILD MULTIPLE
HOOP HOUSES AND YOU ONLY NEED ONE BENDER PER SIZE. THE 6' 10' 12' & 20'
BENDERS WILL ONLY WORK FOR THEIR CORRESPONDING WIDTHS.
Pre-Cut & Drilled Ground Posts
Hoophouse Width (ft) | Approximate Height (ft)
6 | 4
10 | 8.5
12 | 8
20 | 10.75
6

Hoop House Roll Up Side Curtain Kit
2 hand cranks
¾ EMT Couplings to connect locally sourced ¾ x 10' EMT
Conduit
Snap Clamps: to attach greenhouse plastic to EMT
Lock Channel and Spring Wire for hip board to begin roll
up side
Quickly roll up your hoop house side walls to vent or close to
retain heat.
Kit includes:
(only 1 crank is needed per 100', so there is 2 for each side
of the hoop house)
Two holes pre-drilled for quick attachment of your
baseboard and hoops. Top hole is ¼" and drilled 2" from
the top of the ground post. Bottom hole is ¼" and is
drilled 23" from the top perpendicular to the first hole.
Sold in bundles to match kit sizes:
20'- 12 posts 60'- 32 posts 100'- 52 posts
40'- 22 posts 80'- 42 posts
*SNAP CLAMPS ONLY FIY 3/4 EMT- DO NOT USE PVC PIPES! EMT PROVIDES EXTRA WEIGHT AND RIDGED STRENGTH NEEDED FOR THE HAND CRANK! 7
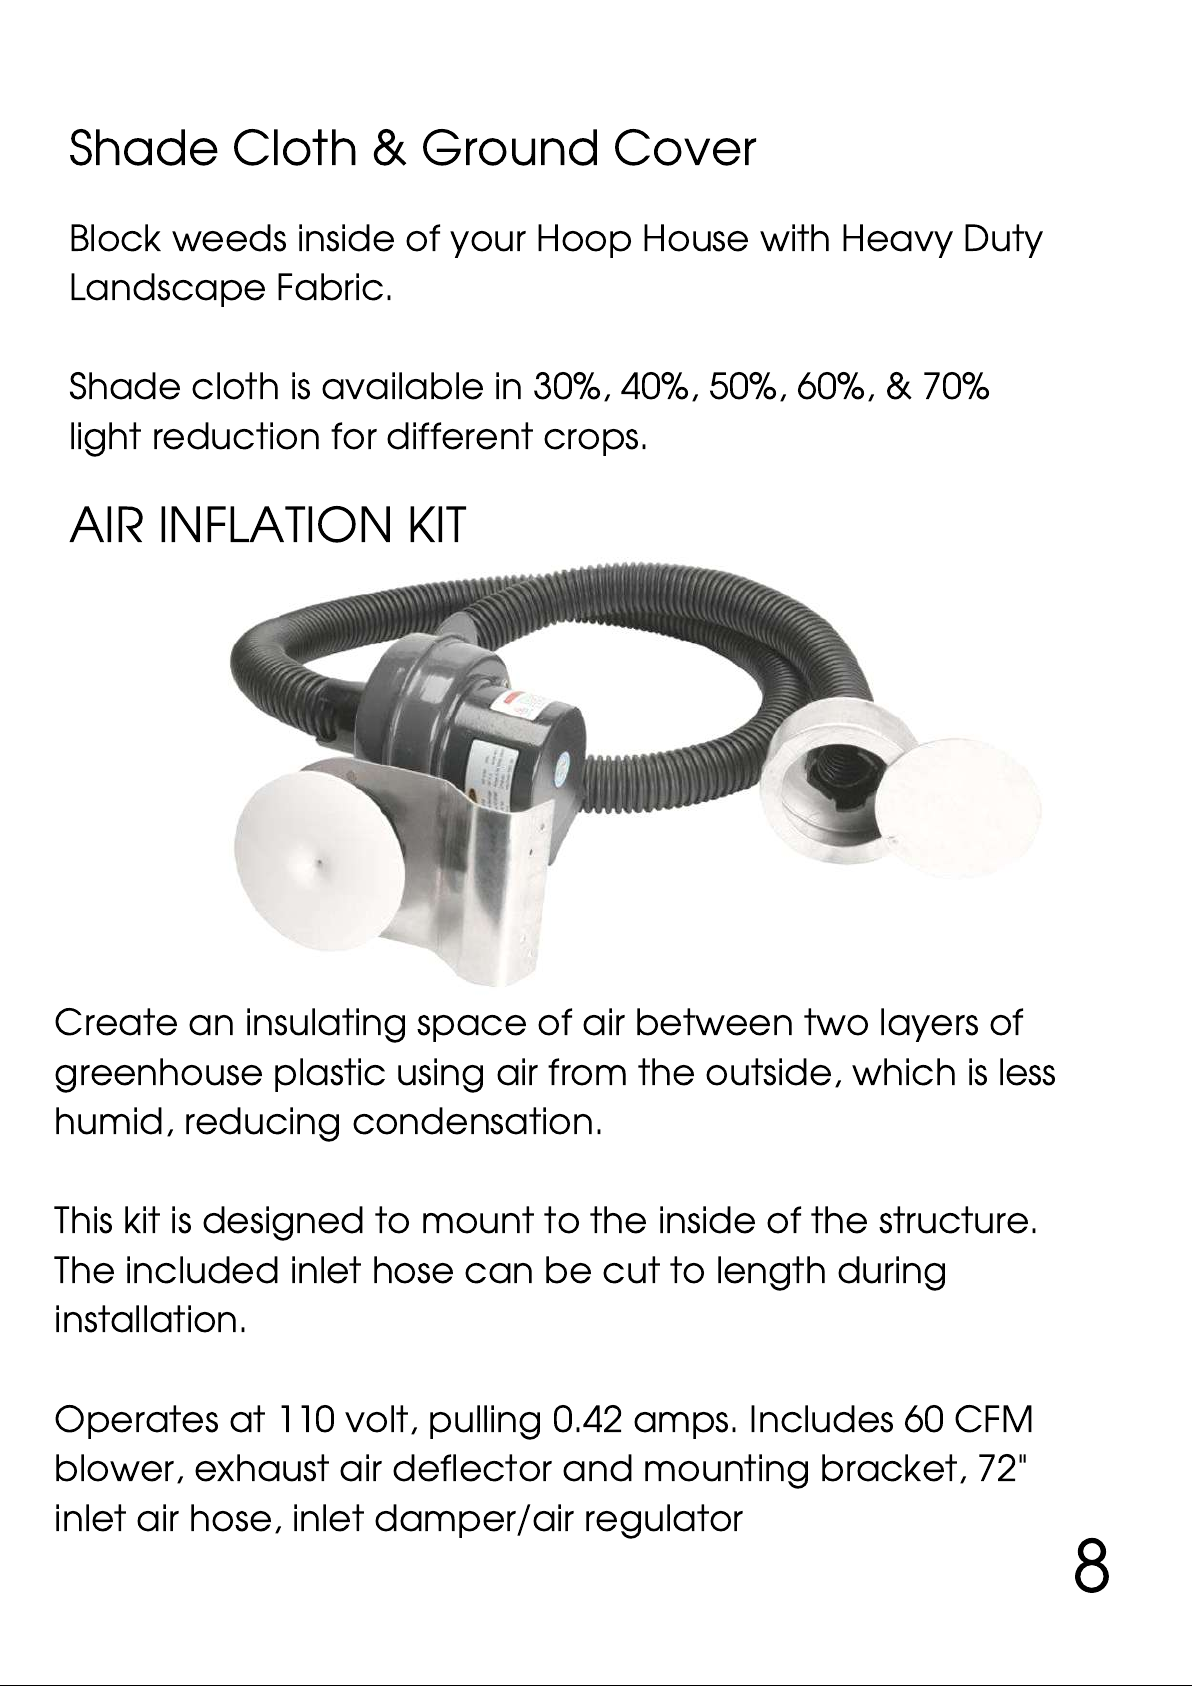
Create an insulating space of air between two layers of
greenhouse plastic using air from the outside, which is less
humid, reducing condensation.
This kit is designed to mount to the inside of the structure.
The included inlet hose can be cut to length during
installation.
Operates at 110 volt, pulling 0.42 amps. Includes 60 CFM
blower, exhaust air deflector and mounting bracket, 72"
inlet air hose, inlet damper/air regulator
AIR INFLATION KIT
Shade Cloth & Ground Cover
Block weeds inside of your Hoop House with Heavy Duty
Landscape Fabric.
Shade cloth is available in 30%, 40%, 50%, 60%, & 70%
light reduction for different crops.
8
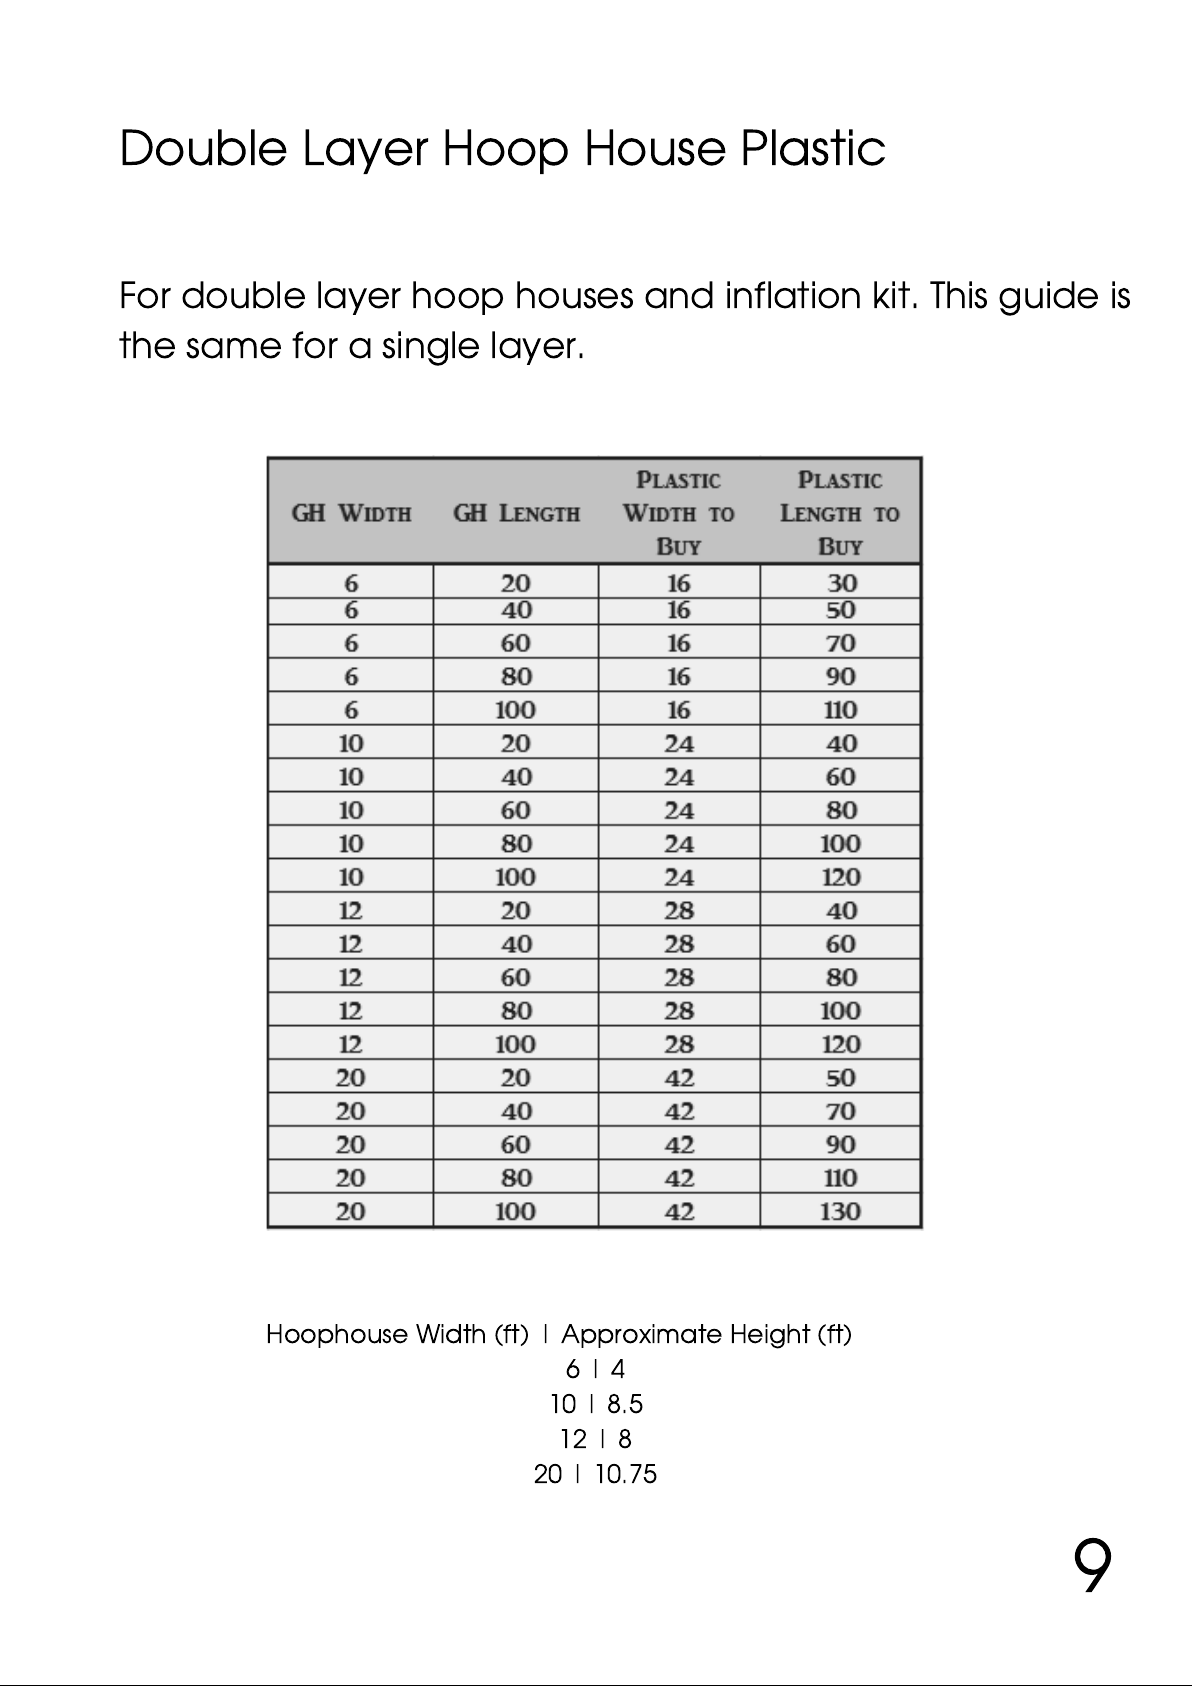
Double Layer Hoop House Plastic
For double layer hoop houses and inflation kit. This guide is
the same for a single layer.
Hoophouse Width (ft) | Approximate Height (ft)
6 | 4
10 | 8.5
12 | 8
20 | 10.75
9
Ground posts and bows every 4 feet.
We sink the ground posts 2 feet into the ground,
allowing for higher tunnels and stronger frames.
*If you are building your hoop house taller with
longer ground posts please note that decision is
made by you and out of spec for this kit.
Set Location of Hoop House:
Start by placing your first marking stake at least 8
feet away from an existing greenhouse or other
small structure.
For larger structures such as a home you will want to
place your greenhouse significantly further away.
Most farms orient their hoop houses North to South.
Hoophouse Width (ft) | Approximate Height (ft)
6 | 4
10 | 8.5
12 | 8
20 | 10.75
FAQ
10

Lay down weed barrier if you prefer. (This is optional
depending on your needs.) Secure the weed barrier
with garden staples, rocks or dirt that will make up the
floor of your high tunnel.
Weed Barrier
Getting Started: The Build
11

Mark each corner of your planned greenhouse area
with any kind of marking stake - First measure length to
length (its best to stick with lengths divisible by 4'). The
width should be 10, 12, 20 or 24 foot for our high
tunnels. Then measure diagonally, making sure
the diagonal measurements are equal to each other.
Double check that each length, width and diagonal
measurements are equal. This ensures your
greenhouse will be square.
Squaring your Hoop House
Once your area is measured out, place a temporary
stake to mark the location of each corner as this will
be where your first ground posts are located.
12

Pre-Cutting Hoop House Ground Posts (If
not using our ground posts)
To make the job much quicker cut all your ground
posts ahead of time. These high-tunnels require 1
⅝
"
fence line posts found at the big box hardware stores.
These are sometimes labeled as terminal posts in the
stores.
To calculate the number of posts you will need take
the length of your greenhouse in feet and divide it by
4 and then add 1. This gives you the number of hoops
you will have. Example Length = 100 feet. (100 ft / 4) +
1 = 26 hoops. 26 hoops = 26 pieces of fence line
posts. Cut each into (2) 48" pieces for 10'-24'
greenhouses.
We recommend using a reciprocating saw with a vice
to hold the poles in place while cutting, and you
should be finished in about an hour. A hacksaw will
work too but it is much slower. After all the ground
posts are cut we want to mark both the depths to
drive the post into the ground and the hole for EMT
hoop attachment.
13
10-20 ft Wide Hoop House: Mark the pole down the
middle at 24". Put an X on one end which will be the
end in the ground. On the above ground end you will
be drilling two holes.
Make sure these holes are perpendicular from each
other (90 degrees away from the other hole). Drill the
top hole 2" from the top with a 1/4" bit. Spin the pole
1/4 of the way around.
Drill the 2nd hole 23" from the top with the same drill
bit.
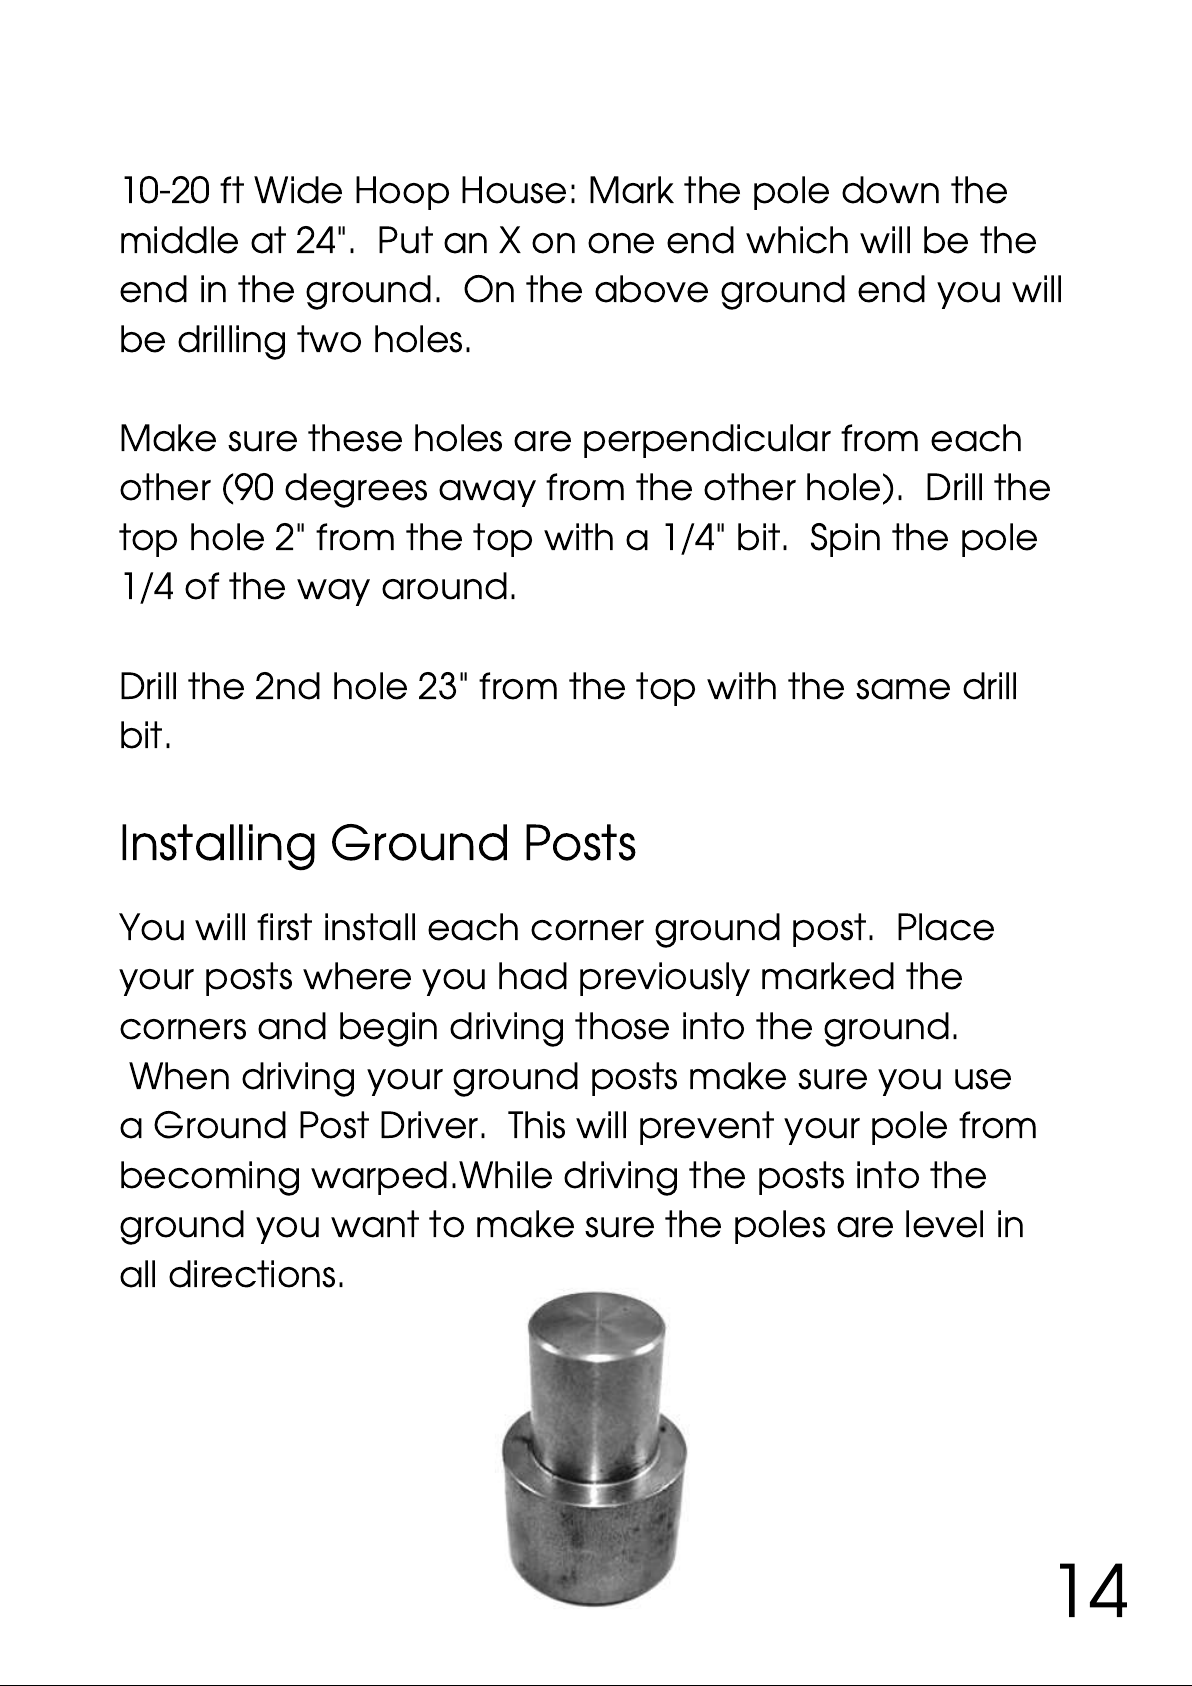
You will first install each corner ground post. Place
your posts where you had previously marked the
corners and begin driving those into the ground.
When driving your ground posts make sure you use
a Ground Post Driver. This will prevent your pole from
becoming warped.While driving the posts into the
ground you want to make sure the poles are level in
all directions.
Installing Ground Posts
14
As you are driving the pole into the ground check for
levelness on the front and sides and adjust as needed.
Also pay attention to those holes you drilled. The top
hole needs to be facing in the direction of your
ground posts.
The bottom hole should be facing toward the inner
part of the greenhouse. Once corner ground posts
are installed re-measure length, width and diagonally
one last time. If you made a mistake it’s not too late to
fix it without too much work. Once you are satisfied,
tie a string line around the outside of the corner posts.
This will help to keep all your ground posts in
alignment so you don't get wavy hoops later on.
Bending Poles to Make Hoops
Lay out the poles with them all facing with the
'swagged' (male) end in the same direction. Mark
each pole at 9" on both ends.
Bending Poles to Make Hoops
REMEMBER- POSTS ARE SET EVERY 4 FOOT
15
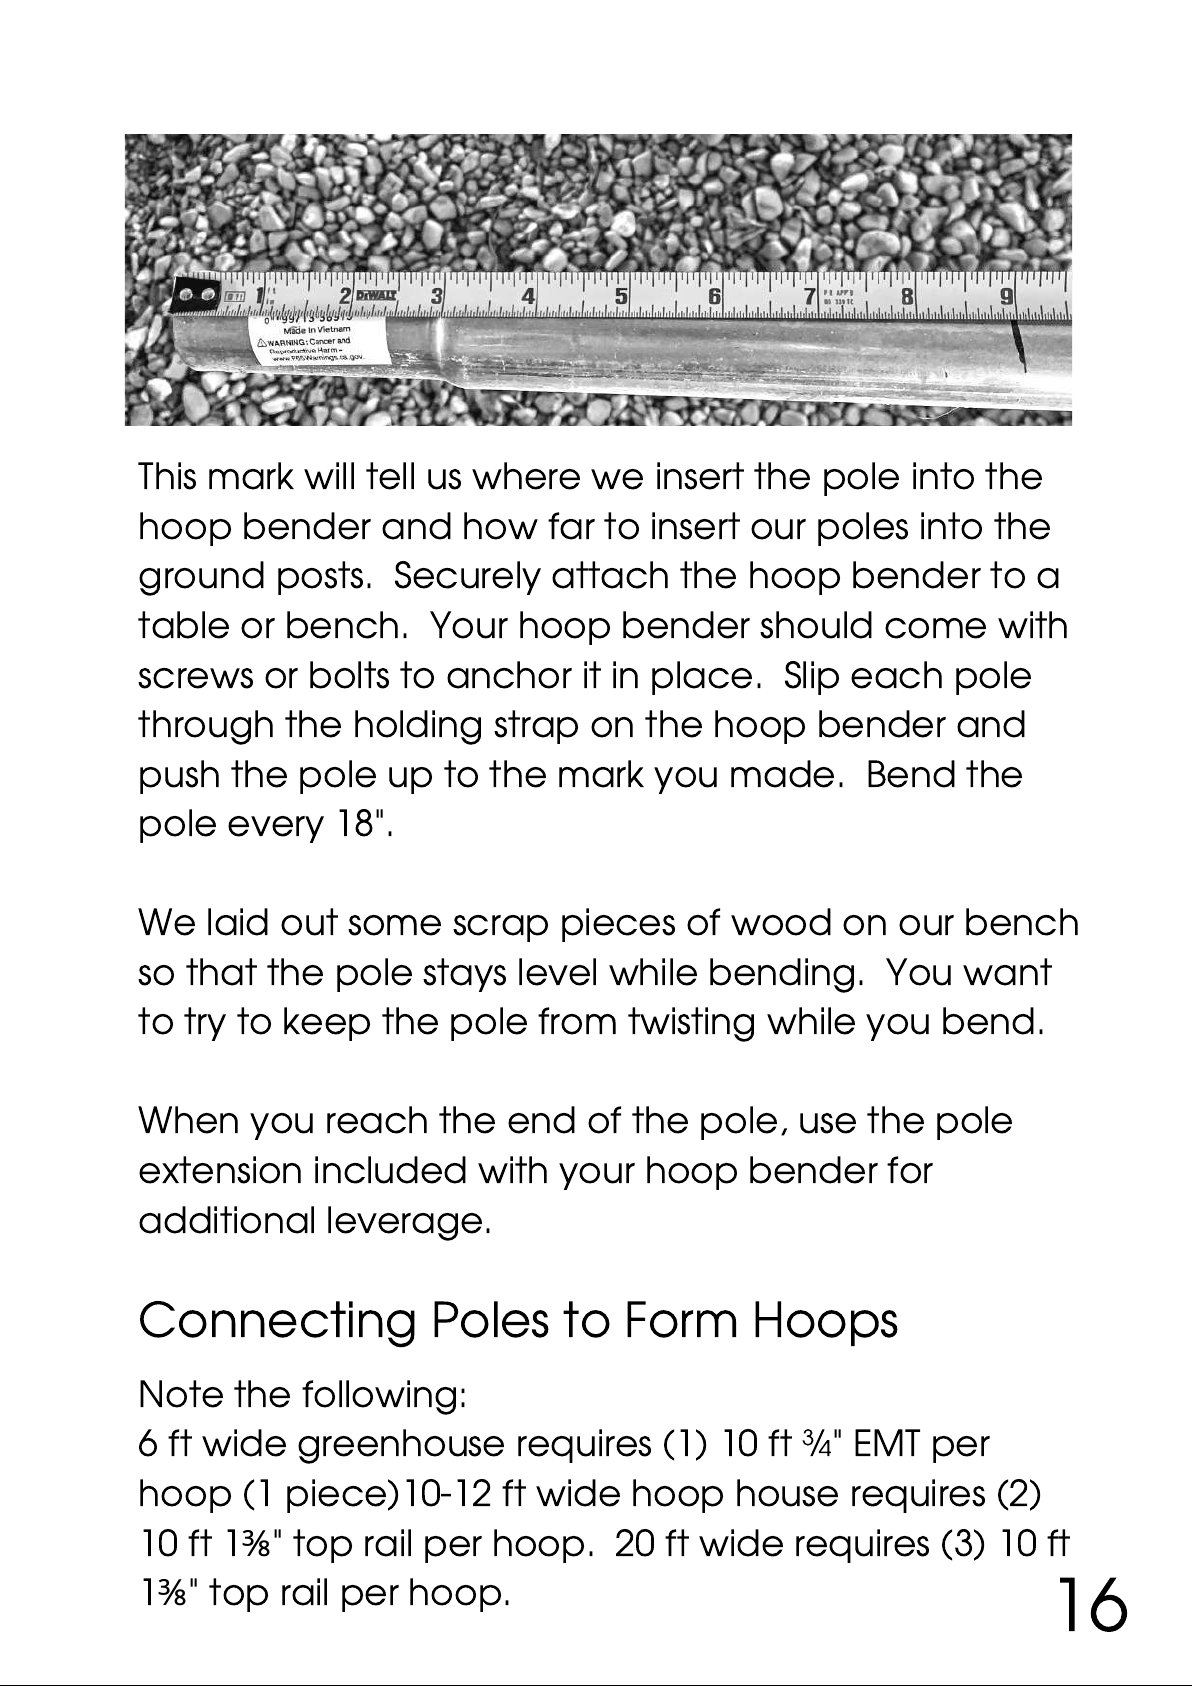
This mark will tell us where we insert the pole into the
hoop bender and how far to insert our poles into the
ground posts. Securely attach the hoop bender to a
table or bench. Your hoop bender should come with
screws or bolts to anchor it in place. Slip each pole
through the holding strap on the hoop bender and
push the pole up to the mark you made. Bend the
pole every 18".
We laid out some scrap pieces of wood on our bench
so that the pole stays level while bending. You want
to try to keep the pole from twisting while you bend.
When you reach the end of the pole, use the pole
extension included with your hoop bender for
additional leverage.
Note the following:
6 ft wide greenhouse requires (1) 10 ft ¾" EMT per
hoop (1 piece)10-12 ft wide hoop house requires (2)
10 ft 1
⅜
" top rail per hoop. 20 ft wide requires (3) 10 ft
1
⅜
" top rail per hoop.
Connecting Poles to Form Hoops
16

After bending the poles, join male and female ends
and screw together with ¾" self-tapping screws. (Be
sure not to place the screws on the top of the hoop
where it would rub against the plastic.)
Start inserting all your hoops you built into the ground
posts. Use the line you previously marked at 9" to
know how far to push your bows in. You should
expect your hoops to be a little wider than your
ground posts. This is perfectly normal as you will just
bend them in a little as you get each end of the hoop
into the ground posts.
After setting all of the hoops into place, you may
have to adjust some of these in or out to make all of
the hoops look even when viewing it from the ends.
Once satisfied use your ¼" bit to drill through the
hoops (at your pre-drilled hole) in the ground posts.
Attach with a 2" hex bolt with washer and nut.
17
Attach Baseboards for 10-20 Ft Hoop
House (Optional for 6ft)
For baseboards we use 1" x 8" x 8' white-wood ledger
boards. This will be in contact with the grounds so
some people like to use pressure treated wood here.
You could, however, but we don't because of the
harsh chemicals that are used to treat the wood.
Pressure treated wood contains chromium, copper,
and arsenic. Government studies have shown that
these chemicals can leach from the wood into your
soil. We don't want this anywhere near our food. You
might consider cedar boards which are naturally
water resistant.
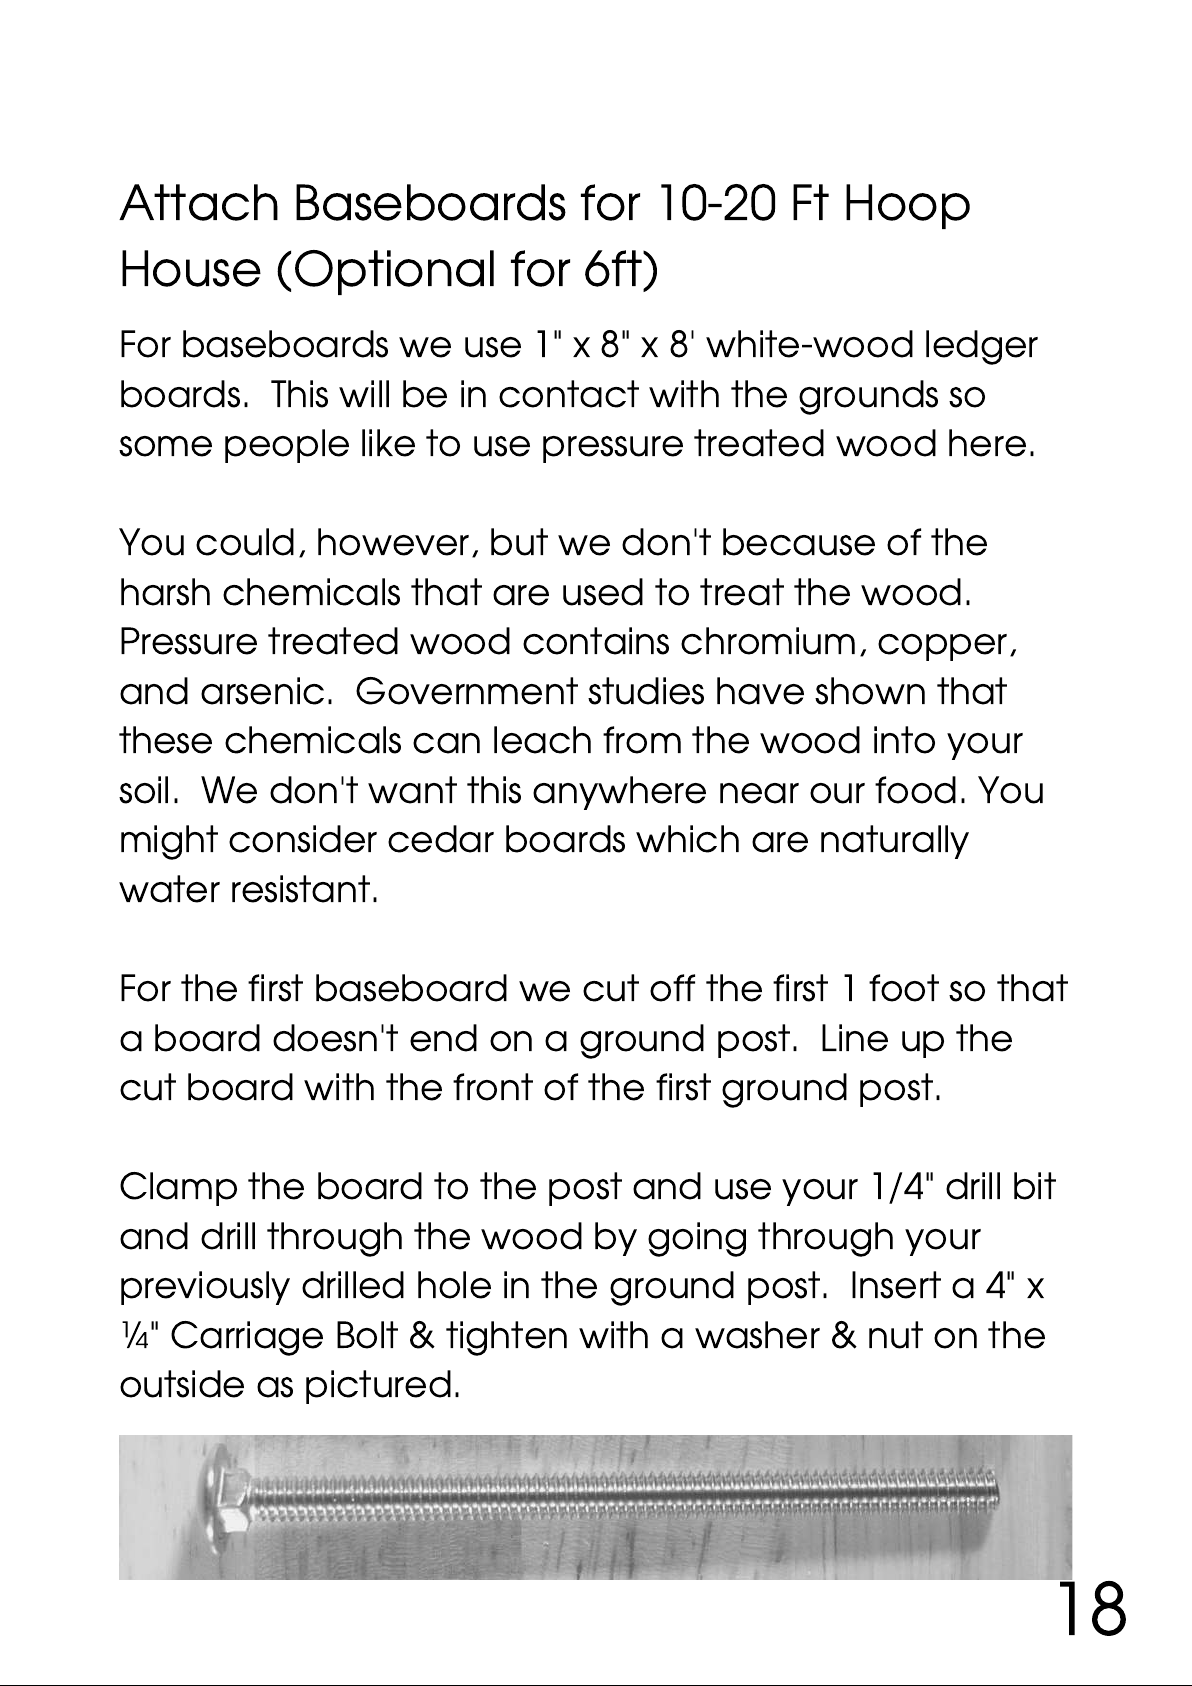
For the first baseboard we cut off the first 1 foot so that
a board doesn't end on a ground post. Line up the
cut board with the front of the first ground post.
Clamp the board to the post and use your 1/4" drill bit
and drill through the wood by going through your
previously drilled hole in the ground post. Insert a 4" x
¼" Carriage Bolt & tighten with a washer & nut on the
outside as pictured.
18
Where two pieces of wood butt together, connect
them with a scrap piece of 1" x 8" and attach with 2-
½" wood screws (Phillips flat head #8). Be sure not to
overdrive these screws as you don't want the screw tip
poking out the other side as it could pierce your
greenhouse plastic.Once you have all the side
baseboards attached you can install the baseboards
on the end walls with a 2" x 6" x 8' board and a
carriage bolt, or you can do this later while building
the end wall.
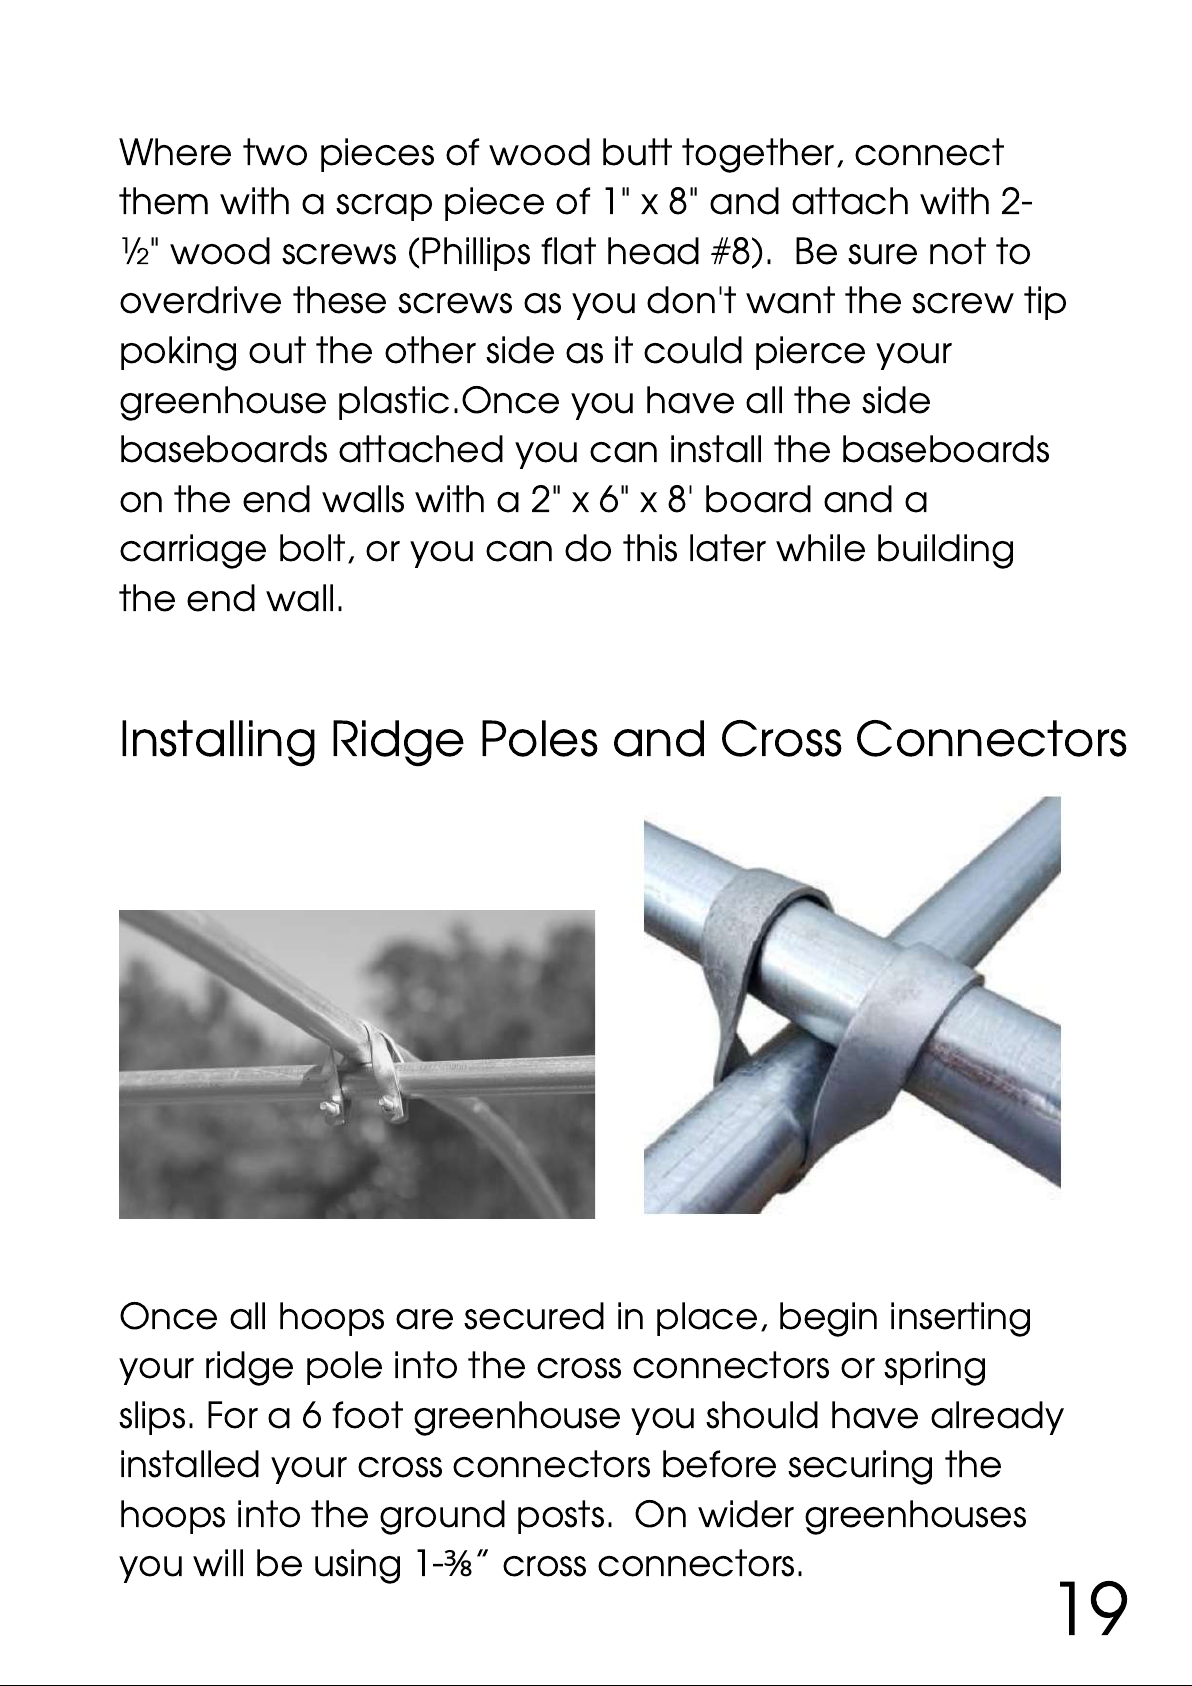
Installing Ridge Poles and Cross Connectors
Once all hoops are secured in place, begin inserting
your ridge pole into the cross connectors or spring
slips. For a 6 foot greenhouse you should have already
installed your cross connectors before securing the
hoops into the ground posts. On wider greenhouses
you will be using 1-
⅜
” cross connectors. 19

Center all your cross connectors in the middle of the
hoop which should be the highest point.
You will be using the same 1
⅜
" fence top rail poles you
used for the hoops as ridge poles. Slide each pole
through the cross connectors and connect each ridge
pole together by inserting the male end into the
female end and securing with a ¼" screw (again from
the side or bottom but not the top).
Stand back away from your greenhouse and adjust
left or right until the whole connected ridge pole is
straight.
Before tightening the screws on the cross connectors,
ensure each bow is 4 ft from each other then tighten
or screw the cross-connectors. Be sure to screw from
the side and not the top as you don't want your
plastic to get caught on the screw.
Make sure each end of the pole is flush with the end
of your greenhouse by cutting off the excess from one
end with a hacksaw. You don't want any excess
sticking out as it could get caught on your plastic.
Duct tape the ends of the ridge poles. This will prevent
the plastic getting hung up on any sharp or protruding
edges.
20
Other Bootstrap Farmer Greenhouse Kit manuals


