BORETTI BPK-45 User manual

NL
EN
I
FR
DE
AUTOMATISCHE
KOFFIEMACHINE
GebruiksaanwijzinG
OperatinG instructiOns
istruziOni per l’usO
nOtice d’emplOi
anweisunGen zur V erwendunG
BPK-45

3
NL
DIT PRODUCT IS BEDOELD VOOR HUISHOUDELIJK
GEBRUIK. DE FABRIKANT KAN NIET AANSPRA-
KELIJK WORDEN GESTELD VOOR PERSOONLIJK
LETSEL OF MATERIËLE SCHADE VEROORZAAKT
DOOR VERKEERDE INSTALLATIE OF EEN ON-
JUIST, OF VERKEERD GEBRUIK.
HET APPARAAT MAG NIET WORDEN GEBRUIKT
DOOR PERSONEN (INCLUSIEF KINDEREN) MET
FYSISCHE, SENSORISCHE OF MENTALE HANDI-
CAP, OF DOOR MENSEN ZONDER DE NODIGE ER-
VARING OF KENNIS, TENZIJ ZE ONDER TOEZICHT
ZIJN VAN EEN PERSOON VERANTWOORDELIJK
VOOR HUN VEILIGHEID.
KINDEREN MOETEN ONDER TOEZICHT ZIJN, OM
TE GARANDEREN DAT ZE NIET MET HET APPA-
RAAT SPELEN. HET APPARAAT EN/OF HET PRO-
DUCT DAT HET PRODUCEERT KAN HEET WOR-
DEN TIJDENS HET GEBRUIK.
Geachte klant,
Wij willen u bedanken en u feliciteren met uw keuze.
Dit nieuwe Boretti product is met zorg ontworpen en
gebouwd met behulp van hoogwaardige materialen
en zorgvuldig getest om ervoor te zorgen dat het aan
al uw culinaire eisen voldoet. Lees en bekijk deze
eenvoudige instructies aub aandachtig door, zodat u
vanaf de eerste keer dat u het apparaat gebruikt, het
optimale resultaat bereikt.
Boretti B.V.
Italiano
I
EN English
FR Français
DE Deutsch
NL Nederlands

4 5
NLNL
INHOUDSOPGAVE
1. VOOR UW VEILIGHEID
• Gebruik
• Installatie en het onderhoud
2. AANBEVELINGEN VOOR BEHOUD MILIEU
• Verpakking
• Verouderde apparatuur
3. INSTALLATIE
• Installatie in modulaire meubels
• Elektrische aansluiting
4. BESCHRIJVING VAN DE KOFFIEZETMACHINE
5. TECHNISCHE KENMERKEN
• Zekeringen
6. BESCHRIJVING VAN HET BEDIENINGSPANEEL
7. EERSTE GEBRUIK
• Vul het waterreservoir
• Vul het koebonen reservoir
• Het inschakelen in stand-by modus
• Regeling van de koe maling
• Reinigings functie
8. KOFFIEAFGIFTE
9. HEET WATERAFGIFTE
10. STOOM AFGIFTE
11. PROGRAMMEREN VAN DE HOEVEELHEID
GEMALEN KOFFIE
12. PROGRAMMEREN VAN DE HOEVEELHEID
KOFFIE
• Herstellen van de fabrieksinstellingen
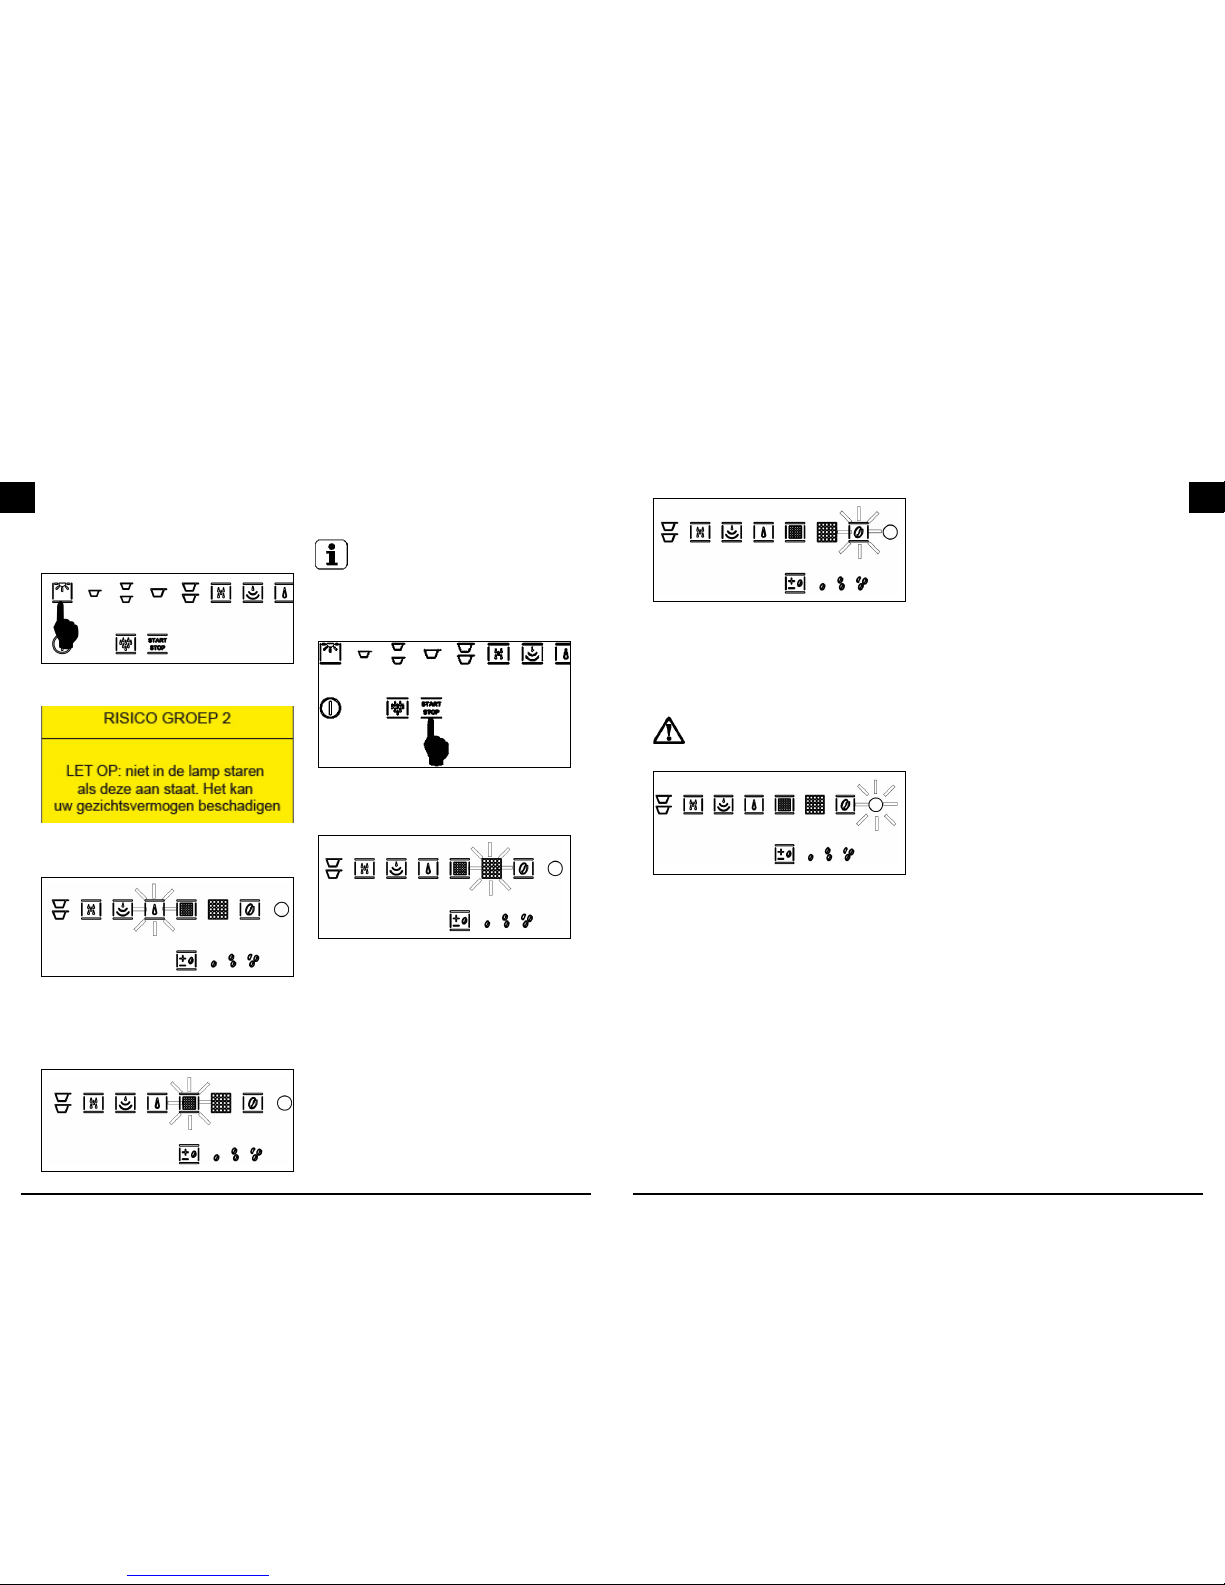
13.VERLICHTING VAN HET AFGIFTE
COMPARTIMENT
14. WAARSCHUWINGEN EN ALARMEN
• Geen water aanwezig
• Vervang het lter
• Verplicht reinigen en koe opvangbak vol
• Koe sonde gebroken
• Algemeen alarm
15. RECEPTEN
• Italiaanse Cappuccino
• Weense Cappuccino
• Koude espresso gekoeld in een shaker
• Ierse koe
• Mexicaanse koe
• Cappuccino ijs
16. REINIGING EN ONDERHOUD
• Externe onderdelen
• Stoompijpje
• Lekbakje
• Het legen van gebruikte koebonen
• Watertank
17.PROBLEMEN OPLOSSEN
18. SERVICE, ONDERDELEN EN GARANTIE
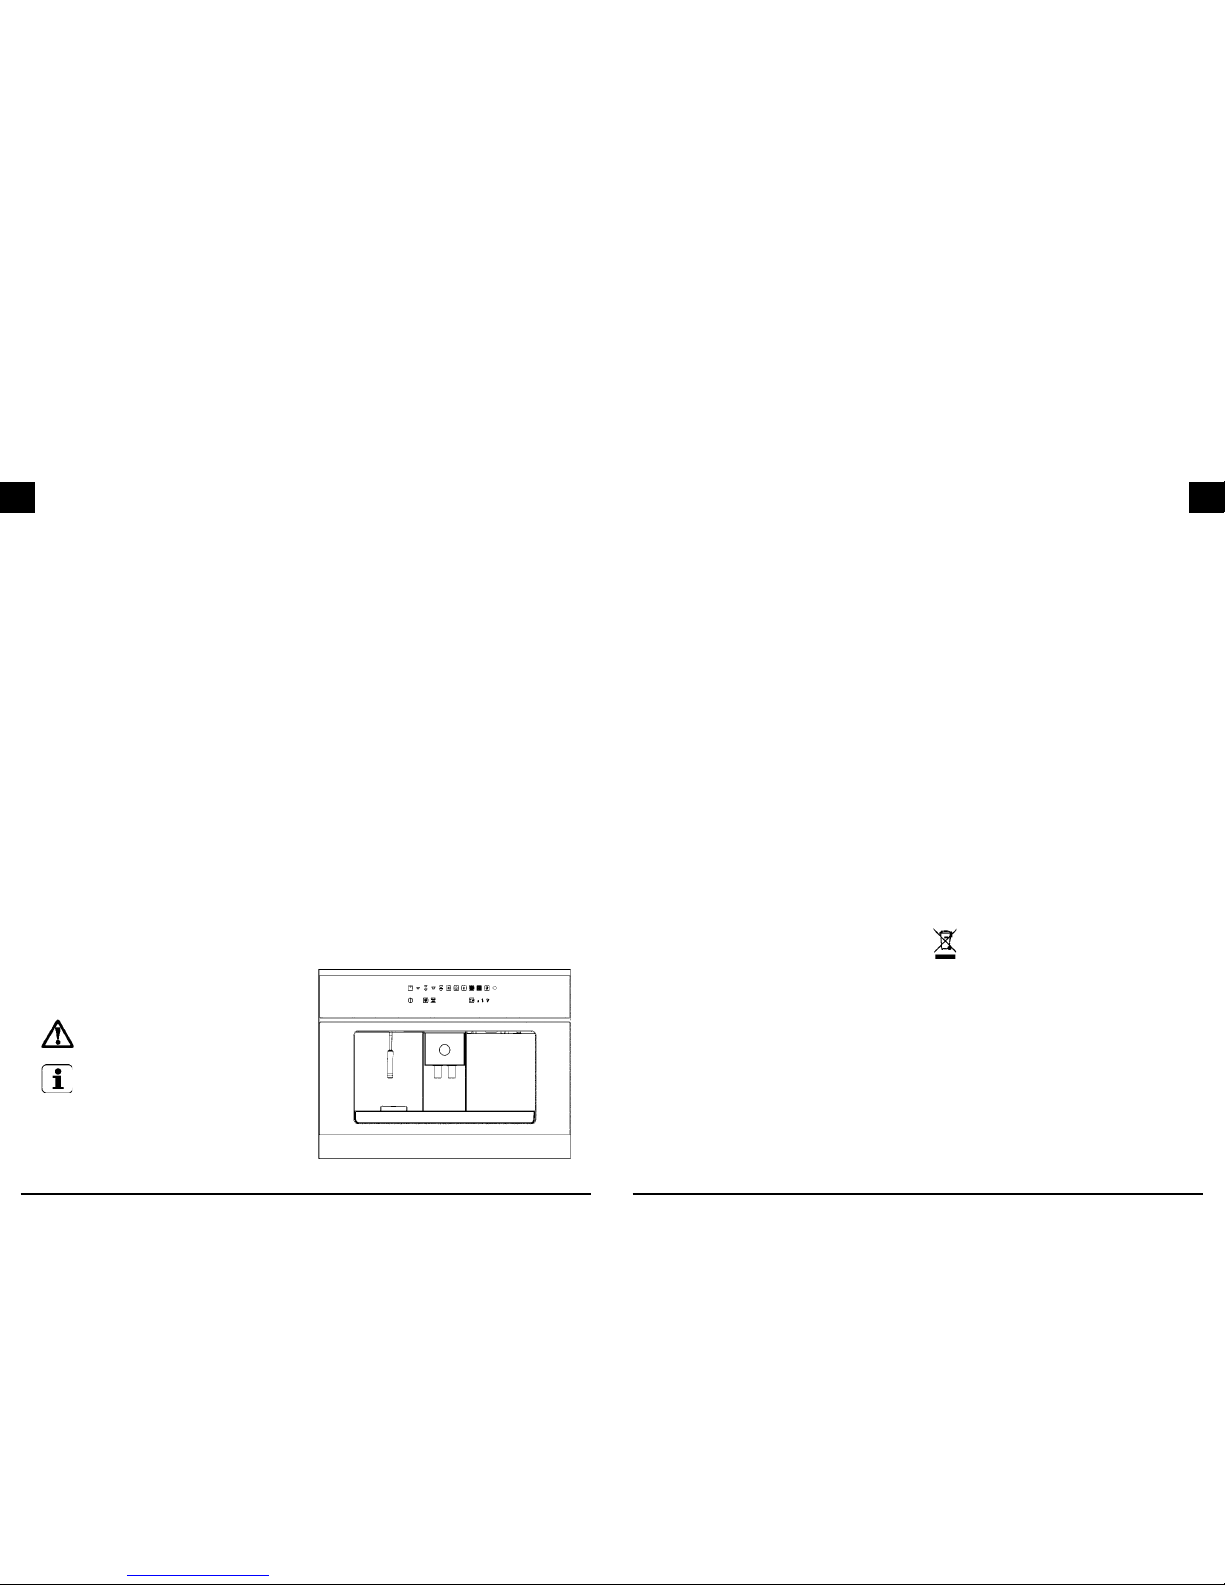
SYMBOLEN
Tijdens het lezen van de handleiding ziet u de volgende
symbolen:
LET OP: Belangrijke aanwijzingen voor het
veilig en correct gebruik van de machine
informatie die nuttig is voor het optimaal
gebruik van de apparatuur.
1. VOOR UW VEILIGHEID
Hoewel de machine eenvoudig te gebruiken is, is het
belangrijk de gehele gebruiksaanwijzing door te lezen
voor het installeren en/of voordat u de eerste keer de
machine gaat gebruiken. Door dit te doen, zult u de
beste prestaties krijgen, fouten vermijden, gebruikt u
de machine in absolute veiligheid en beschermt u het
milieu.
Gebruik
• Deze machine mag alleen door volwassenen worden
gebruikt. Andere-validen personen kunnen alleen
gebruik maken van de machine als er een persoon
toezicht houdt, verantwoordelijk voor hun veiligheid,
die toezicht houdt op het gebruik van de machine.
• Zorg ervoor dat kinderen de tiptoetsen niet kunnen
aanraken, of met de machine kunnen spelen.
• Deze machine is bedoeld voor thuisgebruik, elk
ander gebruik wordt beschouwd als oneigenlijk en
dus gevaarlijk. Ook zal dan de garantie geheel
vervallen.
• Houd de machine schoon.
• Het is gevaarlijk de kenmerken en eigenschappen
aan te passen van dit product.
• De blootgestelde delen van deze machine kunnen
heet worden en blijven tijdens de werking, en een
bepaalde tijd nadat het is uitgeschakeld. Houd
kinderen uit de buurt totdat de machine is afgekoeld.
• Raak geen hete oppervlakken aan, maar gebruik de
handgrepen of knoppen.
• Zorg ervoor dat de machine is losgekoppeld van het
lichtnet voordat u enig onderhoud of reiniging doet.
• Als de machine stuk gaat, probeer het niet zelf
te repareren. Reparaties die door niet bevoegde
personen worden verricht kunnen leiden tot schade
en ongelukken. Raadpleeg de inhoud van dit boekje.
Als u niet de informatie kunt vinden die u nodig hebt,
neem dan contact op met het Boretti service center.
Deze machine mag alleen worden onderhouden
door een erkend Service Centre. Vraag altijd om
het gebruik van originele onderdelen.
• De producten die deze machine produceert zijn heet
en kunnen brandwonden veroorzaken.
Installatie en het onderhoud
• Na het uitpakken van de machine, controleer dan of het
product niet beschadigd is en het netsnoer in perfecte
staat is. Zo niet, neem dan contact op met de verkoper
voordat u de machine in gebruik neemt.
• Het verpakkingsmateriaal (plastic zakken, piepschuim,
enz.) mogen niet binnen bereik van kinderen komen,
omdat zij potentieel onveilig zijn.
• Controleer voor gebruik of de spanning en het
vermogen dat vermeld wordt op het typeplaatje van
de machine overeenkomen met de lijn waarop het zal
worden aangesloten. U dient er ook voor te zorgen
dat het gebouw een eciënte aarde en een geschikte
stroomonderbreker heeft.
• Elke reparatie moet worden uitgevoerd door
gespecialiseerd personeel.
• De fabrikant is niet aansprakelijk te stellen, indien
deze regels niet worden opgevolgd
2. AANBEVELINGEN VOOR BEHOUD
VAN HET MILIEU
Verpakking
Alle gebruikte verpakkingsmaterialen zijn recyclebaar
en veilig voor het milieu. Lever uw bijdrage aan de
bescherming van het milieu door de verpakking in de
daarvoor bestemde bakken toe doen.
Verouderde apparatuur
• Machines die zijn verouderd of niet meer
worden gebruikt, mogen niet worden weggegooid
in de prullenbak. Door middel van ecologische
scheiden kunnen de verschillende materialen
hergebruikt bij de productie van volgende
machines. Voor verder info kunt U contact opnemen
met de lokale autoriteiten of de ophaaldienst voor
huishoudelijk afval.
• Maak het product onklaar als u het weggooit, door
het elektriciteitssnoer door te snijden.
Het is erg belangrijk dit boekje te bewaren als toekomstig
naslagwerk. Indien de machine wordt verkocht of
weggegeven aan een nieuwe gebruiker, dan dient u
dit boekje er bij te geven, zodat de nieuwe gebruiker
zich kan inlezen in de werking van de machine en de
bijbehorende waarschuwingen.
Dit SYMBOOL op de bijgesloten documentatie
geeft aan dat dit product niet mag worden behandeld
als huishoudelijk afval, maar moet worden ingeleverd
bij een speciaal inzamelpunt voor de recycling van
elektrische en elektronische apparatuur.
Het afvoeren van dit apparaat dient te gebeuren conform
de lokale wetten voor afvalverwijdering.
Voor extra informatie over de behandeling, terugwinning
of recycling van dit product, kunt u contact opnemen met
de lokale autoriteiten de ophaaldienst voor huishoudelijk
afval, of de winkel waar u het product heeft gekocht.
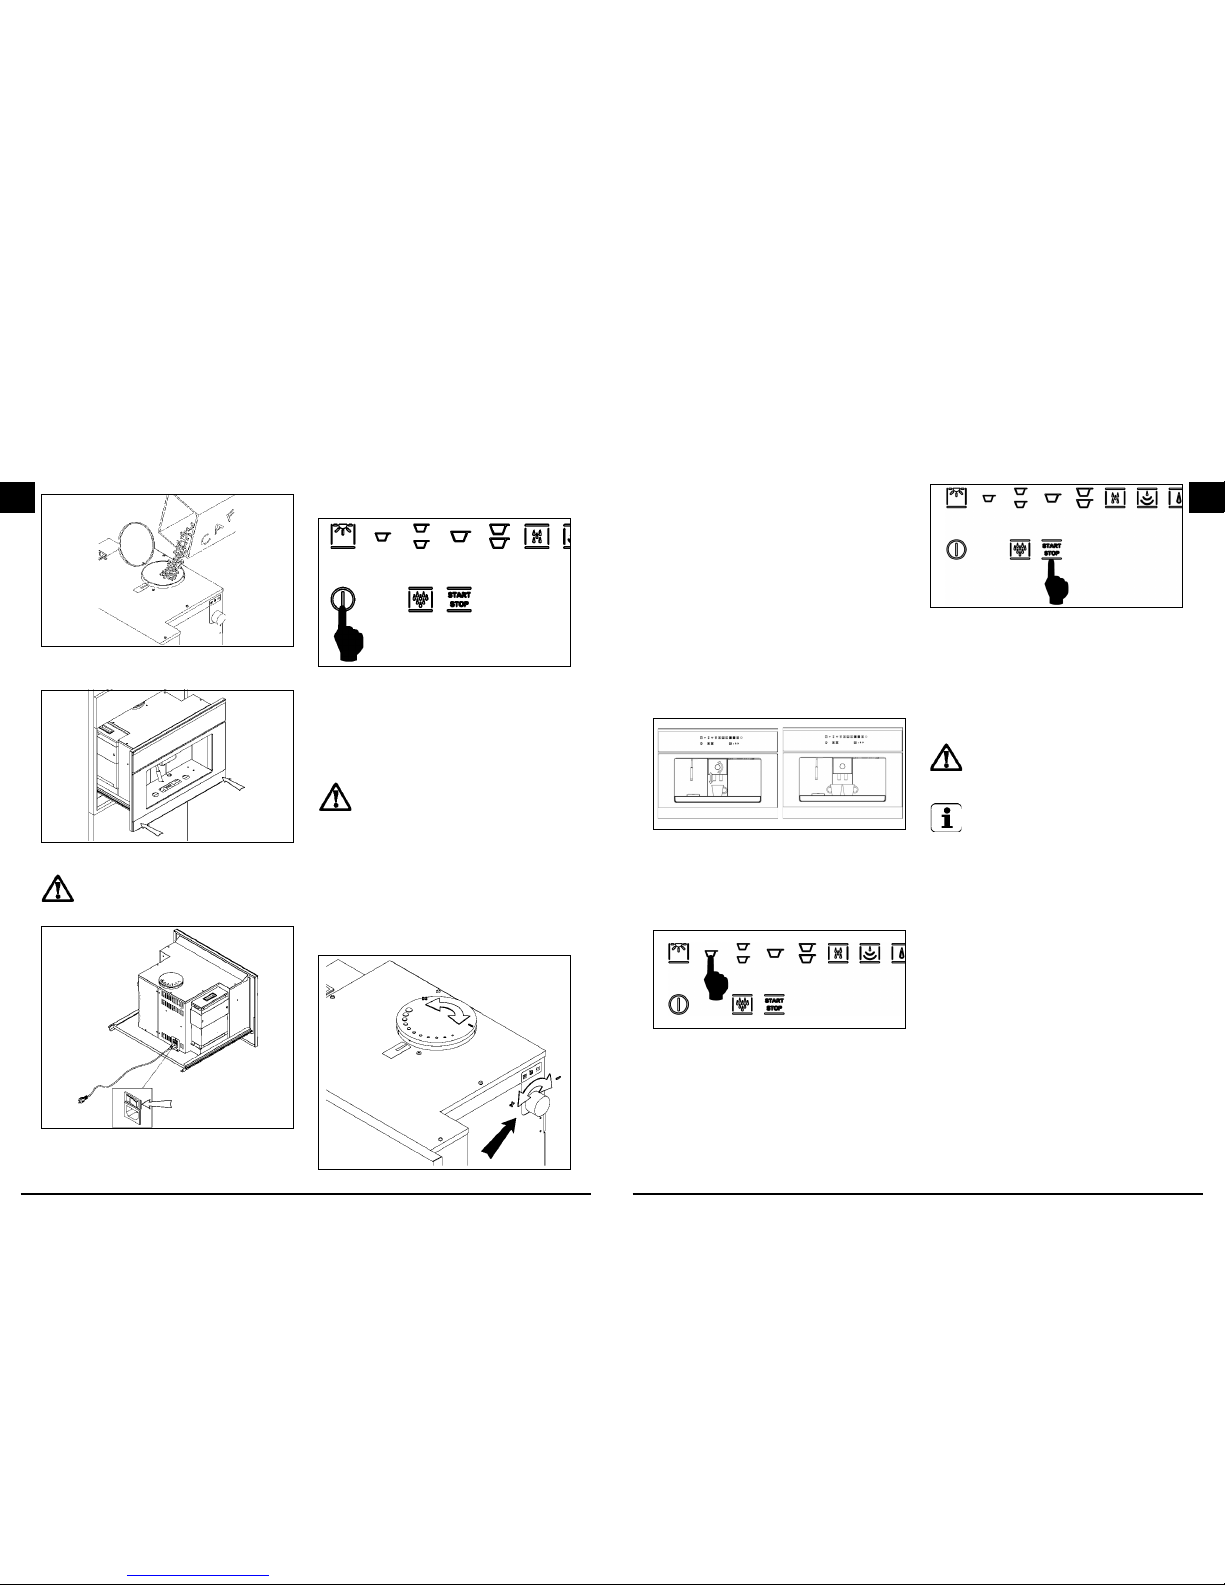
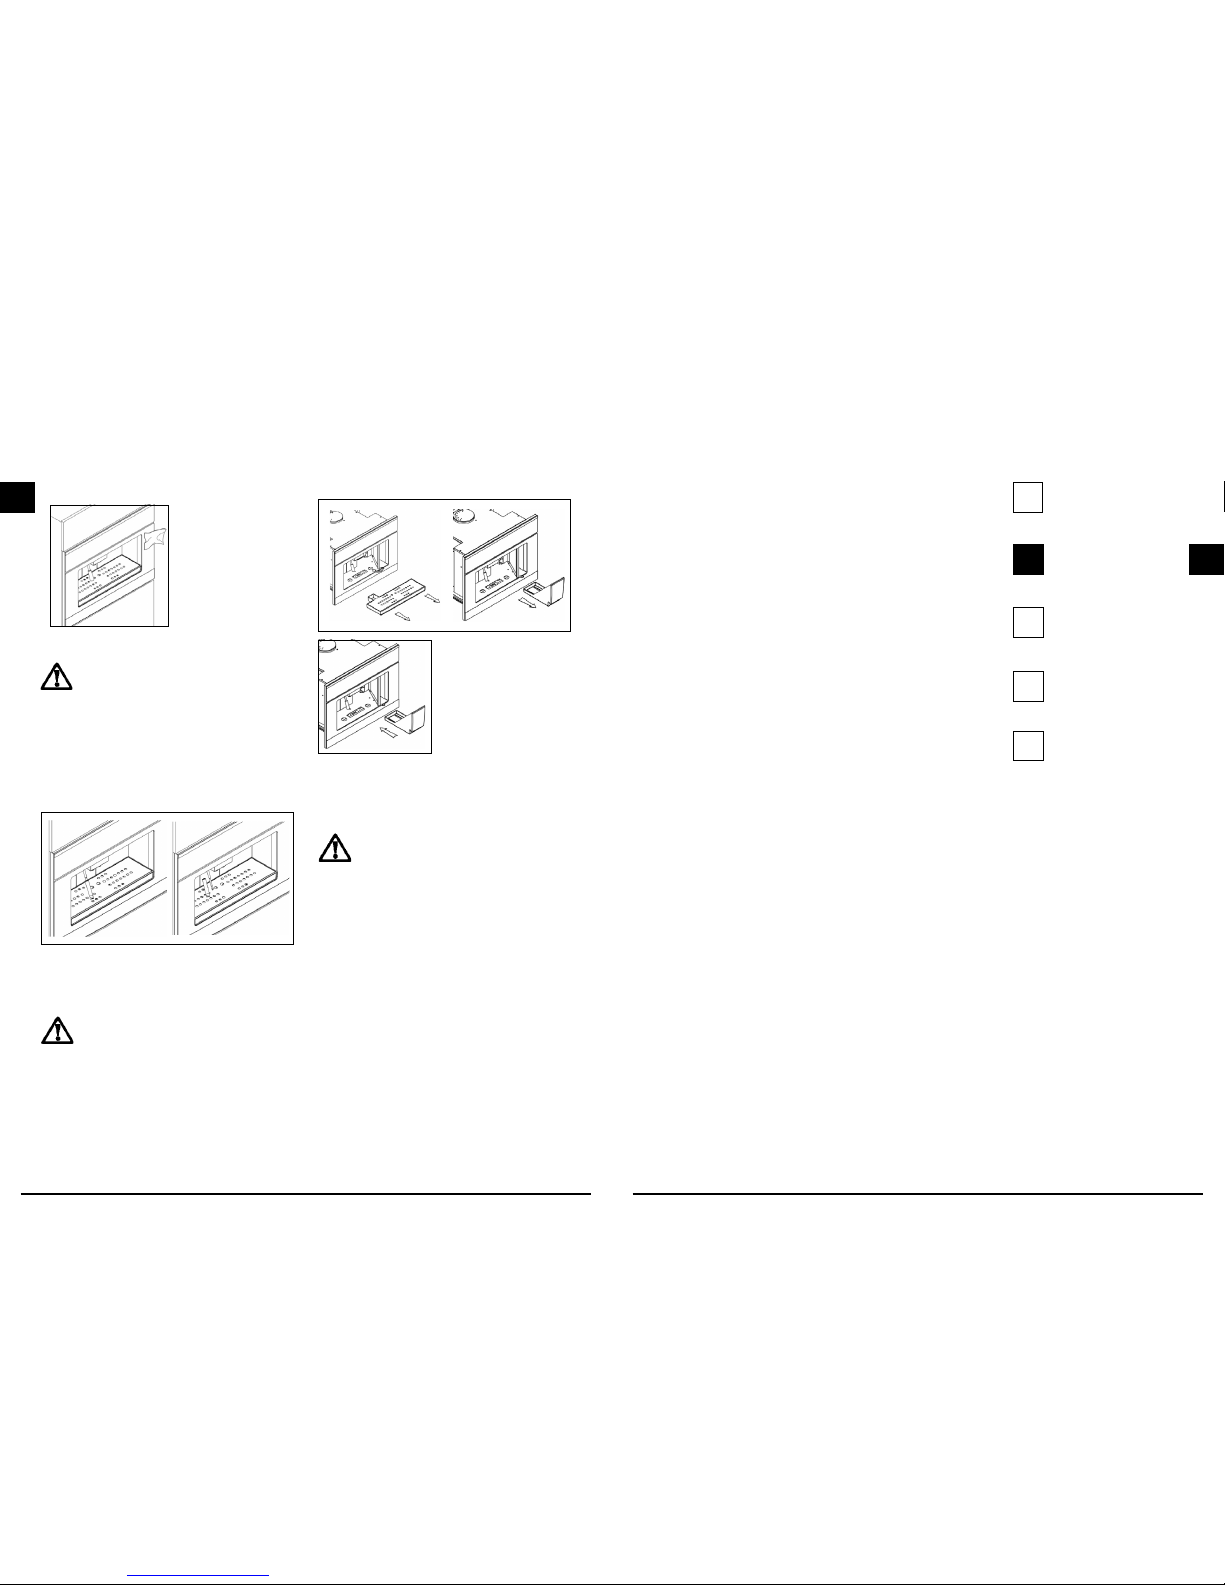
3. INSTALLALATIE VAN DIT APPARAAT
“BUILT-IN” INSTALLATIE IN MODULARE MEUBELS
Voor de goede werking van de machine in ingebouwde
modulaire meubels, moet in overeenstemming met de

6 7
NLNL
veiligheidsnormen, bescherming worden geboden tegen
contact met elektrische onderdelen en onderdelen
die zijn beschermd met functionele isolatie. Alle delen
die bescherming bieden, inclusief het voorpaneel
(bijvoorbeeld als u het apparaat plaatst aan het begin
of einde van een module), dan moet alles zo worden
vastgezet dat er geen gevaarlijke situaties kunnen
ontstaan.
Het is ook aan te raden het apparaat te installeren op
een bepaalde afstand van vriezers en koelkasten, omdat
de warmte afgifte van dit apparaat van invloed kan zijn
op de werking.
De machine moet worden geïnstalleerd in
compartimenten die 460 mm hoog zijn en tussen de 560
en 568 mm breed. De volgende installatie componenten
worden geleverd met de machine:
1. Vaste ondersteuning van
de machine.
2. N ° 13 zelf tappende
schroeven 3.9X19
3. N ° 1 vast netsnoer
4. N ° 2 zijgeleiders
5. N ° 2 laterale 1-mm platen
6. N ° 2 laterale 2-mm platen
Installatie van de machine
Plaats de vaste plaat die wordt meegeleverd op de juiste
plaats door deze te laten rusten op de bodem van het
meubel.
Plaats de zijplaten die nodig zijn om te compenseren
voor eventuele lege ruimten. De breedte van het
compartiment waar de machine zich in bevindt, wordt
bepaald door de dikte van de zijden van het meubel.
Vier plaatjes worden geleverd om te compenseren
voor de verschillende diktes die verkrijgbaar zijn. Twee
van 2 mm dik en 2 van 1 mm. Ze worden gebruikt om
te compenseren voor de inwendige breedte van het
compartiment, om een meting van 562-560 mm te
verkrijgen.
Monteer vervolgens de 2 geleiders met behulp van de
overige 8 zelf tappende schroeven.
Plaats de machine
door het afstemmen
van de geleiders
met de steunen al
gemonteerd op het
apparaat.
Schuif het apparaat
geheel naar binnen, tot de
veiligheidstop klikt.
Elektrische aansluiting
Zet de aansluitkabel vast
tegen de linker zijkant van de
kast, met de houtschroeven,
die zijn meegeleverd, en
bevestig de kabel zoals
aangegeven in het guur.
Maak het vaste snoer dat
aan de machine zit los.
Bevestig het netsnoer aan de
machine, zoals aangeven op de
tekening.
Sluit het netsnoer
aan, zoals getoond in
de afbeelding.
4. BESCHRIJVING VAN DE
KOFFIEMACHINE
1. Waterreservoir
2. Ontkalk lter
3. Dispencer koe
4. Water / stoom afgiftemond
5. Lekbakje
6. Koebonenreservoir
7. Malingsgraad regel knop
8. Bedienpaneel
9. Deur / lade voor het legen van de verbruikte koe
5. TECHNISCHE KENMERKEN
Breedte 594 mm
Diepte 475 mm
Hoogte 445 mm
Tankinhoud 2.5 l
Netto gewicht 26 kg
Bruto gewicht 31 kg
Voedingsspanning 230 V
Nominaal vermogen 2000 W
Opgenomen vermoegen van de
verwarmingselementen
1700 W
Opgenomen vermogen van de pomp 50 W
werkdruk 12 bar

89
NLNL
Bedieningspaneel
Beschrijving van de knoppen en lampjes op het
bedieningspaneel.
Aan/uit knop
START/STOP knop
KOFFIE knop
Grote koe knop
WATER knop
GEEN WATER alarm
Koe afvalbak vol alarm
ALGEMEEN ALARM
REINIG knop
LICHT knop
DUBBELE KOFFIE knop
GROTE DUBBELE KOFFIE knop
STOOM KNOP
VERVANG FILTER alarm
KOFFIE SONDE gebroken alarm
Koe sterkte regeling
MINDER STERKE koe
NORMALE koe
STERKE koe
6. BESCHRIJVING VAN HET BEDIENINGSPANEEL; DE TIPTOETSEN. De exclusieve eigenschap van dit model is het
gebruik van touch-control-technologie. Raak het
gebied van het symbool aan en de machine zal
de bijbehorende functie uitvoeren. U zult merken dat
u een lichte druk op de vinger moet uitoefenen om de
controles te activeren. Dit is dit om te voorkomen dat per
ongeluk commando’s worden gegeven.
7. EERSTE GEBRUIK
Vul het waterreservoir
Fig. 7.1 Verwijder het lekbakje van zijn plaats
Fig. 7.2 Knijp de twee hendels naar elkaar toe onder het
afvalbakje, en trek de machine naar U toe, zoals in de
guur
Fig. 7.3 Trek de koemachine uit het meubilair door
hem naar buiten te laten glijden over de rails.
Fig.7.4 Plaats voor het vullen van het waterreservoir
het ontkalklter op zijn plaats, en controleer of het
ontkalklter te minste 20 minuten werd geweekt in koud
water (volg de instructies op het lterpakket). Na het
weken, plaatst u deze op zijn plaats in de tank, zoals
weergegeven in de guur, totdat je een klik hoort.
Als het apparaat een lange tijd niet is gebruikt , dient u
het water in de tank te vervangen. Het lter kan worden
gekocht bij een witgoed winkel, onze Service Centers of
bij erkende (online) reserveonderdelen winkels.
Fig. 7.5 Verwijder de water tank, zoals op de tekening te
zien is, en vul deze met drinkwater ( ongeveer 2,5 liter).
Fig. 7.6 Plaats de tank terug in de machine, waarbij de 2
aansluitingen in de bodem goed in elkaar moeten vallen.

10 11
NLNL
Vul het reservoir met koffiebonen
Fig. 7.7 Giet ongeveer 200 gram koebonen in het
reservoir en sluit het deksel.
Fig. 7.8 Duw de machine terug in de behuizing, tot u
“klik”hoort.
Let op: Kijk voor u bonen in de machine giet,
of het reservior leeg is!
Het inschakelen vanuit stand-by modus
Fig. 7.9 Trek de machine uit de behuizing.
Zet de hoofdschakelaar, op de achterkant van de
machine op “1”.
Nadat u de machine weer in de behuizing heeft
geschoven, is hij klaar voor gebruik.
Fig. 7.10
Om de stand-by mode te verlaten,, druk op de aan/uit
knop, zoals aangegeven in Fig. 7.10. De LED verlichting
gaat knipperen totdat de machine gereed is. Nu zullen
alle LEDs voor de verschillende opties branden.
Opmerking: Als de machine 45 min. achter elkaar niet
gebruikt wordt, zal deze terug schakelen naar stand-by.
Regeling van de koffie maling
LET OP: de fijnheid van de koffie maling
wordt in de fabriek afgesteld.
Deze jnheid van de koeboonmaling heeft een sterke
invloed op de kwaliteit en smaak van koe. Te “grof”
produceert koe die snel stroomt zonder romigheid
en body. Anderzijds, te jn gemalen koe produceert
koe die “druppelt” met een zeer intense smaak en
een “verbrande” geur. Houd er rekening mee dat
het produceren van een kopje espresso van 15 tot
30 seconden duurt. Om de jnheid van de maling te
regelen, moet u de machine uit de kast trekken, zoals
aangegeven in de guren 7.1 tot 7.3. Draai de regel
knop naar links of rechts, zoals getoond in Fig. 7.11.
Als u de knop met de klok mee draait krijgt u een jnere
maling en sterkere koe. Tegen de klok in krijgt u
grovere maling en minder sterke koe. De maalgraad is
af te lezen op de deksel van het reservoir.
Reinigingsfunctie
De reinigingsfunctie wordt ingeschakeld zodra het
apparaat wordt aangezet, of als deze uit de stand-by
functie komt en opwarmt. De corresponderende LED
licht op. Door eerst op de reinigings knop en daarna op
Start te drukken, start U een wasbeurt,. Als een van de
drankafgifte toetsen wordt ingedrukt, gaat de reinigings
led uit.
8. KOFFIEAFGIFTE
Plaats een kopje onder het afgifte punt. Verstel met de
draaiknop naar behoefte de hoogte van de afgifte-kop,
zoals weergegeven in Fig. 8.1.
Fig. 8.1
Als u 2 kopjes koe tegelijk wilt maken, plaats u ze
samen onder de afgifte-kop.
In de rest van de paragraaf spreken we steeds over
bereiding van 1 kop koe.
De procedure is gelijk aan die van 2 kopjes
koe. Extra sterke koe en 2 extra sterke koe.
Fig. 8.2
Druk op de knop passend voor de selectie die u wilt. (in
Fig. 8.2 is dit espresso koe).
Fig. 8.3
Druk binnen 10 seconden op de START/STOP knop
van uw keuze en wacht op de bereiding van uw koe.
De bereiding eindigt automatisch als de hoeveelheid
koe voor de selectie is bereikt. Deze hoeveelheid is
ingesteld in de machine, maar kan worden gewijzigd.,
zie hiervoor paragraaf 13.
U kunt de afgifte altijd stoppen door te drukken op de
START/STOP knop.
LET OP: als de start-knop niet wordt
ingedrukt binnen 10 seconden, wordt de
functie weer uitgeschakeld. Als u toch een
kop koffie wilt maken, moet u de procedure herhalen.
Nuttige tips voor het maken van een perfecte
espresso
• De afgifte tijd voor een perfecte espresso is zo’n 15-
30 seconden. De factoren die het afgeven van de
tijd beïnvloeden zijn de jnheid van de maling en de
hoeveelheid gemalen koe. Indien nodig kan de
jnheid van het maalsel en hoeveelheid gemalen
koe worden gewijzigd. (Zie hoofdstuk 7, eerste
gebruik).
• Koe is een hygroscopische stof, wat betekent dat
de kenmerken nauw verbonden zijn met het klimaat
(vochtigheid). Vergeet NIET de koffie grover te
malen als de lucht erg vochtig is en jner als de lucht
droger is.

12 13
NLNL
9. HEET WATERAFGIFTE
Om heet water te gebruiken, stelt u de water/stoompijp
zo dat uw kopje er onder past, zie Fig. 9.1
Fig. 9.1
• Plaats een kopje onder de water/stoompijp
• Druk op de water knop.
• Druk op de START knop binnen 10 seconden na het
maken van uw selectie. Het water zal worden
afgegeven zolang de knop wordt ingedrukt, om te
stoppen met het afgeven van water, laat u de
knop los.
LET OP: als de start-knop niet wordt ingedrukt
binnen 10 seconden, wordt de functie weer
uitgeschakeld. Als u toch een drank wilt
maken, moet u de procedure herhalen.
Wij adviseren u niet direct na het nemen van
stoom water te tappen.
10. STOOM AFGIFTE
Om stoomafgifte te starten, druk op de toets stoom. Het
bijbehorende controlelampje knippert gedurende 15
seconden.
Zodra het lampje stopt met knipperen en continu blijft
branden, is het apparaat klaar om stoom af te geven.
• Plaats de beker met de vloeistof die verwarmt moet
worden onder de stoompijp.
• Dompel de stoompijp in de te verwarmen vloeistof
• Toets de START knop binnen 10 seconden, na het
maken van uw keuze, en wacht tot de stoom komt.
Fig. 10.1
LET OP: als de start-knop niet wordt
ingedrukt binnen 10 seconden, wordt de
functie weer uitgeschakeld. Als u toch
een drank wilt maken, moet u de procedure
herhalen.
De stoom blijft vloeien totdat u de START knop
loslaat.
Als u bezig bent met melk voor een cappuccino, raden wij
u aan de melk rustig te bewegen voor betere resultaten.
11. PROGRAMMEREN VAN DE
HOEVEELHEID GEMALEN KOFFIE
U kunt 3 koe sterktes kiezen:
• Slap;
• Medium;
• Sterk.
Om van de ene naar de andere koesterkte te wisselen,
drukt u simpelweg de knop zoals aangegeven in Fig.
11.1. de LED voor de geselecteerde koesterkte gaat
branden (in Fig. 11.2, slappe koe).
Fig. 11.1
Fig. 12.2
Fig. 12.3
• Druk de START/STOP knop nogmaals in, als de
gewenste hoeveelheid is bereikt.
Terug stellen naar de fabrieksinstellingen
Als de machine de fabriek verlaat, is deze
ingesteld op de afgifte van Italiaanse espresso
koe en normale koe.
• Als u de fabriekswaarden weer wilt terugstellen, dan
plaatst u de machine in Stand-by en drukt op de koe
instel knop gedurende 6 seconden.
• Alle LEDs, behalve aan/uit, knipperen gedurende 5
seconden; na die tijd is de machine terug gesteld naar
de fabriekswaarden. Zet de machine weer aan, en alle
koe selecties gebruiken nu de fabrieks instellingen.
• De standaard waarde beїnvloeden alleen de
hoeveelheid water die wordt gebruikt voor een enkele
koe.
ALLEEN VOOR GEVORDERDEN:
PROGRAMMEREN VAN DE MALING-TIJD
De tijd van het malen voor sterke koe is
programmeerbaar en medium en slappe koe worden
dienovereenkomstig gekalibreerd.
Om in de Programmeermodus te komen vanuit Stand-
by:
• Druk de START/STOP knop 5 seconden in; de LED
in de linkerbovenhoek licht op, om de maling-tijd aan
te geven;
• Om de tijd te verlengen, druk op de koe regel knop
en om de tijd te verkorten druk op de START/STOP
knop.
Als u klaar bent met aanpassen, Drukt u op de aan/
uit knop om de veranderingen te bevestigen, en de
programmeer modus te verlaten.
12. PROGRAMMEREN VAN DE
HOEVEELHEID KOFFIE
Alle koesoorten hebben een pre-set afstelling, behalve
voor water en stoom.
De machine is al in de fabriek gekalibreerd om de ideale
hoeveelheid koe te schenken.
Als uw drank wordt bereid, kunt u de bereiding stoppen
door op de START/STOP toets te drukken.
Als extra, kunt u de hoeveelheid water die wordt
afgegeven vergroten, door de START toets in te drukken.
Hiermee start u het geven van extra water. u kunt de
START toets maximaal 20 seconden ingedrukt houden.
De procedure voor het instellen van de hoeveelheid
water die wordt afgegeven bij koe en andere dranken,
is als volgt:
• Druk op de koeknop gedurende 5 sec. tot de LED
gaat knipperen.
Fig. 12.1
• Toets de START/STOP knop om afgifte te starten. De
twee LEDs knipperen voor de duur van de afgifte.

14 15
NLNL
13. VERLICHTING VAN HET AFGIFTE
COMPARTIMENT
De machine heeft LEDs voor het verlichten van het
afgifte compartiment. Om deze functie te activeren,
drukt u gewoon op de lichtknop zoals getoond in Fig.
13.1.
De licht functie is alleen beschikbaar wanneer het apparaat
ingeschakeld is en niet tijdens standby-modus.
14. WAARSCHUWINGEN EN ALARMEN
“Water is op” waarschuwing
Fig. 14.1
De machine heeft een sensor die controleert of er water
in de tank aanwezig is. Als er geen water meer is, zal de
machine het indicator licht aandoen en zal de machine
niet werken totdat de tank gevuld is.
“Vervang filter” waarschuwing
Fig. 14.2
Nadat de machine 80 liter water heeft afgegeven, gaat
de LED van de lter knipperen (pre-alarm), Fig. 14.2.
Nadat de machine 100 liter water heeft afgegeven, gaat
de LED van de lter constant branden (alarm).
Het vervangen van het lter is aan te bevelen binnen
3 maanden vanaf het moment dat de LED constant
brand
Om het alarm te resetten (of het pre-alarm), zet het apparaat
in de Stand-by stand, en houdt de START/STOP knop 5
seconden lang ingedrukt; de alarm LED zal uit gaan en de
waterhoeveelheid teller wordt naar 0 gereset.
Fig. 14.3
Verplicht reinigen en “Koffie opvangbak vol”
waarschuwing.
Fig. 14.4
Na het afgeven van 10 kopjes koe, gaat het
reinigingslampje in g 14.3 constant rood branden. Tevens
zal de “koe opvangbak vol” indicatie in gif 14.4 rood
knipperen. Deze situatie blijft zo, ook al wordt de machine
aan- en uit gezet.
Voordat U de machine weer kunt gebruiken moet U
de machine reinigen, door ALLEREERST de START/
STOP in te drukken, met een leeg kopje onder het
afgifte punt om het water op te vangen. NA het
reinigen opent U de koffie opvangbak en ledigt
deze. Tijdens het reinigen knippert de START/STOP
indicatie rood, na het reinigen gaat deze uit.
Voor het legen van de lade van “gebruikt” koedik, zie
hoofdstuk 16 “REINIGING EN ONDERHOUD”.
“Koffie sonde gebroken” waarschuwing
Fig. 14.5
De machine heeft een functie die waarschuwt wanneer de
koe-eenheid sonde is gebroken.
Als de koe sonde niet goed werkt, zal de bijbehorende
LED knipperen.
probeer de machine te resetten, door deze uit en weer aan
te zetten.
LET OP: Als het alarm blijft bestaan, neem
dan contact op met de service dienst.
“Algemeen alarm” waarschuwing
Fig. 14.6
Fig. 14.6: Er is een aantal mogelijke oorzaken die de
machine in algemeen alarm zet:
• De automatische koe-afgifte-eenheid is
geblokkeerd;
• De beweging van de automatische
koeafgifte eenheid is fout gegaan;
• De deur voor het verwijderen van koedik
is nog open;
• Er wordt geen waterverbruik gesignaleerd
door de teller;
• De temperatuursonde werkt niet goed.
ALS HET ALGEMENE ALARM AFGAAT:
• Controleer of de deur voor de koedik opvang
dicht is.
• Controleer of er water in de tank zit.
Zet de machine uit en weer aan. Als de storing blijft
bestaan, bel dan de Boretti service dienst.
15. RECEPTEN
Italiaanse cappuccino
Dit is een normale espresso met een toevoeging van
melk, die verwarmd is met stoom, waardoor de smaak
van de koe romiger wordt en er een mooie schuimkraag
wordt gevormd. U serveert dit in een groot kopje. Plaats
de koude melk in de opschuimer, en gebruik de stoompijp,
indien aanwezig. Voeg de warme opgeschuimde melk toe
aan de espresso door deze voorzichtig te gieten. U kunt
ook een lepel gebruiken om de schuim te verplaatsen.
Boven op het schuim strooit u wat chocoladepoeder.
Weense cappuccino
Deze variant is het product van de eeuwenoude
Oostenrijkse traditie. Maak een grote espresso
(doorlooptijd 30-35 seconden). Voeg warme melk toe
en boven op komt slagroom. Het wordt geserveerd in
een kopje die tussen de espresso en cappuccino in zit.
Garneer met chocolade schilfers.
Koude espresso gekoeld in een shaker.
Schuimend en zeer verfrissend en daarmee een genot
als het warm weer is.
Bereid een espresso, voeg suiker toe en giet dit
onmiddellijk in een shaker met ijsblokjes. Schud
gedurende enkele seconden. Het wordt geserveerd in
een glas.
Ierse koffie/Irish coffee
Een energieke “pick-me-up”. In een groot, verwarmd
glas, meng acht delen hete koe, een deel whisky en
rietsuiker. Voeg verse slagroom toe, door dit over het
onderste gedeelte van een lepel te laten vloeien. Dit leidt
tot een dunne laag koel slagroom op de koe.
Mexicaanse koffie
Intens en exotisch.
Meng wat slagroom, een theelepel kaneel, een snue
nootmuskaat en suiker.
Giet een theelepel chocolade-siroop in een medium
beker, voeg een beetje kaneel en de koe toe en meng
goed. Garneer met een theelepel vanillesmaak crème.
Cappuccino ijs
Verwarm In een pan twee kopjes espresso, ¾ kopje
slagroom en ½ kopje suiker en breng dit aan de kook.
Wanneer de inhoud van de pan lauw is, plaatst u deze in
de vriezer voor 4-5 uur.
Leg twee of drie bollen in een schaal en garneer met
geroosterde koebonen.
Laat het geheel 30 min in de koelkast afkoelen voor het
serveren.

17
EN
16
NL
16. REINIGING EN ONDERHOUD
Fig. 16.1
LET OP: de machine nooit onderdompelen in
water om te reinigen.
Externe onderdelen
De externe onderdelen van de machine moeten worden
gereinigd met een zachte doek en zonder het gebruik
van agressieve reinigingsmiddelen. Maak de metalen
delen niet schoon met een schuursponsje of schurende
sponsjes. Goed afdrogen met een zachte doek.
Stoompijpje
U moet de stoom pijp regelmatig demonteren en schoon
maken. De pijp kan van binnen vies worden wanneer
u warme melk maakt voor cappucino. om dit te doen
demonteerd U de stoompijp zoals aangegeven in de
tekening.
LET OP: bij het schoonmaken van het
mondstuk, dient u altijd de machine uit te
zetten en vergeet niet minstens 20 minuten
te wachten alvorens de machine weer te gebruiken
omdat deze moet koelen, dit om brandwonden te
voorkomen.
Lekbakje
Verwijder de lekbak uit de machine, op de aangegeven
manier.
Leeg regelmatig de lekbak, om te voorkomen dat deze kan
overstromen, en uw meubilair kan beschadigen. Het bakje
en metalen rooster mogen in de vaatwasmachine
Fig.16.3
Het legen van gebruikte
koffiedik
Om de verbruikte koedik
te kunnen verwijderen, moet
U eerst de lekbak uit nemen
zoals te zien op tekening 16.3,
en 16.4.
Fig 16.4
Neem de lade uit, verwijder de koedik opvangbak en
reinig deze.
Schuif de bak terug in de machine. De machine moet
minimaal 15 sec. openstaan.
LET OP: Zet voor het legen van de lade de
machine uit om te voorkomen dat u zich kunt
branden aan hete delen.
Watertank
• Als u de machine gedurende langere tijd niet heeft
gebruikt, adviseren wij u het water te verversen.
• Reinig regelmatig de watertank (kalk afzetting)
• De watertank mag in de afwasmachine
• Als u het Brita antikalk lter gebruikt, raden wij u
aan deze te vervangen na iedere 2000 kopjes koe
of minimaal 1x per 6 maanden.
17. PROBLEMEN
De gebruiker moet goed controleren of een probleem niet
wordt veroorzaakt door:
• Geen electriciteit
• Geen water in de tank
• Geen koebonen in de machine
• Foutief terug plaatsen van de koedik houder
Als dit allemaal goed is, en uw machine werkt nog niet, belt
u dan met de Boretti service dienst.
THIS PRODUCT IS DESIGNED FOR DOMESTIC USE.
THE MANUFACTURER DECLINES ALL
RESPONSIBILITY FOR DAMAGES TO THINGS
OR PEOPLE DERIVING FROM INCORRECT
INSTALLATION OR IMPROPER, ERRONEOUS OR
UNSUITABLE USE.
THE APPLIANCE MUST NOT BE USED BY PEOPLE
(INCLUDING CHILDREN) WITH PHYSICAL,
SENSORIAL OR MENTAL IMPAIRMENTS, OR BY
PEOPLE WITHOUT THE NECESSARY EXPERIENCE
OR KNOWLEDGE, UNLESS THEY ARE SUPERVISED
OR INSTRUCTED IN THE USE OF THE APPLIANCE
BY A PERSON RESPONSIBLE FOR THEIR SAFETY.
CHILDREN MUST BE SUPERVISED TO ENSURE
THAT THEY DO NOT PLAY WITH THE APPLIANCE.
Dear Customer,
we would like to thank you and congratulate you on your
choice.
This new product has been carefully designed and built
using top quality materials, and meticulously tested to
ensure that it meets all your culinary requirements.
Please read and observe these simple instructions, which
will enable you to achieve excellent results from the very
rst time you use it. This state-of-the-art appliance comes
to you with our very best wishes.
THE MANUFACTURER
Italiano
I
EN English
FR Français
DE Deutsch
NL Nederlands

18 19
ENGB
CONTENTS
1. FOR YOUR SAFETY
• During use
• For installation and maintenance
2. RECOMMENDATIONS FOR THE PROTECTION OF
THE ENVIRONMENT
• Packing
• Obsolete equipment
3. INSTALLATION
• Installation in modular furniture
• Components for the installation of the machine
• Installation of the machine
• Electrical connection
4. DESCRIPTION OF THE COFFEEMAKER
5. TECHNICAL CHARACTERISTICS
• Fuses
6. DESCRIPTION OF THE CONTROL PANEL TOUCH
BUTTONS
7. FIRST USE
• Fill the water tank
• Fill the container with coee beans
• Turning on the machine in standby mode
• Regulation of the ground coee
• Wash function
8. DISPENSING COFFEE
9. DISPENSING HOT WATER
10. DISPENSING STEAM
11. PROGRAMMING THE QUANTITY OF GROUND
COFFEE
12. PROGRAMMING THE QUANTITY OF HOT
WATER
• Restoring the factory settings
13.ILLUMINATION OF THE DISPENSING
COMPARTMENT
14. WARNINGS AND ALARMS
• No water warning
• Replace lter warning
• Coee grounds warning
• Coee probe broken warning
• Generic alarm warning
15. RECIPES
• Italian Cappuccino
• Viennese Cappuccino
• Cold Espresso Chilled in a Shaker
• Irish coee
• Mexican Coee
• Cappuccino Ice Cream
16. CLEANING AND MAINTENANCE
• External parts
• Steam nozzle
• Drip basin
• Emptying used coee grounds
• Water tank
17. TROUBLESHOOTING
18. SERVICE, REPLACEMENT PARTS AND
WARRANTY
SYMBOLS
Durante la lettura del manuale vi capiterà di incontrare i
seguenti simboli:
ATTENTION: important instructions for the safe
and correct use of the machine
information useful for the optimal use of the
equipment.
1. FOR YOUR SAFETY
Although the machine is simple to use, it is important
that you read the entire booklet before installing or
using the machine for the first time. By doing so, you will
achieve the best performance, avoid mistakes, use the
machine in absolute safety and protect the environment.
During use
• This machine must only be used by adults. Other-
abled persons can use the machine only if there is a
person responsible for their safety that will supervise
and instruct them in the use of the machine.
• Makesurethatchildrendonottouchthecontrolsor
play with the machine.
• This machine is intended for home use; another
other use is considered improper and, therefore,
dangerous.
• Always keep the machine clean.
• It isdangerous tomodify, orattempt tomodify, the
characteristics of this product.
• The exposed parts of this machine get hot during
operation and remain hot for a certain period of time
after it is turned o. Keep children away until the
machine has cooled.
• Do not touch the hot surfaces during use but use the
knobs or handles.
• Make sure the machine is disconnected from the
electric mains before any maintenance or cleaning.
• If the machine breaks, do not try and repair it yourself.
Repairs made by unqualied persons can cause
damage and accidents. Consult the contents of this
booklet. If you don’t nd the information you need,
contact the nearest service centre. This machine
must be serviced by an authorised Service Centre.
Always request the use of original replacement parts.
For installation and maintenance
• After unpacking the machine, check that the product
has not been damaged and that the power cord is
in perfect condition. If not, contact the reseller before
operating the machine.
• The packing materials (plastic bags, styrofoam, etc.)
must not be left within the reach of children because
they are potentially dangerous.
• Before use, check that the voltage and power listed
on the machine’s nameplate match the line to which
it will be connected. Also make sure that the building
has an ecient earth line and a suitable circuit
breaker.
• Any service must be performed by specialised
personnel.
• Themanufacturerwillnotbeliableiftheserulesare
not followed.
2. RECOMMENDATIONS FOR THE
PROTECTION OF THE ENVIRONMENT
Packing
All packing materials used are safe for the environment
and recyclable. Please make your contribution to
protecting the environment by disposing of the packing
in the appropriate recycling bins.
Obsolete equipment
• Machines that are obsolete or no longer used should
not be thrown away in the trash. Through ecological
disposal, the various materials used in the production
of your machine can be recovered.
• Ask your specialised reseller or your city administration
about disposal options.
• Before scrapping the machine, cut the power cord to
make it unusable.
It is very important to keep this instruction booklet for
future consultation. If the machine is sold or given to
another person, make sure to give the booklet to the new
user so that they will be informed about the operation of
the machine and the relative warnings.
This symbol on the product or packaging means
that the product must not be thrown away in household
waste but must be taken to a collection point for recycling
electrical and electronic equipment. By disposing of this
product properly, you will avoid potential damage to the
environment and health caused by the incorrect disposal
of the product. For more detailed information about
recycling this product, contact your city administration,
local waste disposal service or the store where you
purchased it.
3. INSTALLATION OF THE MACHINE
“BUILT-IN” INSTALLATION IN MODULAR
FURNITURE
For the good operation of the machine when built-
in to modular furniture, the latter must have suitable
characteristics.
In conformity with safety standards, protection against
contact with electrical parts and parts protected with
just functional insulation must be provided through the
correct housing of the machine.
All the parts that provide protection, including any
covering panel (for example, if the machine is positioned
at the end or beginning of the modules), must be
fastened in such a way that they cannot be removed
with the aid of a tool.
It is also a good idea to install the machine at a certain
distance from refrigerators or freezers because the heat

20 21
ENGB
it emits could aect their operation.
Components for the installation of the machine
The machine must be installed in compartments that are
460 mm high and between 560 and 568 mm wide. The
following installation components are supplied with the
machine.
1. Fixed support of the machine.
2. N°13 self-threading screws 3.9X19
3. N°1 xed power cord
4. N°2 lateral guides
5. N°2 lateral 1-mm plates
6. N°2 lateral 2-mm plates
Installation of the machine
Position the xed part provided
by resting it on the surface of
the furniture
Insert the side plates needed to compensate for any
empty spaces. The width of the compartment that
houses the machine is determined by the thickness of
the sides of the furniture. Four plates are supplied to
compensate for the dierent measures obtainable, two
that are 2 mm thick and two that are 1 mm thick. They
are used to compensate for the internal width of the
compartment to obtain an measurement of 562-560 mm.
Then mount the 2 guides
using the remaining 8
self-threading screws.
Insert the machine
by matching up
the guides with the
supports already
mounted in the
compartment.
Slide it all the way in until the
safety stops click.
Electrical connection
Fasten the power to the left
side of the compartment
using one of the self-
threading wood screws
provided and the xed cord
as indicated in the gure.
Loosen the xed cord
mounted on the machine.
Tighten the power cord on the
machine, as shown in the gure.
Connect the power
cord as shown in the
gure.
4. DESCRIPTION OF THE
COFFEEMAKER
1. Water tank
2. Decalcifying lter
3. Dispenser
4. Water/steam dispensing nozzle
5. Drip basin
6. Coee container
7. Grind regulation knob
8. Control panel
9. Door/tray for emptying the coee grounds
5. TECHNICAL CHARACTERISTICS
Width 594 mm
Depth 475 mm
Height 445 mm
Tank capacity 2.5 l
Net weight 26 kg
Gross weight 31 kg
Power supply voltage 230 V
Rated power 2000 W
Power absorbed by the heating
elements
1700 W
Power absorbed by the pump 50 W
Operating pressure 12 bar

22 23
ENGB
Control panel
Description of the buttons and indicator lights on
the control panel.
ON/OFF button
START/STOP button
COFFEE button
STRETCHED COFFEE button
WATER button
NO WATER alarm
GROUNDS PRESENT alarm
GENERIC ALARM
WASH button
LIGHT button
DOUBLE COFFEE button
DOUBLE STRETCHED COFFEE
button
STEAM button
REPLACE FILTER alarm
COFFEE probe broken alarm
COFFEE regulation
LIGHT COFFEE
MEDIUM COFFEE
STRONG COFFEE
6. DESCRIPTION OF THE CONTROL PANEL: TOUCH BUTTONS The exclusive feature of this model is the use
of touch-control technology. Just touch the area
of the symbol and the machine will perform the
corresponding function. However, you will notice that
you must exert slight pressure to activate the controls,
just like a normal button; this is to avoid accidental
commands.
7. FIRST USE
Fill the water tank
Fig. 7.1 Remove the drip basin from its seat
Fig. 7.2 Press the unlocking lever under the drip basin
and pull the machine towards you as shown in the gure.
Fig. 7.3 Pull the coeemaker out of the furniture by
sliding it on its guides.
Fig.7.4 Insert the decalcifying lter in its seat.
Before lling the water tank, make sure that the
decalcifying lter was soaked in cold water for at least
20 minutes (in any case, follow the instructions on the
lter package). After soaking, insert it in its seat inside
the tank, as shown in the gure, until you hear a click.
If the machine has not been used in a long time, we
recommend changing the water in the tank.
The lter can be purchased at an appliance store, our
Service Centres or at authorised replacement parts
stores.
Fig. 7.5 Remove the water tank as shown in the gure
and ll it with drinking water (about 2.5 litres).
Fig. 7.6 Put the tank back in its seat, taking care to
match up the two connections on the bottom.

24 25
ENGB
Fill the container with coffee beans
Fig. 7.7 Pour about 200 g of coee beans in the coee
container.
Fig. 7.8 Push the machine back into the compartment
until you hear a “CLICK!”, which means it’s locked into
place.
ATTENTION: before pouring beans into the
grinder, make sure that there are no foreign
bodies in the coee.
Turning on the machine in standby mode
Fig. 7.9 Pull out the machine.
Turn the main switch, located on the back of the
machine, to position “1”.
After you push the machine back into the furniture, it is
ready to use.
Fig. 7.10
To exit standby mode, you must press the on/o button,
as shown in Fig. 8.10. The LED will begin to ash until
the machine is “ready”. At this point, all the LEDs for the
various services will be lit.
NOTE: If the machine is not used for 45 minutes, it
returns to standby mode.
REGULATION OF THE GROUND COFFEE
ATTENTION: The neness of the coee grind is
calibrated at the factory.
This neness has a strong inuence on producing good
coee. Too “coarse” a grind produces coee that ows
quickly without creaminess and body. On the other hand,
too ne a grind produces coee that “drips” with a very
intense taste and a “burned” smell. Keep in mind that
producing a cup of espresso coee takes from 20 to 30
seconds.
To regulate the grind, you must pull out the machine as
shown in gures 8.1 to 8.3. Turn the regulation knob on
the right side, as shown in Fig. 8.11.
Turning the knob clockwise produces a ner grind and
stronger coee. Turning the knob counter-clockwise
produces a coarser grind and lighter coee. The grinding
neness can be read on the cover of the container.
Wash function
The wash function is enabled after the machine is
powered on, or comes out of standby mode, and
warms up. The wash button lights. When you press the
WASH button and then the START button, the machine
performs a wash cycle.
If a beverage dispensing button is pressed, the wash
LED turns o.
8. DISPENSING COFFEE
Place a cup under the dispenser, adjust the height of
the dispenser nozzle with the handle: turning it raises or
lowers the nozzles, as shown in Fig. 9.1.
When you want a double coee, you can place two cups
under the dispenser at the same time.
The rest of the paragraph explains how to dispense
one coee. The procedure is similar for double coee,
stretched coee and two stretched coees.
Press the button for the selection you want (in Fig. 7.1 it
is espresso coee).
Press the START/STOP button within 10 seconds of
your selection and wait for the coee to be dispensed.
Dispensing ends automatically when the quantity of
coee for the selection has been reached. This quantity
is preset in the machine but can be changed, see
paragraph 13.
You can stop dispensing at any time by pressing the
START/STOP button.
ATTENTION: if the START button is not pressed
within 10 seconds, the function is disabled. If
you wish to dispense a beverage, you will have
to repeat the procedure.
USEFUL TIPS FOR PREPARING AN
EXCELLENT ESPRESSO
• The dispensing time for an excellent espresso is
about 15-25 seconds. The factors that inuence the
dispensing time are the neness of the grind and the
quantity of ground coee. If necessary, the neness of
the grind and dose of ground coee can be changed.
(See chapter 8, First use).
• Coee is a hygroscopic substance, which means that
its characteristics are closely linked to the climate
(humidity). So, remember to grind the coee coarser
when the air is very humid and ner when the air is
drier.

26 27
ENGB
9. DISPENSING HOT WATER
To dispense hot water, suitably position the water/steam
nozzles, see Fig. 10.1
• Position a container below the water/steam nozzle.
• Press the hot water button.
• Press the START button with 10 seconds from
making your selection. The water will be dispensed
as long as the button is pressed; to stop dispensing,
release the button.
ATTENTION: if the start button is not pressed
within 10 seconds, the function is disabled. If
you wish to dispense a beverage, you will have
to repeat the procedure.
We recommend that you do not dispense hot
water immediately after dispensing steam.
10. DISPENSING STEAM
To dispense steam, press the steam button. The
corresponding indicator light will ash for 15 seconds.
As soon as the indicator light stops ashing and remains
steady on, the machine is ready to dispense steam.
• Place the container with the liquid to be heated below
the steam nozzle.
• Completely immerse the nozzle in the liquid to be
heated.
• Press the START button within 10 seconds from
making your selection and wait for the steam to come
out.
ATTENTION: if the start button is not pressed
within 10 seconds, the function is disabled. If
you wish to dispense a beverage, you will have
to repeat the procedure.
The steam will continue to ow until you release the
START button.
If you are preparing milk for a cappuccino, we
suggest that you agitate the
milk container for better results.
11. PROGRAMMING THE QUANTITY OF
GROUND COFFEE
You can choose from three strengths of coee:
• light;
• medium;
• strong.
To change from one type of coee to the other, just
press the button as shown in Fig. 12.1. The LED for the
selected coee will light (in Fig. 12.2, light coee).
two LEDs ash for its duration.
• press the START/STOP button again when the
desired quantity is reached.
Restoring the factory settings
When it leaves the factory, the machine is calibrated
for Italian-style espresso coffee and German-style
stretched coffee.
• If you need to restore these standard values, you
must place the machine in standby and press the
coee regulation button for 6 seconds.
• You will see all the LEDs, except on/o, ash for 5
seconds; after that time, the board has stored the
default values.
• Press the on button and the selections will now use
the factory values.
The standard values are only relative to the
quantity of water necessary for each single
dose.
FOR EXPERT USERS ONLY:
PROGRAMMING THE GRINDING TIME
The grinding time for strong coee is programmable and
medium and light coee are calibrated accordingly.
To enter programming mode, when the machine is in
standby mode:
• press the START/STOP button for 5 seconds; the
LED s on the upper left line light up to indicate the
grinding time;
• to increase the time, press the coee regulation
button and to, decrease it, the START/STOP button.
At the end of the operation, just press the on/o
button to exit and conrm the changes.
12. PROGRAMMING THE QUANTITY OF
COFFEE IN THE CUP
All the cycles have a preset quantity, except for water
and steam.
The machine is already calibrated at the factory to
dispense the ideal quantity of coee for an espresso
cup.
While dispensing the beverage, you can stop dispensing
before the preset time by pressing the START/STOP
button.
In addition, while dispensing the beverage, you can
obtain a greater quantity than the preset by holding
down the START key continuously within 3 seconds
from the end. This activates the dispensing of additional
beverage until the button is released, up to a maximum
of 20 seconds.
The procedure for programming the quantity of coee,
and other beverages, in the cup is as follows:
• press the coee key for 5 seconds until the LED
ashes.
• press the START/STOP key to start dispensing. The

28 29
ENGB
13. ILLUMINATION OF THE DISPENSING
COMPARTMENT
The machine has LEDs for illuminating the dispensing
compartment. To activate this function, just press the
light button as shown in Fig. 13.1.
The light function is only available when the machine is
on and not during standby mode.
CAUTION: do not stare at the
lamp while it is on. It could
damage your eyesight
14. SIGNALLING AND ALARMS
No water warnin
The machine has a sensor that checks for water in
the tank. If there is no water, the machine turns on the
indicator light and will not work until the tank is lled.
Replace filter warning
After the machine has dispensed 80 litres of water, the
LED for the lter symbol begins to ash (pre-alarm), Fig.
14.2.
If the quantity of dispensed water reaches 100 litres, the
LED will turn steady-on (alarm).
The replacement of the lter is recommended
within 3 months from when the LED remains
steady-on.
To switch-o the alarm (or the pre-alarm), put the
appliance in stand-by condition, hold the START/STOP
button for 5 seconds;the alarm led will switch-o and the
counter of dispensed water will reset.
Coffee grounds warning
After dispencing 10 cups of coee, the wahs light turns
on steady red, while the grounds drower LED ashes with
a red light. This condition persists even when the machine
is turned o and on. To reuse the machine, you must wash
the coee unit by pressing the START/STOP button with a
container under the coee dispencing nozzles to hold the
water. After washing, the START/STOP icon ashes red and
then turns o after washing.
For emptying the tray of “used” coee grounds see Chapter
16 “CLEANING”.
Coffee probe broken warning
The machine has a function that warns you when the
coee unit probe is broken.
When the coee probe is not working correctly, the
relative LED ashes.
Try to turn the machine o and on.
ATTENTION: if the alarm persists, contact the
service centre.
Generic alarm warning
The generic alarm indicator lights up (Fig. 15.5) for a
variety of possible reasons:
• The automatic coee dispensing unit is blocked;
• The movement of the automatic coee dispensing
unit did not occur correctly;
• The door for removing the coee grounds is open;
• The volumetric counter did not detect the passage of
water;
• The temperature probe is not working correctly.
If the generic alarm light turns on:
• Check that the grounds emptying door is closed.
• Check that there is water in the tank.
Turn the machine o and on. If the problem persists, contact
service.
15. RECIPES
Italian cappuccino
This is a normal espresso with the addition of milk heated
by steam, which softens the taste of the coee and creates
a consistent and pleasant surface foam. It is served in a large
cup. Place the cold milk in a tall pitcher and use the steam jet,
if available. Add just the foam to the espresso coee by tilting
and shaking the pitcher or use a spoon. You can dust the top
of the foam with cocoa.
Viennese cappuccino
This variant is the product of the age-old Austrian
tradition. Prepare a stretched espresso (extracted for
30-35 seconds), add warm milk and put whipped cream
on top. It is served in a cup of intermediate size between
an espresso cup and a cappuccino cup.
Garnish with chocolate akes.
Cold espresso chilled in a shaker
Frothy and very refreshing, it a real pleasure on hot days.
Prepare an espresso, add sugar, immediately pour it in
a shaker with large cubes of ice and shake for several
seconds. It is served in a tumbler or ute glass.
Irish coffee
An energising pick-me-up. In a tall, heated glass, mix eight
parts hot coee, one part of whiskey and cane sugar.
Add freshly whipped cream by sliding it on the lower part
of a spoon: this creates a light layer of cool cream on top of
the hot coee.
Mexican coffee
Intense and exotic.
In a small cup, mix one dose of double cream, a teaspoon
of cinnamon, a pinch of nutmeg, sugar and whip.
Pour a teaspoon of chocolate syrup in a medium cup,
add a little more cinnamon and the coee and mix well.
Garnish with a teaspoon of vanilla-avoured cream.
Cappuccino ice cream
In a pan, heat two cups of espresso, ¾ cup of whipping
cream and ½ cup of sugar; bring to a boil.
When the compound is lukewarm, place it in the
refrigerator for 4-5 hours.
Put two or three scoops in a bowl and garnish to toasted
coee beans.
Let cool in the refrigerator for ½ hour before serving.
16. CLEANING
ATTENTION: do not immerse the machine in
water for cleaning.
External parts
The external parts of the
machine must be cleaned
with a soft cloth and without
the use of aggressive
detergents. Do not clean
steel parts of scouring pads
or abrasive sponges. Dry well
with a soft cloth

31
FR
30
GB
Steam nozzle
In addition, periodically clean the steam nozzle, which can
get dirty inside when you warm milk for cappuccino. To do
this, just disassemble it as shown in the gure and wash it
together with its hood with a sponge and hot water.
ATTENTION: when cleaning the nozzle, always
turn o the machine and remember to wait at
least 20 minutes before using it to allow it to cool,
avoiding possible burns.
Drip basin
Remove the drip basin from the machine as shown in the
following gures.
Make sure to periodically empty the basin to avoid
liquid spills that could dirty and ruin the furniture below.
The basin and relative metal grill can be washed in the
dishwasher.
Emptying used coffee grounds
To open the door of the compartment with the tray, you
must rst remove the drip basin as described in Figures
17.4, 17.5 and 17.6.
Remove the tray, empty the
coee grounds and wash
it with hot water or in the
dishwasher.
Put the “used” coee ground
tray back in its compartment.
ATTENTION: avoid emptying the grounds
collection tray with the machine on to avoid
accidental contact with hot parts.
Water tank
• If the machine has not been used in a long time, we
recommend changing the water in the tank
• Periodically clean the water tank of any lime
encrustations.
• The tank can be washed in the dishwasher.
• If using the Brita decalcifying lter, we recommend
replacing the lter every 2000 espresso coees or at
least every six months.
17. TROUBLESHOOTING
The operator should make sure that the problem is not
caused by:
- No electricity
- No water in the tank
- No coee in the machine
- Incorrect closure of the access door to the coee
ground tray.
For any other causes, have the machine checked by a
service centre.
CE PRODUIT A ETE CONÇU POUR UN USAGE
DOMESTIQUE.
LE CONSTRUCTEUR DECLINE TOUTE
RESPONSABILITÉ EN CAS DE DOMMAGES SUBIS
PAR LES CHOSES OU LES PERSONNES DERIVANT
D’UNE INSTALLATION INCORRECTE OU D’UN
USAGE IMPROPRE, ERRONE OU INCOHERENT.
NE PAS CONFIER L’UTILISATION DE L’APPAREIL
A DES PERSONNES (Y COMPRIS DES
ENFANTS) AYANT DES CAPACITES PHYSIQUES,
SENSORIELLES OU MENTALES REDUITES,
OU A DES PERSONNES QUI NE POSSEDENT
PAS L’EXPERIENCE ET LES CONNAISSANCES
NECESSAIRES ; LA SUPERVISION D’UN ADULTE
RESPONSABLE POUR LEUR SECURITE ET EN
MESURE DE COMPRENDRE LE MODE D’EMPLOI
DE L’APPAREIL EST OBLIGATOIRE.
IL FAUT SURVEILLER LES ENFANTS POUR
S’ASSURER QU’ILS NE JOUENT PAS AVEC
L’APPAREIL.
Cher Client,
Vous venez d’acheter l’un de nos produits et nous vous en
remercions vivement.
Ce nouveau produit, minutieusement conçu et construit
avec des matériaux de tout premier choix, a été
soigneusement testé an de satisfaire chacune de vos
exigences en matière de cuisson.
Nous vous prions de lire et de respecter ces instructions
simples qui vous permettront d’obtenir d’excellents
résultats dès la première utilisation. Nous vous souhaitons
une bonne cuisine avec cet appareil moderne.
LE CONSTRUCTEUR
Italiano
I
EN English
FR Français
DE Deutsch
NL Nederlands

3232 33
FRFR
SOMMAIRE
1. POUR VOTRE SÉCURITÉ
• Durant l’utilisation
• Pour l’installation et l’entretien
2. CONSEILS POUR LA PROTECTION DE
L’ENVIRONNEMENT
• Emballage
• Appareillages inutilisés
3. INSTALLATION
• L’encastrement dans les meubles à éléments
• Composants pour l’installation de la machine
• Installation de la machine
• Raccordement électrique
4. DESCRIPTION DE LA MACHINE À CAFÉ
5. CARACTÉRISTIQUES TECHNIQUES
• Fusibles
6. DESCRIPTION DU BANDEAU DE COMMANDE :
TOUCHES À EFFLEUREMENT
7. COMMENT SE COMPORTER LORS DE LA
PREMIÈRE UTILISATION
• Remplir le réservoir d’eau
• Remplir le récipient de café en grains
• Mise en marche de la machine et modalité stand-by
• Réglage du café moulu
• Fonction lavage
8. DISTRIBUTION DU CAFÉ
9. DISTRIBUTION D’EAU CHAUDE
10.DISTRIBUTION DE VAPEUR
11. PROGRAMMATION DE LA QUANTITÉ DE CAFÉ MOULU
12. PROGRAMMATION DE LA QUANTITÉ D’EAU
POUR LE CAFÉ
• Rétablissement des valeurs nominales
13. ÉCLAIRAGE DU COMPARTIMENT DE
DISTRIBUTION
14. SIGNALEMENTS ET ALARMES
• Signalement du manque d’eau
• Signalement de remplacement du ltre
• Signalement de la présence de marc de café
• Signalement de défaut sonde café
• Signalement d’alarme générique
15. RECETTES
• Cappuccino à l’italienne
• Cappuccino viennois
• Espresso froid frappé
• Irish coee
• Café mexicain
• Glace au cappuccino
16. NETTOYAGE ET ENTRETIEN
• Parties externes
• Bec vapeur
• Bac à gouttes
• Vidage du marc de café
• Réservoir d’eau
17. DYSFONCTIONNEMENT
18. ASSISTANCE TECHNIQUE, PIÈCES DE
RECHANGE ET GARANTIE
SYMBOLES
En lisant ce manuel, vous rencontrerez les symboles
suivants :
ATTENTION : indications importantes pour la
sécurité et pour une utilisation correcte de la
machine
informations utiles pour une utilisation optimale
de l’appareil.
1. POUR VOTRE SÉCURITÉ
L’utilisationdecetappareilest simple;toutefois,ilest
important de lire entièrement ce livret, avant d’installer et
d’utiliser l’appareil pour la première fois. Vous obtiendrez
ainsi les meilleures performances, vous éviterez les
comportements erronés, vous saurez utiliser l’appareil
en toute sécurité tout en respectant l’environnement.
Durant l’utilisation
• Cet appareil ne doit être utilisé que par des personnes
adultes. Les porteurs de handicap peuvent utiliser
l’appareil exclusivement s’ils peuvent bénécier,
par l’intermédiaire d’une personne responsable de
leur sécurité, d’une surveillance ou d’instructions
concernant l’utilisation de l’appareil.
• S’assurer que les enfants ne touchent pas les
commandes et qu’ils ne jouent pas avec l’appareil.
• Cet appareil doit être utilisé en milieu domestique;
tout autre usage est impropre et donc dangereux.
• L’appareil doit toujours être propre.
• Ilestrisquédemodieroudetenterdemodierles
caractéristiques de ce produit.
• Les parties exposées de cet appareil chauent durant
le fonctionnement et restent chaudes pendant un
certain temps même après sa mise hors tension.
Éloigner les enfants jusqu’au refroidissement complet
de l’appareil.
• Durant l’utilisation, ne pas toucher les surfaces
chaudes mais utiliser les boutons ou les poignées.
• Avant toute intervention d’entretien ou de nettoyage,
vérifier que l’appareil est débranché du secteur.
• En cas de défauts, ne jamais essayer de réparer
personnellement l’appareil. Les réparations
eectuées par des personnes non compétentes
peuvent provoquer des dommages et des accidents.
Consulter le contenu de ce livret. Si l’on ne trouve
pas les informations recherchées, contacter le Centre
d’Assistance le plus proche. L’assistance doit être
eectuée par un Centre d’Assistance technique
autorisé. Toujours demander l’utilisation de pièces de
rechange originales.
Pour l’installation et l’entretien
• Après avoir extrait l’appareil de l’emballage, s’assurer
que le produit n’est pas endommagé et que le cordon
d’alimentation électrique est en parfait état. Dans
le cas contraire, s’adresser au revendeur avant de
mettre l’appareil en service.
• Ne pas laisser les éléments qui constituent
l’emballage (sacs en plastique, polystyrène, etc.) à la
portée des enfants, car ils représentent une source
de danger potentiel.
• Avant l’utilisation, vérier que les données de
tension et de puissance gurant sur la plaque des
caractéristiques correspondent à la ligne à laquelle
sera raccordée l’installation. Vérier également que le
bâtiment est équipé d’une ligne de terre eciente et
d’un interrupteur magnétothermique adéquat.
• Tout type d’intervention doit être effectué par du
personnel spécialisé.
• Le Constructeur décline toute responsabilité en cas
de non respect de ces consignes.
2. CONSEILS POUR LA SAUVEGARDE
DE L’ENVIRONNEMENT
Emballage
Tous les matériaux utilisés sont compatibles avec
l’environnement et recyclables. Veuillez apporter votre
contribution à la préservation de l’environnement, en
utilisant les canaux spéciques de la collecte sélective.
Appareillages inutilisés
• Les appareils inutilisés ou inutilisables ne sont
pas des déchets communs. Grâce à l’élimination
écologique, diérents matériaux utilisés pour la
production de votre appareil peuvent être récupérés.
• Informez-vous des possibilités actuelles d’élimination
auprès de votre revendeur spécialisé ou de votre
Administration Communale.
• Avant de mettre l’appareil au rebut, coupez le cordon
d’alimentationetrendez-leinutilisable.
Il est très important de conserver ce livret d’instructions
avec l’appareil pour toute consultation future. Si l’appareil
est vendu ou cédé à une autre personne, assurez-vous
que le livret a été remis au nouveau propriétaire an qu’il
puisse être informé du fonctionnement de la machine et
des avertissements correspondants.
Le symbole sur le produit ou sur l’emballage
indique que le produit ne doit pas être considéré
comme un déchet domestique normal, mais qu’il faut
le porter au point de collecte indiqué pour le recyclage
des appareillages électriques et électroniques.
L’élimination appropriée de ce produit contribue à
éviter les conséquences négatives potentielles pour
l’environnement et pour la santé, pouvant dériver
d’une élimination inadéquate du produit. Pour des
informations plus approfondies sur le recyclage de cet
appareil, contacter le bureau communal, le service local
d’élimination des déchets ou le magasin où vous avez
acheté le produit.

3434 35
FRFR
3. INSTALLATION DE LA MACHINE
L’encastrement dans les meubles à éléments
Pour que l’appareil intégré à un meuble à éléments
fonctionne correctement, celui-ci doit posséder les
caractéristiques nécessaires.
Conformément aux normes de sécurité, la protection
contre l’éventuel contact avec les parties électriques
et les parties protégées moyennant une isolation
fonctionnelle, doit être assurée par un encastrement
correct de l’appareil.
Toutes les parties qui assurent la protection, même
un éventuel panneau de protection (par exemple si
l’appareil est positionné au bout ou au début des
meubles à éléments), doivent être xées de manière à
ne pas pouvoir être démontées sans l’aide d’outils.
Installer l’appareil à une certaine distance des
réfrigérateurs ou des congélateurs, car la chaleur émise
risque d’en compromettre le fonctionnement.
Composants pour l’installation de la machine
La machine doit être installée dans des compartiments
d’une hauteur de 460 mm et d’une largeur de 560 mm
à 568 mm. On fournit avec la machine les composants
suivants pour l’installation :
1. Support xe de la machine
2. N°13 vis autotaraudeuses 3,9X19
3. N°1 élément de xation du cordon
4. N°2 glissières latérales
5. N°2 plaques latérales de 1mm
6. N°2 plaques latérales de 2mm
INSTALLATION DE LA
MACHINE
Positionner la partie xe fournie
en la posant sur le dessus du
meuble.
Insérer les plaques latérales nécessaires pour
compenser les éventuels espaces vides. La largeur du
compartiment qui recevra la machine est déterminée par
l’épaisseur des joues du meuble. Pour compenser les
diérentes dimensions possibles, on fournit 4 plaques, 2
d’une épaisseur de 2 mm et 2 d’une épaisseur de 1 mm.
Leur utilisation sert à compenser la largeur interne du
compartiment, pour obtenir une dimension de 562/560
mm.
Ensuite, monter les 2
glissières en utilisant les
8 vis autotaraudeuses
restantes.
Insérer la machine
en accouplant
les glissières aux
supports déjà montés
dans le compartiment.
Faire coulisser l’appareil
jusqu’au bout des
glissières pour provoquer le
déclenchement des arrêts
de sécurité.
Raccordement électrique
Fixer le cordon
d’alimentation du côté
gauche du compartiment
en utilisant une des vis
autotaraudeuses à bois
et l’élément de xation du
cordon xé d’après la gure.
Desserrer l’élément de
xation du cordon monté sur
la machine.
Serrer le cordon d’alimentation
sur l’appareil, en procédant
d’après la gure.
Brancher le cordon
d’alimentation d’après
la gure.
4. DESCRIPTION DE LA MACHINE À
CAFÉ
1. Réservoir à eau
2. Filtre décalciant
3. Distributeur
4. Bec distributeur d’eau/vapeur
5. Bac à gouttes
6. Récipient à café
7. Bouton de réglage de la mouture
8. Bandeau de commande
9. Capot/bac pour le vidage du marc de café
5. CARACTÉRISTIQUES TECHNIQUES
Largeur 594 mm
Profondeur 475 mm
Hauteur 445 mm
Capacité réservoir 2,5 l
Poids net 26 kg
Poids brut 31 kg
Tension d’alimentation 230 V
Puissance nominale 2000W
Puissance absorbée par les
résistances
1700 W
Puissance absorbée par la pompe 50 W
Pression d’exercice 12 bars

3636 37
FRFR
Bandeau de commande
Description des touches et des voyants du bandeau
de commande.
Touche ON/OFF
Touche START / STOP
Touche CAFÉ
Touche CAFÉ DILUÉ
Touche EAU
Alarme MANQUE D’EAU
Alarme PRÉSENCE MARC
Alarme GÉNÉRIQUE
Touche LAVAGE
Touche ÉCLAIRAGE
Touche CAFÉ DOUBLE
Touche CAFÉ DILUÉ DOUBLE
Touche VAPEUR
Alar me R E MPL A C EME N T
FILTRE
Alarme défaut sonde CAFÉ
Réglage CAFÉ
CAFÉ LÉGER
CAFÉ MOYEN
CAFÉ FORT
6. DESCRIPTION DU BANDEAU DE COMMANDE :
TOUCHES À EFFLEUREMENT
La particularité exclusive de ce modèle est
l’utilisation de la technologie des commandes
à eeurement. Il sut d’eeurer l’espace
marqué du symbole choisi et l’appareil exécute la
fonction correspondante. Toutefois, vous noterez qu’il
faut exercer une légère pression pour actionner les
commandes comme s’il s’agissait de simples boutons ;
cela permet d’éviter les actionnements accidentels.
7. COMMENT SE COMPORTER LORS DE LA
PREMIÈRE UTILISATION
Remplir le réservoir d’eau
Fig. 7.1 Extraire le bac à gouttes de son logement.
Fig. 7.2 Enfoncer les leviers de déblocage situés sous le
bac à gouttes et tirer la machine vers soi en procédant
d’après la gure.
Fig. 7.3 Extraire la machine à café du meuble en la
faisant coulisser sur les glissières.
Fig.7.4 Insérer le ltre décalciant dans son logement.
Avant de remplir le réservoir d’eau, s’assurer que le ltre
décalciant a été immergé pendant au moins 20 minutes
dans de l’eau froide (toujours suivre les instructions
gurant sur l’emballage du ltre). Ensuite, l’introduire
dans son logement à l’intérieur du réservoir jusqu’à ce
qu’on entende un déclic, d’après la gure.
En cas de longues périodes d’inutilisation de l’appareil, il
est recommandé de remplacer l’eau du réservoir.
Le ltre est disponible auprès des revendeurs
d’appareils électroménagers, auprès de nos Centres
d’Assistance Technique ou dans les Magasins de Pièces
de Rechange Autorisés.
Fig. 7.5 Extraire le réservoir d’eau d’après la gure et le
remplir avec de l’eau potable (environ 2,5 litres).

3838 39
FRFR
Fig. 7.6 Replacer le réservoir dans son logement en
veillant à faire coïncider les deux embrayages situés sur
le fond.
Remplir le récipient de café en grains
Fig. 7.7 Verser à l’intérieur du récipient à café environ
200 g de café en grains.
Fig. 7.8 Pousser la machine à l’intérieur du compartiment
et exercer une légère poussée jusqu’à ce qu’on entende
un déclic indiquant que le blocage a eu lieu.
ATTENTION : avant de verser les grains dans
le moulin, vérier que le café ne contient pas de
corps étrangers.
Mise en marche de la machine et modalité stand by
Fig. 7.9 Extraire la machine.
Positionner l’interrupteur général, situé à l’arrière de la
machine sur « 1 ».
Après avoir inséré la machine dans le meuble, celle-ci
est prête à l’emploi.
Fig. 7.10
Pour quitter la modalité Stand-by, enfoncer la touche on/
o d’après la g. 8.10, le voyant commence à clignoter
jusqu’à ce que la machine soit en état de « prête » ; à
présent, tous les voyants, relatifs aux diérents services,
s’allument.
REMARQUE : au bout de 45 minutes d’inutilisation, la
machine se met en modalité Stand-by.
Réglage du café moulu
ATTENTION : La machine quitte l’usine
étalonnée sur un niveau de mouture du café en
grains opportun.
Ce niveau inuence considérablement la qualité du
café. Une mouture trop « grossière » donne un café très
uide et dépourvu de crème et de corps. En revanche,
une mouture trop ne donne un café qui s’écoule par
« gouttes », au goût très intense et qui sent le « brûlé
». On rappelle que le temps nécessaire pour obtenir un
espresso varie entre 20 et 30 secondes.
Pour régler le degré de mouture, extraire la machine
d’après les gures 8.1 à 8.3. Ensuite, agir sur le bouton
de réglage situé du côté droit, d’après la g. 8.11.
En tournant le bouton en sens horaire, on obtient une
mouture ne et un café plus fort. En tournant le bouton
en sens inverse horaire on obtient une mouture plus
grossière et un café plus léger. Le niveau de mouture
sélectionné peut être lu sur le couvercle du récipient.ù
Fonction lavage
A la mise sous tension de la machine ou à la sortie de la
modalité stand-by et après la phase de réchauage, la
fonction de lavage s’active. La touche lavage s’allume.
En appuyant sur la touche lavage puis sur la touche
START, on démarre un cycle de lavage de la machine.
Si l’on enfonce une touche de distribution de boisson, le
voyant de la touche lavage s’éteint.
8. DISTRIBUTION DU CAFÉ
Positionner la tasse sous le distributeur, régler la
hauteur du bec distributeur en agissant sur le bouton
; en le tournant, on soulève ou on abaisse les becs,
d’après la gure 9.1.
On peut positionner simultanément deux tasses sous le
distributeur quand on souhaite un café double.
La suite du paragraphe illustre la modalité de distribution
d’un café, la procédure est la même pour le café, le café
dilué et les deux cafés dilués.
Enfoncer la touche correspondant à la sélection
souhaitée (g. 7.1 café espresso).
Enfoncer la touche START/STOP dans un délai de
10 secondes à partir de la sélection et attendre la
distribution.
Celle-ci se termine automatiquement une fois que la
quantité de café correspondant à la boisson choisie
est atteinte. Cette quantité est déjà sélectionnée sur la
machine, mais on peut la modier, voir paragraphe 13.
On peut terminer la distribution à tout moment en
enfonçant la touche START/STOP.
ATTENZION : si la touche de démarrage n’est
pas enfoncée dans un délai de 10 secondes, la
fonction est désactivée. Pour distribuer, il faudra
donc répéter la procédure.
CONSEILS UTILES POUR PRÉPARER UN
EXCELLENT ESPRESSO
• Pour obtenir un excellent espresso, le temps de
distribution doit être d’environ 15 - 25 secondes. Les
Table of contents
Languages:
Other BORETTI Coffee Maker manuals