Borum BOD1906 User manual

Sep-19 Product Code: BOD1906
Made in China to TQB Brands Pty Ltd specifications
Visit us at www.tqbbrands.com.au
OWNER’S MANUAL
PRODUCT CODE: BOD1906
65 LITRE PORTABLE OIL DRAINER
Tank
Capacity
Recovery
Chamber
Capacity
Vacuum
Working
Pressure
Degree of
Vacuum
Net
Weight
Dimensions
65 Litre
9 Litre
0.04-0.06MPa
0.05-0.07MPa
37kg
480x500x1850mm

Sep-19 Product Code: BOD1906
Made in China to TQB Brands Pty Ltd specifications Page 2
Visit us at www.tqbbrands.com.au
WARNING
IMPORTANT: READ ALL INSTRUCTIONS BEFORE USE
WARNING
The instructions and warnings contained in this manual should be read and understood before
using or operating this equipment. Do not allow anyone to use or operate this equipment until
they have read this manual and have developed a thorough understanding of how this
equipment works. Failure to observe any of the instructions contained in the manual could result
in severe personal injury to the user or bystanders, or cause damage to the equipment and
property. Keep this manual in a convenient and safe place for future reference.
Whilst every effort has been made to ensure accuracy of information contained in this manual,
the TQB Brands Pty Ltd policy of continuous improvement determines the right to make
modifications without prior warning.
CONTENT
WARNING .............................................................................................................................. 2
CONTENT ............................................................................................................................... 2
SAFETY INSTRUCTIONS ........................................................................................................... 3
ASSEMBLY, OPERATION, PREVENTITIVE MAINTENANCE .......................................................... 4
TROUBLESHOOTNG ................................................................................................................ 8
PARTS LIST ............................................................................................................................. 9
WARRANTY .......................................................................................................................... 11

Sep-19 Product Code: BOD1906
Made in China to TQB Brands Pty Ltd specifications Page 3
Visit us at www.tqbbrands.com.au
SAFETY INSTRUCTIONS
SAFETY OPERATING INSTRUCTIONS
- Check for damaged parts. Before using any product, any part that appears damaged should
be carefully checked to determine that it will operate properly and perform its intended
function. Check for any broken or damaged parts and any other conditions that may affect
its operation. Replace or repair damaged or worn parts immediately.
- Do not exceed the product’s working pressure of 0.5bar.
- If compressor supplies air pressure in excess of 0.5 Bar, an inline air regulator must be used
to maintain air pressure at 0.5 Bar.
- Only use on a flat surface capable of supporting the Portable Oil Drainer and its maximum
load of 65 litres.
- Use eye and hearing protection. Always wear ANSI approved impact safety goggles, full
face shield and ANSI approved hearing protection when working with this product.
- Dress safely. Non-skid footwear or safety boots should be used when working with the
product. Do not wear loose clothing or jewellery as they can become caught in moving parts
wear a protective hair covering to prevent long hair from becoming caught in moving parts.
- Always secure the wheels and castors in place while operating the oil drainer.
- Never leave unit unattended when operating or evacuating.
- Never use near open flame or heat source.
- Always check that valve below funnel is closed before emptying
- Always disconnect air supply after emptying.
- Never use unit for handling highly volatile fuels and fluids.
- Use only the nozzle assembly provided.
- Never fill the tank over the max. Level given by the level indicator
- Keep work area clean. Cluttered areas and benches invite accidents.
- When servicing, use only Borum Industrial identical replacement parts. Use of any other
parts will void the warranty.
- Use the right product for the job. There are certain applications for which the Oil Drainer
was designed. Do not modify the Oil Drainer and do not use the Oil Drainer for a purpose
for which it was not intended.

Sep-19 Product Code: BOD1906
Made in China to TQB Brands Pty Ltd specifications Page 4
Visit us at www.tqbbrands.com.au
ASSEMBLY, OPERATION, PREVENTITIVE MAINTENANCE
1. FEATURES
The Borum Industrial Oil Drainer is a multifunction oil drainer with 2m x 25.4mm discharge
hose. Discharge is by compressed air fitted with safety valve, 18 litre steel telescopic
collection pan, oil reservoir level indicator and small parts tray; it has heavy duty castors
for easy manoeuvrability.
2. ASSEMBLY
Unpacking: after removing the packing material, make sure the product is in perfect
condition and that there are no visible damaged parts. The packaging materials
(Polyethylene bags, polystyrene etc.), must be disposed of in an appropriate refuse
collection container. These materials must not be left within the reach of children as they
are potential sources of danger.
Assembly according to the exploded drawing, all connecting parts should be well sealed by
tape or seal glue, ensure all parts are tightened.
3. BEFORE USE
Prior to each use conduct a visual inspection by checking for abnormal conditions, such as
cracked joints and damaged, loose, or missing parts.
Air Supply
To prevent explosion:
Only use clean, dry, regulated, compressed air to operate this tool. Do not use oxygen,
carbon dioxide, combustible gases, or any other bottled gas as a power source for this
tool.
Note: Air flow, and therefore tool performance, can be hindered by undersized air
supply components. The compressor air hose must be long enough to reach the work
area.
Before connecting the air compressor to pressurise the Oil Extractor, run the air
compressor to make sure it is in good working order.
- Turn on the air compressor according to the manufacturer’s directions and allow
it to build up pressure until it cycles off.
- Adjust the air compressor’s pressure regulator so that the air output is enough to
properly power the tool, but the output will not exceed the tool’s maximum air
pressure at any time. Turn the knob clockwise to increase the pressure and
counter clockwise to decrease pressure. Adjust the pressure gradually, while
checking the air output gauge to set the pressure.
- Inspect the air connections for leaks. Repair any leaks found.
- If the compressor will not be used at this time, turn off the air supply and safely
discharge any residual air pressure to prevent accidental operation.

Sep-19 Product Code: BOD1906
Made in China to TQB Brands Pty Ltd specifications Page 5
Visit us at www.tqbbrands.com.au
Check the unit meets seal specification:
- Please note that the air intake pipe connected to the quick coupler on the top of
the transparent recovery chamber must be fitted with the oil filter and air
regulator. Turn the ball valve handle under the transparent recovery chamber
to the horizontal position before testing.
- Turn off the valve of the suction probe, connect the air intake pipe with the quick
coupler, adjust the air intake pressure, the needle of the pressure gauge will
move.
- When the pressure reaches to 0.05MPa (7psi), turn off the air intake valve on the
top of transparent recovery chamber and hold pressure for 1 hour ensure the
pressure has been maintained.
- Turn off the air intake valve on the top of the tank
- Turn off the discharging oil pipe valve
- Turn off the valve under the oil tray
- Turn the valve handle under the transparent recovery chamber to the vertical
position, open the transparent recovery chamber top valve, air intake for about
3—5 minutes and then check the pressure gauge reading, the pressure should
not be less than 0.05MPa, (7psi) and should be maintained for at least 1 hour. It
the pressure reads no change the oil drainer is ready for use. If pressure has
dropped below 7psi reseal all fittings and check again.
4. OPERATION
OIL EXTRACTION
1. Position the Extractor on a flat, level surface
2. Choose the appropriate Probe (one of two choices) 2 x 6f , 1 x 8f. Remove the
dipstick and insert the probe into the engine’s dipstick port.
3. Turn off the valve under the transparent recovery chamber, turn on the air intake
valve on the top of transparent recovery chamber, connect the quick coupler on
top of the transparent recovery chamber with the air intake pipe, turn on the air
intake valve and adjust the air intake pressure 0.03—0.05MPa (4-7psi), the
vacuum gauge pointer will move and the degree of vacuum can be adjusted
according to operator’s requirement, the Max. degree of vacuum is not less than
0.057MPa (8psi). Oil cannot exceed the STOP position
4. Lubricate the rubber O-ring of the suction plug
5. Push the suction plug to the quick coupler of the suction probes.
Sep-19 Product Code: BOD1906
Made in China to TQB Brands Pty Ltd specifications Page 6
Visit us at www.tqbbrands.com.au
6. Secure over the two rubber gaskets in the assembly.
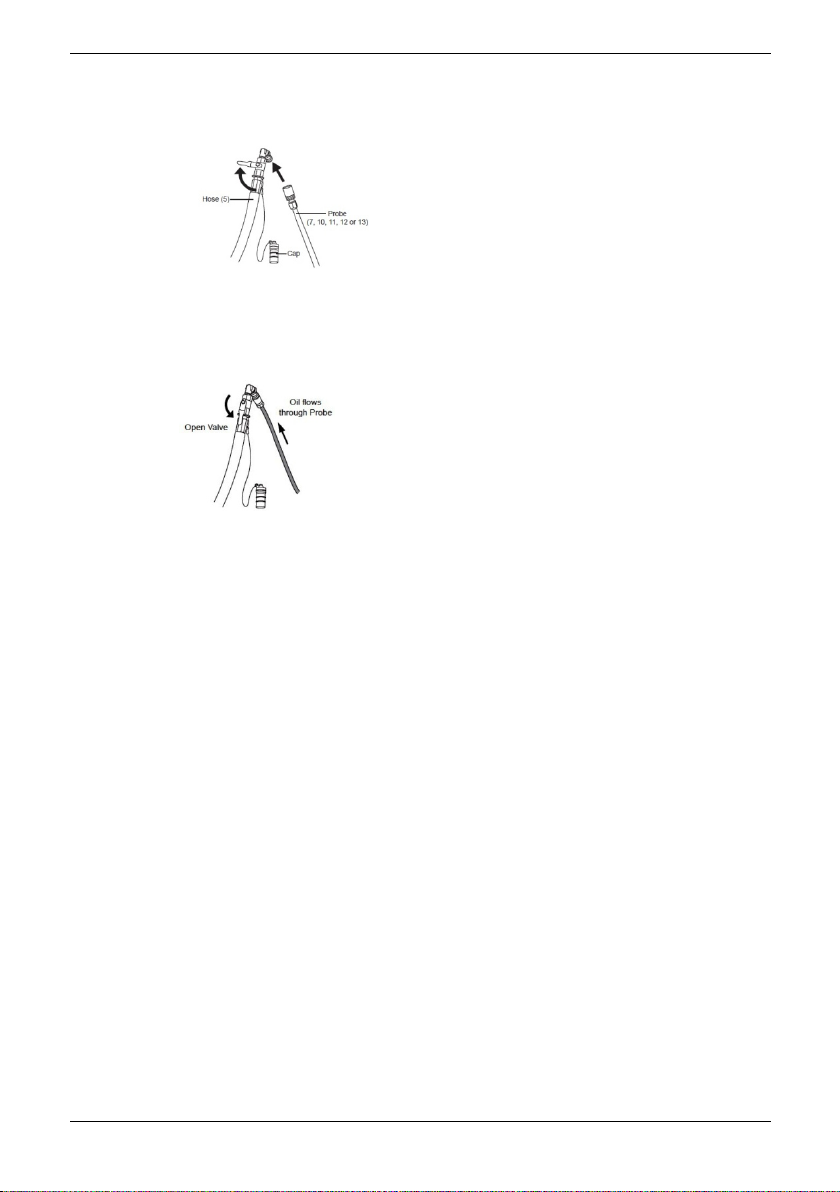
7. Remove the cap (which is attached to a chain) from the end of the hose (5) and
attach the probe to the hose.
8. Open the Ball Valve (4) by aligning it with the hose; oil will begin to flow
9. Oil should always be removed when it is hot, otherwise personal injury or property
damage may result. The oil level tube (see figure F) will show how much oil is in
the tank. Keep the probe near the bottom of the sump.
10. When done, close the Ball Valve Lever (4) (horizontal position). Remove the Probe
from the vehicle.
11. Turn on the probe under the transparent recovery chamber, the oil will flow from
the transparent recovery chamber to the main oil tank.
DISCHARGING OIL
1. Turn Off the valve under the transparent recovery chamber before discharging oil, to
avoid damaging the transparent recovery chamber.
2. Turn On the control valve of oil discharge opening under the tank, place the steel
elbow of the oil pipe on the opening of the oil storage tank.
3. Turn Off the valve under the oil tray.
4. Connect the air intake pipe (requires fitting pressure regulator) with the quick coupler
on the top of tank
- Turn On the air intake valve, adjust the air intake pressure to 0.5Bar, (7psi), then fill the air
and the oil will be discharged out to the oil storage tank. If compressor supplies air pressure
in excess of 0.5 Bar, an inline air regulator must be used to maintain air pressure at 0.5 Bar.

Sep-19 Product Code: BOD1906
Made in China to TQB Brands Pty Ltd specifications Page 7
Visit us at www.tqbbrands.com.au
OIL COLLECTION
1. Turn Off the valve under the transparent recovery chamber.
2. Turn On the valve under the oil tray and the air intake valve on the top of tank, adjust
the oil tray to suitable height, move the portable drainer to the position under the oil
discharging vehicle, open the Ball Valve (9).
5. STORAGE
This Oil Drainer should always be stored in a dry location on a level surface. Disconnect air
supply and empty air and waste oil.
6. MAINTENANCE
Disconnect air prior to any maintenance
Inspect the general condition of the Oil Drainer checking:
- for loose hardware
- misalignment of binding or parts, cracked, bent, or broken parts, and
- any other condition that may affect the Oil Drainers safe operation
7. SERVICE & REPAIR
Any Oil Drainer found damaged in any way, or found to be worn or operates abnormally
should be removed from service until repaired by an authorised service agent. Owners and
/ or operators should be aware that repair of this product may require specialised
equipment and knowledge. Only authorised parts, labels and decals shall be used on this
equipment. Annual inspection of the Oil Drainer is recommended and can be made by an
authorised repair facility to ensure that your equipment is in optimum condition and that
the equipment has the correct decals and safety labels specified by the manufacturer.

Sep-19 Product Code: BOD1906
Made in China to TQB Brands Pty Ltd specifications Page 8
Visit us at www.tqbbrands.com.au
TROUBLESHOOTNG
PROBLEM
POSSIBLE CAUSE
ACTION
Degree of vacuum doesn’t
meet requirement
1. Air leaking
2. Steel ball corroded
1. Test the degree of vacuum
of transparent recovery
chamber, if the chamber
passes test it will show no
signs of leaking. Check tank
seal tape and seal glue.
2. Replace the steel ball and
the upper cover
3. Check all valves are turned
off
The pointer of vacuum
gauge flow down quickly
after vacuumise
1. Air leaking
1. As above
Vacuum gauge has pressure
drop but cannot suck oil
1. The oil temperature
is too low
2. The suction plug seal
has worn out
3. The oil suction
probe cover is
distorted
4. Check the valve of
oil suction turning is
not worn out
5. Check the oil suction
pipe is not jammed
or touching the
bottom of the tank
1. Let the oil reach normal
temperature and retry
2. Replace the seal ring of the
suction plug
3. Change the oil suction probe
cover
4. Turn on valve of oil suction
pipe
5. Clean oil suction pipe

Sep-19 Product Code: BOD1906
Made in China to TQB Brands Pty Ltd specifications Page 9
Visit us at www.tqbbrands.com.au
PARTS LIST
Part
#
Description
QTY
Part
#
Description
QTY
1
Oil suction probe
1
27
1/8” safety valve
1
2
Vacuum recovery chamber
1
28
Air intake connector
1
3
Oil tray
1
29
Air intake pipe connector
1
4
O-ring
2
30
1/4” ball valve
3
5
Oil tray’s connector
1
31
Quick coupler
1
6
O-ring
2
32
Handle
1
7
Oil tray’s connector
1
33
Hex nut
1
8
Hex nut
1
34
Pipe Clipper
1
9
25mm Ball valve
1
35
Hex nut
2
10
Upper connector of drain tube
1
36
Clipper
2
11
Hex nut
2
37
Oil discharging connector
1
12
Fixing ring
1
38
1/2” Ball valve
1
13
Inlay screw
1
39
Oil discharging pipe connector
1
14
Clipper
1
40
Reinforced nylon hose
1
15
O-ring
1
41
Oil discharging elbow
1
16
Drain tube
1
42
Right angle connector
2
17
Tool tray
1
43
Flexible hose connector
2
18
Bush for oil suction probe
1
44
Oil lever
1
19
Self-tapping nut
1
45
Clipper
2
20
Rivet
1
46
Cap screw
2
21
25mm elbow
1
47
Washer
2
22
Oil intake connector
1
48
75mm Castor
2
23
Clipper
2
49
O-ring
1
24
Pressure Hose
1
50
Drain plug
1
25
Down connector
1
51
Circlip
2
26
Tank
1
52
125mm wheel
2

Sep-19 Product Code: BOD1906
Made in China to TQB Brands Pty Ltd specifications Page 10
Visit us at www.tqbbrands.com.au

Sep-19 Product Code: BOD1906
Made in China to TQB Brands Pty Ltd specifications Page 11
Visit us at www.tqbbrands.com.au
WARRANTY
Borum Industrial products have been carefully tested and inspected before shipment and are
guaranteed to be free from defective materials and workmanship for a period of 12 months
from the date of purchase except where tools are hired out when the guarantee period is ninety
days from the date of purchase.
Should this piece of equipment develop any fault, please return the complete tool to your
nearest authorised warranty repair agent or contact TQB Brands Pty Ltd Warranty team –
If upon inspection it is found that the fault occurring is due to defective materials or
workmanship, repairs will be carried out free of charge. This guarantee does not apply to normal
wear and tear, nor does it cover any damage caused by misuse, careless or unsafe handling,
alterations, accident, or repairs attempted or made by any personnel other than the authorised
TQB Brands Pty Ltd repair agent.
This guarantee applies in lieu of any other guarantee expressed or implied and variations of its
terms are not authorised.
Your TQB Brands Pty Ltd guarantee is not effective unless you can produce upon request a dated
receipt or invoice to verify your proof of purchase within the 12 month period.
Consumer Guarantee
Our goods come with a guarantee that cannot be excluded under the Australian Consumer Law.
You are entitled to a replacement or refund for a major failure and compensation for any other
reasonably foreseeable loss or damage. You are also entitled to have the goods repaired or
replaced if the goods fail to be of acceptable quality and the failure does not amount to a major
failure.
All images and illustrations shown are for reference purposes only. All information, specifications and
illustrations in this manual are based on the latest information available at the time of publication and are
subject to change without notice. The information in this manual is periodically revised to ensure the latest
information is included. Download the latest version of this manual and other related technical
documentation from www.tqbbrands.com.au.
Table of contents
Other Borum Industrial Equipment manuals

Popular Industrial Equipment manuals by other brands

CleaverBrooks
CleaverBrooks CB-LE Series Operation, service and parts manual

Haufftechnik
Haufftechnik MIS90D installation instructions

Carbatec
Carbatec TH-B317P owner's manual

Haufftechnik
Haufftechnik HRD Series Assembly instruction

Ditch Witch
Ditch Witch 1CM Operator's manual

Hoffmann&Hoffmann
Hoffmann&Hoffmann Dripmaster EDD-4C user guide


Tolomatic
Tolomatic BC4 Series quick start guide

Oriental motor
Oriental motor SB50W operating manual

KEBCO
KEBCO COMBISTOP 38 Instructions for use

Avantco
Avantco Leguan 50 Operator's manual for Attachment

Flex-A-Seal
Flex-A-Seal 85 Installation, operation, maintenance guide

Haufftechnik
Haufftechnik HRD SG b40 installation instructions