manuals.online logo
Brands
  1. Home
  2. •
  3. Brands
  4. •
  5. Bosch
  6. •
  7. Kitchen Appliance Accessories
  8. •
  9. Bosch 751505 Reference manual

Bosch 751505 Reference manual

TECHNICAL
SERVICE BULLETIN
BOSCH,
THERMADOR, AND SIEMENS BUILT-IN WALL OVENS 58300000169667
ABZ EN A
NOVEMBER
2012
Page 1/
4
Continued next page~
EN
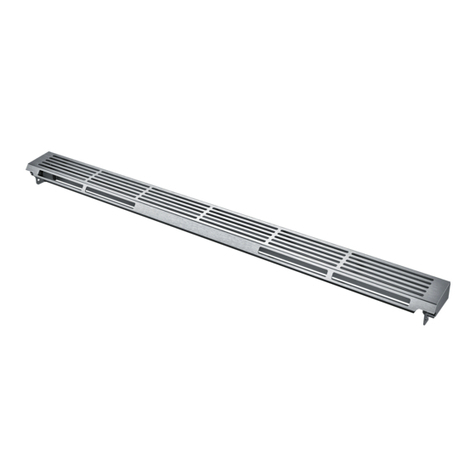
OVEN DOOR LATCH SERVICE KIT 751505
Due to a supplier change, the oven door latch now offered as the service replacement for some Bosch, Thermador, and Siemens built-in wall
ovens may have a slightly different design than the original part. Service kit 751505 has been developed to make the new latch compatible with
products originally built with the 644216 Meteor latch. For wall ovens built with the newer HTI latch, the HTI latch in the service kit can be used
as a direct replacement.
This bulletin includes instructions for unlocking a stuck latch and for replacing a latch with some or all components in Latch Service Kit 751505.
KIT COMPONENTS
O
PENING A STUCK LATCH
If the
oven door latch being serviced is stuck in the locked position, first try to cycle the latch by resetting the power. If that fails, run a thin
wire or a wire coat hanger in between the door and the front face of the oven. Position the wire between the latc
h hook (1) and the plunger
(2), then slide the wire to the left, pushing the latch hook left
and releasing the latch.
The information provided in this document is intended for trained, qualified personnel only. The proper function and the safety of the appliance can be affected by an improper repair, and even serious
threats to life or physical condition may arise. BSH Home Appliances Corporation is not liable for damages caused by improper repairs performed by unauthorized parties. Local codes and standards
apply and must be observed. Contact the Technical Support Team for further assistance.
Position the wire between
the latch hook and the
plunger as shown
(1) HTI Latch
(for all 27“ and 30“ ovens)
(1) Bottom mounting plate
(for 27“ ovens with Meteor
latch only)
(2) Screws for securing HTC
(
for lower ovens in 27“ double ovens with
Meteor latch only)
Original latch in locked position
2
1
New latch in locked position
2
1
TECHNICAL
SERVICE BULLETIN
BOSCH,
THERMADOR, AND SIEMENS BUILT-IN WALL OVENS 58300000169667
ABZ EN A
NOVEMBER
2012
Page 2/
4
Continued next page~
R
EPLACING A
M
ETEOR
L
ATCH ON A
27”
S
INGLE
O
VEN OR
U
PPER
O
VEN
Kit Components Required: HTI Latch, Bottom Mounting Plate
1. Disconnect power to the oven.
2. Remove the screws securing the black latch plate to the
oven, and set parts aside.
3. Remove the 2 outermost screws securing the latch assembly
(with bottom mounting plate attached) to the plenum
bracket, and slide the latch assembly forward; set screws
aside.
4. Disconnect the harness wires attached to the latch assembly
and the HTC.
5. Remove the 2 screws securing the latch assembly to the
bottom mounting plate; set screws aside and discard the
mounting plate.
6. Secure the new latch assembly to the new bottom mounting
plate provided in the service kit using the 2 original screws.
7. Connect the harness wires to the new latch assembly.
8. Attach the new latch assembly (with new bottom mounting
plate attached) to the plenum bracket using the two original
screws.
9. Reinstall the black latch plate using the original screws.
10.Restore power and test operation.
R
EPLACING A
M
ETEOR
L
ATCH ON A
27”
L
OWER
O
VEN
Kit Components Required: HTI Latch, Bottom Mounting Plate, Screws
1. Disconnect power to the oven.
2. Remove the screws securing the black latch plate to the oven,
and set parts aside.
3. Remove the 2 outermost screws securing the latch assembly
(with bottom mounting plate attached) to the plenum bracket,
and slide the latch assembly forward; set screws aside.
4. Disconnect the harness wires attached to the latch assembly
and the HTC.
5. Remove the 2 screws securing the latch assembly to the
bottom mounting plate; set screws aside.
6. Remove the HTC from the bottom mounting plate; set the
HTC aside and discard the screws and mounting plate.
7. Secure the new latch assembly to the new bottom mounting
plate provided in the service kit using the 2 original screws.
8. Attach the original HTC to the right side of the new bottom
mounting plate using the 2 screws included in the service kit.
9. Connect the harness wires to the new latch assembly.
10.Reattach the latch assembly (with new bottom mounting plate
attached) to the plenum bracket using the two original
screws.
11.Reinstall the black latch plate using the original screws.
12.Restore power and test operation.
Attach HTC to new bottom mounting
plate using 2 screws in service kit
TECHNICAL
SERVICE BULLETIN
BOSCH,
THERMADOR, AND SIEMENS BUILT-IN WALL OVENS 58300000169667
ABZ EN A
NOVEMBER
2012
Page 3/
4
Continued next page~
R
EPLACING A
M
ETEOR
L
ATCH ON A
30”
O
VEN
Kit Components Required: HTI Latch
1. Disconnect power to the oven.
2. Remove the screws securing the black latch plate to the oven, and set parts aside.
3. Lift the latch assembly upwards to disengage the rear feet from the rear mounting plate, then pull it forward out of the plenum area.
4. Disconnect the harness wires attached to the latch assembly.
5. Remove the rear mounting plate in the plenum area by using a 1/8” or equivalent Allen wrench, or a 90-degree T-20 screwdriver;
discard the plate – it is not used with the new latch assembly.
6. Remove the 2 screws securing the latch assembly to the bottom mounting plate, and set screws aside.
7. Attach the new latch assembly to the original bottom mounting plate using the two original screws.
8. Connect the harness wires and position the new latch assembly (with original bottom mounting plate attached) in the center of the
plenum.
9. Reinstall the black latch plate using the original screws.
10.Restore power and test operation.
REPLACING AN HTI LATCH ON A 27” OR 30” OVEN
Kit Components Required: HTI Latch
Direct replacement - no special instructions necessary.
Rear mounting plate is visible after
removing the latch assembly from
plenum area
1/8” Allen wrench is used to remove 2
screws securing the rear mounting
plate, which will no longer be used
TECHNICAL
SERVICE BULLETIN
BOSCH,
THERMADOR, AND SIEMENS BUILT-IN WALL OVENS 58300000169667
ABZ EN A
NOVEMBER
2012
Page 4/
4
Copyright by BSH Home Appliances Corporation 1901 Main Street, Suite 600, Irvine CA 9000849295 800 444-9091
For authorized servicers, additional assistance is available by contacting our
Technical Support Team at
(800) 444-9091.
Models Affected
HB30x51UC
HBN3350UC
ME272ES
MED301Jx
MEMC301ES
POD301
PODMW301J
HBL33x0UC
HBN34x0UC
ME301Ex
MED302Ex
MEMCW271ES
POD301J
POM301
HBL34x0UC
HBN35x0UC
ME302Ex
MED302Jx
MEMCW301Ex
POD302
POMW301
HBL35x0UC
HBN54x0UC
ME301Jx
MEDMC301Jx
MEMW271Ex
PODC302
HBL54x0UC
HBN56x0UC
ME302Jx
MEDMCW31Jx
MEMW301ES
PODC302J
HBL56x0UC
M271ES
MED271JS
MEDMCW71JS
MEW301ES
PODM301
HBL57x0UC
M301ES
MED272Ex
MEM271Ex
PO301
PODM301J
HBL8x50UC
ME271Ex
MED272JS
MEM301ES
PO302
PODMW301
Visit QuickFinder at http://portal.mch.bshg.com/portal.

Other Bosch Kitchen Appliance Accessories manuals

Bosch MUZ6ZP Series User manual

Bosch

Bosch MUZ6ZP Series User manual

Bosch MFQ36480 User manual

Bosch

Bosch MFQ36480 User manual

Bosch PRA326B92X User manual

Bosch

Bosch PRA326B92X User manual

Bosch MS 6 User manual

Bosch

Bosch MS 6 User manual

Bosch MUZ5MM1 User manual

Bosch

Bosch MUZ5MM1 User manual

Bosch MSM6 RU Series User manual

Bosch

Bosch MSM6 RU Series User manual

Bosch MUZ6DS Series User manual

Bosch

Bosch MUZ6DS Series User manual

Bosch ErgoMixx MSZV6FS1 User manual

Bosch

Bosch ErgoMixx MSZV6FS1 User manual

Bosch MUZ9CC1 User manual

Bosch

Bosch MUZ9CC1 User manual

Bosch MUZ5NV1 User manual

Bosch

Bosch MUZ5NV1 User manual

Bosch MaxoMixx MSMM7310CN User manual

Bosch

Bosch MaxoMixx MSMM7310CN User manual

Bosch MUZ-6MM3 User manual

Bosch

Bosch MUZ-6MM3 User manual

Bosch MUZ45MX1 User manual

Bosch

Bosch MUZ45MX1 User manual

Bosch MUZ9VL1 User manual

Bosch

Bosch MUZ9VL1 User manual

Bosch MUZ5VL1 User manual

Bosch

Bosch MUZ5VL1 User manual

Bosch MUZ8MX2 User manual

Bosch

Bosch MUZ8MX2 User manual

Bosch MaxxiMUM MUMX50GXCN User manual

Bosch

Bosch MaxxiMUM MUMX50GXCN User manual

Bosch MUZ45X series User manual

Bosch

Bosch MUZ45X series User manual

Bosch ErgoMixx MSM6 IN Series User manual

Bosch

Bosch ErgoMixx MSM6 IN Series User manual

Bosch MFQ4 Series User manual

Bosch

Bosch MFQ4 Series User manual

Bosch MUZ9VLP1 User manual

Bosch

Bosch MUZ9VLP1 User manual

Bosch MSM1 Series User manual

Bosch

Bosch MSM1 Series User manual

Bosch ErgoMixx MSM6 N AU Series User manual

Bosch

Bosch ErgoMixx MSM6 N AU Series User manual

Bosch MUZ5CC2 User manual

Bosch

Bosch MUZ5CC2 User manual

Popular Kitchen Appliance Accessories manuals by other brands

CookStop CookStop Installation guides

CookStop

CookStop CookStop Installation guides

Westinghouse WTB4604S instructions

Westinghouse

Westinghouse WTB4604S instructions

Maytag AG202MG - Gas Burner Module parts list

Maytag

Maytag AG202MG - Gas Burner Module parts list

Instant Air Fryer Lid user manual

Instant

Instant Air Fryer Lid user manual

Miele FlexiTray KFT 7000 manual

Miele

Miele FlexiTray KFT 7000 manual

Miele 07 343 771 installation instructions

Miele

Miele 07 343 771 installation instructions

Jenn-Air JS42NXFXDW installation instructions

Jenn-Air

Jenn-Air JS42NXFXDW installation instructions

Panasonic NNC994S - Genius Prestige - Convection Microwave... installation instructions

Panasonic

Panasonic NNC994S - Genius Prestige - Convection Microwave... installation instructions

Gaggenau BM281711 installation manual

Gaggenau

Gaggenau BM281711 installation manual

Dash DCAF150UP1 manual

Dash

Dash DCAF150UP1 manual

Kenwood AT511 instructions

Kenwood

Kenwood AT511 instructions

Weston 07-0901-W manual

Weston

Weston 07-0901-W manual

ARDES ARPATRI01/G manual

ARDES

ARDES ARPATRI01/G manual

Fulgor Milano F4TK30MWO installation guide

Fulgor Milano

Fulgor Milano F4TK30MWO installation guide

eta 002898040 Instructions for use

eta

eta 002898040 Instructions for use

Nostalgia Electrics TACO TUESDAY TTCHP2RD Operating instructions and recipes

Nostalgia Electrics

Nostalgia Electrics TACO TUESDAY TTCHP2RD Operating instructions and recipes

Miele APFD 200 operating instructions

Miele

Miele APFD 200 operating instructions

Miele CSPE 1300 operating instructions

Miele

Miele CSPE 1300 operating instructions

manuals.online logo
manuals.online logoBrands
  • About & Mission
  • Contact us
  • Privacy Policy
  • Terms and Conditions

Copyright 2025 Manuals.Online. All Rights Reserved.