en
ÚInstallation instructions
This appliance is intended for use up to a maximum height of
2000 metres above sea level.
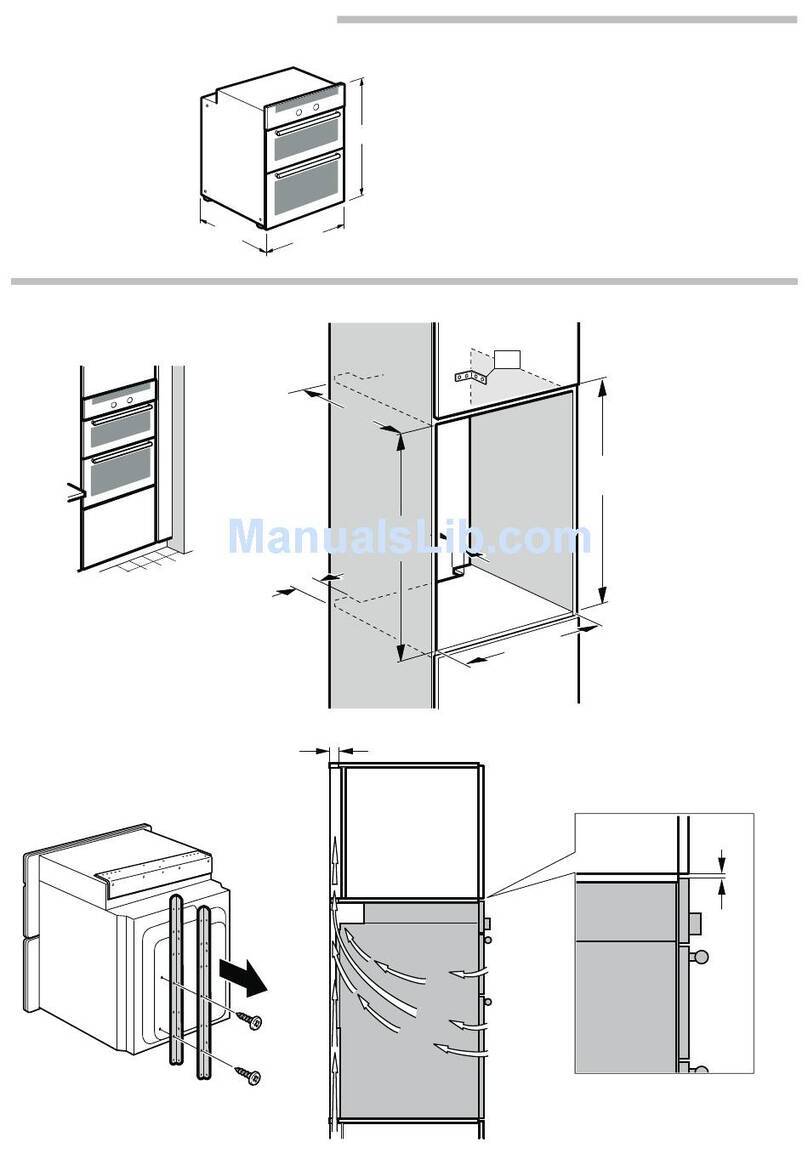
Preparing the unit: figure 1
■For the housing units, the sheets and plastic coatings must
have been completed using an adhesive which is heat-
resistant at 90 ºC for the unit interior (where the oven will be
positioned) and 70 ºC for the adjacent units (located to the
side of the oven). If the sheets and plastic coatings or the
adhesive do not have sufficient heat resistance, the units may
become deformed or burned. In this case, the oven
manufacturer cannot be held responsible for the damage
caused to the unit.
■Do not install the appliance behind a decorative panel. There
is a risk of overheating.
■The units must be cut before installing the oven. Remove any
wood chippings as they could affect the working of the oven
components.
■The oven connection box must be positioned in shaded
surface area Bor in an area where it does not interfere with
the oven assembly.
■Any free-standing units must be fastened to the wall at the
normal angle C.
■The oven housing unit requires a ventilation opening at the
base.
■If the oven is fitted below a hob, follow the hob's assembly
instructions.
Fitting the oven in a high unit: figure 2
The oven can also be assembled in a high unit.
For ventilation, there should be a 20 mm gap approximately
between the lower shelf and supporting wall and another
20 mm gap between the upper shelf and supporting wall.
It is recommended that a gap of 590 mm is left between the
lower and upper shelf for proper ventilation. This gap could be
increased to 595 mm if you want greater ventilation than
recommended.
Ovens with a pull-out carriage door should be assembled so
that the baking trays can be easily removed.
Assembling the oven in a corner: figure 3
When assembling the appliance in a corner, the dimensions in
figure Dmust be taken into account. It is recommended that for
the measurements in figure E, the width of the front part of the
unit and the handle are taken into account.
Connecting the oven to the mains
■Before using the appliance for the first time, you must check
that your house has an earth connection and fulfils all the
applicable safety standards. Your appliance must be installed
by an authorised technician. The requirements of the regional
power supply company and national ones apply.
The use of this appliance without an earth connection or when
not installed correctly can cause serious damage (personal
injury and death by electrocution), albeit this is highly unlikely.
The manufacturer accepts no responsibility for any malfunction
or damage which is caused by unsuitable electrical
installations.
■The oven must be disconnected from the mains during all
assembly operations.
■The oven has class I protection and should only be operated
with an earth connection.
■The cable for connecting the oven to the mains must be
H05 V V-F 3G 1.5 mm² or higher.
The yellow and green colour cable, which is used for the earth
connection, should be connected first and should be longer
than the others.
■To fulfil the normal safety requirements, the installation
technician should ensure that a cut-off switch is installed on all
poles with a contact opening of less than 3 mm. This is not
necessary if the appliance is connected via a plug, if this is
accessible to the user, and provided it is earthed.
■The assembly must ensure protection against manual contact.
■The oven must be connected taking into account the voltage
indicated on the oven's specifications plate.
■To connect the appliance it should be positioned in front of
the unit. The connection cable should be long enough to
ensure connection.
Warning! Make sure the connection cable does not become
trapped during installation and that it does not come into
contact with the hot parts of the oven.
■Any handling of the appliance, including changing or installing
the power cable, must be performed by the Technical
Assistance Service.
Positioning the oven in the unit: figure 4
■For ovens with a pull-out carriage door, the door must be
removed.
■Push the oven completely into the space in the unit provided
for this purpose. Make sure the cable has not been stripped
by the oven edges, that it is not in contact with hot parts and
that it does not run along the bottom of the oven.
■Centre the oven in the unit and fasten with the screws (4x25)
supplied.
■If the unit has been built according to the measurements
provided, there will be a gap at the top of the oven. Do not
cover this gap with wooden slats so as to allow sufficient
ventilation.
■There should be at least a 5 mm gap between the appliance
and the adjacent units (located beside the oven).
Dismantling
Disconnect the oven from the mains. Loosen the screws that
fasten the oven to the unit. Lift the oven slightly and remove it
completely from the unit.
PLQ
