BOSSCO RE-1000 User manual

MULTMECHO
RE'IOOO
Owner's
Manual

CAUTION:
TO
REDUCE
THE
RISK
OF
ELECTRIC
SHOCK,
DO
NOT
REMOVE
COVER
(OR
BACK).
NO
USER-SERVICEABLE
PARTS
INSIDE.
REFER
SERVICING
TO
QUALIFIED
SERVICE
PERSONNEL
A
A
triangle,
is
intended
to
alert
the
user
to
the
presence
of
un¬
insulated
"dangerous
voltage"
within
the
product's
enclosure
that
may
be
of
sufficient
magnitude
to
constitute
a
risk
of
electric
shock
to
persons.
The
exclamation
point
within
an
equilateral
triangle
is
intended
to
alert
the
user
to
the
presence
of
important
operating
and
maintenance
(servicing)
instructions
in
the
literature
accom¬
panying
the
product.
INSTRUCTIONS
PERTAINING
TO
A
RISK
OF
FIRE.
ELECTRIC
SHOCK,
OR
INJURY
TO
PERSONS.
IMPORTANT
SAFETY
INSTRUCTIONS
WARNING
—
When
using
electric
products,
basic
precautions
should
always
be
followed,
including
the
following:
1.
Read
all
the
instructions
before
using
the
product.
2.
Do
not
use
this
product
near
water
—
for
example,
near
a
bathtub,
washbowl,
kitchen
sink,
in
a
wet
basement,
or
near
a
swimming
pool,
or
the
like.
3.
This
product
should
be
used
only
with
a
cart
or
stand
that
is
recommended
by
the
manufacturer.
4.
This
product,
either
alone
or
in
combination
with
an
amplifier
and
headphones
or
speakers,
may
be
capable
of
producing
sound
levels
that
could
cause
permanent
hearing
loss.
Do
not
operate
for
a
long
period
of
time
at
a
high
volume
level
or
at
a
level
that
is
uncomfortable.
If
you
experience
any
hearing
loss
or
ringing
in
the
ears,
you
should
consult
an
audiologist.
5.
The
product
should
be
located
so
that
its
location
or
position
does
not
interfere
with
its
proper
ventilation.
6.
The
product
should
be
located
away
from
heat
sources
such
as
radiators,
heat
registers,
or
other
products
that
produce
heat.
7.
Avoid
using
the
product
where
it
may
be
effected
by
dust.
8.
The
product
should
be
connected
to
a
power
supply
only
of
the
type
described
in
the
operating
instructions
or
as
marked
on
the
product.
9.
T
he
power-supply
cord
of
the
product
should
be
unplugged
from
the
outlet
when
left
unused
for
a
long
period
of
time.
10.
Do
not
tread
on
the
power-supply
cord.
11.
Do
not
pull
the
cord
but
hold
the
plug
when
unplugging.
12.
When
setting
up
with
any
other
instruments,
the
procedure
should
be
followed
in
accordance
with
instruction
manual.
13.
Care
should
be
taken
so
that
objects
do
not
fall
and
liquids
are
not
spilled
into
the
enclosure
through
openings.
14.
The
product
should
be
serviced
by
qualified
service
per¬
sonnel
when:
A.
The
power-supply
cord
or
the
plug
has
been
damaged;
or
B.
Objects
have
fallen,
or
iiquid
has
been
spilled
into
the
product;
or
C.
The
product
has
been
exposed
to
rain;
or
D.
The
product
does
not
appear
to
operate
normally
or
exhibits
a
marked
change
in
performance;
or
E.
The
product
has
been
dropped,
or
the
enclosure
dam¬
aged.
15.
Do
not
attempt
to
service
the
product
beyond
that
described
in
the
user-maintenance
instructions.
All
other
servicing
should
be
referred
to
qualified
service
personnel.
—"———-—-—-For
the
USA
—
GROUNDING
INSTRUCTIONS
This
product
must
be
grounded.
If
it
should
malfunction
or
breakdown,
grounding
provides
a
path
of
least
resistance
for
electric
current
to
reduce
the
risk
of
electric
shock.
This
product
is
equipped
with
a
cord
having
an
equipment-grounding
conductor
and
a
grounding
plug.
The
plug
must
be
plugged
into
an
appropriate
outlet
that
is
properly
installed
and
grounded
in
accordance
with
all
local
codes
and
ordinances.
DANGER:
Improper
connection
of
the
equipment-grounding
conductor
can
result
in
a
risk
of
electric
shock.
Check
with
a
qualified
electrician
or
serviceman
if
you
are
in
doubt
as
to
whether
the
product
is
properly
grounded.
Do
not
modify
the
plug
provided
with
the
product
—
if
it
will
not
fit
the
outlet,
have
a
proper
outlet
installed
by
a
qualified
electrician.
SAVE
THESE
INSTRUCTIONS
-
For
the
U.K.
-
WARNING:
THIS
APPARATUS
MUST
BE
EARTHED
IMPORTANT
:
THE
WIRES
IN
THIS
MAINS
LEAD
ARE
COLOURED
IN
ACCORDANCE
WITH
THE
FOLLOWING
CODE.
GREEN-AND-YELLOW:
EARTH,
BLUE:
NEUTRAL,
BROWN:
LIVE
As
the
colours
of
the
wires
in
the
mains
lead
of
this
apparatus
may
not
correspond
with
the
coloured
markings
identifying
the
terminals
in
your
plug
proceed
as
follows:
The
wire
which
is
coloured
GREEN-AND-YELLOW
must
be
connected
to
the
terminal
in
the
plug
which
is
marked
by
the
letter
E
or
by
the
safety
earth
symbol
0
or
coloured
GREEN
or
GREEN-AND-YELLOW.
The
wire
which
is
coloured
BLUE
must
be
connected
to
the
terminal
which
is
marked
with
the
letter
N
or
coloured
BLACK.
The
wire
which
is
coloured
BROWN
must
be
connected
to
the
terminal
which
is
marked
with
the
letter
Lor
coloured
RED.
The
product
which
is
equipped
with
a
THREE
WIRE
GROUNDING
TYPE
AC
PLUG
must
be
grounded.
Copyright
©1990
by
ROLAND
CORPORATION
All
rights
reserved.
No
part
of
this
publication
may
be
reproduced
in
any
form
without
the
written
permission
of
ROLAND
CORPORATION.

■
PANEL
DESCRIPTION
((Front
Panel))
O
Input
Jacks
1,
2
Jacks
that
accept
input
from
a
microphone
or
musical
instrument.
©
Input
Gain
Knobs
1,
2
Provide
adjustment
of
the
input
gain
for
the
respective
Input
Jacks.
The
further
they
are
moved
clockwise,
the
greater
the
input
level
becomes.
Preferably,
the
adjustment
should
be
made
so
you
get
the
strongest
possible
input
without
causing
the
Overload
indicators
to
light
up.
©
Overload
Indicators
Light
up
when
the
level
of
the
input
signal
is
excessive.
O
Output
Balance
Knob
This
knob
is
used
to
adjust
the
volume
balance
of
the
direct
sound
versus
the
effected
sound.
When
turned
fully
counterclockwise,
you
obtain
solely
the
direct
sound.
When
turned
fully
clockwise,
you
obtain
the
effected
sound
alone.
At
the
center
position
(£))
the
direct
and
effected
signals
will
be
in
equal
proportions.
©
Pre-Equalizer
Low
Knob
Adjusts
the
quality
of
the
lower
frequency
portions
of
the
effected
sound.
At
the
center
position
(£)),
flat
response
is
obtained.
When
moved
clockwise,
the
lower
range
portions
are
emphasized.
When
moved
counterclockwise,
they
are
dampened.
©
Pre-Equalizer
High
Knob
Adjusts
the
quality
of
the
higher
frequency
portions
of
the
effected
sound.
At
the
center
position
(([)),
flat
response
is
obtained.
When
moved
clockwise,
the
upper
range
portions
are
emphasized.
When
moved
coun¬
terclockwise,
they
are
dampened.
Q
Mode
Switch
Provides
for
selection
of
the
type
of
effected
sound
(Mode).
For
explanation
of
the
settings
pertaining
to
each
Mode,
refer
to
the
"Mode
Chart,"
page
6.
*
Note
that
a
certain
amount
of
noise
may
be
produced
when
a
change
in
the
Mode
is
made.
This
does
not
indicate
a
malfunction.
©
Decay
Knob
Used
to
determine
the
number
of
repetitions
in
the
effected
sound
and
the
reverberation
time.
Its
function
varies
depending
on
the
selection
made
using
the
Mode
Switch
©.
For
further
details,
refer
to
the
"Mode
Chart,"
page
6.
*
Although
a
certain
amount
of
noise
may
be
produced
when
this
knob
is
turned,
it
does
not
indicate
a
malfunction.
©
Warmth
Knob
Used
to
add
"pulsation"
to
the
effected
sound.
The
effect
becomes
deeper
the
more
the
knob
is
moved
clockwise.
With
tape-type
echoes,
a
distinctive
effect
is
obtained
as
a
result
of
the
fluctuation
caused
by
minute
changes
in
the
tape
travel.
The
Warmth
knob
allows
you
to
produce
such
fluctuations
(or
pulsations)
electronically,
and
as
a
result
you
obtain
an
echo
simitar
to
that
provided
by
the
tape
method.
©
Power
Switch
Turns
power
on
and
off.
*
Whenever
you
turn
the
power
switch
on
or
off,
make
sure
that
you
have
the
power
on
your
amplifier(s)
turned
down
to
"0".
*
Due
to
this
unit's
circuitry
protection
feature,
it
requires
a
few
moments
after
power
is
turned
on
before
it
is
ready
for
operation.
®
Power
Indicator
Lights
up
when
the
power
is
turned
on.

Thank
you,
and
congratulations
on
your
choice
of
the
BOSS
RE-1000.
The
RE-1000
is
equipped
with
newly
developed
DSP
(Digital
Signal
Processing)
chips,
making
it
a
full-featured
unit
that
provides
high-quality
sound.
It
is
an
easy-to-use,
yet
powerful
Digital
Multi-Echo
unit
that
also
can
boast
of
a
very
favorable
cost/performance
ratio.
To
make
sure
you
get
the
most
out
of
the
RE-1000
and
enjoy
continuing
satisfaction
as
a
result
of
operating
it
under
the
best
of
conditions,
please
thoroughly
read
these
instructions
before
operating
the
unit.
■
FEATURES
•
16-bit
digital
processing
assures
high-quality
sound.
e
Provides
an
abundant
selection
from
16
types
of
effects,
including
simple
echoes
or
multi-echoes,
as
well
as
those
combined
with
reverb.
©
An
Input
Gain
knob
widens
your
possibilities
-
microphones,
musical
instruments,
and
many
other
devices
can
be
used.
•
For
input,
an
onboard
two-channel
mixer
allows
you
to
have
two
devices,
such
as
a
microphone
and
musical
instrument,
connected
simultaneously.
•
A
Warmth
knob
facilitates
creation
of
echo
effects
that
pulsate,
and
have
more
warmth.
©
A
truly
expansive
echo
is
provided
from
the
Stereo
Out
jacks.
©
Full
control
over
the
tone
of
the
effected
sound
is
furnished
by
means
of
the
Pre-Equalizer.
■
IMPORTANT
NOTES
In
addition
to
the
items
listed
under
Safety
Precautions
on
page
2,
please
read
and
adhere
to
the
following:
Power
Supply
©
When
making
any
connections
with
other
devices,
always
turn
off
the
power
to
all
equipment
first;
this
will
help
prevent
damage
or
malfunction.
•
Do
not
use
this
unit
on
the
same
power
circuit
with
any
device
that
will
generate
line
noise,
such
as
a
motor
or
variable
lighting
system.
Placement
•
Using
the
unit
near
power
amplifiers
(or
other
equipment
containing
large
transformers)
may
induce
hum.
•
This
unit
may
interfere
with
radio
and
television
reception.
Do
not
use
this
unit
in
the
vicinity
of
such
receivers.
Maintenance
«
For
everyday
cleaning
wipe
the
unit
with
a
soft,
dry
cloth
(or
one
that
has
been
slightly
dampened
with
water).
To
remove
stubborn
dirt,
use
a
mild
neutral
detergent.
Afterwards,
be
sure
to
wipe
the
unit
thoroughly
with
a
soft,
dry
cloth.
•
Never
use
benzene,
thinners,
alcohol
or
solvents
of
any
kind,
to
avoid
the
risk
of
discoloration
and/or
deformation.
Additional
Precautions
©
Protect
the
unit
from
strong
impact.
•
A
small
amount
of
heat
will
radiate
from
the
unit,
and
thus
should
be
considered
normal.
•
Before
using
the
unit
in
a
foreign
country,
consult
with
qualified
service
personnel.
((Rear
Panel))
RE-IOOO
DO
HOT
OK*
j
0mSS&,
ATTENTION:
msouc
oe
choc
euctmoui
he
ms
ouvhib
WARNING
:
TO
REDUCE
THE
RISK
Of
EIRE
OR
ELECTRIC
SHOCK.
DO
NO!
CKROSE
tM«
APtLlAMCt
TO
RAIN
OR
KOWTOW
“COMRUO
WITH
THE
LIMITS
EOR
A
CLASS
B
COMPUTING
DEVICE
PURSUANT
TC
5UHRART
J
or
KART
IS
c
-
OUTPUT-
WO)
©
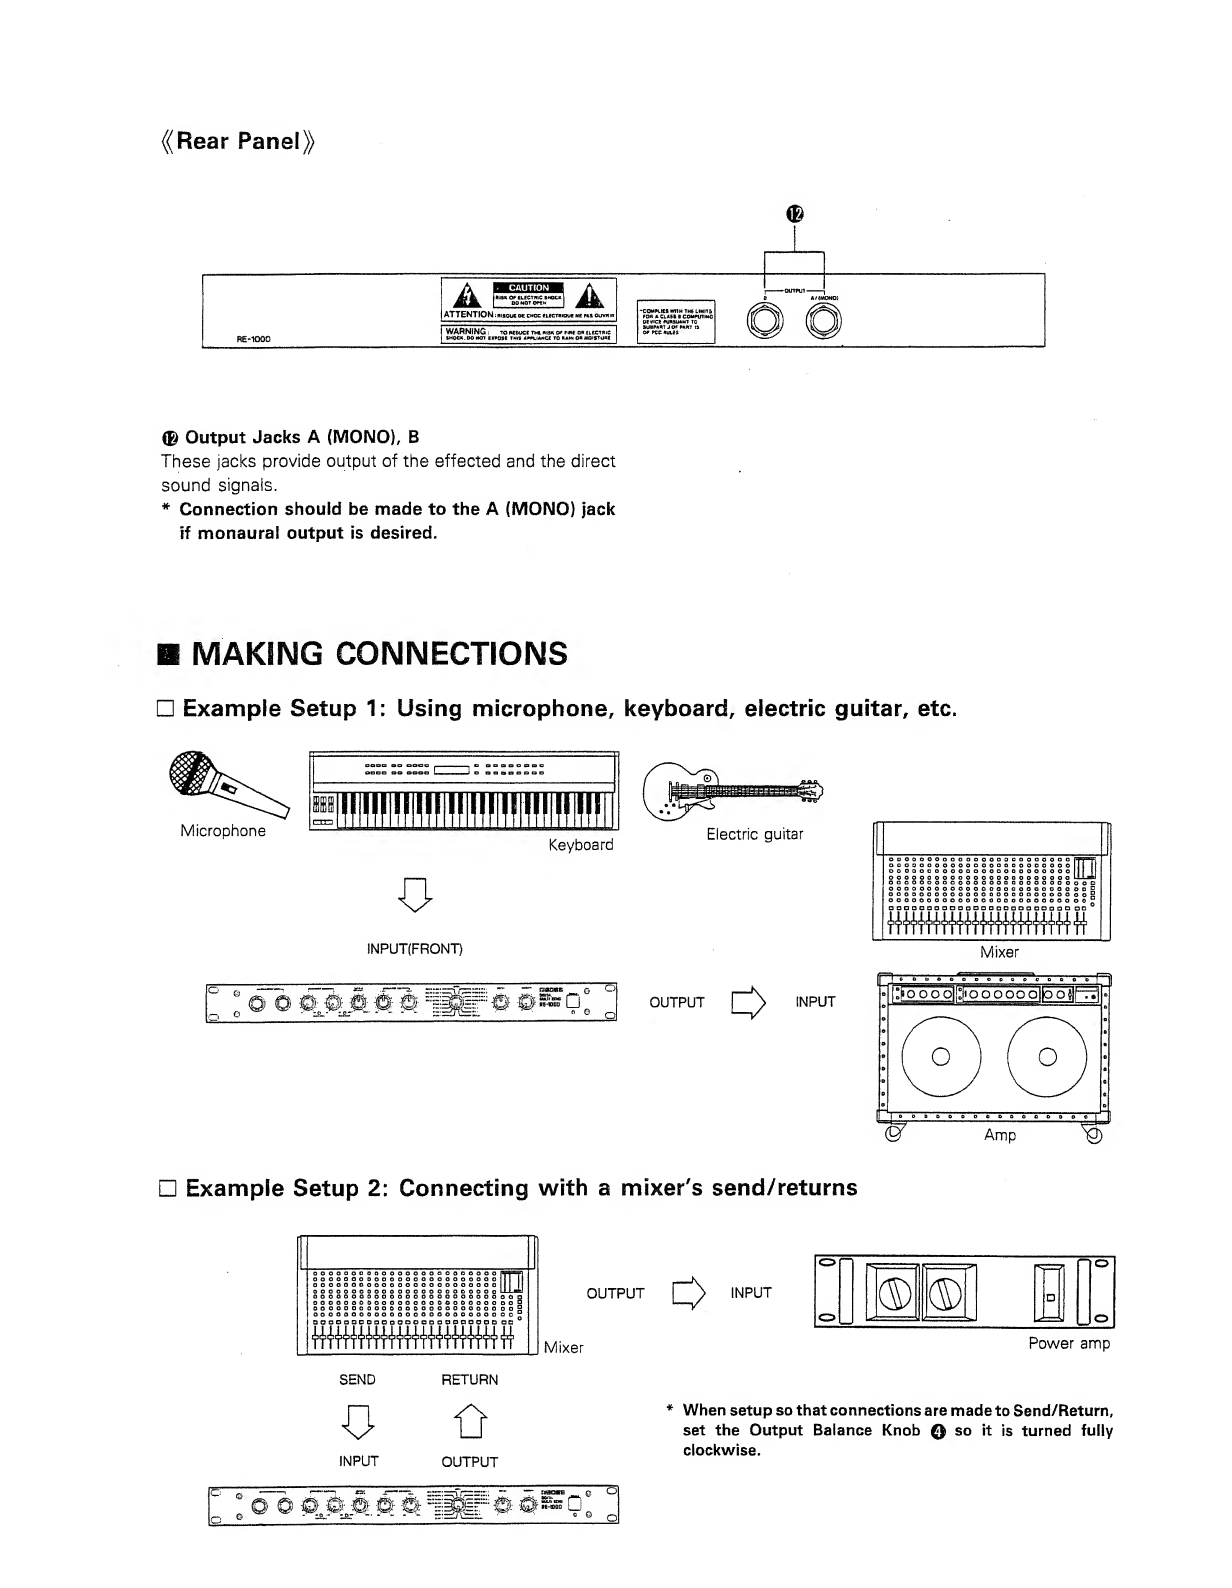
Output
Jacks
A
(MONO),
B
These
jacks
provide
output
of
the
effected
and
the
direct
sound
signals.
*
Connection
should
be
made
to
the
A
(MONO)
jack
if
monaural
output
is
desired.
H
MAKING
CONNECTIONS
□
Example
Setup
1:
Using
microphone,
keyboard,
electric
guitar,
etc.
Keyboard
Electric
guitar
o
INPUT(FRONT)
ooopoooooooooooooooooooo
o
o
9
000000000000000000000000
o
c
“
cjjjj
0
Mixer
□
Example
Setup
2:
Connecting
with
a
mixer's
send/returns
SSI
ooooooooooooooooooooooo
000000000000000000000000°
OUTPUT
Mixer
SEND
RETURN
0
o
INPUT
OUTPUT
°
"
o
c
o
®
-
a:
—
*
-
*
-
■
illfe:
0
Qtnmo
i_J
o
^
INPUT
Power
amp
*
When
setup
so
that
connections
are
made
to
Send/Return,
set
the
Output
Balance
Knob
©
so
it
is
turned
fully
clockwise.
■
OPERATION
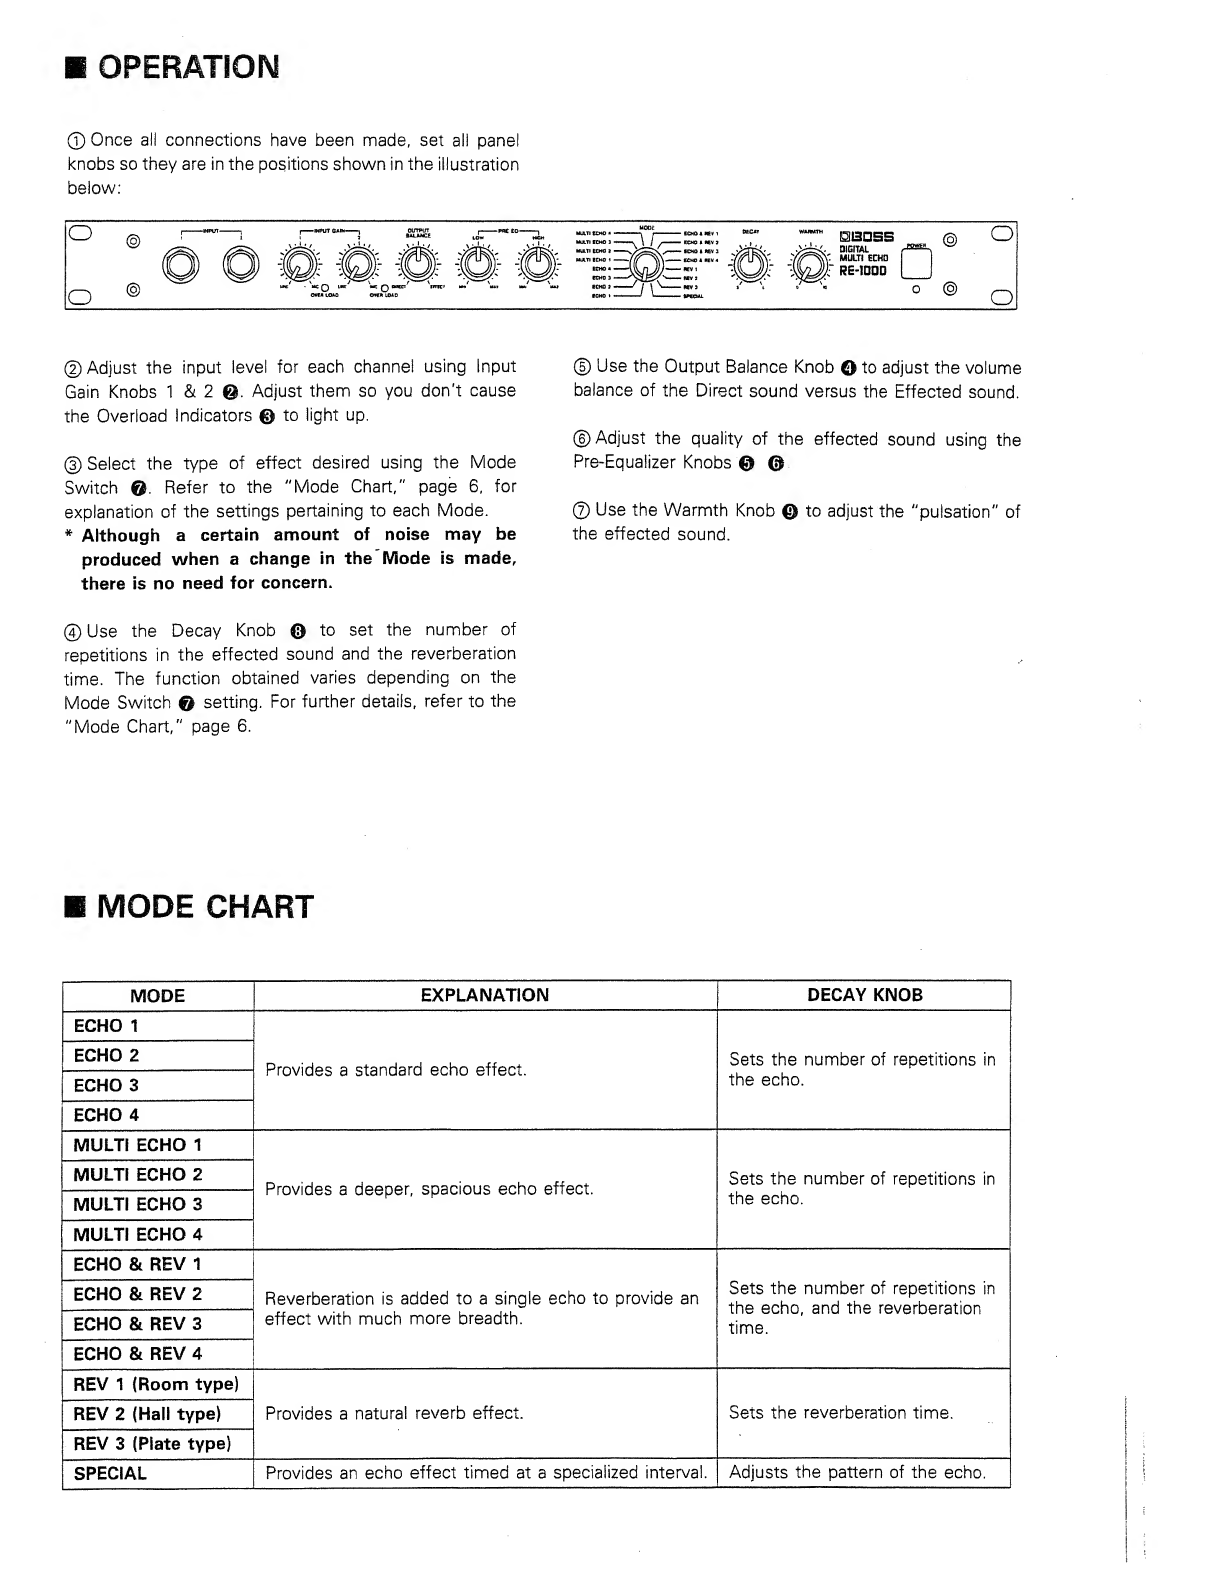
©
Once
all
connections
have
been
made,
set
all
panel
knobs
so
they
are
in
the
positions
shown
in
the
illustration
below:
o
o
©
SBOHS
DIGITAL
^
sm!L
MULTI
ECHO
RE-10DD
®
o
o
©Adjust
the
input
level
for
each
channel
using
Input
Gain
Knobs
1
&
2
©.
Adjust
them
so
you
don't
cause
the
Overload
Indicators
©
to
light
up.
©
Select
the
type
of
effect
desired
using
the
Mode
Switch
©
Refer
to
the
"Mode
Chart,"
page
6,
for
explanation
of
the
settings
pertaining
to
each
Mode.
*
Although
a
certain
amount
of
noise
may
be
produced
when
a
change
in
the
Mode
is
made,
there
is
no
need
for
concern.
@
Use
the
Decay
Knob
©
to
set
the
number
of
repetitions
in
the
effected
sound
and
the
reverberation
time.
The
function
obtained
varies
depending
on
the
Mode
Switch
©
setting.
For
further
details,
refer
to
the
"Mode
Chart,"
page
6.
©
Use
the
Output
Balance
Knob
©
to
adjust
the
volume
balance
of
the
Direct
sound
versus
the
Effected
sound.
©Adjust
the
quality
of
the
effected
sound
using
the
Pre-Equalizer
Knobs
©
©
©
Use
the
Warmth
Knob
©
to
adjust
the
"pulsation"
of
the
effected
sound.
■
MODE
CHART
MODE
EXPLANATION
DECAY
KNOB
ECHO
1
Provides
a
standard
echo
effect.
Sets
the
number
of
repetitions
in
the
echo.
ECHO
2
ECHO
3
ECHO
4
MULTI
ECHO
1
Provides
a
deeper,
spacious
echo
effect.
Sets
the
number
of
repetitions
in
the
echo.
MULTI
ECHO
2
MULTI
ECHO
3
MULTI
ECHO
4
ECHO
&
REV
1
Reverberation
is
added
to
a
single
echo
to
provide
an
effect
with
much
more
breadth.
Sets
the
number
of
repetitions
in
the
echo,
and
the
reverberation
time.
ECHO
&
REV
2
ECHO
&
REV
3
ECHO
&
REV
4
REV
1
(Room
type)
Provides
a
natural
reverb
effect.
Sets
the
reverberation
time.
REV
2
(Hall
type)
REV
3
(Plate
type)
SPECIAL
Provides
an
echo
effect
timed
at
a
specialized
interval.
Adjusts
the
pattern
of
the
echo.

■
SPECIFICATIONS
®
Input
Level/Input
Impedance:
+4dBm/150kfl
to
-52dBm/2kn
(Nominal)
+
19dBm
(Max)
•
Output
Level/Output
Impedance
-20dBm/1.5kn
•
Output
Load
Impedance
More
than
lOkfi
•
Frequency
Response
Direct:
20Hz
to
20kHz
(+1,
-3dB)
Effect:
30Hz
to
10kHz
(+1,
-3dB)
•
Sampling
Frequency
31.25kHz
©
Sampling
System
16-bit
Linear
©
Residual
Noise
Less
than
—96dBm
(IHF-A)
•
Control
input
Gain
1,
2
Output
Balance
Pre
Equalizer-High
Pre
Equalizer-Low
Decay
Time
Warmth
•
Switch
Mode
(16
Mode)
Power
(On/Off)
•
Indicator
Power
Overload
1,
2
•
Jacks
input
1,
2
Output
A
(MONO),
B
•
Power
AC120,
220,
240V
•
Power
Consumption
6.5W
•
Dimensions
482(W)
x
44(H)
x208(D)mm/19"x
1-13/16"x
8-1/4"
•
Weight:
2.5kg
51b
9oz
*
Specifications
are
subject
to
change
without
notice.

/-For
West
Germany-\
Bescheinigung
des
Herstellers/lmporteurs
Hiermit
wird
bescheinigt,
daB
der/die/das
in
Ubereinstimmung
mit
den
Bestimmungen
der
digital
multi
echo
RE-iooo
Amtsbl.
Vfg
1046/1984
(Gerat.
Typ.
Bezeichnung)
(Amtsbiattverfugung)
funk-entstort
ist.
Der
Deutschen
Bundespost
wurde
das
Inverkehrbringen
dieses
Gerates
angezeigt
und
die
Berechtigung
zur
Uberprufung
der
Serie
auf
Einhattung
der
Bestimmungen
eingeraumt.
Roland
Corporation
Osaka/Japan
Name
des
Herstellers/lmporteurs
___
’
-
r—
-—-For
the
USA-\
RADIO
AND
TELEVISION
INTERFERENCE
WARNING
—
This
equipment
has
been
verified
to
comply
with
the
limits
for
a
Class
B
computing
device,
pursuant
to
Subpan
J
of
Part
15
of
FCC
rules
Operation
with
non-certified
or
non-verified
equipment
is
likely
to
result
in
interference
to
radio
and
TV
reception
The
equipment
described
in
this
manual
generates
and
uses
radio
frequency
energy.
II
it
is
not
installed
and
used
properly,
that
is.
m
strict
accordance
with
our
instructions,
it
may
cause
interference
with
radio
and
television
reception.
This
equipment
has
been
tested
and
found
to
comply
with
the
limits
for
a
Class
B
computing
device
in
accordance
with
the
specifications
in
Subpart
J,
of
Part
15,
of
FCC
Ruies.
These
rules
are
designed
to
provide
reasonable
protection
against
such
a
interference
in
a
rasidential
installation
However,
there
is
no
guarantee
that
the
interference
will
not
occur
in
a
particular
installation
If
this
equipment
does
cause
interference
to
radio
or
television
reception,
which
can
be
determined
by
turning
the
equipment
on
and
off.
the
user
is
encouraged
to
try
to
correct
ihe
interference
by
the
following
measure
•
Disconnect
other
devices
and
their
input/output
cables
one
at
a
time
II
the
interference
stops,
it
is
caused
by
either
the
other
device
ot
its
I
O
cable
These
devices
usually
require
Roland
designated
shielded
I/O
cables
For
Roland
devices,
you
can
obtain
the
proper
shielded
cable
from
your
dealer
Foi
non
Roland
devices,
contact
the
manufacturer
or
dealer
for
assistance.
If
your
equipment
does
cause
interference
to
radio
or
television
reception,
you
can
try
to
correct
the
interference
by
using
urn?
m
more
ol
the
following
measures
•
Turn
the
TV
or
radio
antenna
until
the
interference
stops.
•
Move
the
equipment
to
one
side
or
the
other
of
the
TV
or
radio
•
Move
the
equipment
farther
away
from
the
TV
or
radio.
•
Plug
the
equipment
into
an
outlet
that
is
on
a
different
circuit
than
the
TV
or
radio.
(That
is.
make
certain
the
equipment
and
the
radio
or
television
set
are
on
circuits
con¬
trolled
by
different
circuit
breakers
or
fuses.)
•
Consider
installing
a
rooftop
television
antenna
with
coaxial
cable
lead-in
between
the
antenna
and
TV
If
necessary,
you
should
consult
your
dealer
or
an
experienced
radio/tetevision
technician
for
additional
suggestions.
You
may
find
helpful
the
following
booklet
prepared
by
the
Federal
Communications
Commission
"How
to
Identify
and
Resoive
Radio
—
TV
Interference
Problems'
This
booklet
is
available
from
the
U.S.
Government
Printing
Office.
Washington.
D-C-.
20402.
Stock
No.
004-000-00345-4.
v,___
For
Canada-\
CLASS
B
NOTICE
This
digital
apparatus
does
not
exceed
the
Class
B
limits
for
radio
noise
emissions
set
out
in
the
Radio
Interference
Regulations
of
the
Canadian
Department
of
Communications.
CLASSE
B
AVIS
Cet
appareil
numerique
ne
depasse
pas
les
limites
de
la
classe
B
au
niveau
des
emissions
de
bruits
radioelectriques
fixes
dans
le
Reglement
des.signaux
parasites
par
le
ministere
canadien
des
Communications.
Printed
in
Taiwan
'90-4-E3-11Y
Products
of
Roland


Table of contents
Other BOSSCO Marine Equipment manuals


