BOSSCO WAVE RADIO II User manual

WAVE®RADIO II
Owner’s Guide | Bedienungsanleitung | Notice d’utilisation | Manuale di istruzioni | Gebruiksaanwijzing
©2009 Bose Corporation, The Mountain,
Framingham, MA 01701-9168 USA
AM324805 Rev.00
WAVE®RADIO II
AM324805_00_Cover.fm Page 1 Tuesday, July 28, 2009 12:55 PM
2
Français Español English
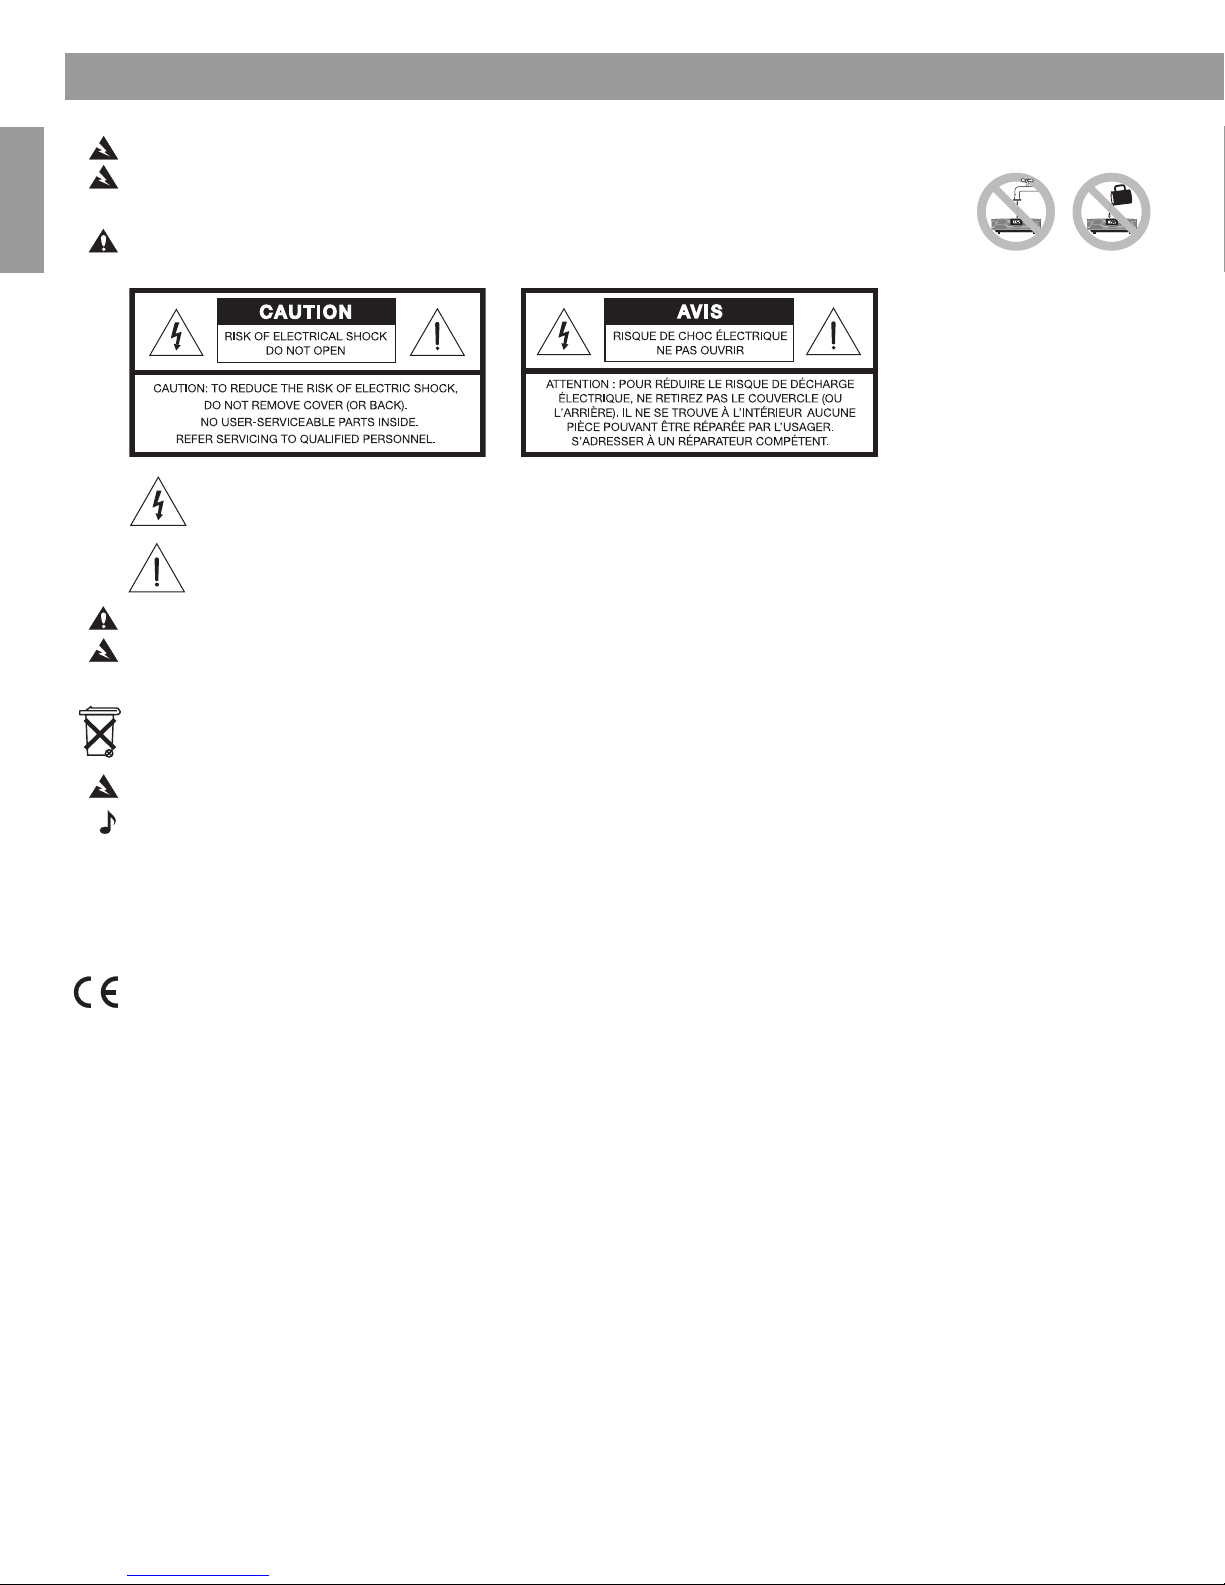
Safety Information
WARNING:
To reduce the risk of fire or electrical shock, do not expose the product to rain or moisture.
WARNING: The apparatus should not be exposed to dripping or splashing, and objects filled with liquids,
such as vases, should not be placed on the apparatus. As with any electronic products, take care not to spill
liquids into any part of the system. Liquids can cause a failure and/or a fire hazard.
CAUTION: To reduce the risk of electric shock, do not disassemble this product unless you are qualified.
Refer servicing to qualified service personnel.
The lightning flash with arrowhead symbol within an equilateral triangle alerts the user to the presence of uninsulated
dangerous voltage within the system enclosure that may be of sufficient magnitude to constitute a risk of electrical
shock.
The exclamation mark within an equilateral triangle, as marked on the system, is intended to alert the user to the
presence of important operating and maintenance instructions in this owner’s guide.
CAUTION:
To prevent electric shock, match the wide blade of the line cord plug to the wide slot of the AC (mains) receptacle. Insert fully.
WARNING:
K
eep the remote control battery away from children. It may cause a fire or chemical burn if mishandled. Do not
recharge, disassemble, heat above 100ºC (212ºF) or incinerate. Dispose of used batteries promptly. Replace only with a battery of the
correct type and model number.
Please dispose of used batteries properly,
following any local regulations. Do not incinerate.
WARNING: No naked flame sources, such as lighted candles, should be placed on the apparatus.
Note: The product label is located on the bottom of the product.
Please read this owner’s guide
Please take the time to follow the instructions in this owner’s guide carefully. It will help you set up and operate your system
properly and enjoy all of its advanced features. Please save this owner’s guide for future reference.
This product conforms to all EU Directive requirements as applicable by law. The complete Declaration of Conformity can be
found at: www.Bose.com/static/compliance.
©1994-2005 Bose Corporation. No part of this work may be reproduced, modified, distributed or otherwise used without prior
written permission. All trademarks referenced herein are property of Bose Corporation. The Wave®radio II design is a registered
trademark of Bose Corporation.
01.WRII_Pg2_Safety.fm Page 2 Tuesday, August 4, 2009 10:01 AM

3
English Français NederlandsDeutsch Italiano Italiano SvenskaNederlands
Contents
Setting Up Your Wave®Radio II . . . . . . . . . . . . . . . . . . . . . . . . . . . . . . . . . . . . . . . . . . . . . . . . . . . . . . . . . 4
Unpacking . . . . . . . . . . . . . . . . . . . . . . . . . . . . . . . . . . . . . . . . . . . . . . . . . . . . . . . . . . . . . . . . 4
Selecting a location . . . . . . . . . . . . . . . . . . . . . . . . . . . . . . . . . . . . . . . . . . . . . . . . . . . . . . . . . 4
Connecting to power . . . . . . . . . . . . . . . . . . . . . . . . . . . . . . . . . . . . . . . . . . . . . . . . . . . . . . . . 5
Setting the clock . . . . . . . . . . . . . . . . . . . . . . . . . . . . . . . . . . . . . . . . . . . . . . . . . . . . . . . . . . . . 6
A Brief Introduction to Some Special Features . . . . . . . . . . . . . . . . . . . . . . . . . . . . . . . . . . . . . . . . 7
Introduction . . . . . . . . . . . . . . . . . . . . . . . . . . . . . . . . . . . . . . . . . . . . . . . . . . . . . . . . . . . . . . . 7
Special Features . . . . . . . . . . . . . . . . . . . . . . . . . . . . . . . . . . . . . . . . . . . . . . . . . . . . . . . . . . . . 7
Operating Your Wave®radio II . . . . . . . . . . . . . . . . . . . . . . . . . . . . . . . . . . . . . . . . . . . . . . . . . . . . 8
Remote control operating guide . . . . . . . . . . . . . . . . . . . . . . . . . . . . . . . . . . . . . . . . . . . . . . . . 8
Reading the display . . . . . . . . . . . . . . . . . . . . . . . . . . . . . . . . . . . . . . . . . . . . . . . . . . . . . . . . . 9
Turning the Wave®radio II on and off . . . . . . . . . . . . . . . . . . . . . . . . . . . . . . . . . . . . . . . . . . . 9
Controlling the volume . . . . . . . . . . . . . . . . . . . . . . . . . . . . . . . . . . . . . . . . . . . . . . . . . . . . . . . 9
Setting up automatic shutoff (Sleep) . . . . . . . . . . . . . . . . . . . . . . . . . . . . . . . . . . . . . . . . . . . . 9
Listening to FM/AM Radio . . . . . . . . . . . . . . . . . . . . . . . . . . . . . . . . . . . . . . . . . . . . . . . . . . . . . . . 10
Turning the radio on . . . . . . . . . . . . . . . . . . . . . . . . . . . . . . . . . . . . . . . . . . . . . . . . . . . . . . . . . 10
Tuning the radio . . . . . . . . . . . . . . . . . . . . . . . . . . . . . . . . . . . . . . . . . . . . . . . . . . . . . . . . . . . . 10
Storing a radio station to memory (Presets) . . . . . . . . . . . . . . . . . . . . . . . . . . . . . . . . . . . . . . . 11
TALK RADIO mode . . . . . . . . . . . . . . . . . . . . . . . . . . . . . . . . . . . . . . . . . . . . . . . . . . . . . . . . . . 11
Setting and Using The Alarm . . . . . . . . . . . . . . . . . . . . . . . . . . . . . . . . . . . . . . . . . . . . . . . . . . . . . 12
Setting the alarm . . . . . . . . . . . . . . . . . . . . . . . . . . . . . . . . . . . . . . . . . . . . . . . . . . . . . . . . . . . 12
Waking to a radio station . . . . . . . . . . . . . . . . . . . . . . . . . . . . . . . . . . . . . . . . . . . . . . . . . . 12
Setting the alarm time . . . . . . . . . . . . . . . . . . . . . . . . . . . . . . . . . . . . . . . . . . . . . . . . . . . . 12
Using the alarm . . . . . . . . . . . . . . . . . . . . . . . . . . . . . . . . . . . . . . . . . . . . . . . . . . . . . . . . . . . . 13
Stopping a sounding alarm . . . . . . . . . . . . . . . . . . . . . . . . . . . . . . . . . . . . . . . . . . . . . . . . 13
Turning alarm on and off . . . . . . . . . . . . . . . . . . . . . . . . . . . . . . . . . . . . . . . . . . . . . . . . . . 13
Snoozing an alarm . . . . . . . . . . . . . . . . . . . . . . . . . . . . . . . . . . . . . . . . . . . . . . . . . . . . . . . 13
Connecting Other Equipment . . . . . . . . . . . . . . . . . . . . . . . . . . . . . . . . . . . . . . . . . . . . . . . . . . . . . 14
Rear panel input/outputs . . . . . . . . . . . . . . . . . . . . . . . . . . . . . . . . . . . . . . . . . . . . . . . . . . . . . 14
Connecting an external FM antenna . . . . . . . . . . . . . . . . . . . . . . . . . . . . . . . . . . . . . . . . . . . . 14
Using headphones . . . . . . . . . . . . . . . . . . . . . . . . . . . . . . . . . . . . . . . . . . . . . . . . . . . . . . . . . . 15
Using your Wave®radio II with other audio equipment . . . . . . . . . . . . . . . . . . . . . . . . . . . . . . 16
Connecting your Wave®radio II to a Lifestyle®system . . . . . . . . . . . . . . . . . . . . . . . . . . . . . . 16
Personalising Your Wave®radio II . . . . . . . . . . . . . . . . . . . . . . . . . . . . . . . . . . . . . . . . . . . . . . . . . 18
The set-up menu . . . . . . . . . . . . . . . . . . . . . . . . . . . . . . . . . . . . . . . . . . . . . . . . . . . . . . . . . . . 18
Adjusting the snooze time . . . . . . . . . . . . . . . . . . . . . . . . . . . . . . . . . . . . . . . . . . . . . . . . . . . . 19
Changing the Radio Data System (RDS) information setting . . . . . . . . . . . . . . . . . . . . . . . . . . 19
Changing the clock time format . . . . . . . . . . . . . . . . . . . . . . . . . . . . . . . . . . . . . . . . . . . . . . . . 20
Adjusting the display brightness . . . . . . . . . . . . . . . . . . . . . . . . . . . . . . . . . . . . . . . . . . . . . . . 20
Setting the room code . . . . . . . . . . . . . . . . . . . . . . . . . . . . . . . . . . . . . . . . . . . . . . . . . . . . . . . 21
Enabling the low-power mode . . . . . . . . . . . . . . . . . . . . . . . . . . . . . . . . . . . . . . . . . . . . . . . . . 21
Performing a system reset . . . . . . . . . . . . . . . . . . . . . . . . . . . . . . . . . . . . . . . . . . . . . . . . . . . . 22
Maintaining Your Wave®radio II . . . . . . . . . . . . . . . . . . . . . . . . . . . . . . . . . . . . . . . . . . . . . . . . . . . 23
Cleaning . . . . . . . . . . . . . . . . . . . . . . . . . . . . . . . . . . . . . . . . . . . . . . . . . . . . . . . . . . . . . . . . . . 23
Replacing the remote control battery . . . . . . . . . . . . . . . . . . . . . . . . . . . . . . . . . . . . . . . . . . . . 23
Troubleshooting . . . . . . . . . . . . . . . . . . . . . . . . . . . . . . . . . . . . . . . . . . . . . . . . . . . . . . . . . . . . 24
Customer service . . . . . . . . . . . . . . . . . . . . . . . . . . . . . . . . . . . . . . . . . . . . . . . . . . . . . . . . . . . 24
Limited warranty . . . . . . . . . . . . . . . . . . . . . . . . . . . . . . . . . . . . . . . . . . . . . . . . . . . . . . . . . . . . 24
Technical information . . . . . . . . . . . . . . . . . . . . . . . . . . . . . . . . . . . . . . . . . . . . . . . . . . . . . . . . 24
Index . . . . . . . . . . . . . . . . . . . . . . . . . . . . . . . . . . . . . . . . . . . . . . . . . . . . . . . . . . . . . . . . . . . . . . . . 26
00.WRII_UKE.book Page 3 Tuesday, July 28, 2009 8:43 AM
4
Français Español English
Setting Up Your Wave®Radio II
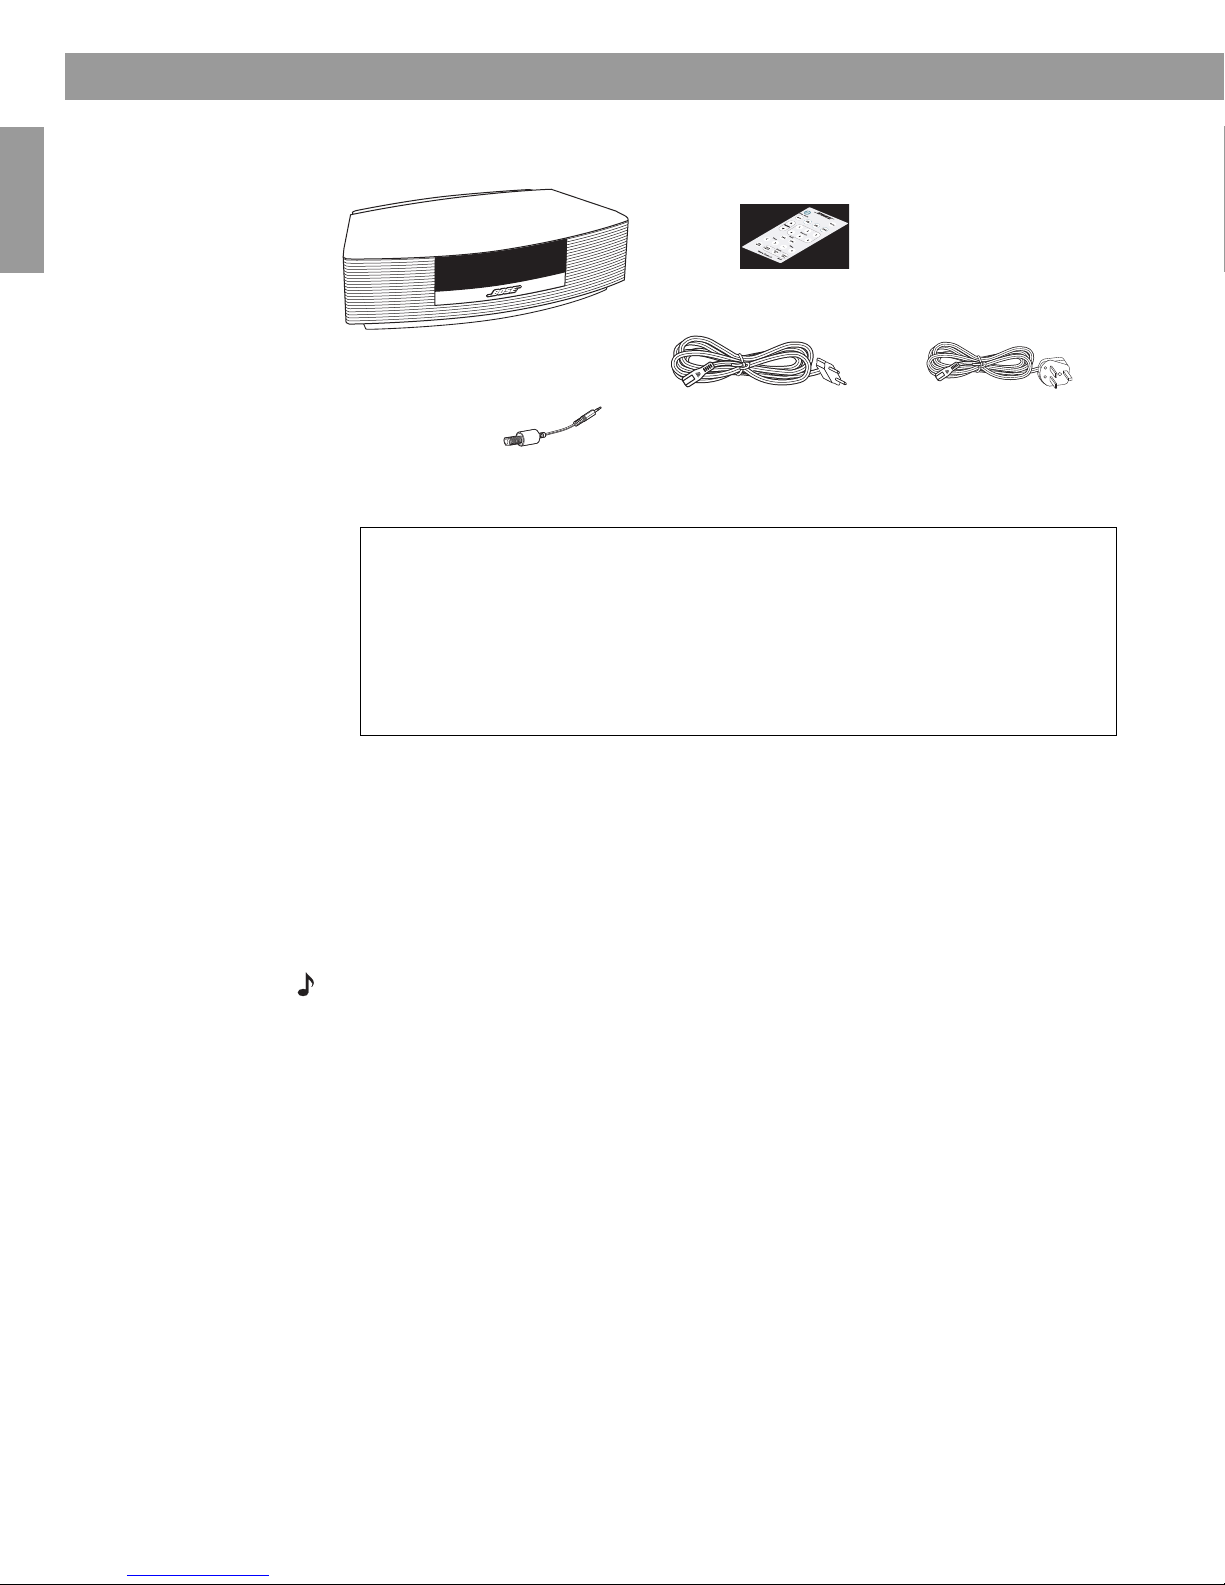
Unpacking
Please check the packaging for the following items:
Selecting a location
• Place your Wave®radio II on a table or other flat surface.
• To enjoy maximum performance, place your Wave®radio II across the room from where you
will be listening.
• For best performance, place your Wave®radio II within half a metre of a wall, and avoid
placing directly in a corner.
Note:
• DO NOT place your Wave®radio II on a metal surface. It could interfere with
AM reception.
• DO NOT place your Wave®radio II on a heat-sensitive surface. Like all electrical
equipment, it generates some heat.
•DO NOT use your Wave®radio II in a damp location or any other place where
moisture can get inside.
Wave®radio II
Euro power cord*
Remote control
(battery pre-installed)
®
*In the UK the appropriate
power cord is included.
For your records
Now is a good time to record the serial number of your new Wave®radio II. The
serial number is located on the bottom of the enclosure.
Serial number __________________________
Purchase date__________________________
We suggest you keep your sales receipt with this owner’s guide.
Antenna adapter
00.WRII_UKE.book Page 4 Tuesday, July 28, 2009 8:43 AM
5
Setting Up Your Wave®Radio II
English FrançaisEspañol
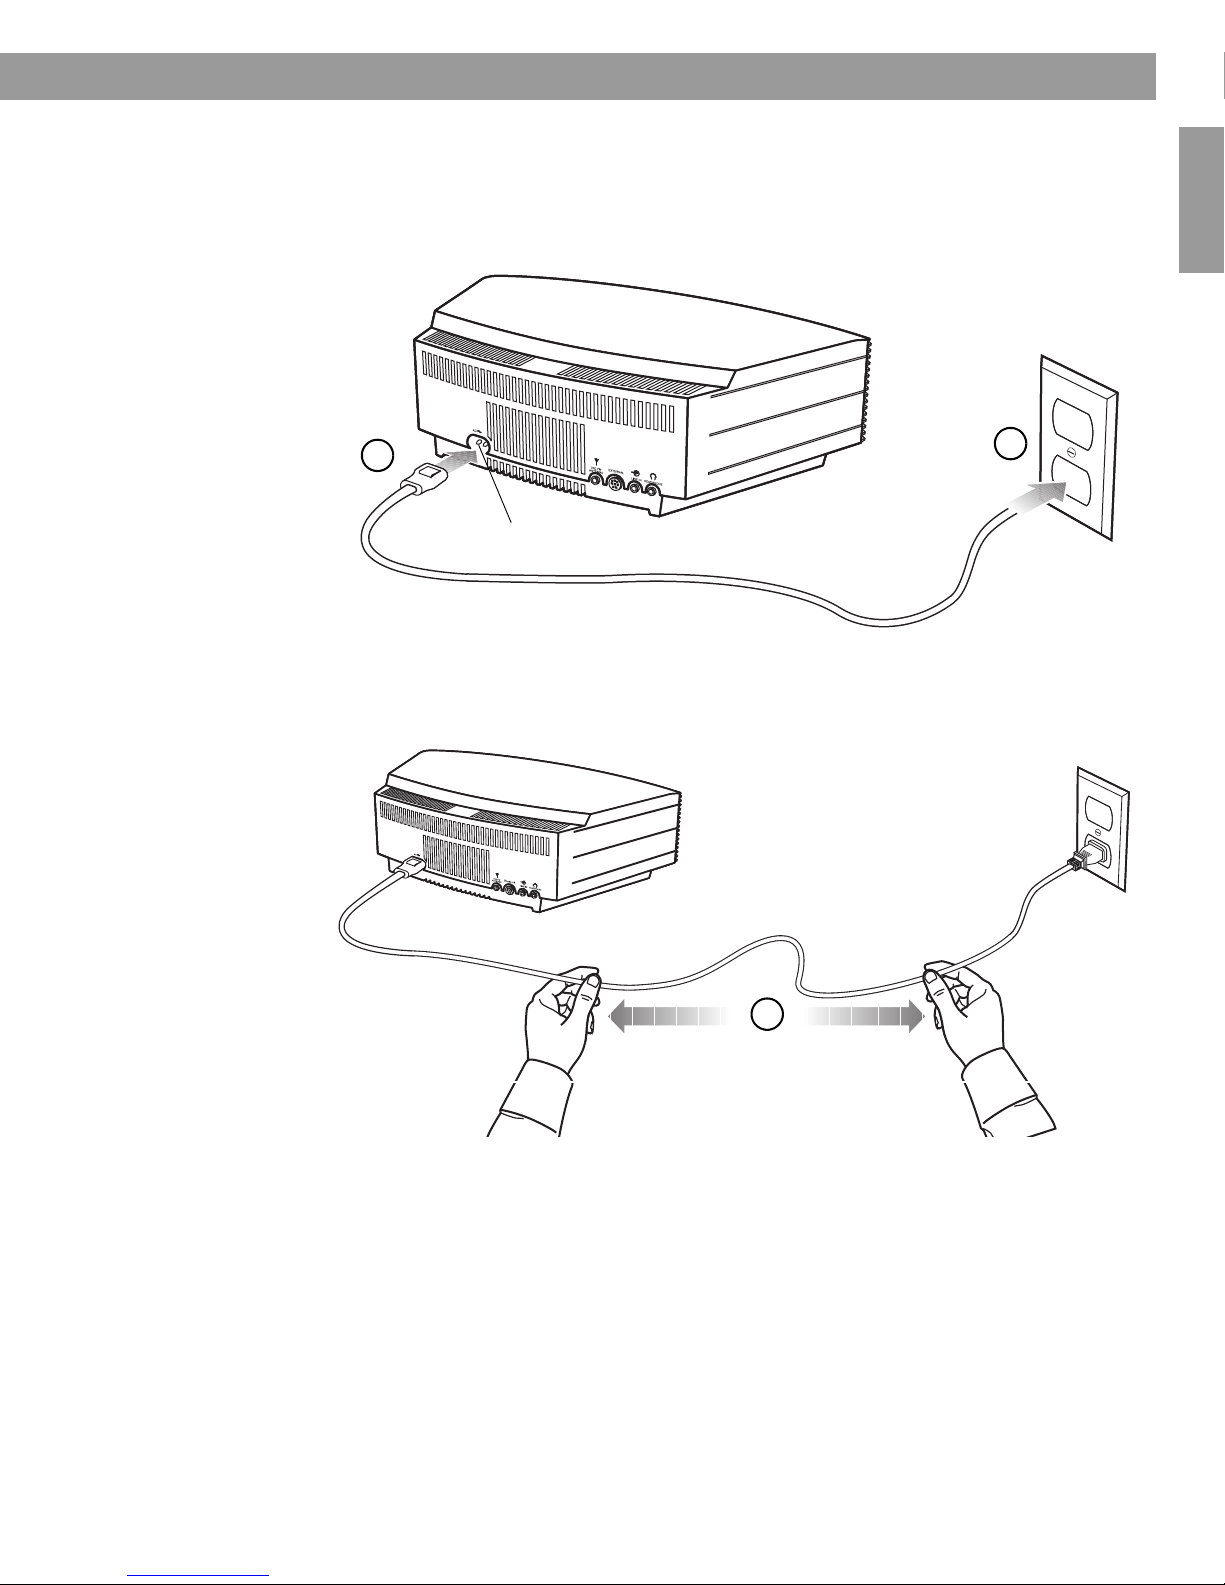
Connecting to power
1. Insert the small end of the power cord into the connector labelled AC POWER on the rear
panel of your Wave®radio II.
2. Plug the power cord into an electrical outlet.
3. Unwind and straighten the power cord to ensure the best FM reception. Your
Wave®radio II uses the power cord as an FM antenna.
12
AC POWER connector
3
00.WRII_UKE.book Page 5 Tuesday, July 28, 2009 8:43 AM

6
Setting Up Your Wave®Radio II
Français Español English
Setting the clock
After plugging in your Wave®radio II, set the clock using the remote.
Your Wave
®
radio
II
is easily operated using the remote control. Just aim the remote at the front panel and
press the buttons.
1. Press and hold Time – or Time + until
– CLOCK SET – appears on the display.
2. Press Time – to adjust the displayed time backwards or press Time + to adjust the
displayed time forwards until it matches the current time. You can also press and hold for
rapid adjustment.
3. Wait five seconds for the system to exit the clock set-up mode automatically.
To change the clock display from 12-hour (AM/PM) time to 24-hour (military) time, see
“Changing the clock time format” on page 20.
Note: In the event that the Wave®radio II loses power, the clock time and other system settings
are stored in backup memory for up to 48 hours. This feature retains the systems settings when
you unplug and move the unit or when a power outage occurs.
Note: Press-and-hold operations require holding the button down for at least one second.
00.WRII_UKE.book Page 6 Tuesday, July 28, 2009 8:43 AM

7
English FrançaisEspañol
A Brief Introduction to Some Special Features
Introduction
Thank you for purchasing the Bose®Wave®radio II, an elegant way to bring high
quality sound into any room.
Over fourteen years of research by Bose
Corporation brings you the benefits of
award-winning patented acoustic
waveguide speaker technology. Using this
technology, a tube efficiently transfers
energy from a small speaker to the
outside air over a wide range of low
frequencies. And, long waveguides,
folded into intricate patterns, fit into
products small enough to be placed
comfortably in your home. Your Wave®
radio II features new dual tapered
waveguide speaker technology,
connecting two speakers to two 66 cm
tapered waveguides which combine to
produce unprecedented instrument
timbre from a system this size.
Special Features
Alarm settings let you wake to your favourite radio station
You can set your Wave®radio II to wake you to your favourite radio station. For more details,
see “Waking to a radio station” on page 12.
The set-up menu allows you to personalise system operation
Factory system settings have been set to satisfy most owners. If you wish to change the
settings, see “Personalising Your Wave®radio II” on page 18.
The set-up menu allows you to change the following system settings to your liking:
Dual tapered
waveguides
• Snooze time • Display brightness level
• Clock time format (12- or 24-hour) •Bose
®link room code
• Reset to factory settings
00.WRII_UKE.book Page 7 Tuesday, July 28, 2009 8:43 AM
8
Français Español English
Operating Your Wave®radio II
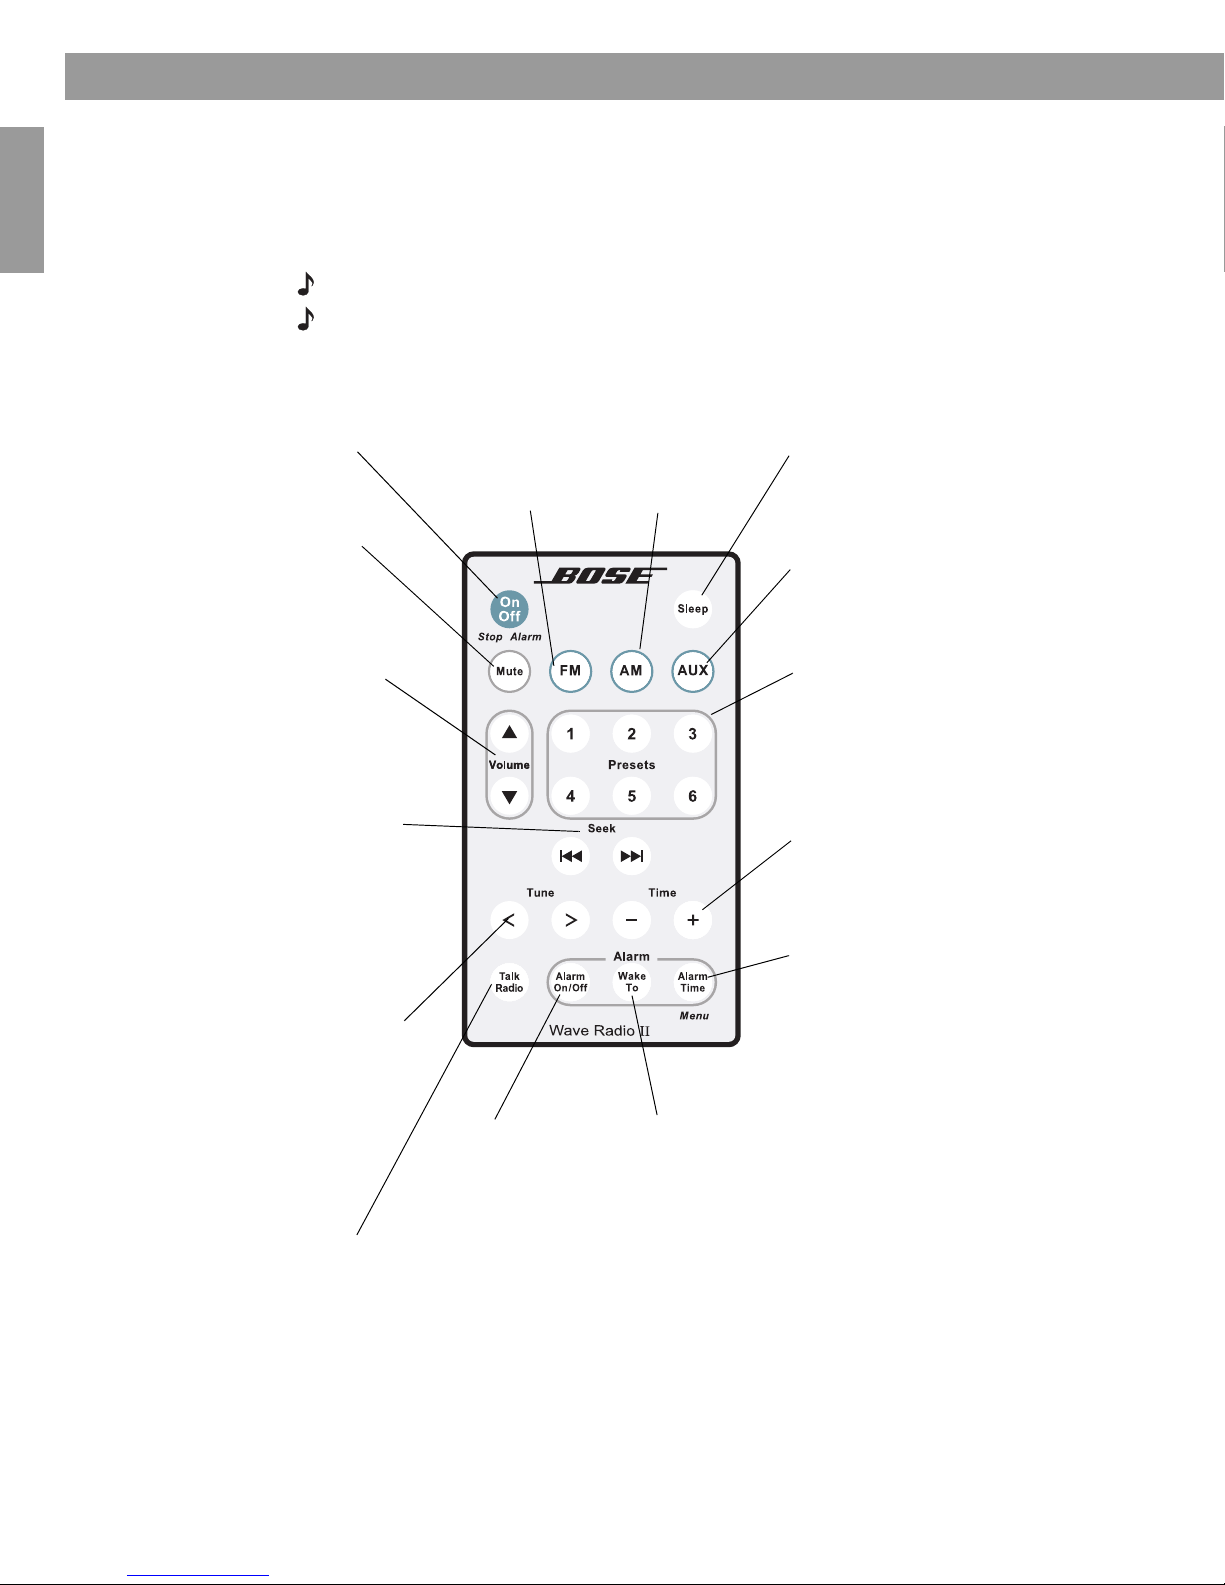
Remote control operating guide
Your Wave
®
radio
II
is easily operated using the remote control. Just aim the remote at the front
panel and press the buttons. The remote normally works within 6 metres of the front panel.
Throughout this owner’s guide you will see button icons to the left of the operating
instructions. These icons refer to buttons located on the remote control.
Note: Press-and-hold operations require holding the button down for at least one second.
Note: Pressing FM, AM, or AUX automatically turns on the Wave®
radio II to the source
selected.
On/Off (Stop Alarm)
• Turns the power on or off (page 9).
• Stops a sounding alarm (page 13). Sleep
• Snoozes a sounding alarm (page 13).
• Sets unit to shut off automatically after
10-90 minutes (page 9).
Volume
• Turns volume up or down (page 9).
Mute
• Press to silence audio (page 9).
• Press again to restore audio.
Presets
•Press: recalls a stored radio station
(page 11).
• Press and hold: stores a radio station for
quick recall (page 11).
Seek
•Press: finds the next radio station with
a strong signal (page 10).
•Press and hold: rapidly moves forwards/
backwards through radio frequencies
with a strong signal (page 10).
Tune
•Press: skips to next/previous radio
frequency (page 10).
•Press and hold: rapidly moves
forwards/backwards through radio
frequencies (page 10).
Time
• Sets clock time (page 6).
• In Alarm Set mode, sets alarm time
(page 12).
Alarm On/Off
• Turns alarm on
or off (page 13).
Talk Radio
• Turns TALK RADIO mode on or off for
AM or FM (page 11).
AUX
• Press to hear audio from an external
source connected to the AUX IN input
(page 16).
Alarm Time
•Press once: enters alarm time set-up
mode (page 12).
•Press and hold: enters the set-up menu
(page 18).
FM
• Turns on the
radio.
• Switch from
FM to AM
(page 10).
Wake To
•Press and hold: sets
the currently playing
radio station as the
alarm sound
(page 12).
AM
• Turns on the
radio.
• Switch from
AM to FM
(page 10).
00.WRII_UKE.book Page 8 Tuesday, July 28, 2009 8:43 AM
9
Operating Your Wave®radio II
English FrançaisEspañol
Reading the display
Turning the Wave®
radio II on and off
Press On/Off once to turn the Wave®
radio II on or off. The Wave®radio II turns on to the last
source played.
OR
Press any source button to turn the Wave®
radio II on to that source. Pressing the AUX does
not turn on an auxiliary source (such as your TV), so turn that on first.
Controlling the volume
Press and hold Volume or to adjust the volume level. VOLUME - 0 (silent) to 99
(loud) appears on the display to indicate the level.
Press Mute to silence the Wave®
radio II. Press Mute again, or press Volume to unmute.
To lower the volume before unmuting, press Volume while muted.
Note: When the Wave®
radio II is off, the volume can only be adjusted between 10 and 75.
Setting up automatic shutoff (Sleep)
Press Sleep to set the Wave®
radio II to shut off automatically after a selected period of time.
• After pressing Sleep, SLEEP - 30 MIN appears on the display and the sleep timer
begins counting down. If your Wave®
radio II is off, press Sleep to turn it on and
immediately set the sleep time. The last source selected will start playing as the sleep
timer counts down.
• While the SLEEP setting is displayed, press Sleep again to set the sleep timer to
10-90 minutes (in 10-minute increments) or OFF.
Note: While in sleep timer set-up mode, if more than 10 seconds elapses between button
presses, the Wave®radio II will automatically exit the sleep timer set-up mode.
• To review the remaining sleep time, press Sleep.
• To cancel the sleep timer, press On/Off.
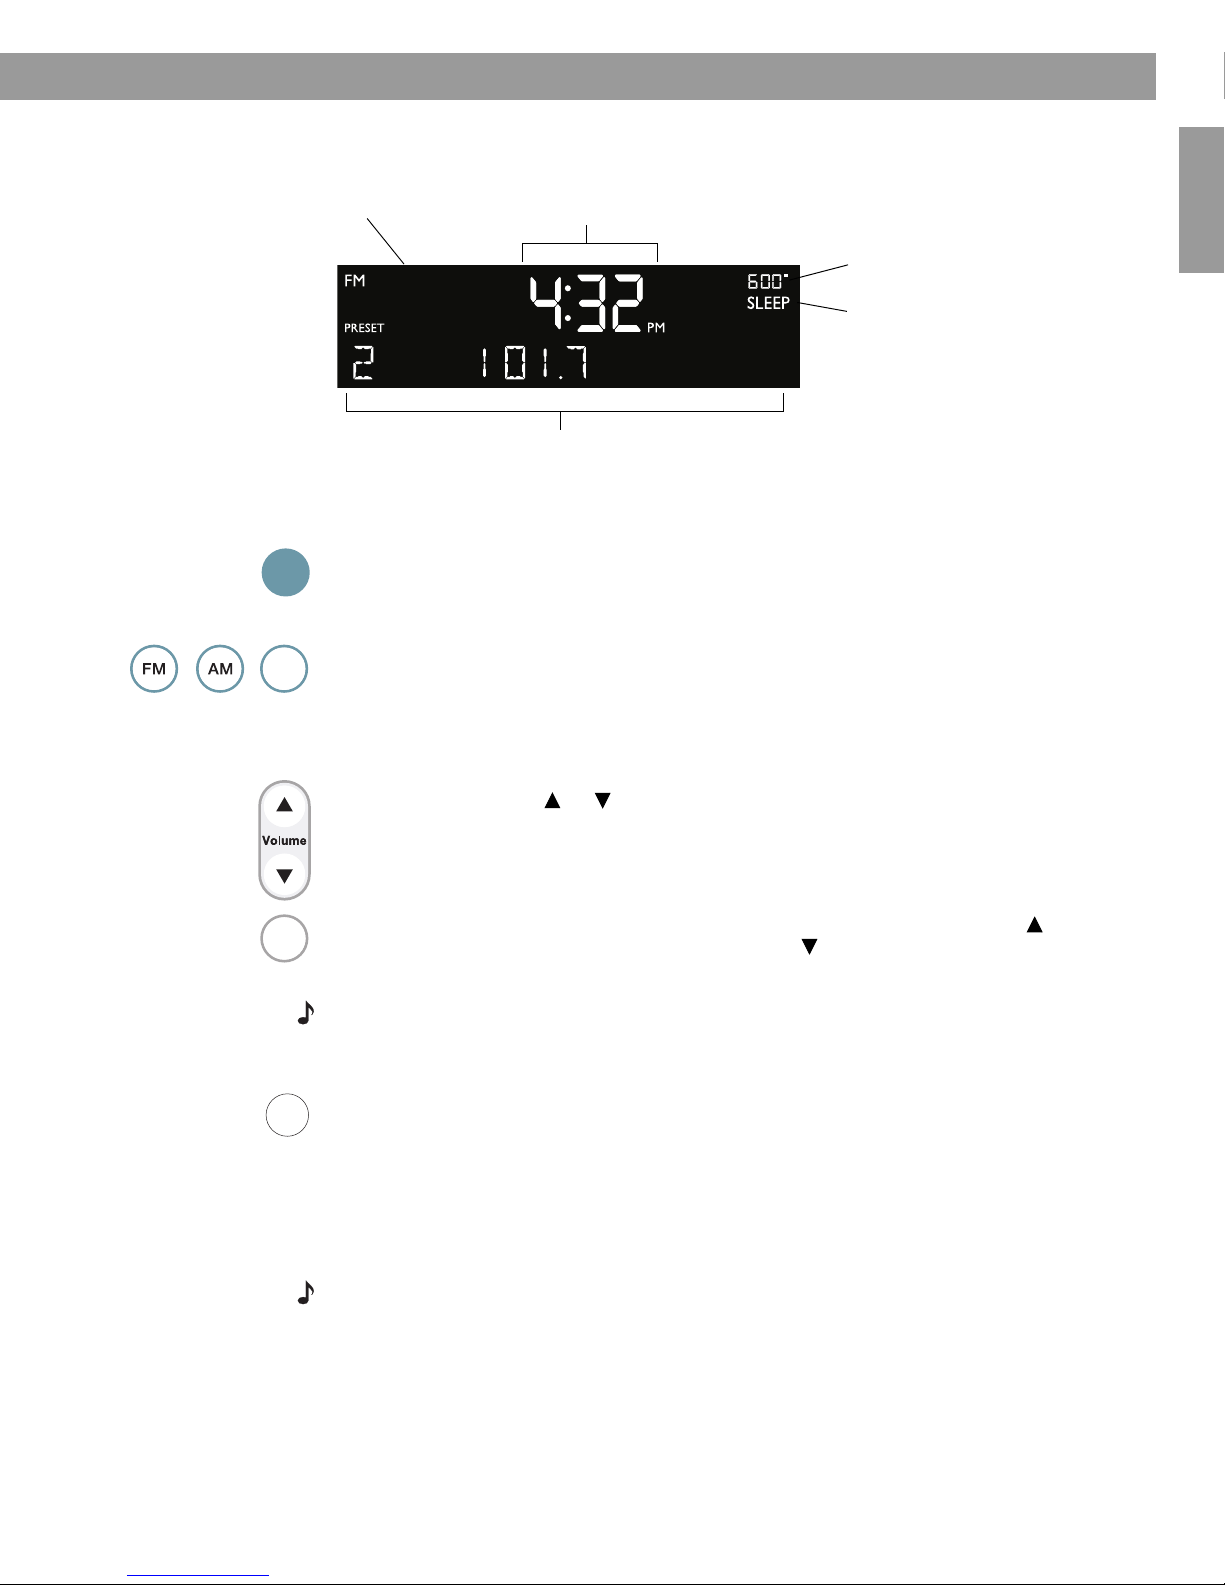
Clock time in 12-hour (AM/PM)
time or 24-hour (military) format
Displays operating information for the active
source or the set-up menu.
Alarm time appears when alarm is
set.
SLEEP appears when the sleep
timer is activated.
FM, AM, AUX or Bose®link
appears for the selected source.
On
Off
AUX
Mute
Sleep
00.WRII_UKE.book Page 9 Tuesday, July 28, 2009 8:43 AM
10
Français Español English
Listening to FM/AM Radio
Turning the radio on
Press FM or AM to turn on the radio to the FM or AM station last selected. Press FM or AM
again to switch between FM and AM.
When the radio is playing, radio station information is displayed. If RDS is enabled (ON) in the
system set-up menu (see page 19), RDS information appears in place of the station
frequency.
Note: The Radio Data System (RDS) is a system that transmits useful information, such as
station name, programme information and the current time. RDS is used only on FM and RDS
information is displayed only if it is included in the FM broadcast signal.
Tuning the radio
Press FM or AM to switch between FM and AM.
Press Seek to find a lower frequency station with a strong signal; press Seek to find
a higher frequency station with a strong signal.
Press Tune < to manually tune to a lower frequency; press Tune > to manually tune to a
higher frequency.
Press and hold Tune < to move rapidly down through the frequency band; press and hold
Tune > to move rapidly up through the frequency band.
Note: Five seconds after releasing FM, AM, Tune or Seek, the clock time returns to the centre
of the display and the radio frequency appears below it.
Note: If AM reception is weak, rotate your Wave®radio II clockwise or anticlockwise to improve
AM reception. If FM reception is weak, make sure the power cord is straightened as much as
possible. To improve FM reception, you can install an external FM antenna. See
“Connecting an external FM antenna” on page 14.
Clock time
Selected
preset station
FM
source
Station
frequency
FM display – Active RDS
FM display – No RDS information
Clock time
Selected
preset station
FM
source
RDS information
FM
source
Selected preset
station
Station
frequency
Display while tuning
When you press FM,AM, Seek or Tune
to tune to a radio station, the frequency
appears in the centre of the display while
you are tuning.
Seek
Tune
00.WRII_UKE.book Page 10 Tuesday, July 28, 2009 8:43 AM

11
Listening to FM/AM Radio
English FrançaisEspañol
Storing a radio station to memory (Presets)
You can store up to six FM and six AM radio stations for quick recall using the
Presets
buttons.
1. Tune to the station you want to save as a preset.
2. Press and hold one of the six
Presets
buttons until you hear a double beep and the
preset number and station frequency appear on the display.
3. Press one of the Presets buttons to quickly tune to a previously stored FM or AM
station.
Note: Storing a preset will replace any station previously stored to that preset number.
Note: During a power outage, stored presets are saved in a backup memory system.
TALK RADIO mode
Talk radio broadcasts can be greatly affected by either the microphone selection or the
boosting of low frequencies by some radio stations. They do so in an attempt to improve
speech when heard through conventional radios. In high-quality audio products, this results in
sound that is unnatural or bass heavy. By selecting the TALK RADIO mode, your Wave®radio II
automatically adjusts to compensate for artificially boosted low frequencies.
When the radio is playing, press Talk Radio twice to change the TALK RADIO mode setting.
When on, TALK RADIO– ON is displayed. When off, TALK RADIO– OFF is displayed.
Note: The TALK RADIO setting is automatically cancelled when you tune to another station,
switch to another source or turn your Wave®radio II off.
Presets
123
456
00.WRII_UKE.book Page 11 Tuesday, July 28, 2009 8:43 AM
12
Français Español English
Setting and Using The Alarm
Setting the alarm
Waking to a radio station
1. Turn on your Wave®radio II and select
the radio station you would like
to wake to.
2. Adjust the volume to the level you would like
to wake to.
3. Press and hold Wake To until you hear a
double beep. Your alarm is now set to wake
you to your chosen radio station.
Setting the alarm time
1. Press Alarm Time to enter the alarm time set-up mode. The alarm time is displayed in
the centre of the display and flashes in the upper right corner.
2. Press Time – or Time + to set your wake-up time.
3. Press Alarm Time again. Your alarm time is now set.
Note: While in alarm time set-up mode, if more than 10 seconds elapses between button
presses, the Wave®radio II will automatically exit the alarm time set-up mode.
Note: To confirm the alarm time and Wake To settings, press Alarm Time. Alarm time and
Wake To settings will be displayed for 10 seconds.
Wake
To
Alarm
Time
Alarm
Time
FM radio alarm Alarm time flashing
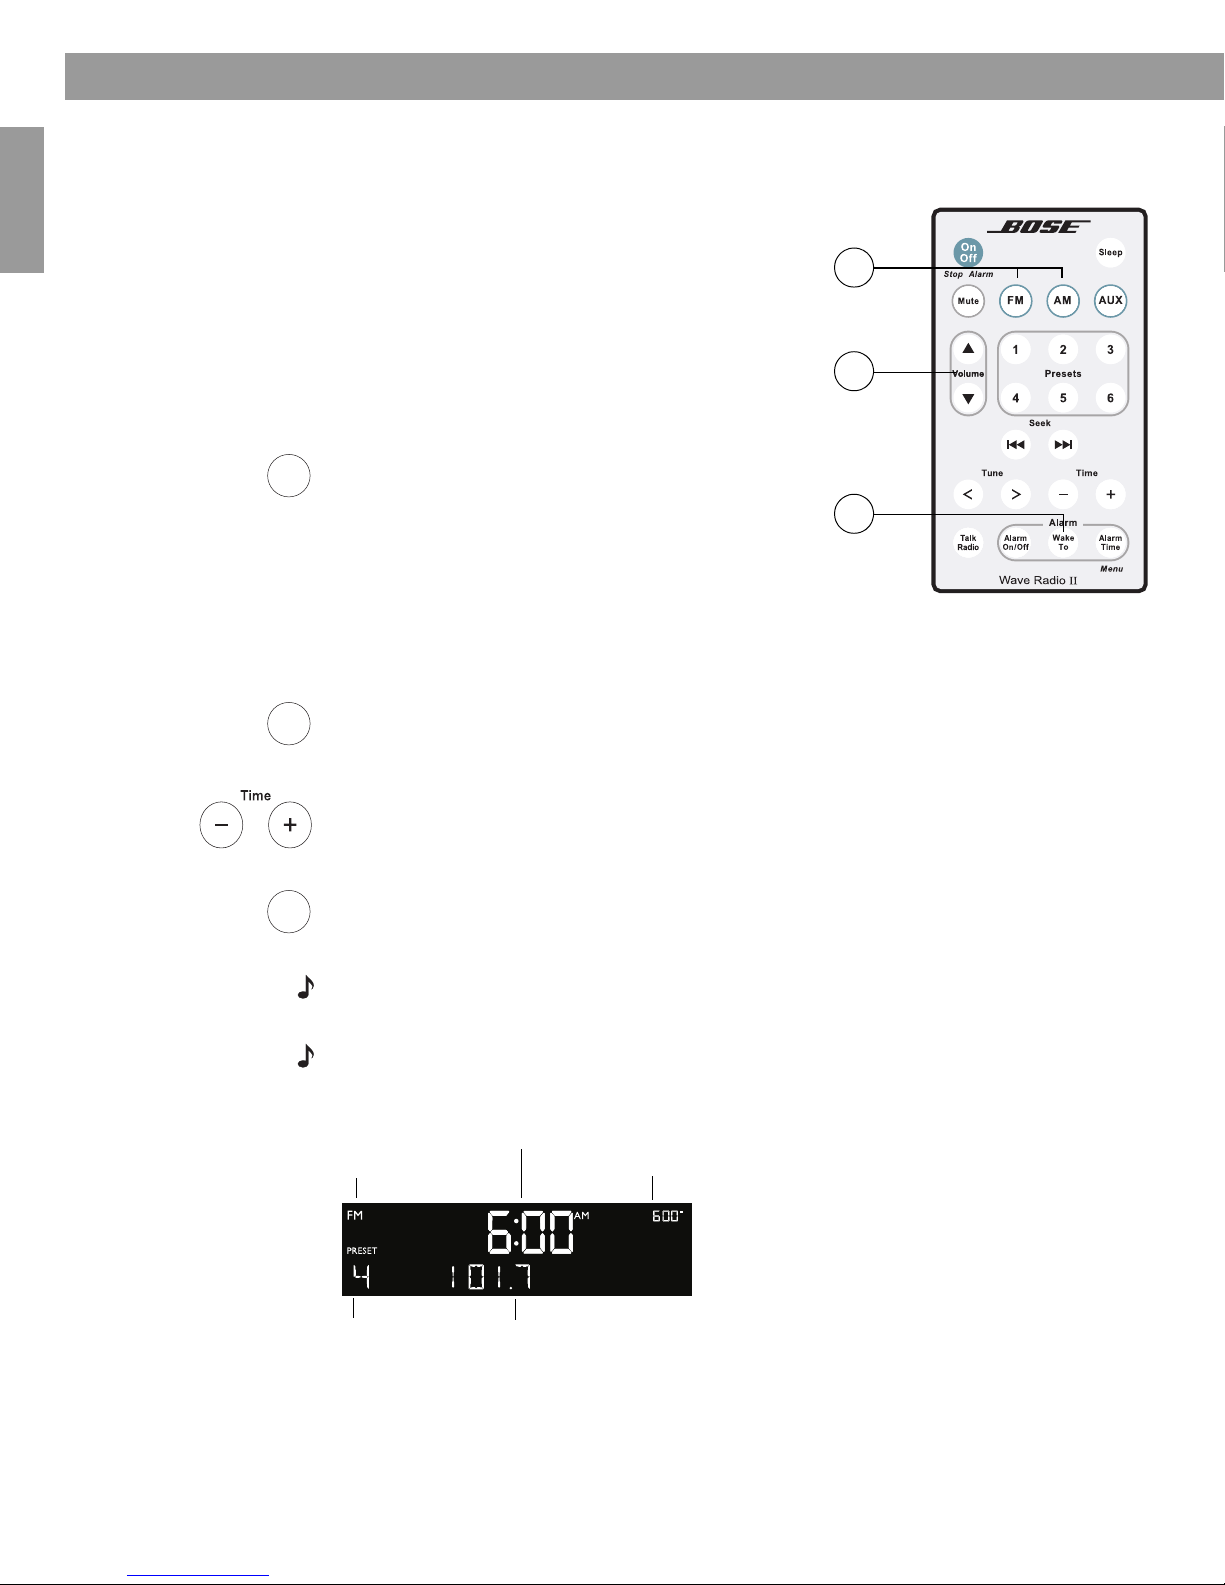
Preset number Radio station frequency
Alarm time
Example: alarm is set to play radio station Preset 4,
101.70 FM, at 6:00 A.M.
3
1
2
Press and hold
for at least
one second
00.WRII_UKE.book Page 12 Tuesday, July 28, 2009 8:43 AM

13
Setting and Using The Alarm
English FrançaisEspañol
Using the alarm
Stopping a sounding alarm
Press On/Off (Stop Alarm) to stop a sounding alarm and reset it for the next day.
Turning alarm on and off
Press Alarm On/Off to turn alarm on or off. It’s on when the alarm time is displayed in the
upper right-hand corner. It’s off when the alarm time is not visible in the upper right-hand
corner of the display.
Snoozing an alarm
Press Sleep to snooze a sounding alarm.
During the snooze time, SNOOZE is displayed. After the snooze time expires, the alarm
sounds again. Pressing Sleep again will silence the alarm again for another 10 minutes.
(Factory default is 10 minutes for the snooze time. See “Adjusting the snooze time” on
page 19.
Alarm
On/Off
Sleep
00.WRII_UKE.book Page 13 Tuesday, July 28, 2009 8:43 AM

14
Français Español English
Connecting Other Equipment
Rear panel input/outputs
The rear panel of your Wave®radio II provides connections for external equipment.
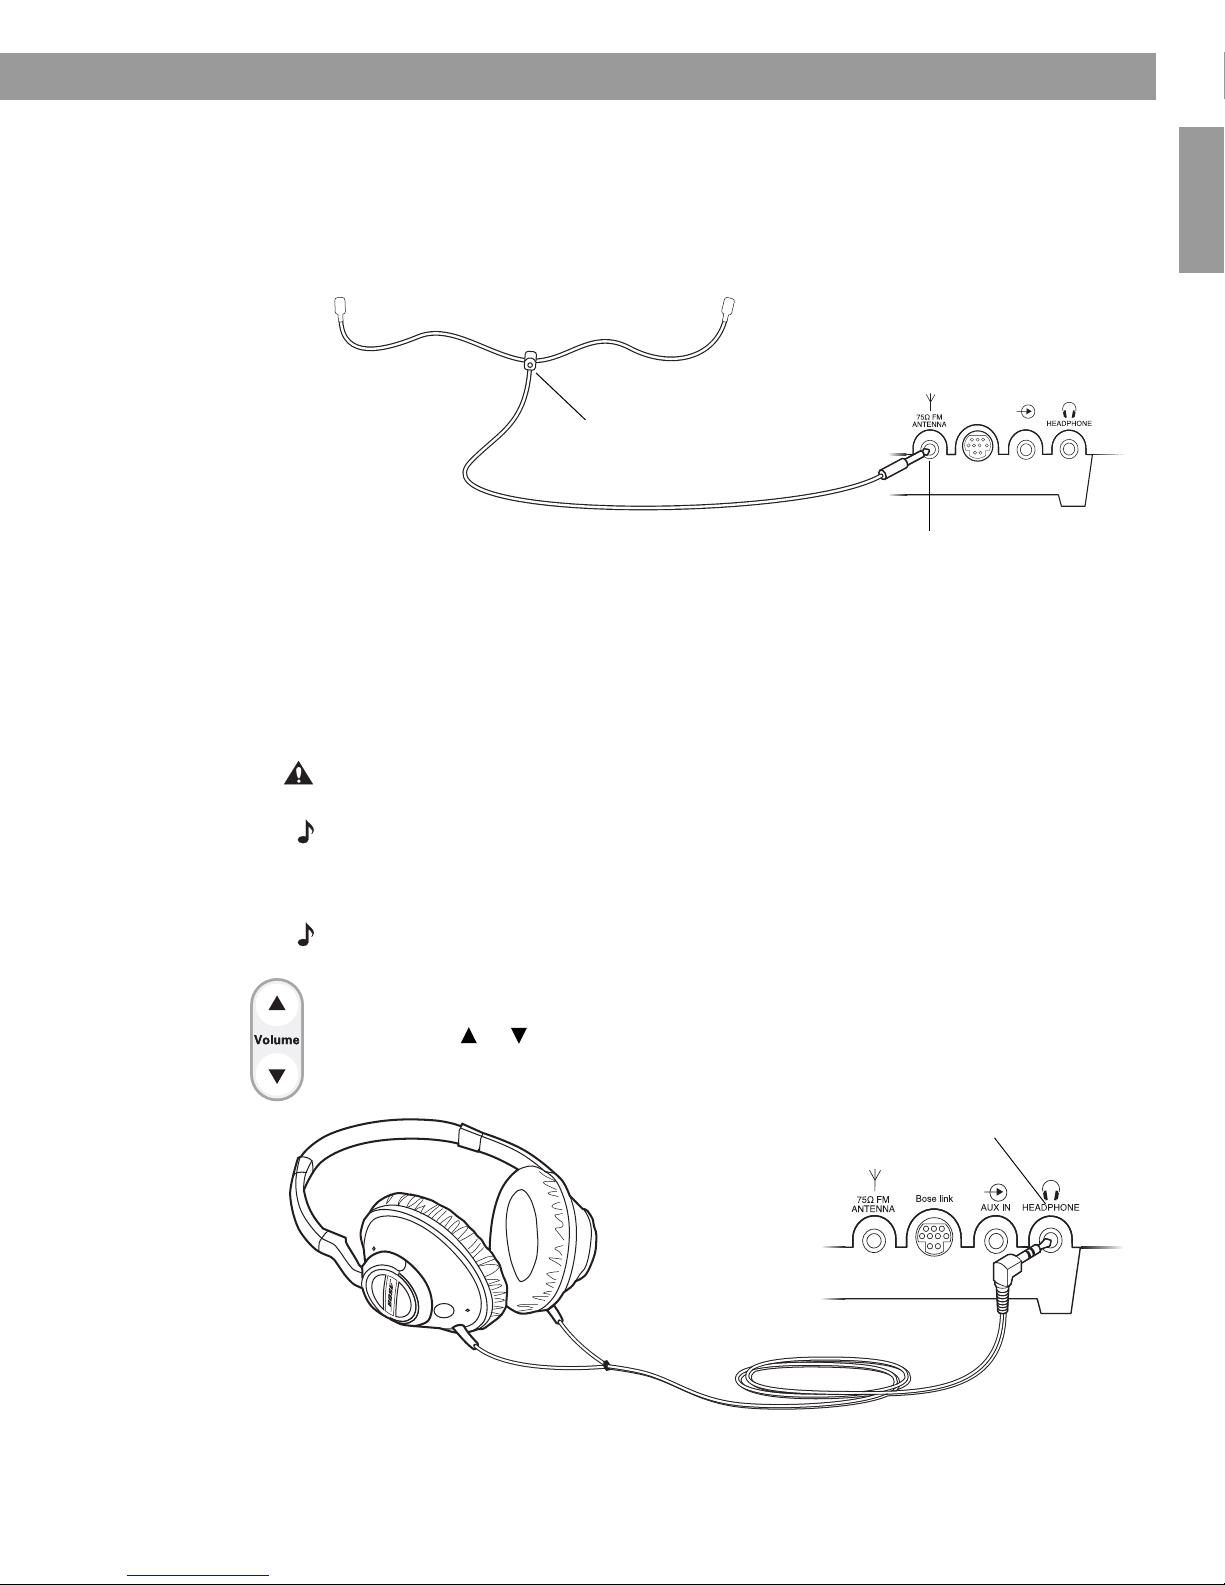
Connecting an external FM antenna
The Wave®radio II power cord includes a built-in FM antenna. If, after adjusting the position
of the power cord, you still experience poor reception, you may connect the system to an
external roof or cable antenna or an FM dipole antenna. An adapter is included for
connecting the system to an external roof or cable antenna, and an external FM dipole
antenna can be ordered through Bose®Customer Service. See the phone numbers listed
inside the back cover of this guide.
To connect an external roof or cable antenna using the antenna adapter:
• Plug the 3.5 mm (1/8") plug of the antenna adapter into the 75ΩFM ANTENNA connector on
the rear panel of your Wave®radio II.
• Connect the other end of the adapter to your external roof or cable antenna cable.
Note: Connecting the system to an external roof or cable antenna disables the built-in antenna,
and the FM signal will only be received through the external antenna. Disconnecting the external
antenna reactivates the built-in antenna
Bose link AUX IN
EXTERNAL
75ΩFM ANTENNA
A 3.5 mm (1/8") FM
antenna connector.
Bose®link connector
Connects to Bose®link-
enabled Lifestyle®systems.
AUX IN
A 3.5 mm (1/8") stereo input
connector for connecting
external sources.
HEADPHONE
A 3.5 mm (1/8") stereo headphone
connector. The Wave®radio II
speakers are muted when
headphones are connected.
75ΩFM ANTENNA connector
Antenna adapter
00.WRII_UKE.book Page 14 Tuesday, July 28, 2009 8:43 AM
15
Connecting Other Equipment
English FrançaisEspañol
To connect an external FM antenna:
• Plug the 3.5 mm (1/8") plug of the FM antenna into the 75ΩFM ANTENNA connector on the
rear panel of your Wave®radio II.
• Extend the ends of the antenna to establish optimum FM reception.
• Extend the ends of the antenna as far from the unit and other external equipment as
possible to establish optimum reception.
Using headphones
For private listening, connect headphones to the headphone connector on the rear panel of
the Wave®radio II.
• The speakers are automatically muted when you plug in your headphones.
CAUTION: Long-term exposure to loud music may cause hearing damage. It is best to avoid
extreme volume when using headphones, especially for extended periods.
Note: The speakers will automatically unmute when headphones are disconnected from the
Wave®radio II. Because headphone volume levels may vary from speaker volume levels,
be sure to lower the volume of the Wave®radio II before connecting or disconnecting
headphones.
Note: If an alarm sounds while using headphones, it will sound through the Wave®radio II
speakers.
To change the volume level of headphones
Press Volume or to adjust the listening level of your headphones.
Bose link AUX IN
75ΩFM ANTENNA connector
FM dipole antenna (not included)
(Headphones not included)
HEADPHONE connector
00.WRII_UKE.book Page 15 Tuesday, July 28, 2009 8:43 AM

16
Connecting Other Equipment
Français Español English
Using your Wave®radio II with other audio equipment
When using a TV, VCR, computer, video game or cassette tape player, you can enhance your
listening experience by playing the audio device through your Wave®radio II.
Connecting an audio device to your Wave®radio II, requires one of the following cables:
To obtain the correct cable, contact Bose®Customer Service or visit a local electronics store.
See the phone numbers listed inside the back cover of this guide.
To connect an audio device, such as your TV, to your Wave®radio II:
1. Connect one end of the stereo cable to the output of the audio device.
2. Connect the other end of the cable to the AUX IN connector on the rear panel of your
Wave®radio II.
3. Turn on your Wave®radio II and the audio device.
4. Press AUX.
5. Press and hold Volume or to adjust the listening level.
Note: If the volume level of your Wave®radio II cannot be adjusted high enough, try to increase
the volume level of the connected audio device.
Connecting your Wave®radio II to a Lifestyle®system
You can use your Wave®radio II as a multi-room expansion speaker system for a Bose®link-
enabled Lifestyle®home entertainment system. Your Wave®radio II was set up at the factory
for room B. To change this setting, see “Setting the room code” on page 21.
Contact Bose®Customer Service to obtain the required cables and instructions. See the
phone numbers listed inside the back cover of this guide.
• Male-to-male 3.5 mm (1/8") stereo cable
• Dual RCA male to 3.5 mm (1/8") male
stereo cable
On
Off
AUX
Dual RCA male to 3.5mm (1/8")
male stereo cable
TV
AUX IN
connector
00.WRII_UKE.book Page 16 Tuesday, July 28, 2009 8:43 AM
17
English FrançaisEspañol
Personalising Your Wave®radio II
Factory defaults have been set to satisfy most owners.
However, if you wish to adjust the system settings see
the instructions on pages 18 to 22.
00.WRII_UKE.book Page 17 Tuesday, July 28, 2009 8:43 AM
18
Français Español English
Personalising Your Wave®radio II
The set-up menu
The set-up menu allows you to customise the operation of the Wave®radio II.
1. Press and hold Alarm Time (Menu) until -SET-UP MENU- is displayed.
2. Press Tune >until the menu item you want to change is displayed.
3. Press Time – or Time + to change the value or selection.
4. Press Alarm Time (Menu) to exit the set-up menu or wait 10 seconds for the set-up
menu to end automatically.
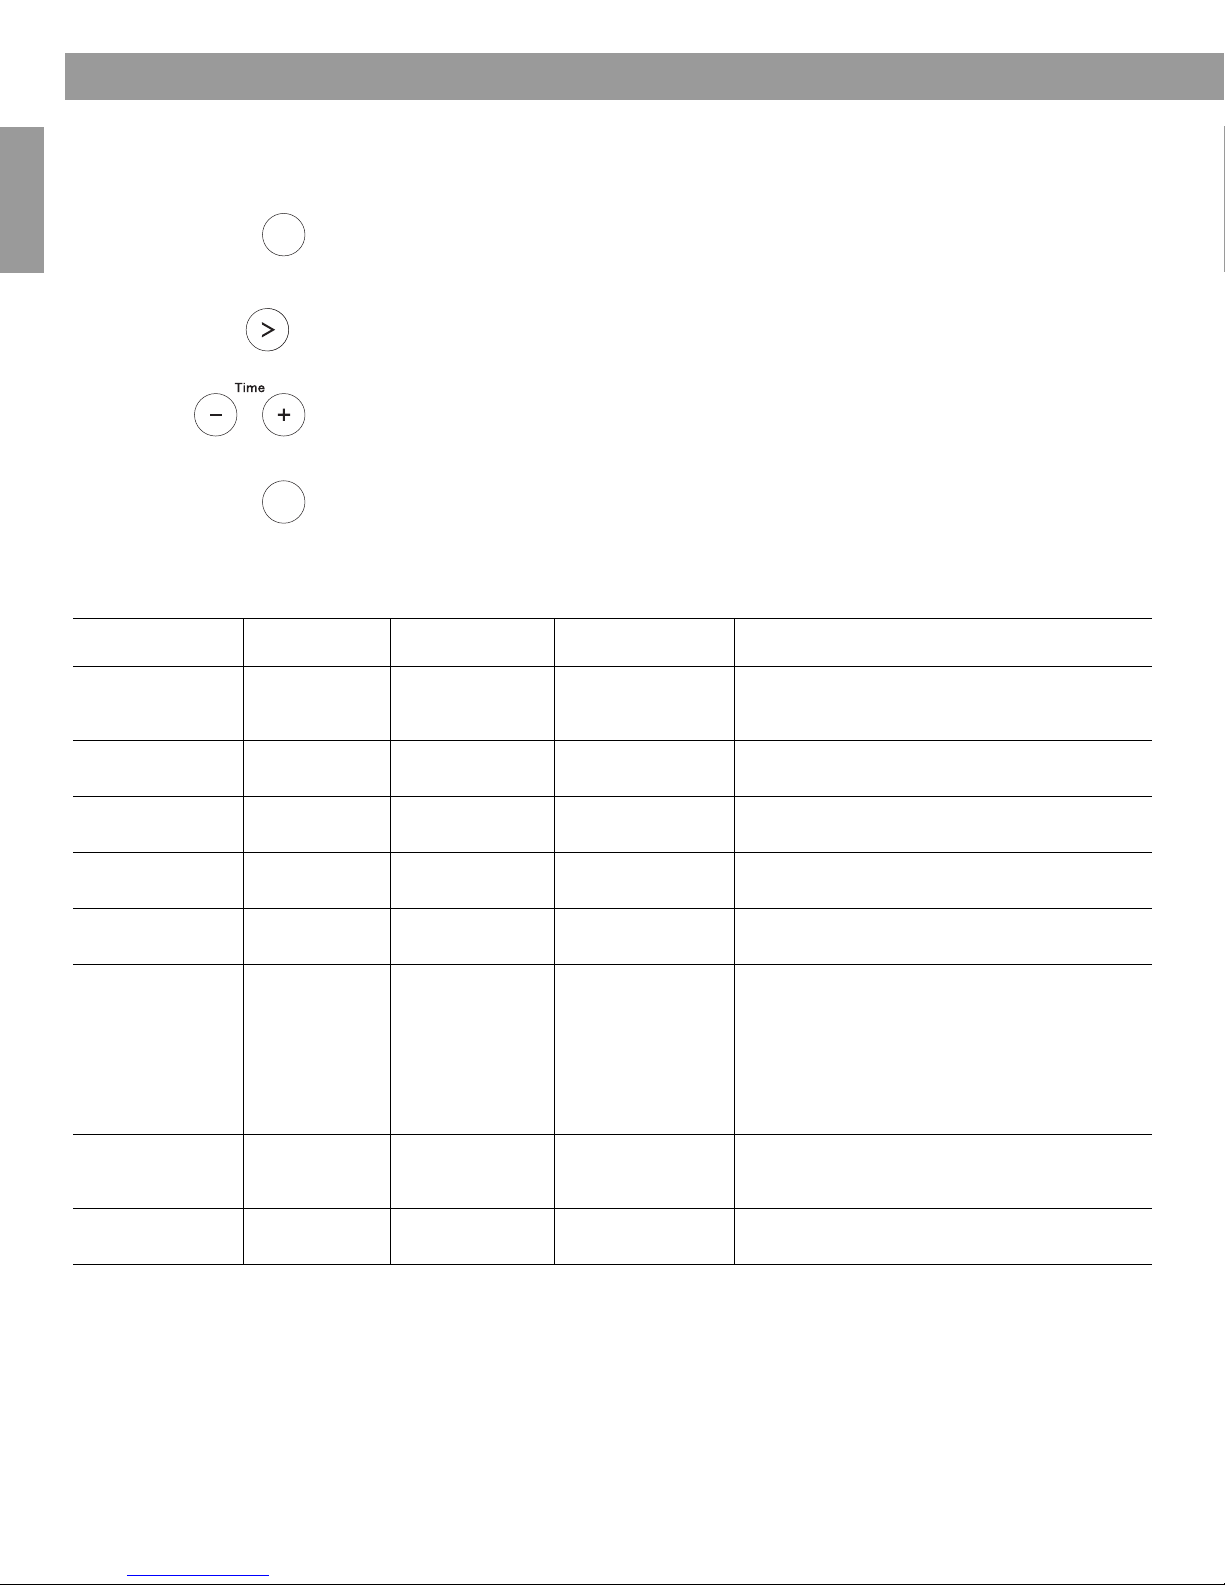
Wave®radio II Set-up Menu
Tune
Alarm
Time
Menu
Alarm
Time
Menu
System Setting Menu Item Factory Setting Choices Description
Snooze Control SNOOZE- 10 MIN 10 MIN, 20 MIN,
30 MIN, 40 MIN,
50 MIN, 60 MIN
Determines the snooze time.
Radio Data System
(RDS) information RDS- ON OFF, ON Enables (ON) or disables (OFF) the system to
display RDS information.
Clock Time
Format TIME- 12 HOUR 12-HOUR,
24-HOUR
Sets the clock display for 12-hour (AM/PM) or
24-hour (military) time.
Display High
Brightness Level BRIGHT HI- 12 8-15 Sets the display brightness level when the unit
detects high ambient light conditions.
Display Low
Brightness Level BRIGHT LO- 4 1-8 Sets the display brightness level when the unit
detects low ambient light conditions.
Room Code ROOM- B _ _ _ –B _ _ _ –, C _ _ – _,
D _ _ – –, E _ – _ _,
F _ – _ –, G _ – – _,
H _ – – –, I – _ _ _,
J – _ _ –, K – _ – _,
L – _ – –, M – – _ _,
N – – _ –, O – – – _
Sets the room code for your Wave®radio II when
it is connected to your Lifestyle®system through a
Bose®link network.
The dashes following the room letter indicate how
the microswitches should be set on the Lifestyle®
remote control.
Low-power Mode LOW POWER- OFF OFF, ON Enables (ON) or disables (OFF) the low-power
mode. The low-power mode causes the system to
use less energy after you turn it off.
System Reset RESET ALL- NO NO, YES Restores the Wave®radio II to factory
settings.
00.WRII_UKE.book Page 18 Tuesday, July 28, 2009 8:43 AM

19
Personalising Your Wave®radio II
English FrançaisEspañol
Adjusting the snooze time
This setting determines the duration of time the system remains silent when the snooze
function is activated.
1. Press and hold Alarm Time (Menu) until -SETUP MENU- is displayed.
2. Press Tune >once until SNOOZE- 10 MIN is displayed.
3. Press Time – or Time + to change the snooze time to 10-60 minutes (in 10-minute
increments).
4. Press Alarm Time (Menu) to exit the set-up menu or wait 10 seconds for the
set-up menu to end automatically.
Changing the Radio Data System (RDS) information setting
This setting enables or disables your system to display RDS information. The RDS is a
system that transmits useful information, such as station name, programme information and
the current time. RDS is used only on FM and RDS information is displayed only if it is
included in the FM broadcast signal.
1. Press and hold Alarm Time (Menu) until -SETUP MENU- is displayed.
2. Press Tune >twice until RDS- ON is displayed.
3. Press Time – or Time + to change RDS- ON to RDS- OFF.
4. Press Alarm Time (Menu) to exit the set-up menu or wait 10 seconds for the
set-up menu to end automatically.
5.
Alarm
Time
Menu
Alarm
Time
Menu
Tune
Alarm
Time
Menu
Alarm
Time
Menu
Tune
00.WRII_UKE.book Page 19 Tuesday, July 28, 2009 8:43 AM

20
Personalising Your Wave®radio II
Français Español English
Changing the clock time format
You can choose to have the display show the time in 12-hour (AM/PM) or 24-hour (military)
time.
1. Press and hold Alarm Time (Menu) until -SETUP MENU- is displayed.
2. Press Tune >four times until TIME- is displayed.
3. Press Time – or Time + to select 12 HOUR or 24 HOUR.
4. Press Alarm Time (Menu) to exit the set-up menu or wait 10 seconds for the set-up
menu to end automatically.
Adjusting the display brightness
The brightness level of the display automatically adjusts itself for low and high ambient light
conditions. This feature brightens the display for better visibility in high ambient light
conditions and dims the display making it less intrusive in low ambient light conditions. High
and low brightness settings can be set independently.
1. Press and hold Alarm Time (Menu) until -SETUP MENU- is displayed.
2. Press Tune >five times until BRIGHT HI- is displayed.
3. Press Time – or Time + to set the high display brightness level to a value from 8-15.
4. Press Tune >once until BRIGHT LO- is displayed.
5. Press Time – or Time + to set the low display brightness level from 1-8.
6. Press Alarm Time (Menu) to exit the set-up menu or wait 10 seconds for the
set-up menu to end automatically.
Alarm
Time
Menu
Alarm
Time
Menu
Tune
Alarm
Time
Menu
Alarm
Time
Menu
Tune
Tune
00.WRII_UKE.book Page 20 Tuesday, July 28, 2009 8:43 AM
Table of contents
Languages:


