trig TY91 User manual

TY91 and TY92 VHF Radio
Operating Manual
00840-00-AD
26 November 2014
Trig Avionics Limited
Heriot Watt Research Park
Riccarton, Edinburgh
EH14 4AP
Scotland, UK
© Copyright 2012, 2013, 2014
EN / DE / FR


EN
1
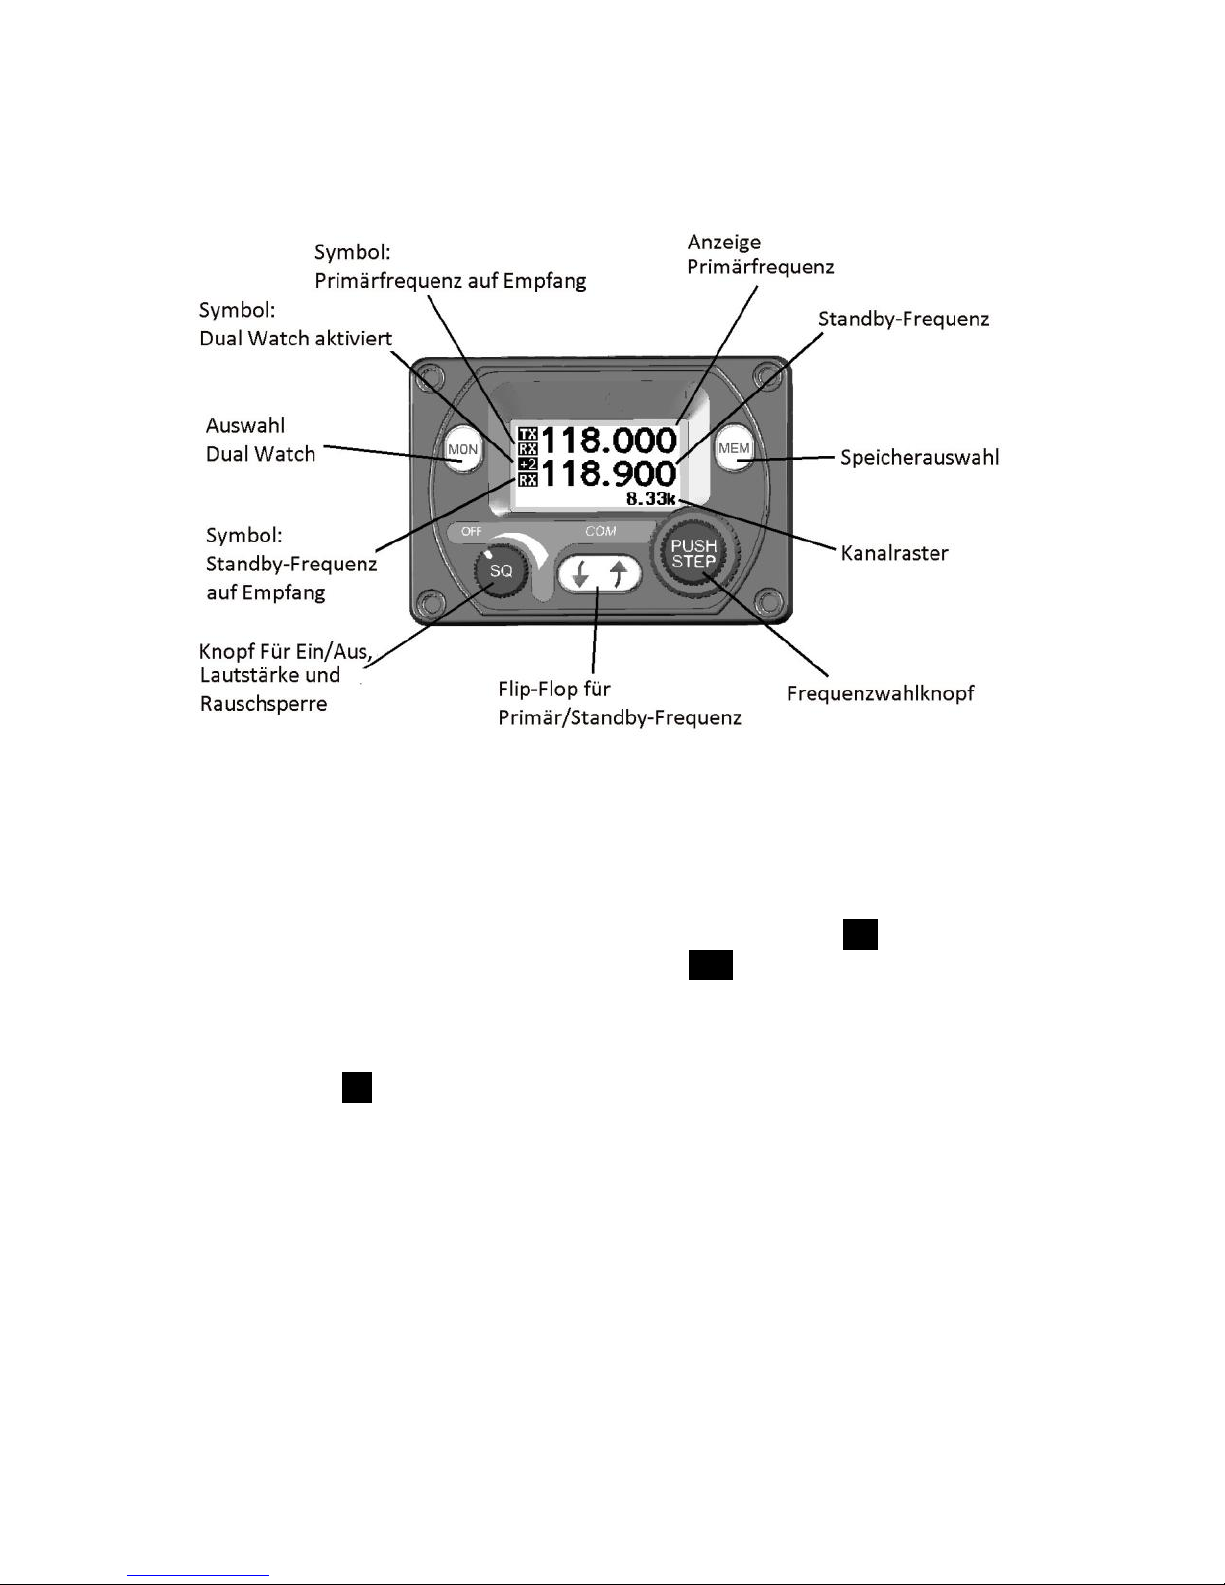
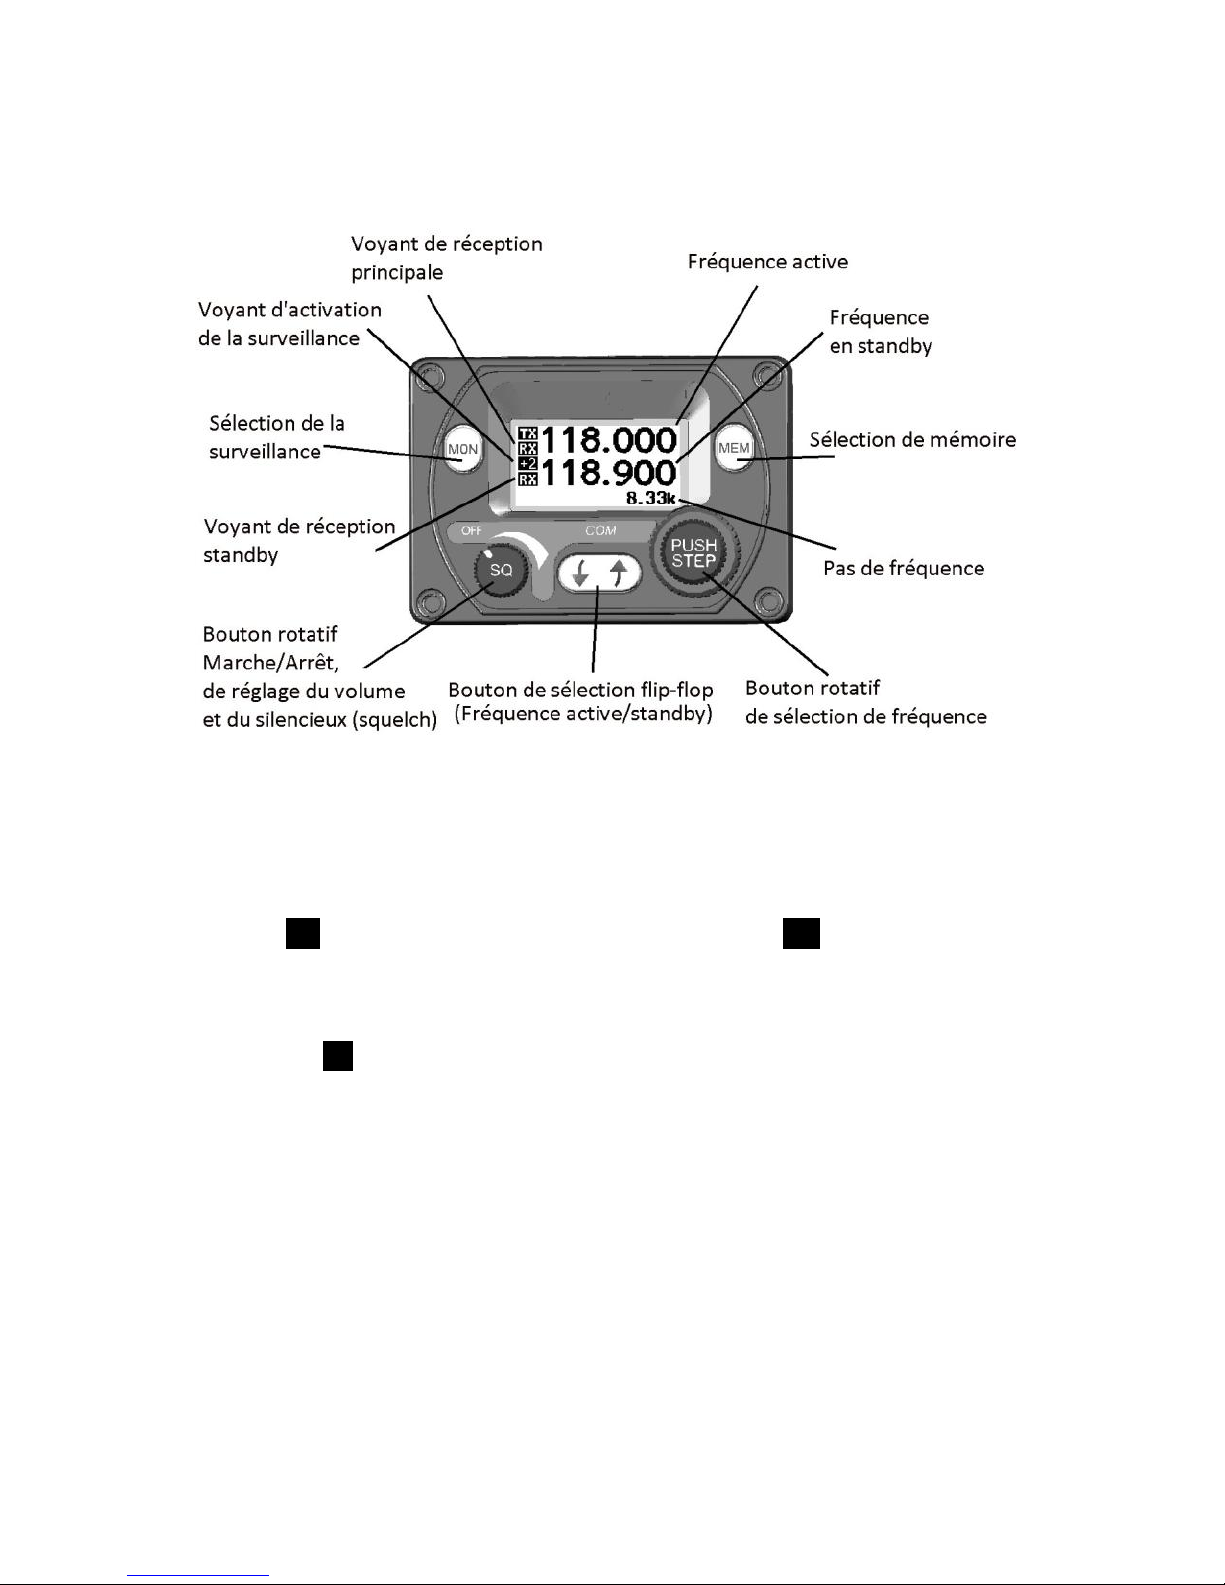
Front Panel
Display
The display shows the primary and standby frequencies and a series
of icons to indicate the operating mode of the radio.
The primary frequency is at the top and the standby frequency is at the
bottom half of the screen. The TX icon shows that the radio is
transmitting. An RX icon shows that the frequency is active and the
audio will be heard through the headphone and speaker outputs. The
standby frequency will only be received during the MONITOR function
which is indicated by a +2 icon when active.
The bottom right hand side indicates what frequency step size is
selected.
On/Off, Volume and Squelch Knob
The left hand knob controls the power to the VHF radio, adjusts the
audio volume, and controls the squelch. Turning this knob clockwise
will switch on the radio and then increase the volume. Turning
anticlockwise will reduce the volume and eventually will click off.
Pressing this knob toggles the automatic squelch on and off, which
can be used to listen for faint stations and as a simple audio test.
Secondary Frequency

EN
2
Tuning Knobs
The right hand concentric knobs are used to tune the radio. The large
knob adjusts the MHz portion of the standby frequency, and the
smaller knob adjusts the kHz portion of the standby frequency.
Pressing the end of the small knob changes the channel spacing that
the small knob operates through. If the radio is configured for 8.33
kHz operation, the steps toggle between 8.33 kHz channels and 25
kHz channels. If the radio is configured only for 25 kHz operation, the
steps toggle between 25 kHz and 50 kHz channels.
Changing the step size does not change the behaviour of the radio,
only the tuning knob step size –it helps to quickly tune a frequency.
Flip-flop Button
The flip-flop button swaps the frequency in the standby position into
the active position, and moves the active frequency to the standby
position.
MON Button
The VHF radio includes a dual-frequency listen feature; pressing the
MON button toggles this feature on and off.
When the monitor is active, a +2 icon appears next to the standby
frequency, and the radio will scan between the active and standby
frequencies listening for transmissions. The primary channel has
priority –a transmission on the primary channel will interrupt the
secondary channel. As an aid to identifying which channel is active,
the RX icon will light next to the active channel and the secondary
channel will appear slightly quieter than the primary.
This is useful in an aircraft with only a single radio since it allows you,
for example, to copy the ATIS whilst maintaining a listening watch on
the ATC frequency.
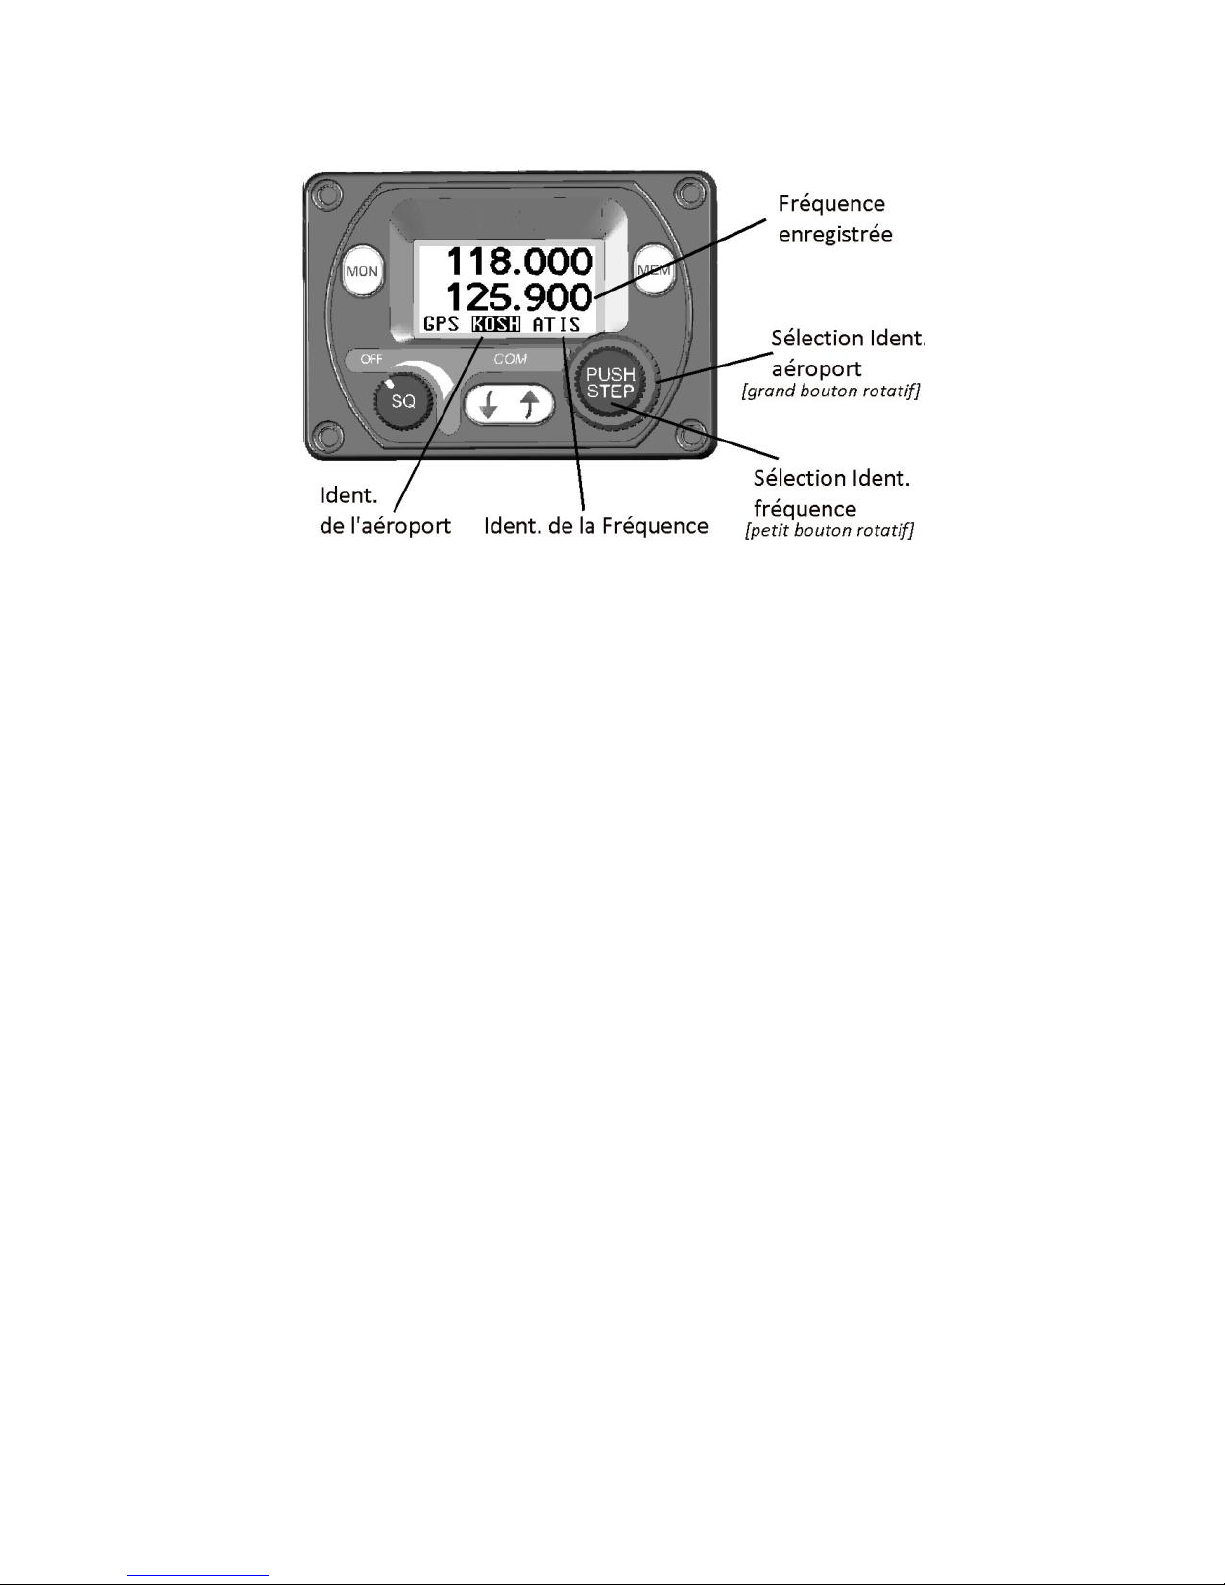
Remote Frequency Database
If a compatible GPS is connected, the controller will be loaded with
airport frequencies from the GPS database. These frequencies are
accessed by pressing the MEM button. The airport frequencies and
selection order are determined by the data sent to the controller from
the GPS.

EN
3
The available airports can be scrolled through using the large
frequency select knob. The individual frequencies associated with that
airport can be scrolled through by using the smaller frequency select
knob. After you have stepped through all the loaded airports, or if
there is no GPS attached, the built-in memory of the controller will be
displayed.
In each case the selected frequency is loaded into the standby
position. Pressing MEM again leaves the stored frequency in the
standby window. Pressing the Flip-flop button loads the stored
frequency directly into the active channel.
Note: When the controller is displaying the available airport
frequencies it will not accept any new updates from the GPS
to avoid the frequencies changing during selection. To allow
the GPS to update the available frequency database you must
come out of memory mode by pressing the MEM or flip-flop
button.
Frequency Memory
If no GPS is connected and the MEM button is pressed, or if the large
knob is rotated beyond the remote database the controller will access
the internal quick reference memory. There are 9 quick reference
memory locations and the bottom edge of the screen will display which
memory location is currently selected (1 –9).

EN
4
Rotating the small frequency selector knob will step through the
memory locations. The standby frequency window will display the
stored frequency.
To store a frequency in one of the memory locations it must first be
tuned and active as the primary frequency. Press MEM to enter the
memory mode in the usual way. Select the channel you want to
overwrite with the tuning knobs. Now press, AND HOLD, the MEM
button for 2 seconds. The current active frequency will be moved to
the selected memory location, overwriting the existing contents.
Intercom Function
The TY91/TY92 radio has a built in intercom which can be installed as
permanently engaged or selected via a switch. The intercom is voice
activated and the audio is routed through to both of the headsets. The
intercom squelch and volume can be adjusted independently from the
radio function through the configuration menu.
Stuck Mic
If the PTT switch is stuck in the ON or transmit position, the radio will
automatically cut out after 35 seconds as a safety measure.
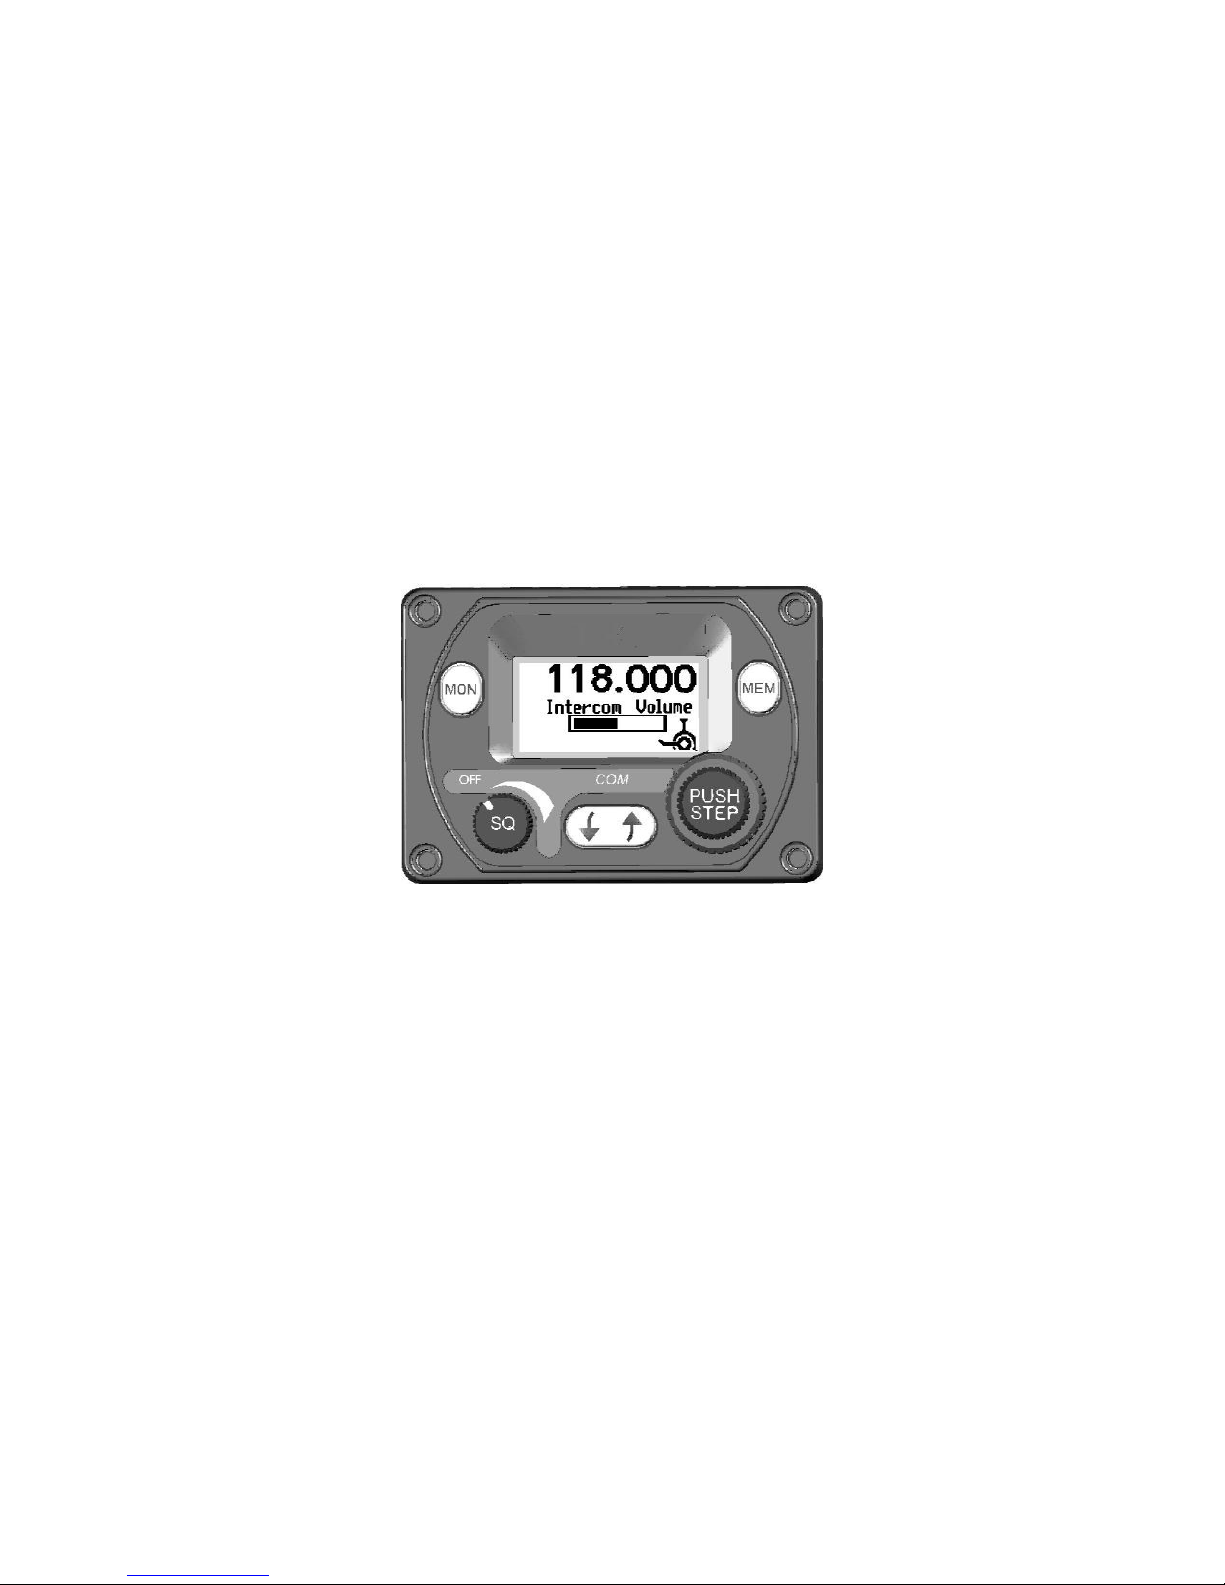
Configuration Mode
Additional setup items can be accessed by holding down the MON
button for 5 seconds. The menu options can be selected using the
larger inside tuning knob and the parameter value can be altered using
the smaller outside tuning knob.

EN
5
Intercom Volume
Sets the intercom volume level
Intercom Squelch
Sets the sensitivity of the intercom voice operated
squelch
AUX In Volume
Sets the volume level of the auxiliary input
AUX In Mute
Mutes the auxiliary audio when a VHF transmission
is received by the radio
Sidetone Volume
Sets the volume level of sidetone heard when
transmitting
Radio Squelch
Sets the sensitivity of the radio squelch
Enable 8.33 kHz
Sets the frequency step size to 8.33/25 kHz or
25/50 kHz
Brightness
Sets the LCD backlight brightness
Dual Control Operation
If two control heads are installed for a dual control setup then changes
made to one controller will be automatically updated on the second
controller. There is a small time lag between operating one controller
and updating the display on the second controller. This is purely a
delay in the display and there is no delay in the tuning or operation of
the TY91/TY92 radio.
The exception is that the radio volume knob works on a “loudest wins”
basis. The radio volume will always correspond to the control head
that has the volume knob set to the highest position. This means that
only one of the controllers needs to be turned up to operate the radio
normally, for example when flying a tandem aircraft solo.
Dual Control Individual Functions
The following functions are local to the individual control head and will
not automatically update or transfer between two controllers:
EN
6
Frequency Step Size
Changing the frequency step size by
pressing the PUSH/STEP button on one
controller does not affect the other controller.
Brightness
The brightness is separately adjusted on
each controller.
Memory
The frequencies stored in the memory are
local to each controller. The memory data is
not transferred between controllers, although
a frequency selected from the memory will
appear on the screen on the other controller.
General Low Temperature Operation
The TY91/TY92 is certified to operate correctly down to -20°C, but at
low temperatures the controller display may be impaired. On a cold
day you may need to wait for the cockpit to warm up to ensure normal
operation.
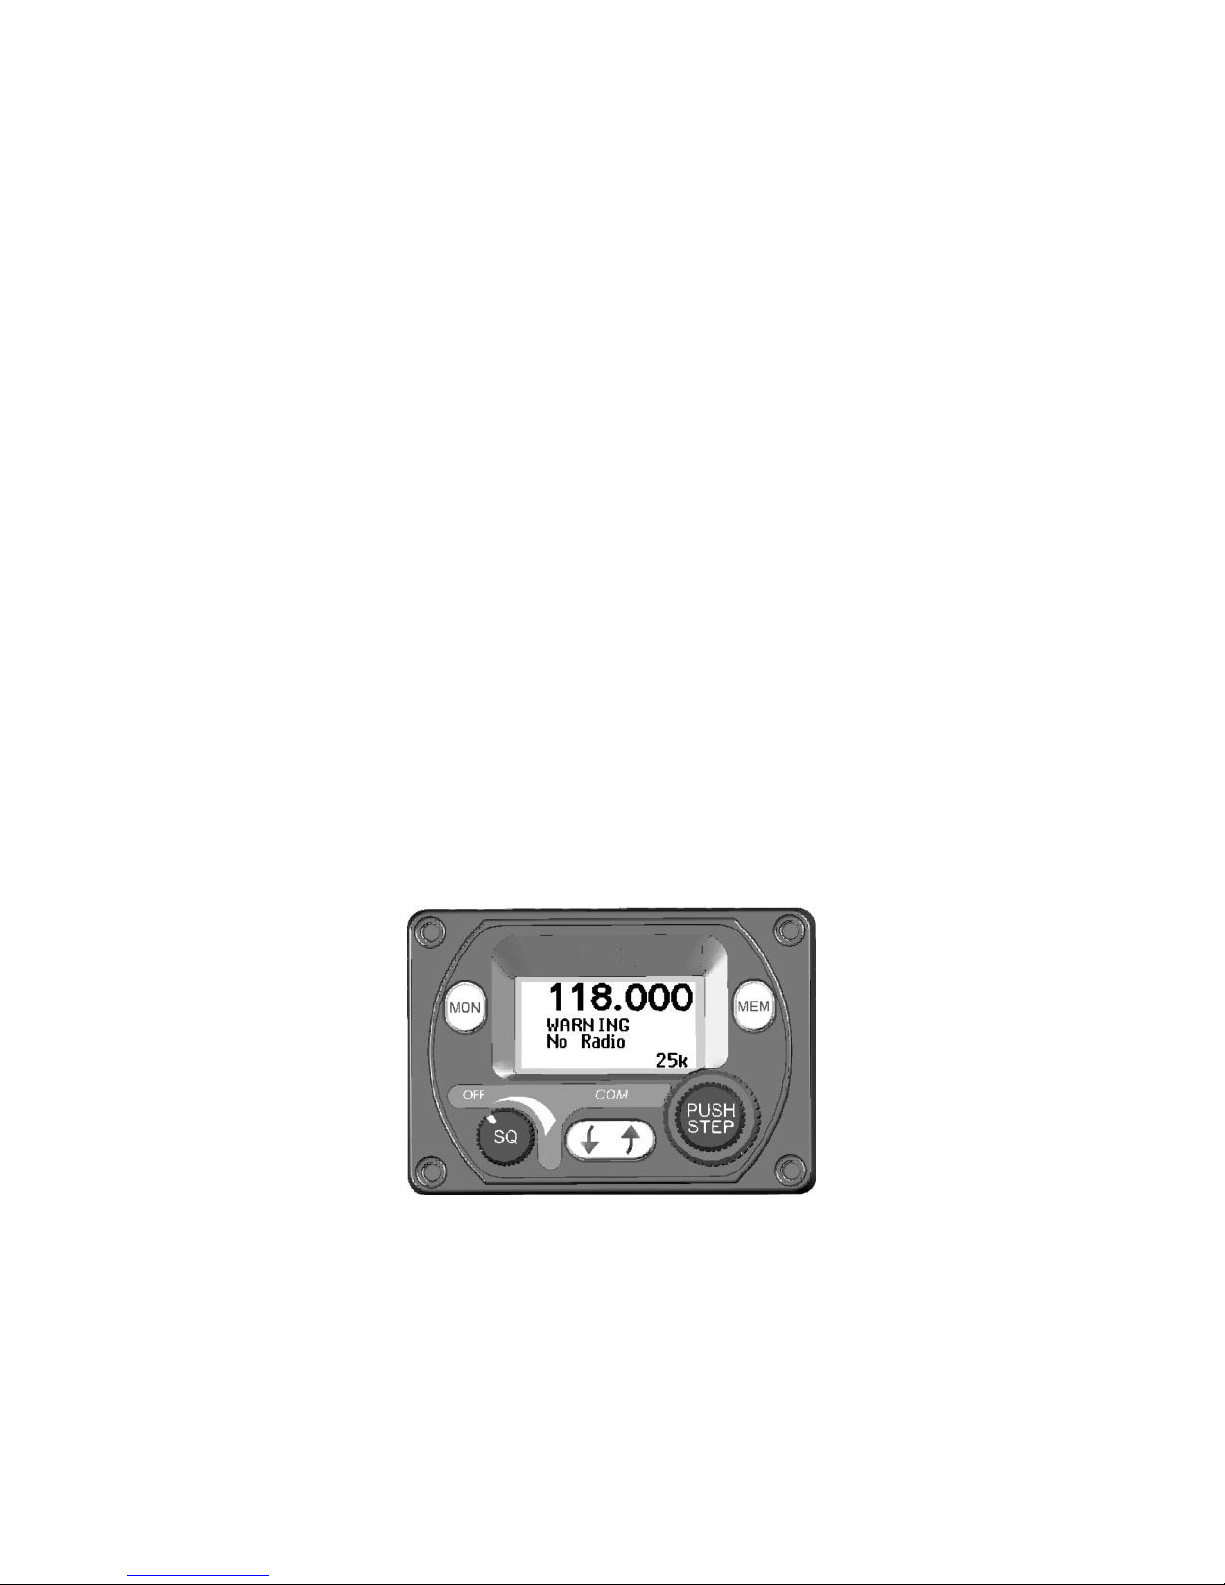
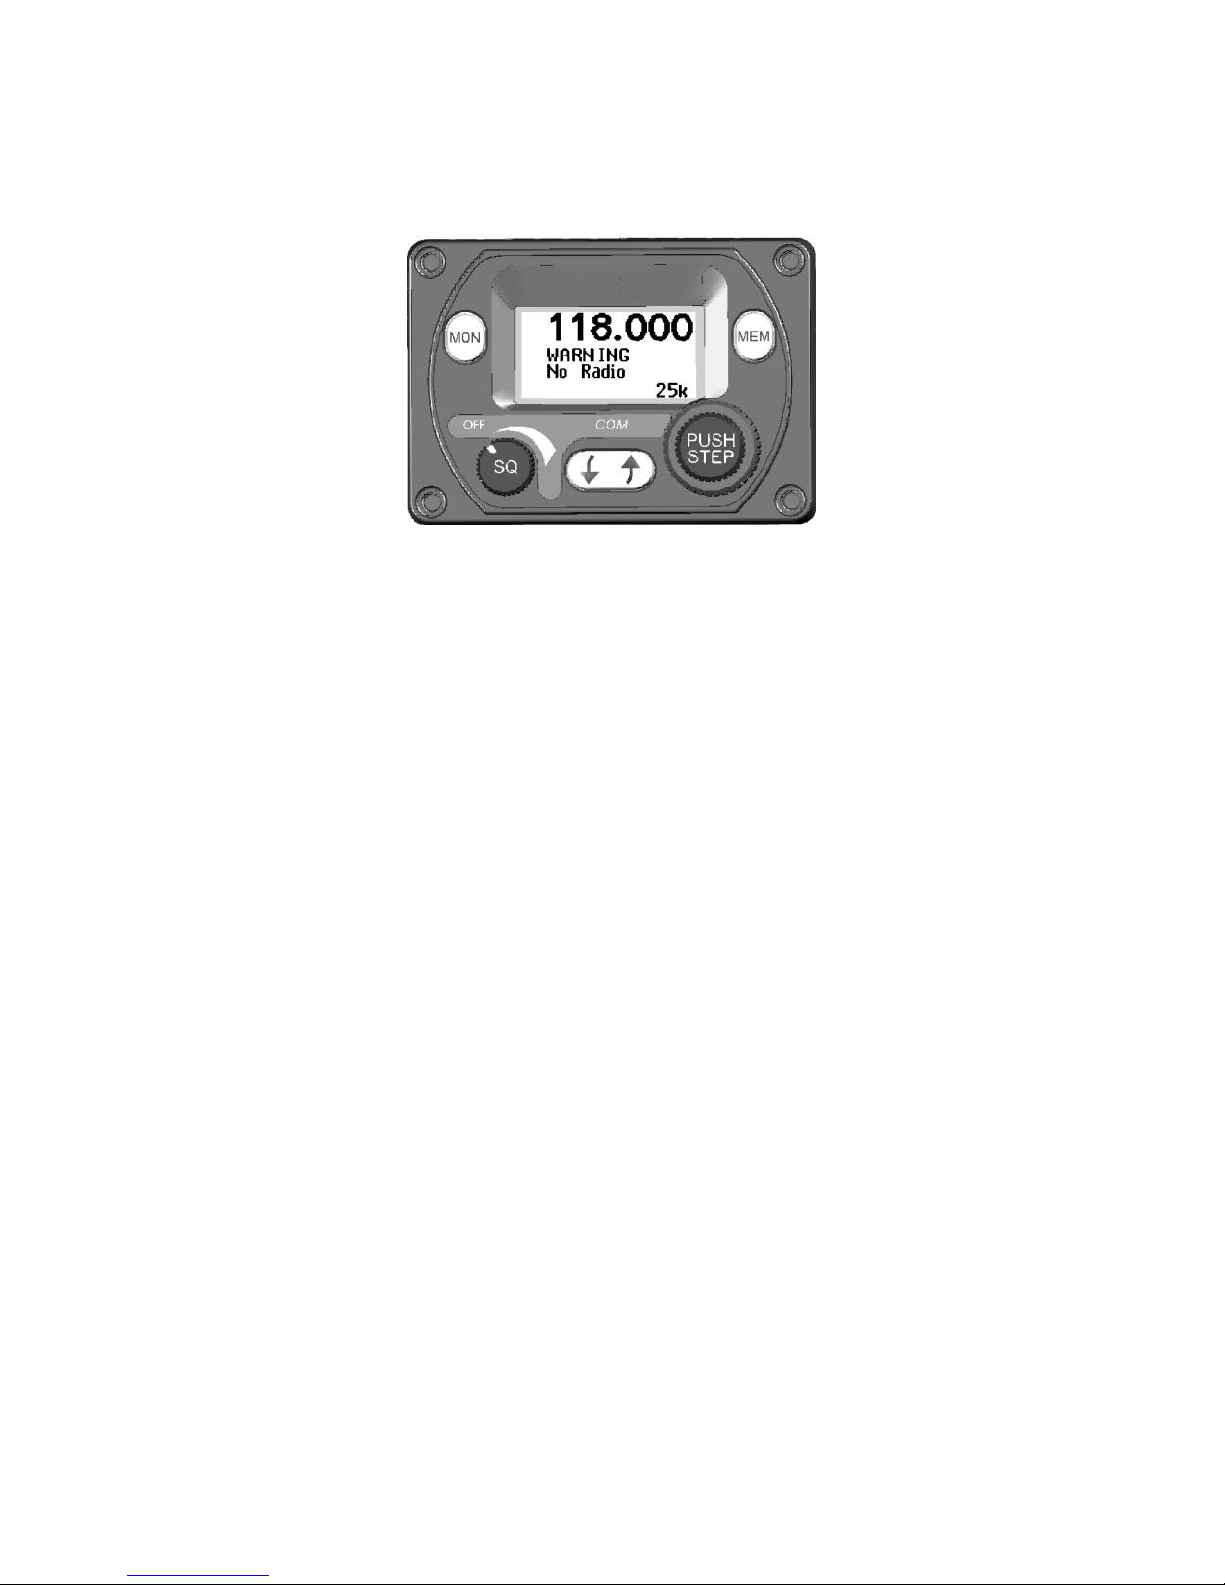
Warning Messages
If the VHF radio detects a problem, the screen will indicate WARNING
and a brief statement of the problem. Depending on the nature of the
problem, your VHF radio may not be working properly. Note the
message on the screen and pass that information to your avionics
maintenance organisation. Press the flip-flop button to clear the
message.
The following warnings may be seen:
Remote Hot
The remote radio is overheating.
Stuck Mic
The PTT switch has been closed for more than 35
seconds.
Low Volts
The aircraft power input is below 10 volts (TY91) or
16 volts (TY92).

EN
7
No Radio
Connection between the controller and the remote
radio has been lost.
Radio Fault
The remote radio is reporting an unspecified fault.
Fault Annunciation
If the VHF radio detects a catastrophic internal failure, the screen will
indicate FAULT and a brief statement of the problem. Note the FAULT
message at the bottom of the screen and pass that information to your
avionics maintenance organisation. The fault may be cleared by re-
cycling the power to the radio but if the fault is still present the
message will reappear.
Dual Control Warnings and Fault Annunciations
In a dual control head installation, any warning or fault annunciation
will be displayed on both controllers. If one of the controllers suffers a
failure, the second controller may still continue to control the radio.
The fault should be investigated and rectified as soon as possible. It is
not advisable to continue to operate a dual control setup with only one
controller operational.
DE
8
Bedienelemente
Anzeige
Die Anzeige zeigt die Primär- und die Standby-Frequenz sowie eine
Reihe von Symbolen an, die den Betriebsmodus des Funkgeräts
angeben.
Die Primärfrequenz steht in der oberen Hälfte des Bildschirms, die
Standby-Frequenz in der unteren Hälfte. Das Symbol TX zeigt an,
dass das Funkgerät sendet. Das Symbol RX zeigt an, dass die
entsprechende Frequenz aktiv und das Audiosignal über die Headset-
und Lautsprecherausgänge zu hören ist. Die Standby-Frequenz wird
nur im DUAL WATCH Modus empfangen, der bei Aktivierung durch
das Symbol +2 angezeigt wird.
Unten rechts in der Anzeige wird angegeben, welches Kanalraster
gewählt wurde.
Knopf für Ein/Aus, Lautstärke und Squelch (Rauschsperre)
Der Knopf auf der linken Seite schaltet das VHF-Funkgerät sowie die
Rauschunterdrückung ein und aus und regelt die Lautstärke des
Audiosignals. Durch Drehen des Knopfes nach rechts wird das
Funkgerät eingeschaltet und dann die Lautstärke erhöht. Die Drehung
nach links senkt die Lautstärke und schaltet das Funkgerät schließlich
mit einem Klick aus.
Nebenfrequenz

DE
9
Durch Drücken des Knopfes wird die automatische Rauschsperre, die
zum besseren Hören schwacher Funkstellen oder als einfacher
Audiotest verwendet werden kann, ein- bzw. ausgeschaltet.
Frequenzwahlknöpfe
Die konzentrischen Knöpfe auf der rechten Seite werden verwendet,
um Frequenzen einzustellen. Der große Knopf dient zur Einstellung
des MHz-Segments der Standby-Frequenz, der kleinere Knopf zur
Einstellung des kHz-Segments der Standby-Frequenz.
Drückt man oben auf den kleinen Knopf, wird der Kanalabstand für die
Frequenzeinstellung mit dem kleinen Knopf geändert. Ist das
Funkgerät für den Betrieb im 8,33 kHz-Raster konfiguriert, schaltet
man so zwischen 8,33 kHz-Kanälen und 25 kHz-Kanälen um. Ist das
Funkgerät nur für den Betrieb im 25 kHz-Raster konfiguriert, schaltet
man so zwischen 25 kHz-Kanälen und 50 kHz-Kanälen um.
Die Änderung des Kanalabstands ändert nichts an den
Betriebseigenschaften des Funkgeräts, sondern nur die Schrittweite
des Frequenzeinstellknopfes –dadurch lässt sich eine Frequenz
schneller einstellen.
Flip-Flop-Schalter
Der Flip-Flop-Schalter macht die Standby-Frequenz zur aktiven
Frequenz und die aktive Frequenz zur Standby-Frequenz.
MON-Taste
Das VHF-Funkgerät hat eine Funktion, die die gleichzeitige
Überwachung von zwei Frequenzen ermöglicht (Dual Watch); durch
Drücken der MON-Taste wird diese Funktion ein- und wieder
ausgeschaltet.
Wenn die Überwachung eingeschaltet ist, erscheint das Symbol +2
neben der Standby-Frequenz und das Funkgerät scannt die aktive und
die Standby-Frequenz auf Übermittlungen. Der Hauptkanal hat
Priorität –eine auf dem Hauptkanal gesendete Nachricht unterbricht
die Kommunikation auf dem Nebenkanal. Damit besser zu sehen ist,
welcher Kanal aktiv ist, leuchtet das Symbol RX neben dem aktiven
Kanal, und der Nebenkanal wird etwas leiser wiedergegeben als der
Hauptkanal.
Das ist bei einem Flugzeug, das nur mit einem einzigen Funkgerät
ausgerüstet ist, nützlich, da man das ATIS abhören und gleichzeitig
die Frequenz der Flugsicherung überwachen kann.

DE
10
Ferndatenbank für Frequenzen
Wenn ein kompatibles GPS angeschlossen ist, werden
Flughafenfrequenzen aus der GPS-Datenbank in das Bediengerät
geladen. Diese Frequenzen können durch Drücken der MEM-Taste
aufgerufen werden. Welche Flughafenfrequenzen in welcher
Reihenfolge ausgewählt werden, wird durch die Daten bestimmt, die
das GPS an das Bediengerät sendet.
Mit Hilfe des großen Frequenzwahlknopfes kann die Liste der
verfügbaren Flughäfen durchgeblättert werden. Mit Hilfe des kleineren
Frequenzwahlkopfes kann die Liste der einzelnen mit diesem
Flughafen verbundenen Frequenzen durchgeblättert werden.
Nachdem Sie alle geladenen Flughäfen durchgegangen sind, oder
falls kein GPS angeschlossen ist, wird der eingebaute Speicher des
Bediengeräts angezeigt.
In beiden Fällen wird die gewählte Frequenz als Standby-Frequenz
geladen. Durch nochmaliges Drücken der MEM-Taste bleibt die
gespeicherte Frequenz in der Standby-Anzeige. Durch Drücken des
Flip-Flop-Schalters wird die gespeicherte Frequenz direkt in den
aktiven Kanal geladen.
Hinweis: Während das Bediengerät die verfügbaren
Flughafenfrequenzen anzeigt, nimmt es keine neuen Updates
vom GPS an, um zu vermeiden, dass sich die Frequenzen
während der Auswahl ändern. Um zuzulassen, dass das GPS
die Datenbank der verfügbaren Frequenzen aktualisiert,
müssen Sie durch Drücken der MEM- oder der Flipflop-Taste
den Speichermodus verlassen.

DE
11
Frequenzspeicher
Wenn kein GPS angeschlossen ist und die MEM-Taste gedrückt wird,
oder wenn der große Knopf über die Ferndatenbank hinaus gedreht
wird, greift das Bediengerät auf den internen Schnellwahlspeicher zu.
Es gibt 9 Speicherplätze für die Schnellwahl und der gewählte
Speicherplatz (1-9) wird am unteren Bildschirmrand angezeigt.
Durch Drehen des kleinen Frequenzwahlknopfes werden die
Speicherplätze nacheinander aufgerufen. Die gespeicherte Frequenz
wird in der Standby-Frequenzanzeige angezeigt.
Damit eine Frequenz auf einem der Speicherplätze gespeichert
werden kann, muss sie zunächst als Primärfrequenz eingestellt und
aktiv sein. Drücken Sie wie gewohnt die MEM-Taste, um in den
Speichermodus zu gelangen. Wählen Sie den Kanal, den Sie
überschreiben möchten, mit Hilfe der Frequenzwahlknöpfe aus. Dann
müssen Sie die MEM-Taste 2 Sekunden lang GEDRÜCKT HALTEN.
Die gegenwärtig aktive Frequenz wird auf dem ausgewählten
Speicherplatz gespeichert und überschreibt den bestehenden Inhalt
des Speicherplatzes.
Intercom-Funktion
Das Funkgerät TY91/TY92 hat ein eingebautes Intercom, das
wahlweise so installiert werden kann, dass es dauernd in Betrieb ist
oder über einen Schalter aktiviert werden kann. Das Intercom ist
stimmaktiviert und die Audiosignale werden an beide Headsets
geleitet. Rauschsperre und Lautstärke des Intercoms können
DE
12
unabhängig von der Funkfunktion über das Konfigurationsmenü
eingestellt werden.
Blockierte PTT-Taste
Wenn die PTT-Taste eines Mikrofons in der eingeschalteten oder
Sende-Position festsitzt, schaltet sich das Funkgerät aus
Sicherheitsgründen nach 35 Sekunden automatisch ab.
Konfigurationsmodus
Der Zugriff auf zusätzliche Einrichtungsfunktionen ist durch 5
Sekunden langes Gedrückthalten der MON-Taste möglich. Die
Menüpunkte können mit Hilfe des größeren Innenknopfes für die
Frequenzwahl ausgewählt und die Parameterwerte mit Hilfe des
kleineren Außenknopfes für die Frequenzwahl geändert werden.
Intercom Volume
Hier wird die Lautstärke des Intercoms eingestellt
Intercom Squelch
Hier wird die Empfindlichkeit der stimmaktivierten
Rauschsperre des Intercoms eingestellt
AUX In Volume
Hier wird die Lautstärke des AUX-Eingangs
eingestellt
AUX In Mute
Hier wird das über den AUX-Eingang laufende
Audiosignal stummgeschaltet, wenn vom
Funkgerät eine VHF-Übertragung empfangen wird.
Sidetone Volume
Hier wird die Lautstärke des beim Senden
gehörtem Mithörton eingestellt
Radio Squelch
Hier wird die Empfindlichkeit der Rauschsperre des
Funkgeräts eingestellt
Enable 8.33 kHz
Hier wird das Kanalraster auf 8,33/25 kHz oder
25/50 kHz eingestellt
Brightness
Hier wird die Helligkeit des LCD eingestellt

DE
13
Betrieb mit Dual Schaltköpfen
Sollten in einer Dual-Konfiguration 2 Schaltköpfe installiert sein, wird
eine Einstellungsänderung an einem Schaltkopf automatisch auf den
Anderen übertragen. Eine Eingabe an einem Schaltkopf erscheint mit
einer kleinen Verzögerung am zweiten Schaltkopf. Diese Verzögerung
betrifft nur die Anzeige –die Eingabe wird verzögerungsfrei auf die
TY91/TY92 COMs übertragen.
Eine Ausnahme bildet die Lautstärke Einstellung die auf dem Motto:
„der Lautstärkste gewinnt“ basiert. Die höhere Lautstärkeeinstellung
beider Schaltköpfe wird übernommen. Dies bedeutet dass nur ein
Lautstärkeregler bedient werden muss, wie zum Beispiel in einem
Doppelsitzer mit einem Piloten.
Individuelle Funktionen mit 2 Schaltköpfen
Folgende Funktionen bleiben lokal und werden nicht automatisch auf
den zweiten Schaltkopf übertragen:
Frequenz
Schrittweite
Die Änderung der Frequenz Schrittweite durch
Drücken der Taste PUSH/STEP an einem Schaltkopf
wird nicht vom zweiten Kopf übernommen.
Helligkeit
Die Helligkeitseinstellung ist separat an jedem
Schaltkopf einzustellen.
Speicher
Die Frequenzspeicher bleiben zu jedem Schaltkopf
zugeordnet. Der Inhalt eines Speichers wird nicht auf
den zweiten Schaltkopf übertragen auch wenn eine
selektierte Speicherfrequenz auf der zweiten Anzeige
erscheinen wird.
Allgemeiner Betrieb bei niedrigen Temperaturen
Das TY91/TY92 ist für einwandfreien Betrieb bis zu -20°C zertifiziert,
es kann jedoch sein, dass die Anzeige des Bediengeräts bei niedrigen
Temperaturen beeinträchtigt ist. An einem kalten Tag müssen Sie
eventuell warten, bis das Cockpit warm geworden ist, damit die
Anzeige normal funktioniert.
Warnmeldungen
Wenn das VHF-Funkgerät ein Problem entdeckt, zeigt der Bildschirm
WARNING und eine kurze Schilderung des Problems an. Je nach Art
des Problems kann es sein, dass Ihr VHF-Funkgerät nicht einwandfrei
funktioniert. Notieren Sie sich die auf dem Bildschirm angezeigte
Meldung und leiten Sie diese Information an das
DE
14
Wartungsunternehmen für Ihre Bordelektronik weiter. Drücken Sie auf
ENT, um die Meldung zu löschen.
Die folgenden Warnungen können angezeigt werden:
Remote Hot
Das separate Funkgerät läuft heiß.
Stuck Mic
Die PTT-Taste ist seit mehr als 35 Sekunden in der
Sendeposition.
Low Volts
Die Bordstromversorgung beträgt weniger als 10 Volt
(TY91) oder 16 Volt (TY92).
No Radio
Die Verbindung zwischen dem Bediengerät und dem
separaten Funkgerät ist unterbrochen.
Radio Fault
Das separate Funkgerät meldet einen nicht
definierten Fehler.
Störungsmeldung
Wenn das VHF-Funkgerät einen internen Totalausfall registriert, zeigt
der Bildschirm FAULT und eine kurze Schilderung des Problems an.
Notieren Sie sich die unten auf dem Bildschirm angezeigte
Störungsmeldung und leiten Sie diese Information an das
Wartungsunternehmen für Ihre Bordelektronik weiter. Die Störung
kann eventuell behoben werden, indem das Funkgerät aus- und
wieder eingeschaltet wird. Besteht die Störung jedoch weiterhin, wird
die Meldung erneut angezeigt.
Warn und Fehleranzeigen in Dual-Schaltkopf Konfigurationen
In einer Installation mit 2 Schaltköpfen erscheinen jegliche Warn-oder
Fehleranzeigen auf beiden Anzeigen. Sollte ein Schaltkopf fehlerhaft
sein, bleibt die Funktion des zweiten Schaltkopfs erhalten. Der Fehler
sollte analysiert und schnellstens behoben werden. Vom Betrieb einer
Anlage mit 2 Schaltköpfen mit nur einem funktionstüchtigen, wird
abgeraten.
FR
15
Panneau de contrôle
Écran
L'écran affiche les fréquences actives et standby ainsi que toute une
série d'icônes indiquant le mode de fonctionnement de la radio.
La fréquence active est indiquée sur la première ligne tandis que la
fréquence standby est indiquée sur la deuxième ligne de l'écran.
L'icône TX indique que la radio transmet. L'icône RX indique que la
fréquence reçoit un signal et que la communication audio sera
transmise aux casque et haut-parleur. La fréquence standby sera
uniquement reçue lorsque la fonction MONITOR (surveiller) indiquée
par l'icône +2 est active.
La valeur indiquée en bas à droite de l'écran correspond au pas de
fréquence sélectionné.
Bouton rotatif Marche/Arrêt, de réglage du volume et de squelch
Le bouton rotatif de gauche permet de mettre en marche la radio VHF,
de régler le volume audio et le squelch. La rotation du bouton dans le
sens des aiguilles d'une montre allume la radio puis augmente le
volume. La rotation du bouton dans le sens inverse des aiguilles
d'une montre baisse le volume puis éteint la radio.
Une pression sur le bouton active et désactive le squelch automatique
qui peut être utilisé pour écouter les stations de faible amplitude et
pour effectuer un simple test audio.
Fréquence secondaire

FR
16
Boutons rotatifs de réglage de la radio
Les boutons rotatifs concentriques situés sur la droite sont utilisés
pour régler la radio. Le gros bouton rotatif règle la tranche MHz de la
fréquence standby tandis que le plus petit bouton rotatif permet de
régler la tranche kHz de la fréquence standby.
Une pression sur l'extrémité du petit bouton rotatif de réglage permet
de changer l'espacement entre les canaux. Si la radio est configurée
pour fonctionner à 8,33 kHz, les pas permutent entre les canaux de
8,33 kHz et de 25 kHz. Si la radio est configurée pour fonctionner
uniquement à 25 kHz, les pas permutent entre les canaux de 25 kHz
et de 50 kHz.
La modification de la taille du pas ne change pas le comportement de
la radio. Le bouton rotatif de réglage de la radio permet de modifier la
taille du pas et ainsi de trouver plus rapidement une fréquence.
Bouton de sélection flip-flop
Le bouton de sélection flip-flop permet de basculer de la fréquence
standby à la position active et de mettre la fréquence active en
position standby.
Bouton MON
La radio VHF inclut une fonction d'écoute duplex qui peut être activée
ou désactivée par un simple appui sur le bouton MON.
Lorsque la fonction de surveillance est activée, l'icône +2 apparaît
près de la fréquence standby et la radio va balayer les fréquences
actives et standby à l'écoute d'émissions. Le canal principal est
prioritaire. Toute émission sur le canal principal interrompt le canal
secondaire. Pour vous aider à identifier le canal actif, l'icône RX
s'allume à côté du canal actif et le canal secondaire apparaît plus
faiblement que le canal principal.
Ceci s'avère particulièrement utile dans un avion muni d'une seule
radio, car vous pouvez, par exemple, copier l'ATIS, tout en maintenant
une écoute permanente de la fréquence ATC.
Base de données des fréquences à distance
Si un GPS compatible est connecté, le panneau de contrôle sera
chargé avec les fréquences d'aéroport à partir de la base de données
du GPS. Ces fréquences sont accessibles par un simple appui sur le
bouton MEM. Les fréquences d'aéroport et l'ordre de sélection sont
déterminés par les données envoyées au panneau de contrôle à partir
du GPS.
FR
17
Le grand bouton rotatif de sélection des fréquences permet de
parcourir les aéroports disponibles. Le petit bouton rotatif de sélection
des fréquences permet de parcourir les fréquences individuelles
associées à l'aéroport de votre choix. La mémoire intégrée du
panneau de contrôle s'affiche lorsque vous avez fini de faire défiler
tous les aéroports chargés ou s'il n'y a pas de GPS connecté.
Dans chaque cas, la fréquence sélectionnée est chargée en position
standby. Si vous appuyez de nouveau sur le bouton MEM, la
fréquence enregistrée est conservée dans la fenêtre standby. Si vous
appuyez sur le bouton de sélection flip-flop, la fréquence enregistrée
est chargée directement dans le canal actif.
Remarque : lorsque le panneau de contrôle affiche les
fréquences d'aéroport disponibles, il n'accepte aucune
nouvelle mise à jour provenant du GPS afin d'éviter le
changement de fréquences pendant la sélection. Pour
permettre au GPS de mettre à jour la base de données des
fréquences disponibles, vous devez quitter le mode mémoire
en appuyant sur le bouton MEM ou sur le bouton de sélection
flip-flop.
Mémoire de fréquences
Si aucun GPS n'est connecté et que vous appuyez sur le bouton MEM
ou tournez le grand bouton rotatif au-delà de la base de données à
distance, le panneau de contrôle accède à la mémoire de références
rapides interne. Il y a 9 emplacements de mémoire de références
rapides et l'emplacement de mémoire actuellement sélectionné (1 –9)
est affiché tout en bas de l'écran.

FR
18
La rotation du petit bouton rotatif de sélection des fréquences permet
de faire défiler les différents emplacements de mémoire. La fenêtre
de fréquence standby affiche la fréquence enregistrée.
Pour enregistrer une fréquence dans un des emplacements de
mémoire, elle doit d'abord être syntonisée et activée en tant que
fréquence principale. Appuyez sur le bouton MEM pour entrer dans le
mode mémoire de la même manière que d'habitude. Sélectionnez le
canal que vous voulez remplacer à l'aide des boutons rotatifs de
réglage. À présent, appuyez sur le bouton MEM pendant 2 secondes.
La fréquence active en cours d'utilisation va être enregistrée dans
l'emplacement de mémoire sélectionné et remplacer le contenu
existant.
Fonction intercom
La radio TY91/TY92 intègre un intercom qui peut être installé et
connecté en permanence ou sélectionné à l'aide d'un interrupteur.
L'intercom fonctionne par commande vocale et la communication
audio est acheminée vers les deux casques. Le silencieux (squelch)
de l'intercom et le volume peuvent être réglés indépendamment de la
fonction radio à l'aide du menu de configuration.
Microphone bloqué (Stuck Mic)
Si l'interrupteur PTT (appuyer pour parler) est bloqué sur ON ou en
position émission, la radio se coupe automatiquement après 35
secondes par mesure de sécurité.
Other manuals for TY91
2
This manual suits for next models
1
Table of contents
Languages:
Other trig Radio manuals


