BOSSCO Watches Installation guide

WATCH CARE AND MAINTENANCE, OPERATING INSTRUCTIONS
WARRANTY AND SERVICE GUIDE

BOSS BLACK
WATCHES WITH SIMPLE FUNCTIONS
2 or 3 hands - Hours – Minutes 3
2 or 3 hands - Hours – Minutes – Date aperture(s) 4
WATCHES WITH MULTIPLE FUNCTIONS
2 or 3 hands & small seconds 5
3 hands – date counter 6
Multi-eye – Day - Date - 24-hour counter 7
Multi-eye – Day of the week – Date & moon phase 8
WATCHES WITH CHRONOGRAPH FUNCTION
Simple Chronograph 9
1/10 seconds Aviator Chronograph 10
1/5 seconds Chronograph 11
COMPLEX WATCHES WITH CHRONOGRAPH FUNCTION
Regatta Chronograph 12
Racing Chronograph 13 - 15
Worldtimer Chronograph 16
AUTOMATIC WATCHES 17 - 18
BOSS Orange
DIGITAL WATCHES
Models with digital display 20
Digital Chronograph Models 21
Models with analog and digital display 22
ANALOG WATCHES
Models with two or three hands 23
Models with multi-eye 24
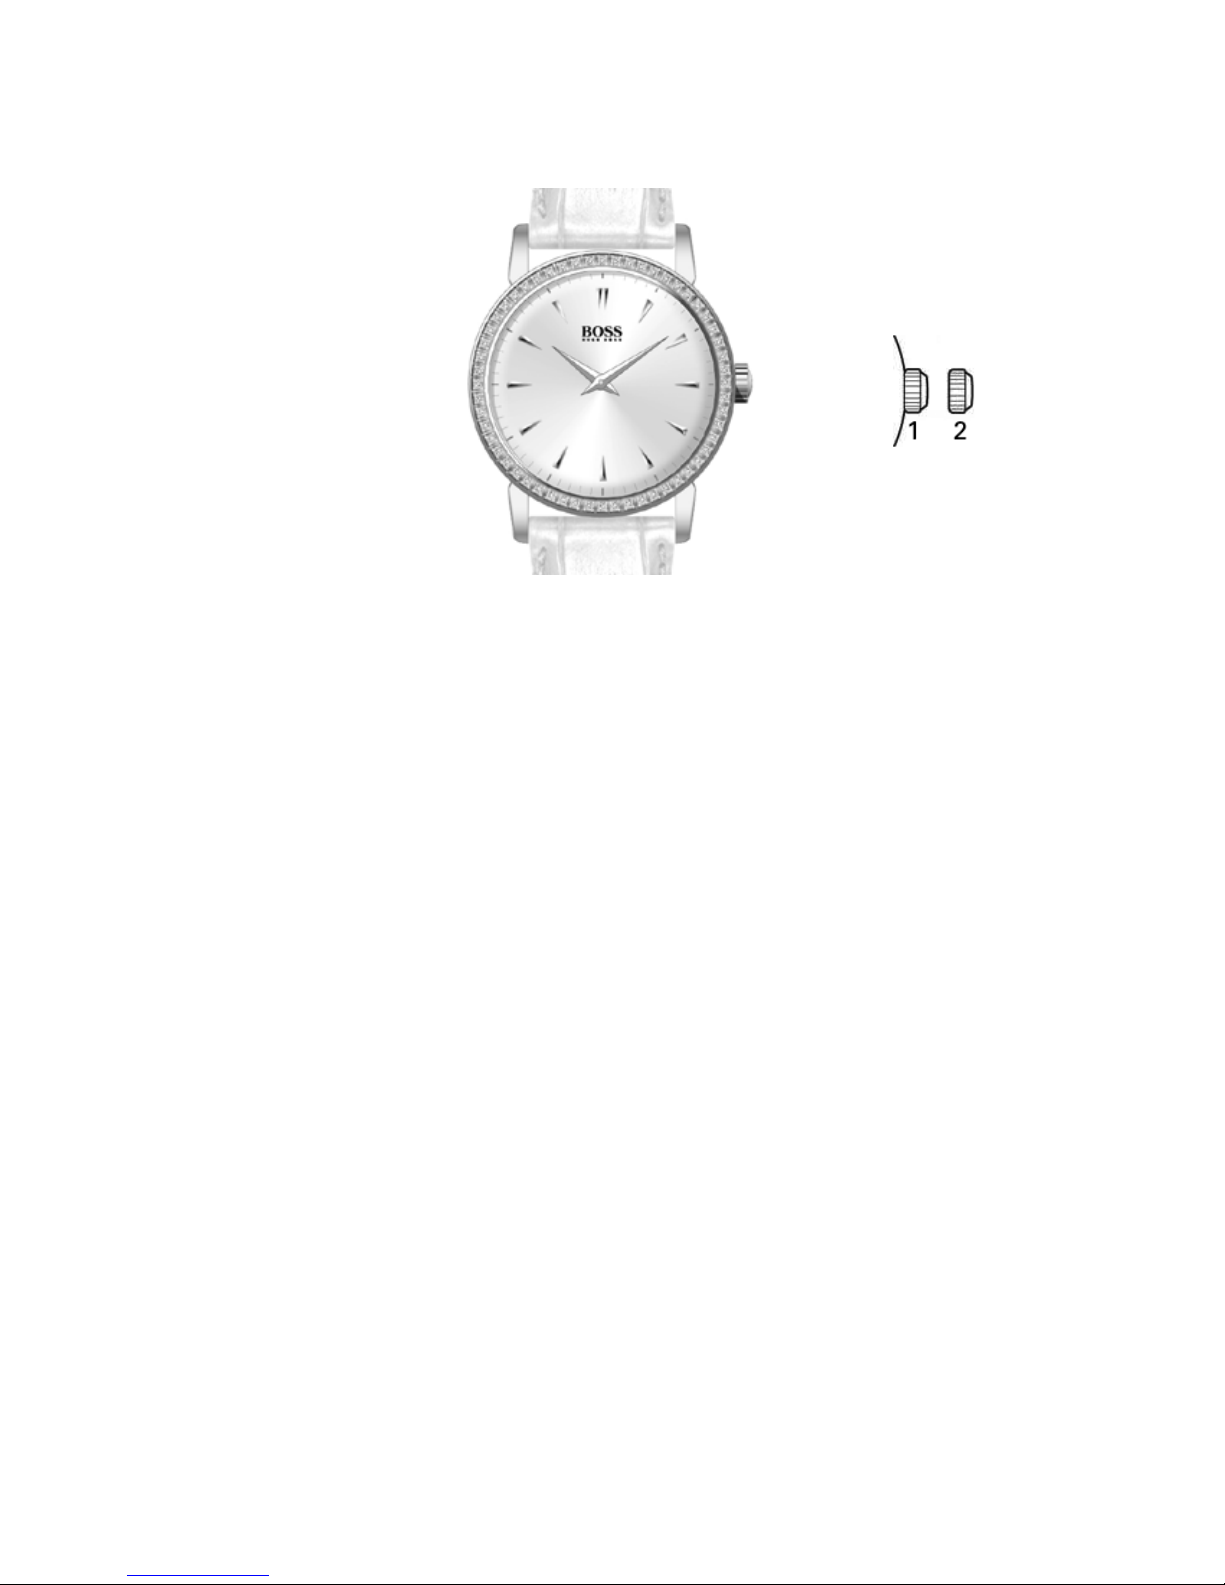
WATCHES WITH SIMPLE FUNCTIONS
2 or 3 hands - Hours – Minutes
3
Positions of the crown:
Position 1 - Normal position.
Crown pushed against the case.
Position 2 - Setting the TIME:
Rotate the crown in either direction.
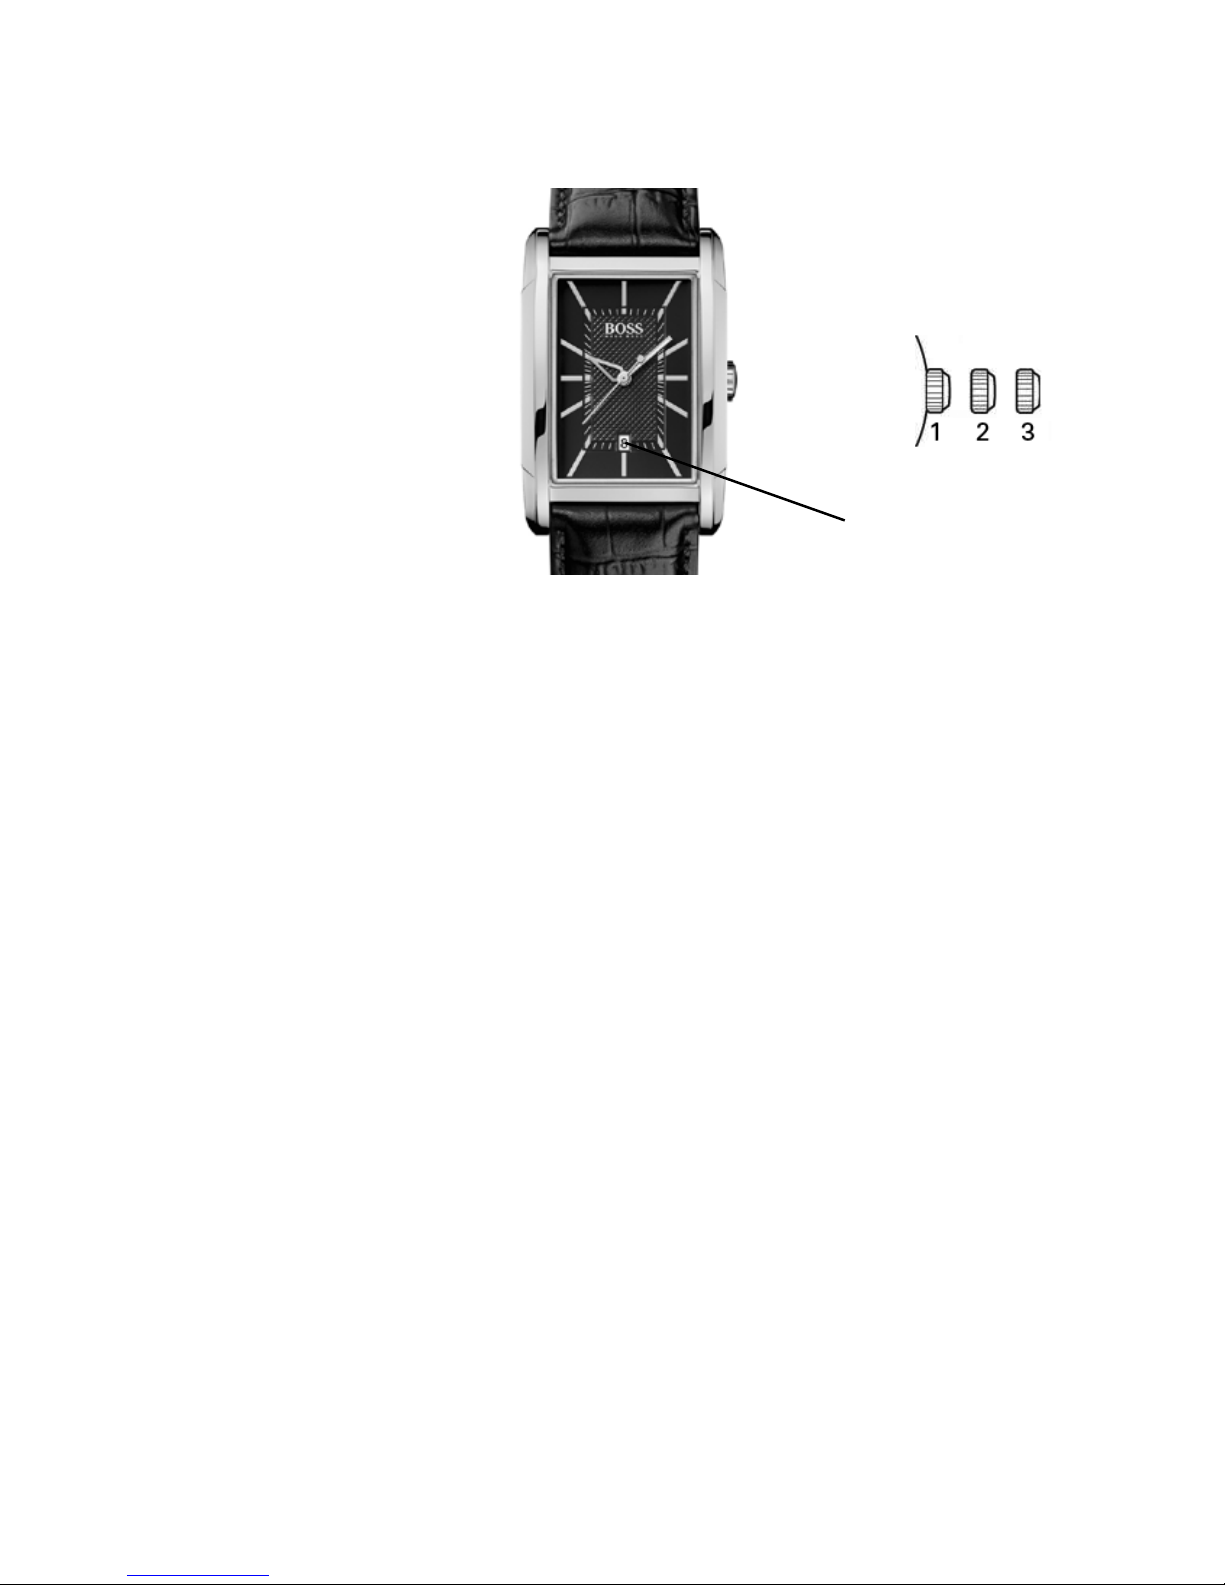
WATCHES WITH SIMPLE FUNCTIONS
2 or 3 hands - Hours – Minutes – Date aperture(s)
4
Date
Positions of the crown:
Position 1 - Normal position.
Crown pushed against the case.
Position 2 - Setting the DAY*:
Rotate the crown clockwise.
NOTE: For models with DAY OF THE WEEK/DAY
display(s): Rotate the crown clockwise to set the
DAY and counterclockwise to set the
DAY OF THE WEEK.
Position 3 - Setting the TIME:
Rotate the crown in either direction.
*WARNING: Never set the day of the week when the hands
are between 9:00 pm and 3:00 am to avoid damage to the
calendar mechanism.
NOTE: Setting the date does not affect the working of the
watch. When the watch is working, the date changes gradually
during the period between 9:00 pm and 3:00 am.
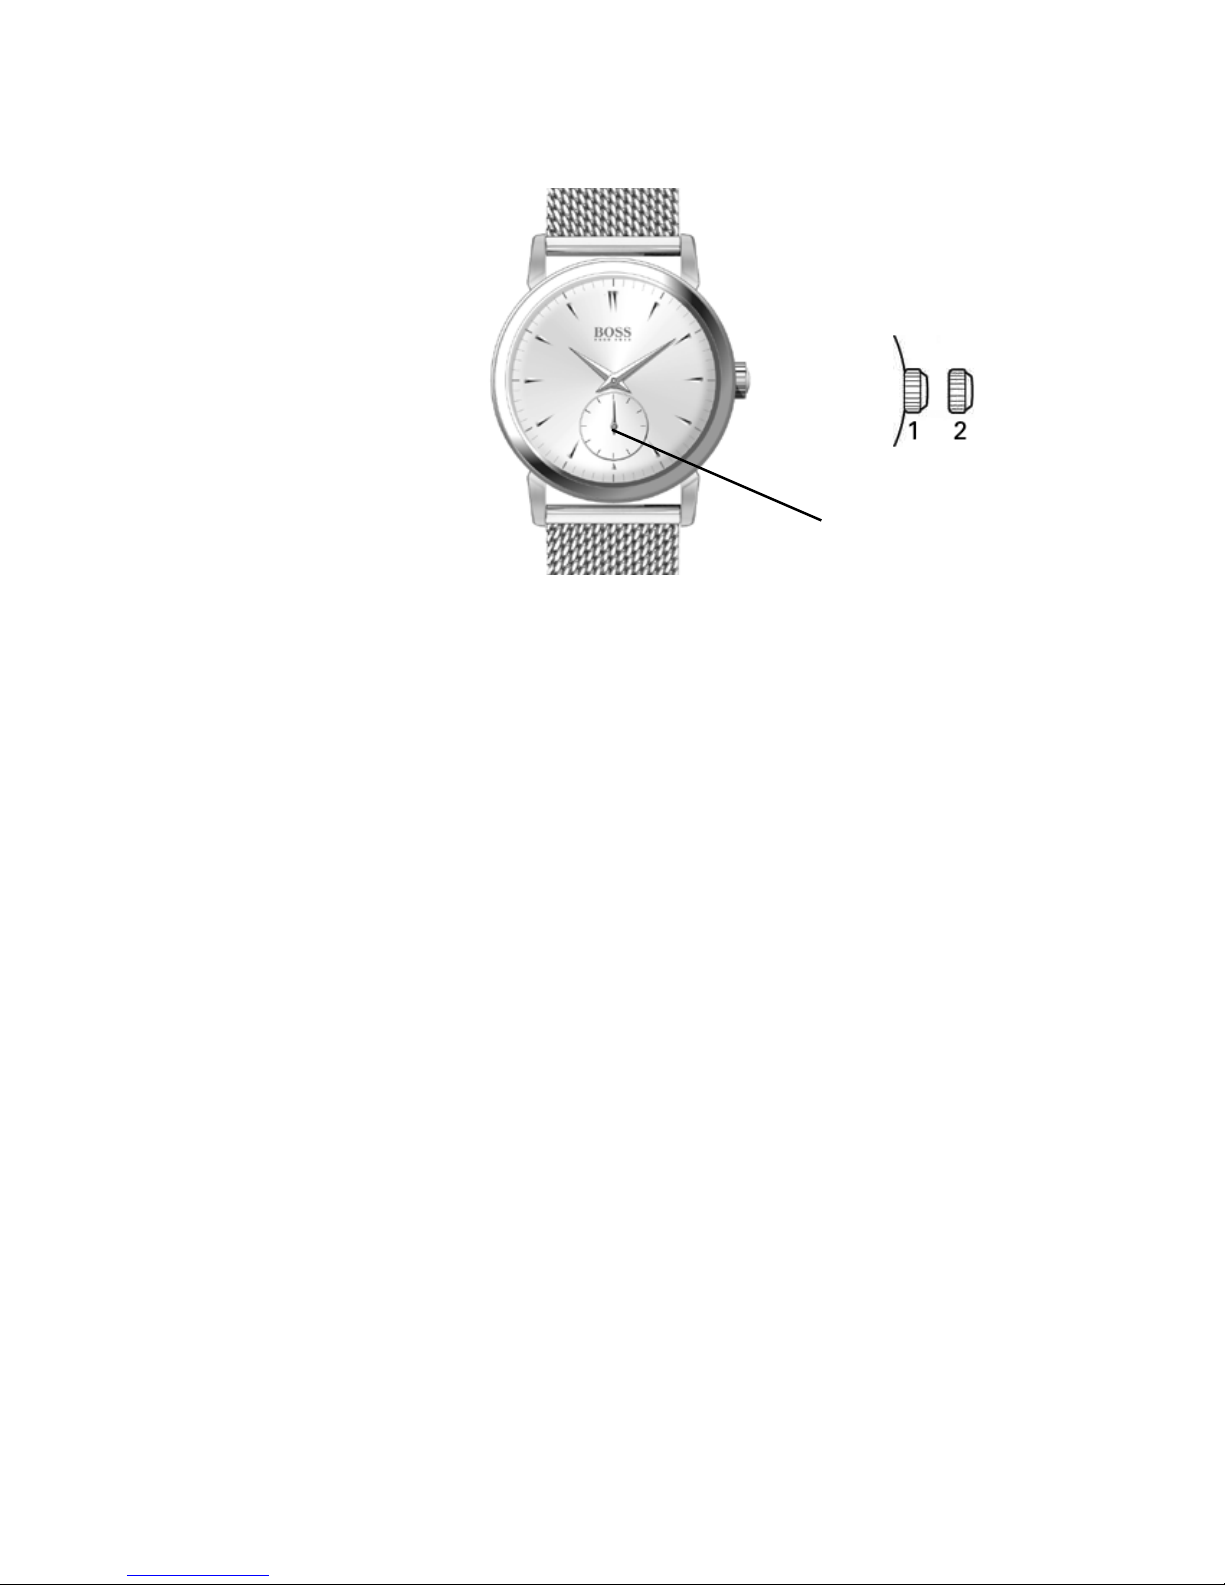
WATCHES WITH MULTIPLE FUNCTIONS
2 or 3 hands & small seconds
5
Direct-drive seconds
Positions of the crown:
Position 1 - Normal position.
Crown pushed against the case.
Position 2 - Setting the TIME:
Rotate the crown in either direction.
WATCHES WITH MULTIPLE FUNCTIONS
3 hands – date counter
6
Date hand
Positions of the crown:
Position 1 - Normal position.
Crown pushed against the case.
Position 2 - Setting the DATE counter:
Rotate the crown in either direction.
Position 3 - Setting the TIME:
Rotate the crown in either direction.
WATCHES WITH MULTIPLE FUNCTIONS
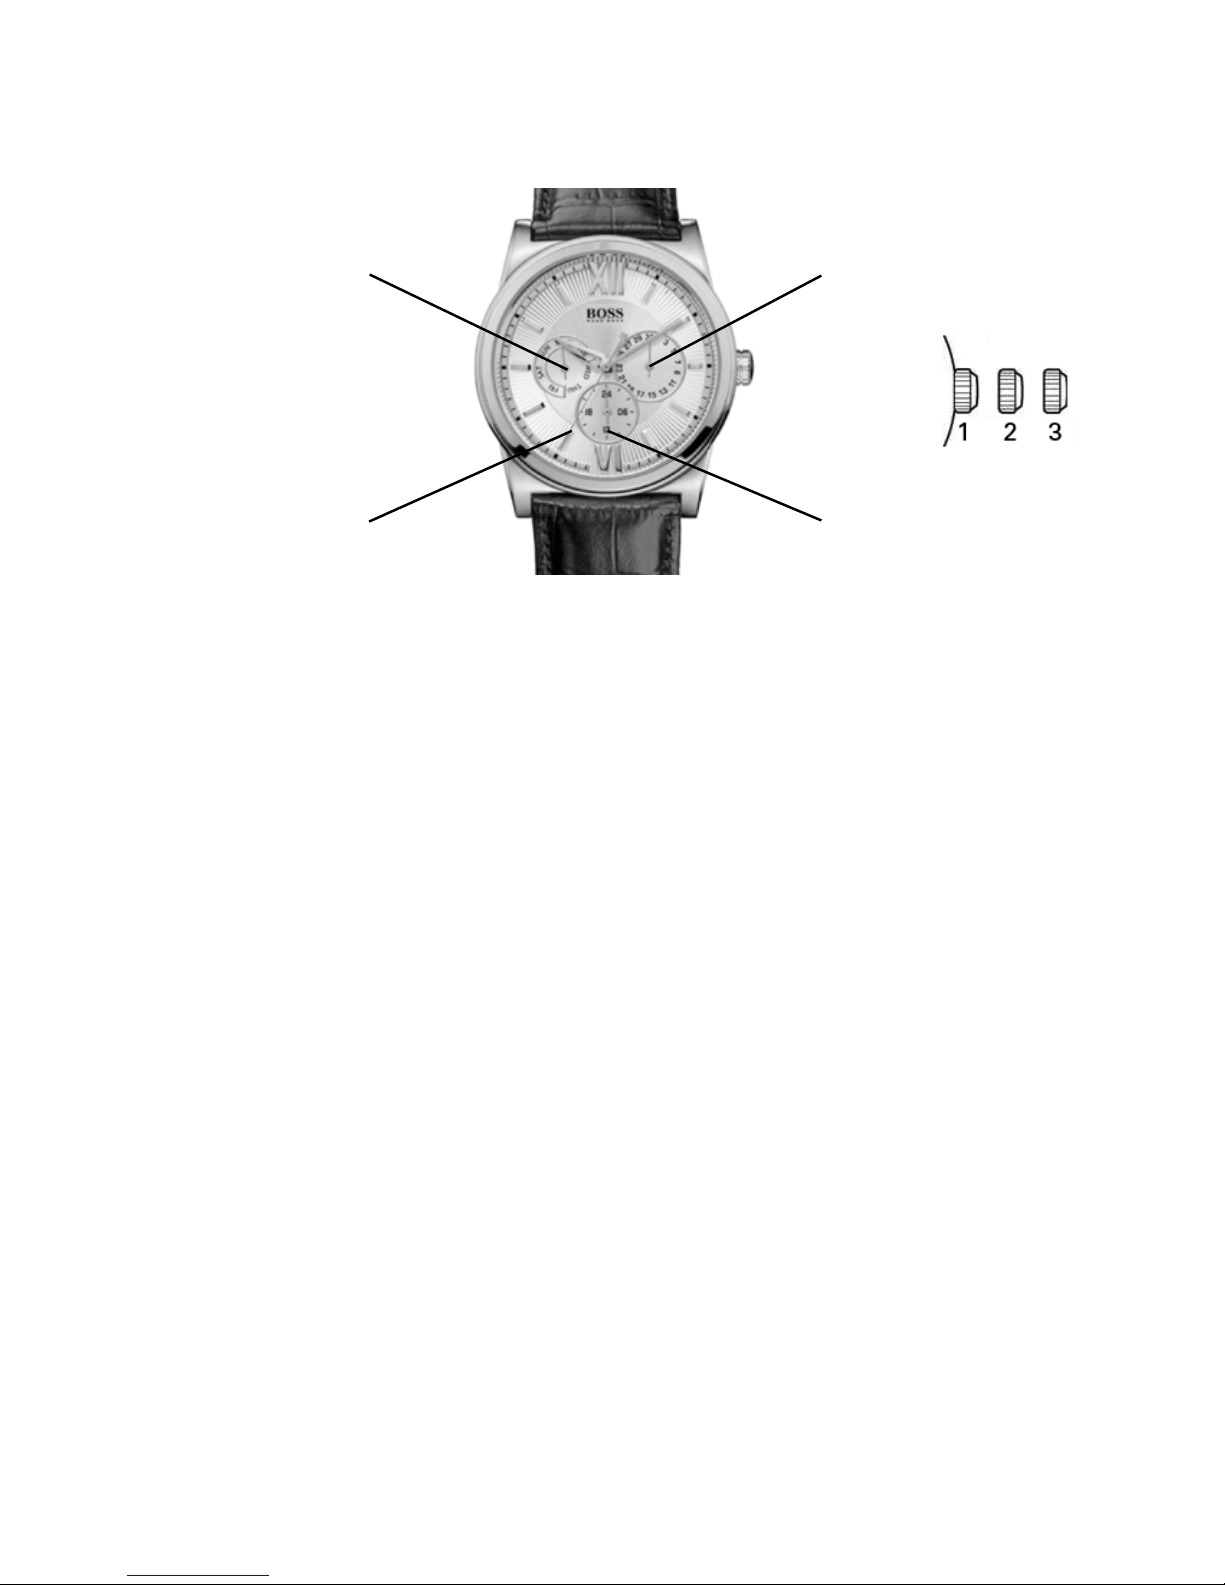
Multi-eye – Day – Date – 24-hour counter
7
24-hour hand
Date hand
Direct-drive seconds
Day-of-the-week
hand
Setting the hour, minutes and 24 hours:
1. Pull the crown out to position 3.
2. Rotate the crown clockwise to place the hour, minute and
24-hour hands at the desired time.
3. Push the crown back to position 1.
Setting the second time zone:
1. With the crown in position 1, press and release the push-
button Bto place the 24-hour hand to the desired position;
the hand moves forward one hour with each press.
Setting the day:
1. Pull the crown out to position 3.
2. Rotate the crown clockwise: The day hand moves forward
one figure each time the hour and minute hands pass the
midnight position (00:00).
3. Once the desired day is obtained, push the crown back to
position 1.
Quick date correction:
1. Pull the crown out to position 2.
2. Rotate the crown clockwise to move the day
forward step by step.
3. Once the desired day is obtained, push the crown
back to position 1.
WARNING: To avoid damage to the watch mechanism, do not
use the quick day correction function between 9:00 pm (21:00)
and 12:30 am (00:30) as the automatic date changes take place
during this interval.
Setting the day of the week:
1. Pull the crown out to position 3.
2. Rotate the crown clockwise: the day-of-the-week hand
moves forward one day each time the hour and minute hands
pass the 4:00 am (04:00) position.
3. Once the desired day is obtained, push the crown back to
position 1.
Setting the month:
1. With the crown in position 1, press then release push-button
Ato set the month; the month hand moves forward one
month at each press.
CAUTION: To avoid damage to the watch mechanism, do not
use the quick month correction function on the 31st of the
month as automatic month changes take place on this day.

WATCHES WITH MULTIPLE FUNCTIONS
Multi-eye – Day of the week – Date & moon phase
8
Moon phase
Date hand
Direct-drive
seconds
Day-of-the-week hand
Setting the day
Pull the crown out to 2nd position to stop the seconds hand
on 0 (12 hours).
Rotate the hours/minutes hands clockwise to set a day.
To set the day, you need to rotate the hour hand forward
24 hours per day.
NOTE:
If you set the day by rotating the crown counterclockwise,
the date may not change.
Do not set the day by rotating the crown counterclockwise.
The day changes during the period between 0:00 am
and 5:30 am or a bit later.
Setting the time
Having set the day, set the hour and minute hands.
Rotate the hour/minute hands clockwise to set the time.
To ensure correct setting of the time, first rotate the minute
hand 5 minutes ahead of the desired time, then go back
(by rotating counterclockwise) to the desired time.
Having set the time, use a time signal to synchronize the watch
by pushing in the crown to its normal position to start the
direct-drive seconds hand.
NOTE:
Make sure you have correctly set the AM/PM status before
setting the time.
When the day changes, the watch moves to AM status
(ante meridiem).
(The day changes during the period between 0:00 am and
5:30 am or a bit later).
Setting the moon phase
Pull the crown to the 1st position.
Rotate the crown clockwise to move the moon phase forward.
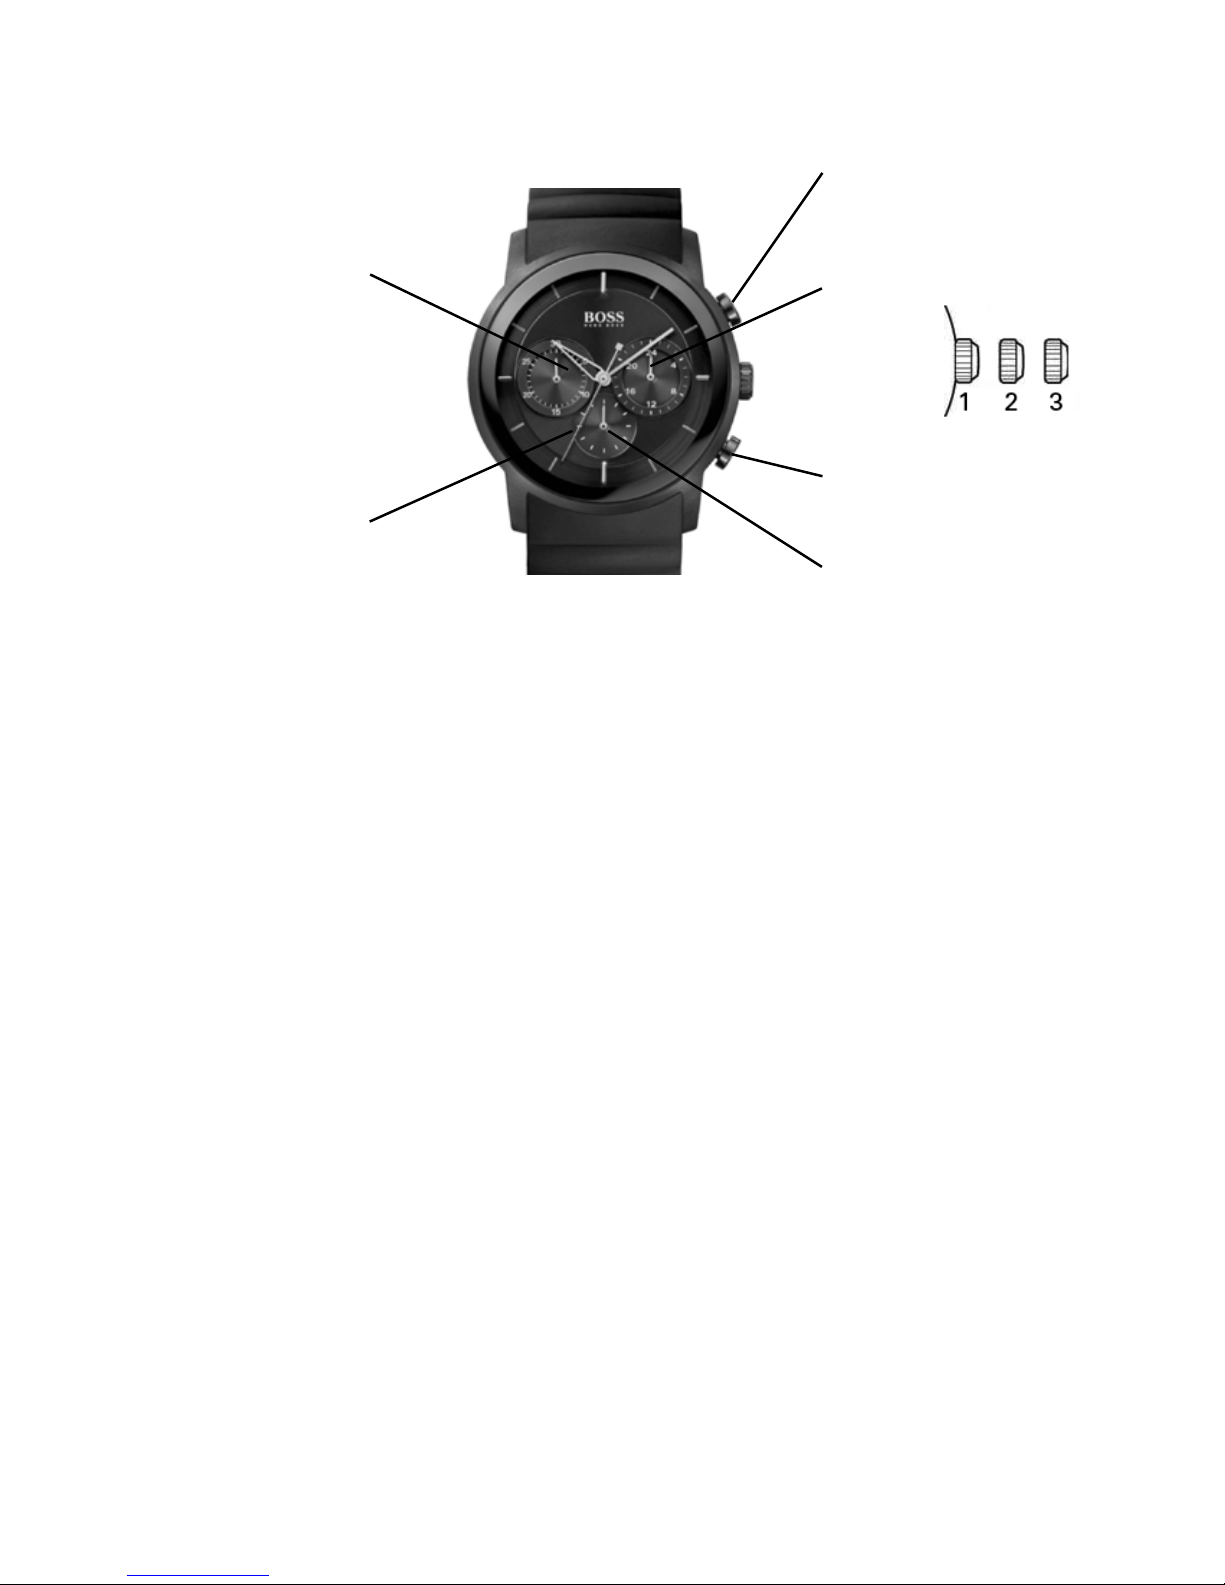
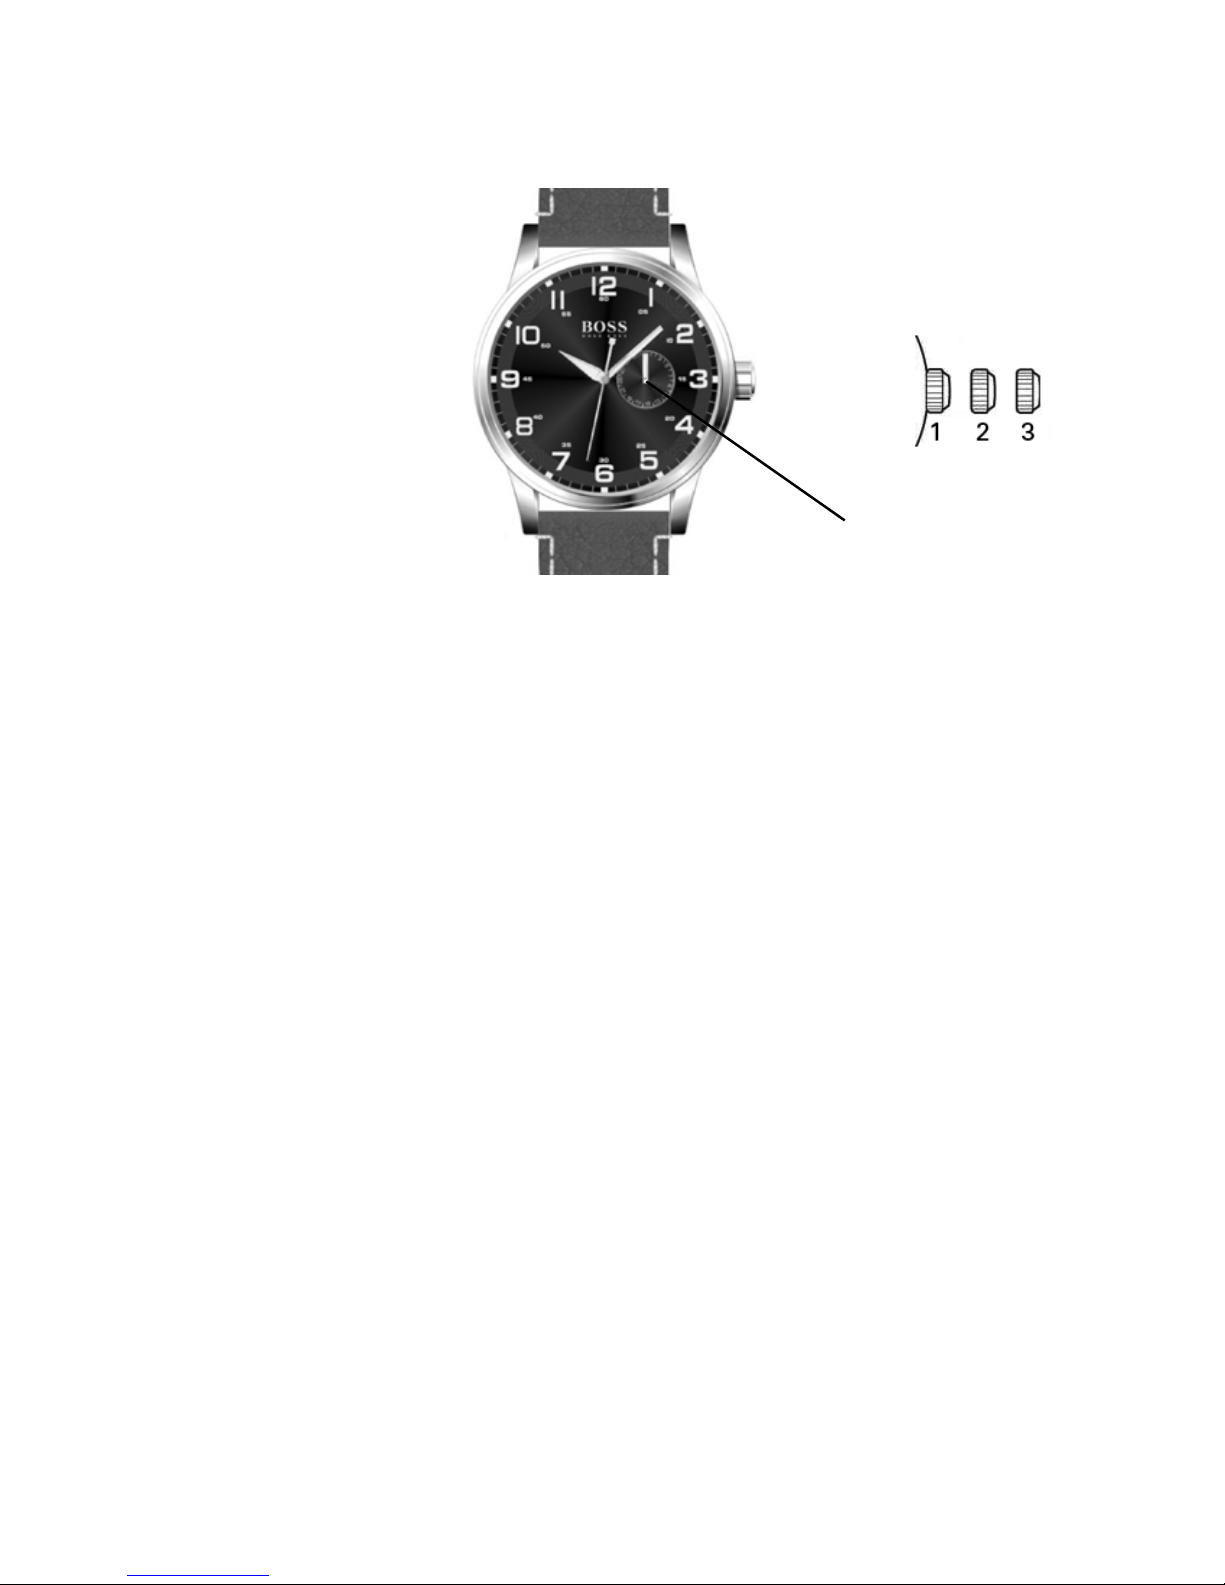
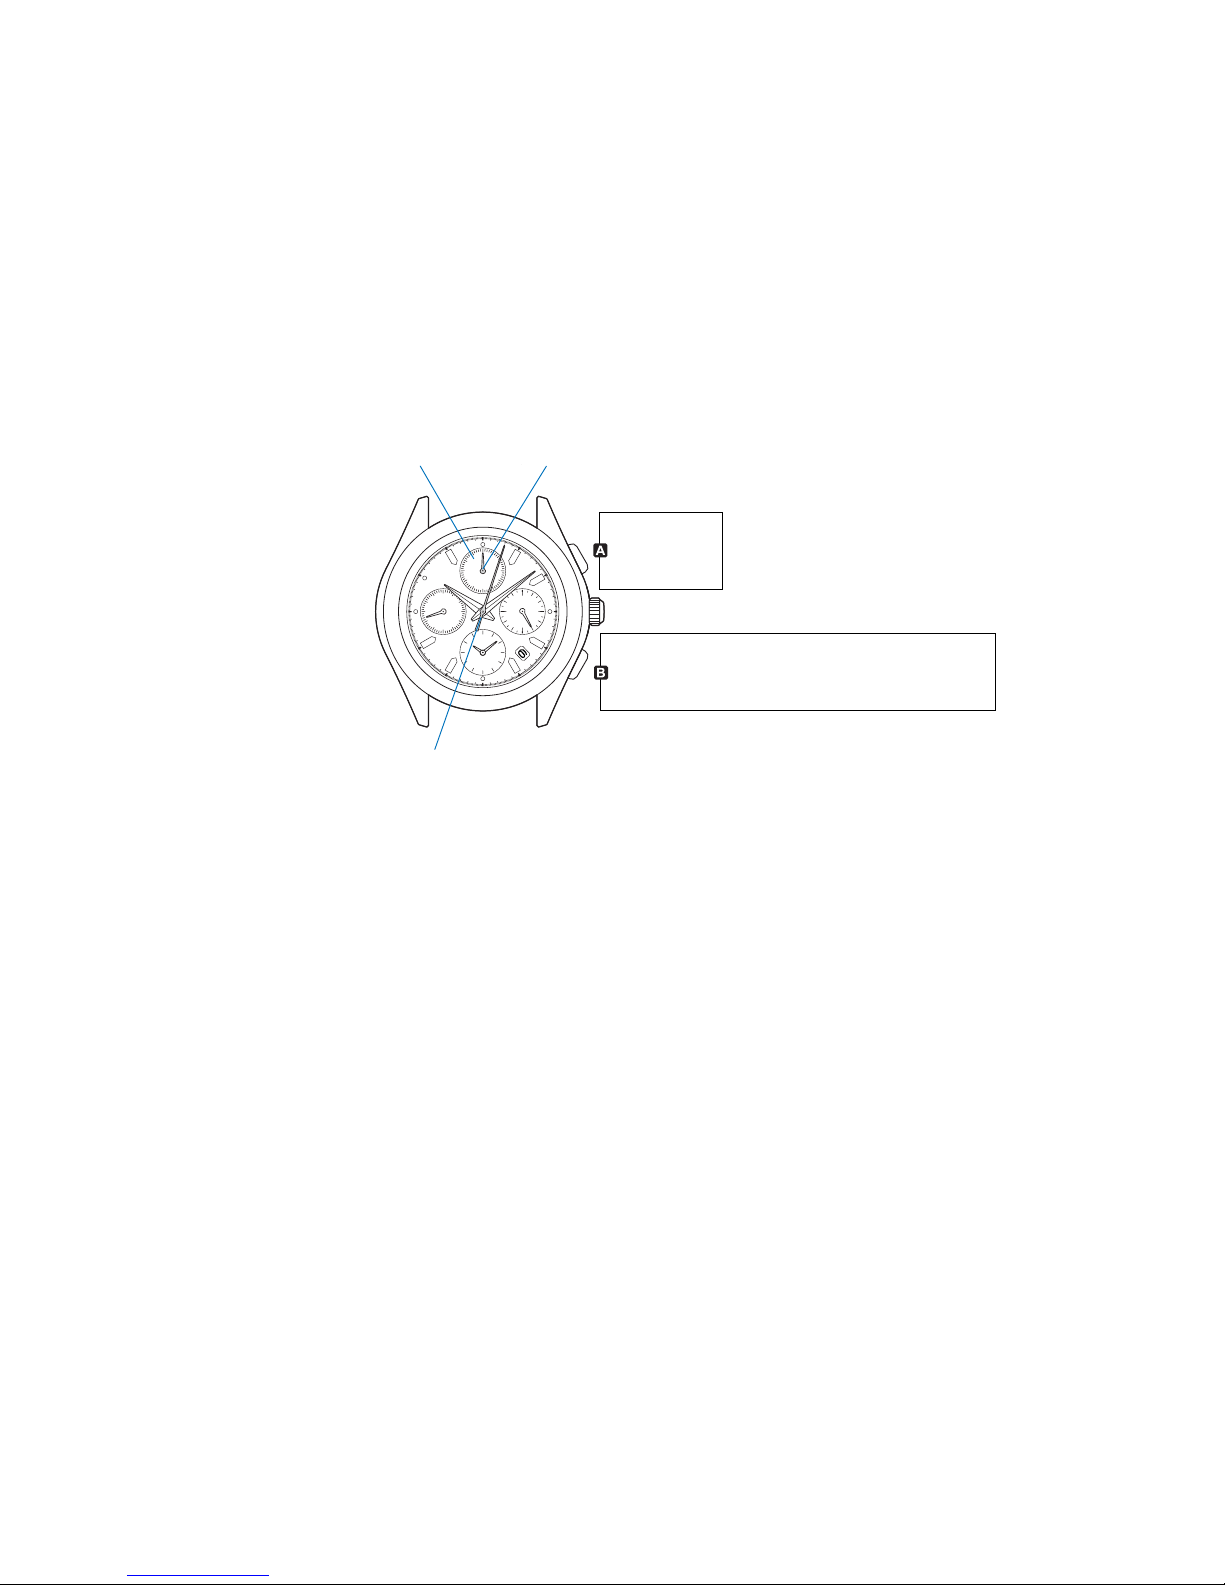
WATCHES WITH CHRONOGRAPH FUNCTION
Simple Chronograph
Chronograph
seconds hand
24-hour hand
A: Start/Stop
B: Intermediate time /
Reset to zero
Direct-drive seconds
Chronograph
minute hand
9
Positions of the crown:
Position 1 - Normal position.
Crown pushed against the case.
Position 2 - Setting the DAY*:
Rotate the crown counterclockwise.
Position 3 - Setting the TIME:
Rotate the crown in either direction.
*NOTE: If the date setting is performed between 9:00 pm
and 3:00 am, it is possible that the date will not be changed
the following day.
Using the chronograph:
The chronograph function of this model lets you time an event
lasting up to 59 minutes / 59 seconds in one second increments.
Use the buttons Aand Bto use the chronograph.
IMPORTANT: The crown must be in position 1, and the
hands of the chronograph must be at 60 (zero) before starting
chronograph. Do not use the chronograph if the crown is in
position 2 or 3. If necessary press button Bto set the hands of
the chronograph to zero before using it.
Simple chronograph functions:
Measuring a single event without interruptions:
1. Press button Ato start the chronograph.
2. Press button Aa second time to stop the chronograph.
3. Press button Bto reset the chronograph to zero.
Clocking total time of a series of events of short duration
(for example, the exact playing time of a soccer game which
is frequently interrupted):
1. Push button Ato start the chronograph at the beginning
of the match.
2. Push button Ato stop the timing when the match is
interrupted.
3. Press button Aagain when play resumes.
4. Repeat steps 2 and 3 until the end of the match.
5. Press button Bto reset the chronograph to zero.
Synchronizing the chronograph hands:
After a battery change or in case of error, it may be necessary
to adjust the seconds hand of the chronograph to align it
correctly to the zero position:
1. Pull the crown out to position 2.
2. Press button Ato adjust the chronograph seconds hand:
Each press of button Awill move the chronograph hand
forward one second. Press button Awithout releasing
the pressure to move the hand forward fast.
3. Once the hand is properly aligned, push the crown back
to position 1.

10
WATCHES WITH CHRONOGRAPH FUNCTION
1/10 seconds Aviator Chronograph
Chronograph seconds hands
1/10th of seconds hands
A: Start/Stop
B: Intermediate time /
Reset to zero
Direct-drive seconds
Minute hands of
the chronograph
OVERVIEW
This precision quartz-movement chronograph has a
minute counter (up to 30”), a counter of tenths of
seconds (after 30 minutes it counts the hours),
a small subdial for seconds, a central seconds hand,
an advanced calendar function with display apertures
for the day and month, and a central hand indicating the
date. It can be used to measure an event lasting up to
30 minutes to the tenth of a second, or events lasting
up to 10 hours to the nearest second.
SETTING THE TIME
Setting the time:
1. Pull the crown to position 3 as soon as the small
seconds hand reaches the 60 seconds position.
The watch stops.
2. Rotate the crown in either direction to move the
hands and set the time, making sure that the date
changes at midnight and not at noon.
3. Place the hands slightly ahead of the exact time,
then rotate the crown slowly counterclockwise
to align the minute hand with the correct
minute marker.
4. Use an accurate and reliable time signal (from a radio
station for example). When the exact time is given,
push the crown back to position 1, against the case.
The watch restarts at the exact time.
Setting the date:
1. Pull the crown to position 2.
2. Rotate the crown in either direction to move the
hands and set the time making sure that the date
changes at midnight and not at noon. (To set the
time to the precise second, see “Setting the time”).
Setting the day and time:
Positions of the crown:
Position 1 - Normal position.
Crown pushed against the case.
Position 2 - Setting the DAY*:
Rotate the crown clockwise.
Position 3 - Setting the TIME:
Rotate the crown in either direction.
*NOTE: If the day setting is performed between 9:00 pm and
3:00 am, it is possible that the date will not be changed the
following day.
Using the chronograph:
This watch offers a chronograph function to measure an event
lasting up to 20 minutes to the fifth of a second. Use the
buttons Aand Bfor the chronograph.
IMPORTANT: The crown must be in position 1 and the hands
of the chronograph must be at 60 (zero) before starting the
chronograph. Do not use the chronograph if the crown is in
position 2 or 3. If necessary, Press button Bto reset the hands
of the chronograph to zero before using it.
Simple chronograph functions:
Measuring a single event without interruptions:
1. Press button Ato start the chronograph.
2. Press button Aa second time to stop the chronograph.
3. Press button Bto reset the chronograph to zero.
Intermediate time functions:
Clocking split times during a race:
1. Press button Ato start the chronograph.
2. Press button Bto temporarily stop the chronograph.
3. Read the intermediate time.
4. Press button Bto restart the chronograph.
The hands go back to catch up with the ongoing event.
5. To read a second intermediate time, press button Bagain.
Repeat steps 2 to 4 to measure further intermediate times.
6. Press button Ato stop the chronograph.
7. Final time display.
8. Press button Bto reset the chronograph to zero.
NOTE: The chronograph’s 1/5-seconds hand will stop after
10 minutes while the internal mechanism continues
the calculation.
Synchronization of the chronograph hands:
After a battery change or in case of error, it may be necessary
to adjust the 1/5-second, seconds, minute and hour hands to
correctly align their respective positions to zero.
NOTE: It is important to follow the steps in the prescribed order:
1. Pull the crown out to position 3.
2. Press button Band keep it down for 2 seconds, then release.
3. Rotate the crown to move the chronograph minute hand to
zero position.
4. Press button Bagain and keep it down for 2 seconds,
then release.
5. Rotate the crown to bring the seconds hand to zero.
6. Press button Ba third time and keep it down for 2 seconds,
then release.
7. Rotate the crown to bring the minute and hour hands to zero.
8. If necessary, Press button Band keep it down for 2 seconds,
then release to prepare the mechanism to adjust the seconds
hand of the chronograph.
9. When the chronograph hand setting is finished,
push the crown back to position 1.
11
Chronograph seconds hands
WATCHES WITH CHRONOGRAPH FUNCTION
1/5-second Chronograph
Small seconds hand
24-hour hand
A: Start/Stop
B: Intermediate time/
Reset to zero
Chronograph
hand
(1/5-second
precision)
Chronograph
minute hand

WATCHES WITH COMPLEX CHRONOGRAPH FUNCTIONS
Regatta Chronograph
12
7
2
0
I2
8
3
5
WATER RESISTANT
10 ATM
Y
A
C
H
T
I
N
G
T
I
M
E
R
3
4
6
M
I
N
.
5
M
I
N
.
1
M
I
N
U
T
E
60
30
2040
1050
8
40 20
60
0
6
12
18
2
4
H
O
U
R
S
5
5
0
5
1
0
5
0
4
5
3
5
2
5
1
5
1
0
M
I
N
.
6
8
Seconds hand
Central hand
To display:
• Minute
countdown
• Clocking
minutes
Pusher A
• START/STOP
Pusher B
• Reset to zero
• Setting the
countdown
• Second chance
countdown
adjustment
• Change the hours/
seconds display on
the subdial at
10 o’clock
Alarm hand
Minute hand
Warning: timing starts with a countdown, then continues
with chronograph timing.
Hour and second
counter
Display:
• Second
countdown
• Clocking the hours
Pusher C
• Alarm
ON/OFF

13
WATCHES WITH COMPLEX CHRONOGRAPH FUNCTIONS
Racing Chronograph
18
24
12
6
30
SEC
60
6
ALARM
12
3 9
30
MIN
60
45 15
4
5
5
0
5
5
6
0
1
0
1
5
5
4
0
3
5
3
0
2
5
2
0
1
Tirer
3
7LUHU
HQ
4
5
5
0
5
5
6
0
1
0
1
5
5
4
0
3
5
3
0
2
5
2
0
30
SEC
60
6
ALARM
12
3 9
30
MIN
60
45 15
18
24
12
6
7LUHU
2
4
5
5
0
5
5
6
0
1
0
1
5
5
4
0
3
5
3
0
2
5
2
0
18
24
12
6
30
SEC
60
6
ALARM
12
3 9
30
MIN
60
45 15
18
24
12
6
30
SEC
60
6
ALARM
12
3 9
30
MIN
60
45 15
4
5
5
0
5
5
6
0
1
0
1
5
5
4
0
3
5
3
0
2
5
2
0
de seconde
Aiguille des heures
Date
la petite seconde
Aiguille des heures
Aiguille de
la petite seconde
Aiguille de
la petite seconde
Aiguille des heures
CHRONOGRAPH
Minute hand
Minute hand
24-hour hand
Date
ALARM
Minute hand
ALARM
Hour hand
CHRONOGRAPH
1/5-seconds hand
Small seconds
hand
Hour hand
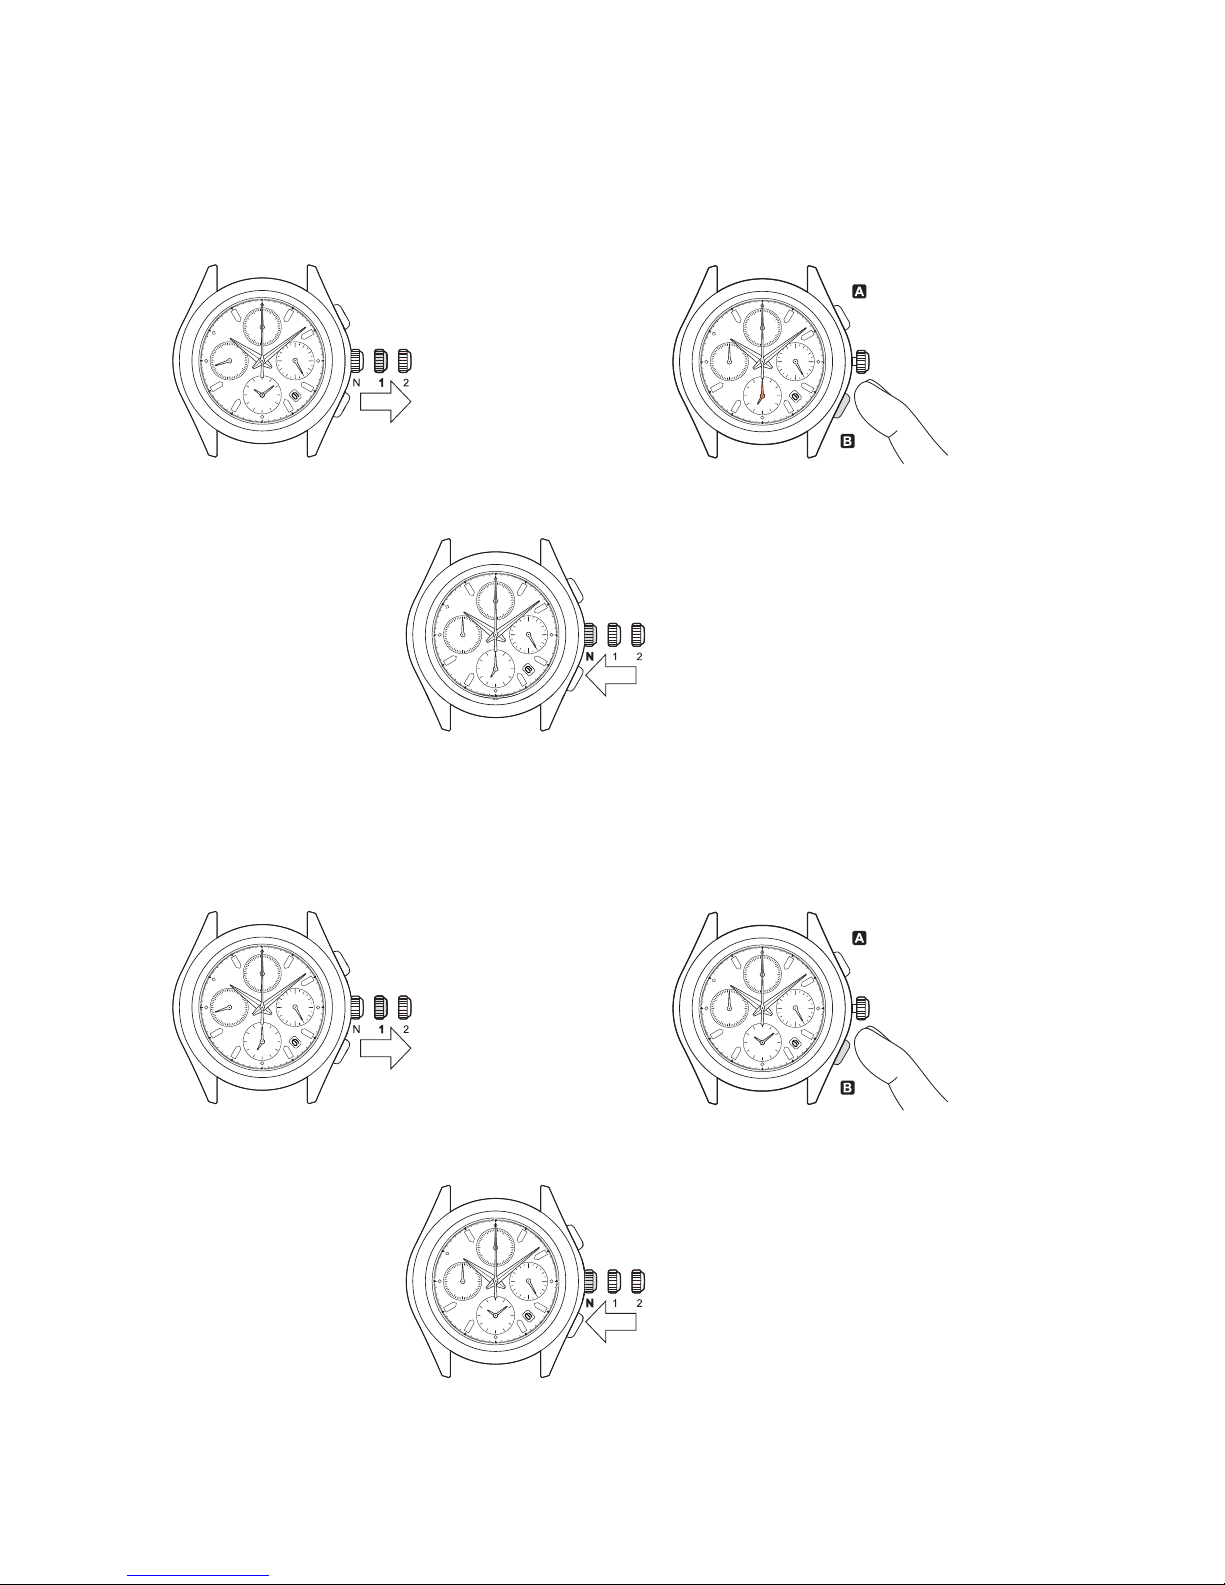
How to set the time and date:
Pull out to 1st position
Pull out to 2nd position
sPull the crown out one click. sRotate the crown clockwise until the previous
day’s date is displayed.
Note: do not set the date between 9 pm and 1 am to avoid
upsetting the change.
sPull the crown out one more click when the
seconds hand is at 12 o’clock.
Note: when the chronograph is running or has stopped, the hands
will be automatically reset to zero if the crown is two clicks out.
N: Normal
1: One “click” out
2: Two “clicks” out
Crown
WATCHES WITH COMPLEX CHRONOGRAPH FUNCTIONS
Racing Chronograph
14
Pousser
Pousser
en position normale
4
5
5
0
5
5
6
0
1
0
1
5
5
4
0
3
5
3
0
2
5
2
0
30
SEC
60
6
ALARM
12
3 9
30
MIN
60
45 15
18
24
12
6
3
4
5
5
0
5
5
6
0
1
0
1
5
5
4
0
3
5
3
0
2
5
2
0
18
24
12
6
30
SEC
60
6
ALARM
12
3 9
30
MIN
60
45 15
2
18
24
12
6
30
SEC
60
6
ALARM
12
3 9
30
MIN
60
45 15
4
5
5
0
5
5
6
0
1
0
1
5
5
4
0
3
5
3
0
2
5
2
0
1
Tirer
Pousser
4
5
5
0
5
5
6
0
1
0
1
5
5
4
0
3
5
3
0
2
5
2
0
30
SEC
60
6
ALARM
12
3 9
30
MIN
60
45 15
18
24
12
6
3
3
5
3
0
2
5
4
5
5
0
5
5
6
0
1
0
1
5
5
4
0
3
5
3
0
2
5
2
0
18
24
12
6
30
SEC
60
6
ALARM
12
3 9
30
MIN
60
45 15
2
18
24
12
6
30
SEC
60
6
ALARM
12
3 9
30
MIN
60
45 15
4
5
5
0
5
5
6
0
1
0
1
5
5
4
0
3
5
3
0
2
5
2
0
1
Tirer
How to set the alarm function:
Pull out to 1st position
Pull the crown out one click.
Push back to normal
position
Replace the crown in normal position.
Note: the alarm function is automatically activated.
Press button Bseveral times to set the Alarm
function hands to the desired time.
Note: if button Bis kept down, the Alarm function hands move fast.
Then press button Ato activate the alarm.
Pull out to 1st position
Pull the crown out one click.
Push back to normal
position
Replace the crown in normal position.
Note: the alarm function is automatically activated.
Press button Band keep it down until the Alarm
function hands stops on the current time.
Note: if button Bis kept down, the alarm function hands move fast.
How to cancel the alarm you have set:
SPLIT-TIME COUNTER
RELEASING THE SPLIT-TIME COUNTER HAND
REINITIALIZING
START
STOP
RESTART
23
MODE%D’EMPLOI
Modèles%Convertibles%à%Bracelet%Cuir/Métal
2
134
Intégration du bracelet en cuir
24
Montre Boss Black Racing
MODE%D’EMPLOI
25
18
24
12
6
30
SEC
60
6
ALARM
12
3 9
30
MIN
60
45 15
4
5
5
0
5
5
6
0
1
0
1
5
5
4
0
3
5
3
0
2
5
2
0
Aiguille des heures
CHRONOMÈTRE
Aiguille 1/5ème de seconde
Aiguille de
la petite seconde
Aiguille des minutes
Aiguille 24 heures
RÉVEIL
Aiguille des minutes
RÉVEIL
Aiguille des heures
CHRONOMÈTRE
Aiguille des minutes
Date
Couronne
N: Normal
1: Position du premier déclic
2: Position du second déclic
Comment régler l’heure et la date :
Tirer la couronne jusqu’au premier déclic
Tirer
en 1ère position
18
24
12
6
30
SEC
60
6
ALARM
12
3 9
30
MIN
60
45 15
4
5
5
0
5
5
6
0
1
0
1
5
5
4
0
3
5
3
0
2
5
2
0
Faire tourner la couronne dans le sens horaire
jusqu’à ce que la date de la veille s’affiche.
Remarque : ne pas régler la date entre 21 h et 1 h sous peine de perturber
le changement.
2
4
5
5
0
5
5
6
0
1
0
1
5
5
4
0
3
5
3
0
2
5
2
0
18
24
12
6
30
SEC
60
6
ALARM
12
3 9
30
MIN
60
45 15
Tirer la couronne jusqu’au deuxième déclic
lorsque l’aiguille des secondes est à 12 heures.
Remarque : lorsque le chronomètre est en marche ou a été arrêté,
si la couronne est sur la position du second déclic,
les aiguilles seront automatiquement remises à zéro.
3
7LUHU
HQQGHSRVLWLRQ
4
5
5
0
5
5
6
0
1
0
1
5
5
4
0
3
5
3
0
2
5
2
0
30
SEC
60
6
ALARM
12
3 9
30
MIN
60
45 15
18
24
12
6
1
Comment régler l’heure et la date :
15
WATCHES WITH COMPLEX CHRONOGRAPH FUNCTIONS
Racing Chronograph
18
24
12
6
30
SEC
60
6
ALARM
12
3 9
30
MIN
60
45 15
4
5
5
0
5
5
6
0
1
0
1
5
5
4
0
3
5
3
0
2
5
2
0
CHRONOMÈTRE
Aiguille 1/5ème de seconde
CHRONOMÈTRE
Cadran des minutes CHRONOMÈTRE
Aiguille des minutes
DÉMARRER
ARRÊTER
REDÉMARRER
RATTRAPANTE
LIBÉRATION DE LA RATTRAPANTE
RÉINITIALISATION
Comment utiliser les fonctions du chronomètre :
,E CHRONOMáTRE PEUT MESURER JUSQUÜ MIN S EN UNIT£S DE áME DE SECONDE
!PRáS MINUTES IL REPRENDRA LE D£COMPTE Ü Z£RO JUSQUÜ HEURES
!U BOUT DE HEURES LE CHRONOMáTRE SARRäTE AUTOMATIQUEMENT
27
Tirer la couronne jusqu’au premier déclic.
Tirer
en 1ère position
18
24
12
6
30
SEC
60
6
ALARM
12
3 9
30
MIN
60
45 15
4
5
5
0
5
5
6
0
1
0
1
5
5
4
0
3
5
3
0
2
5
2
0
Appuyer à plusieurs reprises sur le bouton B
Puis appuyer sur le bouton A pour actionner
le réveil.
sur l’heure souhaitée.
pour régler les aiguilles de la fonction Réveil
Remarque : si le bouton B est maintenu enfoncé, les aiguilles de
la fonction Réveil se déplacent rapidement.
4
5
5
0
5
5
6
0
1
0
1
5
5
4
0
3
5
3
0
2
5
2
0
18
24
12
6
30
SEC
60
6
ALARM
12
3 9
30
MIN
60
45 15
Remettre la couronne en position normale
Remarque : la fonction Réveil est automatiquement activée.
Pousser
en position normale
4
5
5
0
5
5
6
0
1
0
1
5
5
4
0
3
5
3
0
2
5
2
0
30
SEC
60
6
ALARM
12
3 9
30
MIN
60
45 15
18
24
12
6
2
3
1
Tirer la couronne jusqu’au premier déclic.
Tirer
en 1ère position
18
24
12
6
30
SEC
60
6
ALARM
12
3 9
30
MIN
60
45 15
4
5
5
0
5
5
6
0
1
0
1
5
5
4
0
3
5
3
0
2
5
2
0
Appuyer et maintenir le bouton B enfoncé
jusqu’à ce que les aiguilles de la fonction Réveil
s’arrêtent sur l’heure actuelle.
Remarque : si le bouton B est maintenu enfoncé, les aiguilles de
la fonction Réveil se déplacent rapidement.
4
5
5
0
5
5
6
0
1
0
1
5
5
4
0
3
5
3
0
2
5
2
0
18
24
12
6
30
SEC
60
6
ALARM
12
3 9
30
MIN
60
45 15
Remettre la couronne en position normale.
Remarque : la fonction Réveil est automatiquement activée.
Pousser
en position normale
4
5
5
0
5
5
6
0
1
0
1
5
5
4
0
3
5
3
0
2
5
2
0
30
SEC
60
6
ALARM
12
3 9
30
MIN
60
45 15
18
24
12
6
2
3
1
Tirer la couronne jusqu’au premier déclic.
Tirer
en 1ère position
18
24
12
6
30
SEC
60
6
ALARM
12
3 9
30
MIN
60
45 15
4
5
5
0
5
5
6
0
1
0
1
5
5
4
0
3
5
3
0
2
5
2
0
Appuyer à plusieurs reprises sur le bouton B
Puis appuyer sur le bouton A pour actionner
le réveil.
sur l’heure souhaitée.
pour régler les aiguilles de la fonction Réveil
Remarque : si le bouton B est maintenu enfoncé, les aiguilles de
la fonction Réveil se déplacent rapidement.
4
5
5
0
5
5
6
0
1
0
1
5
5
4
0
3
5
3
0
2
5
2
0
18
24
12
6
30
SEC
60
6
ALARM
12
3 9
30
MIN
60
45 15
Remettre la couronne en position normale
Remarque : la fonction Réveil est automatiquement activée.
Pousser
en position normale
4
5
5
0
5
5
6
0
1
0
1
5
5
4
0
3
5
3
0
2
5
2
0
30
SEC
60
6
ALARM
12
3 9
30
MIN
60
45 15
18
24
12
6
2
3
1
Tirer la couronne jusqu’au premier déclic.
Tirer
en 1ère position
18
24
12
6
30
SEC
60
6
ALARM
12
3 9
30
MIN
60
45 15
4
5
5
0
5
5
6
0
1
0
1
5
5
4
0
3
5
3
0
2
5
2
0
Appuyer et maintenir le bouton B enfoncé
jusqu’à ce que les aiguilles de la fonction Réveil
s’arrêtent sur l’heure actuelle.
Remarque : si le bouton B est maintenu enfoncé, les aiguilles de
la fonction Réveil se déplacent rapidement.
4
5
5
0
5
5
6
0
1
0
1
5
5
4
0
3
5
3
0
2
5
2
0
18
24
12
6
30
SEC
60
6
ALARM
12
3 9
30
MIN
60
45 15
Remettre la couronne en position normale.
Remarque : la fonction Réveil est automatiquement activée.
Pousser
en position normale
4
5
5
0
5
5
6
0
1
0
1
5
5
4
0
3
5
3
0
2
5
2
0
30
SEC
60
6
ALARM
12
3 9
30
MIN
60
45 15
18
24
12
6
2
3
1
Comment régler la fonction Réveil :
Comment annuler le réveil que vous avez réglé :
26
Montre Boss Black Racing
MODE%D’EMPLOI
Montre Boss Black Racing
MODE%D’EMPLOI
18
24
12
6
30
SEC
60
6
ALARM
12
3 9
30
MIN
60
45 15
4
5
5
0
5
5
6
0
1
0
1
5
5
4
0
3
5
3
0
2
5
2
0
CHRONOMÈTRE
Aiguille 1/5ème de seconde
CHRONOMÈTRE
Cadran des minutes CHRONOMÈTRE
Aiguille des minutes
DÉMARRER
ARRÊTER
REDÉMARRER
RATTRAPANTE
LIBÉRATION DE LA RATTRAPANTE
RÉINITIALISATION
Comment utiliser les fonctions du chronomètre :
,E CHRONOMáTRE PEUT MESURER JUSQUÜ MIN S EN UNIT£S DE áME DE SECONDE
!PRáS MINUTES IL REPRENDRA LE D£COMPTE Ü Z£RO JUSQUÜ HEURES
!U BOUT DE HEURES LE CHRONOMáTRE SARRäTE AUTOMATIQUEMENT
27
Tirer la couronne jusqu’au premier déclic.
Tirer
en 1ère position
18
24
12
6
30
SEC
60
6
ALARM
12
3 9
30
MIN
60
45 15
4
5
5
0
5
5
6
0
1
0
1
5
5
4
0
3
5
3
0
2
5
2
0
Appuyer à plusieurs reprises sur le bouton B
Puis appuyer sur le bouton A pour actionner
le réveil.
sur l’heure souhaitée.
pour régler les aiguilles de la fonction Réveil
Remarque : si le bouton B est maintenu enfoncé, les aiguilles de
la fonction Réveil se déplacent rapidement.
4
5
5
0
5
5
6
0
1
0
1
5
5
4
0
3
5
3
0
2
5
2
0
18
24
12
6
30
SEC
60
6
ALARM
12
3 9
30
MIN
60
45 15
Remettre la couronne en position normale
Remarque : la fonction Réveil est automatiquement activée.
Pousser
en position normale
4
5
5
0
5
5
6
0
1
0
1
5
5
4
0
3
5
3
0
2
5
2
0
30
SEC
60
6
ALARM
12
3 9
30
MIN
60
45 15
18
24
12
6
2
3
1
Tirer la couronne jusqu’au premier déclic.
Tirer
en 1ère position
18
24
12
6
30
SEC
60
6
ALARM
12
3 9
30
MIN
60
45 15
4
5
5
0
5
5
6
0
1
0
1
5
5
4
0
3
5
3
0
2
5
2
0
Appuyer et maintenir le bouton B enfoncé
jusqu’à ce que les aiguilles de la fonction Réveil
s’arrêtent sur l’heure actuelle.
Remarque : si le bouton B est maintenu enfoncé, les aiguilles de
la fonction Réveil se déplacent rapidement.
4
5
5
0
5
5
6
0
1
0
1
5
5
4
0
3
5
3
0
2
5
2
0
18
24
12
6
30
SEC
60
6
ALARM
12
3 9
30
MIN
60
45 15
Remettre la couronne en position normale.
Remarque : la fonction Réveil est automatiquement activée.
Pousser
en position normale
4
5
5
0
5
5
6
0
1
0
1
5
5
4
0
3
5
3
0
2
5
2
0
30
SEC
60
6
ALARM
12
3 9
30
MIN
60
45 15
18
24
12
6
2
3
1
Tirer la couronne jusqu’au premier déclic.
Tirer
en 1ère position
18
24
12
6
30
SEC
60
6
ALARM
12
3 9
30
MIN
60
45 15
4
5
5
0
5
5
6
0
1
0
1
5
5
4
0
3
5
3
0
2
5
2
0
Appuyer à plusieurs reprises sur le bouton B
Puis appuyer sur le bouton A pour actionner
le réveil.
sur l’heure souhaitée.
pour régler les aiguilles de la fonction Réveil
Remarque : si le bouton B est maintenu enfoncé, les aiguilles de
la fonction Réveil se déplacent rapidement.
4
5
5
0
5
5
6
0
1
0
1
5
5
4
0
3
5
3
0
2
5
2
0
18
24
12
6
30
SEC
60
6
ALARM
12
3 9
30
MIN
60
45 15
Remettre la couronne en position normale
Remarque : la fonction Réveil est automatiquement activée.
Pousser
en position normale
4
5
5
0
5
5
6
0
1
0
1
5
5
4
0
3
5
3
0
2
5
2
0
30
SEC
60
6
ALARM
12
3 9
30
MIN
60
45 15
18
24
12
6
2
3
1
Tirer la couronne jusqu’au premier déclic.
Tirer
en 1ère position
18
24
12
6
30
SEC
60
6
ALARM
12
3 9
30
MIN
60
45 15
4
5
5
0
5
5
6
0
1
0
1
5
5
4
0
3
5
3
0
2
5
2
0
Appuyer et maintenir le bouton B enfoncé
jusqu’à ce que les aiguilles de la fonction Réveil
s’arrêtent sur l’heure actuelle.
Remarque : si le bouton B est maintenu enfoncé, les aiguilles de
la fonction Réveil se déplacent rapidement.
4
5
5
0
5
5
6
0
1
0
1
5
5
4
0
3
5
3
0
2
5
2
0
18
24
12
6
30
SEC
60
6
ALARM
12
3 9
30
MIN
60
45 15
Remettre la couronne en position normale.
Remarque : la fonction Réveil est automatiquement activée.
Pousser
en position normale
4
5
5
0
5
5
6
0
1
0
1
5
5
4
0
3
5
3
0
2
5
2
0
30
SEC
60
6
ALARM
12
3 9
30
MIN
60
45 15
18
24
12
6
2
3
1
Tirer la couronne jusqu’au premier déclic.
Tirer
en 1ère position
18
24
12
6
30
SEC
60
6
ALARM
12
3 9
30
MIN
60
45 15
4
5
5
0
5
5
6
0
1
0
1
5
5
4
0
3
5
3
0
2
5
2
0
Appuyer à plusieurs reprises sur le bouton B
Puis appuyer sur le bouton A pour actionner
le réveil.
sur l’heure souhaitée.
pour régler les aiguilles de la fonction Réveil
Remarque : si le bouton B est maintenu enfoncé, les aiguilles de
la fonction Réveil se déplacent rapidement.
4
5
5
0
5
5
6
0
1
0
1
5
5
4
0
3
5
3
0
2
5
2
0
18
24
12
6
30
SEC
60
6
ALARM
12
3 9
30
MIN
60
45 15
Remettre la couronne en position normale
Remarque : la fonction Réveil est automatiquement activée.
Pousser
en position normale
4
5
5
0
5
5
6
0
1
0
1
5
5
4
0
3
5
3
0
2
5
2
0
30
SEC
60
6
ALARM
12
3 9
30
MIN
60
45 15
18
24
12
6
2
3
1
Tirer la couronne jusqu’au premier déclic.
Tirer
en 1ère position
18
24
12
6
30
SEC
60
6
ALARM
12
3 9
30
MIN
60
45 15
4
5
5
0
5
5
6
0
1
0
1
5
5
4
0
3
5
3
0
2
5
2
0
Appuyer et maintenir le bouton B enfoncé
jusqu’à ce que les aiguilles de la fonction Réveil
s’arrêtent sur l’heure actuelle.
Remarque : si le bouton B est maintenu enfoncé, les aiguilles de
la fonction Réveil se déplacent rapidement.
4
5
5
0
5
5
6
0
1
0
1
5
5
4
0
3
5
3
0
2
5
2
0
18
24
12
6
30
SEC
60
6
ALARM
12
3 9
30
MIN
60
45 15
Remettre la couronne en position normale.
Remarque : la fonction Réveil est automatiquement activée.
Pousser
en position normale
4
5
5
0
5
5
6
0
1
0
1
5
5
4
0
3
5
3
0
2
5
2
0
30
SEC
60
6
ALARM
12
3 9
30
MIN
60
45 15
18
24
12
6
2
3
1
Comment régler la fonction Réveil :
Comment annuler le réveil que vous avez réglé :
26
Montre Boss Black Racing
MODE%D’EMPLOI
Montre Boss Black Racing
MODE%D’EMPLOI
23
MODE%D’EMPLOI
Modèles%Convertibles%à%Bracelet%Cuir/Métal
2
134
Intégration du bracelet en cuir
24
Montre Boss Black Racing
MODE%D’EMPLOI
25
18
24
12
6
30
SEC
60
6
ALARM
12
3 9
30
MIN
60
45 15
4
5
5
0
5
5
6
0
1
0
1
5
5
4
0
3
5
3
0
2
5
2
0
Aiguille des heures
CHRONOMÈTRE
Aiguille 1/5ème de seconde
Aiguille de
la petite seconde
Aiguille des minutes
Aiguille 24 heures
RÉVEIL
Aiguille des minutes
RÉVEIL
Aiguille des heures
CHRONOMÈTRE
Aiguille des minutes
Date
Couronne
N: Normal
1: Position du premier déclic
2: Position du second déclic
Comment régler l’heure et la date :
Tirer la couronne jusqu’au premier déclic
Tirer
en 1ère position
18
24
12
6
30
SEC
60
6
ALARM
12
3 9
30
MIN
60
45 15
4
5
5
0
5
5
6
0
1
0
1
5
5
4
0
3
5
3
0
2
5
2
0
Faire tourner la couronne dans le sens horaire
jusqu’à ce que la date de la veille s’affiche.
Remarque : ne pas régler la date entre 21 h et 1 h sous peine de perturber
le changement.
2
4
5
5
0
5
5
6
0
1
0
1
5
5
4
0
3
5
3
0
2
5
2
0
18
24
12
6
30
SEC
60
6
ALARM
12
3 9
30
MIN
60
45 15
Tirer la couronne jusqu’au deuxième déclic
lorsque l’aiguille des secondes est à 12 heures.
Remarque : lorsque le chronomètre est en marche ou a été arrêté,
si la couronne est sur la position du second déclic,
les aiguilles seront automatiquement remises à zéro.
3
7LUHU
HQQGHSRVLWLRQ
4
5
5
0
5
5
6
0
1
0
1
5
5
4
0
3
5
3
0
2
5
2
0
30
SEC
60
6
ALARM
12
3 9
30
MIN
60
45 15
18
24
12
6
1
Comment régler l’heure et la date :
Tirer la couronne jusqu’au premier déclic
Tirer
en 1ère position
18
24
12
6
30
SEC
60
6
ALARM
12
3 9
30
MIN
60
45 15
4
5
5
0
5
5
6
0
1
0
1
5
5
4
0
3
5
3
0
2
5
2
0
Faire tourner la couronne dans le sens horaire
jusqu’à ce que la date de la veille s’affiche.
Remarque : ne pas régler la date entre 21 h et 1 h sous peine de perturber
le changement.
2
4
5
5
0
5
5
6
0
1
0
1
5
5
4
0
3
5
3
0
2
5
2
0
18
24
12
6
30
SEC
60
6
ALARM
12
3 9
30
MIN
60
45 15
Tirer la couronne jusqu’au deuxième déclic
lorsque l’aiguille des secondes est à 12 heures.
Remarque : lorsque le chronomètre est en marche ou a été arrêté,
si la couronne est sur la position du second déclic,
les aiguilles seront automatiquement remises à zéro.
3
7LUHU
HQQGHSRVLWLRQ
4
5
5
0
5
5
6
0
1
0
1
5
5
4
0
3
5
3
0
2
5
2
0
30
SEC
60
6
ALARM
12
3 9
30
MIN
60
45 15
18
24
12
6
1
Comment régler l’heure et la date :
Tirer la couronne jusqu’au premier déclic
Tirer
en 1ère position
18
24
12
6
30
SEC
60
6
ALARM
12
3 9
30
MIN
60
45 15
4
5
5
0
5
5
6
0
1
0
1
5
5
4
0
3
5
3
0
2
5
2
0
Faire tourner la couronne dans le sens horaire
jusqu’à ce que la date de la veille s’affiche.
Remarque : ne pas régler la date entre 21 h et 1 h sous peine de perturber
le changement.
2
4
5
5
0
5
5
6
0
1
0
1
5
5
4
0
3
5
3
0
2
5
2
0
18
24
12
6
30
SEC
60
6
ALARM
12
3 9
30
MIN
60
45 15
Tirer la couronne jusqu’au deuxième déclic
lorsque l’aiguille des secondes est à 12 heures.
Remarque : lorsque le chronomètre est en marche ou a été arrêté,
si la couronne est sur la position du second déclic,
les aiguilles seront automatiquement remises à zéro.
3
7LUHU
HQQGHSRVLWLRQ
4
5
5
0
5
5
6
0
1
0
1
5
5
4
0
3
5
3
0
2
5
2
0
30
SEC
60
6
ALARM
12
3 9
30
MIN
60
45 15
18
24
12
6
1
Comment régler l’heure et la date :
How to use the Chronograph functions:
The Chronograph can measure up to 59’ 59” 80 in 1/5 second increments.
After 60 minutes, it resumes counting from zero to 12 hours.
After 12 hours the Chronograph stops automatically.
CHRONOGRAPH
Minutes dial
CHRONOGRAPH
Minute hand
CHRONOGRAPH
1/5-seconds hand
WATCHES WITH COMPLEX CHRONOGRAPH FUNCTIONS
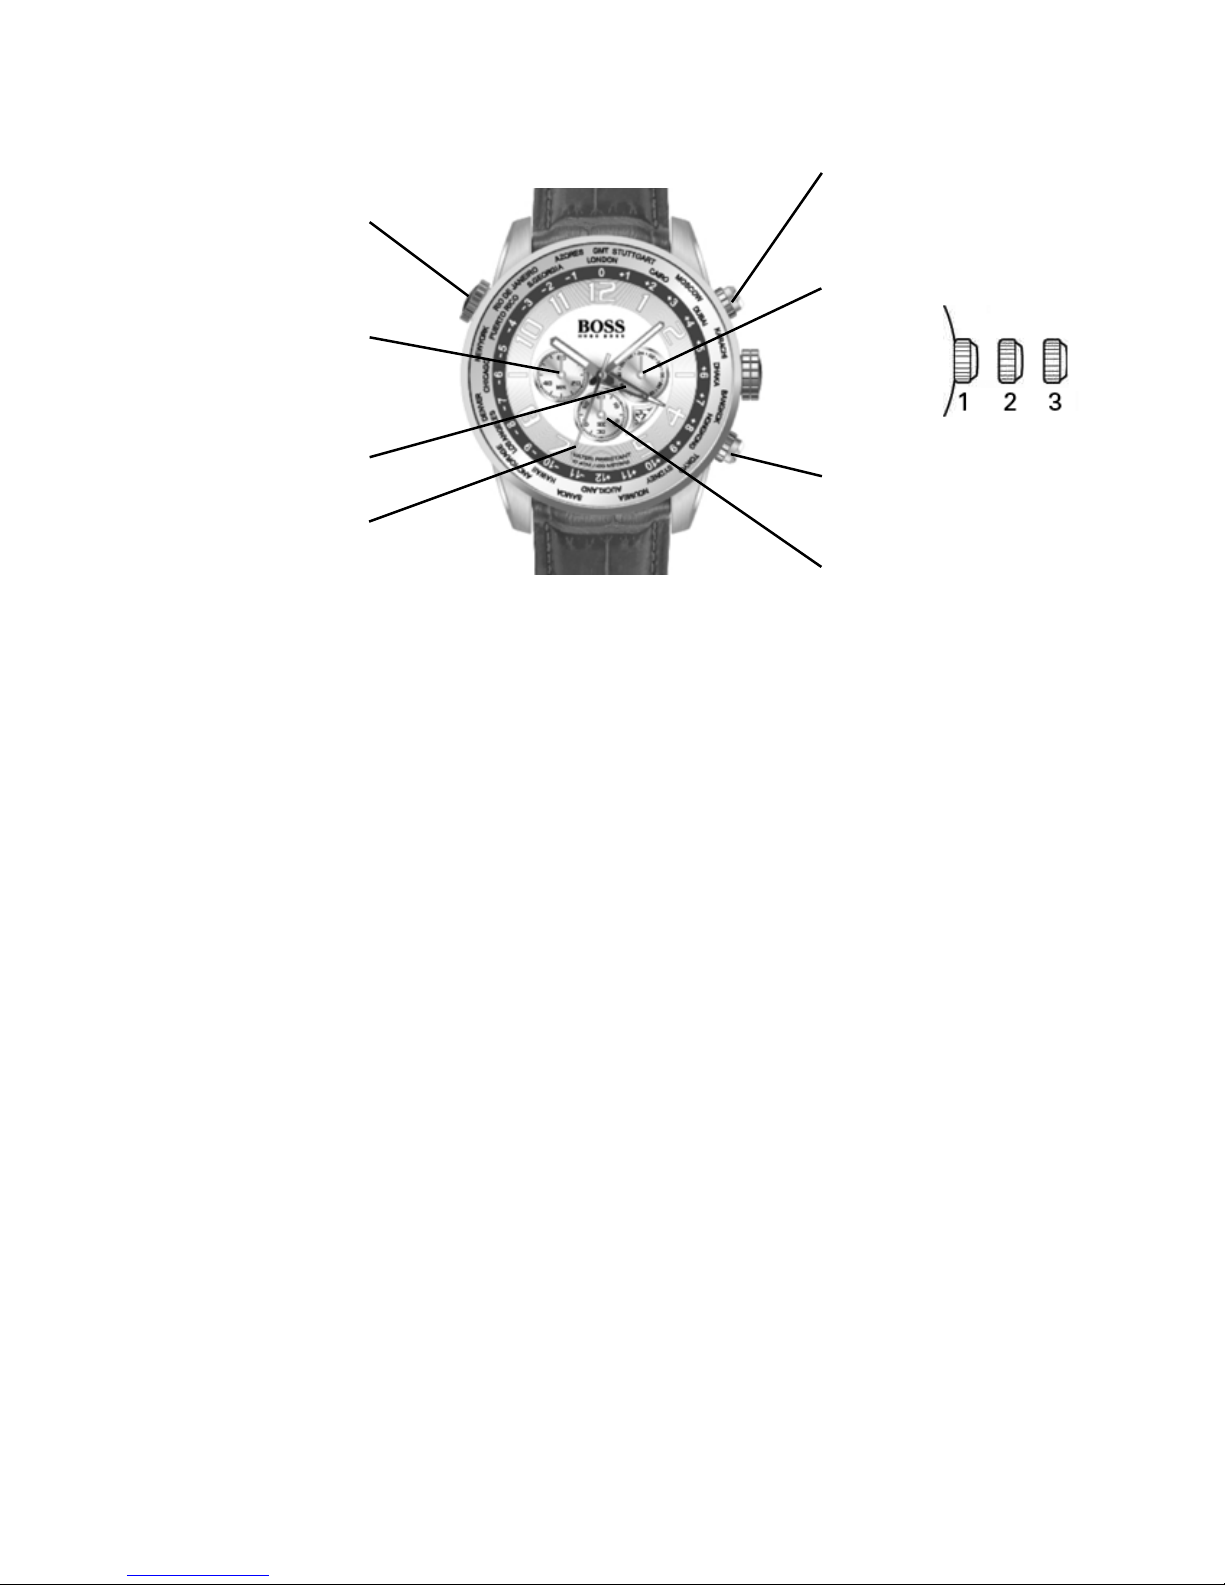
Worldtimer chronograph
16
Small direct drive
seconds hand
24 hours
A: Start/Stop
B: Intermediate time /
Reset to zero
Chronograph
seconds hand
Chronograph
minute hand
Worldtimer ring
adjustment crown
2nd time-zone
AUTOMATIC WATCHES
Positions of the crown:
Position 1 - Normal position.
Crown pushed against the case.
Position 2 - Setting the DAY*:
Rotate the crown clockwise.
Setting ONLY the HOUR:
Turn the crown in either direction.
Position 3 - To set the hour for both the local time and
in a second time zone, turn the crown in
either direction. The hour hand for the local
time and the hour hand for the second time
zone are connected to set the time for both.
*NOTE: If the date setting is performed between
9:00 pm and 3:00 am, it is possible that the date
will not be changed the following day.
Simple chronograph functions:
Measuring a single event without interruptions:
1. Press button Ato start the chronograph.
2. Press button A a second time to stop
the chronograph.
3. Press button Bto reset the chronograph to zero.
Clocking total time of a series of events of short
duration (for example, the exact playing time of
a soccer game which is frequently interrupted):
1) Push button Ato start the chronograph at the
beginning of the game.
2) Push button Ato stop the chronograph when the
game is interrupted.
3) Press button Awhen play resumes.
4) Repeat steps 2 and 3 until the end of the game.
5) Press button Bto reset the chronograph to zero.
Synchronizing the chronograph hands:
After a battery change or in case of error, it may be
necessary to adjust the seconds hand of the chronograph
to align it correctly to the zero position:
1. Pull the crown out to position 2.
2. Press button Ato adjust the chronograph seconds
hand: Each press of button Awill move the
chronograph hand forward one second.
Press button Aand keep it pressed to make the
hand advance fast.
3. Once the hand is properly aligned, push the crown
back to position 1.
GMT functions:
- The red hand indicates a second time zone.
To set the second time-zone, pull the crown to
position 2 and rotate counterclockwise.
Then push the crown back to position 1.
Worldtimer functions:
- The crown at 10 o’clock rotates a graduated ring set in
the watch dial. It is not necessary to pull the crown to
rotate this ring.
- The user can instantly calculate the time in the
24 cities printed on the flange.
Simply align the figure “0” with your current city.
Then add the number corresponding to each city
to the local time to know the time instantly.
So in the diagram below, it is 10:10 am in London.
It is therefore 10:10 + 2 hours = 12:10 pm in Cairo
10:10 + 4 hours = 14:10 (2:10 pm) in Dubai
10:10 – 6 hours = 4:10 am in Chicago
17
24 hours
A: Start/Stop
B: Intermediate time /
Reset to zero
AUTOMATIC WATCHES
Positions of the crown:
Position 1 - Normal position.
Crown pushed against the case.
Rotate the crown clockwise to manually wind up
the movement.
Position 2 - Setting the TIME:
Rotate the crown in either direction.
18
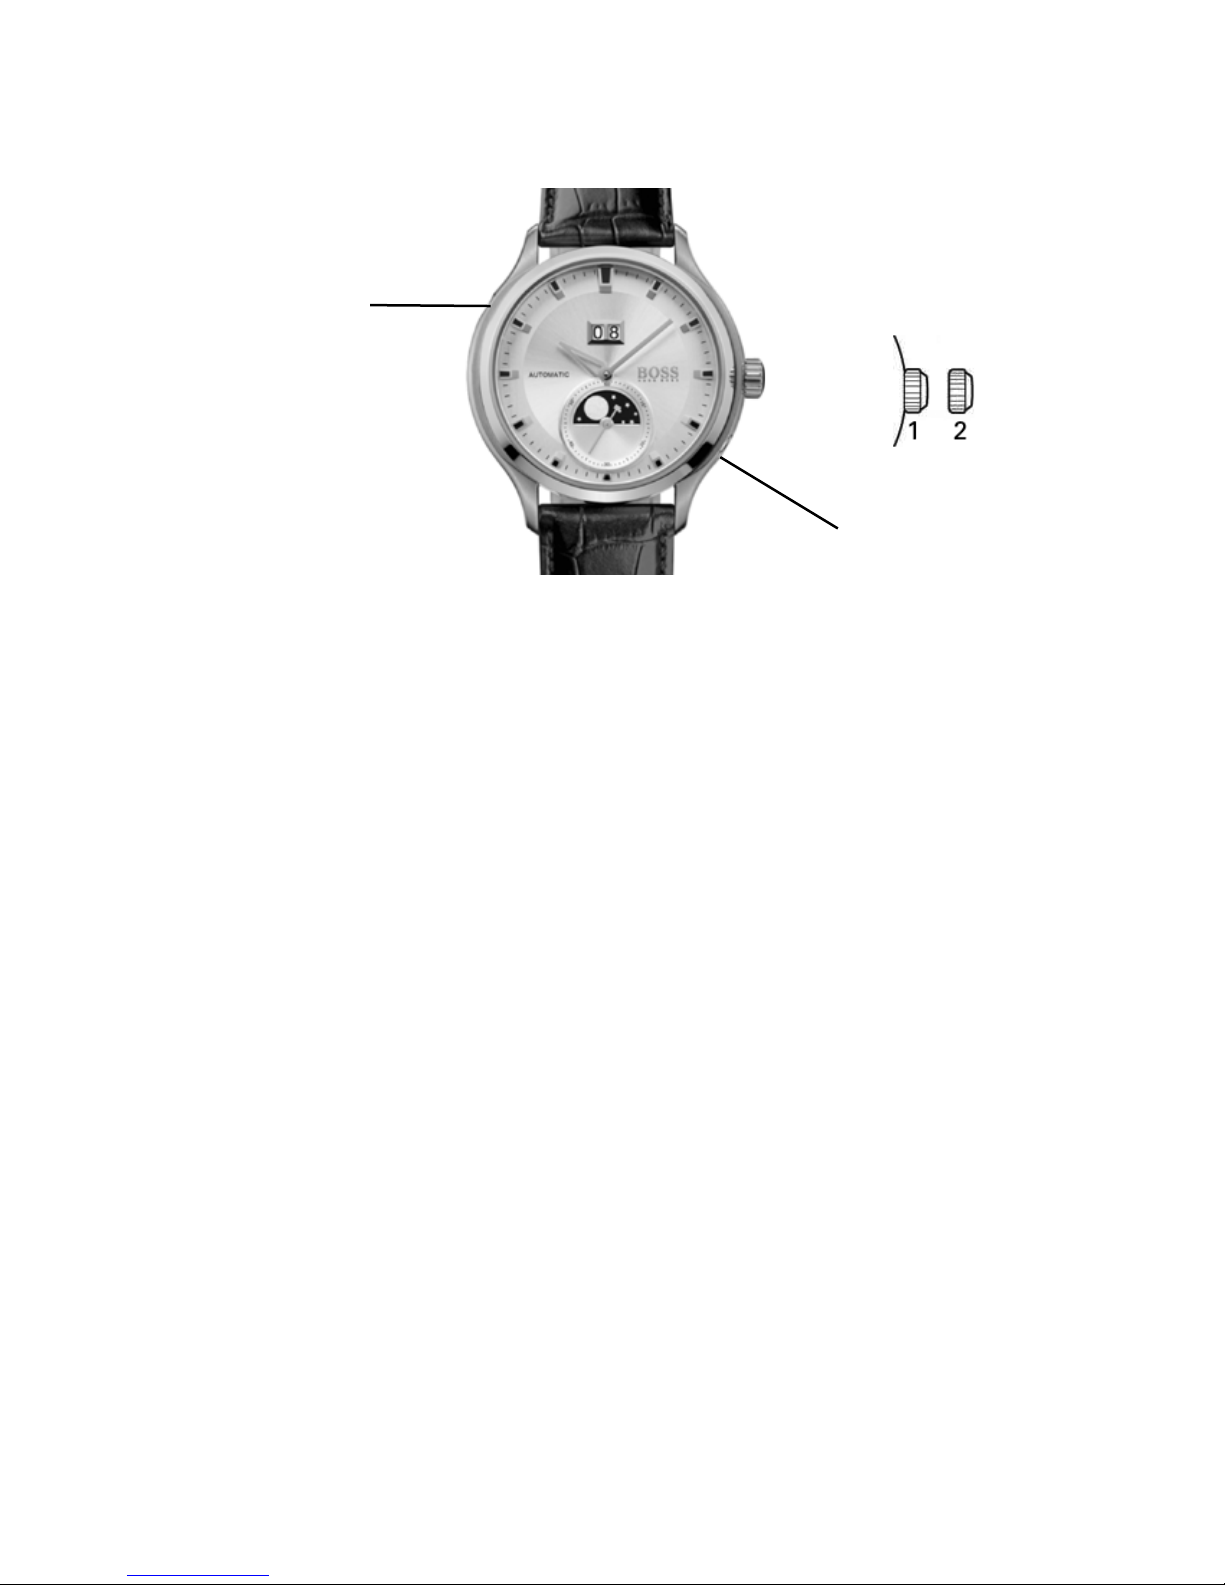
AUTOMATIC WATCHES
Large date
corrector
Moon phase
corrector
Positions of the crown:
Position 1 - Normal position.
Crown pushed against the case.
Rotate the crown clockwise to manually
wind up the movement.
Position 2 - Setting the TIME:
Rotate the crown in either direction.
The correction of the moon phase is
accomplished with small touches on the
corrector at 10 o’clock with the crown
pulled out.
The correction of the date phase is
accomplished with small touches
on the corrector at 4 o’clock with
the crown pulled out.

WATCH CARE AND MAINTENANCE, OPERATING INSTRUCTIONS
WARRANTY AND SERVICE GUIDE
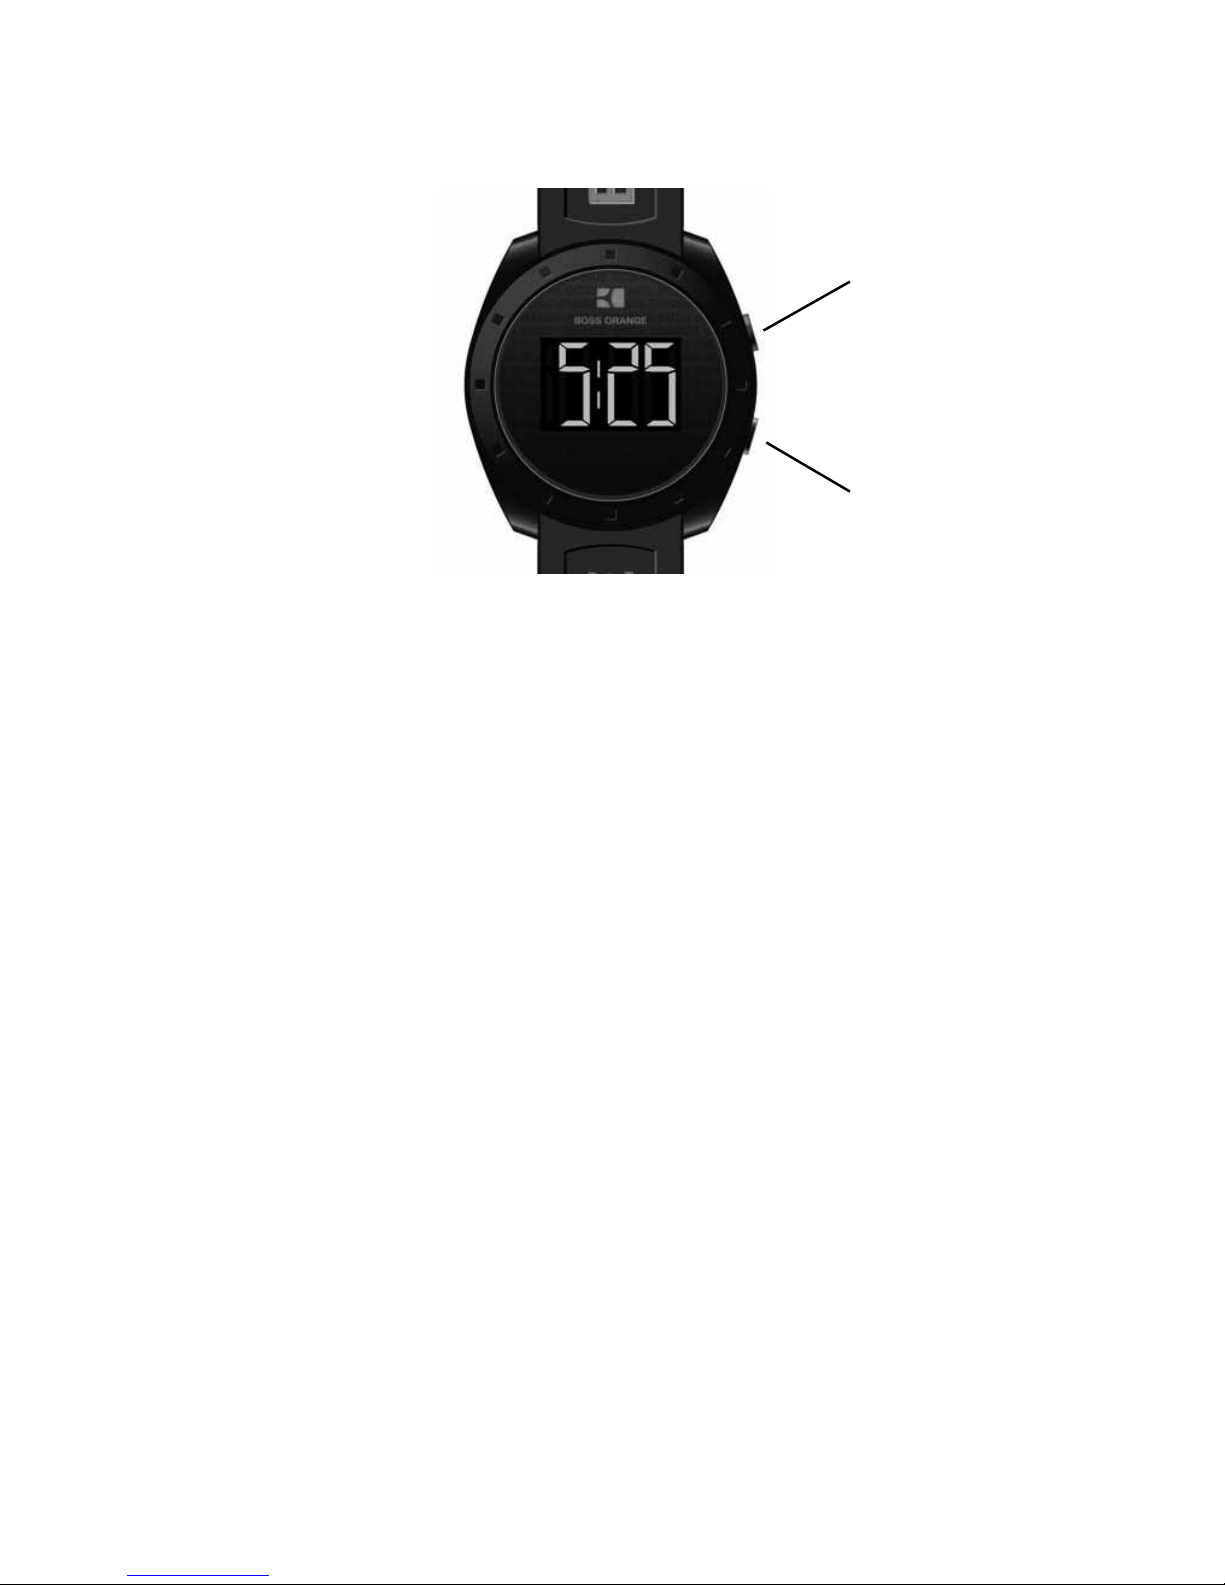
DIGITAL WATCHES
Models with simple digital display
20
B - MODE
A - SET
Time setting
Press key Atwice to set the time, select the
chosen display: month / day / hours / minutes.
The display flashes. Press Bto set your choice.
Press Ato confirm.
Table of contents
Other BOSSCO Watch manuals


Popular Watch manuals by other brands

MYCRONOZ
MYCRONOZ ZeNeo+ Get started

Garmin
Garmin Forerunner 310XT - Running GPS Receiver Quick start manual

Omega
Omega De Ville quick guide

ORIGO
ORIGO Digital compass watch instruction manual

Sony Ericsson
Sony Ericsson MBW-100 Important information

Parmigiani Fleurier
Parmigiani Fleurier KALPAGRAPHE CHRONOR manual


