Bosslan BOSSNAS122 User manual
DOC0003192. Rev 03 1 / 79 06 July, 2009
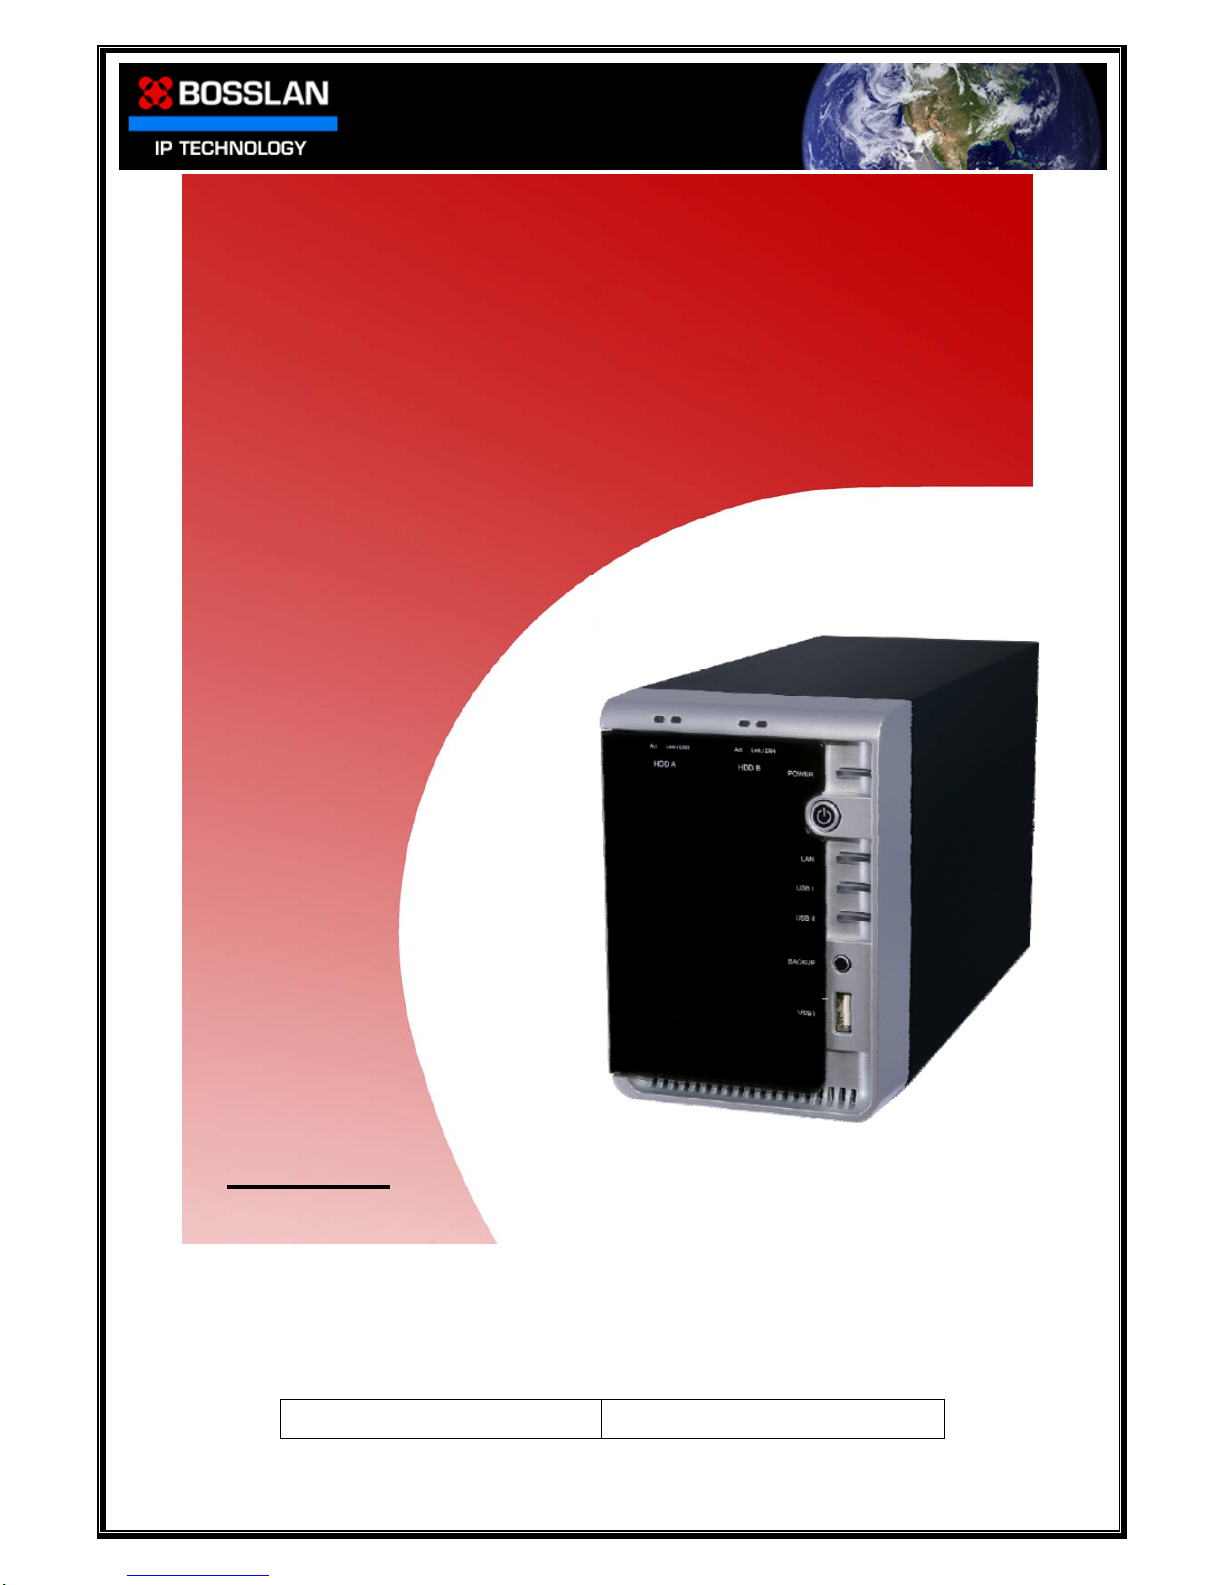
NETWORK ATTACHED STORAGE
Dual Bay Pro Enclosure
Users Manual
Includes
☆ Features Description
☆ Quick Install
☆ Detailed Setup Guide
☆ Tools Guide
User Name and Password: admin / root Administrator Factory Default Settings
BOSSNAS122

DOC0003192. Rev 03 2 / 79 06 July, 2009
Contents
What’s in the box 4
Introduction 4
Rear Connections 5
Buttons and Indicators 6
Getting Connected 8
Connecting your BOSSNAS122 to a DHCP Router 10
Connecting your BOSSNAS122 directly to your PC 11
Connecting your BOSSNAS122 to a Static IP Address Router 14
Quick Setup Guide 16
Setting Language 16
GUI, User Name and Password 17
Setting Date and Time 17
Formatting Hard Disk Drives 18
Configuring and Formatting in RAID 19
Setting up Users 22
Setting up Groups 25
Creating a Folder 27
Setting User access rights to a folder 28
User Manual 30
Section 1: Language 31
Section 2: System 32
2.1 General Setup 32
2.2 Devices 33
2.3 FW Upgrade 35
2.4 Restart 36
2.5 Save Config 37
2.6 Factory Default 38
2.7 Login Setting 38
2.8 System Log 39
Section 3: Interfaces 40
3.1 Network 40
Section 4: Disks 41
4.1 Management 41
4.2 Setting up JBOD 42
4.3
Setting up RAID 43
4.4 Formatting a External USB Storage Device in RAID Configuration 44
Section 5: Access 46
5.1 Users 46
5.2 Groups 51
5.3 Folders 53
5.4 Admin Folder 56
5.5 ADS (Active Directory Service) 57

DOC0003192. Rev 03 3 / 79 06 July, 2009
Section 6: Services 62
6.1 FTP Server 62
6.2 Backup 65
6.3 Media 69
6.4 iTunes 70
6.5 BitTorrent 71
Section 7: Aid to AD Connectivity 73
Section 8: AD Folder Access via Shortcut (Drive Mapping) 75
Warranty Information 79

DOC0003192. Rev 03 4 / 79 06 July, 2009
What’s in the box
BOSSNAS122 Enclosure (No HDD installed)
RJ-45 Cable
Power Supply
Power Cable EU
Power Cable UK
Quick Start Guide
CD
Introduction
Congratulations on purchasing your BOSSNAS122 Network Attached Storage (NAS) device.
With your BOSSNAS122 you are able to:
1. Easily setup users, groups and folders
2. Set accessibility rights such as; No access for individual users, Read only
access for all users, and Read/Write access for all users
3. Backup your data over the network
4. Backup USB devices to BOSSNAS122 HDD with innovative One Touch Backup
button
5. Connect additional USB storage and printer via USB 2.0 connections
6. Backup and share files via FTP client
7. Play media files via UPnP client
8. Play media files via iTunes client
All these features provide an excellent data storage and sharing solution for your
small business, SOHO (Small Office or Home Office), or personal requirements.
☆ Supports CIFS/SMB for Microsoft
Network allowing remote users to
retrieve files easily using “My
Neighborhood”
☆ WEB-based User Interface (UI) for easy
configuration
☆ Supports 3.5” SATA HDD - up to 1TB
☆ Provides Password security for
management & HD Access
☆ Embedded FTP server for FTP clients to
transfer files
☆ Supports USB mass storage device
☆ One Touch Backup button for easy
backup of files (from USB Device)
☆ Supports 32 concurrently connected FTP
users
☆ Supports user name & password for 256
users
☆ Supports Windows AD authentication
(ADS)
☆ Supports access management for 256
folders
☆ BOSSNAS122 NetTool for user-friendly setup
☆ Supports static IP & DHCP client
network environment.
☆ Supports Unicode for multiple-language
characters
☆ Supports group access management of
128 groups
☆ Compatible with Windows XP, Vista
& MAC OS X

DOC0003192. Rev 03 5 / 79 06 July, 2009
Connectors, Buttons and Indicators
Rear Connections
DC In
LAN
USB
Factor
y
Reset

DOC0003192. Rev 03 6 / 79 06 July, 2009
Buttons and Indicators
HDD A
Active LED
Link / Error LED
HDD B
Active LED
Link / Error LED
Power LED
Power Button
LAN LED
USB I LED
USB II LED
Backup Button
USB II Port
LED Indicators
Power Green – System ready
LAN Green – Valid Connection at 10/100/1000 Mbps
Error Red – HDD error
USB Green – Valid connection on USB Port
HDD A/B Link Green – HDD A / HDD B Ready
HDD A/B Act Yellow – Data transmitting on HDD A / HDD B

DOC0003192. Rev 03 7 / 79 06 July, 2009
This Manual has been laid out in such a way that you, the user, can quickly
and easily get connected, setup users and folders, and then take full
advantage of all functions in the Full User Manual section
Getting Connected
This section shows how to connect your BOSSNAS122 to a Router and direct to a PC
Quick Setup Guide
This section is designed to get you started with the basic setup
•Set date and time
•If necessary, Format Hard Disk Drives
•Setup Users, Groups and Folders
Full User Manual
This section has a more in-depth explanation of all functions of your BOSSNAS122
It is setup in a way that follows the menu on the user interface

DOC0003192. Rev 03 8 / 79 06 July, 2009
Getting Connected
By following this simple guide, you will soon be enjoying your new high speed BOSSNAS122
This section shows you how to connect your BOSSNAS122
(To setup users, folders and groups please read the Quick Setup Guide section)
1) Connect one end of the RJ-45 cable (supplied) to the LAN port on your
BOSSNAS122

DOC0003192. Rev 03 9 / 79 06 July, 2009
2) Connect the appropriate power cord (supplied) to the power adaptor
3) Connect the power adaptor end to the BOSSNAS122
4) Connect the plug end of the power cord to an outlet socket
5) Push and hold the power button (2-3 sec), to power on
DOC0003192. Rev 03 10 / 79 06 July, 2009
Copy the BOSSNAS122 NetTool software, supplied on CD, to your PC
(Select BOSSNAS122 NetTool, right click, copy, and then paste to your PC)
Connecting your BOSSNAS122 to a DHCP Router
When you connect your BOSSNAS122 to a Dynamic Host Configuration Protocol (DHCP)
device, the device assigns your BOSSNAS122 with a unique IP address
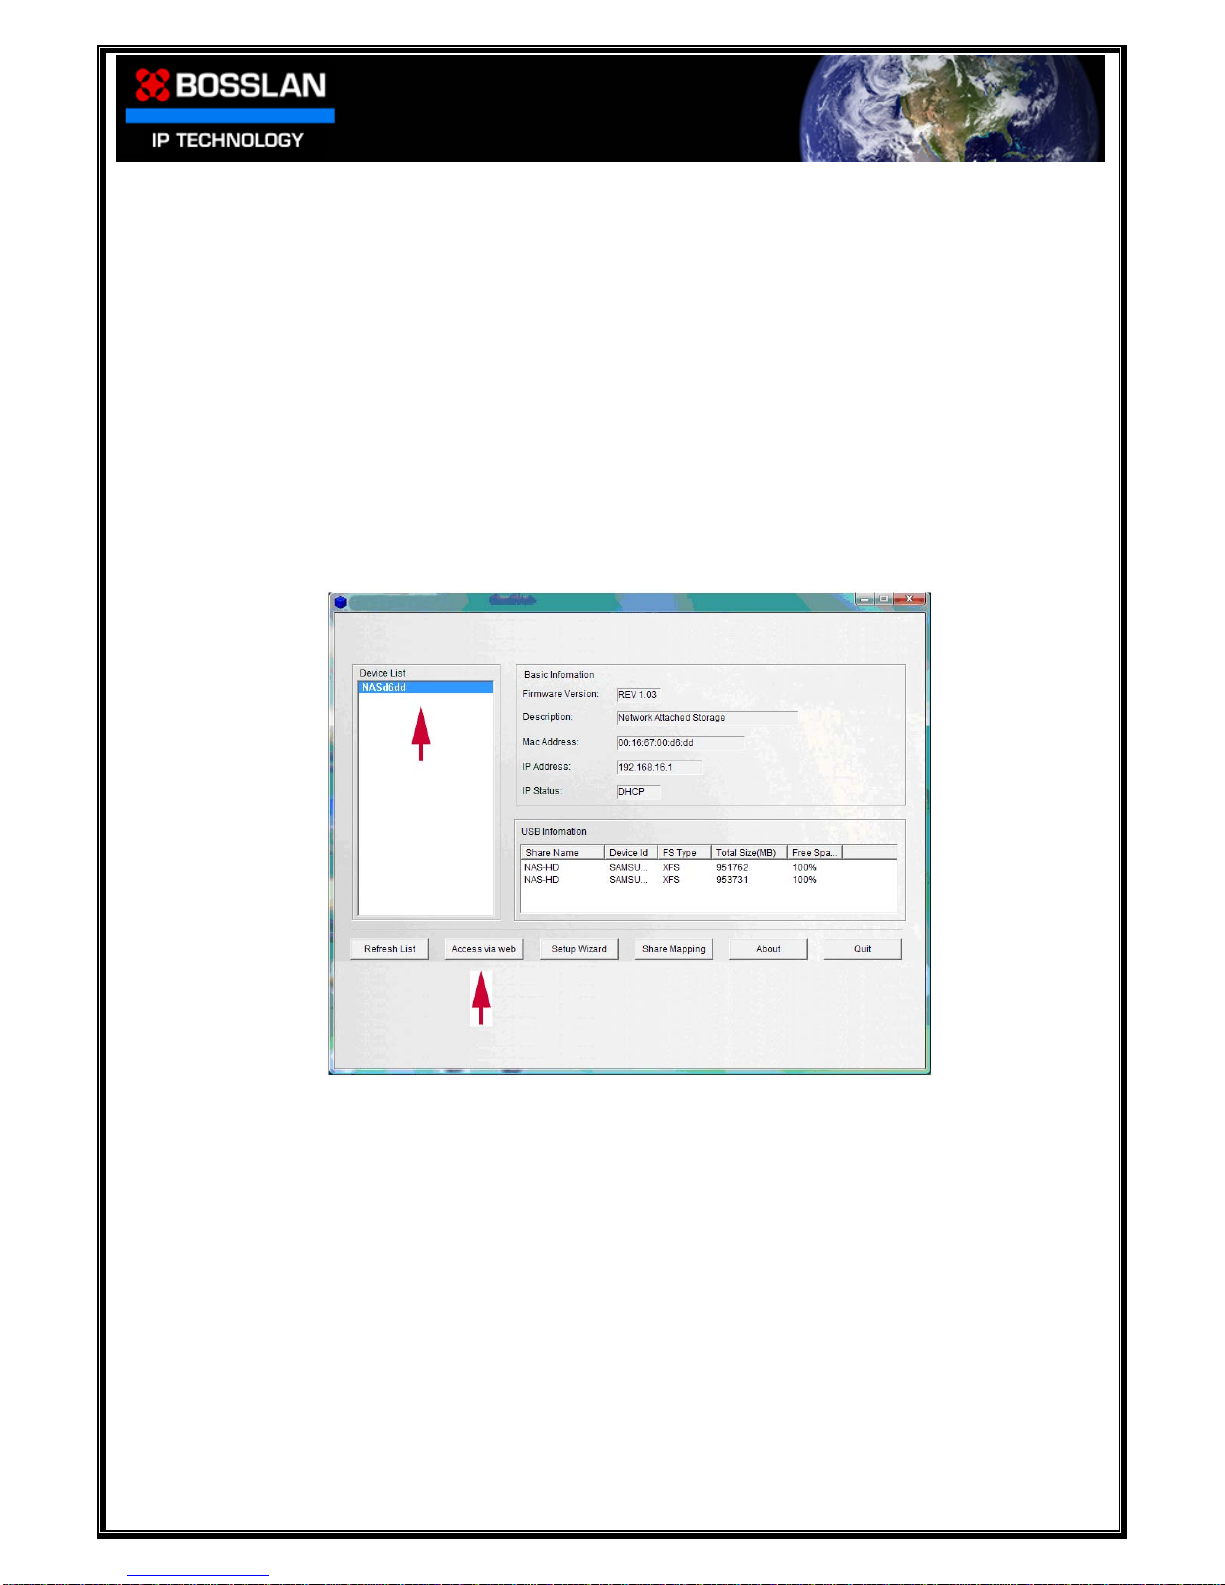
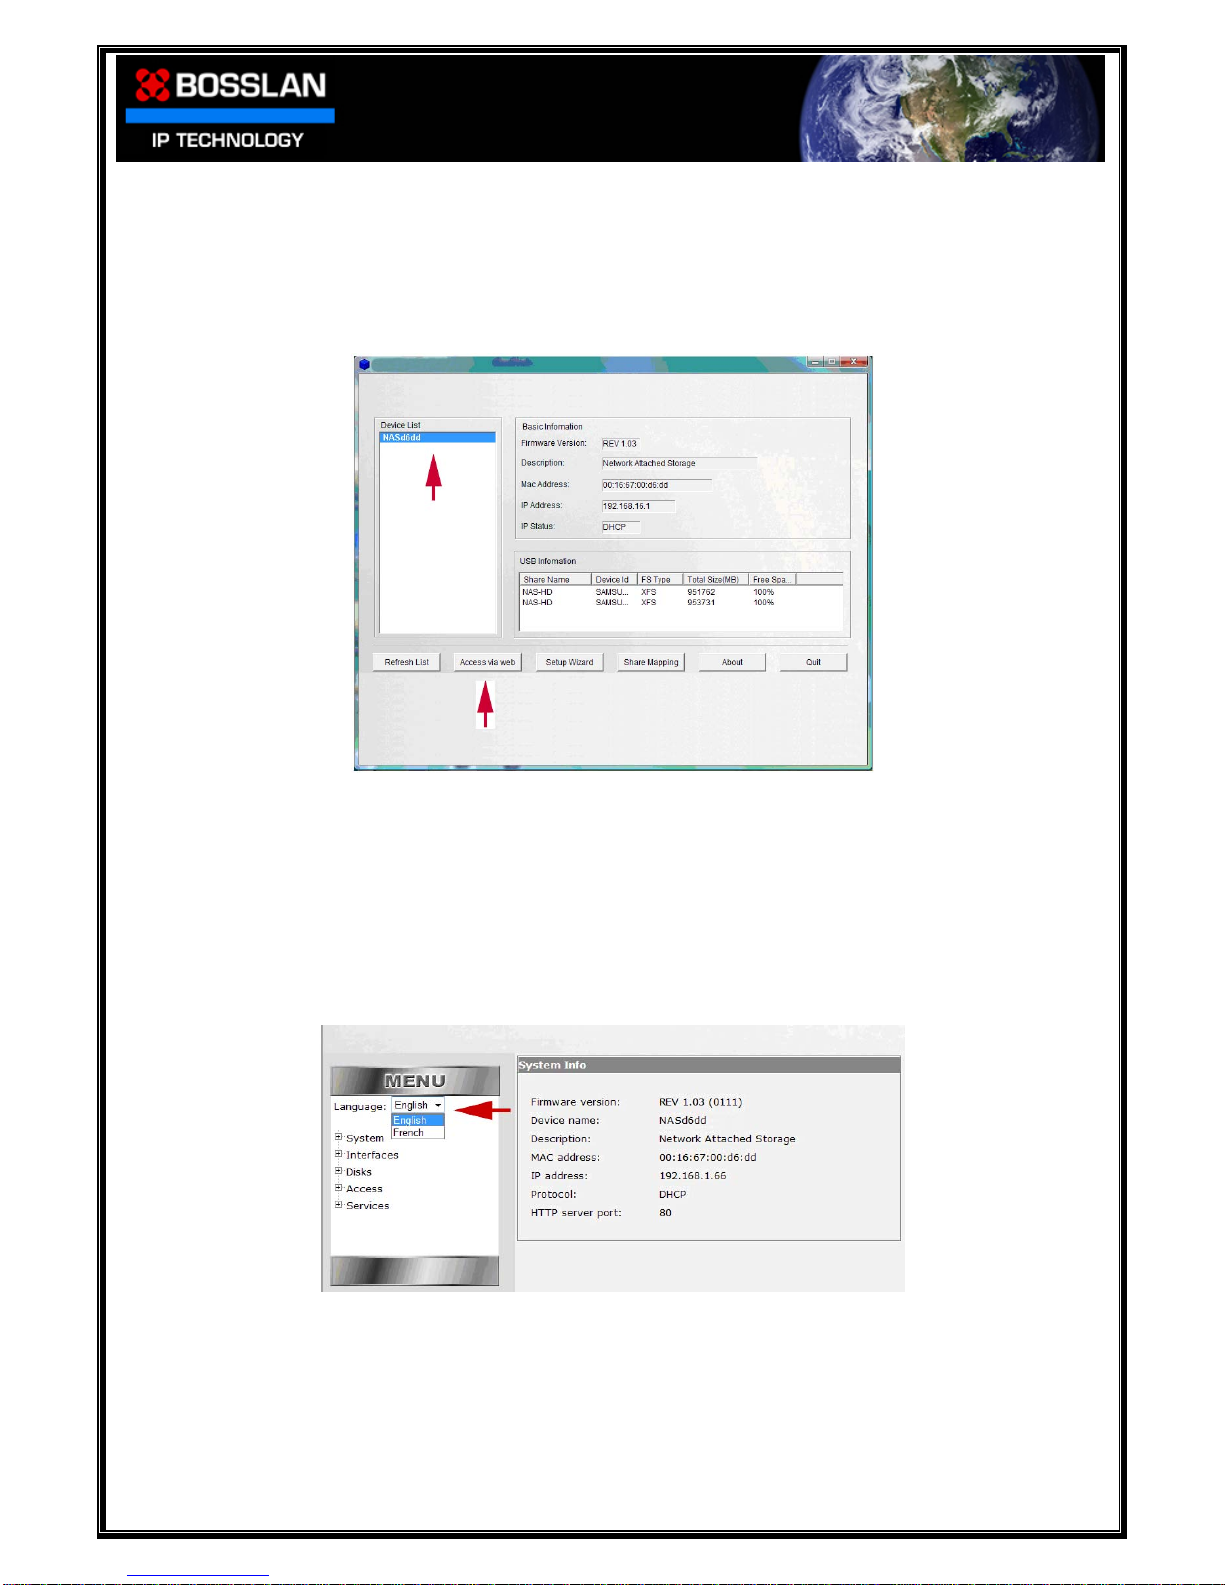
You can confirm network connection and view IP address via the BOSSNAS122 NetTool
•Open the BOSSNAS122 NetTool
•If no device is shown click Refresh List
•Click on NASxxxx
•Your BOSSNAS122 details will be shown
•Select Access via web

DOC0003192. Rev 03 11 / 79 06 July, 2009
Connecting your BOSSNAS122 directly to your PC
Note: Disable any wireless connections and connect your BOSSNAS122 to your PC via the
RJ-45 LAN cable
BOSSNAS122 has a default IP address of 192.168.16.1.
In order to connect directly to your PC you must setup your PC to recognize this IP
address
Follow these simple steps
1. From the start menu, open Network
2. Select, Network and Sharing Centre

DOC0003192. Rev 03 12 / 79 06 July, 2009
3. Select, Manage network connections
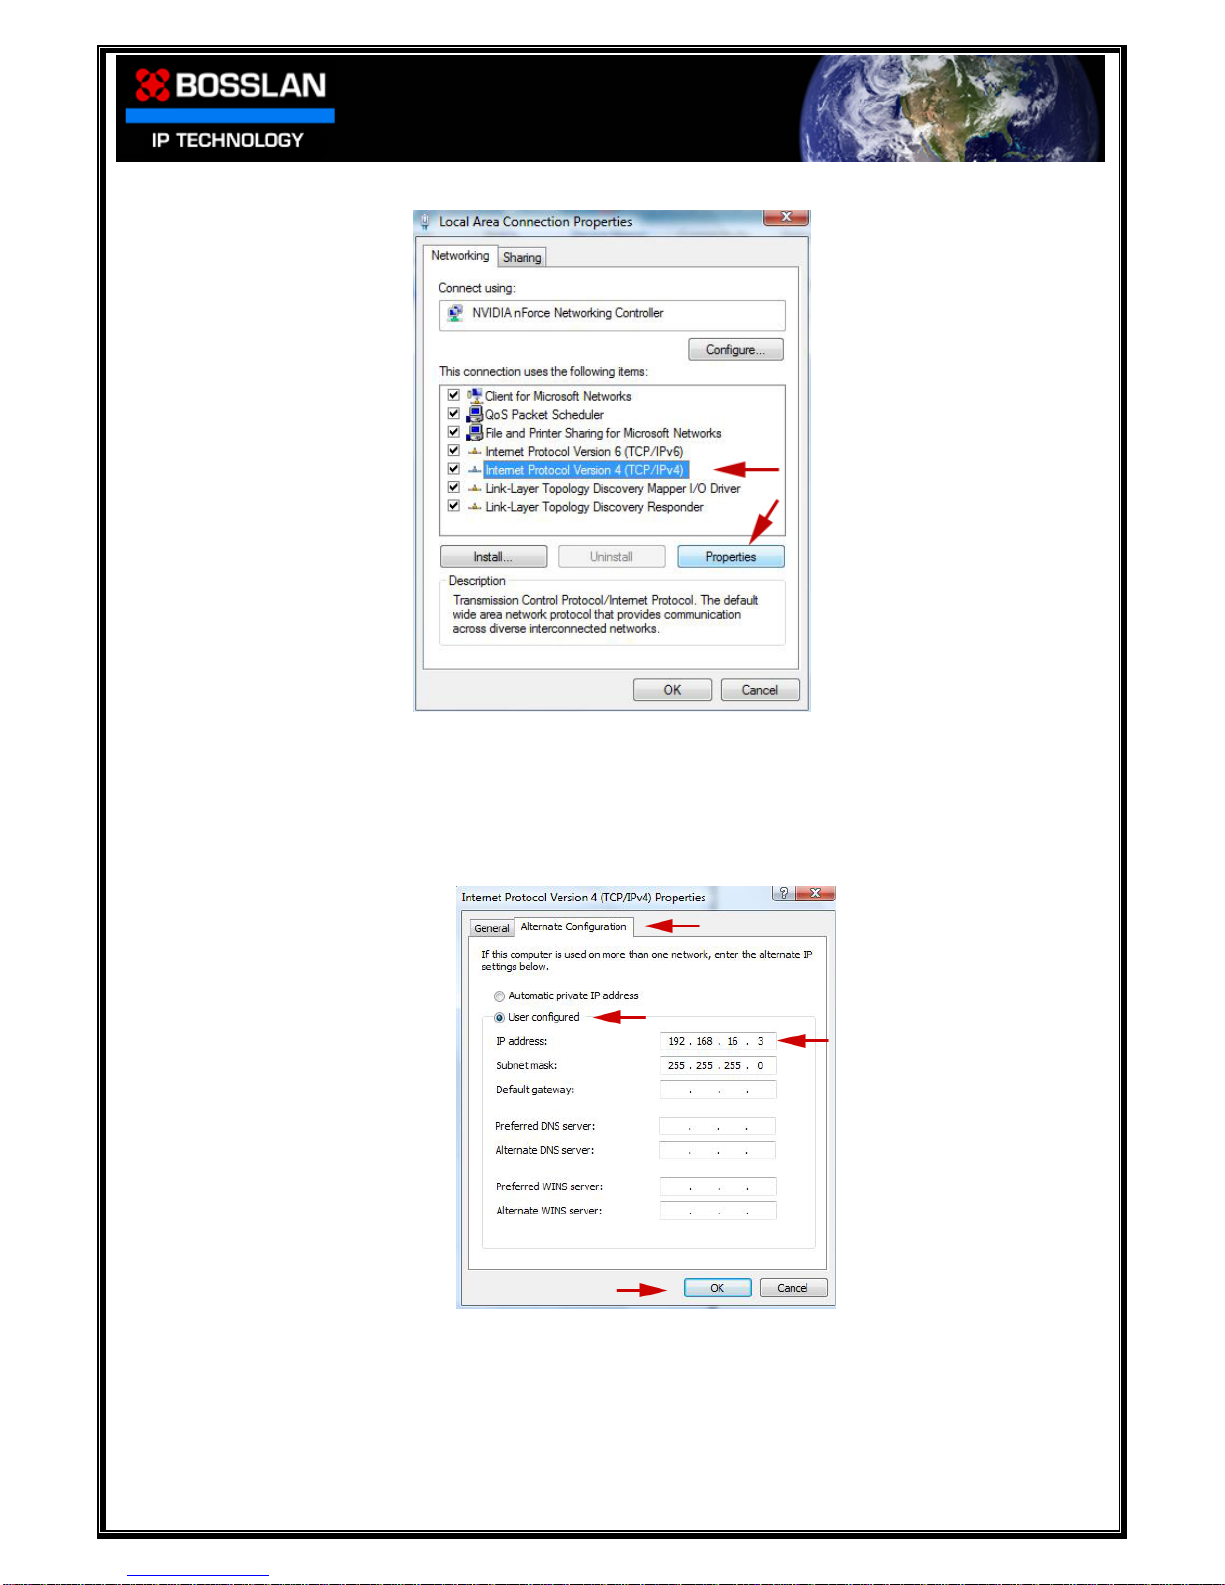
4. Right click on Local Area Connection, then select Properties
DOC0003192. Rev 03 13 / 79 06 July, 2009
5. Select Internet Protocol Version 4 (TCP/IPv4), then Properties
6. Select the Alternative Configuration tab, at the top
Select User configured, Input an IP address similar to the BOSSNAS122 (i.e.
192.168.16.3)
Click on the Subnet mask box and it will automatically fill
Select OK
Setup Complete
Go to the BOSSNAS122 NetTool and open the user interface

DOC0003192. Rev 03 14 / 79 06 July, 2009
Connecting your BOSSNAS122 to a Static IP Address Router
BOSSNAS122 has a default IP address of 192.168.16.1
In order to change this IP address to one within the range of your static IP address
router you must first connect the BOSSNAS122 to a PC via its LAN connection
Please disable any wireless connection on your PC before attaching your BOSSNAS122.
Once finished setting up the static IP address you can re-enable the wireless
connection.
1: Connect BOSSNAS122 directly to your PC via LAN cable
2: Open BOSSNAS122 NetTool on PC
3: Select device (NASxxxx)
4: Select Setup Wizard
5: Enter default user name (admin) and password (root)
6: Click OK
DOC0003192. Rev 03 15 / 79 06 July, 2009
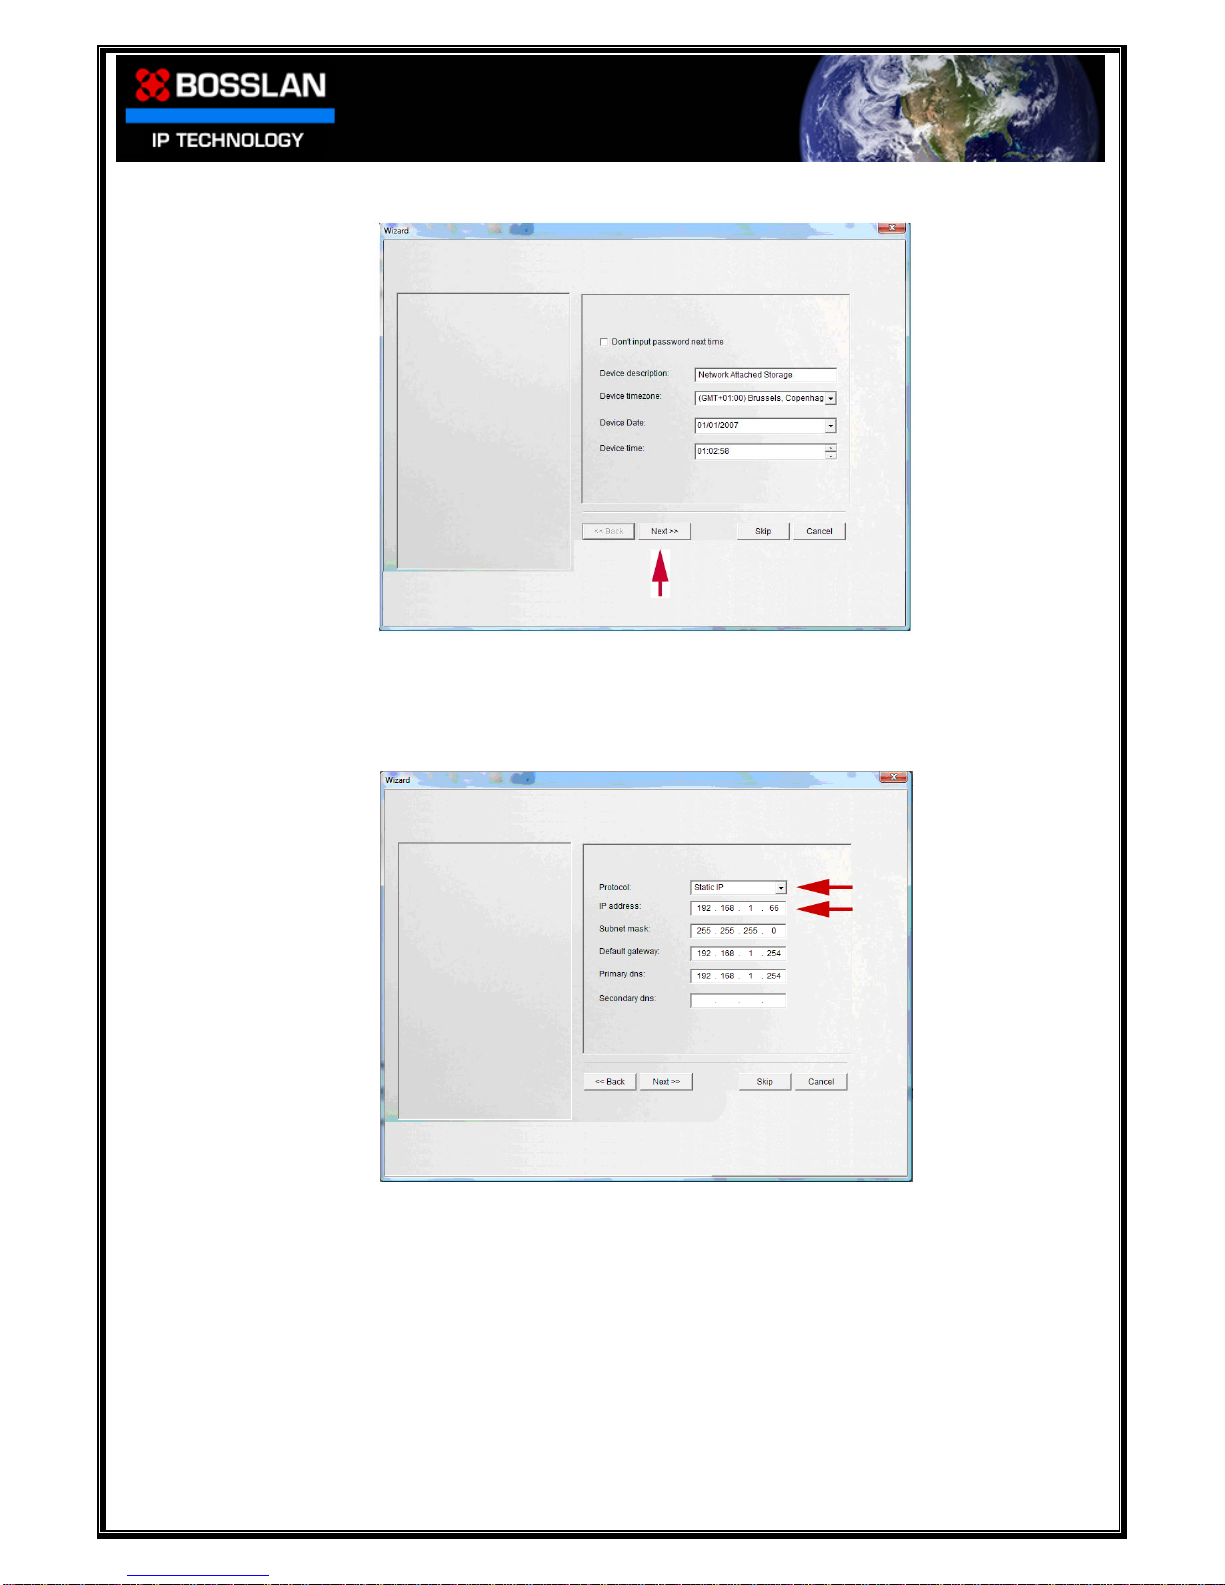
7: Click Next to skip past date & time setup (you can set this up later)
8: Enter a static IP address within the range of your Router
(See the user manual supplied with your Router)
Ensure no previously configured devices share your chosen IP address
9: Click Next then Finished to save your settings
You might lose connection to your BOSSNAS122 as you have now changed the
BOSSNAS122 IP address to be compatible with your router and not your PC
10: Disconnect the BOSSNAS122 from PC
11: Re-connect your PC to router (re-enable wireless on your PC)
12: Connect your BOSSNAS122 to your router
DOC0003192. Rev 03 16 / 79 06 July, 2009
Quick Setup Guide
Open the BOSSNAS122 NetTool
In the Device List, highlight your BOSSNAS122
Select Access via web
You will now see the user interface home screen (notice the menu tree down the left
hand side).
Setting Language
The default language of BOSSNAS122 is English, but this can be changed by selecting a
language from the pull down menu.
Supported languages are: English, French, German, Spanish, Italian and Dutch

DOC0003192. Rev 03 17 / 79 06 July, 2009
GUI, User Name and Password
To enter any part of the menu tree you will need to enter a user name and password
The default user name is: admin
The default password is: root
(Ensure there are no spaces before or after user name and password)
Resetting to factory defaults will always revert the GUI admin user name and
password to the above settings
Setting Date and Time
Select, System, General Setup
In the Device Settings window, select your Time Zone from the pull down menu,
then select Apply.
DOC0003192. Rev 03 18 / 79 06 July, 2009
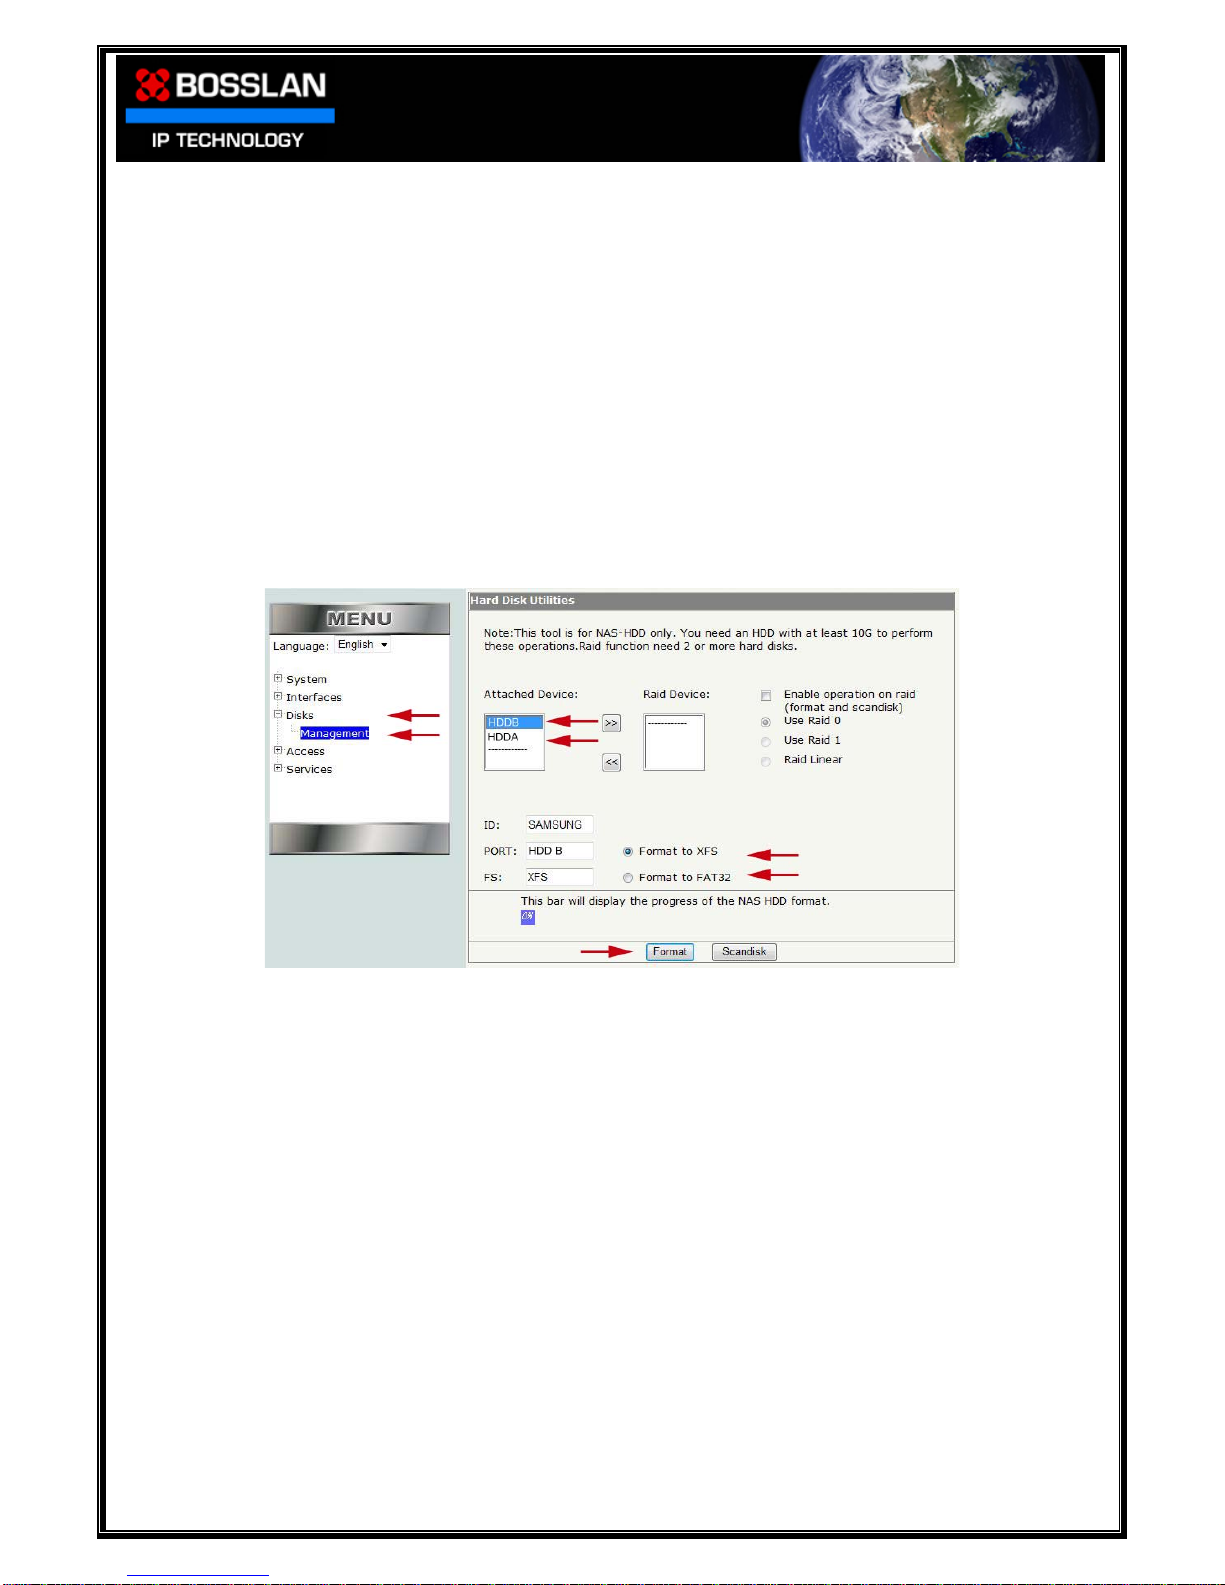
Formatting Hard Disk Drives
Formatting in JBOD
Select, Disks, Management
In the Hard Disk Utilities window
•Select a Hard Disk Drive to be formatted
(
Note: In JBOD configuration each Hard Disk Drive must be formatted individually.)
•Select the file system you would like the disk formatted to (XFS or FAT32)
•Select Format
Remember, In JBOD each Hard Disk will have to be formatted individually, so after
formatting Disk A, you will have to select Disk B and format in the same file system
DOC0003192. Rev 03 19 / 79 06 July, 2009
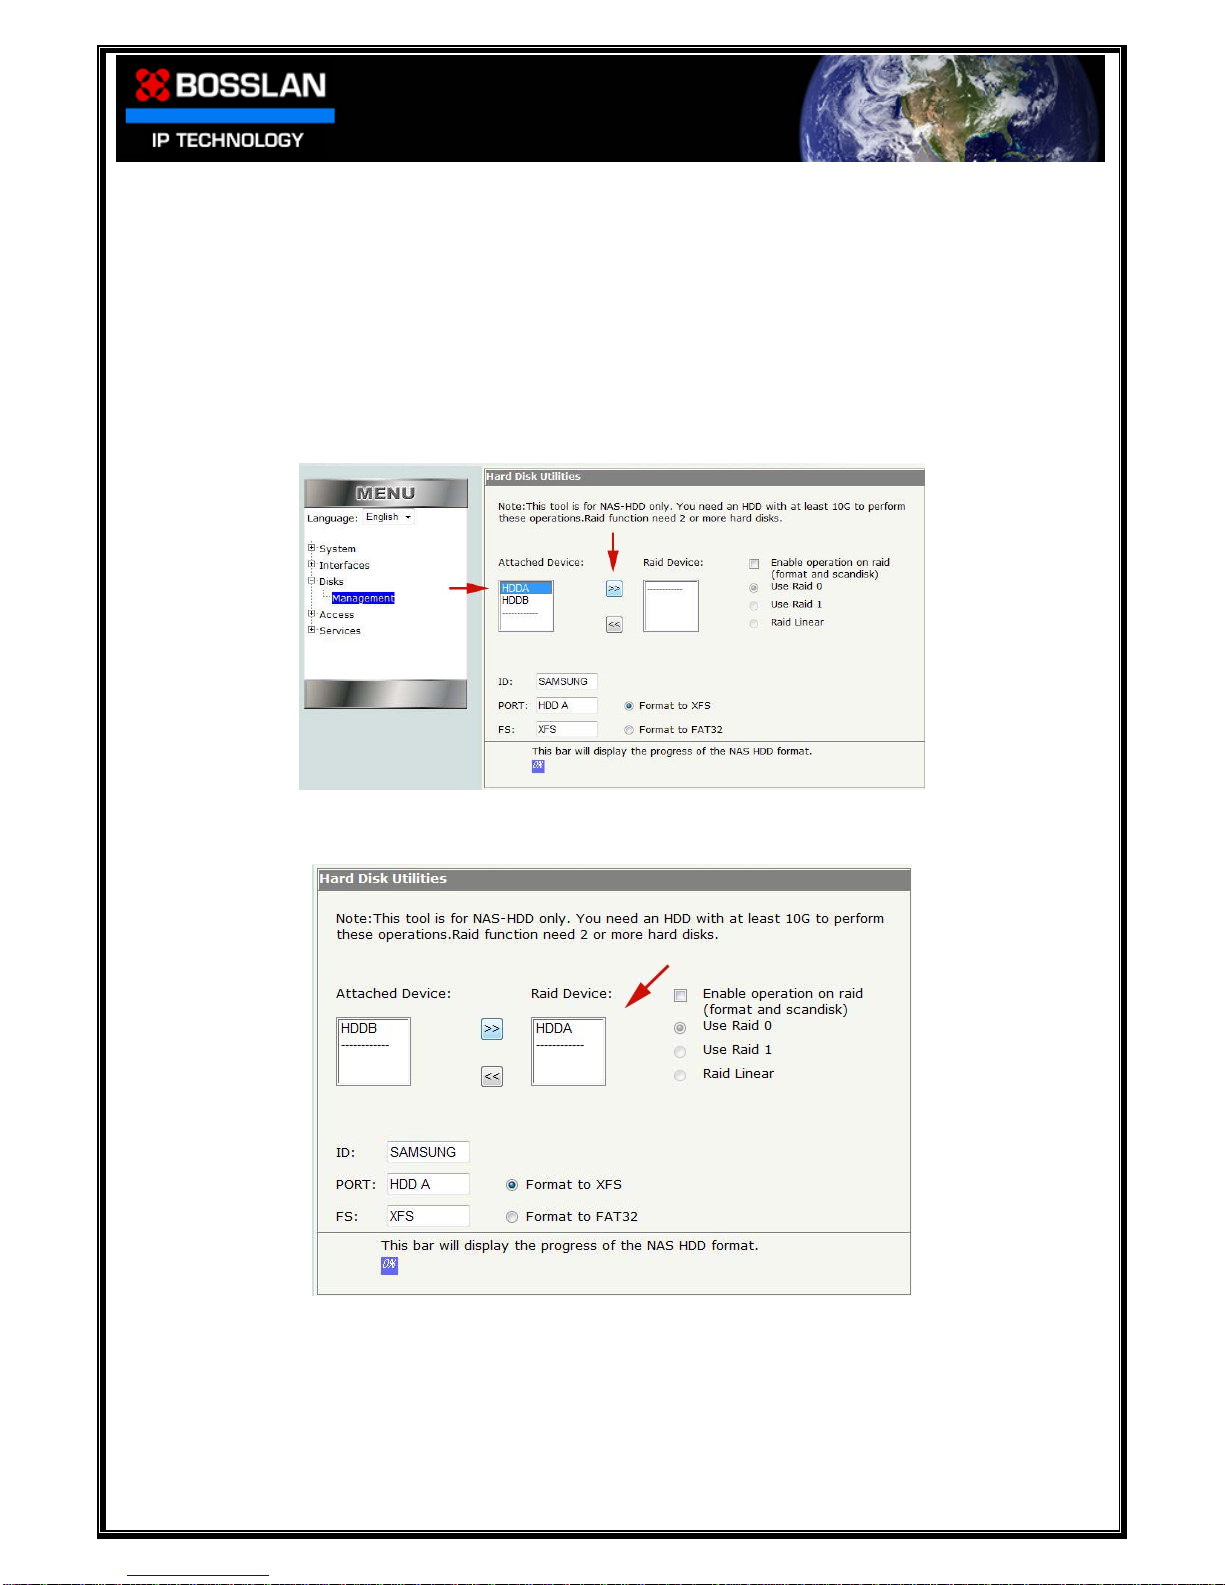
Configuring and Formatting in RAID
In order to configure the Hard Disk Drives to RAID, you must first transfer them from
the Attached Device section to the RAID Device section
Select, Disks, Management
•Select HDDA
•Click on >>
You will now see HDDA has been transferred to the RAID Device section
DOC0003192. Rev 03 20 / 79 06 July, 2009
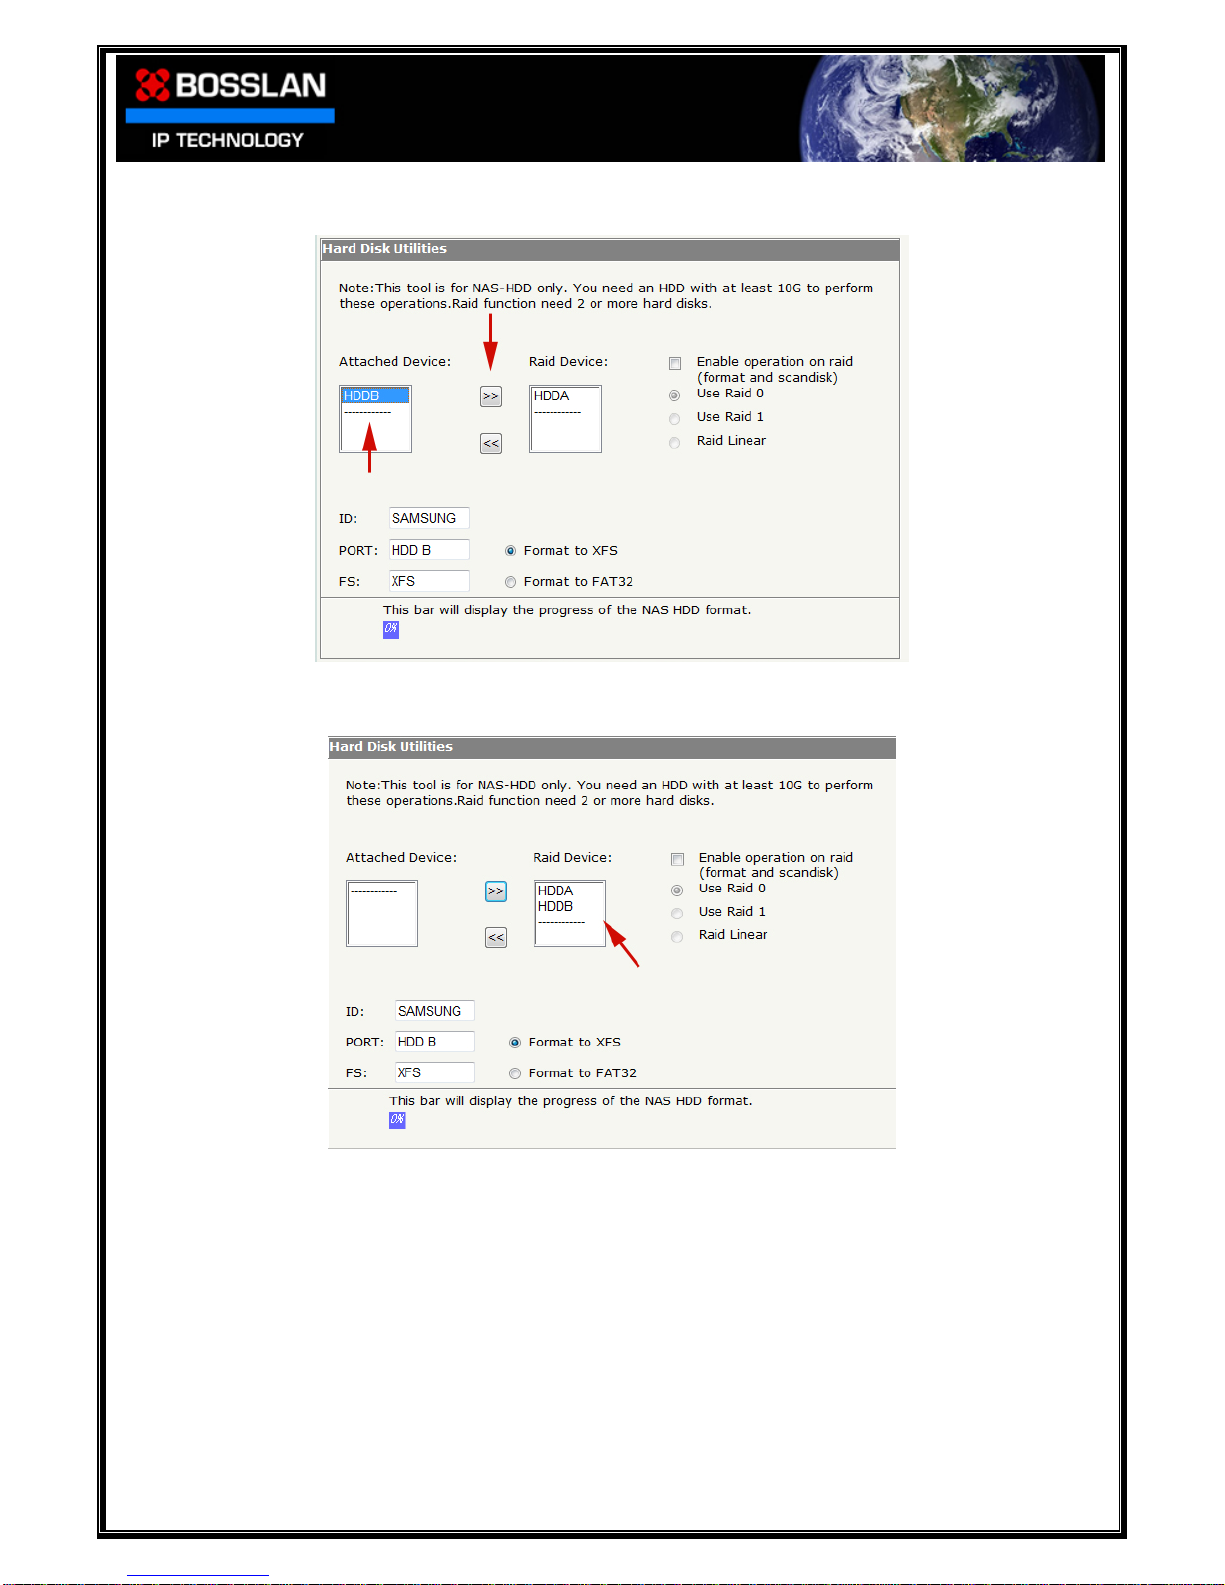
•Select HDDB
•Click on >>
You will now see HDDB has been transferred to the RAID Device section
Table of contents
Popular Storage manuals by other brands

Dell
Dell EMC Integrated Data Protection Appliance... Service guide

APARTMENT B
APARTMENT B NOOK Assembly instructions

LG
LG D010KE1N211 Quick installation guide

HP
HP StorageWorks 8000 - NAS overview

Panasonic
Panasonic RP-SDW64GE1K operating instructions

Tandberg Data
Tandberg Data StorageLoader DLT VS160 Quick install guide

Western Digital
Western Digital WDBGJA0010BBK Product specifications

INOVU
INOVU CHROME BOX 2.5 L user guide

Disc
Disc Blu-Safe user guide

SanDisk
SanDisk SSD X100 product manual

Spectra Logic
Spectra Logic T-Series Spectra T200 quick start guide

NETGEAR
NETGEAR ReadyNAS OS 6 Desktop Storage Systems Installation


