BossWeld BRAZEN 3000 User manual

PORTABLE BRAZING
AND HEATING KIT
MANUAL
BRAZEN 3000 G
GAS

2

3
INDEX PAGE
GENERAL SAFETY INFORMATION 5 3
PHYSICAL AND SAFETY PROPERTIES OF GASES 6
GAS SUPPLY 7
SAFETY 8-9
CYLINDER STORAGE, NOZZLE CHART 10
PERSONAL PROTECTIVE EQUIPMENT 11
BOX CONTENTS 12
SETUP AND LIGHTING PROCEDURE 13-15
SHUT DOWN PROCEDURE 16
WARNINGS & MAINTENANCE 17
WARRANTY 18
CONSUMABLES 19

4
BOSSWELD GAS WELDING EQUIPMENT
Dear customer,
Thank you for your purchase of our BOSSWELD BRAZEN 3000 portable
brazing & heating kit. The BOSSWELD range of gas welding and cutting
equipment has been rigorously tested by independent laboratories and
conforms to the following Australian Standards for gas welding and cutting
processes:
Small heating and brazing kits currently are not covered under the scope of
an existing Australian standard (DEC 2018), however the Brazen 3000 kit meets
the requirements of the European Standard.
EN 1326 - 1996 Gas welding equipment
- small Kits for brazing and welding
BOSSWELD strives to meet all relevant Australian Standards. Should there
be change to existing or creation of new Australian Standards, BOSSWELD
will endeavor to ensure that all products and services comply with those
standards.
This manual refers to safety measures that must be adhered to for the safe
operation of your BOSSWELD BRAZEN 3000 equipment. Please read and
understand these warnings and instructions before use. Failure to do so
could result in serious injury or death. BOSSWELD brazing and heating
equipment should only be used by operators who are properly trained and
qualied in the safe use of this type of equipment.

5
GENERAL SAFETY INFORMATION
Safety consideration for both the operator and surroundings must be given to
the heat source produced by mixing compressed oxygen with a fuel gas and
igniting the resulting mixture. When using these processes, particular safety
considerations apply with respect to:
a) Do not leave the Brazen 3000 torch unattended when lit, or put it down
b) Burns from ames, hot objects, malfunctioning hand-held equipment,
molten particles, etc.
c) Explosions from mixed gas concentrations created by fuel gas leakage
from cylinders,
d) Fire caused by ignition of ammable materials, leakage of fuel gases,
contact with hot slag, poor condition of welding equipment, etc. (Plant,
building, ship and bush res have occurred)
e) Use welding goggles when using the Brazen 3000 kit.
d) Do not breath welding fumes
e) Violent rupture or explosion of components due to pressurisation beyond
their designed working pressures
f) Asphyxiation due to the displacement of atmospheric, breathable air by
inert or toxic gases. For example, leakages in conned spaces or lack of
oxygen resulting from excessive rusting in conned spaces
g) Radiation damage (to eyes principally and other exposed surfaces)
h) Fumes originating from the particular materials being welded and heating

6
PHYSICAL AND SAFETY PROPERTIES OF GASES
a) DO NOT use oxygen to refresh air. There is often a temptation to use
oxygen to ‘sweeten’ air whilst welding or cutting operations are being
carried out in conned spaces. Large amounts of oxygen can be released
locally in a short time from gas cylinders under pressure. In one situation
where this was done, hot work in the form of ame cutting was carried out
with a subsequent ignition of worker’s clothes and fatal burns.
b) TAKE CARE in conned spaces. Do not leave blowpipes or hoses
connected to the supply gases within conned spaces overnight or during
work breaks. Slow leaks can result in very hazardous situations, with
possible re and explosion on re-ignition of the blowpipe.
c) VENTILATE conned spaces. In ame cutting not all of the oxygen
released from the cutting nozzle is necessarily used in cutting. In conned
spaces this may result in a dangerous increase in oxygen content in the air,
pointing to the need for adequate ventilation in such situations.
d) DO NOT use oxygen as a substitute for compressed air. There are
many examples of this situation where oxygen has been used, such as in
cleaning, resulting in serious and fatal accidents due to re or explosion from
spontaneous ignition. NEVER use oxygen to start engines, drive air tools
etc.
e) DO NOT use oxygen or compressed air to dust off clothes. Clothes
can become readily ammable and even self-igniting through oxygen
enrichment.
f) DO NOT kink pressure hosing. Kinking or nipping hose to interrupt gas
ows or whilst changing torches is a very dangerous practice. Gas can still
bleed through the system, or more seriously, escape rapidly should the hose
rupture or the operator lose their grip.
g) The oxygen cylinder once it is empty can devalued and the cylinder
recycled at a scrap metal merchant.
DO NOT USE BRAZEN 3000 IF THE RUBBER O-RING IS MISSING
OR DAMAGED IN THE REGULATORS

7
GAS SUPPLY
General
Your BOSSWELD gas welding and cutting equipment is designed to be used
by gases delivered to the point of use from portable compressed gas cylinders.
In all cases, gas supplies may be subject to statutory or regulatory provisions.
Many Australian Standards cover the subject.
a) The Brazen 3000 is fueled with Oxygen and Mapp gas cylinders, Cylinders
are generally obtained from gas suppliers.
b) Do not tamper with the markings or colour coding of cylinders. Do not use
non colour coded cylinders or those without safety and information labels.
c) The Oxygen and Mapp gas cylinders are not rellable.
d) Gas should only be used for the particular intended purpose, e.g. never
use oxygen for cleaning (dusting), or to provide ventilation or to support
breathing
e) Gases should only be identied by their correct name so as to avoid
dangerous confusion or misunderstanding.
f) Valve seats and outlets should be protected by keeping all kinds of dirt
and contamination away from cylinders, especially during connection
and disconnection. Grit, loose bers and other dirt may lodge in
connectors or valve seats causing leaks or may be picked up by high
velocity gas streams, causing hot spots in regulators, potentially resulting
in ignition. Organic matter such as oil, grease and hydrocarbon liquids
which may ignite spontaneously in high pressure oxygen is another hazard
to regulators and other downstream equipment.
g) Do not tamper with safety devices.
DO NOT CONNECT CYLINDERS BEFORE YOU HAVE READ THIS
MANUAL IN FULL AND UNDERSTAND IT.
THE BRAZEN 3000 OXYGEN BOTTLE CONNECTION ONLY
CONNECTS TO M12x1 THREAD.
THE BRAZEN 3000 MAP-PRO CONNECTION IS CGA 600.

8
SAFETY
The regulators supplied ensure a low and constant ow and pressure. Inspect
all parts of the equipment for wear or loose connection before use. If you have
a leaking hose or connection, close all valves regulators and torch handles, and
ensure you ventilate the area you are working in. and remove this equipment
from and ammable sources. Do not attempt to x any damaged parts contact
your nearest Bossweld service agent or Bossweld directly.
• Always make sure the ame is fully extinguish after use before place the
torch on any surface.
• Check hoses for kinks or bends.
• Keep ame away from cylinders, regulators, hoses and other persons.
• Only use this product in a well ventilated space - never use in a conned
area.
• Make sure the cylinder holder is on a at surface - do not drag the cylinders
or cylinder holder by the hoses.
• Ensure the work area is clean and remove all ammable objects and re
hazards.
• Always wear the appropriate PPE equipment when operating this equipment.
IN CASE OF FIRE
• In the event of a re, if it is safe to do close the oxygen valve, this should
extinguish the ame and also if safe close the fuel valve and remove the
equipment from the area.
• Extinguish the re with the appropriate equipment only if it is safe to do so.
• If you are unable to turn of the valves or extinguish the re leave the area,
warn any other persons in the area and contact emergency services
- Phone 000.

9
SAFETY SAFETY
TIP REPLACEMENT
Make sure you use the tool supplied and that tips are installed straight as not to
wear the thread, this can result in a leak.
• Ensure tip has cooled after use before replacing.
• Do not over tighten
• Ensure tip is clean and dry before installing and is not blocked.
CYLINDER REPLACEMENT
• Make sure the regulator is completely shut off before removing it from the
cylinder., Always check condition of the seal in the regulator before replacing
on a new cylinder
• Unscrew the empty cylinder and replace with a new one.
• Dispose of empty cylinder at your local recycling center
- NEVER incinerate empty cylinder.
- Do NOT puncture.
10
Storage
In the case where the Brazen 3000 should not be used for a long time or
when requiring transport by a motor vehicle, unscrew the cylinders from
the regulators, This will ensure that the contents of the cylinder will remain
contained and prevent leaks. Do not expose cylinders to a temperature higher
than 50ºC.
- Always transport in a well ventilated vehicle never transport in a closed
vehicle
- It is dangerous to use damaged or incorrectly functioning equipment
CYLINDER STORAGE
NOZZLE CHART
TIP SIZE ORIFICE WELDING RANGE
0# 0.7mm 0.5mm - 1mm
1# 0.8mm 1mm - 2mm
2# 0.9mm 2mm - 3mm
3# 1.0mm 3mm - 4mm

11
Personal protective equipment should be used by all operators of oxy-fuel gas
equipment to ensure their protection of body and clothing from:
a) The heat from the work
b) Burns which may result from contact with hot components or small
globules of hot metal
c) Radiation which may burn the skin or eyes
This protection is achieved by the use of ame resistant clothing, gloves
and footwear that is suitable to prevent the entry of hot particles or objects.
Aprons, sleeves, shoulder covers, leggings or spats of pliable ame resistant
leather and other suitable materials may also be required where the areas of
the body will encounter hot metal. Protection of the eyes from radiation is also
very important. The recommended minimum shade numbers are listed below,
however if any discomfort is felt, darker lters may be used.
Gas Welding - Low heat input Shade 3
- Light fusion welds Shade 4
- Heavy fusion welds Shade 5
PERSONAL PROTECTIVE EQUIPMENT
12
8
10
7
3
4
6
21
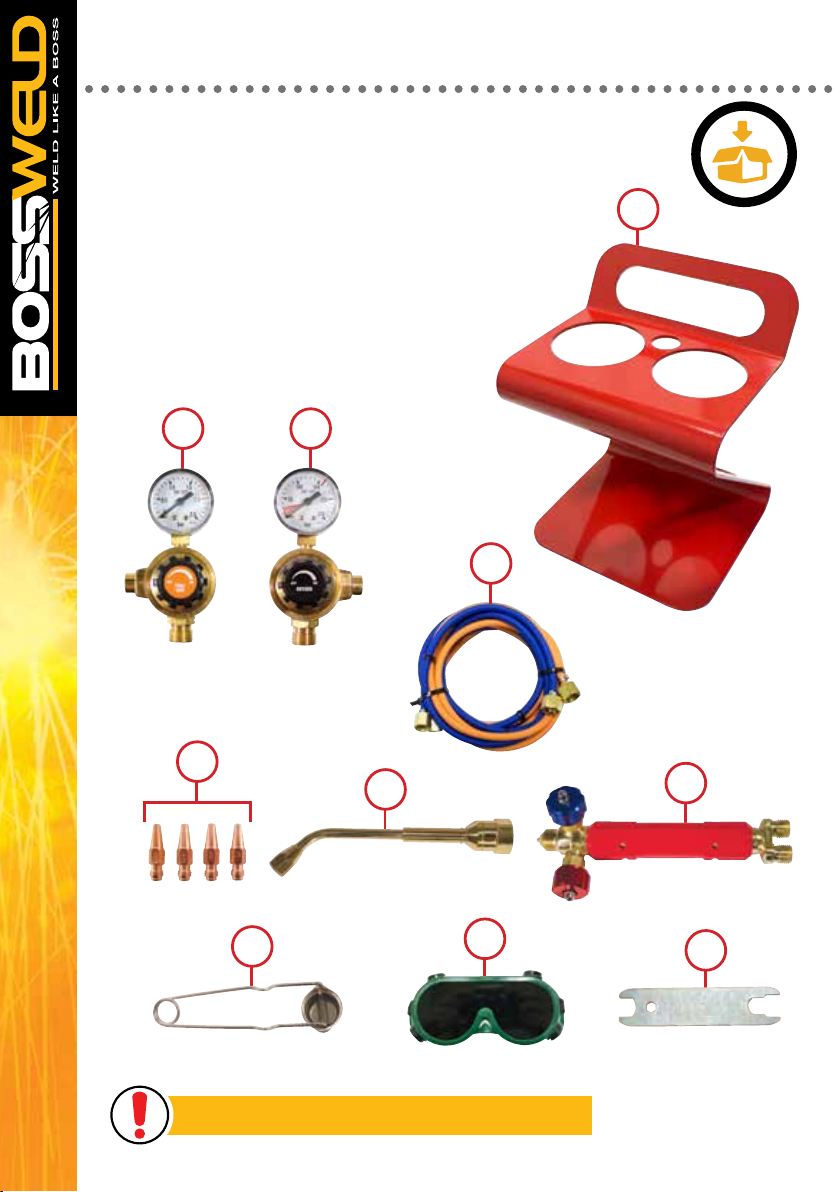
BOX CONTENTS
Kit Contains
1. Fuel gas regulator with gauge.
2. Oxygen regulator with gauge with M12x1mm connection.
3. Hand piece with adjustment values
4. Blowpipe.
5. 2.5m Oxygen / Fuel hose set.
6. Light weight & heavy duty carry case.
7. Flint Lighter.
8. Combination Spanner
9. Brazing nozzle size: 0, 1, 2, 3.
10. Brazing goggles.
Disposable gas cylinders sold separately
9
5
• OXYGEN REGULATOR
- CONNECTS TO M12x1 THREAD.
• MAP-PRO REGULATOR
- CONNECTS TO CGA 600 THREAD

13
BOX CONTENTS BRAZEN 3000 SETUP
1. Make sure you have the valve on
the fuel regulator in the off position.
4. Make sure you have the valve
on the Oxygen regulator in the off
position.
2. Check the seal in the regulator is
seated properly and not kinked or
raised.
5. Check the seal in the regulator is
seated properly and not kinked or
raised.
3. Screw the Fuel regulator onto the
fuel bottle in a clockwise direction
to tighten. And place into the carry
case. CONNECTS TO CGA 600 THREAD
6. Screw the Oxygen regulator onto
the Oxygen bottle in a clockwise
direction to tighten, and place into
the carry case
CONNECTS TO M12x1 THREAD
Disposable gas cylinders sold separately - Oxygen Reg has a M12x1mm Connection
- Map-Pro Reg has CGA 600 Connection
14
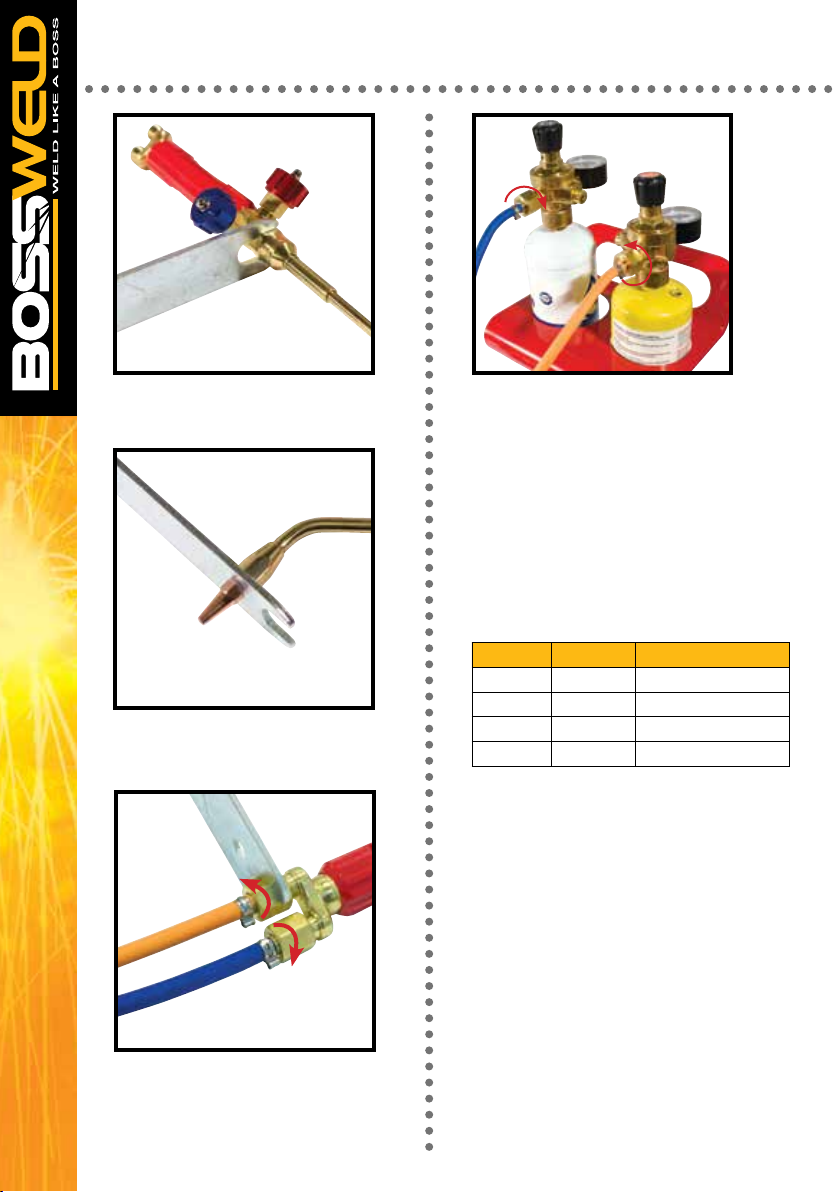
BRAZEN 3000 SETUP - CONTINUED
7. Attach the blowpipe to the handle
using the spanner supplied, do not
over tighten
8. Screw the required tip onto
the blowpipe. Using the spanner
supplied, do not over tighten
9. Attach the hose to the handle
with the numbers facing up, orange
hose on the left, tighten anti-clockwise
and blue hose on the right tighten
clockwise using the spanner supplied,
do not over tighten
10. Attach the hose to the fuel and
oxygen regulators
• Orange hose connected to the fuel
regulator tighten anti-clockwise using
the spanner supplied, do not over
tighten
• Blue hose to the Oxygen regulator
tighten clockwise using the spanner
supplied, do not over tighten
TIP SIZE ORIFICE WELDING RANGE
0# 0.7mm 0.5mm - 1mm
1# 0.8mm 1mm - 2mm
2# 0.9mm 2mm - 3mm
3# 1.0mm 3mm - 4mm

15
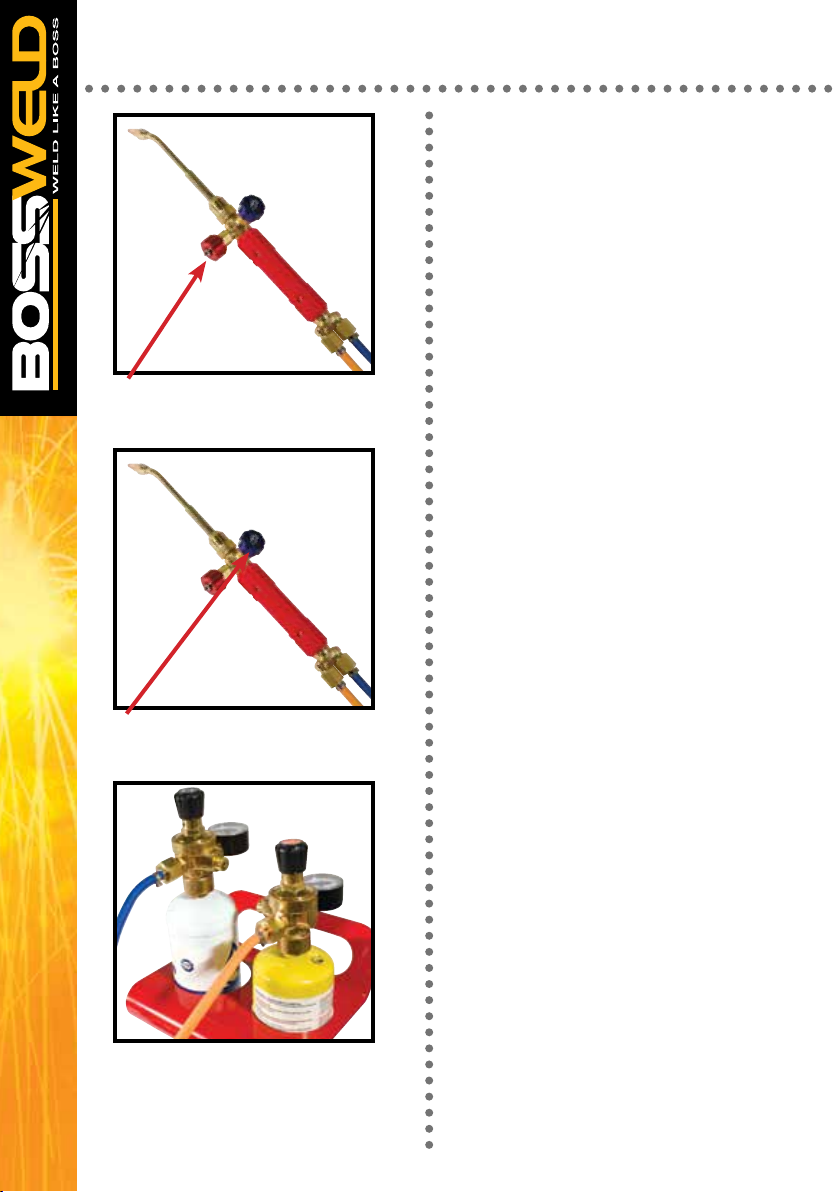
BRAZEN 3000 SETUP - CONTINUED BRAZEN 3000 IGNITING PROCEDURE
1. Make sure the valves on the torch
handle are closed
4. Adjust the fuel dial on the torch
until the yellow ame ows right from
the tip of the nozzle.
2. Turn the Oxygen regulator on until
it is fully open, and Turn the Fuel
regulator on until it is fully open.
5. Turn the blue dial on the torch
handle anti-clockwise to introduce
oxygen to the ame.
NOTE:
• Not enough oxygen will produce a
orange ame
• Excess oxygen will produce a
transparent ame.
• The ideal ame is a blue ame
with a cone shape.
3. Turn the Red Fuel dial
anti-clockwise to open the ow of
fuel, and immediately light the torch
using the int lighter provided in the
kit
√X
√
16
SHUT DOWN PROCEDURE
1. Turn The Fuel dial off from the
torch handle, This will extinguish the
ame.
2. Turn the Oxygen dial off from the
torch handle.
3. Shut the Fuel regulator off and
Shut the Oxygen regulator off.
NOTE:
In the case where the Brazen 3000
should not be used for a long time or
when requiring transport by a motor
vehicle, unscrew the cylinders from the
regulators,

17
SHUT DOWN PROCEDURE WARNING
• Do not ignite the torch near your body, combustible material or close to
regulators and cylinders.
• Caution: the torch can become very hot during and after use, keep away
from skin and combustible materials, lay at on a clean surface after use.
• Make sure you follow the correct shutdown procedures.
• This equipment uses compressed gas cylinders, do not disassemble
cylinders, puncture or incinerate.
• Always wear the appropriate personal protective equipment when using this
equipment.
• Do not disassemble the regulators, if regulator stops working, contact your
Bossweld agent or Bossweld directly.
• Use only recommended parts with this equipment, altering removing or
using non genuine part can be very dangerous.
• Only use fuel and oxygen cylinders that pass the AS/NZS standards,
compress cylinders can be very dangerous, make sure you follow
manufactures operating instructions.
MAINTENANCE
• Only use Bossweld approved replacement parts
• Do not use this equipment if you are unshore of any procedures outline in
this manuals, contact your Bossweld agent or Bossweld directly.
• Do not use this equipment if part is damage, replace any damaged parts
before use.
• Regularly inspect all parts before use, ensure valves are clean and dry
before connecting to the cylinders.
• Do not disassemble any part of the equipment unless stated in this manual.
• Check equipment for any leaks before ignition of the ame.

18
WARRANTY
BOSSWELD undertakes to repair or replace, at its option, any new
BOSSWELD product which fails due to a defect in materials or workmanship
during the 12 month warranty period. Any repair work must be carried out by
an authorised BOSSWELD repair agent.
This warranty does not apply to, or in any way cover:
1. Normal everyday wear and tear.
2. Failure due to improper use.
3. Failure of, or caused by, parts or components which are not original
BOSSWELD parts.
4. Failure arising from accident, abuse, re, vandalism, contaminated uids
or neglect or failure to store or use the BOSSWELD product in
accordance with the instructions provided in this manual.
Note:
The following items are not included in the 12 month warranty period:
Welding tips, welding goggles and int lighter
DISCLAIMER
Whilst the above information is provided in good faith, BOSSWELD does
not warrant the accuracy of the information provided or assume any legal
responsibility for it or for any damage which may result from reliance on
or use of it or from any negligence of BOSSWELD or other person(s) with
respect to it.
19
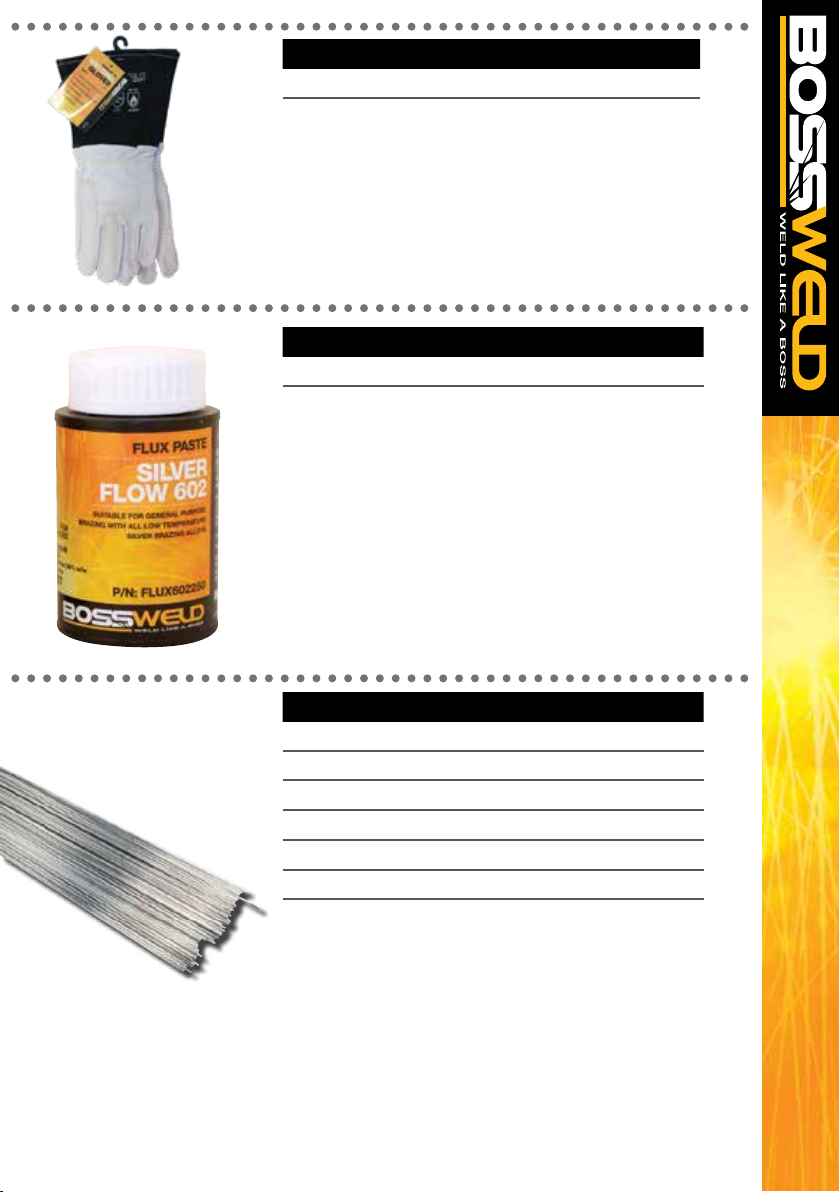
Bossweld Goat Skin Tig Glove
White goat skin TIG glove, reinforced tipping on back
of 2nd and 3rd ngers, yellow cow split cuff,
Kevlar stitching, unlined, (32cm for size M).
Features
Reinforced tipping on the back of the 2nd and 3rd ngers
Yellow cow split cuff
Kevlar stitching
Goat skin gloves
Silver Brazing Flux
Fine paste with excellent suspension & easy to spread.
For low temperature silver brazing, provides quality
joints in station less, copper, brass & bronzes
Bossweld Silver Brazing Alloys
CAWS A5.8-B CuP5
A ller for brazing copper. Wide molting range for lling
loose connections and to build up around nished joints.
When heated above liquidus temperature will ow into
tight connections. Extensively used on hot water tanks,
copper tubing, plumbing or where a strong, ductile joint is
required. Not recommended for brazing steel or other
ferrous metals.
CODE DESCRIPTION
700015M Bossweld “GoaTig” Tig Welding Glove - Medium
CODE DESCRIPTION
FLUX602250 Silver Brazing Flux x 250g Jar
CODE DESCRIPTION
300201 2.4mm 2% Silver Brazing 1Kg
300202 2.4mm 5% Silver Brazing 1Kg
300203 3.2mm 5% Silver Brazing 1Kg
300204 1.6mm 15% Silver Brazing 1Kg
300206H 2.4mm 15% Silver Brazing 6 stk
300206 2.4mm 15% Silver Brazing 1Kg

OTHER PRODUCTS IN OUR RANGE
• ELECTRODES
• TIG RODS
• WELDING HELMETS
• WELDING MACHINES
• TORCH SPARE PARTS
• WELDING ACCESSORIES
• MIG WIRE
• GAS EQUIPMENT
• WELDING SAFETY
• MIG TORCHES
• TIG TORCHES
• WELDING CABLE
Table of contents
Other BossWeld Welding System manuals

BossWeld
BossWeld M100 User manual

BossWeld
BossWeld POWERPULSE 250 User manual

BossWeld
BossWeld 200X User manual

BossWeld
BossWeld MST X250 PFC User manual

BossWeld
BossWeld X Series User manual

BossWeld
BossWeld P40 User manual

BossWeld
BossWeld TS200 User manual

BossWeld
BossWeld MST X250 PFC User manual

BossWeld
BossWeld S140 User manual

BossWeld
BossWeld Buddy MIG 150 User manual


Popular Welding System manuals by other brands

Lincoln Electric
Lincoln Electric AC-235 Guide

Linde
Linde BOC Raptor CUT 30C operating manual

MK Welding
MK Welding PC 40 PFC user manual

Lincoln Electric
Lincoln Electric RANGER 300 D Operator's manual

Lincoln Electric
Lincoln Electric Power MIG 350MP Operator's manual

Miller
Miller Spectrum 700i owner's manual


