Boston Acoustics A7rc Safety guide

REMOTE CONTROL
SETUP AND USE GUIDE
TSU501

FCC COMPLIANCY
This equipment has been tested and found to comply with the limits for a Class B digital device, pursuant to
part 15 of the FCC rule. These limits are designed to provide reasonable protection against harmful interference
in residential installations. This equipment generates, uses, and can radiate radio frequency energy and if, not
installed and used in accordance with the instructions, may cause harmful interference to radio communications.
However, there is no guarantee that interference will not occur in a particular installation. If the equipment does
cause harmful interference to radio or televisions reception, which can be determined by turning the equipment
off and on, the user is encouraged to try to correct the interference by one or more of the following measures:
• Reorient or relocate the receiving antenna.
• Increase the separation between the equipment and receiver.
• Connect the equipment into an outlet on a different circuit from the receiver.
• Consult the dealer or an experienced radio/TV technician for help.
Note If serial or parallel ports are configured, a filtered/shielded serial or parallel cable is recommended to
minimize EMI and ensure FCC class B compliance.

TABLE OF CONTENTS
Taking a First Look 2
Using the Avidea Remote
The Batteries 3
The Remote Control Layout 4
Activating the Avidea Remote 5
The Touch Screen 6
Operating Devices 9
Working with Modes 13
Adjusting the Settings 14
Changing the RF/IR Settings 18
Entering Codes for Other Devices 21
Learning Commands 24
Labeling Buttons and Devices 26
Recording Macros 28
Freedom Edit 32
Maintaining the Avidea Remote 34
Important Notices 34
Cleaning Avidea Remote 34
Troubleshooting 36
General Problems 36
Programming Problems 38
Specifications 39
Table of Brands 40
Index 54
SETUP AND USE GUIDE

TAKING A FIRST LOOK
SETUP AND USE GUIDE 22
The Avidea Remote Control is a Radio Frequency (RF) and Infrared (IR)
remote that can be programmed to operate all the Devices connected to your
Avidea System, such as your TV, cable box, satellite receiver, VCR, etc. It has
an extensive library of codes for these Devices that can be easily programmed.
See "Entering Codes for Other Devices" on p. 21.
In addition, the Avidea Remote can "learn" codes from your existing remote
controls that are not already stored in its library. See "Learning Commands"
on p. 24.
You can label the touch screen buttons on the Avidea Remote. Characters and
numbers are available for labeling as well as various audio and video symbols.
See ‘Labeling Buttons and Devices’ on p. 26.
Recording macros is another feature of the Avidea Remote. If you wish to
assign a sequence of commands to a single button, you can record a macro. See
‘Recording Macros’ on p. 28.
We have provided you with software for use on a PC called Freedom Edit, so
that you can create your own screens and create an individualized look for
your remote. You can find Freedom Edit on the included CD-ROM and on
the Boston Acoustics website www.bostonacoustics.com/avidea. Freedom
Edit’s online help system will guide you through the process. In the future
Freedom Edit will also allow you to upgrade your Avidea Remote. See
‘Freedom Edit’ on p. 32.

SETUP AND USE GUIDE 3
USING THE AVIDEA REMOTE
The Batteries
The Avidea Remote requires 3 AA-batteries (3 x 1.5 V) to function.
You can use either the supplied batteries or purchase rechargeable batteries.
1 Remove the battery cover by releasing the tab and lifting.
2Install the batteries in the battery compartment.
3Replace the battery cover.
After a few seconds, the Avidea Remote starts up automatically and beeps
twice to indicate that it is ready for use.
Note: Do not touch the screen or hard buttons during start up as this may cause your
remote to lock up. If it does lock up, remove one battery and start again.

SETUP AND USE GUIDE 4
TABLE OF CONTENTSUSING THE AVIDEA REMOTE
The Remote Control Layout
On the Avidea Remote you can perform functions by means of soft and hard
buttons.
• Soft buttons are the buttons you can tap on the LCD Touch Screen.
• Hard buttons are the buttons located above, below and on the left side of
the LCD touch screen.
• The 2 hard buttons located above the Touch Screen turn the Avidea
System and TV Power on and off.
• The 4 hard buttons just below the touch screen are Mode, OSD (On
Screen Display) Close (Closes OSD), and the Device button. Their
labels are displayed at the bottom of the Touch Screen.
• The hard buttons located at the bottom are for the Avidea System
Volume Up/Down, Mute, Channel Up/Down, TV source, and the
Navigation buttons.
•The hard buttons located on the left side of the Avidea Remote are
the Backlight button and the Touch Screen Page Up/Down buttons.
Avidea System Power TV power
Serial port for
connecting to a PC
Backlight button to
activate the Backlight
Page Up button
Page Down button
LCD Touch Screen
Soft buttons
OSD (On Screen
Display)
Close (Closes On
Screen Display)
Device button
to go to the
Device Page
Navigation
buttons
Avidea Mute
Mode button
to switch to another mode
Avidea System Volume
Up/Down
Channel Up/Down
TV Source
Learning eye

TABLE OF CONTENTS
SETUP AND USE GUIDE 5
USING THE AVIDEA REMOTE
Activating the Remote Control
Turning on the Display and the Backlight
The Remote Control’s display can be activated
in four different ways:
Tilting the unit more than 50 degrees
as illustrated activates the display but
not the backlight.
Pressing the Backlight button on the
left side will activate the display and
the backlight.
Tapping the screen gently with your finger
or a blunt, soft object like a pencil eraser
will activate the display, but not the backlight.
Pressing any button will activate the display, but not the backlight.
Note: You can set the backlight to automatically activate whenever you use the
remote. See ‘Adjusting the Backlight Timer’ on p. 15.
Whenever batteries are installed in the Avidea Remote or when it is reset, the
Remote will beep twice. The Avidea Remote then automatically switches to
the Device Page that displays all potential Devices that your Avidea Remote
can operate.
Fig 1: Device Page

USING THE AVIDEA REMOTE
SETUP AND USE GUIDE 6
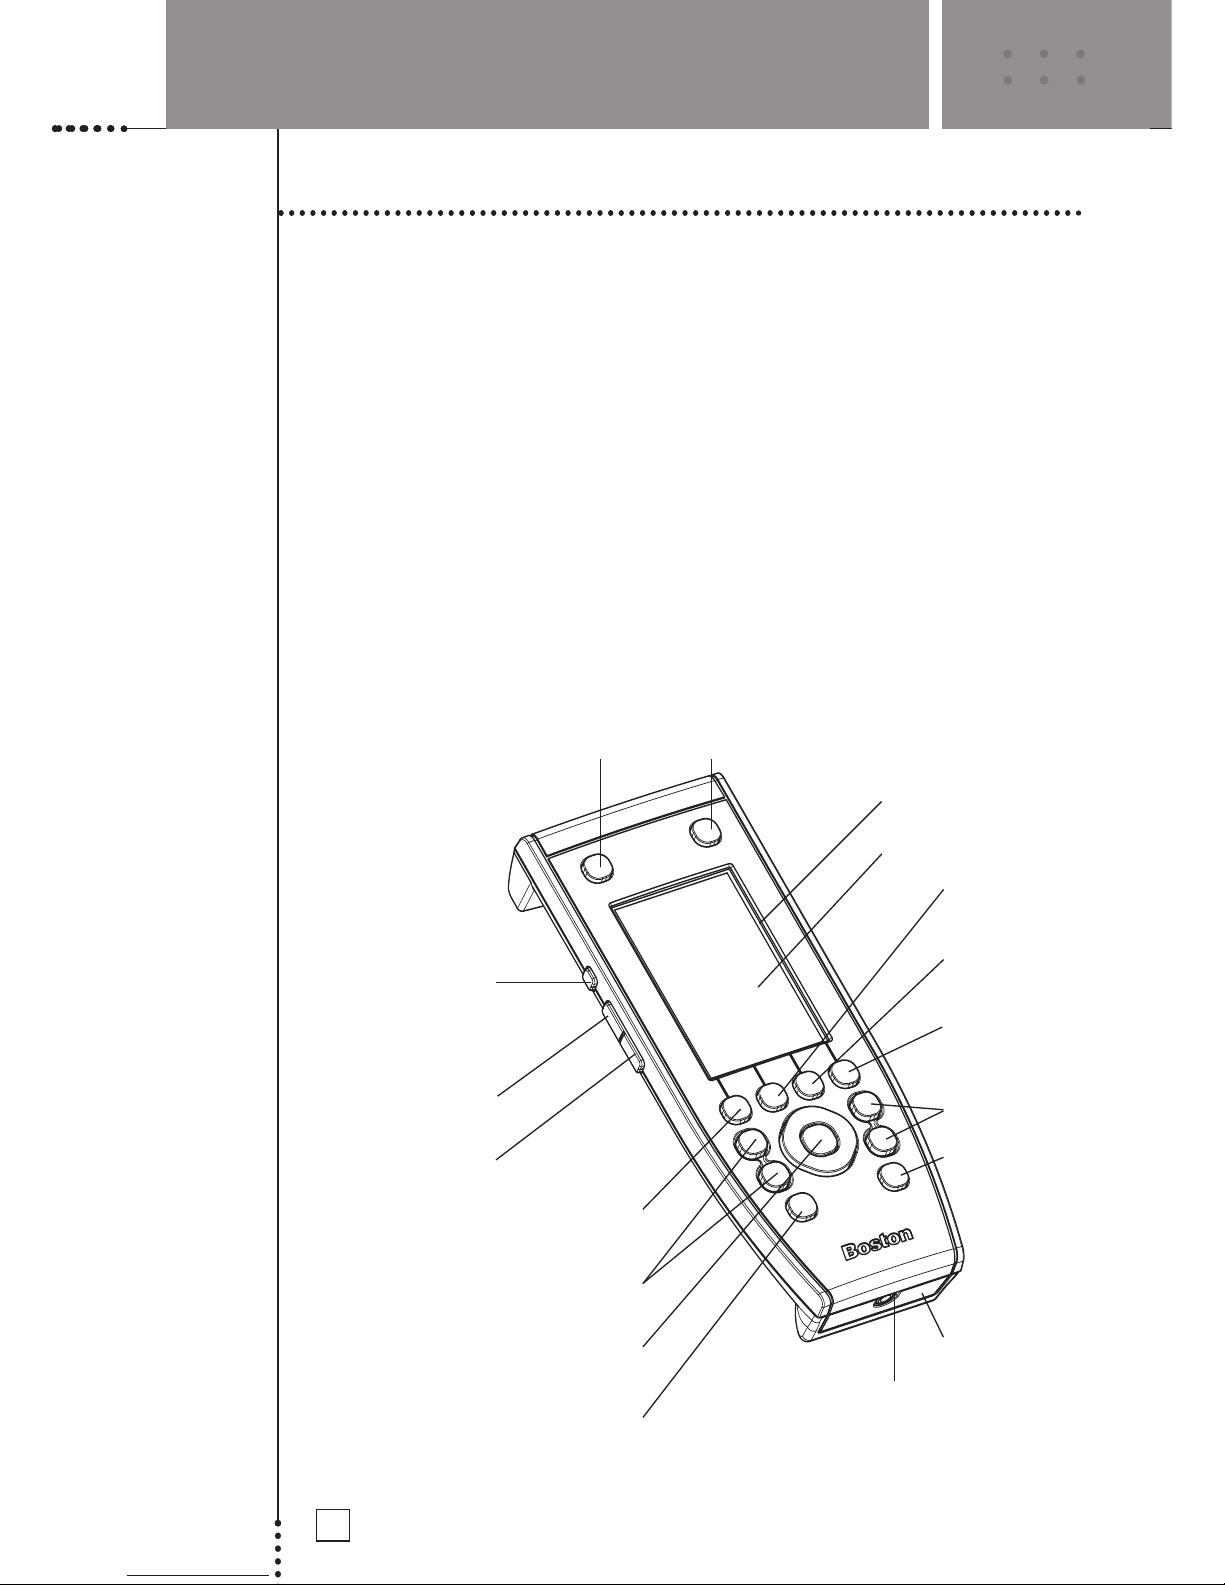
The Touch Screen
The LCD Touch Screen is divided into different sections:
Using the Soft Buttons
By tapping the soft buttons on the LCD Touch Screen you send commands to
the Device you have selected. The name of the active Device is indicated at
the top of the touch screen.
Note You can operate the soft buttons in the same way you operate hard buttons on
a conventional remote control. When you keep the soft button pressed
instead of tapping it, the Avidea Remote keeps sending the command for up
to 30 seconds.
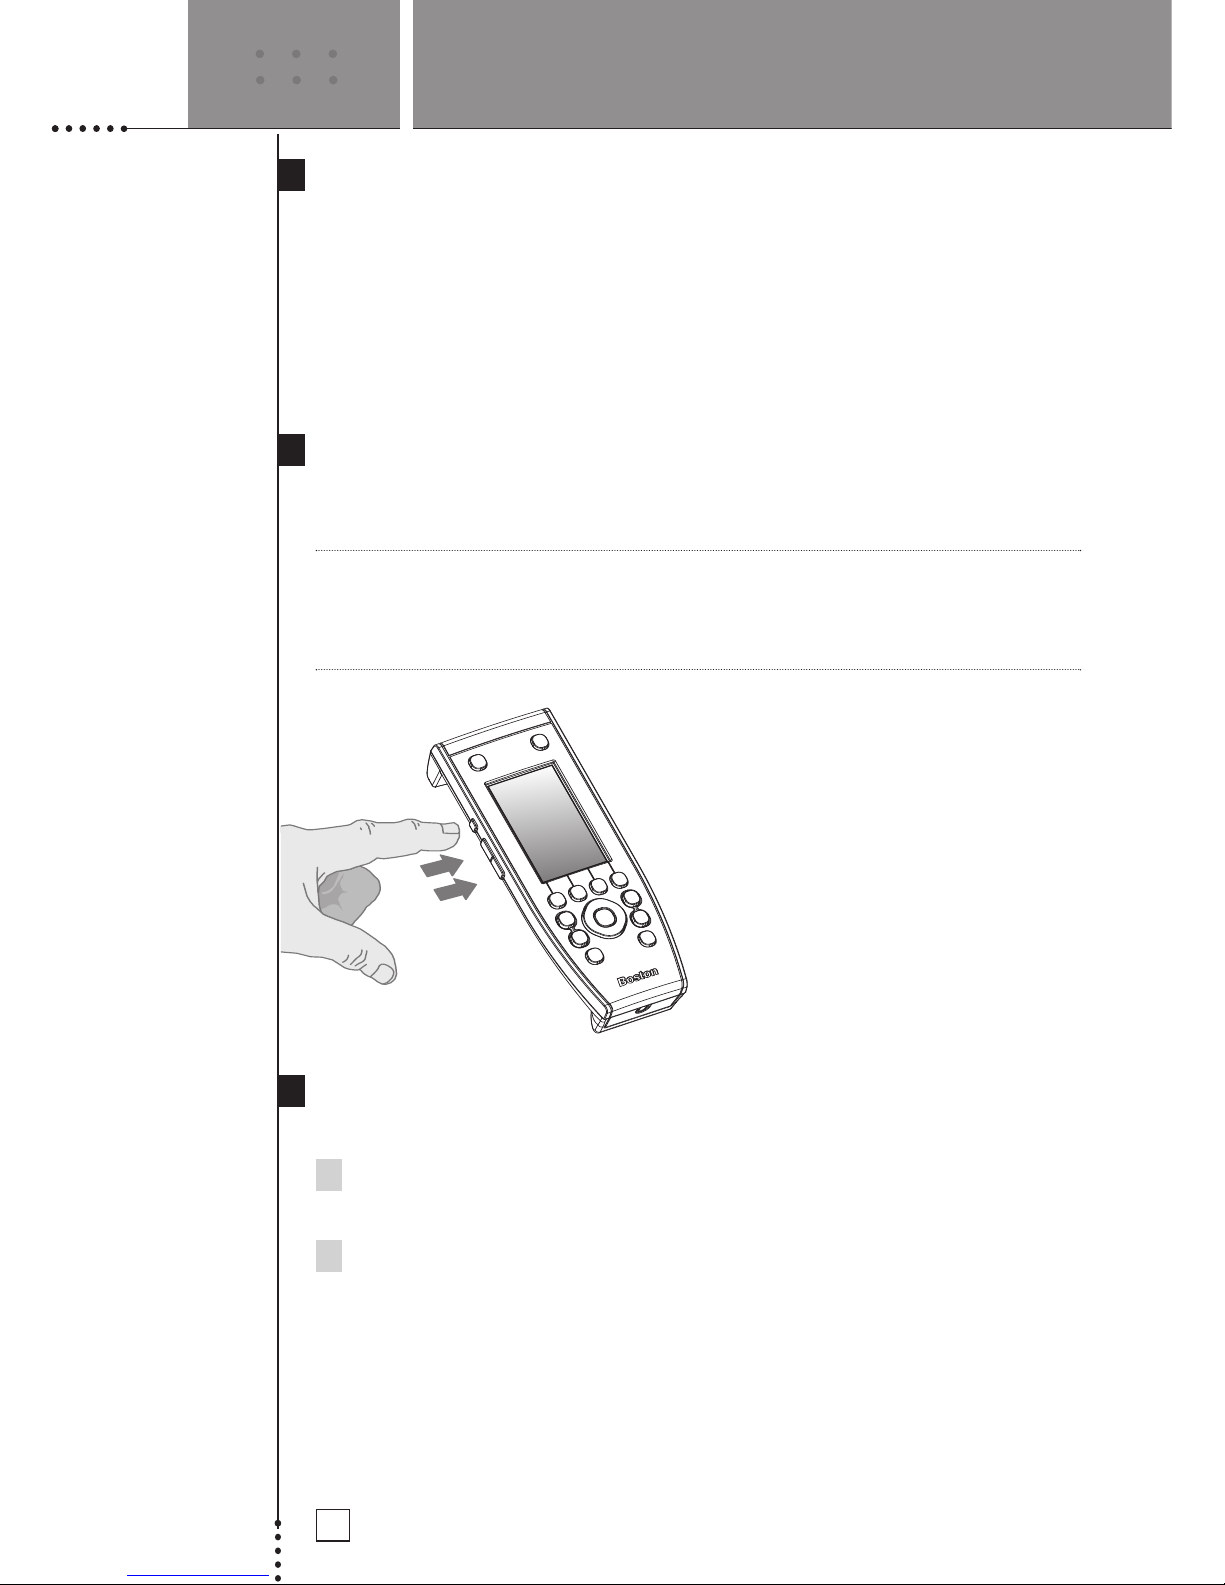
Using the Hard Buttons
Hard Buttons can be operated at any time, even without turning on the LCD
Touch Screen.
Here the date and time are displayed when you are
operating your Devices. See p. 15 & 16 to set time
and date.
In this area you can see:
· The page number of the Device
· The Device you are operating
· The battery level indicator
With these soft buttons you operate your Device.
These are the labels of the 4 hard buttons below the
touch screen.
Device button:
Press to go to the
Device Page. Only
active when the word
“Device” is displayed
above the button.
Channel Up/Down
OSD (opens On Screen Display) Close (closes On Screen Display)
Mode button:
Press and hold 3 seconds to
activate the Mode screen.
TV Source:
Selects the input on your TV.
Navigation buttons:
To perform actions in the menu of a Device, like the on
screen display of a TV or a VCR display. Use the cursor
to move up, down, left or right in the menu and press
OK to select.
Avidea System
Volume Up/Down
Avidea System Mute

SETUP AND USE GUIDE 7
USING THE AVIDEA REMOTE
Using the Page Up and Page Down Buttons
The controls to operate your Devices are typically located on different pages.
You can scroll through these pages using the Page Up and Page Down
buttons on the left side of the touch screen. The page number on the left of
the touch screen indicates the active page number and the total number of
screens; for example 1/6 means page 1 of 6 pages. The pages also “wrap
around” which means you can go to any page in any direction.
Using the Backlight Button
Use the Backlight button to activate the Avidea Remote’s display and
backlight.
Note If the screen stays black or becomes blank, adjust the contrast using the page
buttons on the left side. See Changing the LCD Contrast below. The Remote
Control also has an automatic shut-off feature to conserve battery life.
See ‘Adjusting the Backlight Timer’ on p. 15.
Changing the LCD Contrast
To adjust the LCD contrast on the touch screen:
1 Press and hold the Backlight button.
The screen lights up.
2 While still holding the Backlight button, press the Page Up button
once to increase the LCD contrast one level.
The LCD contrast is adjusted one level up.
–or–
Press the Page Down button once to decrease the LCD contrast
one level.
The LCD contrast is adjusted one level down.

USING THE AVIDEA REMOTE
SETUP AND USE GUIDE 8
3 Release the Backlight button when the contrast is satisfactory.
The LCD contrast can be adjusted to 4 different levels.
Note To adjust the contrast multiple levels, press the Page Up or Page Down
button multiple times. When you press and hold the Page Up or Page Down
button, the LCD contrast will change only one level.
The Battery Status
The battery icon indicates the status of your batteries.
When the battery status is low, the Low Battery icon appears at the top
of the touch screen. You can still operate your Devices, but you cannot adjust
the settings, enter codes, learn commands or record macros anymore. When
you try to perform these actions, a message screen appears.
Replace the batteries to make the Avidea Remote fully functional again. See
‘The Batteries’ on p. 3 to replace the batteries.

USING THE AVIDEA REMOTE
SETUP AND USE GUIDE 9
Operating Devices
To operate Devices on your Avidea Remote select the Device Page. This
screen displays the available Devices: TV, VCR, Disc, Tuner, Sat, etc.
Activating the Device Page
Press the Device button.
The Device Page appears.
Fig. 2: The Device button
Selecting a Device on the Device Page
Tap the soft button of the Device you want to operate.
The first page of the selected Device appears. Using the Page Up and
Page Down Buttons you can go to another page of the Device.
You operate Devices using the buttons on your Avidea Remote:
• Soft buttons (touch screen buttons)
• Hard buttons
Selecting Other Device Functions
The second Device Page allows you additional control
of your Avidea System. On this page you will find four
soft buttons labeled Zone 2, Macros, Listen Modes,
and Sleep Timer.

USING THE AVIDEA REMOTE
SETUP AND USE GUIDE 10
Zone 2
The Avidea System has the ability to provide audio simultaneously and
independently in two different listening "zones". With the connection of
additional amplification and loudspeakers to the Zone 2 output from your
Avidea Control Center you can for instance, enjoy a CD in one room and the
FM tuner in another.
To activate a Device from Zone 2 tap the Zone 2 button. Devices available
now come up in a new page labeled Zone 2. You operate the Devices as you
would in Zone 1. To turn off Zone 2, or return operation to Zone 1, tap the
Off or Zone 1 soft buttons at the bottom of the touch screen.
Note If a Zone 2 user selects a Device already in operation in Zone 1 (or vice versa)
both users will have control of that same Device. This may cause conflicting
use and programming.
Listen Modes
The Avidea Remote allows adjustment of several “listening modes”. Listening
Modes allow you to use two, five or all six of the system’s speakers, depending
on program type, format, and personal choice. The Avidea subwoofer is
always on, regardless of the number of speakers being used.
Note Page 2 of each Device contains a customized Listening Mode page for that
Device.
On the Listening Mode page you will find the following soft buttons:
Display
Turns the display and lights on the Avidea Control Center on or off. The
power button will remain illuminated.
Status
Brings up the Status Bar on your TV. Shows full
system configuration, settings, and Device playback
information.
Surround Music
Uses all six speakers to recreate the ambience of a
live musical performance. This is the preset mode
for all audio-only Devices.
Stereo
Uses only two speakers, the front left and front right,
allowing Avidea to behave like a traditional 2-channel
stereo system.

USING THE AVIDEA REMOTE
SETUP AND USE GUIDE 11
Surround Movie
Uses all six speakers to recreate a movie theater surround sound experience
from sources that are not Dolby®Digital or DTS®. This is the preset mode
for all video Devices. When any external Device provides a Dolby Digital
or DTS signal, the Avidea System will automatically select the ideal
playback mode.
5/6
Turns the rear center speaker on and off. The Avidea System can properly
decode the latest surround sound formats: Dolby®Digital Surround EX™
and DTS®-ES™. Both of these formats are available on DVD, and may be
provided by some digital cable and satellite programming.
The proper amount of sound will come automatically from the rear center
speaker when watching an EX- or ES-encoded movie. A regular Dolby
Digital or DTS soundtrack will also send sound to this speaker. However,
when watching these movies it is possible that too much sound can come
from the rear center speaker, and not enough from the rear left and right
speakers. If that is the case, press the 5/6 button to turn the rear center
speaker on or off. (The corresponding blue light on the control center will
provide a visual confirmation of the status of the rear center speaker.)
Simply choose which system configuration you prefer for a specific movie
soundtrack.
Subw -/+
Adjusts the output level of the subwoofer to match the type of
programming being played. You may also find that a relatively higher
subwoofer level is preferred when playing the system at lower volumes.
The range of this control is -12 to +12, and a visual indication of any
level change will appear on the control center display and your television.
Night (Disc and Changer Device only)
Changes the Avidea System’s overall dynamic range while listening to
DVD’s. This will reduce the difference between a movie’s softest and
loudest passages, making the movie more suitable for viewing when you
are concerned about disturbing others.
Note: The Avidea System has Listening Mode Memory™. It will automatically
remember both the Listening Mode and the associated subwoofer level setting
for each Device. Let’s say that the last time you listened to the Tuner you
listened in Stereo and set the subwoofer to +3. You just finished watching a
movie in Dolby Digital Surround EX with the rear center speaker on and the
subwoofer set to +5. When you switch to Tuner, the system will
automatically switch to Stereo, subwoofer +3. Any changes you make to the
Listen Mode settings will be stored automatically in the system’s memory and
recalled the next time you choose that Device.

SETUP AND USE GUIDE 12
USING THE AVIDEA REMOTE
Macros
A macro allows you to send a sequence of commands using one single
button. You can for instance switch on your TV, turn on your cable box
and tune to a movie channel, all by pressing a single button. Pressing the
Macros soft button on the second page of the Device Overview will bring
you to a set of Macro soft buttons. Refer to ‘Recording Macros’ on p. 28
to learn how to program these for your particular needs.
Sleep
You can program your Avidea System to shut off automatically. Using the
- and + soft buttons allows you to program the Avidea System to shut off
automatically in 15 minute intervals for up to 90 minutes.
Activating The Avidea System ‘On Screen Display’ (OSD)
Your Avidea System is equipped with an On Screen Display (OSD). The OSD
is used to check system status and make adjustments to your Avidea System.
Adjustments may include things like TV aspect ratios, speaker levels and
parental controls. (See your Avidea Home Theater System Setup and Use
Guide for complete information on the use of the OSD)
To access the OSD press the OSD hard button at the bottom of the LCD
display. You use the Navigation Buttons (up/down/left/right/ok) to access
specific adjustments within the OSD. Use the Close hard button at the bottom
of the LCD display to close the OSD.
Note After pushing the Close button it is necessary to press the Device button to
return to normal remote operation.

USING THE AVIDEA REMOTE
SETUP AND USE GUIDE 13
Working with Modes
Operation of the Avidea System or connected Devices requires that the remote
be in Use mode. For customizing the Avidea Remote (adjusting the settings,
entering codes, learning and labeling buttons, or recording macros) requires
switching to the appropriate mode.
The Avidea Remote can be put into 7 different modes. These modes are:
Use mode The normal mode for operating your Avidea System and all
the connected Devices. See ‘Operating Devices’ on p. 9.
Setup mode For changing the Avidea Remote settings.
See ‘Adjusting the Settings’ on p. 14.
Brand mode For entering the codes for the brands of your Devices using
the Avidea Remote’s library. See ‘Entering Codes for Other
Devices' on p. 21.
Learn mode For learning commands from other remote controls. See
‘Learning Commands’ on p. 24.
Label mode For re-labeling buttons and re-naming Devices on the Avidea
Remote. See ‘Labeling Buttons and Devices’ on p. 26.
Macro mode For recording macros. You can assign multiple commands to
one single button. See ‘Recording Macros’ on p. 28.
RF/IR mode For changing mode of communication to connected Devices.
You can control other Devices (VCR, satellite receiver) from
greater distances. See ‘Changing the RF/IR settings’ on p. 18.
Note For learning commands, entering codes, and recording macros, it is necessary
to select a Device on the Device Page. (See below.)
1 On the Device Page tap the soft button of
the Device you want to customize.
The first page of the selected Device appears.
2 Press and hold the Mode button for 3 seconds.
The Mode screen appears.
Note You have to press and hold the Mode button for
3 seconds to prevent accidental changes.

SETUP AND USE GUIDE 14
3 Select the desired mode from the Mode screen.
Adjusting the Settings
The Avidea Remote settings can be adjusted in the Setup mode.
1 Press and hold the Mode button for 3 seconds.
The Mode screen appears.
2Tap Setup in the Mode screen.
The first Setup page appears.
The Avidea Remote settings consist of 3 setup pages with several settings per
page. Use the Page Up and Page Down buttons to navigate to the appropriate
setup page.
First Setup Page
On the first setup page you can adjust:
• The LCD timer
• The backlight timer
•The beep volume
Adjusting the LCD Timer
The LCD timer indicates how long the LCD touch screen stays active before
before it turns off. You can set the timer between 3 and 120 seconds.
USING THE AVIDEA REMOTE

SETUP AND USE GUIDE 15
Press ‘+’ to increase or ‘-’ to decrease the time the LCD stays active.
1 Tap ‘+’ or ‘-’ once to adjust the timer 1 second up or down.
2 Press and hold ‘+’ or ‘-’ to adjust the timer in 10 second intervals.
Adjusting the Backlight Timer
The backlight setting indicates how long the backlight of the LCD touch
screen and the buttons stays active. The backlight timer can be set between 1
second and 120 seconds. You can also set the backlight in the ‘On’ setting so
that the backlight automatically activates when the touch screen is tapped or
a hard button is pressed.
Note The backlight cannot stay active longer than the LCD. If you increase the
backlight timer, the LCD timer will automatically increase as well.
Press ‘+’ to increase or ‘-’ to decrease the time the backlight stays active.
1 Tap ‘+’ or ‘-’ once to adjust the timer 1 second up or down.
2Press and hold ‘+’ or ‘-’ to adjust the timer in 10 second intervals.
3 After you have reached 120 seconds, press the ‘+’ once more to jump
to the ‘On’ state which will automatically activate the backlight whenever
the unit is used.
Note Battery life will be reduced when the settings for the LCD timer and the
backlight timer are high or when the backlight is activated automatically.
Change the Beep Volume
The beep volume setting adjusts or turns off the volume of all button and
system beeps on the Avidea Remote. The beep volume levels are mute, soft,
medium and loud.
Press ‘+’ to increase or ‘-’ to decrease the beep volume.
Second Setup Page
Use the Page Down button to get to page 2.
Adjust the Date
You can set the year, the month and the day.
Press ‘+’ to increase or ‘-’ to decrease the value for the year, month, and day.
1 Tap ‘+’ or ‘-’ once to adjust the year, month and day one value up
or down.
USING THE AVIDEA REMOTE

SETUP AND USE GUIDE 16
2 Press and hold ‘+’ or ‘-’ to adjust the values for
the year and the month more rapidly. The value
for the day settings will change per 5 days.
The Avidea Remote will immediately reflect the date
change at the top of the screen.
Adjust the Time
1 Tap ‘+’ or ‘-’ once to adjust the time 1 minute
up or down.
2 Press and hold ‘+’ or ‘-’ to adjust the time more
rapidly. The time will increase or decrease per
30 minutes.
The Avidea Remote will immediately reflect the time
change at the top of the screen.
Third Setup Page
Use the Page Down button to get to page 3.
On the third setup page you can:
•Calibrate the touch screen
• Read information about your Device
• Revert the Avidea Remote
Calibrate the touch screen
1 Tap the Calibrate button.
The first instruction “Touch the top left corner” appears.
2 Tap as accurately as possible in the center of the image in the upper left
corner using a small blunt object such as a pen cap or PDA stylus.
The second instruction “Touch the button right corner” appears.
3 Tap as accurately as possible in the center of the image in the lower right
corner using a small blunt object such as a pen cap or PDA stylus.
A message screen “Calibration successful” appears for 3 seconds. The setup
panel appears again.
USING THE AVIDEA REMOTE

SETUP AND USE GUIDE 17
Avidea Remote Information
This page contains information that may be important to the dealer in case of
a defect. The following information is displayed on this screen:
• Free memory (in percentage), which gives you an indication on how much
memory is left to (further) customize the Avidea Remote
• Boot version
• Application version
• Configuration file
Revert
Warning When you revert the Avidea Remote, all customization is lost. You loose all
the Avidea Remote settings, Device codes, learned codes, and custom macros.
You should save your configuration file to your PC before reverting. See the
Freedom Edit on p. 32 for more details.
By tapping the Revert button the Avidea Remote will be reverted to the
original configuration file. You might have to revert when you notice that
scrolling through pages is slowing down.
1 Tap the Revert button.
A message screen appears to confirm or cancel the revert process.
2Press OK or Cancel.
To exit Setup Mode
1 Press the Mode button.
The Mode screen appears.
2Tap the Mode button you want to go to.
For normal operation, press Use.
USING THE AVIDEA REMOTE

SETUP AND USE GUIDE 18
Changing the RF/IR Settings
Your Avidea Remote Control comes from the factory ready to control the
Avidea System using Radio Frequencies (RF). RF signals have an operating
range of 20 meters (66 feet) in a typical home and unlike traditional Infrared
(IR) signals used by most consumer electronics, RF signals can go through
walls and obstacles, allowing you to operate the system throughout your house.
This feature is particularly helpful when controlling your system from another
room or even outside where you may have additional speakers. There are two
reasons why you may want to adjust the RF/IR characteristics of your Remote
Control and Avidea System. One, to extend control of IR Devices by using RF.
Two, to resolve system interference problems.
Changing Infrared (IR) Devices to Radio Frequency (RF)
Control
Additional Devices (VCR, Satellite Receiver, etc.) that you may want to
connect to your Avidea System will typically use IR signals to operate via a
remote and your Avidea Remote Control is designed to learn these IR
commands. (See ‘Entering Codes’ and ‘Learning Commands’ on p. 21 and p.
24.)
However you may choose to operate your IR Devices using RF signals giving
you the conveniences of RF as mentioned. The Avidea System can receive RF
signals from the Remote Control and translate them into IR commands and
send them to the appropriate Device.
Note: To be able to operate one or more IR Devices with RF signals from your
Avidea Remote, you have to change the Remote Control’s RF/IR settings for
those Devices. You will also need to connect the supplied Dual IR Emitter to
the rear of your Avidea Control Center. The Emitter also needs to be placed
near the IR Device you want to operate, ensuring the Emitter’s sending eye is
pointed at the Device. (See your Avidea System Setup and Use Guide for
complete information on RF/IR operation)
1 From the Device Page, press and hold
the Mode button for 3 seconds.
The Mode screen appears.
USING THE AVIDEA REMOTE
This manual suits for next models
1
Table of contents