Bosworth SapCheck User manual

SapCheck® User’s Guide
Doc M-PR-09-45.120119.1
Model # MS-SCK-001
Version 2.0

1 Doc M-PR-09-45.120119.1
The Bosworth Company
SapCheck User’s Guide
T C
Limited Warranty ………………………………………………………………. 2
Save the Packaging…………………………………………………………….. 3
Before You Begin—Check for Communicaons………………….. 3
Introducon ………………………………………………………………………. 5
Safety…………………………………………………………………………………. 6
Definions………………………………………………………………………….. 7
SapCheck Components ………………………………………………………. 8
Installaon …………………………………………………………………………. 9
Operaon……………………………………………………………………………13
Monitoring Funcons‐Asking SapCheck a Queson……..13
Seng a Vacuum Alert…………………………………………………14
Temperature Auto‐Control…………………………………………..15
Remotely Starng/Stopping Pump……………………………….16
Command Phone Numbers…………………………………………..16
Service Mode……………………………………………………………….17
Calibrang SapCheck’s Vacuum Sensor………………………...17
SapCheck Acvaon; Monthly Text Message Limits …….18
List of Commands ……………………………………………………….……..19
Support……………………………………………………………………………….22
Soware Updates ……………………………………………………………….22
Troubleshoong………………………………………………………………….23

SapCheck User’s Guide
The Bosworth Company
2
Doc M-PR-09-45.120119.1
L W
You should first read all the instrucons in this User’s Guide before aempng
to use this product.
The SapCheck Controller and sensors are warranted against defecve material
or workmanship from the date of purchase. The warranty period is one (1)
year.
This limited warranty applies to repair or replacement of product found to be
defecve in material or workmanship. This warranty does not apply to dam‐
age resulng from commercial, abusive, unreasonable use or supplemental
damage. Defects that are the result of normal wear and tear will not be con‐
sidered manufacturing defects under this warranty. THE BOSWORTH COMPA-
NY IS NOT LIABLE FOR INCIDENTAL OR CONSEQUENTIAL DAMAGES OF ANY
NATURE. ANY IMPLIED WARRANTY OF MERCHANTABILITY OR FITNESS FOR
A PARTICULAR PURPOSE ON THIS PRODUCT IS LIMITED IN DURATION TO THE
DURATION OF THIS WARRANTY. Some jurisdicons do not allow the exclu‐
sion or limitaon of incidental or consequenal damages or limitaons on how
long an implied warranty lasts, so the above limitaons or exclusions may not
apply to you. This warranty gives you specific legal rights, and you also may
have other rights which vary from jurisdicon to jurisdicon. This warranty
applies only to the original purchaser of this product from the original date of
purchase.
At its opon, The Bosworth Company will repair or replace this product if it is
found to be defecve in material or workmanship.
This warranty does not cover damage resulng from any unauthorized
aempts to repair or from any use not in accordance with the instrucon man‐
ual.
NOTE: IF YOU EXPERIENCE A PROBLEM, PLEASE FIRST CONTACT SUP-
PLEASE HAVE AVAILABLE THE SAPCHECK MODEL NUMBER PRINTED ON THE
BOTTOM OF THE CONTROLLER BOX. DO NOT RETURN THE PRODUCT TO THE
ORIGINAL PLACE OF PURCHASE WITHOUT A RETURN MERCHANDISE AU-
THORIZATION. DO NOT ATTEMPT TO OPEN THE SAPCHECK CONTROLLER
BOX YOURSELF. DOING SO MAY VOID YOUR WARRANTY AND MAY CAUSE
PERSONAL INJURY OR DAMAGE TO THE PRODUCT.
IMPORTANT! READ THIS FIRST !
SAVE THE PACKAGING!
Should you need to return SapCheck for any reason, you will need to send it
back in its original carton in order to reduce the risk of possible damage dur‐
ing shipping. Shipping damage may not be covered under the product war‐
ranty if SapCheck has not been properly packaged in its original container
prior to shipment.
B Y B—C C
Before you begin your installaon, check to be sure that there is sufficient cell
phone signal strength at your sugarbush for SapCheck to operate.
Note: If you purchased your SapCheck unit from a dealer, you will need to
first contact The Bosworth Company to purchase a SapCheck Support Plan
for your unit. (See page 20 for details.) Purchasing a plan will allow your
SapCheck device to be assigned a SapCheck phone number to communicate
on a cellular network. If you purchased your SapCheck directly from The
Bosworth Company, then a phone number has already been assigned to
your SapCheck, and your unit is ready to send and receive text messages.
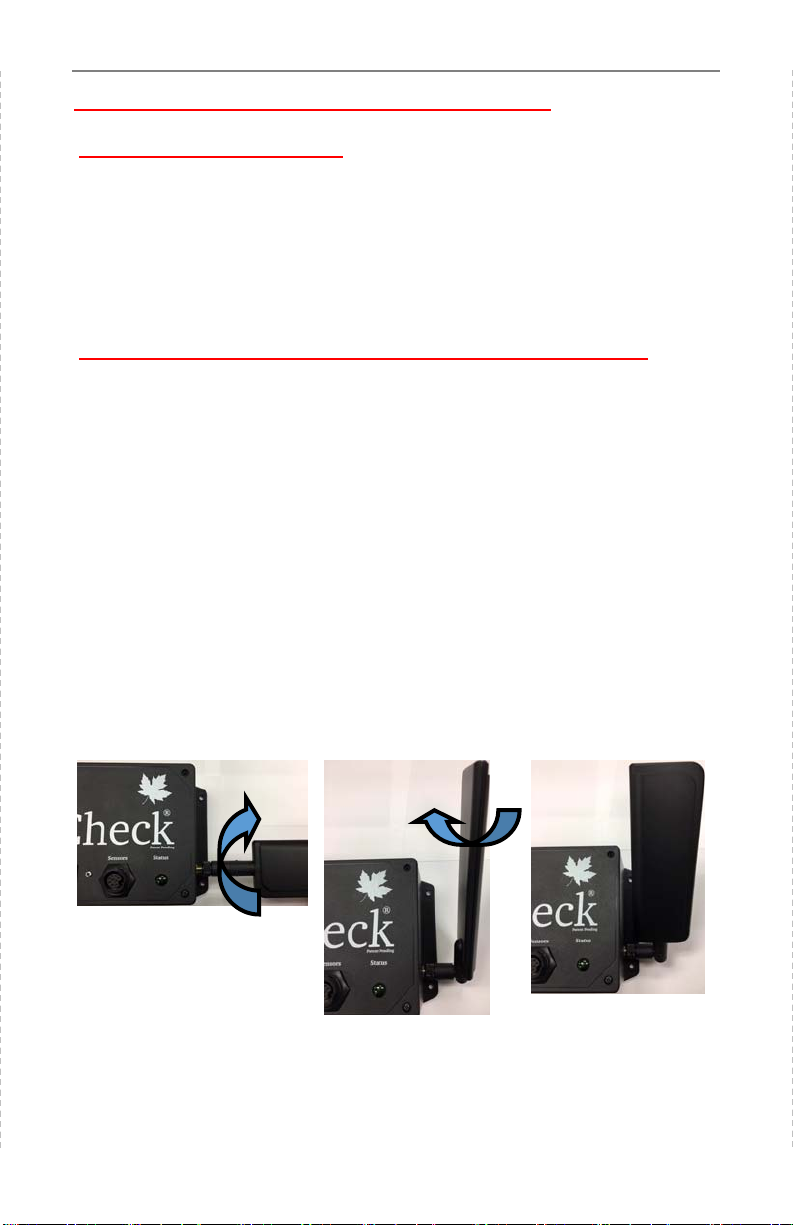
Remove the SapCheck Controller from the packaging and aach the antenna
to the box as shown in the figures below.
Figure 1a. Screw the an‐
tenna into the antenna
port on the side of the
SapCheck Controller.
Figure 1b. Flip the
antenna up. Opon‐
ally, rotate the an‐
tenna so that the flat
side faces forward.
Figure 1c. An‐
tenna installed in
oponal rotated
orientaon.
3 Doc M-PR-09-45.120119.1
The Bosworth Company
SapCheck User’s Guide

Bring the SapCheck Controller and power cord to your sugarbush. Be sure to
have the cell phone with you that is going to funcon as the Command Num‐
ber.
While at your sugarbush, connect the SapCheck Controller to power. If there
is sufficient cell phone connecvity at the sugarbush, then within approxi‐
mately two minutes aer powering on, SapCheck will send a text message to
the Command Number, indicang the soware version that is running. You
can text the command “Get signal” to SapCheck and it will return a percent
indicator of cell phone signal strength.
If you do not receive this text message, or if the percent signal strength is
below 10%, then there may be insufficient cell phone signal strength at your
sugarbush for SapCheck to operate.
In this case, you may return SapCheck for a full credit if you act within 15
days of date of purchase and if you return SapCheck in its original shipping
carton.
C C (C’)
4
Doc M-PR-09-45.120119.1
SapCheck User’s Guide
The Bosworth Company

I
SapCheck requires 120 VAC power to the controller, and it can control vacu‐
um pumps that operate on 120 VAC. Vacuum pumps up to 1/2 Hp can be
directly controlled with SapCheck.
However, SapCheck is not limited to controlling pumps that plug directly into
the SapCheck Controller. SapCheck can be used to control power to any
electrical device that is powered by 120 VAC and does not draw more than
370 was of power. This includes the possibility of controlling 120 VAC re‐
lays that control larger pump equipment.
SapCheck operates by sending and receiving text messages over a cellular
network. To operate properly, cell phone communicaons must be available
at the sugarbush, but only to the extent of being able to send and receive
text messages.
Figure 2
SapCheck is used to remotely monitor and control vacuum pump operaon
at maple syrup sugarbushes. It consists of a controller together with three
(3) sensors and associated connecng wires to monitor vacuum and tem‐
perature condions at the sugarbush. SapCheck also sends an alert when
the sap in the collecon tank has reached a user‐specified target level.
Doc M-PR-09-45.120119.1
5
The Bosworth Company
SapCheck User’s Guide

S
SapCheck should not be used to power any device that requires more than
370 was of power. Using SapCheck with such a device could pose a risk of
fire or electrical shock.
The SapCheck controller requires protecon from the elements. The unit
should be deployed in a dry environment and should not be operated in
temperatures below 20°F (-6°C) or above 90°F (32°C)
Under no circumstances should the SapCheck controller be opened or disas-
sembled. Tampering with the SapCheck equipment will void the warranty.
Each SapCheck unit has an associated phone number that is used for sending
text messages to it. If you purchased your SapCheck unit directly from The
Bosworth Company, that phone number has already been assigned to your
device and your unit is ready to send and receive text messages.
If you purchased your unit through a dealer, you must call The Bosworth Com‐
pany (1‐888‐438‐1110) or visit the company website at hps://
thebosworthco.com/acvate to purchase a support plan that will provide the
cell phone communicaons necessary for SapCheck to operate. When you
purchase a support plan, your SapCheck unit will be acvated and you will
receive your SapCheck’s phone number.
To purchase a support plan you will need to provide the SapCheck ID # printed
on the boom of the SapCheck Controller. (Figure 3 shows an example of a
SapCheck with ID # “D0000XT003”.)
Figure 3
Example of SapCheck ID # printed on boom of SapCheck controller:.
6
Doc M-PR-09-45.120119.1
SapCheck User’s Guide
The Bosworth Company

SapCheck Controller That poron of the SapCheck product that contains the
acve electronics of the product. The product ID # is print‐
ed on the boom of the Controller unit.
Command Number SapCheck will only receive text commands from cell phone
numbers that it recognizes. Each of these numbers is re‐
ferred to as a Command Number. The “Set User” text com‐
mand can be used to add or delete cell phone numbers
from this list.
SapCheck Phone
Number
This is the phone # to which you will send text messages to
your SapCheck device. You can add this phone # to your
“Contacts” on your cell phone under the name “SapCheck”.
(Note: if you have more than one SapCheck device, you may
want to list each in your Contacts giving it a unique name,
such as “SapCheck—Marshfield Rd”.)
Service mode When service mode is turned on, SapCheck will only re‐
spond to text commands sent from The Bosworth Compa‐
ny’s service support line. This mode is only acvated upon a
user’s request and allows Bosworth to send and receive
diagnosc text messages to the unit for troubleshoong
purposes.
Acvated A SapCheck unit is “Acvated” when its wireless communi‐
caons components have been configured to send/receive
text messages on a cell phone network. To be acvated, a
SapCheck unit must be covered by a Support Plan. An ac‐
vated SapCheck has an assigned SapCheck phone #.
Inacve A SapCheck unit is “Inacve” if its wireless communicaons
components have not been configured to send/receive text
messages. An inacve SapCheck unit has not been assigned
a SapCheck phone #.
Deacvated Unless a customer purchases addional support plan cover‐
age, a SapCheck unit with an assigned phone # is Deacvat‐
ed once the term of the Support Plan ends. When a Sap‐
Check unit is deacvated, it can no longer send/receive text
messages and it no longer retains its originally assigned
SapCheck phone #. If a new Support Plan is purchased, a
new phone # is assigned to the unit and communicaons
are restored for the length of the new Support Plan.
7 Doc M-PR-09-45.120119.1
The Bosworth Company
SapCheck User’s Guide

Figure 4
SC C
8
Doc M-PR-09-45.120119.1
SapCheck User’s Guide
The Bosworth Company
SapCheck Controller (A)
Tank float switch (B)
12’ insulated float switch cable (C)
Wire assembly consisng of Male Sensor Connector Plug (D) with
temperature sensor (E) and male vacuum sensor connector (F) and
2 terminated Float Switch wires (G)
Vacuum Sensor transducer with female connector (H)
Controller Power Cord (J)
“Power In” Receptacle on Controller (L)
“Power Out” Receptacle on Controller (M)
Mul‐sensor connector (N)
Float Switch By‐pass wire (P)
Antenna (Q)
A
B
C
D E
F G
H
J
M NL
Q
P

B Y B
The SapCheck Controller unit must be co‐located near your pump. It should
be installed in a dry, venlated enclosure that protects it from the elements.
These instrucons assume that SapCheck will be installed in the same enclo‐
sure that contains your vacuum pump.
Your SapCheck unit has been pre‐configured to send text messages to the
cell phone number (a “Command Number”) you provided. You can send
text messages to your SapCheck unit at the SapCheck phone number listed
with this installaon note. We suggest you add this phone number to your
“Contacts” on your cell phone, giving it the name “SapCheck” or, if you have
more than one SapCheck unit, a name referencing the sugarbush locaon
where the unit is deployed. That way, you will be receiving and sending text
messages either from/to “SapCheck” or from/to the sugarbush locaon
where SapCheck is operang.
T
I
I S
1. Locate the SapCheck controller (A) within your pump enclosure. (Make
sure that you have previously installed the antenna (Q) onto the control‐
ler. (See page 3 for details.)
2. Aach the Male Sensor Connecon Plug (D) to the Female Connector (N)
on the top of the SapCheck box.
3. Note: If you do not wish to install the Tank Float Switch provided, simply
connect the two Float Switch (G) wires coming from the Male Sensor
Connector Plug (D) to the Float Switch By‐pass wire (P).
4. Note: The tank float switch (B) is to be installed in your sap collecon
tank. The maximum tank wall thickness that the float switch can accom‐
modate is 3/8 in. The switching end of the float switch must be installed
poinng down.
9 Doc M-PR-09-45.120119.1
The Bosworth Company
SapCheck User’s Guide
Drill bits Other
9/32” ‐Pump enclosure hole for tempera‐
ture sensor
1/8” NPT tap
21/64” ‐Starter hole for vacuum transduc‐
er (to be tapped 3/8” NPT)
Electrical tape
3/8” ‐Pump enclosure hole for float switch
cables
Teflon tape
13/32” ‐Float switch hole in sap collecon
tank (Drill 2‐34” above alert level.)
Adjustable wrench (for installing tank float
switch and vacuum transducer
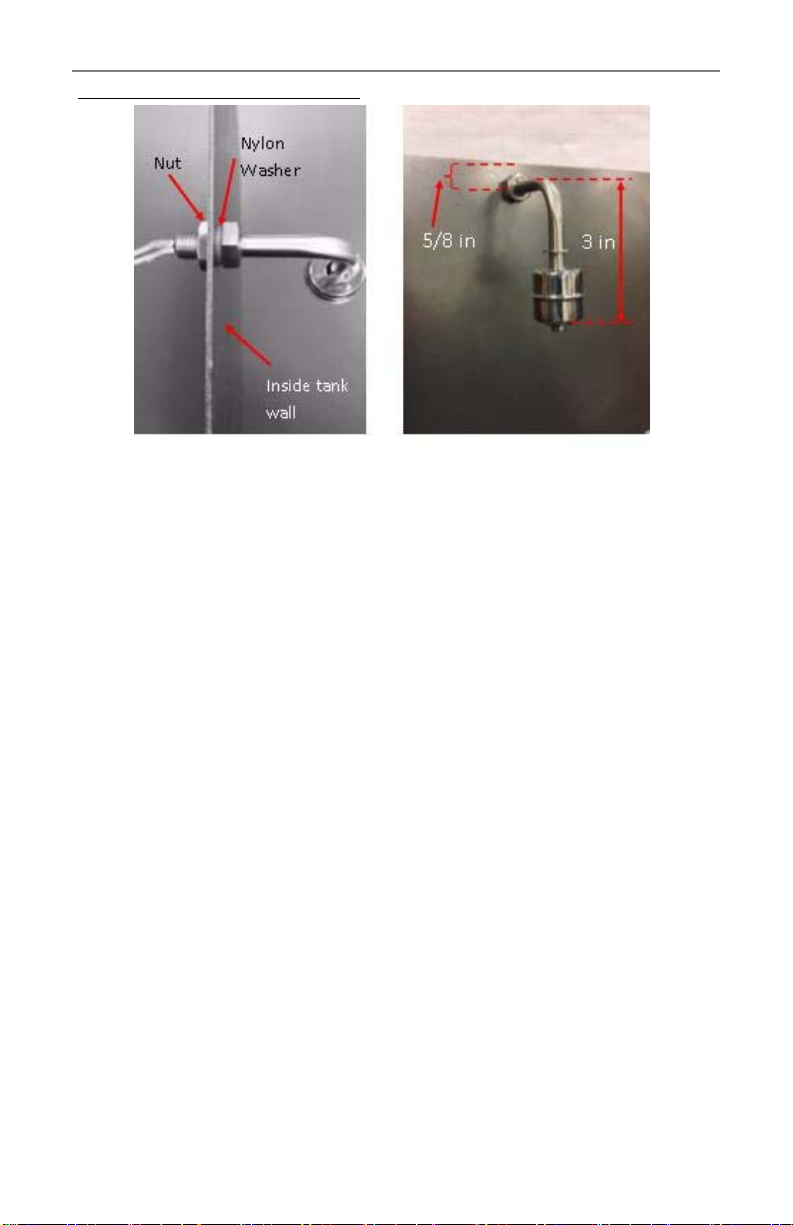
5. Determine the desired sap level height in your collecon tank at which
you want the SapCheck unit to send you a Sap Alert Level message. Us‐
ing the 13/32” drill bit, drill a hole 2‐3/4” above this height in your tank
to mount the float switch. Remove the nut from the Float Switch (G) and
pass the float switch wires through this hole from inside the tank wall
out. (Ensure that the nylon washer sits between the inside tank wall and
the interior float switch nut.) Pass the nut over the wires on the outside
and secure the nut onto the exposed threads of the tank float switch
using an adjustable wrench.
6. Drill a 3/8” hole in the pump enclosure near where the SapCheck Control‐
ler is to be located. Pass the end of the 12’ float switch cable (C) through
this hole and connect the cable to the SapCheck Float Switch wires (G)
using the red Posi‐Tap connectors. (See Figure 6.) Wrap the connec‐
ons with waterproof electrical tape. (Note: If your sap collecon tank is
further than 12 feet from the SapCheck Controller, you can splice addi‐
onal wires onto the exisng Float Switch wires without affecng the
operaon of the Float Switch.).
Figure 5a pictures tank wall from above, showing the installed float switch with
exterior nut holding switch in place. The nylon washer fits between the inside
nut (non‐rotang) and inside tank wall to ensure secure fit with no leakage.
Figure 3b shows installed float switch, with boom of switch roughly 3‐1/2 in
from top of tank. Center of hole drilled to accommodate float switch (13/32 in
diameter) was located 5/8 in from top of tank.
Figure 5b View from inside tank
Figure 5a View from above
I S (’)
10
Doc M-PR-09-45.120119.1
SapCheck User’s Guide
The Bosworth Company

I S (’)
8. Drill a 9/32” hole in the pump enclosure box near where the SapCheck
Controller is located and pass the temperature sensor (E) from inside the
enclosure to the outside. (See Figure 7.) Ensure that the end of the
temperature sensor probe is exposed to the outside temperature.
Figure 7bFigure 7a Figure 7c
11 Doc M-PR-09-45.120119.1
The Bosworth Company
SapCheck User’s Guide
Figure 6a Figure 6b Figure 6c Figure 6d
(6a) Remove red nut from one of the Posi‐tab terminals on the 12’ float switch
cable and insert one of the bared end float switch wires through the red nut. (6b)
Insert the bared end wire into the other end of the Posi‐tab terminals. Screw the
red nut from (6a) onto the Posi‐tab terminal in (6b) into which the float switch
wire has been inserted. When the red nut is completely screwed onto the Posi‐
tab terminal, pull on the float switch wire (6d) to test that a solid connecon has
been made. Repeat to connect the other float switch wire to the remaining float
(7a) shows temperature probe being inserted through 9/32” diameter hole in floor
of pump enclosure box. (7b) shows temperature sensor installed through a hole
in the floor of the pump enclosure box. (7c) shows the metal end of the tempera‐
ture probe located outside and below the pump enclosure box. The metal end p
of temperature sensor must be exposed to the outside air to correctly register
outside temperature. The probe p should be located at least 12 inches away
from the pump enclosure box so that it does not register heat being radiated in
the area immediately near the box by the equipment operang within.
9/32” diameter
I S (’)
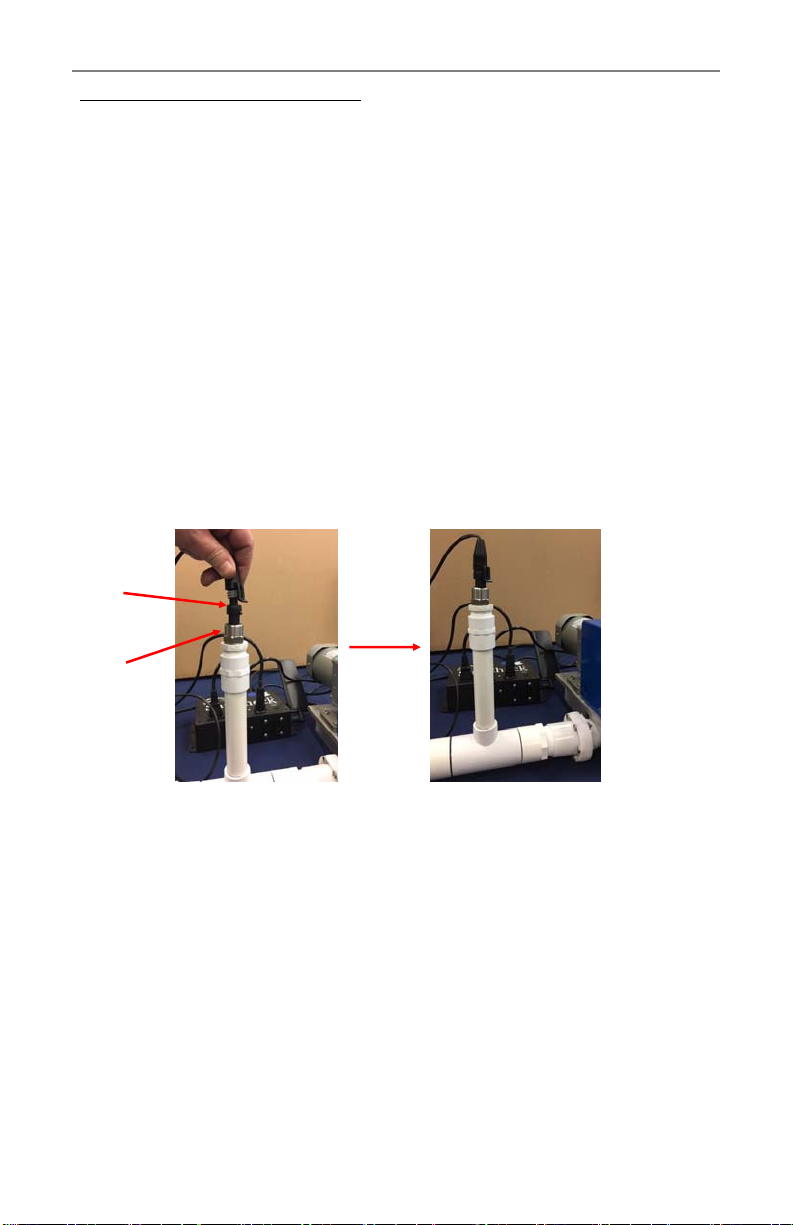
9. For best results, SapCheck’s vacuum sensor should be installed so that it
avoids coming in contact with sap. We recommend loing it approxi‐
mately 6 inches above the mainline near the pump inlet. This can be
accomplished by installing a T‐fing in the mainline near the pump that
can accommodate a 6‐inch length of tubing terminated with a plug. (See
Figure 8.)
Tap a 1/8” NPT hole in the tubing plug. (First drill a 21/64” hole and
then use a tapping tool to create a 1/8” NPT tap inside the hole.) Note:
Locate this tapped hole so that it can connect to the SapCheck Controller
using the approximately 30” long wire coming from the Controller and
terminang in the male vacuum sensor connector (F). Using an adjusta‐
ble wrench, install the vacuum sensor transducer (H) into the tapped
hole, using Teflon tape for a leak‐proof connecon. Connect the male
vacuum sensor plug (F) into the female receptacle on the vacuum sensor
transducer (H). (See Figure 8.)
Figure 8
10. Connect your vacuum pump to 120 VAC Out power receptacle (M) on
the SapCheck Controller. If your vacuum pump has an ON/OFF switch,
set it to the ON posion.
11. Connect the female end of the Controller power cord (J) into the male
120 VAC In power plug (L) on the Controller and plug the other end of
this cord into 120 VAC power. The green light on the SapCheck Control‐
ler will illuminate. Within 2 minutes, you will receive a “Monitoring Sys‐
tem is ON” text message on the cell phone set up as the Command Num‐
ber for your device. (Ensurethatyourcellphoneispoweredonandhas
recepon.)
SapCheck is now ready to receive and respond to text message commands
from your cell phone to monitor and control your vacuum pump operaon.
12
Doc M-PR-09-45.120119.1
SapCheck User’s Guide
The Bosworth Company
H
F

SC O
When SapCheck receives a text message from a Command Number, it will
always reply by texng back a confirming message. This indicates that Sap‐
Check has received and processed the text message command that you sent.
M F—A SC Q (?)
To ask SapCheck a queson, you simply begin the text message with a ques‐
on mark (?) or the word “get”. SapCheck can provide you with temperature
and vacuum informaon as collected from its temperature and vacuum sen‐
sors. Addionally, SapCheck will tell you whether or not the level of sap in
your sap collecon tank has reached the tank float switch. The “?” (get)
commands allow you to inquire about the readings from these sensors:
“?temp” OR “get temp” returns current temperature
“?vac” OR “get vac” returns current vacuum
“?tank” OR “get tank” returns a message indicang whether or
not the sap has reached the sap alert level
(Note that the sap alert level corresponds to the height at which
you have installed the float switch on your sap collecon tank.)
Addionally, you can send the following text messages:
“?status” OR “get status” returns a message indicang current
temperature, vacuum, tank full status and pump operaon state.
Note: This is the most efficient way to monitor condions at the
sugarbush as it returns all informaon in one text message, as
opposed to mulple individual messages for each piece of infor‐
maon.
“?sengs” OR “get sengs” returns a message indicang the
values of all the control or alert sengs that you have previously
defined.
“?version” OR “get version” returns the current version number
of the SapCheck soware installed in the Controller.
13 Doc M-PR-09-45.120119.1
The Bosworth Company
SapCheck User’s Guide

SC O
“?help” OR “help” returns a text message lisng all the text mes‐
sage commands that SapCheck recognizes. The “?help” command is
really the only SapCheck command you need to remember if you do
not have access to your User’s Guide.
S V A
Commands that set various values for alert or temperature‐based pump con‐
trol are preceded by the equals sign, “=“, or you can substute “set “.
To set the vacuum alert level, send the text message
=vac warning <value> ORset warning <value>
For example, to set the vacuum alert level to 10 in Hg, send the text message
=vac warning 10 ORset warning 10
If the vacuum measured by SapCheck’s vacuum sensor falls below the previ‐
ously specified alert level, SapCheck will send the following message to your
cell phone:
Low Vacuum Warning <nn> in. Hg
The <nn> value is the current vacuum reading.
If you cannot remember what value you have specified for the vacuum alert,
send the text message
?sengs OR get sengs
and it will return the values of all the sengs you have specified, including
the vacuum alert level.
S L A
When the sap in your collecon tank rises to the point where it causes the
float switch to close, SapCheck will text the following alert to your cell
phone:
Sap Alert Level
14
Doc M-PR-09-45.120119.1
SapCheck User’s Guide
The Bosworth Company

T A C
SapCheck can automacally turn your vacuum pump on/offbased on the tem‐
perature at your sugarbush. You can define one temperature at which the
pump will turn on, and a second temperature at which the pump will turn off.
For example, you might want to wait unl the temperature warms up to 33°F
before turning the pump on (to be sure that any ice inside the pump has melt‐
ed) and to keep running unl the temperature drops below, say, 30°F .
To set the temperature value at which the pump will turn on, send the text
message
=temp on <value>ORset temp on <value>
To set the temperature value at which the pump will turn off, send the text
message
=temp off<value>ORset temp off<value>
Finally, send the following text message to tell SapCheck to use these temper‐
ature sengs to automacally turn the pump on and off.
auto
Figure 9 below shows a sample texng session implemenng Temperature
Auto Control.
Figure 9
15 Doc M-PR-09-45.120119.1
The Bosworth Company
SapCheck User’s Guide

SC O
R S / S V P
To force your pump to turn on, simply text the following message to Sap‐
Check:
start
To force your pump to turn off, text the following message to SapCheck:
stop
If you have previously texted “auto” to SapCheck to turn on Temperature
Auto‐Control, texng either the “start” or “stop” commands will override the
Temperature Auto‐Control funcon.
To return the pump to Temperature Auto‐Control, simply text the “auto”
command again to Sapcheck.
C P N
SapCheck will only respond to text commands from cell phone numbers that
have been registered with it using the “set user” command. To add a new
Command Number for a user with cell phone xxx‐yyy‐zzzz, send the text mes‐
sage command below:
set user xxxyyyzzzz
To delete xxx‐yyy‐zzzz from the command number list, text:
set user xxxyyyzzzz del
Any acve command number can issue a SapCheck command, and all acve
command numbers will receive SapCheck alerts. Only the command‐issuing
number will receive a response to a SapCheck query.
To make a command number inacve, text
set user xxxyyyzzzz act off
Inacve command numbers will not receive SapCheck alerts, and SapCheck
will not process any command from an inacve number with the excepon of
the command to make the number acve
set user xxxyyyzzzz act on
The “get user” text command returns a list of all Command Numbers and
their status (acve/inacve).
16
Doc M-PR-09-45.120119.1
SapCheck User’s Guide
The Bosworth Company

SC O
S M
For product support purposes, SapCheck can be put into “service mode” by
texng the command
service control on
When in service mode, the unit will respond only to command texts from a
special Bosworth Service Number. While in service mode, all command‐
confirming texts are sent only to this number. When this command is iniat‐
ed, SapCheck texts the following message to the user:
SERVICE CONTROL ON
This message indicates that the unit is currently under "Service Control", and
that no commands will be accepted from any user Command Numbers while
in this mode.
When service mode is terminated, SapCheck resumes responding to texts
from the user’s Command Number. The user receives the following text to
indicate that service mode has been terminated:
SERVICE CONTROL OFF
C SC’V S
The SapCheck vacuum sensor is factory‐calibrated prior to product shipment.
However, it is possible for sensor accuracy to driover me. Addionally,
you may choose to calibrate SapCheck’s vacuum sensor to more closely
match vacuum readings of a vacuum gauge installed on your sap line. For
these reasons, SapCheck provides a set of commands that you can use to re‐
calibrate its vacuum sensor.
Re‐calibrang the SapCheck vacuum sensor involves seng two different
vacuum readings, one at zero vacuum (atmospheric pressure) and one at as a
high a vacuum as you can obtain on your system as read by your calibraon
gauge. Follow the steps below:
1) With your pump system running so that your calibrang gauge reads 0 in
Hg vacuum, text the following command to SapCheck:
set calibrate lowvac 0.0
2) With your pump system running so that your calibrang gauge reads as
high a vacuum reading as possible, text the following command to Sap‐
Check
17 Doc M-PR-09-45.120119.1
The Bosworth Company
SapCheck User’s Guide

18
Doc M-PR-09-45.120119.1
SapCheck User’s Guide
The Bosworth Company
set calibrate hivac <##.#>
where <##.#> is the vacuum reading on your calibrang gauge.
3) Aer seng the low and high vacuum points, text the following com‐
mand to SapCheck
set calibrate
The Calibrate command causes SapCheck to install the new calibraon
sengs and automacally reboot.
4) Issue the following SapCheck command to restart SapCheck:
reboot
When SapCheck restarts, the new calibraon sengs will be used for re‐
porng vacuum sensor readings.
SC A; M T M L
Your SapCheck Support Plan provides cellular network connecvity for your
SapCheck unit. SapCheck units become acve once a Support Plan is pur‐
chased. A SapCheck Support Plan provides up to 1500 messages per month
and can be purchased to cover from 1 to 6 months’ operaon. Both messag‐
es “sent” and “received” by the SapCheck unit are counted toward the 1500
monthly message limit. Addional charges apply for messages above the
1500 monthly message limit. Contact The Bosworth Company for more de‐
tails.

19 Doc M-PR-09-45.120119.1
SapCheck User’s Guide
L C
Text Message Command Meaning
auto Returns the pump to operang under sensor con‐
trol; sends confirming text
get help OR ?help Generates 4 successive text messages lisng all
user text commands recognized by SapCheck
get sengs OR?sengs Generates text message containing current temper‐
ature and vacuum warning sengs, as well status
report interval.
get status OR?status Generates text message containing current oper‐
ang state of pump (on/off), vacuum and tempera‐
ture readings, whether or not tank has reached sap
alert level in tank
get tank OR?tank Generates text message containing tank full status
(full or not full)
get temp OR?temp Generates text message containing current temper‐
ature reading (°F) measured by sensor
get vacuum OR?vac Generates text message containing current vacuum
reading (in of Hg) measured by sensor
get version OR ?version Reports soware/firmware version # that the unit
is running.
reboot Turns SapCheck offand then back on. When the
unit turns back on, it issues the “SapCheck is ON …”
message to the command number.
service control on Turns "Service Control" on. Unit will only respond
to text commands from the "Service" phone #.
set calibrate lowvac <##.#> Sets the low vacuum endpoint used for calibrang
the SapCheck vacuum sensor. Usually, this is cho‐
sen when the system is running so that a second,
calibrang gauge reads 0 in Hg. In that case, the
value 0.0 is entered for <##.#>
get user OR ?user Returns the list of SapCheck command numbers
and their acve/inacve status
This manual suits for next models
1
Table of contents
Other Bosworth Measuring Instrument manuals

Popular Measuring Instrument manuals by other brands

Pfeiffer Vacuum
Pfeiffer Vacuum IKR 251 operating instructions

Aplisens
Aplisens PMS-620N user manual

Guildline
Guildline 9334A Series Technical manual

BRUEL & KJAER
BRUEL & KJAER 2976 instruction manual

Level Developments
Level Developments LD-2M operating instructions

Bresser
Bresser 7007410CM3000 instruction manual


