Bottecchia ETR 3 User manual


2
Index
Safety precautions.........................................................................................................3
Quick start......................................................................................................................3
Display specications.....................................................................................................4
Display appearance, dimensions, and remote control...................................................4
Summary of the functions..............................................................................................4
Generaloperations.........................................................................................................5
E-bike switching on and off..............................................................................5
Display interface...............................................................................................5
Switching on and off of the walking assistance................................................6
Backlight adjustment........................................................................................6
Selection of the assistance level .....................................................................6
Battery indicator................................................................................................7
Engine power indicator ....................................................................................7
Error code indicator...........................................................................................8
General settings............................................................................................................8
Reset the trip odometer....................................................................................8
Setting the contrast...........................................................................................9
Km/mi convertion..............................................................................................9
Restore default settings ................................................................................10
Battery.........................................................................................................................10
Instructions for the user .................................................................................10
Warnings.........................................................................................................12
Specications..................................................................................................12
Batterycharger.............................................................................................................12
General Warnings...........................................................................................12
Operation: Battery Installation .......................................................................13
Operation: Removing the battery ..................................................................13
LED charge level............................................................................................14
Charge the battery...........................................................................................14
Warnings.........................................................................................................14
Store the battery .........................................................................................................15
Warnings.........................................................................................................15
Battery wear................................................................................................................15
Disposal......................................................................................................................16
Note.............................................................................................................................16

3
Safety precautions
• Please follow the instructions provided in this manual for your bike safety.
• Check the battery and battery charger regularly, especially the cable, the plug and
the battery casing. If battery or charger are damaged, they do not have to be used
until they are repaired.
• Please follow the safety precautions provided in this manual when using an e-bike.
This bike is not suitable for use by children, people with reduced physical, mental
or sensory abilities or without the necessary experience and knowledge unless they
are supervised or have received the right instructions for the use of the bike from a
person responsible for their safety.
• In case of any problem or error, consult the nearest dealer.
• Do not modify the electrical system. This could be illegal, cause malfunctions and
cause the warranty decay.
• The product has been designed to be water resistant so it can be used even when it
rains. In any case it cannot be deliberately immersed in water.
• Do not clean the e-bike with the hydro cleaner. If water enters some components,
problems may arise.
• When carrying the bike on a high-speed vehicle exposed to rain, remove the battery
and store it in a safe place away from rain.
• Handle the bike with care and avoid any kind of strong impact.
• Use a well-wrung wet cloth to clean the battery casing.
• For any questions regarding the maintenance and use of the product, please contact
the dealer where you purchased the bike.
• We advise you to use your e-bike for the rst time on a safe ground.
Quick start
In this section, you will nd important information and instructions to know your e-bike
as soon as possible.
• Read all safety precautions.
• Completely charge the battery
• If not assembled, assemble the battery
• Lock the battery with the use of the key.
• Press the “start” button on the remote control on the handlebars: the system will
switch on.
• Select the assistance level through the control unit.
The bike is now ready to be used.

4
Specications
• Rated voltage: 24V/36V/48V
• Rated working current: 10mA
• Max. working current: 30mA
• Off leakage current: <1uA
• The supply controller working current: 50mA
• Operating temperature: -20°C~ 60°C
• Storage temperature: -30°C~ 70°C
Appearance and Size
Display appearance and dimension gure (unit: mm)
Function Summary
The display can provide a lot of functions to t the users’ needs. The indicating
contents are as follows:
• Smart battery indicator
• Assistance-level indication
• Speed indication (incl. running speed, max. speed and average speed)
• Odometer and trip distance
• The push-assistance function
• Trip time indication
• Backlight On/Off
• Error code indication
• Motor-output indicator

5
Functional Area Distribution.
General Operation
Switching the E-bike System On/Off
Briey press the power button to switch on the E-bike system, to hold the power
button for 2s, the E-bike system will be switched off. When switching off the E-bike
system the leakage current is less than 1 uA. When parking the E-bike for more than
10 minutes, the E-bike system switches off automatically.
Display Interface
After switching on the E-bike system, the display will show Speed and Total Distance.
Pressing the “ ” button will show more riding data as belows:
Running Speed (Km/h) → Ave. Speed (Km/h) → Max. Speed (Km/h) → Trip Distance
(Km) → Total Distance (Km) → Trip Time (Min.) .
Display Interface.

6
Switching Push-assistance Mode On/Off
To activate the push-assistance function, hold the “-” button always. The E-bike’s
drive is activated at a uniform speed of 6 Km/h.The push-assistance function is
switched off as soon as you release the “-” button on the operating unit.
Push-assistance Mode.
Push-assistance function may only be used when pushing the E-bike. Danger of
injury when the wheels of the E-bike do not have ground contact while use the push-
assistance function.
Switching the Lighting On/Off
To switch on the lighting ( headlights, taillights and display backlight ), brie y press
the “ ” button.
Switching the Lighting Mode On/Off Interface.
Selezione del livello d Assistance Level Selection
The level of assistance of the E-bike drive when pedaling can be adjusted via the
display. The assistance level can be changed anytime, even during riding.
The default assistance level ranges from level “0” to level “5”.The output power is
zero on Level “0”. Level “1” is the minimum power. Level “5” is the maximum power.
To increase the assistance level, press the “+” button until the desired assistance
level is displayed; to decrease the assistance level, press the “-” button.

7
The default value is level 1.
Assistance Level “5”.
Battery Indicator
The ve battery bars represent the capacity of the battery. Each bar of the battery pack
symbol is equivalent to a capacity of approx. 20%. When the battery is in low voltage,
battery frame will ash to notice that the battery needs to be recharged immediately. When
there is only one bar, it has a maximum range of 5-10 km.
Battery Indicator.
Motor Power Indicator
The power of the motor can be read via the interface.
Motor Power Indication
8
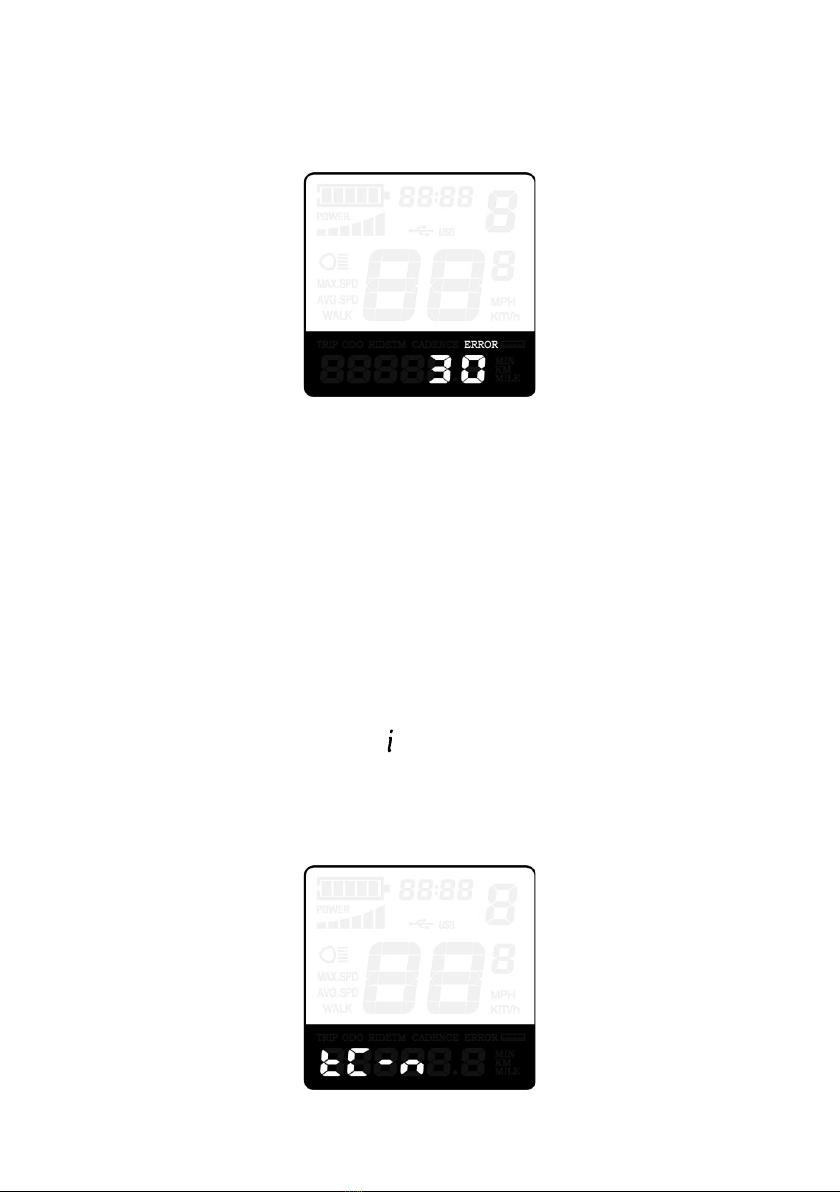
Error Code Indication
The components of the E-bike system are continuously and automatically monitored.
When an error is detected, the respective error code is indicated in text indication
area.
Indicazione del codice Error Code Indicatione
When an error code appears, contact a dealer to solve the problem.
General Settings
To access general settings menu, hold both the “+” button and the “-” button for 2s.
All the Settings are operated in the case of parking the E-bike.
Trip Distance Clearance
TC represents trip distance clearance setting.
To clear trip distance, press the “+” button or the “-” button until the Y is displayed.
To store a changed setting, press the “ ” button and then access backlight contrast
settings.
Trip Distance Clearance Settings Interface.

9
Backlight Contrast Settings.
bL represents backlight contrast settings. Level “1” is the low brightness, Level “2” is
the middle brightness, Level “3” is high brightness. The default level is “1”.
To modify the backlight brightness, press the “+” button or the “-” button to choose the
desired setting item.
To store a changed setting, press the “ ” button and then access the unit Conversion
Settings.
Backlight Brightness Settings Interface.
Unit km/mi Conversion
U represents unit settings, “1” is mile and “2” is kilometer. The default value is “2”.
To convert unit, press the “+” button or the “-” button to choose the desired setting
item, and then press the “ ” button to conrm.
To store a changed setting, press the “ ” button and then access trip distance
clearance settings.
Mile and Kilometer Conversion Settings Interface.
To store a changed setting, hold the “ ” button for 2s and then exit general settings.
If no operations are performed for one minute, the settings state will automatically
exit.
10
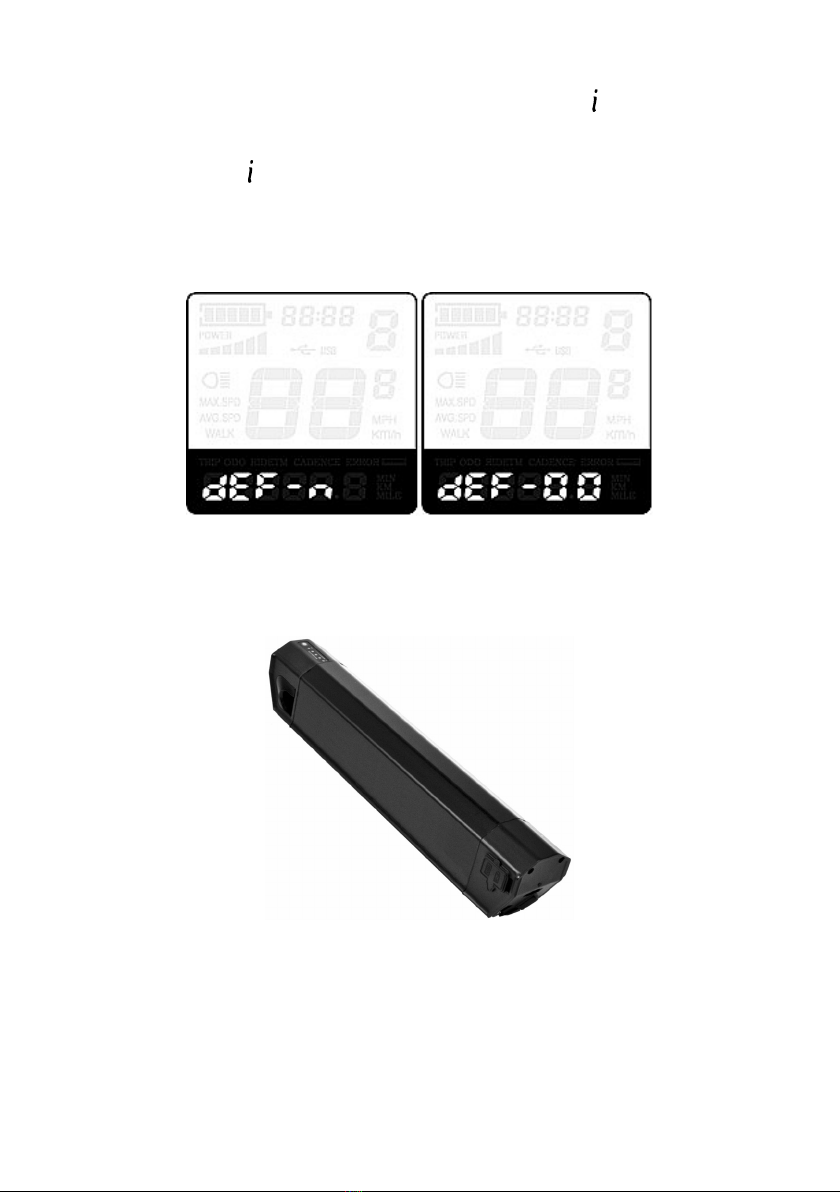
Recover Default Settings
dEF represents recover default settings. The default value is N.
To access recover default settings, hold both the “+” and the “ ” button for 2s.
Press the “+” or the “-” button to choose Y or N again. N means that do not recover
default settings. Y means that recovers default settings.
When it is Y, hold the “ ” button for 2s to recover default settings;
The display shows DEF-00 at the same time, and then return to general display state.
Recover Default Settings Interface
Battery
Integrated Battery.
Instructions for user
Please read the battery instructions carefully.
• Do not open, disassemble or puncture the battery under any circumstances, it could
cause serious damages.
• In the event of a fall, impact or similar events, do not continue to use the battery and
bring it to a dealer to check it as soon as possible.

11
• Use only the special charger provided with the battery.
• Disposal of used batteries must follow local disposal regulations.
Please read carefully the following before use.
• The battery is not supplied fully charged.
• Fully recharge the battery before using it for the rst time and before storing it.
• After the rst three charging cycles, fully charge the battery. This will give maximum
capacity to your battery. If the battery is continuously and completely discharged
during use and never fully charged, this will reduce its life.
• Never leave the battery completely empty and recharge it even after a short period
of use
• Do not destroy or disassemble the battery.
• Do not store the battery in a humid place to avoid damage.
• When removing the battery, be sure to follow the rules.
• Do not immerse in water and do not throw it on re.
• Do not drop the battery.
• When storing the battery for a long time, make sure it is charged for at least half of
its capacity, and charge it again at least every two months.
• Do not wrap it with any driver material to prevent it from any damage due to direct
contact between metal and battery.
• Store the battery in a dry place.
• The battery should always be kept away from children. Do not allow children to
remove the battery or play with it.
• If the battery seems to be in a strange condition, it seems dirty or has a strange
smell, do not use it.
Warnings
• The battery should not be left in direct sunlight to avoid overheating and to avoid the
decrease of its performance and duration.
• Do not touch a battery that leaks liquid. The liquid can cause problem to the skin.
If it meets the eyes do not rub but rinse immediately with clean water and go to the
hospital.
• Do not put in microwave or other kitchen ovens
• Keep the battery away from the mobile phones or from the charger if it is hot to the
touch, if it leaks liquids or has a strange smell. Dispose of it. Defective batteries can
cause overheating, they can catch re.
• If the battery is completely discharged, charge it as soon as possible. Leaving the
battery empty for long periods could damage its capacity.

12
Specications
Power 490 Wh
Charge time 4,5 h
Temperature during the charge 0°~45°C
Temperature during the discharge -20°~60°C
Range Min. 60 Km
Position intégrée dans le cadre
Battery charger
Battery charger
The charger is specically designed to charge lithium-ion batteries. It is equipped
with an integrated fuse and overload protection. Keep the battery charger away from
children and animals to prevent they damage the cable while playing and to avoid
malfunctions.
General warnings
• Children or persons with limited physical and mental abilities, except under the strict
control of an adult, should not use the charger.
• Make sure the charger is clean to avoid the risk of electric shock.
• Do not use the charger in places that are humid or full of dust.
• Avoid direct exposure to sunlight.
• Unplug the charger from the power outlet when it is not in use
• Use only the charger that is supplied with the electric bike
• Do not cover the charger while it is in use.
• When cleaning the charger, unplug it from the power outlet.
• When the charging time exceeds what indicated on the specications table, stop
charging.
13
• After charging, disconnect the battery from the charger and the charger from the
power outlet
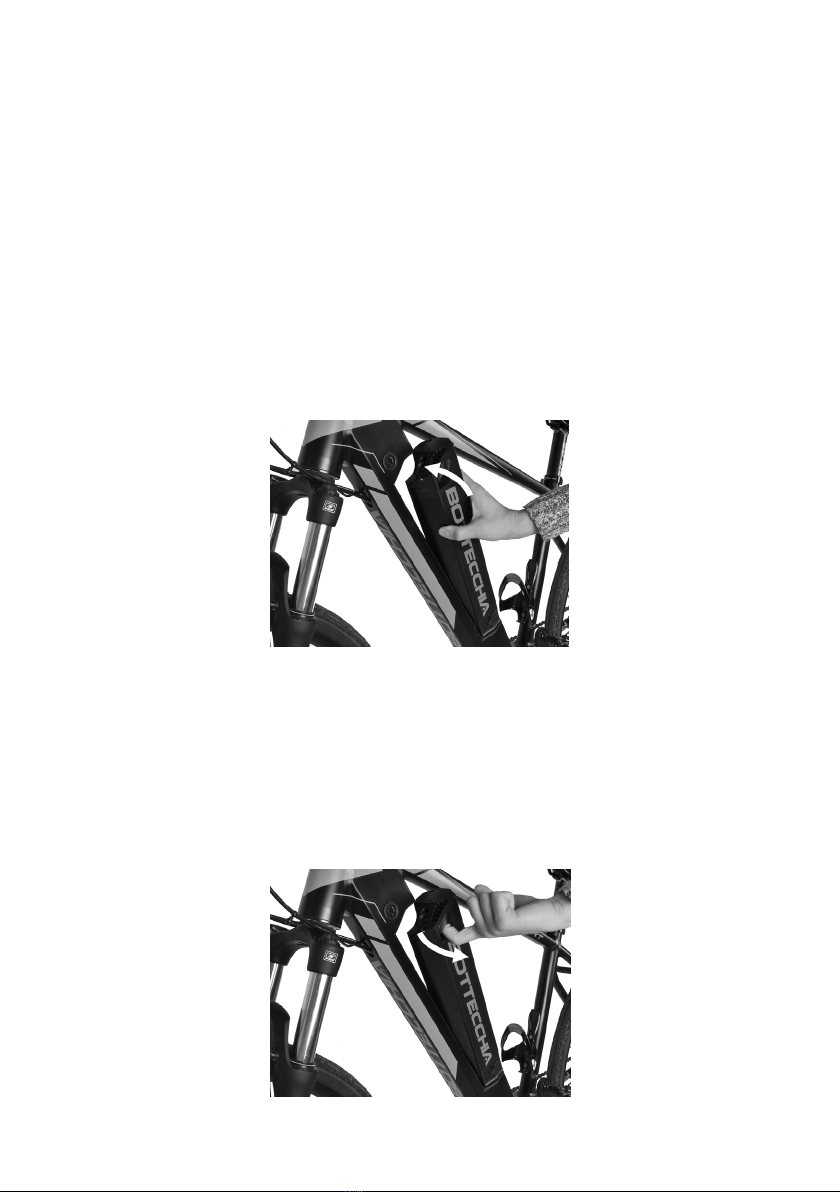
Operation: Battery Installation
For a correct installation of the battery, it must be inserted in the appropriate position
and locked. Without the contact with the battery the e-bike system does not work. To
insert and remove the battery, the safety lock must be unlocked. You can lock and
unlock the battery using the supplied key.
Proceed as follows to install the battery:
1. Unlock the battery safety lock
2. Place the battery in its housing inside the frame, rst with the bottom and then
rotate the upper part sideways towards the frame to insert it.
3. Turn the key to lock the battery.
4. Remove the key to avoid losing or breaking it.
Battery installation
Operation: Removing the battery
To remove the battery proceed as follows:
1. Turn off the electrical system.
2. Unlock the battery with the use of the key.
3. Remove the battery from the holder using the appropriate groove and pulling it
sideways
Battery removal

14
LED state of charge
Check the battery charge level by pressing the battery on / off button. The charge
level is indicated by leds, which are illuminated differently depending on the charge
level.
Charge the battery
You can charge the battery either when it is assembled on the bike or when it is not
assembled.
Lithium-ion batteries are not subject to memory so you can recharge the battery at
any time even after a short journey. Charge the battery at a temperature between 0 °
c and 45 ° c (ideal temperature around 20 ° c).
Read the charger instructions (inside the box) before charging the battery.
Proceed as indicated:
1. Insert the charger cable plug into the battery socket and then the charging socket
into the electrical socket.
2. As soon as the cable is plugged into the electrical socket, a red LED lights up.
3. When the charge is complete, the LED will be green.
Charging time depends on various factors. It can vary depending on temperature, age
and use and battery capacity. If necessary, you can nd information on charging times
in the battery technical data. When the battery is fully charged, the charging process
stops automatically. Remove the socket from the battery and the electrical outlet.
Use the own battery charger of the battery.
Be sure to use the correct main voltage. The correct main voltage required is
indicated on the charge. It must respect the voltage of the current source. The 230V
chargers can also operate at 220V.
Warnings
• Do not touch the socket with wet hands to avoid shock.
• Before using the charger, the cable and the socket, check that they are intact. If
there are any damage, do not use the charge to avoid electric shocks.
• Charge the battery in well-ventilated areas.
• Do not cover the battery and charger during charging.
• Charge only on dry and non-ammable surfaces.
IMPORTANT:
The battery must be fully charged at least every 2 months to avoid damage or
destruction of the cells.
If the charging time exceeds the usual charging time (see table), the battery may be
damaged. In this case, stop charging immediately and bring both the battery and the
charger to a dealer for a check.

15
Store the battery
If you do not use your e-bike for a long period, remove the battery, charge it (60-80%)
and store it in a dry place.
Warnings
• Check the charge level every 2 months and recharge if necessary.
• Store the battery in a place between -10 ° C and 35 ° C. Be aware that temperatures
around 45 ° C can be easily reached near the radiators and inside the vehicles left in
the sun.
• Avoid storing the battery in direct sunlight.
• To prevent the complete discharging, the battery will go into “sleep” mode after a
certain period.
• Do not expose the battery to temperatures lower than those allowed -10 ° c.
• If you notice that the battery becomes hot during use, during charging or during
storage or if it gives off a strong odor, changes its appearance or any other anomaly,
do not continue to use the battery but take it to a dealer for inspection before using it
again.
Battery wear
The battery has a life of about 700-800 recharge cycles.
As battery usage increases, battery capacity slowly decreases.
This also reduces the travel range of your e-bike and does not constitute a defect.
If the distance is still sufcient according to your needs, you can continue to use the
battery.
Battery life depends on various factors:
• Number of recharges (about 700/800 charge cycles).
• The age of the battery
• Storage and use conditions.
Obviously, the battery deteriorates and loses capacity even if it is not used. The life of
your battery may be affected by the following precautions:
• Charge the battery after each run even if it is a short journey. Lithium ion batteries
are not subject to memory effects.
• Avoid riding for long distances with high gears on high slopes with assistance at the
maximum level.

16
Disposal
If you replace parts of your e-bike, please take note of the local waste disposal
regulations. Used batteries and accumulators do not have to be disposed with normal
household waste.
Every consumer is required by law to dispose of used batteries at specic collection
points at a recycling center, a battery trading company, a specialist retailer or
manufacturer.
Batteries containing dangerous substances are marked with a symbol consisting of
a waste bin and the chemical symbol (Cd, Hg or Pb) of heavy materials, which are
responsible for their classication as pollutant.
For more information, please contact your local waste disposal service or your
municipal administration.
Exhausted batteries, accumulators with LEDs, NiMH (nickel metal hydride) or lithium
ion technology are to be considered dangerous goods
Lithium-ion batteries must be insulated in each pole with insulating tape to prevent
short circuits and potential dangerous reactions.
During the transport or the transfer of the exhausted batteries to the waste disposal
facilities, the ADR regulations (regulation for the transport of dangerous goods) have
to be applied.
In compliance with the European Directive 2006/66 / EC, defective or used batteries
must not be used, and according to the European directives 2002/96 / EC, electrical
equipment that can no longer be used must be collected separately and recycled in
an environmentally friendly way respecting the environment.
The drive unit, the battery, the display, the control element, the accessories and the
packaging must be recycled in an environmentally friendly manner.
Do not dispose electronic drive components with household waste.
Notes:
Table of contents
Popular Bicycle Accessories manuals by other brands


Specialized
Specialized Elite CylcoComputer user manual

Sigma
Sigma BC 16.16 manual

Playcore
Playcore Dero Setbacks installation instructions

VDO Cyclecomputing
VDO Cyclecomputing x3dw instruction manual

Cateye
Cateye RAPID X2 manual

buratti meccanica
buratti meccanica Clorofilla Trail Use and maintenance manual


