Bowers Sylvac XT3 User manual

Digital and
Digital Bluetooth®
Bore Gauge
Operating Instructions
Electronics
Digital et
Digital Bluetooth®
Al somètre
Notice d'utilisation
Electronique
Digital und
Digital Bluetooth®
Bohrungslehre
Bedienungsanleitung
Elektronik
Digital y
Digital Bluetooth®
Micrómetro de interiores
Instrucciones de funcionamiento
Electrónica
Digital e
Digital Bluetooth®
Alesametro
Istruzioni d’uso per
L’elettronica

Measuring Operation Mode opératoire Messung 5
LCD Display Affichage LCD LCD Anzeige 7
Button Functions Fonctions des boutons Tastenfunktionen 8
ON / OFF Marche / Arrêt Ein / Aus 9
Reset Parameters Remise à zéro Parameter reset 9
Set Mode Mode "SET" Set Modus 10
Reference Mode Mode "REFERENCE" Referenz-Modus 10
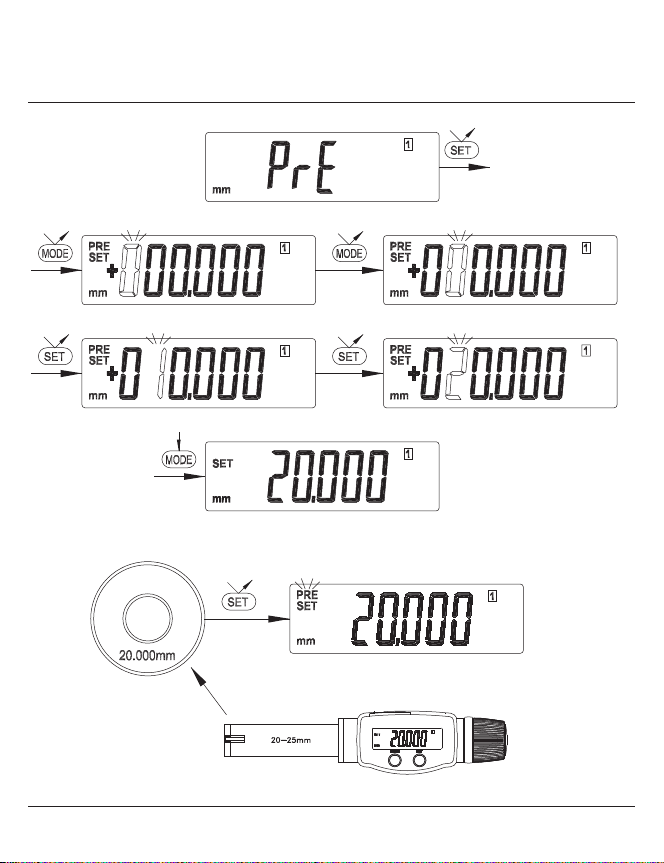
Preset Mode Mode "PRESET" Preset Modus 11
Unit Unités de mesure Messeinheit 12
Resolution Résolution Auflösung 12
Auto switch Off Touche auto. Marche/Arrêt Automatisches Ausschalten 13
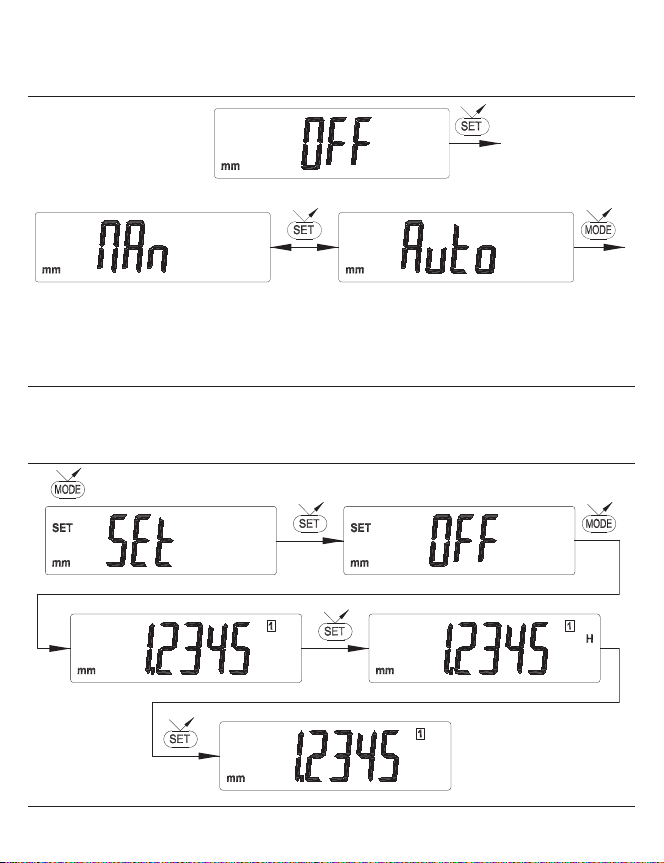
Hold measured value Blocage de la mesure affichage Einfrieren des Messwertes 13
Bluetooth®Mode Mode "BLUETOOTH®" Bluetooth®Modus 14
Bluetooth®Configuration Spécifications Bluetooth®Bluetooth®-Konfiguration 14
Technical Data Données Techniques Technische Daten 17
Changing Battery Changement de la pile Batteriewechsel 18
Data Transmission Transmission des données Datenübertragung 19
IP67 Protection Protection IP67 IP67 - Schutz 20
Warranty Garantie Garantie 20
Bluetooth®Brazil Certification 21
Bluetooth®Mexico Certification 21
Bluetooth®USA / Canada Certification 22
CONTENTS TABLE DES MATIERES INHALTSVER EICHNIS
3

4
Operazione di misura Operación de medición 6
Display LCD Pantalla LCD 7
Funzioni dei pulsanti Funcionamiento de teclas 8
ON / OFF Encender / Apagar 9
Resettaggio parametri Reinicio de parámetros 9
Modalità set Modo Set 10
Modalità riferimento Modo Referencia 10
Modalità preset Modo Preset 11
Unità Unidad 12
Risoluzione Resolución 12
Spegnimento automatico Auto apagado 13
Congelamento del valore di misura Congelar el valor medido 13
Modalità Bluetooth® Modo Bluetooth® 14
Configurazione Bluetooth® Configuración de Bluetooth® 16
Specifiche Especificación 17
Sostituzione della batteria Cambio de la batería 18
Trasmissione dati Transision de datos 19
Protezione IP67 Protección IP67 20
Garanzia Garantia 20
Bluetooth®Brazil Certification 21
Bluetooth®Mexico Certification 21
Bluetooth®USA / Canada Certification 22
CONTENUTO CONTENIDO

The gauge should be placed into
the appropriate measuring ring
to set or check the calibration.
Place the gauge into the bore to
be measured, ensuring that the
anvils sit squarely on the surface
of the bore. In each case twist
the ratchet controller three
times to achieve a set pressure
on the anvils.
When sets with alternative
measuring heads are used, make
sure that the head is screwed
firmly onto the electronic
reading head.
The surfaces between the
mating parts should be clean
and free from grit or swarf
before assembly.
Etalonner le micromètre en
utilisant la bague appropriée.
Placer le micromètre dans
l’alésage tout en s’assurant que
les touches de la tête de mesure
sont bien en contact avec la
surface de l’alésage. Tourner le
cliquet sur 3 tours complets afin
d’appliquer la pression optimale
au niveau des touches.
En cas d’utilisation avec des têtes
de mesure interchangeables,
s’assurer que la tête de mesure
est fermement vissée sur l’unité
de mesure. Les surfaces en
contact doivent être propres
(touches exemptes de graisses,
poussières..etc.).
Das Gerät sollte in einem
passenden Einstellring kalibriert
bzw. die Kalibrierung überprüft
werden. Beim Einführen in die
Bohrung darauf achten, daß die
Messeinsätze rechtwinklig in der
Bohrungsfläche stehen. Die
Ratsche sollte mindestens
dreimal angedreht werden,
damit der richtige Messdruck an
den Einsätzen gewährleistet ist.
Beim Austausch von Messköpfen,
immer darauf achten, daß der
Kopf fest auf den Halter
aufgeschraubt ist. Dabei müssen
die Anlageflächen sauber und frei
von Fett und Schmutz sein.
5
Measuring Head
Tête de mesure
Messkopf
Testa di misurazione
Cabeza de medición
Ratchett Controller
Cliquet de contrôle
Ratchet-Controller
Crichetto
Embrague de fricción
MEASURING OPERATION MODE OPERATOIRE MESSUNG

Lo strumento deve essere posizionato all'interno
dell'anello di riscontro appropriato al campo di
misura della testa, per azzerarlo o controllare la sua
taratura.
Posizionare il micrometro nel foro da misurare,
assicurandosi che le incudini poggino correttamente
sulle pareti del foro stesso. Ad ogni modo, per
sicurezza, girare a il cricchetto tre volte prima
di leggere la misura, in modo da esercitare la
giusta pressione.
Quando si cambia spesso testa, controllare che
questa sia correttamente avvitata in battuta
all'unità elettronica, e che tra le superfici a contatto
non ci siano sporco o residui prima di procedere
all'assemblaggio.
Introduzca el micrómetro en el anillo patrón
adecuado y realice una medición usando el
embrague de fricción, compruebe que la lectura
es igual a la del anillo y sino realice la calibración
del instrumento.
Introduzca ahora el micrómetro en el orificio
a medir. Gire el embrague de fricción para medir
el agujero y compruebe que los palpadores están
correctamente apoyados en 3 puntos. Cuando haga
tope gire el embrague 3 veces para asegurar una
presión uniforme.
Cuando se utilizan juegos con varios cabezales de
medición, asegúrese de que la cabeza se enrosca
firmemente sobre la unidad de lectura electrónica.
Las superficies de contacto deben estar limpias y
libres de grasa y suciedad.
6
OPERA IONE DI MISURA OPERACIÓN DE MEDICIÓN

LCD DISPLAY AFFICHAGE LCD
DISPLAY LCD PANTALLA DIGITAL
LCD-AN EIGE
Description of LCD
1. Measured Value
2. Positive / Negative sign
3. Indicator of Preset Mode
4. Indicator of Set
5. Battery life warning display
6. Indicator of Measuring Unit
7. Display 0,00005 inch
8. Data send indicator
9. Hold Indicator
10. Indicator of Reference Mode
11. Indicator of Bluetooth®
Description de l'affichage LCD
1. Valeur mesurée
2. Signe positif / negatif
3. Affichage de la fonction “Preset”
4. Affichage de la fonction “Set”
5. Indicateur de pile faible
6. Indicateur d’unité de mesure
7. Affichage 0,00005 pouce
8. Indicateur de transmission
9. Indicateur de gel de l'affichage
10. Affichage de la fonction “Référence”
11. Indicateur Bluetooth®
LCD-Beschreibung
1. Messwert
2. Positiv / Negativ- eichen
3. Preset Modus-Anzeige
4. Einstellen-Anzeige
5. Batterianzeige
6. Messeinheit-Anzeige
7. Auflösung 0,00005 inch
8. Datenübertragungsanzeige
9. Halten-Anzeige
10. Referenzmodus-Anzeige
11. Bluetooth®-Anzeige
Descrizione del Display
1. Valore misurato
2. Segno positivo / negativo
3. Indicazione della modalità Preset
4. Indicazione della modalità Set
5. Indicazione batterie scariche
6. Indicazione dell'unità di misura in uso
7. Display 0,00005 pollici
8. Indicatore invio dati
9. Indicazione del congelamento della lettura
10. Indicazione modalità riferimento
11. Indicazione della Bluetooth®
Descripción de la pantalla digital
1. Valor de la medición
2. Signo positivo / negativo
3. Modo preselección
4. Modo ajuste
5. Indicador de la batería
6. Unidad de medición
7. Pantalla 0,00005 pulgadas
8. Indicador de envio de datos
9. Indicador de bloqueo
10. Modo Referencía
11. Indicador de Bluetooth®
7

8
BUTTON FUNCTIONS FONCTIONS DES BOUTONS TASTENFUNKTIONEN
FUN IONI DEI PULSANTI FUNCIONAMIENTO DE TECLAS
KEY CLE SCHLÜSSEL IMPORTANTE
How to use buttons Synoptique fonctionnel Tastenbedienung Come usare i pulsanti Funciones de las teclas
Auto
Switch Off
menu
Bluetooth®
menu Resolution
menu
Unit
menu
Measuring
mode
Set
menu
Ref
menu
Preset
menu

9
ON / OFF MARCHE / ARRET EIN / AUS
ON / OFF ENCENDER / APAGAR
RESET PARAMETERS REMISE A ERO PARAMETER RESET
RESETTAGGIO PARAMETRI REINICIO DE PARÁMETROS
Switch On
Activer
Einschalten
Accendere
Encender
Switch Off
Désactiver
Ausschalten
Spegnere
Apagar
Wake Up
Sortie du mode “veille”
Aufwachen
Sveglia
Despertarse
Standby
Veille
Bereitschaft
En espera
Off
Désactivé
Aus
Spento
Apagado

10
SET MODE MODE “SET” SET MODUS MODALITÀ SET MODO SET
REFERENCE MODE MODE "REFERENCE" REFEREN MODUS
MODALITÀ RIFERIMENTO MODO REFERENCIA
11
PRESET MODE MODE “PRESET” PRESET MODUS
MODALITA’ PRESET MODO PRESET

12
UNIT UNITE MESSEINHEIT UNITÁ UNIDAD
RESOLUTION RESOLUTION AUFLÖSUNG
RISOLU IONE RESOLUCIÓN
13
AUTO SWITCH OFF TOUCHE AUTO. MARCHE/ARRET
AUTOMATISCHES AUSSCHALTEN SPEGNIMENTO AUTOMATICO AUTO APAGADO
HOLD MEASURED VALUE BLOCAGE DE LA MESURE AFFICHAGE
EINFRIEREN DES MESSWERTES CONGELAMENTO DEL VALORE DI MISURA
CONGELAR EL VALOR MEDIDO
Manual switch Off
Eteindre manuellement
Manuelle Abschaltung
Spegnimento manuale
Apagado manual
Auto switch off after approximately 4 hours
Arrêt automatique après environ 4 heures
Automatische Abschaltung nach ca. 4 Stunden
Spegnimento automatico dopo circa 4 ore
Apagado automático después de
aproximadamente 4 horas
14
BLUETOOTH®MODE MODE “BLUETOOTH®” BLUETOOTH® MODUS
MODALITÀBLUETOOTH®MODO BLUETOOTH®
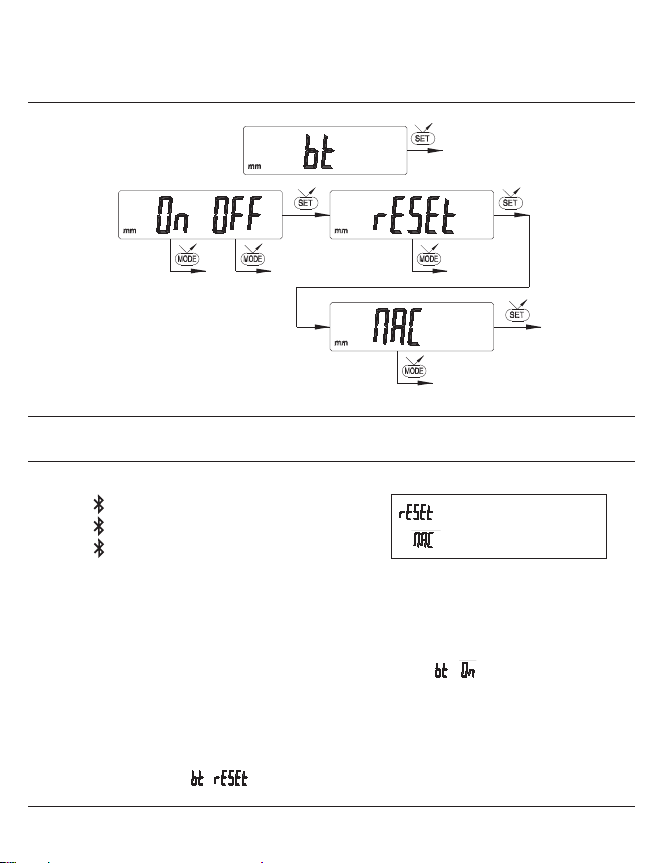
BLUETOOTH®CONFIGURATION
CONNECTION PROCEDURE
1. Symbol off..............disconnected mode
2. Symbol blinking.....advertising mode
3. Symbol on...............connected mode
Connection:
1. Activate Bluetooth®Smart compatible software and hardware (Master : PC, Display Unit).
2. Start the instrument. By default the Bluetooth®module is active and the instrument is available for
connection during 120s (advertising mode).
3. As soon as the device is detected, a connection is established automatically. If no connection is
established during 120s, reactivate the Bluetooth®module using the / menu.
4. Instrument is ready to communicate (connected mode).
Pairing:
Pairing with master is automatically done at first connection.
To connect the instrument to a new master (new pairing), it is necessary to clear all pairing information
on the instrument using the / menu.
- Clear pairing information
- Display the MAC address

15
CONFIGURATION BLUETOOTH®BLUETOOTH® - KONFIGURATION
PROCÉDURE DE CONNEXION
1. Symbole éteint.............mode déconnecté
2. Symbole clignote.........mode découverte
3. Symbole allumé...........mode connecté
Connexion:
1. S'assurer que l'application et le matériel Bluetooth®Smart compatible sont actives (Master : PC. unité
d'affichage).
2. Démarrer l'instrument. Par défaut le module Bluetooth®est actif et l'instrument est connectable durant
120s (mode découverte).
3. Dès que l'instrument est détecté la connexion est automatique. Si la connexion n'a pas été établie durant
les 120s, réactiver le module Bluetooth®via le menu /
4. L'instrument est prêt à transmettre (mode connecté).
Appairage:
L’appairage de l’instrument avec le maître se fait automatiquement à la première connexion.
Pour connecter un instrument à un nouveau
maître
(nouvel appairage) il est nécessaire d’effacer ses
informations d’appairage via le menu /
- Efface les informations d'appairage
- Affiche l'adresse MAC
VERBINDUNGSVERFAHREN
1. Kein Symbol...........keine Verbindung
2. Blinkendes Symbol...........bereit zur Verbindung
3. Stehendes Symbol...........Verbindung hergestellt
Verbindungsaufbau:
1. Stellen Sie sicher, dass die Bluetooth®Smart Anwendung und das Gerät kompatibel und aktiv sind
(Master : PC, Einheit).
2. Schalten Sie das Instrument ein. Die Bluetooth®-Funktion ist standardmäßig aktiviert und das
Instrument kann innerhalb von 120 s verbunden werden (Verbindung wird gesucht).
3. Sobald das Instrument gefunden wurde, wird die Verbindung automatisch hergestellt. Wurde
innerhalb von 120 s keine Verbindung hergestellt, aktivieren Sie Bluetooth®erneut über das
Menü /
4. Das Gerät ist bereit zum Senden (Verbindung hergestellt).
Kopplung:
Die Kopplung des Instruments an dem Master erfolgt automatisch bei der ersten Verbindung.
Um das Instrument mit einem neuen Master zu verbinden (Neue Kopplung), müssen diese Einstellungen
über das Menü / gelöscht werden.
- Kopplung aufheben
- eigt die MAC Adresse

16
CONFIGURA IONE BLUETOOTH®CONFIGURACIÓN BLUETOOTH®
PROCEDURA DI COLLEGAMENTO
1. Simbolo spento ...................modalità scollegata
2. Simbolo lampeggiante .......modalità scoperta
3. Simbolo acceso ....................modalità collegata
Connessione:
1. Assicurarsi che l'applicazione e il materiale Bluetooth®Smart compatibili siano attivi (Master : PC,
Display Unit).
2. Avviare lo strumento. Come impostazione predefinita il modulo Bluetooth®è attivo e lo strumento
è collegabile in 120s (modalità scoperta).
3. Da quando lo strumento è rilevato il collegamento è automatico. Se il collegamento non è stato
stabilito in 120s, riattivare il modulo Bluetooth®mediante il menu /
4. Lo strumento è pronto alla trasmissione (modalità collegata).
Accoppiamento:
L'accoppiamento dello strumento con la matrice avviene automaticamente al primo collegamento.
Per collegare uno strumento a una nuova matrice (nuovo accoppiamento) è necessario cancellare le
informazioni di accoppiamento mediante il menu /
- Cancellare le informazioni
di accoppiamento
- Visualizza l'indirizzo MAC
PROCEDIMIENTO DE CONEXIÓN
1. Símbolo apagado .............modo desconectado
2. Símbolo parpadeante .......modo detección
3. Símbolo encendido ..........modo conectado
Conexión:
1. Compruebe que la aplicación y el Bluetooth®Smart compatibles están activos (Master : PC, Monitor).
2. Encienda el dispositivo. El módulo Bluetooth®está activo por defecto y el dispositivo es conectable
durante 120 segundos (modo detección).
3. En cuanto se detecta el dispositivo, la conexión es automática. Si la conexión no se ha establecido
durante los 120 segundos, reactive el módulo Bluetooth®con el menú /
4. El dispositivo está listo para transmitir (modo conectado).
Emparejamiento:
El emparejamiento del dispositivo con el maestro es automático en la primera conexión.
Para conectar un dispositivo a otro maestro (nuevo emparejamiento), hay que eliminar su información
de emparejamiento desde el menú /
- Eliminar su información
de emparejamiento
- Muestra la dirección MAC

17
TECHNICAL DATA DONNEES TECHNIQUES TECHNISCHE DATEN
SPECIFICHE ESPECIFICACIÓN
Radio Frequency / Fr quence radio /
Funkfrequenz / Radiofrequenza /
Radiofrecuencia
2.4 Ghz
FHSS
<6ms
Open space / Espace Ouvert / Im Freien / Spazio aperto /
Espacio abierto : <15m
Industrial environment / Environnement industriel / Industrielles Umfeld /
Ambiente industriale / Entorno industrial : 1-5m
Blind/Push : up to 7 months (Value is sent from the instrument (button)
or requested from the computer).
Jusqu’à 7 mois (la valeur est envoyée de l`instrument
(bouton) ou sollicitée par l’ordinateur).
bis zu 7 Monate (Der Wert wird von dem Gerät gesendet
(Taste) oder vom Computer angefordert).
fino a 7 mesi (valore viene inviato dal (pulsnate strumento)
o richiesto dal computer).
hasta 7 meses (Valor se envía desde el (botón de
instrumento) se puede solicitar la computadora).
Saver : up to 5 months (The instrument sends value only when the
position has changed).
Jusqu’à 5 mois (l’instrument envoie les valeurs uniquement
lorsque la position a changé).
bis zu 5 Monate (das Gerät sendet die Werte nur wenn die
Position geändert hat).
fino a 5 mesi (Lo strumento invia valore solo quando la
posizione è cambiata).
hasta 5 meses (El instrumento envia valor sólo cuando la
posición ha cambiado).
Continuous : up to 2 months (Always connected with 4 values/sec).
jusqu’à 2 mois (Toujours connecté avec 4 valeurs/sec).
bis zu 2 Monate (Immer verbunden mit 4 Werte/sek).
fino a 2 mesi (sempre connessi con i 4 valori/sec).
hasta 2 meses (siempre conectados con 4 valores/seg).
Robustness / Robustesse /
Robustheit / Resistenza / Robusted
Latency / Latence / Latenz /
Latenza / Latencia
Range / Port e / Reichweite /
Portata / Alcance
Autonomy / Autonomie /
Autonomie / Autonomia /
Autonomia

18
CHANGING BATTERY CHANGEMENT DE LA PILE BATTERIEWECHSEL
SOSTITU IONE DELLA BATTERIA CAMBIO DE LA BATERÍA
CR2032 3 Volts
Lithium Coin Cell Battery
Pile CR2032 3 Volts
Au lithium de type "bouton"
CR2032 3 Volt
Lithium-Knopfzelle
CR2032 3 Volt
Batteria a bottone al litio
CR2032 3 voltios
Batería de litio de tipo botón

19
DATA TRANSMISSION TRANSMISSION DES DONNEES DATENÜBERTRAGUNG
TRASMISSIONE DATI TRANSMISIÓN DE DATOS

20
IP67 PROTECTION PROTECTION IP67 IP67 - SCHUT
PROTE IONE IP67 PROTECCION IP67
Please note the IP67 Protection rating for
the instrument contained in these
instructions applies to the electronics only.
WARRANTY GARANTIE GARANTIE
GARAN IA GARANTIA
Except for battery exchange only
the manufacturer has the ability
to dismount the electronics. Any
tampering will invalidate warranty.
Esclusa la sostituzione della batteria, solo
il costruttorè e autorizzato ad accedere all
interno dell'elettronica. Qualsiasi tentatativo
o manomissione farà decadere automaticamente
ogni garanzia.
La garantía cubre defectos de fabricación. Las
baterías no están incluidas en la misma.
Cualquier intento de manipular el equipo
invalidará la garantía.
A l’exception du changement de pile,
l’unité électronique ne peut être
démontée que par le fabricant, sinon la
garantie sera rendu nulle et sans effet.
Mit Ausnahme der Batteriewechsel
darf die Elektronik nur vom Hersteller
demontiert werden, sonst entfällt
jeder Garantieanspruch.
La protection IP67 vaut uniquement pour
l’afficheur digital.
Die IP67 Schutzkategorie gilt nur für
die Elektronik.
Il grado di protezione IP67 si intende
esclusivamente per l'elettronica.
La protección IP67 se aplica sólo a la unidad
electrónica.

21
BLUETOOTH®
BRA IL CERTIFICATION
BLUETOOTH®
MEXICO CERTIFICATION
Este equipamento opera em caráter secondário, isto é, não tem direito à proteção contra
interferência prejudicial, mesmo de estações do mesmo tipo e não pode causar interferência
a sistemas operando em caráter primário.
La operación de este equipo está sujeta a las siguientes dos condiciones: (1) es posible que este
equipo o dispositivo no cause interferencia perjudicial y (2) este equipo o dispositivo debe
aceptar cualquier interferencia, incluyendo la que pueda causar su operación no deseada.
Description of Bluetooth®Module:
This module is based on Nordic Semiconductor nRF8001 μBlue Bluetooth Low Energy Platform. The
nRF8001 is a single chip transceiver with an embedded baseband protocol engine, suitable for ultra-
low power wireless applications conforming to the Bluetooth Low Energy Specification contained
within v4.0 of the overall Bluetooth specification. The nRF8001, used in the current revision of
ISP091201, is a production product using a RoM for the baseband protocol engine.
Contiene módulo inalámbrico
Marca: Sylvac
Modelo: ISP091201D
IFT: RCPSYIS14-0655
Other manuals for Sylvac XT3
1
Table of contents
Other Bowers Measuring Instrument manuals


