Boyd night air User manual


Assembly Instructions
Night Air®Sleep System Assembly ..................................................................................3
Hand Control Operation
7105 6-Chamber Hand Control........................................................................................7
6003 6-Chamber Hand Control........................................................................................8
3604 2-Chamber Hand Control........................................................................................9
2504 2-Chamber Hand Control ......................................................................................10
Mattress Care ......................................................................................................12
Troubleshooting ..................................................................................................14
Warranty ..............................................................................................................17
Customer Care ....................................................................................................19
2
Contents

Assembly
uDecide where to put your Night Air®Sleep System
uMake sure there is an electrical outlet nearby
uAssemble your metal bed frame (sold separately)
If using a slat support system and not a Heavy Duty metal bed
frame, make sure that you position the slats evenly to support the
foundation. If your bed has fewer than three slats, we suggest
adding additional slats to ensure adequate support of your Night
Air®Sleep System.
uAllow 30-45 minutes to complete set-up process
3

4
Assemble the metal bed frame or
platform bed frame (sold separately)
Assemble the metal frame and place it where you
are going to put your bed. Leave space at the
head of the bed (2-3 feet, just during set-up) to
position the processor and for easy access to
connect the hoses.
1
Remove foundation from carton and
place on metal frame or slats
(sold separately)
Place the foundation on the frame (or slats),
leaving space at the head of the bed to
connect the hoses. Make sure the hand control
pockets on each side of the foundation are
located at the head of the bed.
2
Assemble mattress following separate
step-by-step instuctions included with
your air bed
Assemble air bed, making sure the air hoses (4
hoses for 6-chamber bed; 2 hoses for 2-chamber
bed) are protruding approximately 2 feet from the
back (head) of the mattress. Place mattress on
foundation, leaving space at the head of the bed
for access to hoses. Do not pull hoses forcefully.
3
Remove air processor from carton
and connect to mattress
Remove air processor from carton and place
directly under the hoses protruding from the
head of the mattress. Connect the color coded
hoses from the mattress to the corresponding
color coded nozzles on the processor. You will
hear a “click” when the hoses are securely
connected to the processor.
4

5
Connect hand controls to processor
Attach one hand control to the “LH” connector on
the side of the processor. Attach the other hand
control to the “RH” connector on the side of the
processor. As you are standing at the foot of the
bed, facing the head of the bed, “LH” refers to the
left side of the bed and “RH” refers to the right
side of the bed. (The hand controls are already
permanently connected to the 6003 processor)
5
Plug processor into a UL®listed surge
protector (UL®1449, 330 volt, 700 joule or higher)
Even though you can plug the processor into
a grounded three prong outlet, we recommend
using a surge protector to guard against
unexpected power surges.
Note: Your 20 year limited warranty does not
cover damage due to a power surge, regardless
of the source.
6
Enjoy you new Night Air®Sleep System
The air cores of your Night Air Sleep System
are fully inflated upon arrival. However, you may
want to engage the auto fill button (if available)
to reset each side of the bed to 100%. Once set-
up is complete, place the hand controls in the
convenient side pockets, and make up your bed
with deep pocket bed linens.
7

Hand Control Operation
6

7
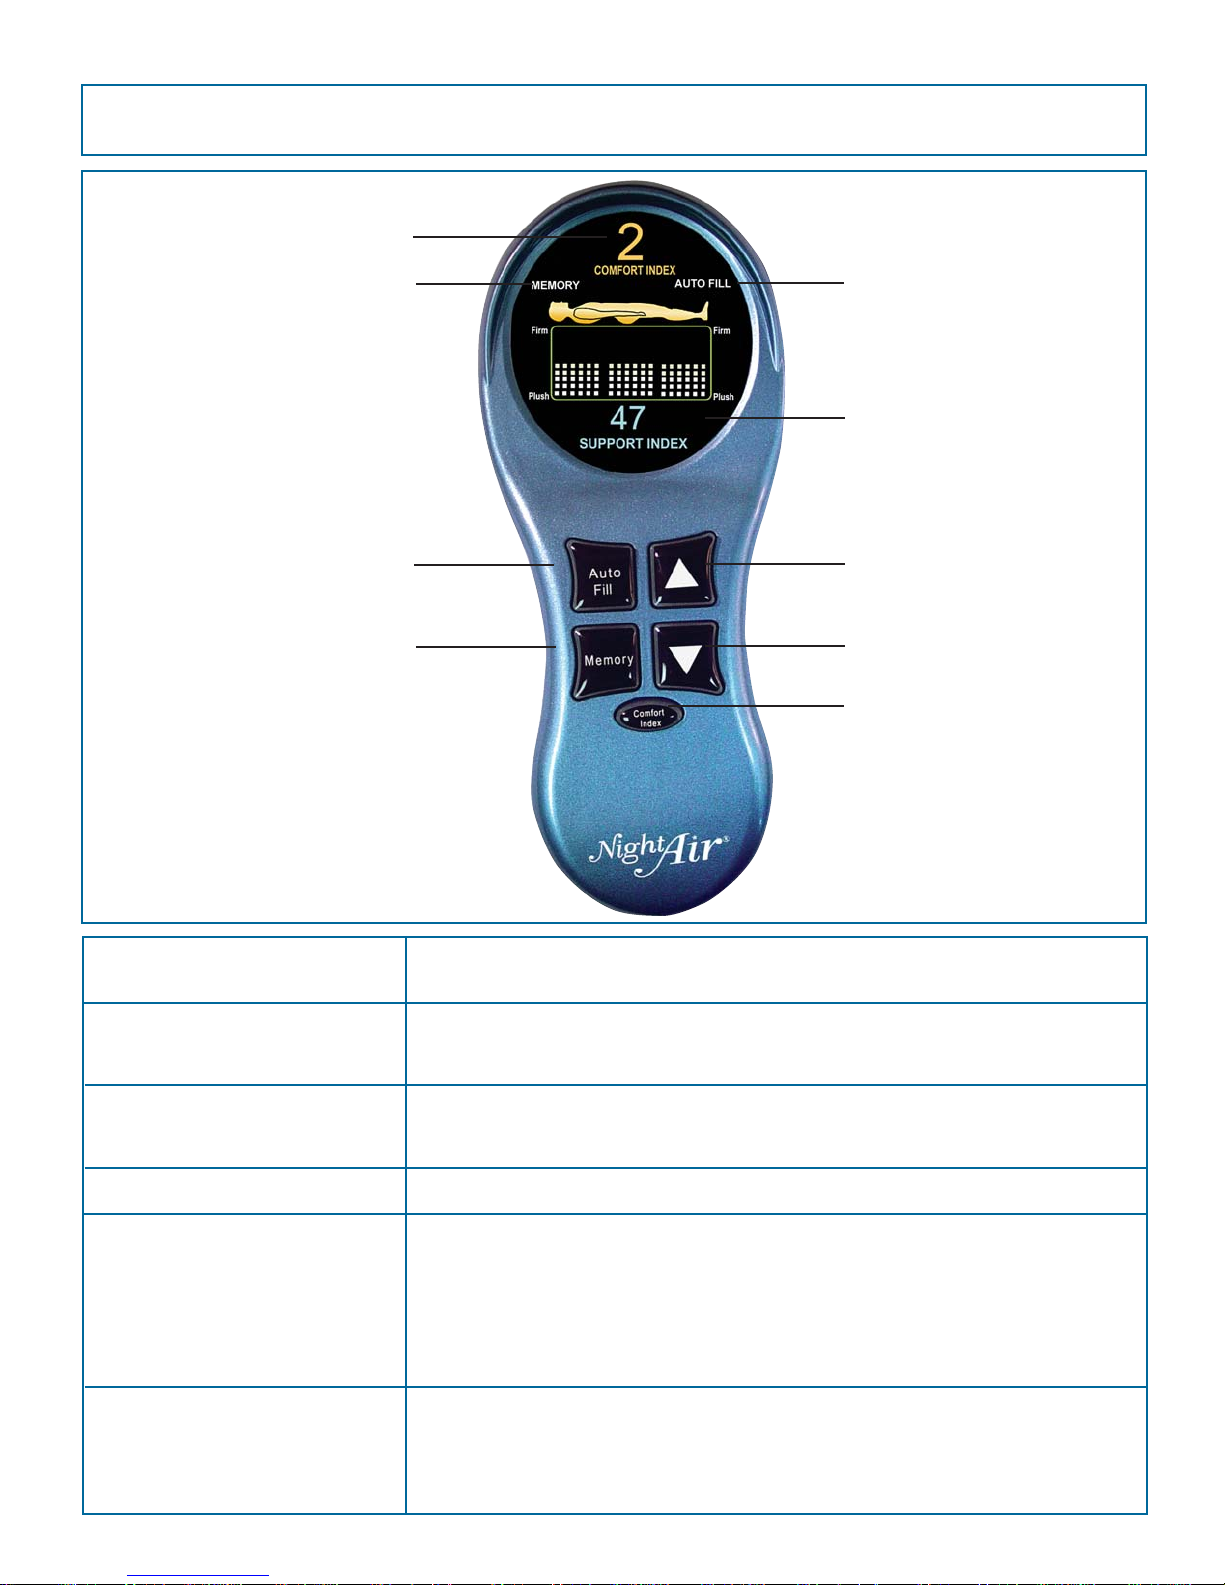
7105 6-Chamber Hand Control Operation
Auto Fill Indicator
Memory Indicator
Head/Foot Firmer pBriefly PRESS and RELEASE button to view the current Support Index™ settings.
PRESS and HOLD button to make the bed firmer until comfortable, then release.
Your Support Index™ will be displayed for 30 seconds for your reference.
Lumbar Firmer Button
Lumbar Plusher Button
Head/Foot Firmer Button
Head/Foot Plusher Button
Auto Fill Button
Memory Button
Comfort Index™ Button
Lumbar Firmer p
Support Index™ Numbers
Comfort Index Number
Head/Foot Plusher qBriefly PRESS and RELEASE button to view the current Support Index™ settings.
PRESS and HOLD button to make the bed plusher until comfortable, then release.
Your Support Index™ will be displayed for 30 seconds for your reference.
Lumbar Plusher q
Comfort Index Used at store level to calculate your Comfort Index™ from 1-4.
Memory
Place your perfect Support Index™ settings into memory by briefly PRESSING and
HOLDING until the Memory Indicator Icon flashes. Release button and your saved
settings will be displayed for 30 seconds. To return to your memory settings, briefly
PRESS and RELEASE and the processor will automatically inflate or deflate the
mattress to your last memory setting then automatically shut off. Your Support
Index™ settings will be displayed for 30 seconds. If at any time you wish to stop the
process, briefly press and release any button and the process will stop.
Auto Fill
Briefly PRESS and RELEASE and the air processor will fill the bed to until
completely full then automatically shut off. A digital Support Index™ of 100% will be
displayed for 30 seconds. If at any time you wish to stop the auto fill process, briefly
press and release any button and the auto fill process will stop. Using the Auto Fill
feature each morning when making the bed will give the bed a fuller appearance.
BUTTON FUNCTION

8
6003 6-Chamber Hand Control Operation
Lumbar Fill Level Indicator
Body Firmer pPRESS and HOLD button to make the bed firmer until comfortable, then release.
Your current fill level will be displayed by the LCD indicator light.
Body Firmer Button
Body Plusher Button
Lumbar Firmer Button
Lumbar Plusher Button
Lumbar Firmer p
Body Fill Level Indicator
Processor Activity Indicator
Body Plusher qPRESS and HOLD button to make the bed plusher until comfortable, then release.
Your current fill level will be displayed by the LCD indicator light.
Lumbar Plusher q
BUTTON FUNCTION
9
3604 2-Chamber Hand Control Operation
Auto Fill Indicator
Memory Indicator
Firmer pBriefly PRESS and RELEASE button to view the current Support Index™ settings.
PRESS and HOLD button to make the bed firmer until comfortable, then release.
Your Support Index™ will be displayed for 30 seconds for your reference.
Firmer Button
Plusher Button
Auto Fill Button
Memory Button
Comfort Index™ Button
Support Index™ Numbers
Comfort Index Number
Plusher qBriefly PRESS and RELEASE button to view the current Support Index™ settings.
PRESS and HOLD button to make the bed plusher until comfortable, then release.
Your Support Index™ will be displayed for 30 seconds for your reference.
Comfort Index Used at store level to calculate your Comfort Index™ from 1-4.
Memory
Place your perfect Support Index™ settings into memory by briefly PRESSING and
HOLDING until the Memory Indicator Icon lights up. Release button and your saved
settings will be displayed for 30 seconds. To return to your memory settings, briefly
PRESS and RELEASE and the processor will automatically inflate or deflate the
mattress to your last memory setting then automatically shut off. Your Support
Index™ settings will be displayed for 30 seconds. If at any time you wish to stop the
process, briefly press and release any button and the process will stop.
Auto Fill
Briefly PRESS and RELEASE and the air processor will fill the bed to until
completely full then automatically shut off. A digital Support Index™ of 100% will be
displayed for 30 seconds. If at any time you wish to stop the auto fill process, briefly
press and release any button and the auto fill process will stop. Using the Auto Fill
feature each morning when making the bed will give the bed a fuller appearance.
BUTTON FUNCTION
10
2504 2-Chamber Hand Control Operation
Fill Level Indicator
PRESS and HOLD button to make the bed firmer until comfortable, then release.
Your current fill level will be displayed by the LCD indicator light.
Firmer Button
Plusher Button
Firmer p
Processor Activity Indicator
PRESS and HOLD button to make the bed plusher until comfortable, then release.
Your current fill level will be displayed by the LCD indicator light.
Plusher q
BUTTON FUNCTION

11
Your Support Index™ is a number between 1 and 100 that represents your ideal level of comfort, firmness
and support. You can adjust this number up and down in single digit increments, giving you precise control
exclusive to Boyd Night Air®Sleep Systems.
Your Support Index™ Setting
As you are adjusting your Boyd Night Air®Sleep System for your ideal level of comfort and support you will
want to consider your sleep position and determine whether your neck and back are aligned in the same
position as when you are upright. You may need to make adjustments to the firmness level and/or your pillow.
You should not have discomfort either at your shoulders or hips. Your pillow should keep your body properly
aligned, otherwise it is just interfering with your ability to sleep comfortably. If your pillow makes your head tilt
at an angle to the rest of your body, of if you feel discomfort from pressure at your neck, shoulders, back,
hips or legs you should replace your pillow with one that is properly fitted to both your sleep surface and
sleep position.
How to Determine Your Ideal Support Index™ Setting
It may take several nights of sleeping at different settings in order to determine your ideal Support Index™.
When you have found a setting that you feel offers you the ideal combination of both comfort and support,
program this setting into the memory feature of the hand control (7105 and 3604 models only) Try sleeping
at this setting for a minimum of 5 nights. It will take that long for your body to become accustomed to a new
sleep surface. After five nights, evaluate your sleep experience. If necessary, adust your Boyd Night Air®Sleep
System to a firmer or plusher setting and repeat the process until you have found the perfect level of comfort
and support.
Adjusting To Your New Boyd Night Air®Sleep System
Once you have found your ideal Support Index™ setting, you should be able to return to this setting each
night and experience a deep, restorative level of sleep. However, you may need to adjust your Support
Index™ for any of the following reasons:
Reasons to Alter Your Ideal Support Index™ Setting
uStrained or pulled muscles
uBack pain
uWeight change
uPregnancy
uSunburn
uNew sleep position
uTo make getting in and out of bed easier
uTo give bed a fuller appearance

Mattress Care
12

13
The Stay Pure™ cover of your Night Air®Sleep mattress can be completely zipped off and professionally dry
cleaned. Do not attempt to wash the cover yourself. Also, do not apply stain guard, as it may yellow the
fabric. The unique zip-off feature also allows you to completely remove your Night Air®cover so that you
can easily ventilate your mattress and air out your cover if so desired.
Care of Your Stay Pure™ Mattress Cover
The Micro-Pure sleeve surrounding the foam components of your 6-Chamber Night Air®Sleep System can be
completely zipped off and machine washed and dried.
Care of Your Anti-Microbial Micro-Pure Sleeve (6-Chamber models only)
Boyd Night Air®incorporates numerous anti-microbial safeguards into each of its Night Air®Sleep Systems.
We are dedicated to protecting you from such contaminants as mold, mildew and the growth of bacteria.
Some of these features are as follows:
Advanced Anti-Microbial Features
uStay Pure™ Removable Dry Cleanable Cover Ensures You Will Always Have A Clean,
Hygienic Sleep Surface
uRemovable Washable Micro-Pure Fabric Sleeve With Moisture Barrier Protects Rubber
Air Core From Condensation and Protects Foam From Contaminants (6-Chamber Models Only)
uFriction Free Safety Liner Prevents Condensation Transfer to Foam Support Tray
uSpecially Treated Anti-Microbial Foam
Both the mattress and foundation of your Night Air®Sleep System are lightweight and can easily be moved
anywhere there is a 110 volt electrical outlet to plug in the processor. There is no need for disassembly of any
kind, since your Night Air®mattress and foundation are both one-piece components.
Moving Your Night Air®Sleep System

Troubleshooting
14

15
If you believe your
mattress is loosing air, it
is important to determine
if the source of the leak is
originating from the
mattress or the processor.
Follow the steps listed
here to determine the
source of the possible
leak.
I think my mattress
is leaking.
1Fill mattress to 100%. Unzip cover, pull back the foam comfort layer(s) and
press your hand directly on the air core to test the firmness. Both air
bladders should feel firm and full of air.
2 Disconnect mattress from processor by disengaging rubber hose from
processor by squeezing the grey tab on the quick connect.
3 The mattress will retain air if there is no leak in the mattress. There is a one
way valve in the rubber hose that prevents air loss when the mattress is
disconnected from the processor.
4 Let the mattress sit for 8-12 hours. Unzip cover and press your hand once
again directly on the air core to test the firmness. If the mattress feels the
same as when you first filled the mattress to 100%, it has been determined
there is no leak in the mattress. Proceed to step 5. If the mattress feels like it
has lost air, contact a Boyd Night Air®Representative at 1-866-758-7424
to initiate an air core exchange.
5Reconnect the air hose to processor and fill to 100%. Let the mattress sit for
8-12 hours. Unzip cover and press your hand directly on the air core to test
the firmness. If the mattress feels the same as when you first filled the
mattress to 100%, it has been determined the leak has not been caused by
the processor. If you feel a decrease in air, proceed to step 6.
6 Disconnect the hoses from the processor. Check the black “O” rings on the
external air ports of the processor to be sure they are not cracked or
missing. If the “O” rings are missing or damaged, contact a Boyd Night Air®
Representative at 1-866-758-7424. If the “O” rings are in place and not
damaged, proceed to step 7.
7 Check all hose connections and sleep on the mattress overnight. If the
problem persists, call a Boyd Night Air®Representative at 1-866-758-7424
for further assistance.
If your processor or
hand controls have
stopped operating
please take these
actions in the order
listed.
My processor/hand
controls stopped
working.
1Make sure the processor is plugged into a standard wall outlet and that the
outlet is getting power. (Be sure that an On/Off light switch on the wall does
not control power to the outlet.)
2 Check to make sure your surge protector is plugged in, the power switch is
“On” and surge protector is working properly.
3 Verify that the hand controls are still properly connected to the processor and
have not become loose or disconnected.
4 Press the deflate button on either hand control several times to see if you can
activate a release of pressure from the air chamber. If successful, continue to
release pressure to approximately 50%. The processor should work correctly
after this adjustment. If the processor still does not operate, proceed to step 5.
5 Unplug the processor from the outlet for 1 minute. This allows the computer
in the pump to reboot. Reconnect and try the hand controls again.
6 If the deflate button on either hand control will still not function allow the
processor to rest for 5-10 minutes. There is a safety mechanism built into the
processor to prevent possible overheating. This will reset during the rest
period.
6 If the above actions are unsuccessful and the problem persists, call a Boyd
Night Air®Representative at 1-866-758-7424 for further assistance.

16
My side of the bed
will not adjust.
1Only one hand control can be operated at a time.
2 Make sure the hand controls are not reversed. The hand controls are
attached to either the “LH” connector or the “RH” connector on the
processor. (The permanently connected hand controls, and not the
processor, are labeled on the 6003 unit.) As you are standing at the foot
of the bed, facing the head of the bed, “LH” refers to the left side of the
bed and “RH” refers to the right side of the bed.
3 Make sure the hand controls are securely attached to the processor.
4 Make sure the air hose is not kinked and is properly connected to the
processor.
5 Check the connection of the air hose to the processor. Disconnect the
hose from the processor and then reconnect. You should hear a “click”
when the hose connects properly to the processor. This will verify that a
good connection has been made.
6 If the problem persists, call a Boyd Night Air®Representative at
1-866-758-7424 for further assistance.
There appear to be
body impressions
in the cover.
1Fully inflate the mattress to 100%. Air cores that are less than 100% inflated
will cause the mattress cover to dip and as you are looking at the bed,
giving the appearance of a large body impression.
2 Remove the Stay Pure™ cover and shake it to restore loft.
3 Use a vacuum nozzle to fluff the cover in areas where the fiber may have
settled from use.
4 If you have any further questions, call a Boyd Night Air®Representative at
1-866-758-7424.
Body impressions in an
innerspring bed are an
indicator that the spring
support system is com-
pressing and breaking
down. However, since the
Night Air®mattress uses
air as its support system,
which cannot break
down, your mattress and
cover should retain its full
appearance for years to
come.
If you find that
your processor runs
continuously and will
not turn off, take the
following actions in
the order listed.
My processor runs
continuously.
1Make sure that the hoses are not kinked against the back wall or where your
bed has been slipped up against your headboard. If the hoses are not
kinked, proceed to step 2.
2Unzip the cover, straighten out the hoses inside the bed and check for kinks. If
you found no twisted or kinked hoses inside the bed, proceed to step 3.
3 Unplug processor from the electrical outlet for 5-10 minutes. This will allow
the computer inside the pump to reset. Plug the processor back into the
outlet and check to see if this resolves the issue. If not, proceed to step 4.
4 If your processor continues to run despite the above actions, call a Boyd
Night Air®Representative at 1-866-758-7424 for further assistance.

Warranty
17

18
BOYD NIGHT AIR LIMITED WARRANTY
What is covered:
Boyd Night Air®warrants that your mattress and/or foundation
and/or Night Air®Processor and Hand Control will be free from
defects in materials and workmanship for a period of 20 years
from the original purchase date. This warranty is between Boyd
Night Air®and the original purchaser and is valid only when
accompanied by the original purchaser’s sales receipt showing
original date of purchase and location of purchase.
Replacements under this warranty revert back to the date of
original purchase for future warranty.
This warranty assures that:
• Cover will remain serviceable and free of runs and tears.
• Edge tape stitching will not become defective.
• The foam wedges will not crumble, bow out, or become
deformed.
• The box foundation parts will stay intact and not break.
• For the rubber air core, this warranty applies to defects in the
seaming and workmanship only.
It DOES NOT APPLY TO tears, punctures, or cuts caused by
accidents, abuse, improper installation of components, or any
negligence by the consumer or user. The rubber air core must
be properly installed within the approved supporting frame.
What is not covered:
• Components subjected to abuse including abuse intended to
simulate failure
• Tampering with any component or opening the Night Air®
Processor or Night Air®Hand Control
• Damages caused by shipper, dealer, or installation crew
• Any part which merely exhibits normal wear, yet functions
essentially as new, including stretching of materials and
stitching
• Boyd Night Air®disclaims liability for any aspect of installation
and any inconvenience caused by a defective part of a
component
• Because the consumer controls the end use and maintenance
of the rubber air core, Boyd Night Air®disclaims all liability for
damages caused by the use or misuse of this bed
• Tears, punctures, or any damage caused by improper
installation, moving of the bed or use
• Failures attributed to improper design or function of associated
components not manufactured by Boyd Night Air®
• Body impressions less than 2 inches deep
• Comfort preference
• Fabric stains, soiling or burns
What you must do:
Return the warranted product or component in sanitary condition
to Boyd Night Air®. Boyd will incur the cost of shipping up to two
years after the original purchase date; after two years the return
shipping to Boyd will be at the customer's expense. Please
telephone our Customer Service department at 1-866-758-
7424 to obtain a Return Authorization (RA) number and arrange
for the return of the warranted product or component.
What we will do:
Boyd Night Air®will repair or replace, at Boyd’s option, the
defective product or component at a cost to the original
purchaser based on Trade-In Value of Current Manufacturers
Suggested Retail Price. Trade-In value means that Boyd Night
Air®will offer a credit of 100/50/20% of the current
manufacturer’s suggested retail price for a defective component,
this credit to be applied towards the purchase of a replacement
component or complete bed from Boyd Night Air®. See below to
calculate trade in value.
Years After Original Purchase Original Purchaser’s Cost
Up to 2 years None
2 to 7 years 50%
7 to 20 years 20%
Boyd Night Air®reserves the right to substitute products or
components of equal or better quality, and to use or deliver
refurbished products or components, in the repair or replacement
of any product under this limited warranty.
Limitations:
Your exclusive remedy, IN LIEU OF ALL INCIDENTAL, SPECIAL OR
CONSEQUENTIAL DAMAGES, INCLUDING FOR NEGLIGENCE,
is limited to repair or replacement of any product or component
deemed to be defective under the terms and conditions stated
above. This warranty applies to normal residential use only. Boyd
Night Air®can accept or reject warranty claims based upon its
findings. Boyd Night Air®will bear no other damages or
expenses. Customer maintains responsibility for installation of
parts replaced under terms of the warranty. Boyd Night Air®
reserves the right to refuse to repair or replace any product or
component that is returned in an unsanitary condition. This
Limited Warranty applies only to the product as used in the United
States and Canada. It is not applicable in U.S. territories or other
countries. This Limited Warranty is non-transferable. Repair or
replacement of a product or component under the terms of this
limited warranty in no way lengthens the limited warranty period.
ANY IMPLIED WARRANTIES APPLICABLE TO THIS PRODUCT,
INCLUDING ANY WARRANTIES OF MERCHANTABILITY OR
FITNESS FOR A PARTICULAR PURPOSE, ARE LIMITED IN
DURATION TO THE DURATION OF THIS WRITTEN LIMITED
WARRANTY.
All claims relating to the limited warranty products
should be made by contacting Customer Service at:
1-866-758-7424, or writing to:
Boyd Specialty Sleep, 2440 Adie Road, St. Louis, MO 63043.

Customer Care
If you ever have product questions or need assistance please call us at:
Help is just a phone call away
1-866-758-7424
Sleep Specialists are available
Monday through Friday from
9:00 am until 5:00 pm (CST)
You must present your original receipt in order to process a warranty
claim. It is your responsibility, not the responsibility of Boyd Night Air® or
your retailer, to keep your receipt(s) in a safe place. Claims presented
without a receipt cannot be processed under the terms of the warranty.
Save your sales receipts
19
Table of contents
Other Boyd Indoor Furnishing manuals


Popular Indoor Furnishing manuals by other brands

VAS Furniture Mfg. Inc.
VAS Furniture Mfg. Inc. AVC9001GB Assembly instructions

Safco
Safco 3966 Assembly instructions

Habitat
Habitat Kuda 968419 Assembly instructions

PHI VILLA
PHI VILLA THD7-305-351 Use and care guide

Livarno Living
Livarno Living 326145 Assembly instruction

Dream On Me
Dream On Me 598CA owner's manual
 installation instructions")


Costway
Costway HW61323 user manual

Tauris
Tauris RIO2200LLOAK Assembly & instruction manual

Rauch
Rauch M2611 Assembly instructions

Furniture of America
Furniture of America Pantaleon CM7392Q Assembly instructions

Drive
Drive Med Aire Plus 8 Operator's manual

Blanco
Blanco BLANCOPRECISION 515-638 Specifications