Brabantia BBEK1031 User manual

INSTRUCTION MANUAL
4 SLICE TOASTER
4 SLICE TOASTER
INSTRUCTION MANUAL
MODEL NO.: BBEK1031

1
IMPORTANT SAFEGUARDS
1. Please read through the following safety precautions carefully before switching on the 4 Slice
Toaster.
2. Keep this instruction manual in a safe place for future reference. Also keep the sales receipt
and, if possible, the gift box with the inner packaging.
3. Failure to follow all the instructions listed may result in electric shock, fire or serious personal
injury.
4. Before plugging the 4 Slice Toaster into the mains electrical supply, check that the voltage
and power supply comply with the specifications indicated on the rating plate of the
appliance.
5. The 4 Slice Toaster is not intended for use by persons with reduced physical, sensory or
mental capabilities, or lack of experience and knowledge, unless they have been given
supervision or instruction concerning use of the appliance by a person responsible for their
safety.
6. The 4 Slice Toaster may be used by children aged from 8 years and above if they have been
given supervision or instruction concerning the use of the appliance by a person responsible
for their safety.
7. It is imperative that children aged from 8 years and above are carefully instructed to use the
4 Slice Toaster in a safe way and that they understand the hazards involved. Children should
only be allowed to clean the 4 Slice Toaster whilst under adult supervision.
8. Always keep the 4 Slice Toaster and its power cord out of reach of children. Close adult
supervision is necessary when the toaster is used by or near children. Children should not play
with the appliance.
9. Always place the 4 Slice Toaster on a stable, flat, heat-resistant surface. Also ensure that the
surface can take the weight of the unit during use.
10. This appliance is intended for HOUSEHOLD USE and for similar domestic applications such as
staff kitchen areas in shops, offices and other working environments; by guests in hotels,
motels and other residential type environments including guest houses and bed and breakfast
type establishments.
11. The 4 Slice Toaster should not be used for commercial purposes. The toaster should only be
used for its intended purpose.
12. Do not leave the 4 Slice Toaster unattended when in use.
13. Do not move or lift the 4 Slice Toaster while it is operating or while it is connected to an
electrical socket.
14. This appliance is not intended to be operated by means of an external timer or separate
remote control system.
15. The use of attachments, not specifically recommended by the manufacturer, must not be used
as they may cause personal injury or damage to the 4 Slice Toaster.
16. Take care when using the 4 Slice Toaster as it reaches very high temperatures and the outside
surfaces are liable to get hot during use. DO NOT touch the outside surfaces during use,
particularly in the area of the toasting slots.
17. Bread may burn; therefore the 4 Slice Toaster must not be used near or below curtains and
other combustible materials.
18. Do not place the cable or any other object over the toasting slots whilst the 4 Slice Toaster is
in operation.
19. Do not attempt to dislodge food while the 4 Slice Toaster is in operation.
20. The Pop-up lever must be in the ‘UP’ position before connecting or disconnecting the plug
from the mains electrical supply.
22. Do not insert metal objects or other utensils into the 4 Slice Toaster as this will cause an
electric shock or cause a fire.
23. Do not operate the 4 Slice Toaster if the plug or power cord has been damaged, is not
working properly, has been dropped or has been exposed to water or other liquid.

2
TECHNICAL DATA
Power: 220-240V
Power: 1512W - 1800W
5 YEAR GUARANTEE
24. Regularly check the 4 Slice Toaster’s power cord carefully for damage. If the power cord is
damaged in any way, the manufacturer or its service agent or a similarly qualified person
must replace it in order to avoid an electrical hazard.
25. Do not allow the power cord to hang over sharp table edges or come into contact with hot
surfaces.
26. Make sure that the 4 Slice Toaster is switched off and remove the plug from the mains
electrical supply when it is not in use, before it is cleaned and while it is being repaired.
27. To prevent the risk of electrical shock, do not immerse the power cord, plug, or any non-re
movable parts of this 4 Slice Toaster in water or any other liquid.
28. The 4 Slice Toaster must not be submerged in water, as any contact with the electrical parts
would create the risk of malfunction and electric shock. Do not use the appliance with wet
hands.
29. Do not use the 4 Slice Toaster outdoors.
30. To unplug the appliance, grasp the plug firmly and remove it from the mains electrical supply.
DO NOT PULL ON THE CORD.
31. Never use the 4 Slice Toaster if it is damaged in any way.
32. A qualified electrician should do all repairs. Improper repairs may place the user at risk.
33. When handing this product over to a third party, ensure that this instruction manual is
supplied with the appliance.
3
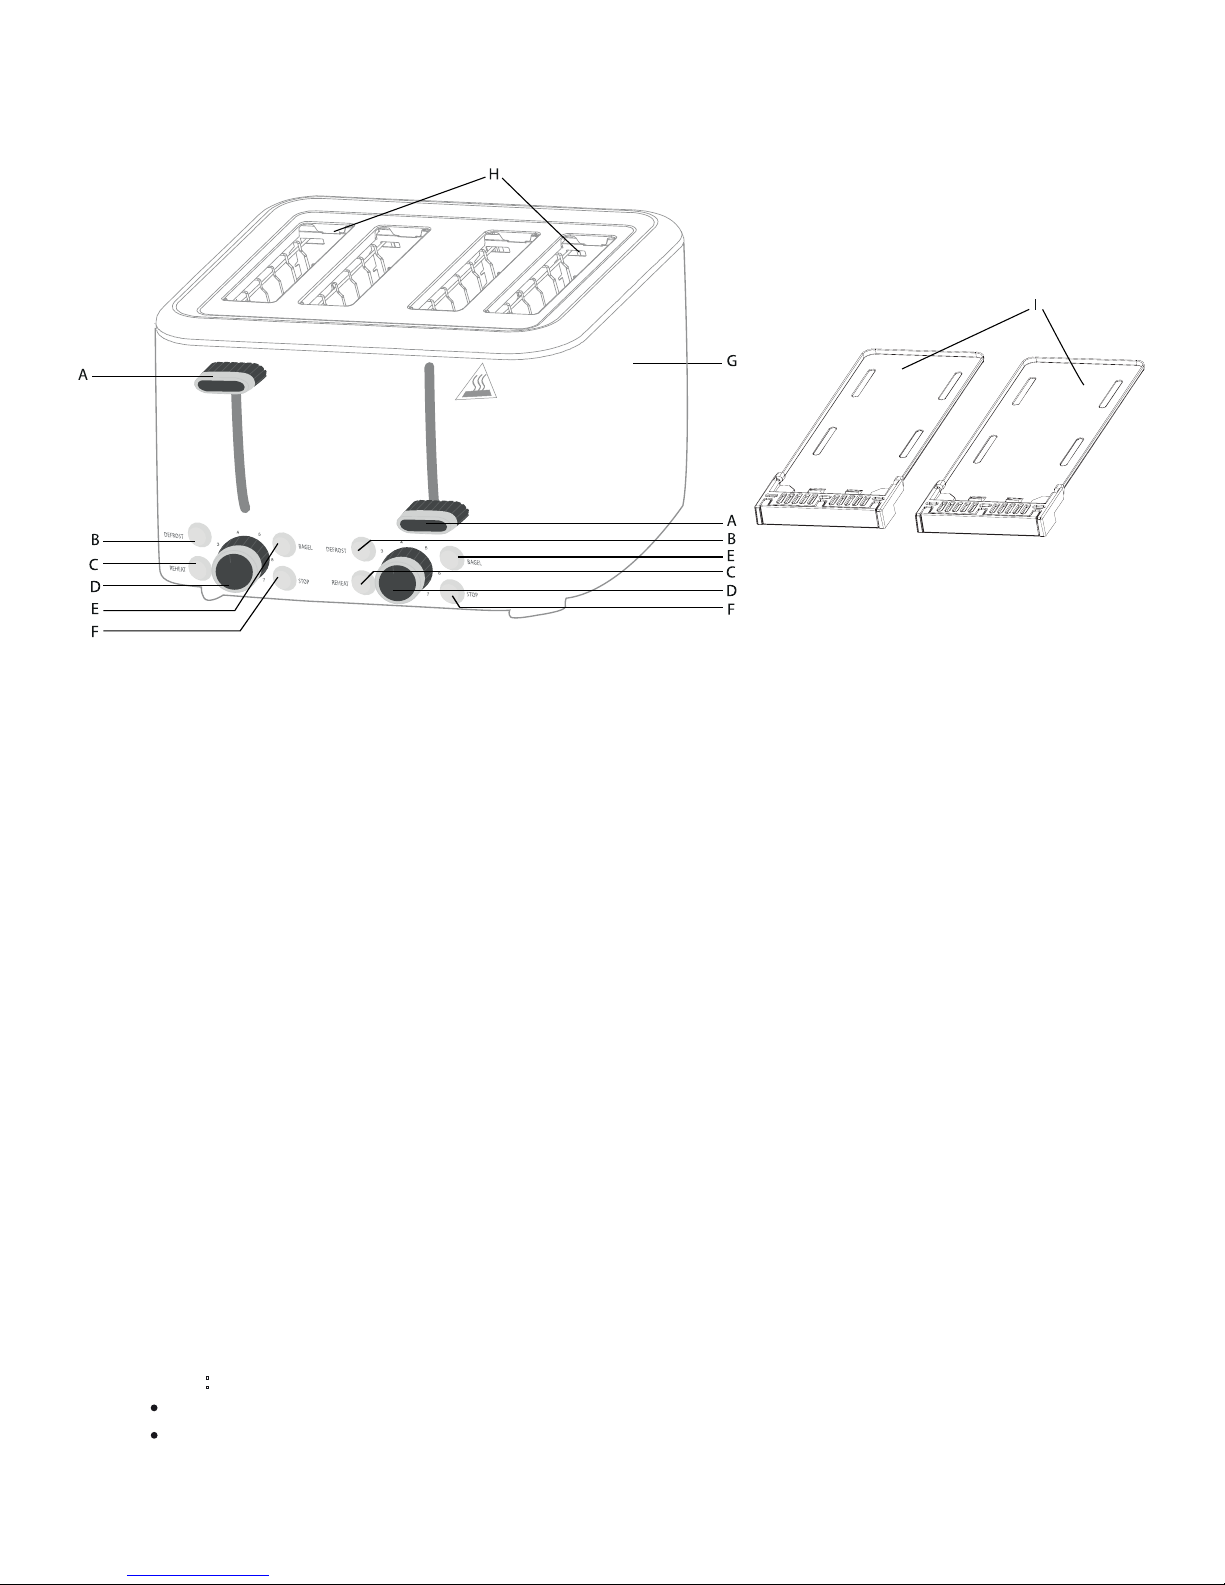
KNOW YOUR 4 SLICE TOASTER
HOW TO USE YOUR 4 SLICE TOASTER
1. There are 2 browning control buttons and 2 pop-up levers to operate the toasting slots as
separate pairs. Operate one or both pairs of toasting slots at the same time.
2. Make sure that the 2 crumb trays are always in place in the base of the toaster as they also
protect the surface it is standing on from the heat of the elements in the toasting slots.
3. Insert the plug into the mains electrical supply and switch on at the socket.
4. Place the bread to be toasted in the Wide Self-Centering Slots
5. Turn the browning control to the required setting. The browning control sets the time that the
toaster will operate. ‘1’ is for light toasting and ‘7’ is for the darkest toast.
6. Push the pop-up lever down until it clicks into position.
7. The bread will be lowered and centred as the lever moves down. The ‘Stop’ button will
illuminate blue while the toaster is in use.
.
8. tOnce the selected toasting cycle is complete he pop-up lever will release, automatically
lifting the toast The ‘Stop’ button light will go out.
9. To lift the toast further out of the slot, lift the pop-up lever to the highest position.
NOTE:
Since the toast will be hot, use caution when removing it from the toaster.
The toaster surface will get hot during use, especially near the toasting slots, so always allow the
A.
B.
C.
D.
E.
F.
G.
H.
I.
Pop-up Lever with High-Lift Option
‘Defrost’ Button
‘Reheat’ Button
7 Setting Browning Control
‘Bagel’ Button
‘Stop’ Button
Stainless Steel Housing
Wide Self-Centering Slots
Bread Crumb Trays

4
appliance to cool down before touching it.
Always disconnect the appliance from the mains electrical supply when not in use.
The two crumb trays have a ‘press-to-release’ system. Press to release and slide out the crumb
trays; empty and slide the crumb trays back into the toaster.
High-Lift Function
1. After toasting you may find small toast/bread particles
the toast/bread particles
in the toaster and it may be difficult
to remove them from the slots. Lift the toaster lever upwards to make it easier to remove
from the toaster.
2. Do not use a knife, fork or other utensil to remove the bread from the toaster or to clean the
toaster. If the toast/bread becomes lodged in the toaster, unplug the toaster from the mains
electrical supply before attempting to remove it.
Toasting Bread From Frozen: Defrost button (B)
1. Frozen bread can be used to make toast with the ‘Defrost’ button (top button).
2. Place the frozen bread in the toasting slots and select the desired browning setting as though
toasting thawed bread.
3. Push down the pop-up lever until it clicks into place and then press the ‘Defrost’ button. Both
the ‘Stop’ and the ‘Defrost’ buttons will illuminate blue.
4. When toasted, the pop-up lever will lift the toast automatically and both lights will go out.
Re-Heating Toast: Reheat button (C)
1. Reheat toast without additional toasting on this setting.
2. Place toast into toasting slots.
3. Push down the pop-up lever until it clicks into place and press the ‘Reheat’ button. It will
illuminate blue along with the ‘Stop’ button.
4. When the toast is reheated, the pop-up lever will lift the toast automatically and both lights will
go out.
Stop button (F )
1. This button is always illuminated blue when the toaster is in use.
2. The toasting operation can be halted at any time by pressing the blue illuminated ‘Stop’
button.
3.
1.
2.
3.
4.
The pop-up lever will lift the toast automatically and the light will go out.
IMPORTANT:
Never use utensils to try to release trapped toast from the slots as it is highly dangerous to do so
and it can damage the appliance.
Turn off at the mains electrical supply and unplug the appliance.
Allow the toaster tocool down, then turn it upside down and gently shake it to release trapped
toast/bread particles.
Bagel Function (E)
The ‘Bagel’ button is used for toasting bagels.
Bagels should be cut through the middle before toasting. The cut side only will be toasted
when the ‘Bagel’ button is in operation.
The ‘Bagel’ button’s indicator light and the ‘Stop’ light will go on when the ‘Bagel’ button is pressed.
The pop-up lever will lift the bagel/s automatically once they are toasted and both lights will go out.

5
CLEANING AND MAINTENANCE
ENVIRONMENT FRIENDLY DISPOSAL
This marking indicates that this product should not be disposed of with other household
waste. To prevent possible harm to the environment or human health from uncontrolled
waste disposal, recycle it responsibly to promote the sustainable re-use of material
resources. To dispose of your appliance correctly, please contact or take it to your local
refuse / recycling centre. Alternatively, contact your local council for information on your
local re-use centre. Please make this product environmentally safe for recycling.
1. Always turn off the mains electrical supply at the socket and unplug the 4 Slice Toaster.
2. Never immerse the 4 Slice Toaster or power cord in water, or allow moisture to contact these
parts.
5. Wash the crumb trays in warm soapy water. Rinse with clean water and dry thoroughly with a
3. To remove the crumbs, simply ‘press to release’ the crumb trays from their slots at the bottom
of the back of the 4 Slice Toaster and then slide them out.
4. Empty the crumbs into a suitable container.
soft cloth.
6. Ensure that the raised sides of the crumb trays are facing upwards before sliding back into slots.
7. All other parts should be cleaned with a damp cloth and dried thoroughly using a soft cloth
before re-use.
8. Children should only be allowed to clean the 4 Slice Toaster if they do so in the presence of the
person responsible for their safety.
9. NOTE: DO NOT use abrasives or chemical cleaners on any part of this appliance.
STORAGE
1. Never wrap the cord around the outside of the Toaster.
2. Wrap the cord neatly around the ‘cord storage’ provided on the underside of the toaster.
3. When not in use, remove the power plug from the mains electrical supply and store the toaster
in a dry, safe place, out of reach of children.

MODEL NO : BBEK1
BRABANTIA CUSTOMER CARE LINE FOR RSA ONLY
0861 RANK SA (7265 72)
1
Table of contents
Other Brabantia Toaster manuals

Brabantia
Brabantia D2-2B User manual

Brabantia
Brabantia BBEK1031NMB User manual

Brabantia
Brabantia D2-2PLA User manual

Brabantia
Brabantia D2-2W User manual

Brabantia
Brabantia D2-2GY User manual

Brabantia
Brabantia BBEK1022 User manual

Brabantia
Brabantia BBEK103 User manual

Brabantia
Brabantia BBEK1021N User manual

Brabantia
Brabantia BBEK1021NMB User manual

Brabantia
Brabantia BBEK1031N User manual


