Braun Syncro System 7570 User manual

+
Syncro System
7570
Type 5491
KURTZ DESIGN 16.09.99
5491453_S_S 1 Seite 1 Montag, 20. November 2000 8:20 08

English 4, 63, 69
Français 9, 63, 69
Magyar 14, 63, 69
âesk˘
19, 64, 69
Slovensk˘
24, 64, 69
Hrvatski 29, 64, 69
Polski 34, 65, 69
Türkçe 39, 69
усск
44, 65, 69
Укск
49, 66, 69
62, 68, 69
Internet:
www.braun.com
5-491-453/01/XI-00
GB/F/H/CZ/SK/HR/PL/TR/RUS/UA/Arab
Printed in Germany
Braun Infoline
Türkiye’deki Tüketici Danıs¸ ma Servisi:
0 800 261 19 53
TR
5491453_S_S 2 Seite 1 Montag, 20. November 2000 8:23 08

Syncro 7570
2
4
5
3
No. 7000
6
7
8
9
10
KURTZ DESIGN 16.08.99
Syncro
Syncro
Syncro
Syncro
5491453_S_S 3 Seite 1 Montag, 20. November 2000 8:24 08

4
Our products are designed to meet the highest
standards of quality, functionality and design.
We hope you enjoy your new Braun shaver.
Your Braun Syncro is supplied with a
Braun Clean&Charge (please see separate
use instructions).
Important
Only use the power supply cord set provided.
A damaged cord must be replaced immediately.
Description
1 Foil protection cap 6 Switch
2 Shaver foil 7 Display
3 Cutter block 8 Info key
4 Foil release button 9 Pilot light
5 Long hair trimmer 10 Shaver socket
Technical specifications:
•
Wattage via cord set: 7 W
•
Power supply via cord set:
100-240 V
2
/ 50 or 60 Hz (automatic adaptation)
•
Shaver input voltage: 12-24 V
Charging the shaver
•
First charging: Using the power supply cord set,
connect the shaver to the mains with the switch on position
«0» and charge it for at least 4 hours
(plug might get warm).
•
Once the shaver is completely charged, shave without
the cord until fully discharged. Then recharge to full
capacity again (subsequent charges will take about
1 hour).
•
A full charge will give up to 50 minutes of cordless
shaving time depending on your beard growth.
However, the maximum battery capacity will only be
reached after several charging/discharging cycles.
•
Best environmental temperature range for charging is
15 °C to 35°C.
+35°C
+15°C
210
7570
English
5491453_S_S 4-74 Seite 4 Montag, 20. November 2000 8:28 08

5
Display
The pilot light shows that the shaver is connected to the
mains.
The display shows the operation mode and charging
conditions of the shaver: During charging the display
shows the battery capacity symbol increasing by 20%
segments and the remaining charging time (flashing):
First charging (4 h):
The display counts down in 20 min. steps.
Subsequent chargings (1 h):
The display counts down in 5 min. steps.
The battery is fully charged.
Below 10 minutes remaining shaving time, the display
shows the minutes left. The «moving»plug symbol
indicates that you should charge your shaver.
There is insufficient battery charge for a cordless shave.
Either recharge the shaver or shave with the cord
connected to the mains.
The display changes to this format when the shaver is in
the Clean&Charge.
Your shaver features an automated battery conditioning
facility which monitors the charging/discharging process.
If necessary, it will automatically recondition the battery
with a complete discharge/recharge cycle (about every
6 months).
For additional information, press the info key:
press once:
–to display the duration of the last shave
press again:
–to display the key part number for shaver foil
and cutter block
hold for 3 secs:
–to run a display demo
*
*
*
5491453_S_S 4-74 Seite 5 Montag, 20. November 2000 8:28 08

6
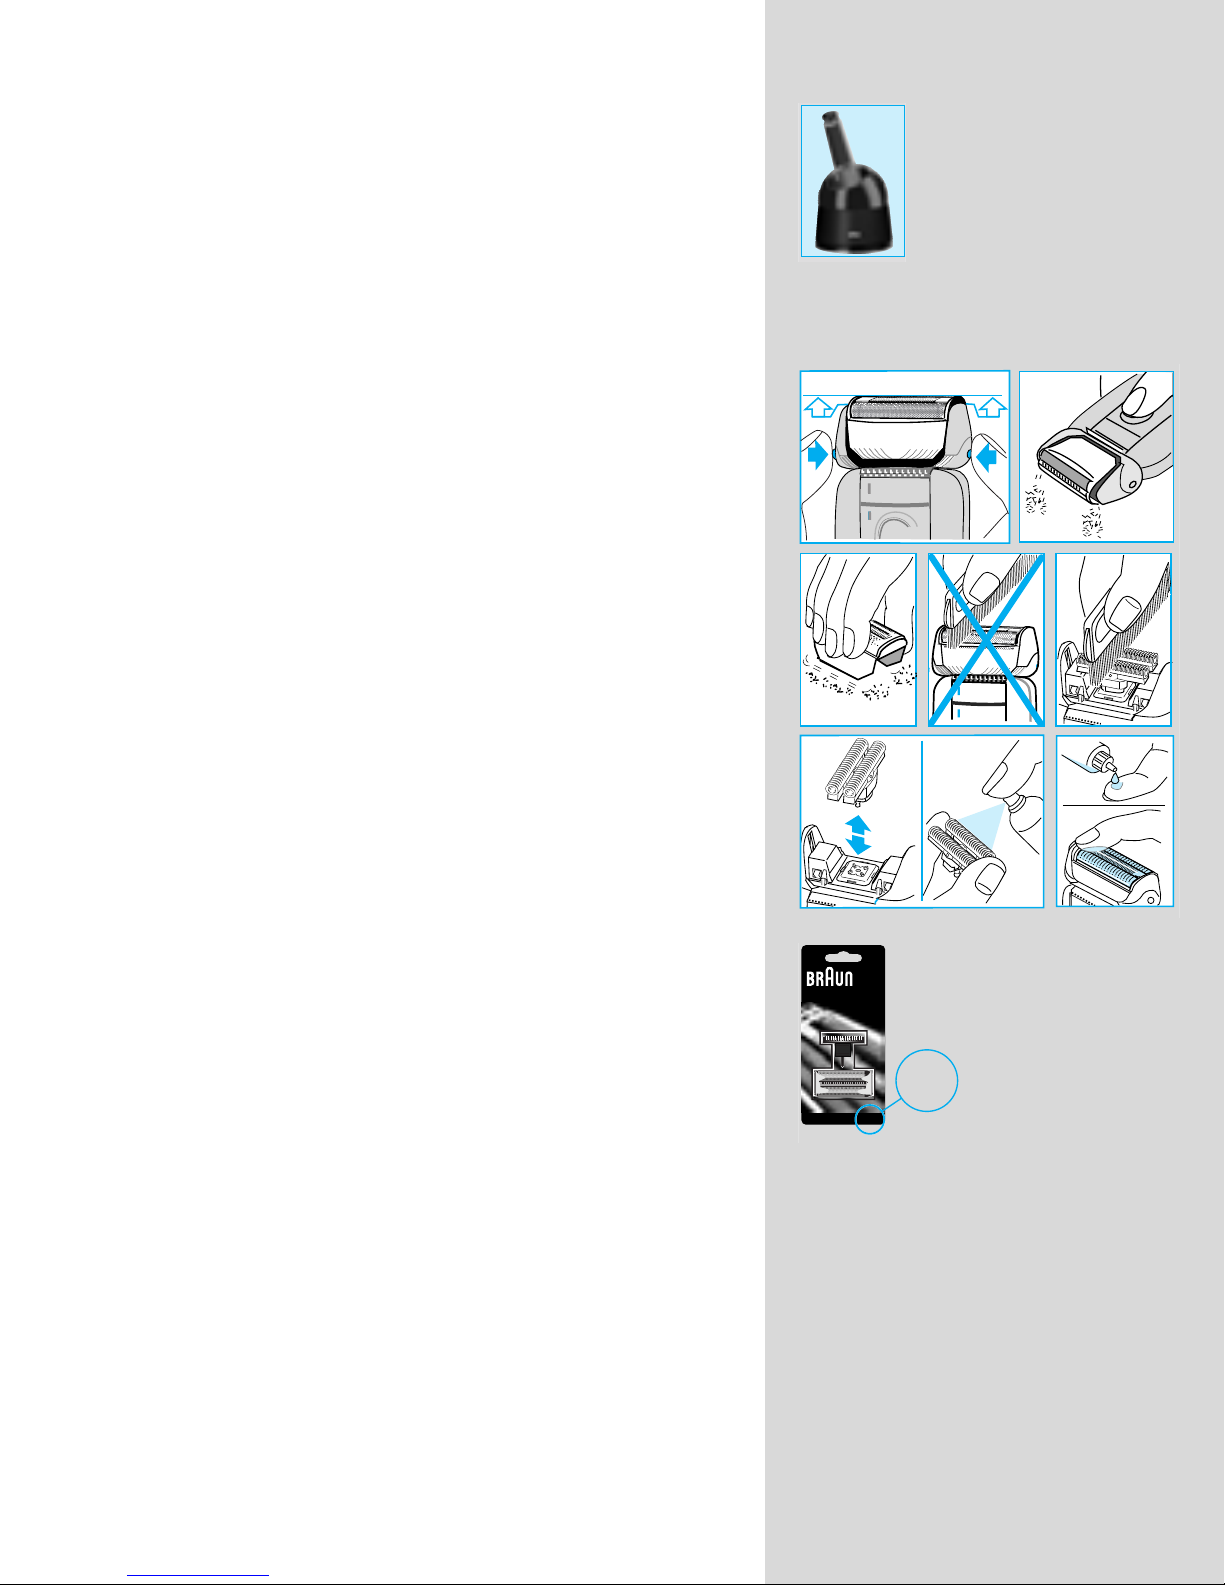
The shaver has to be cleaned (refer to paragraph «Manual
cleaning»or to separate «Clean&Charge»use instructions).
To reset the display, push the info key.
The shaver has to be lubricated (refer to paragraph
«Manual cleaning»or to separate «Clean&Charge»use
instructions). To reset the display, push the info key.
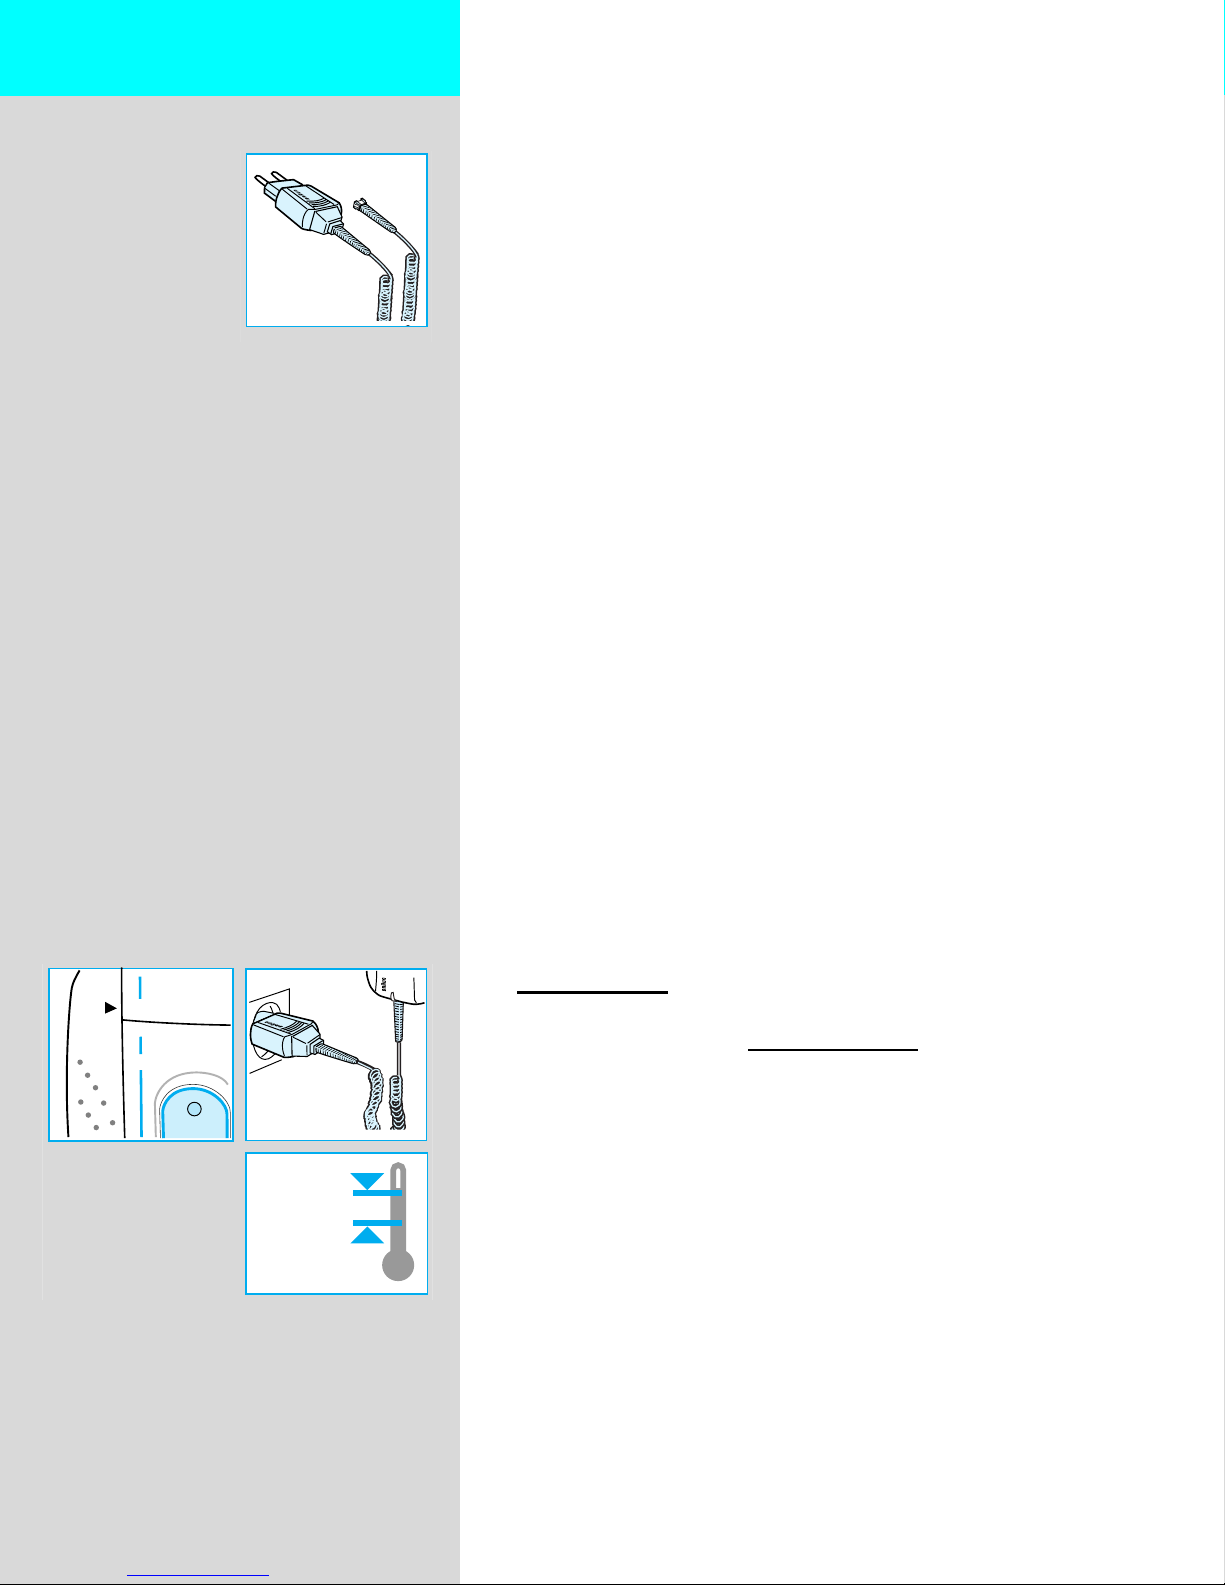
The shaver cannot be charged if the environmental
temperature is too low (<0 °C) or too high (>55 °C).
Allow the shaver to remain for some time at room
temperature for optimal charging conditions.
No display: The rechargeable battery is completely
discharged and has to be recharged.
Shaving
Switch positions
0 = Off (switch is locked)
Press and push up the switch to operate the shaver:
1 = Shaving with the pivoting head
The pivoting cutting system automatically adjusts
to every contour of your face.
2 = Shaving with the pivoting head locked at an angle
(to permit shaving in difficult areas, e.g. under the nose)
3 = The long hair trimmer is activated
(for trimming sideburns, moustache and beard).
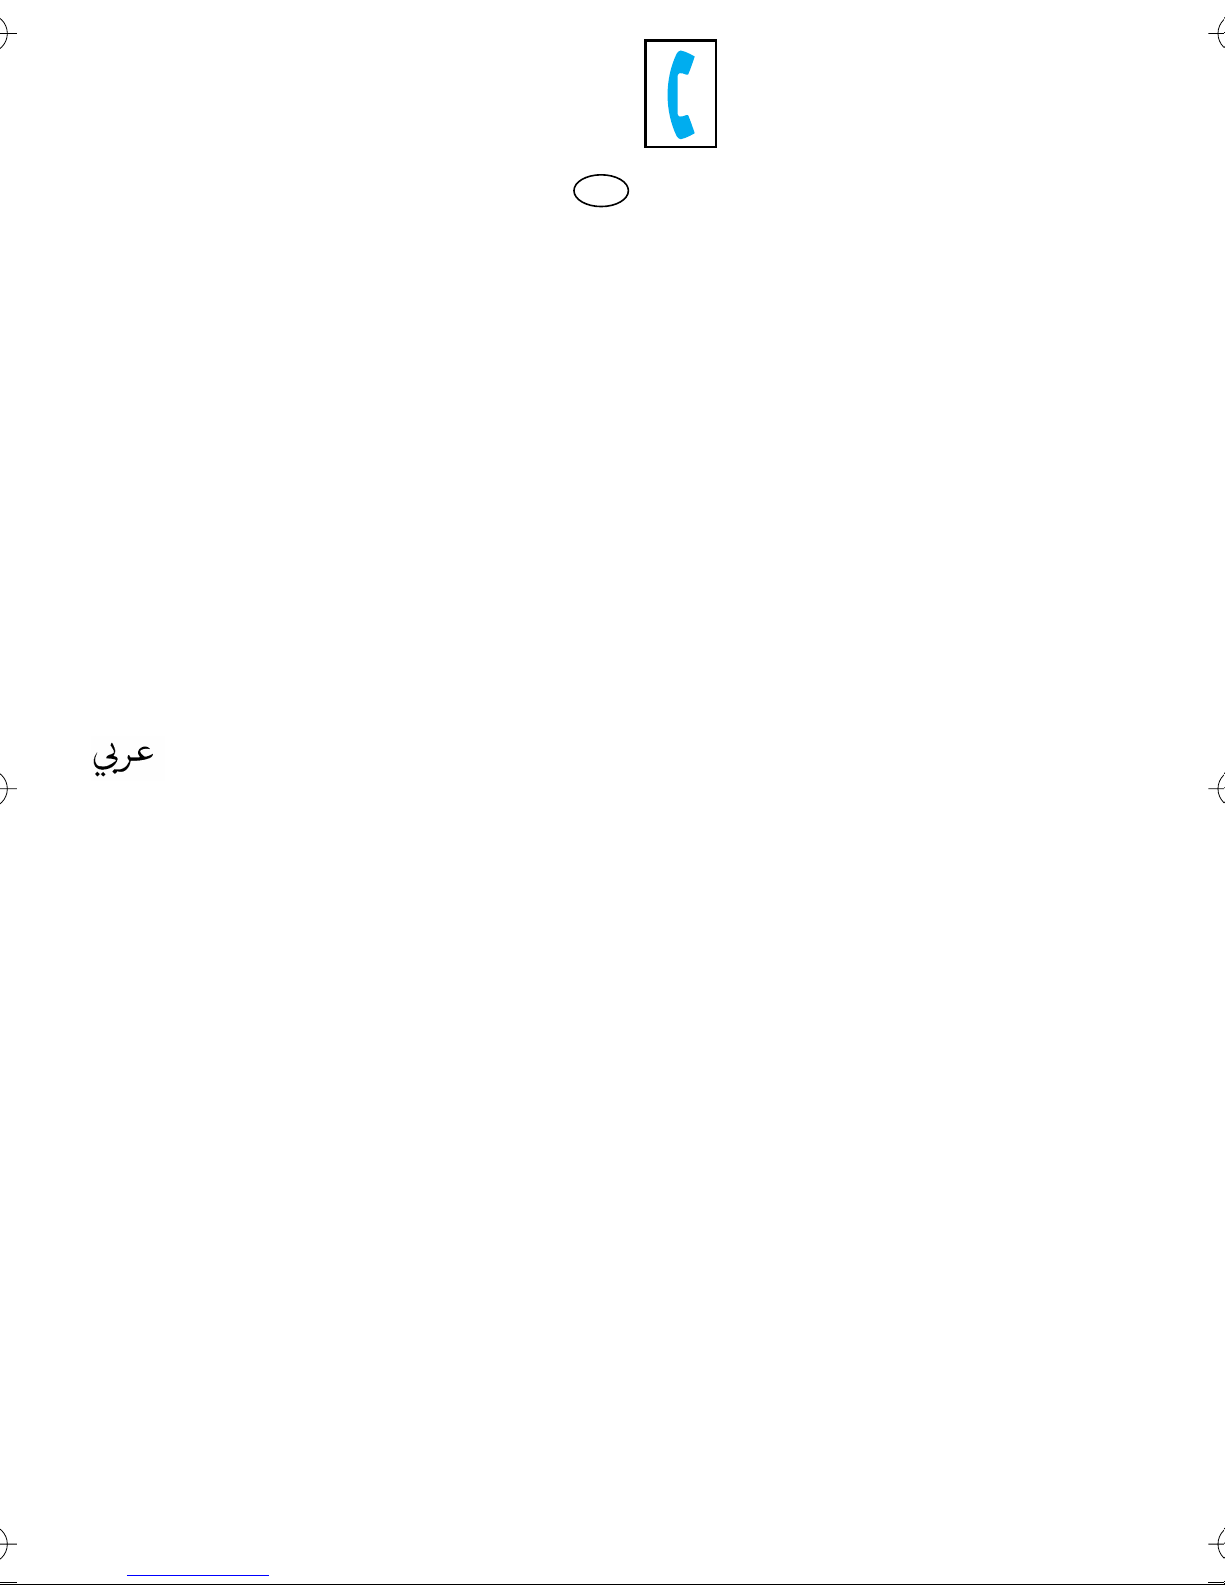
Shaving with the cord
If the rechargeable battery is discharged, you may also
shave with the shaver connected to the mains via the
power supply cord set.
(If the shaver does not run immediately, charge it with the
switch on position «0»for approx. 1 minute.)
Tips for the perfect shave
•
We recommend that you shave before washing,
as the skin tends to be slightly swollen after washing.
•
Hold the shaver at right angles (90°) to the skin.
•
Stretch your skin and shave against the direction
of beard growth.
•
Replace the shaver foil and cutter block every
1
1
/
2
years, or when the parts are worn, to ensure
optimum shaving performance.
21
21
a
u
t
o
m
a
t
i
c
l
o
c
k
2
1
3
5491453_S_S 4-74 Seite 6 Montag, 20. November 2000 8:28 08

7
Keeping your shaver in top shape
Automated cleaning
The Braun Clean&Charge takes care of all cleaning and
lubrication needs of your shaver. Please refer to the
separate use instructions.
If not supplied already with your shaver, the Braun
Clean&Charge is available at your dealer or Braun Service
Centres.
Manual cleaning
For easy cleaning after each shave, switch the shaver
off. Press the release buttons to lift the shaver foil
(do not remove the foil completely). Switch on
the
shaver for approx. 5-10 seconds so that the shaved
stubbles can fall out.
For a thorough cleaning (weekly), remove the shaver
foil and tap it out on a flat surface. Using the brush,
clean the cutter block and the inner area of the pivoting
head. About every four weeks, clean the cutter block
with Braun cleaning agents.
If your skin is very dry and you notice a reduced
operation time of the shaver or if the display shows «oil!»,
apply a drop of light machine oil onto the shaver foil.
Replacing the shaving parts
The shaver foil and cutter block are precision parts that,
in time, are subject to wear. Replace your foil and cutter
block every 18 months and get a 25% better shave.*
(Shaver foil and cutter block: part No. 7000)
(* Overall evaluation from Braun users comparing their
shave with new parts and those used for 18 months.)
Accessories
available at your dealer or Braun Service Centres:
•
Shaver foil and cutter block
(part No. 7000)
oil
10
10
7000
7000
Syncro
5491453_S_S 4-74 Seite 7 Montag, 20. November 2000 8:28 08

8
Environmental notice
This appliance is provided with nickel-hydride recharge-
able batteries. To protect the environment, do not dis-
pose of the appliance in the household waste at the end
of its useful life. Open the housing as shown, remove
and dispose of the batteries at your retail store or at
appropriate collection sites according to national or
local regulations.
Subject to change without notice.
This product conforms to the EMC-Require-
ments as laid down by the Council Directive
89/336/EEC and to the Low Voltage Regulation
(73/23 EEC).
7XXX
12
4
5 6
3
5491453_S_S 4-74 Seite 8 Montag, 20. November 2000 8:28 08

9
Nos produits sont conçus pour satisfaire aux plus hautes
exigences en matière de qualité, fonctionnalitéet design.
Nous espérons que vous serez pleinement satisfait
de votre nouveau rasoir Braun.
Votre Braun Syncro est fourni avec un Braun
Clean&Charge (merci de voir la notice séparée).
Important
Utiliser uniquement le cordon d’alimentation fourni avec
l’appareil. Un cordon endommagédoit être remplacé
immédiatement.
Description
1 Capot de protection 5 Tondeuse rétractable
de la grille 6 Interrupteur central
2 Grille de rasage 7 Ecran LCD de fonctions
3 Bloc-couteaux 8 Bouton d’informations
4 Bouton d’ouverture 9 Témoin lumineux
de la tête de rasage 10 Prise du rasoir
Spécificités techniques :
•
Consommation via le cordon : 7 W
•
Tensions admissibles : 100-240 V
2
/ 50 ou 60 Hz
(adaptation automatique)
•
Alimentation admissible : 12-24 V
Recharge du rasoir
•
Première charge : Utilisez le cordon d’alimentation,
branchez le rasoir sur le secteur en mettant l’interrupteur
central en position «0»et laissez-le se charger pendant
au moins 4 heures (la prise pourrait devenir tiède).
•
Quand le rasoir est complètement chargé, vous pouvez
vous raser sans le fil jusqu’à ce qu’il soit complètement
déchargé. Ensuite rechargez-le ànouveau pour atteindre
la capacitémaximale (les recharges suivantes prendront
environ 1 heure).
•
Une pleine charge procurera environ 50 minutes de
rasage sans fil en fonction du type de barbe. Cependant,
la capacitémaximum des batteries sera atteinte seule-
ment après plusieurs cycles de charge et de décharge.
•
La température idéale pour la mise en charge est comprise
entre 15°C et 35°C.
+35°C
+15°C
210
7570
Français
5491453_S_S 4-74 Seite 9 Montag, 20. November 2000 8:28 08

10
Ecran LCD de fonctions
Le témoin lumineux indique que le rasoir est branché
sur le secteur.
L’écran àaffichage digital indique le fonctionnement et
le niveau de charge du rasoir : pendant la recharge l’écran
indique la capacitéde la batterie par des segments égaux
augmentant par tranches de 20% ainsi que le temps de
charge restant (clignotement).
Première charge (4 h) :
L’écran compte àrebours par tranches de 20 minutes.
Charges suivantes (1 h) :
L’écran compte àrebours par tranches de 5 minutes.
La batterie est pleinement chargée.
S’il ne reste plus que 10 minutes d’autonomie, l’écran
LCD affiche les minutes restantes. Le symbole prise, en
mouvement, signale que vous devez charger votre rasoir.
Il y a alors une charge insuffisante de la batterie pour
un rasage sans fil. Soit vous rechargez le rasoir, soit vous
vous rasez en branchant le cordon d’alimentation sur le
secteur
*
L’écran change de format quand le rasoir est dans
le Clean&Charge.
Les caractéristiques de votre rasoir et la gestion facile
de la capacitécontrôlent la charge et la décharge.
Si nécessaire et afin de régénérer la batterie, un cycle
complet de charge et de décharge se fera automatique-
ment (environ 6 mois).
Pour plus de précisions, appuyez sur le bouton
d’informations :
Appuyez une fois :
–pour visualiser la durée du dernier rasage
Appuyez ànouveau :
–pour visualiser la référence de la grille et du bloc-
couteaux de votre rasoir
Maintenez le bouton appuyépendant 3 secondes :
–
pour lancer la démonstration de l’écran de contrôle LCD
*
*
5491453_S_S 4-74 Seite 10 Montag, 20. November 2000 8:28 08

11
Le rasoir doit être nettoyé(référez-vous au paragraphe
«Nettoyage manuel»ou àla notice séparée
«Clean&Charge»). Pour réinitialiser l’écran de contrôle
LCD, appuyez sur le bouton d’informations.
Le rasoir doit être lubrifié(référez-vous au paragraphe
«Nettoyage manuel»ou àla notice séparée
«Clean&Charge»). Pour réinitialiser l’écran de contrôle
LCD, appuyez sur le bouton d’informations.
Le rasoir ne peut pas être chargélorsque la température
ambiante pendant la recharge est trop basse (< 0°C) ou
trop élevée (> 55°C).
Si c’est le cas, mettez votre rasoir pendant quelques
temps dans une pièce oùla température ambiante se
trouve dans l’intervalle ci-dessus pour optimiser la
recharge.
Pas d’information sur l’écran de contrôle LCD :
la batterie rechargeable est complètement vide et doit
être rechargée.
Rasage
Positions de l’interrupteur central
0 = Arrêt (l’interrupteur central est verrouillé)
Appuyez et poussez l’interrupteur central pour
mettre en marche le rasoir
1 = Rasage avec la tête pivotante
Le système de coupe pivotant s’adapte
automatiquement aux contours du visage
2 = Rasage avec la tête pivotante bloquée en angle
(pour faciliter le rasage sur les zones difficiles,
telles que sous le nez)
3 = Tondeuse en fonctionnement
(pour tailler les pattes, la moustache et la barbe)
Rasage avec le cordon d’alimentation
Lorsque la batterie est déchargée, vous pouvez également
vous raser avec le rasoir branchésur le secteur grâce au
cordon d’alimentation. (Si le rasoir ne fonctionne pas
immédiatement, rechargez-le en le mettant sur position
«0»pendant 1 minute environ.)
21
21
a
u
t
o
m
a
t
i
c
l
o
c
k
2
1
3
5491453_S_S 4-74 Seite 11 Montag, 20. November 2000 8:28 08

12
Pour conserver votre rasoir
en bon état
Nettoyage automatique
Le chargeur auto-nettoyant Braun Clean&Charge prend
soin de tous les besoins de votre rasoir en termes de
nettoyage et de lubrification. Merci de vous référer au
mode d’emploi séparée. Si le Braun Clean&Charge
n’est pas fourni avec votre rasoir, vous pouvez vous le
procurer chez votre revendeur ou dans un centre service
agréé Braun.
Nettoyage manuel
Pour un nettoyage facile après chaque rasage, arrêtez
votre rasoir. Appuyez sur les boutons d’éjection pour
soulever la grille du rasoir (ne pas enlever complètement
la grille). Mettez votre rasoir en marche pendant 5 à
10 secondes environ afin que les résidus de barbe
puissent tomber.
Pour un nettoyage plus approfondi (hebdomadaire),
enlevez la grille du rasoir et tapez la légèrement sur une
surface plane. En utilisant la brosse, nettoyez le bloc-
couteaux et la partie interne de la tête pivotante.
Toutes les 4 semaines environ, nettoyez le bloc-couteaux
avec du liquide nettoyant Braun.
Si votre peau est très sèche et si vous constatez une
baisse d’efficacitéde votre rasoir, ou si l’écran indique
«oil! »(huile), appliquez une goutte d’huile de machine
àcoudre sur la grille du rasoir.
Conseils d’utilisation pour un rasage parfait
•
Toujours se raser avant la toilette faciale car la peau a
tendance àlégèrement gonfler lorsqu’elle est humide.
•
Tenir le rasoir perpendiculairement (90°) au visage.
•
Tendre la peau et se raser dans le sens contraire de
la pousse du poil.
•
Remplacer la grille et le bloc-couteaux de votre rasoir
tous les ans et demi, ou avant s’ils sont usés, afin
d’assurer des performances de rasage optimales.
oil
10
10
5491453_S_S 4-74 Seite 12 Montag, 20. November 2000 8:28 08

13
Remplacement des pièces détachées du rasoir
La grille et le bloc-couteaux de votre rasoir sont des pièces
de précision qui, dans le temps, sont amenées às’user.
Le remplacement de la grille et du bloc-couteaux tous
les 18 mois augmente l’efficacitéde rasage de 25%.*
(Grille et bloc-couteaux: référence No. 7000)
(* Appréciation globale des utilisateurs Braun lorsqu’ils
comparent un rasage avec des pièces neuves àun rasage
avec des pièces utilisées pendant 18 mois).
Accessoires
Accessoires disponibles chez votre revendeur ou auprès
de votre Centre-Service agréé Braun :
•
Grille et bloc-couteaux
(reférence No. 7000)
Respect de l’environnement
Cet appareil est équipéde batteries rechargeables nickel-
hydrure. Afin de protéger l’environnement, ne jetez jamais
l’appareil dans les ordures ménagères àla fin de sa durée
de vie. Ouvrez le boîtier comme indiqué, retirez la batterie
et remettez-la àvotre Centre-Service agréé Braun ou
déposez-la dans des sites de récupération appropriés
conformément aux réglementations locales ou nationales.
Sujet àmodifications sans préavis.
Cet appareil est conforme aux normes
Européennes fixées par les Directives 89/336/EEC
et la Directive Basse Tension 73/23/EEC.
7000
7000
Syncro
7XXX
12
4
5 6
3
5491453_S_S 4-74 Seite 13 Montag, 20. November 2000 8:28 08

14
Termékeink tervezése során a legfontosabb szempont,
hogy azok a legmagasabb színvonalat képviseljék mind a
minŒség, mind pedig a funkcionalitás és a formatervezés
terén. eméljük, hogy új Braun borotvája Önnek is örömet
szerez majd.
Az Ön Braun Syncro borotvájához egy Braun
Clean&Charge, azaz Tisztító és TöltŒ berendezés is
tartozik. (Kérjük, olvassa el a berendezéshez tartozó
külön használati utasítást.)
Fontos!
Csak és kizárólag a borotva eredeti vezetékét használja!
Ha a vezeték megsérül, haladéktalanul cserélje ki!
Leírás
1
SzitavédŒ fedél
6
Kapcsológomb
2
Szita
7
KijelzŒ
3
Kés
8
Információs gomb
4
Szita-kioldó gomb
9
Készenléti jelzŒfény
5
Hosszúhaj-vágó
10
Csatlakozó aljzat
Mıszaki adatok:
•
A vezeték elektromos teljesítménye: 7 Watt
•
Felvett energia a vezetéken keresztül:
100-240 V
2
/ 50-60 Hz
(automatikus feszültségilleszkedés)
•
Bemeneti feszültség-érték: 12-24 V
A borotva töltése
•
ElsŒ töltés: a vezeték segítségével csatlakoztassa a
borotvát az aljzathoz, miközben a kapcsoló a «0»,
azaz kikapcsolt állapotban van, és töltse legalább 4 órán
keresztül. (Eközben a csatlakozó felmelegedhet.)
•
Amint a borotva teljesen feltöltŒdött, vezeték nélkül
használja a borotvát, amíg az akkumulátor teljesen le
nem merül. Azután töltse újra, míg az akkumulátor ismét
eléri teljes kapacitását. (A további töltések
hozzávetŒlegesen 1 órát vesznek igénybe.)
•
Teljes feltöltés után maximálisan 50 percnyi vezeték
nélküli borotválkozásra használhatja a borotvát, a
szakállszŒrzet erŒsségétŒl függŒen. A maximális
akkumulátor-kapacitás azonban csak több töltési/
lemerülési ciklus után érhetŒ el.
•
A töltésre legmegfelelŒbb környezeti hŒmérséklet:
15°C-35 °C.
+35°C
+15°C
210
7570
Magyar
5491453_S_S 4-74 Seite 14 Montag, 20. November 2000 8:28 08

15
KijelzŒ
A készenléti jelzŒfény mutatja, hogy a borotva a hálózati
csatlakozóhoz csatlakozik.
A kijelzŒ mutatja, hogy milyen üzemmódban van a
készülék, valamint jelzi a töltöttségi szintet. Töltés során a
kijelzŒ 20%-os egységenként növekedve mutatja az
akkumulátor kapacitásának szintjét, valamint villogva a
töltésbŒl még hátralévŒ idŒt:
ElsŒ töltés (4 óra):
A kijelzŒn a visszaszámlálás 20 perces egységekben
jelenik meg.
ovábbi töltések (1 óra):
A kijelzŒn a visszaszámlálás 5 perces egységekben
jelenik meg.
Az akkumulátor teljesen feltöltött állapotban van.
Ha a borotválkozásra felhasználható idŒ kevesebb,
mint 10 perc, a kijelzŒ mutatja a felhasználható percek
számát. A mozgó aljzat-szimbólum figyelmezteti Önt,
hogy az akkumulátort fel kell tölteni.
A töltési szint nem elegendŒ vezeték nélküli
borotválkozáshoz. Töltse újra a borotvát, vagy
csatlakoztassa a borotvát a hálózathoz, és vezetékkel
együtt használja a borotvát.
*
A kijelzŒ ebbe a formátumba vált, mikor a borotva a
Clean&Charge, azaz a Tisztító és TöltŒ berendezésben
helyezkedik el.
A borotvához automata akkumulátor-szabályozó
berendezés tartozik, amely felügyeli a töltési/merülési
folyamatot. Amennyiben szükséges, a berendezés
automatikusan helyreállítja az akkumulátor mıködését
egy teljes töltési/lemerülési ciklus beiktatásával
(kb. félévente).
További információkért nyomja meg az információs
gombot:
A kijelzŒ
a gomb egyszeri megnyomására:
– jelzi a legutóbbi borotválkozás idŒtartamát
a gomb következŒ megnyomására:
– jelzi a szita és a kés cikkszámát
*
*
5491453_S_S 4-74 Seite 15 Montag, 20. November 2000 8:28 08

16
a gomb folyamatos nyomvatartására (3 másodpercig):
– futtatni kezdi a kijelzŒ demo programját
A borotvát meg kell tisztítani. (Erre vonatkozóan olvassa
el a «Kézi tisztítás» címszó alatti bekezdést, illetve a
«Clean&Charge», azaz «Tisztító és TöltŒ berendezés»-
hez tartozó különálló használati utasítást.) A kijelzŒ
visszaállításához nyomja meg az információs gombot.
A borotvát meg kell olajozni. (Erre vonatkozóan olvassa
el a «Kézi tisztítás» címszó alatti részt, illetve a
«Clean&Charge», azaz «Tisztító és TöltŒ berendezés»-
hez tartozó különálló használati utasítást.) A kijelzŒ
visszaállításához nyomja meg az információs gombot.
A borotva nem tölthetŒ, ha a környezeti hŒmérséklet
túl alacsony (< 0 °C) illetve túl magas (> 55 °C).
Tartsa a borotvát egy ideig szobahŒmérsékleten az
optimális töltési feltételek elérése érdekében.
A kijelzŒn nem jelenik meg semmi: az akkumulátor
teljesen lemerült, és újratöltésére van szükség.
Borotválkozás
A kapcsoló lehetséges állásai
0 = A borotva ki van kapcsolva (a kapcsoló lezárva)
Nyomja be és tolja fölfelé a kapcsolót a borotva
üzembehelyezéséhez:
1 = Borotválkozás a mozgófejjel
A billenŒrendszer automatikusan alkalmazkodik
az arc vonalához.
2 = Borotválkozás a rögzített fejjel egy bizonyos szögbe
állítva (a borotválkozás szempontjából problémás
bŒrfelületek borotválásához, mint pl. az orr alatti rész)
3 = A hosszúhaj-vágó bekapcsolt állapotban van
(a pajesz, szakáll és bajusz nyírására)
Vezetékes használat
Ha az akkumulátor lemerült, a vezeték aljzathoz való
csatlakoztatása után használhatja a borotvát hálózatról
mıködtetve is.
(Amennyiben a borotva nem mıködik azonnal, töltse
közel egy percig úgy, hogy közben a kapcsoló kikapcsolt
állásban van «0».)
21
21
a
u
t
o
m
a
t
i
c
l
o
c
k
2
1
3
5491453_S_S 4-74 Seite 16 Montag, 20. November 2000 8:28 08

17
A borotva állapotának megŒrzése
Automatizált tisztítás
A Braun Clean&Charge, azaz a Tisztító és TöltŒ
berendezés elvégez minden tisztítási és kenési
mıveletet, amire az Ön borotvájának szüksége van.
Kérjük, olvassa el a berendezéshez tartozó külön
használati utasítást.
Amennyiben az Ön borotváját eredetileg nem szerelték
fel Braun Clean&Charge, azaz Tisztító és TöltŒ
berendezéssel, azt külön megvásárolhatja.
Kézi tisztítás
Minden borotválkozás után egyszerıen tisztíthatja
borotváját a következŒ módon: kapcsolja ki a készüléket.
Nyomja meg a szitakioldó gombokat, hogy a szita
felemelkedjék. (Ne távolítsa el teljesen a szitát.) Kapcsolja
be a borotvát kb. 5-10 másodpercre, hogy a levágott
szŒrszálak kipotyoghassanak belŒle. Alapos tisztításhoz
(hetente egyszer) távolítsa el a szitát és lapos felülethez
ütögetve várja meg, amíg a szŒrszálak kihullanak. A kefe
segítségével tisztítsa meg a kést és a fejet. Kb. négy
hetente tisztítsa meg a kést lehetŒség szerint Braun
tisztítószerekkel.
Ha a bŒre nagyon száraz és lecsökkent üzemidŒt
észlel borotvájánál, illetve a kijelzŒn megjelenik az «oil!»
(olaj!) felirat, a szitára cseppentsen finom gépolajat.
Ötletek a tökéletes eredmény eléréséhez
•
Javasoljuk, hogy mosakodás elŒtt borotválkozzon,
mivel mosakodás után a bŒr többnyire enyhén
felduzzad.
•
Mindig megrŒlegesen (90°) tartsa a borotvát
a bŒréhez.
•
ArcbŒrét feszítse meg és száliránnyal ellentétes
irányban borotválkozzon.
•
A legjobb eredmény elérése érdekében másfél évente,
illetve amikor az adott tartozékok elhasználódnak,
cserélje ki a szitát és a kést.
oil
10
10
5491453_S_S 4-74 Seite 17 Montag, 20. November 2000 8:28 08

18
A tartozékok cseréje
A szita és a kés precíziós tartozékok, melyek idŒvel
elhasználódnak. Másfél évente cserélje ki a szitát és a
kést. Ezzel a borotválkozás minŒsége 25%-kal javul.*
(Szita és kés: száma 7000)
(* Összefoglaló jellegı adat Braun borotvát használók
véleménye alapján, miután összehasonlítottak új,
és másfél éve használatban lévŒ tartozékokat.)
KiegészítŒk
•
Szita és kés
(cikkszáma 7000)
Környezetvédelmi megjegyzés
A készülékben nikkel-hidrid akkumulátor található.
Környezetünk védelmének érdekében ne dobja a
tönkrement készüléket háztartási szemétbe. Nyissa fel a
burkolatot az ábrán látható módon, majd vegye ki az
akkumulátort és azt vigye egy megfelelŒ szemétgyıjtŒ
telepre az országos, illetve helyi szabályzatnak
megfelelŒen.
A változtatás jogát fenntartjuk.
7000
7000
Syncro
7XXX
12
4
5 6
3
5491453_S_S 4-74 Seite 18 Montag, 20. November 2000 8:28 08

19
Na‰e v˘robky jsou vyrobeny tak, aby splÀovaly
nejvy‰‰í nároky na kvalitu, funkãnost a design.
Doufáme, Ïe budete se sv˘m nov˘m holicím strojkem
Braun plnû spokojeni.
VበBraun Syncro je pfiiloÏen k Braun Clean&Charge
(viz samostatn˘ návod k pouÏití).
DÛleÏité
PouÏívejte pouze pfiiloÏen˘ síÈov˘ pfiívod.
Po‰kozen˘ síÈov˘ pfiívod je nutno okamÏitû vymûnit.
Popis
1 Ochrann˘ kryt planÏety 6 Spínaã
2 Holicí planÏeta 7 Displej
3 Bfiitov˘ blok 8 Tlaãítko Info
4 UvolÀovací tlaãítko planÏety 9 Kontrolka
5 Zastfiihovaã dlouh˘ch 10 SíÈová zásuvka
vousÛ na strojku
echnické údaje:
•
Pfiíkon pfii napájení pfies speciální síÈov˘ pfiívod: 7 W
•
Napájecí napûtí pfii napájení pfies speciální síÈov˘ pfiívod:
100-240 V
2
/ 50 nebo 60 Hz (automatické pfiizpÛsobení)
•
Napájecí napûtí holicího strojku: 12-24 V
Nabíjení holicího strojku
•
První nabíjení: Pomocí speciálního síÈového pfiívodu
pfiipojte holicí strojek k síti a nabíjejte jej nejménû
4 hodiny, pfiiãemÏ spínaã je v poloze «0» (síÈová vidlice
se mÛÏe mírnû zahfiívat).
•
JestliÏe je strojek plnû nabit˘, holte se bez síÈového
pfiívodu, dokud se úplnû nevybije. Pak jej opût dobijte
na plnou kapacitu (následné dobíjení bude trvat pfiibliÏnû
1 hodinu).
•
Plné nabití Vám poskytne kapacitu pro pfiibliÏnû 50 minut
holení bez síÈového pfiívodu, v závislosti na vzrÛstu
Va‰ich vousÛ.
Plné kapacity se v‰ak dosáhne aÏ po nûkolika cyklech
nabíjení/vybíjení.
•
Nejvhodnûj‰í teplota okolí pro nabíjení je 15°C aÏ 35 °C.
+35°C
+15°C
210
7570
âesk˘
5491453_S_S 4-74 Seite 19 Montag, 20. November 2000 8:28 08

20
Displej
Kontrolka ukazuje, Ïe je holicí strojek pfiipojen k síti.
Displej informuje o provozním reÏimu a stavu nabití
holicího strojku:
Bûhem nabíjení se na displeji znázorÀuje na symbolu
baterie kapacita akumulátoru v segmentech po 20%,
jakoÏ i zb˘vající doba nabíjení (bliká):
První nabíjení (4 hodiny):
Doba se na displeji odeãítá po 20-minutov˘ch krocích.
Následující nabíjení (1 hodina):
Doba se na displeji odeãítá po 5-minutov˘ch krocích.
Baterie je plnû nabita.
Pfii zb˘vající dobû holení krat‰í neÏ 10 minut se na displeji
zobrazují zb˘vající minuty. Pohybující se symbol síÈové
vidlice indikuje, Ïe je nutno strojek dobít, protoÏe je
kapacita baterie pro holení bez napájení ze sítû
nedostateãná. Strojek buì nabijte, nebo se holte se
strojkem pfiipojen˘m k síti.
*Displej se zmûní, kdyÏ je holicí strojek v Clean&Charge.
Tento holicí strojek je vybaven automatickou funkcí péãe
o akumulátorovou baterii, která monitoruje interval
nabíjení/vybíjení. V pfiípadû nutnosti automaticky
probûhne cyklus plného vybití/nabití baterie (cca kaÏd˘ch
6 mûsícÛ), aby se obnovila její plná kapacita.
Dal‰í informace získáte tisknutím tlaãítka Info:
Stisknûte jednou:
– zobrazí se doba trvání posledního holení
Stisknûte znovu:
– zobrazí se ãíslo náhradního dílu holicí planÏety
a bfiitového bloku
DrÏte stisknuté 3 sekundy:
– rozebûhne se demo zobrazování funkcí na displeji
*
*
5491453_S_S 4-74 Seite 20 Montag, 20. November 2000 8:28 08
Table of contents
Other Braun Electric Shaver manuals

Braun
Braun 580 CC User manual

Braun
Braun 350CC-4 User manual

Braun
Braun InterFace Excel 3770 User manual

Braun
Braun 5408 User manual

Braun
Braun BS 8795 User manual

Braun
Braun 5708 User manual

Braun
Braun Flex XP 5663 User manual

Braun
Braun cruZer FACE User manual

Braun
Braun 8 Pro Series User manual

Braun
Braun 320 User manual

Braun
Braun 5684 User manual

Braun
Braun Cruzer 6 High definition User manual

Braun
Braun LS 5500 User manual

Braun
Braun cruZer6 User manual

Braun
Braun 7 User manual

Braun
Braun MGK 3335 User manual

Braun
Braun Flex integral 6550 ultra speed Operator's manual

Braun
Braun 9 PRO+ Series User manual

Braun
Braun SERIES 5 590 CC-4 User manual

Braun
Braun 5544 User manual