Bravetti PC107B User manual

EURO-PRO OPERATING LLC
Boston, MA, 02465
1 (800) 798-7398
www.euro-pro.com
OWNER’S MANUAL
GUIDE D’UTILISATION
Model/Modèle PC107B
120V., 60Hz., 900 Watts
Intelligent Electronic Pressure Cooker
Autocuiseur Électronique Intelligent
Copyright © EURO-PRO Operating LLC 2008
28. Use extreme caution when removing
the cover after cooking. Serious burns
can result from steam inside. Always
lift and tilt the cover away from you and
allow water to drip into the unit.
29. Never remove the cover while the
pressure cooker is in operation.
IMPORTANT SAFETY INSTRUCTIONS
2
30. Let the pressure cooker cool before
removing the cover.
31. Do not use the “Advance Timer”
feature when cooking foods that may
spoil if left out at room temperature.
32. Do not use with foods that can
overcook easily and quickly.
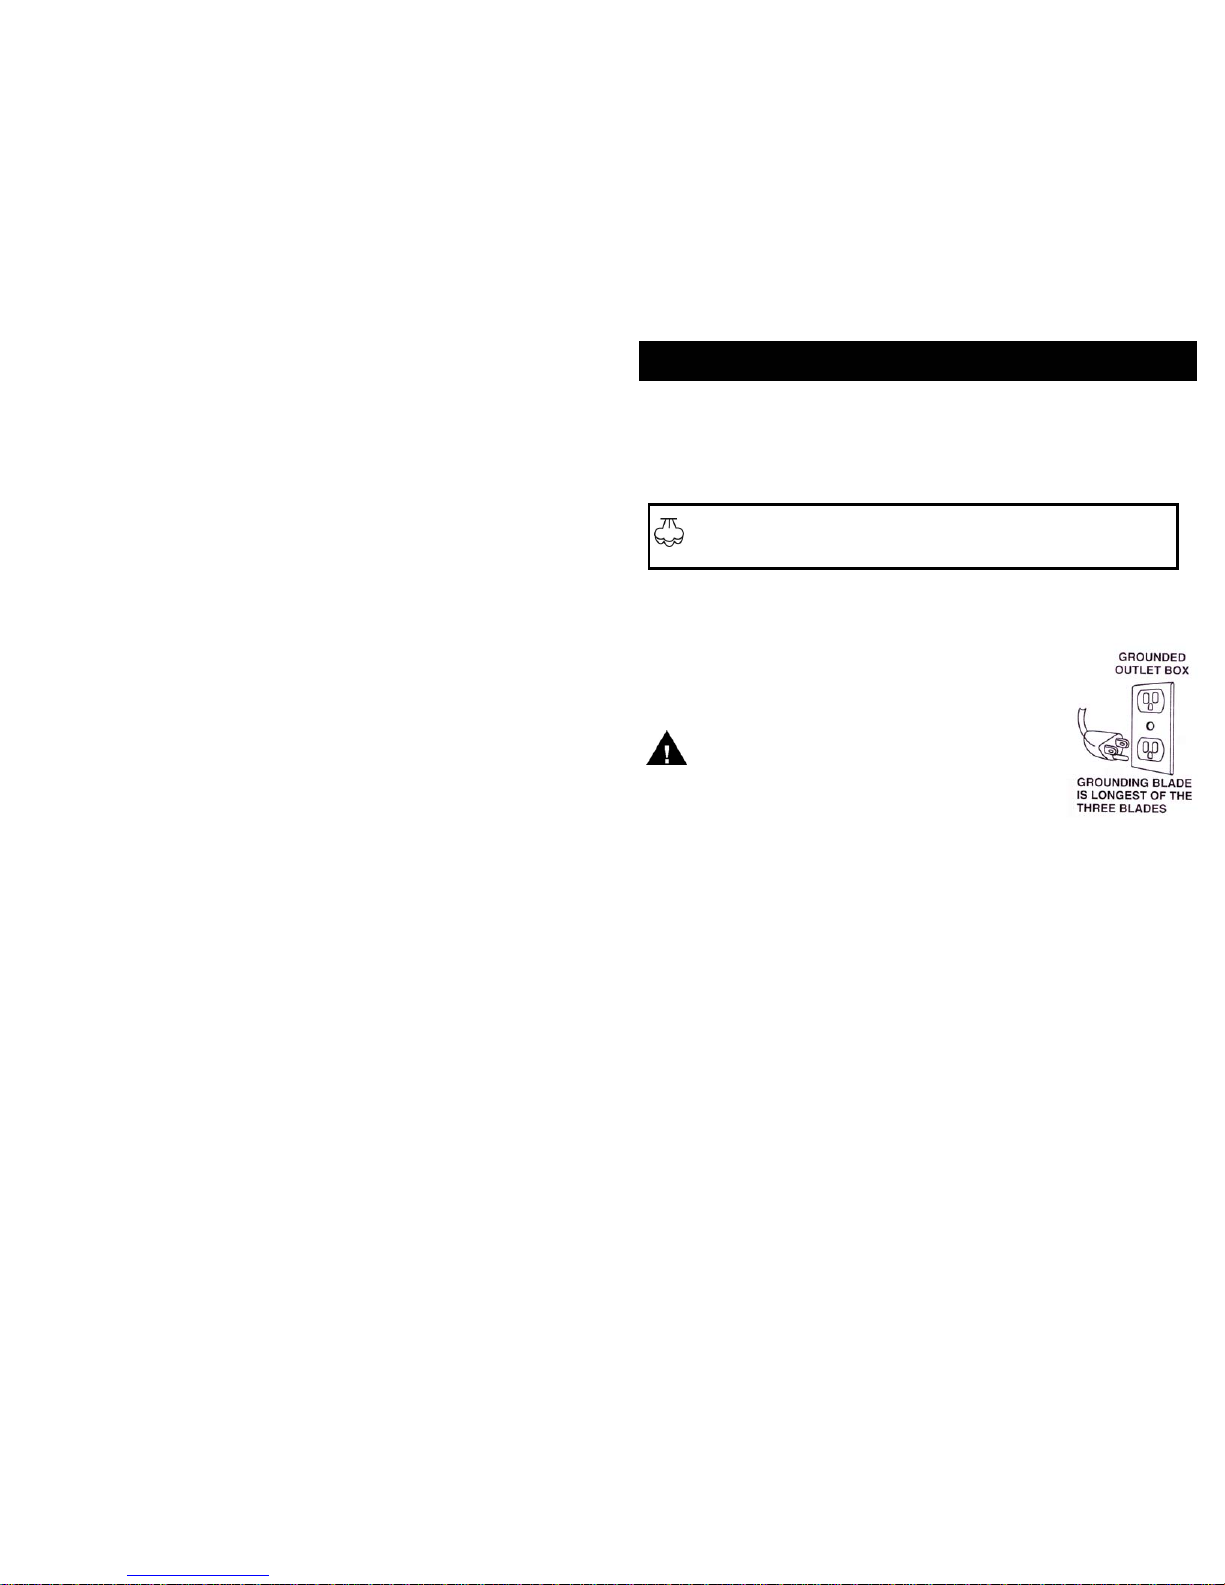
WARNING: Danger of Scalding. Please use caution when using
the pressure cooker. The steam emitted from this aperture is
very hot.
This appliance must be grounded. If it should malfunction or
breakdown, grounding provides a path of least resistance for
electric current to reduce the risk of electric shock. This appliance
is equipped with a cord having an equipment-grounding conductor
and grounding plug. The plug must be inserted into an appropriate
outlet that is properly installed and grounded in accordance with all
local codes and ordinances.
WARNING: Improper connection of the equipment-
grounding conductor can result in a risk of electric shock.
Consult with a qualified electrician or service person if you are in
doubt as to whether the outlet is properly grounded. Do not modify
the plug provided with the appliance - if it will not fit the outlet, have
a proper outlet installed by a qualified electrician.
This appliance is for use on a nominal 120-volt circuit, and has a
grounding attachment plug that looks like the plug illustrated at
right. Make sure that the appliance is connected to an outlet having
the same configuration as the plug. No adaptor should be used
with this appliance.
1. If it is necessary to use an
extension cord, use only a 3-wire
extension cord that has a 3-blade
grounding plug and a 3-slot
receptacle that will accept the plug
on the appliance. The marked
rating of the extension cord should
be equal to or greater than the
electrical rating of the appliance.
OR
2. Do not use an extension cord. If
the power cord is too short, have a
qualified electrician or serviceman
install an outlet near the appliance.
Please Note:
1. A short power supply cord is provided
to reduce the risks resulting from
becoming entangled in or tripping
over a longer cord.
2. Extension cords may be used is care
is exercised in their use.
3. If a long cord or extension cord is used,
(1) the marked electrical rating of the
cord set or extension cord should be at
least as great as the electrical rating of
the appliance, (2) the extension cord
must be a grounding-type 3-wire cord,
and (3) the longer cord should be
arranged so that it will not drape over
the countertop or tabletop where it can
be pulled on by children or tripped over
accidentally.
GROUNDING INSTRUCTIONS
IMPORTANT SAFETY INSTRUCTIONS
SAVE THESE INSTRUCTIONS
1
For Household Use Only
Rev. 06/05C
14. A fire may occur if the appliance is
covered or touching flammable material,
including curtains, draperies, walls, and
the like, when in operation.
15. Do not attempt to dislodge food when
appliance is plugged in.
16. Do not fill the unit over 2/3 full. When
cooking foods that expand during
cooking such as rice or dried
vegetables, do not fill the unit over 1/2
full. See “Cooking with your Pressure
Cooker”.
17. Do not cook foods such as applesauce,
cranberries, pearl barley, oatmeal or
other cereals, split peas, noodles,
macaroni, rhubarb, or spaghetti. These
foods tend to foam, froth and sputter,
and may block the steam release valve.
18. Do not attempt to open cover until
internal pressure has been reduced.
19. Do not use this pressure cooker for
pressure frying with oil or shortening.
20. Never operate the pressure cooker
without any liquid inside. Do not allow
the pressure cooker to boil dry.
21. Always wear protective, insulated oven
gloves when opening the pressure
release valve.
22. Do not use this appliance outdoors.
23. Do not use this appliance for other than
intended use.
24. Keep hands and face away from steam
release valve when releasing pressure.
25. Caution: To reduce the risk of electric
shock, cook only in the removable
cooking pot. Never place anything into
the housing.
26. Do not use without the removable
cooking pot in place.
27. Do not cover the pressure release valve
with anything or lock it in place as an
explosion may occur.
When using your Pressure Cooker basic safety precautions should always be
observed, including the following:
1. Read all instructions before using your
Pressure Cooker.
2. To protect against fire, electric shock
and injury to persons, do not immerse
cord, plugs, or Pressure Cooker
Housing in water or other liquid.
3. Do not touch hot surfaces. Always
use handles or knobs.
4. Close supervision is necessary when
any appliance is used by or near
children. This appliance is not for use
by children.
5. Do not let cord hang over edge of
table or counter, or touch hot surfaces.
6. Do not operate any appliance with a
damaged cord or plug or after the
appliance malfunctions or has been
dropped or damaged in any manner.
Return appliance to EURO-PRO
Operating LLC for examination, repair
or adjustment.
7. The use of accessory attachments not
recommended by the appliance
manufacturer may result in fire, electric
shock or injury to persons.
8. Do not place on or near a hot gas or
electric burner or in a heated oven.
9. To avoid possible steam damage,
place pressure cooker away from walls
or cabinets during use.
10. Unplug from outlet when not in use and
before cleaning. Allow the appliance to
cool before putting on or taking off
parts, and before cleaning.
11. To disconnect, press the “Cancel”
button, then remove the plug from
electrical outlet. Always hold the plug,
and never pull the cord.
12. Extreme caution must be used when
moving an appliance containing hot oil
or other hot liquids.
13. Oversized foods, metal foil packages,
or utensils must not be inserted in the
appliance, as they may involve a risk of
fire or electric shock.
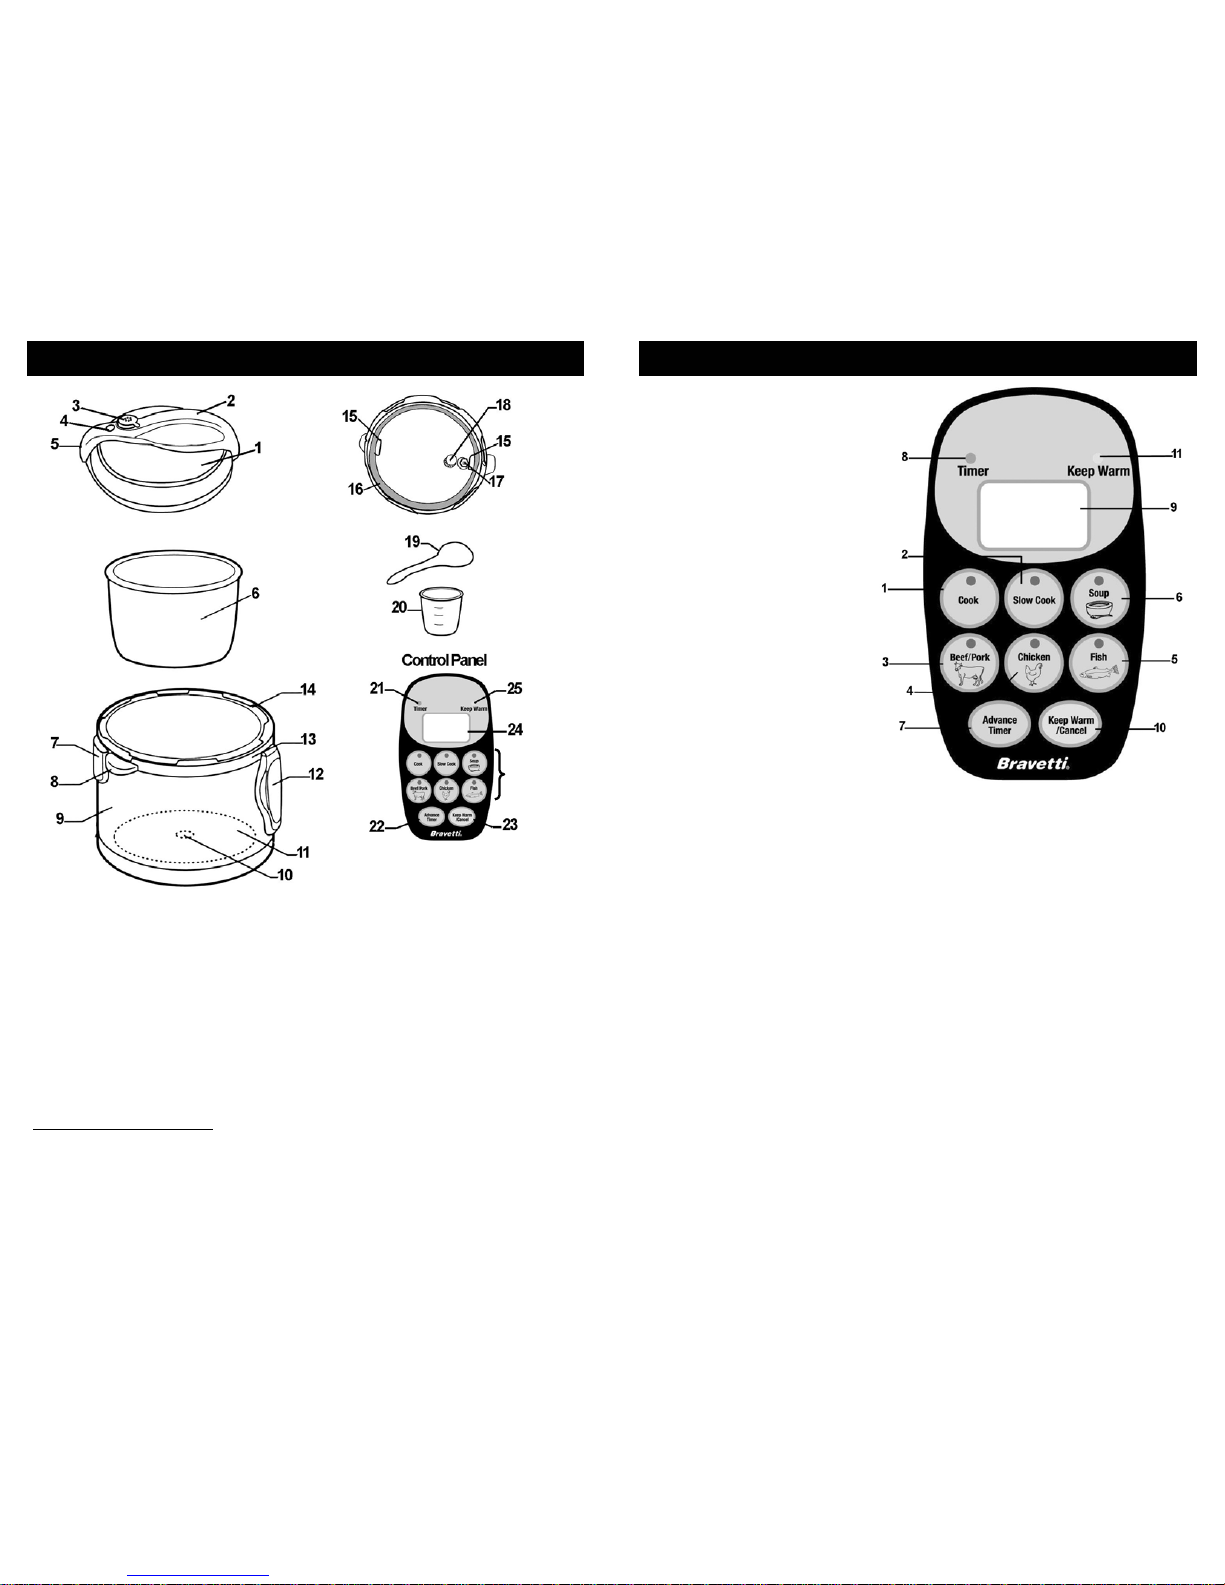
Getting To Know Your Programmable Pressure Cooker
Technical Specifications
Voltage: 120V., 60Hz.
Power: 900 Watts
NOTE: *Illustrations may vary from actual product
3
1. Pressure Cooker Cover
2. Cover Handle
3. Pressure Release Valve
4. Safety Float Valve
5. Cover Locking Pin
6. Removable Cooking Pot
7. Vapor Collector
8. Carry Handles
9. Stainless Steel Housing
10.Temperature Sensor
11.Heating Plate
12.Control Panel
13.Upper Ring
14. Inner Tank
15. Sealing Gasket Holder
16. Sealing Gasket
17. Floating Valve Washer
18. Diffuser
19. Spatula
20. Measuring Cup
21. Timer Light
22. Advance Timer Button
23. Keep Warm/Cancel
24. Timer Display
25. Keep Warm Light
26. Preset Buttons
27. Detachable Power Cord (not shown)
26
CONTROL PANEL FEATURES
4
9. Timer Display
The timer display will show the
advance time that you have set.
It will count down the time by
half hour increments.
10. Keep Warm/Cancel Button
The keep warm/cancel can be
used to keep cooked food warm
until ready for use or to cancel a
cooking cycle or to cancel a
wrong selection.
11. Keep Warm Indicator Light
This indicator light (yellow) will
illuminate when the cooking
process has been completed
and the pressure cooker has
switched over to the “Keep
Warm” cycle.
Cooking with your new Electronic
Pressure Cooker is simple and easy
to use. The intelligent electronic
controls take the guesswork out of
heat adjustment and cooking times.
Simply add your food to the cooking
pot, close the cover and push one of
the preset buttons and let the
pressure cooker do the rest.
Preset Buttons
1. Cook Button
The cook button is excellent for
cooking unprocessed white rice
and fresh vegetables.
2. Slow Cook Button
The slow cook button is excellent
for sticky rice, brown or wild rice.
3. Beef/Pork Button
The beef/pork button is
for cooking roasts, briskets or
pork ribs. You can also use this
setting for dry beans or other
legumes, whole beets, chili and
other foods that require longer
cooking time.
4. Chicken Button
The chicken button is set to
prepare roasts or poultry of any
kind.
5. Fish Button
The fish button set to cook fish
perfectly. You can also cook fresh
vegetables on this setting.
6. Soup Button
The soup button is programmed
to cook soups, stews, or sauces.
7. Advance Timer Button
The advance timer can be preset
to start the cooking process later.
CAUTION: Do not use the advance
timer when cooking perishable
foods that may spoil if left out at
room temperature.
8. Timer Indicator Light
This indicator light (green) is
only lit when the advance timer
is selected.

5
OPERATING INSTRUCTIONS
Preparing Your Pressure Cooker
Before using the electronic pressure
cooker for the first time:
1. Remove the cooking pot from the unit.
2. Wash the removable cooking pot with
warm, soapy water. The removable
cooking pot may also be washed in a
dishwasher.
3. Remove the sealing gasket from the
cover and wash it with warm, soapy
water. (Fig. 1)
Do not wash in a
dishwasher. Allow
the sealing gasket to
air dry or dry with a
paper towel before
inserting back into
the cover.
4. The cover of the pressure cooker may
be washed with warm, soapy water or
can also be placed into the dishwasher
after the sealing gasket has been
removed.
5. Replace the sealing gasket into the
cover by placing it under the gasket
holding ring ensuring that the crease in
the sealing gasket meets with the
gasket holding ring.
Important: The removable cooking pot and
pressure cooker cover are dishwasher
safe, however, you must remove the
gasket before placing the cover in
dishwasher.
Using Your Pressure Cooker
NOTE: For best results, always check that
the pressure release valve, the diffuser and
the sealing gasket are in good working
condition. Visually inspect the sealing
gasket for any defects such as cracks,
punctures or tears. Also check that there
are no particles blocking the pressure
release valve or the diffuser openings on
the underside of the cover. If you find any
defects in the sealing gasket, do not use
the pressure cooker. Call customer service
at 1 (800) 798-7398 for a replacement
sealing gasket.
Once all parts are washed and dried, your
pressure cooker is ready for use.
The pressure cooker cover has a locked
position and an open position.
To remove the cover:
1. Turn cover clockwise until the cover
locking pin lines up with the vapor
collector. (Fig. 2)
4. Plug the cord into a grounded-type
120V AC electrical wall outlet.
5. Choose the desired program by
pressing one of the pre-set cooking
buttons. Once the indicator light is lit
on that selection, the pressure cooker
has begun the pre-heating and
cooking cycle. The pressure cooker
will beep three times when the
pressure cooker has finished cooking.
6. When the cooking cycle has finished,
cooking, or to cancel the selection
press the Keep Warm/Cancel button.
CAUTION: The cover must be in the
locked position when steaming or
cooking under pressure.
7. For pressure cooking turn the
pressure release valve one half turn
to the closed position, that is the
lowest position the valve naturally
sits. (Figs. 4)
Cover
Locking
Pin
Fig. 1
Pressure Release
Valve Closed
Fig. 4
2. Place the food that you want to cook
inside the removable cooking pot.
3. Replace the cover onto the pressure
cooker and turn counter-clockwise to
lock the cover in place. The cover
should stop turning when the cover
locking pin is over the carry handle.
(Fig. 3)
Fig. 2
Carry
Handle Fig. 3
6
OPERATING INSTRUCTIONS
9. Alternately you can allow the steam
to release naturally, this can take a
few more minutes and add to the
cooking time of the food inside.
NOTE: This unit has a built-in safety
feature, the cover will not turn to the
open position unless the pressure has
been released by allowing the unit to sit
or by turning the pressure release valve
to the open position.
10. Allow the unit to cool completely
before cleaning.
8. When the cooking process is
complete, release the pressure by
turning the pressure release valve
one half turn to the upper most
position to release steam. (Fig. 5)
WARNING: Steam can cause serious
burn injury avoid contact with face or
hands. To open the pressure release
valve it is suggested to use a utensil with
a long reach to the turn the valve.
Pressure Release
Valve Open
Fig. 5
4. Place the cover on the pressure
cooker and turn it counter-clockwise
to lock in place.
5. Plug the power cord into the unit
and then into the electrical outlet.
6. Lower the pressure release valve so
that steam may not escape.
7. Select the desired preset button
depending on food to prepare. (See
Cooking Guide or Features).
8. Ensure that the indicator light on the
preset button is lit.
9. The pressure cooker will beep three
(3) times to let you know that the
cooking process is complete.
10. Then wait for unit to beep to signal
end of cooking process.
11. The pressure cooker will
automatically go into “Standby”
mode for one (1) minute and then
into “Keep Warm” mode for up to 24
hours.
12. Slowly rotate the pressure release
valve to the “Open” position to
release the steam. (Fig. 6)
13. After the safety float valve has fallen
down, remove the cover and
remove the food. (Fig. 7)
Cooking with the Pre-Set Buttons
When cooking with the pressure cooker
using the pre-set buttons, the unit will
cook automatically and set the pressure
depending which preset button is
selected.
1. Place the removable cooking pot
into the unit.
2. Add the ingredients to be cooked
into the removable cooking pot
following your recipe.
3. You should add a minimum of 1 cup
(250 ml) of liquid into the cooking
pot. Do not fill the cooking pot
more than one-third full when
cooking dried beans and
legumes; no more than half way
when cooking soups and stews;
and not more than two-thirds full
when cooking vegetables or
whole pieces of meat.
Fig. 6
Fig. 7

COOKING GUIDE
FOOD SETTING COOKING
TIME RELEASE
METHOD
VEGETABLES - Add 1-1/2 cups water
Artichoke Cook
Cook times
will range
from 15 to
40 minutes
on the Cook
Setting.
Quick
Asparagus Cook Quick
Beans (Green) Cook Quick
Beets Cook Quick
Broccoli Cook Quick
Cabbage Cook Combination
Carrots Cook Quick
Cauliflower Cook Quick
Corn Cook Quick
Potato Cook Combination
Spinach Cook Combination
Squash Cook Combination
BEANS, MEAT, POULTRY, AND FISH - When adapting standard recipes, use 1/2
amount of water used with conventional cooking
Beef Beef/Pork
Cook times will
range from:
40 to 70 minutes
on Beef/Pork
Setting,
30 to 50 minutes
on Chicken
Setting,
15 to 40 minutes
on Fish Setting.
Combination
Chicken Chicken Combination
Pork Beef/Pork Combination
Shellfish Fish Combination
Fish Fish Combination
Beans (Navy) Beef/Pork Combination
Beans (Kidney) Beef/Pork Combination
Split peas Fish Quick
RICE - To reduce foam add at least one tablespoon of oil or butter
Rice (White) - Use 1/3
to 1/2 less than normal
recipe Cook Cook times will
range from 15 to
40 minutes on
the Cook
Setting.
Combination
Rice (Brown) - Use 1/4
to 1/2 less than normal
recipe Cook Combination
Note: Cook times will vary as the pressure cooker will adjust the cooking times based
on the volume of ingredients and liquid added to the pot.
7 8
OPERATING INSTRUCTIONS
Releasing Steam Pressure
WARNING: Use extreme caution when
removing the cover after cooking. Serious
burns can result from steam inside.
After you have finished cooking in your
pressure cooker, you can release the
steam pressure in one of three (3) ways,
“Quick Release” , “Combination” and
“Normal”.
Quick Release Method:
1. After the cooking process has been
completed, press the “Keep
Warm/Cancel” button to stop the
pressure cooker from going into the
“Keep Warm” mode.
2. Turn the steam release valve to the
“Open” position to release the steam
fast. (Fig. 8)
3. Wait until the safety float valve has
gone down before removing the cover.
Always lift the cover away from you to
release any remaining steam so that
you do not get burned.
CAUTION: Escaping steam is very hot.
To avoid serious injuries or burns, keep
bare skin, face and eyes away from the
steam release valve.
CAUTION: Do not use the quick release
method for foods with a lot of liquid
such as soups and sauces. There could
be an overflow.
Combination Method:
1. After the cooking process has been
completed, press the “Keep
Warm/Cancel” button to stop the
pressure cooker from going into the
“Keep Warm” mode.
2. Let the unit cool down for approx. thirty
(30) minutes and then turn the steam
release valve to the “Open” position to
release the steam. (Fig. 8)
3. Wait until the safety float valve has
gone down before removing the cover.
Always lift the cover away from you to
release any remaining steam so that
you do not get burned.
Normal Method:
Allowing the steam to release naturally is
preferred when cooking foods like stocks,
sauces, and certain large cuts of meat
which will benefit from continuing to cook
in the pressure cooker. As the
temperature decreases so does the
pressure.
1. After the cooking process has been
completed, press the “Keep
Warm/Cancel” button to stop the
pressure cooker from going into the
“Keep Warm” mode.
2. Wait until the safety float valve has
gone down before removing the
cover. Always lift the cover away from
you to release any remaining steam
so that you do not get burned. (Fig. 9)
NOTE: Do not use this method with
foods that easily overcook.
CAUTION: Never attempt to force open
the pressure cooker cover until the
safety float valve has dropped.
NOTE: Since overcooked food cannot be
corrected, it is almost better to err on the
undercooked side by cooking an
unfamiliar food for a shorter period of
time than you may think necessary.
Fig. 8
Fig. 9
IMPORTANT: Do not use the “Quick
Release” method with foods such as
legumes, grain, or other foods that
froth or when the pressure cooker is
very full.
Table of contents
Languages:
Other Bravetti Electric Pressure Cooker manuals


