Bravo IND-400BT User manual

USER MANUAL
VERSION 1.0
Bravo View Technology
20153 Paseo Del Prado
Walnut, CA 91789
United States of America
www.bravoview.com
Thank You for purchasing the
IND-400BT
IN-DASH DIGITAL MEDIA RECEIVER
WITH BLUETOOTH AND USB/SD/AUX-IN

1
SAFETY PRECAUTIONS
To ensure safe driving, please adjust the
volume to a safe & comfort level in case of
emergency situations.
Never expose this unit, amplifier, and
speakers to moisture or water for preventing
electric sparks or res.
Please don't change the fuse on the power
cord without professional guidance, using
improper fuse may cause damage to this unit
or even cause re.
Please power off this unit at once and send it
back to the after-sales service center or the
dealer/distributor you purchased from if one
of the following symptoms is found:
(a). Water or other obstacle enters the unit;
(b). Smoking;
(c). Peculiar smell.
Only connect the unit to a 12-volt power
supply with negative grounding.
Never install this unit where the operation &
condition for safety driving is restrained.
Thank you for purchasing this product.
Please read through these operating
instructions so you will know how to operate
your model properly. After you have nished
reading the instructions, keep this manual in
a safe place for future reference.
To provide a clear demonstration and an
alternative for easy understanding of the
operation of this unit, graphic illustration
was used. However, this illustration is not
necessary printed as the actual image found
on the unit.

2
WMA and MP3 Compatibility
It is possible to playback WMA and MP3 les.
About WMA
The unit can playback WMA data.
Windows Media and the Windows logo are
trade marks or registered trademarks of
Microsoft Corporation in the United States
and/or other countries.
This unit may not operate correctly depending
on the application used to encode WMA les.
About MP3
Supply of this product only conveys a license
for private, non-commercial use and does not
convey a license nor imply any right to use
this product in any commercial (i.e.revenue-
generating) realtime broadcasting (terrestrial,
satellite, cable and/or any other media),
broad-casting/streaming via internet, intranets
and/or other networks or in other electronic
content distribution systems, such as pay-
audio or audio-on-demand applications.
An independent license for such use is
required. For details, please visit http://www.
mp3licensing.com.
FEATURES CONTENTS
Safety Precautions ......................................... 1
Features ......................................................... 2
Panel Controls ................................................ 3
Remote Controls ............................................ 4
General Operation .......................................... 5
Sound Setting ................................................. 5
Tuner Operation ............................................. 6
USB/SD/MMC/MP3 Playback ........................ 6
MP3/WMA Operation ..................................... 7
Anti-Theft System ........................................... 9
Bluetooth Operation ..................................... 10
Menu Function .............................................. 12
Device Connections ..................................... 13
Installation Guide .......................................... 14
Troubleshooting ............................................ 15
Specications ............................................... 16

3
PANEL CONTROLS
Power ON: Press [ ] button to turn on the unit.
1. - Power
2. - Mute
3. - SD/MMC mode – Search function.
- AUX mode – No function.
- USB mode – Search function
- RADIO mode – PTY function.
4. - Band switch (in Radio mode)
5. - Unlock the front panel.
6. - Display switch
- System setup (long press)
7. - Scan play / Preset scan
- Auto memory store (long press)
8. - Adjust volume level / Conrm (press)
9. - Button 1: Play / Pause / Top play (long press) / Preset station 1
- Button 2: Scan play / Preset station 2.
- Button 3: Repeat play / Preset station 3.
- Button 4: Random play / Preset station 4.
- Button 5: Previous folder / Preset station 5. /MP3 track -10 down (long press)
- BT mode – Dial/Answer / Transfer call
- Button 6: Next folder / Preset station 6. /MP3 track +10 up (long press)
- BT mode – Reject / Terminate call
10.- Aux-in jack
11.- USB connector
12.- Previous / next track
- Seek + / - (long press)
13.- Toggle the audio source

4
REMOTE CONTROLS
Replacing the lithium battery of
remote control unit.
When the range of the operation of the card
remote control becomes short or no functions
while operating. Replace the battery with a
new lithium battery. Make sure the battery
Polarity replacement is correct.
1. Pull out the battery holder while pressing
the stopper.
2. Insert the button-type battery with the
stamped(+) mark facing upward.
Insert the battery holder into the remote
control.
(CR2025)
Remote
Sensor
Operating range
Point the remote control unit to the remote
sensor when you operate with it.
The remote control can operate within a
distance of 3~5m.
EQ
WARNING:
Store the battery in place where children
cannot reach. If a child accidentally
swallowed the battery, consult a doctor
immediately.
Do not recharge, short, disassemble or heat
the battery or dispose it in a re. Doing this
may cause the battery to give off heat, crack
or start a re.
Do not leave the battery with other metallic
materials or poke the battery with tweezers
or similar tools.
When throwing away or saving the battery,
wrap it in tape and insulate.
1. - Toggle the audio source
- Power on / Power off (long press)
2. - Band switch: FM1, FM2, FM3, MW1, MW2
-MP3/WMA mode – Top play (long press)
- BT mode – Dial / Receive / Transfer call
3. - Radio tune
- Track seek
4. - Play / Pause
5. - Display switch
6. - Buttons
[1] Button: Preset station 1.
[2] Button: Preset station 2.
[3] Button: Preset station 3.
[4] Button: Preset station 4.
[5] Button: Preset station 5.
[6] Button: Preset station 6.
7. - Volume up / down
8. - Press to enter menu mode.
- BT mode – Reject / Terminate call.
9. - Scan play / Preset scan
- Auto memory store (long press)
10. - Repeat play
11. - Random play
12. - Mute the volume
13. - EQ

5
Power On/Off Button
Press the [ /MUTE] button to turn the unit on
when the vehicle ignition switch is on. Press
and hold the button to turn the unit off.
Adjust Volume level
Rotate the knob to adjust volume level. Rotate
it clockwise to increase and anticlockwise to
decrease the volume.
Audio Mute
Press the [ /MUTE] button to mute the
volume from the system. “MUTE” will appear
on the display panel and the volume will be
muted. Press the [ /MUTE] button again, or
rotate or press the knob to return the volume
level to the setting in use before the Mute
function was activated.
Mode Button (SRC)
Press the [SRC] button to change between
Radio, USB (when USB is connected),
Card(when SD/MMC card is in), A2DP (when
BT is connected) or AUX play.
Auxiliary Input
To access an auxiliary device:
1. Connect the portable audio player to the
AUX interface on the front panel.
2. Press the [SRC] button to select Aux-In
mode.
Press SRC again to cancel Aux-In mode and
go to the next mode.
Display Selector (DISP)
Prest the [ DISP ] button to display the clock
time, the time will display at all times. Prest
the [ DISP ] button again to turn back previous
mode.
GENERAL OPERATION
Press and hold the [ MENU ] button to enter
sound effect setting mode. First press shows
current EQ, then rotate the knob to changes
BEAT EQ in this order:
OFF <-> POP <-> CLASSIC <-> ROCK <->
JAZZ <-> CUSTOM
Rotate the knob to changes CUSTOM, and
press the knob, the press [ ] or [ ]
button to select and rotate the knob to select a
value.
80HZ: (-16)- (+6)
250HZ: (-16)- (+6)
800HZ: (-16)- (+6)
2.5KHZ: (-16)- (+6)
8KHZ: (-16)- (+6)
Press and hold the [ MENU ] button to enter
sound effect setting mode, then press [ ] or
[ ] button to select USER preset including:
BALANCE -> FADER -> LOUD, rotate the
knob to select a value.
BALANCE:LEFT 1-7->CENTRE->RIGHT 1-7
FADER:FRONT 1-7->CENTRE->REAR 1-7
LOUD: ON/OFF
SOUND SETTING

6
TUNER OPERATION USB/SD/MMC/MP3 Playback
1. Loading SD/MMC Card
Insert the SD/MMC card into the slot.
The unit will play the music automatically and
the LCD will show CARD.
2. Take out SD/MMC Card
Push SRC button and switch to non CARD
mode, slightly press SD/MMC card, take out
the card when it was popped out.
3. Loading USB equipment
Open the rubber cap, insert the USB into the
connector and the unit play the music in the
USB storer automatically, and the LCD will
show USB.
4. Take out USB equipment
Push the SRC button and switch to non USB
mode, then take off the USB storer, close the
rubber cap.
USB/SD/MMC Notes
USB functions (ash memory type) MP3 music
play
1. SD/ MMC card support.
2. USB flash memory 2 in 1 (SD/MMC )
support.
3. Fat 12/fat 16/fat 32 is possible.
4. File name : 32 byte/dir name : 32 byte/tag
name : 32 byte
5. Tag (ID3 tag ver 2.0)
- title/artist/album : 32 byte support.
6. Multi card reader not support.
7. USB 1.1 support, USB 2.0 support (It can
not support USB 2.0 speed. Just, get the
same speed with USB 1.1).
Not all kinds of USB devices are compatible
with the unit.
Note:
Not all USB devices are compatible with the
unit.
Band
During radio play, press the [BAND] button to
choose between three FM, two AM bands.
Up Tuning
Press the seek up [ ] button to tune
stations upward step-by-step. The current
frequency will be shown in digital format on
the display panel.
Press and hold the seek [ ] button to the
next available station.
Down Tuning
Press the seek down [ ] button to tune
stations downward step-by-step.
Press and hold the seek down [ ] button
to the previous available station.
Auto Memory Store
Press the [AMS] button to automatically select
six stations and store them in the current
band. The new stations replace stations
already stored in that band.

7
This unit can play back MP3/WMA
les
Notes:
If you play a WMA file with active DRM (Digital
Rights Management), no audio is output.
To disable DRM
(Digital Rights Management)
When using Windows Media Player 9/10/11,
click on Tool -> Options -> Copy music tab,
then under Copy settings, unclick the Check
box for Copy protect music. Then, reconstruct
les.
Personally constructed WMA les are used at
your own responsibility.
Precautions when creating MP3/
WMA le
Usable sampling rates and bit rates
1. MP3: Sampling rate 8 kHz-48 kHz, Bit rate
8 kbps-320 kbps / VBR
2. WMA: Bit rate 8 kbps-320 kbps
File extensions
1. Always add a le extension “.MP3”, “.WMA”
to MP3, WMA file by using single byte
letters. If you add a le extension other than
specied or forget to add the le extension,
the le cannot be played.
2. Files without MP3/WMA data will not play.
The files will be played soundlessly if you
attempt to play files without MP3/WMA
data.
* When VBR les are played, the play time
display may differ the play location.
* When MP3/WMA files are played, a little
no sound part is caused between tunes.
Logical format (File system)
1. The folder name and file name can be
displayed as the title during MP3/WMA play
but the title must be within 32 single byte
alphabetical letters and numerals (including
an extension).
2. Do not afx a name to a le inside a folder
having the same name.
Number of les or folders
1. Up to 999 files can be recognized per
folder.
Up to 3000 les can be played.
MP3/WMA OPERATIONS
2. Some noise may occur depending on
the type of encoder software used while
recording.
Pausing play
1. Press the [ 1 ] button on the front panel or the
[ TOP ] button on the remote control to
pause play.
“PAUSE” appears in the display.
2. Press the above button again to resume
play.
Selecting a track
Track-up
1. Press the [ ] button to move to the
beginning of the next track.
2. Each time you press the [ ] button, the
track advances to the beginning of the next
track.
3. For MP3/WMA tracks, press and hold the
[6] button (1 sec.) to move ahead to +10
tracks.
Track-down
1. Press the [ ] button to move back to the
beginning of the current track.
2. Press the [ ] button twice to move back
to the beginning of the previous track.
Fast-forward/Fast-reverse
Fast-forward
Press and hold the [ ] button .
Fast-reverse
Press and hold the [ ] button .
* For MP3/WMA tracks, it takes some time
until the start of searching and between
tracks. In addition, some error may occur in
the play time.
Folder select
This function allows you to select a folder
containing MP3/WMA files and start playing
from the rst track in the folder.
1. Press the [ 5 ] or [ 6 ] button.
Press the [ 5 ] button to move the previous
folder. Press the [ 6 ] button to move the
next folder.
2. To select a track, press the [ ] or [ ]
button.

8
Search Function
Press the [MENU], then rotate the knob to
choose FOLD SCH or TRK SCH.
Direct Song/File Access
1. Press the knob to enter the track list search
mode.
2. Turn the knob to select a digit.
3. Press the knob to conrm entry and the tens
digit will ash.
4. Turn the knob to select digit.
5. Repeat above steps to enter the hundreds
and thousands digit, if necessary.
NOTE: The unit will only allow the selection of
digits that correspond with the number of les
on the media you are searching.
6. Once the track number appears on the
screen, press the knob to play the selected
song/le.
Searching Folders/Files
1. Press the knob to enter the folder list
search mode.
2. Turn the knob to select a le or folder, press
the [MENU] botton to turn back the previous
folder.
3. Press the knob to enter the search mode.
And then the list appears in the display.
4. Turn the knob to select a track or folder.
5. If there is a track, press the knob to play.
If there is a folder, press the knob to go on
searching.
* When play back MP3 / WMA file, this
function is performed in the current folder.
Top function
The top function resets the player to the first
track. Press and hold the [ 1 ] button (1 sec.) to
play the rst track (track No. 1).
* In case of MP3/WMA, the rst track of the
current folder will be played.
Other various play functions
Scan play
This function allows you to locate and play the
rst 10 seconds of all the tracks.
Press the [ 2 ] button to perform scan play.
Repeat play
This function allows you to play the current
track repeatedly or play a track currently being
played in the MP3/WMA folder repeatedly.
CD:
1. Press the [ 3 ] button once or more until
“RPT ON” appears on the LCD to perform
repeat play.
2. Press [ 3 ] button repeatedly until “RPT
OFF” appears on the LCD to cancel repeat
playback.
Random play
This function allows you to play the current
track random play being played in the MP3/
WMA folder.
CD:
1. Press the [ 4 ] button “RDM ON” appears
on the LCD to perform random play.
2. Press the [ 4 ] button repeatedly until
“RDM OFF” appears on the LCD to cancel
random playback.
MP3/WMA OPERATIONS

9
ANTI-THEFT SYSTEM
This unit is equipped with a detachable panel.
Removing this panel makes the radio totally
inoperable.
Remove the detachable panel
1. Press button.
2. Hold the part popped out
and pull the panel out.
3. Gently press the button
of the case and open the
cover. Place the panel
into the case and take it
with you when you leave
the car.
Install detachable panel
1. Fix right part of face
plate in the panel slot of
the unit.
2. Press down the left side
of the face plate until it
clicks into the panel slot.
Remove the unit
1. Switch off the power of the unit.
2. Remove the panel and
the trim plate.
3. Insert both Removal
Keys into the hole on the
front of the set until they
lock.
4. Pull out the unit.
2
2
1
1
2
2
1
1
2
2
1
1

10
BLUETOOTH OPERATIONS
Note:
For your safety, avoid talking on the phone as
much as possible while driving.
Bluetooth is a wireless transmission way
for short distance. The built-in Bluetooth
can connect with the mobile phones having
Bluetooth function.
After connecting, you can control your mobile
phone through the unit.
Pairing
Use this function to establish a connection
between the unit and your mobile phone.
1. Turn on the unit.
2. Turn on Bluetooth function of your mobile
phone, keep phone within 3 meters to
the unit and start to search for Bluetooth
devices.
3. After the name of the Bluetooth module
“BRAVO” appears on the pairing list of
your mobile phone, select it. At this time, a
pairing code is required. Enter the pairing
code “0000”, and the Bluetooth pairing
will process automatically. Some mobile
phones may instruct you to select connect
or disconnect, please select connecting.
Receive
1. After pair successfully, if there is a call
incoming, the unit switch to BT mode
automatically.
2. Press [5/ ] button to receive.
3. Press [6/ ] button to hang up.
Call Transfer
During talking, press [5/ ] button to transfer
audio from the unit to your mobile phone.
Note:
Some mobile phones will transfer audio from
the unit to themselves once the incoming call
is answered.
BT Audio
To listen to audio from a bluetooth device and
control playback with the unit.
1. Press SRC button repeatedly to select A2DP
mode.
2. To play or pause, press [1 >|| TOP].
Selecting a track
Track-up
Press the [ ] button to move to the
beginning of the next track.
Track-down
Press the [ ] button to move to the
beginning of the previous track.
Music Mode
A2DP
A2DP is short for Advanced Audio Distribution
Profile. The mobile phones supporting this
function can transmit stereo audio, whereas
the ones not supporting this function can
transmit mono audio only.
General Notes for Bluetooth
1. For some types of mobile phones, during
our test, after the mobile phones appear
connection successful, the unit still appear
waiting for pairing. At this time you must nd
the unit’s Bluetooth module name “BRAVO”
on the pairing list on your mobile phone
and select connecting in the submenu, then
the unit will appear CONNECT. Otherwise,
there is no voice coming out when
communicating, though the mobile phone
has already displayed CONNECT. Some
mobile phones, when it play back A2DP, you
must nd the unit name in the phone’s menu
and reconnect (check your mobile phone
whether has the A2DP & AVRCP functions).
2. When pairing, some types of mobile phone
hint that how to operate, for example, when
you make a phone call by the unit, if the
mobile phone voice dosn’t be transferred to
the unit, no voice comes out.
3. Depending on the mobile phone, if private
mode is selected, when you make a phone
call by the unit, or receive, the voice would
be transferred to the mobile phone. But
sometime the Bluetooth maybe disconnect
till the communication ends, then connects
your mobile phone to the unit automtically.
Some mobile phones maybe need pair
again.
4. For mobile phone, the Bluetooth device
name must be primary symbols or numbers.
Otherwise, some unpredictable issues
may occur during the Bluetooth devices

11
BLUETOOTH OPERATIONS
connecting and making phone call.
5. After CONNECT, if no sound produced,
please check whether the Bluetooth stereo
audio on the phone switched ON.
12
MENU FUNCTION
At all mode, press and hold [DISP] button to
enter system setup. Press [ ] or [ ]
button to select options, rotate the knob to
adjust.
AF ON/OFF mode
Rotate the knob to choose AF ON or OFF.
TA ON/OFF mode
Rotate the knob to choose TA ON or OFF.
REG ON/OFF mode
Rotate the knob to choose REG ON or OFF.
DX/LO (RADIO mode)
Rotate the knob to choose radio local or
distant at RADIO mode.
• LO: Only stations with strong signal can be
received.
• DX: Stations with strong and weak signals
can be received.
STEREO/MONO mode
Rotate the knob to choose FM STEREO or
MONO.
SCROLL ON/OFF
Rotate the knob to choose SCROLL ON or
OFF.
For track information that is longer than the
display panel:
When SCROLL is ON, the LCD will display
ID3 TAG information cyclely, e.g: TRACK-
>FOLDER->FILE->ALBUM->TITLE->ARTIST-
>TRACK->...
When SCROLL is OFF, the L will display
one of the ID3 TAG information, the default
is TRACK, but user can adjust it to other ID3
TAG information by press [DISP] button.
BEEP ON/OFF
Rotate the knob to choose button beep sound
ON or OFF.
12/24H
Rotate the knob to choose time format: 12 or
24 hour.
AUTO CON ON/OFF (BT mode)
Rotate the knob to choose AUTOCONNECT
ON or OFF.
* The factory default setting is “ON“.
CLOCK
Press the knob to enter clock setting mode,
rotate the knob to set clock, press [ ] or
[ ] button to select hour or minute, press
and hold the knob to conrm.

13
DEVICE CONNECTIONS
Wiring Diagram
ANTENNA
MIC
14
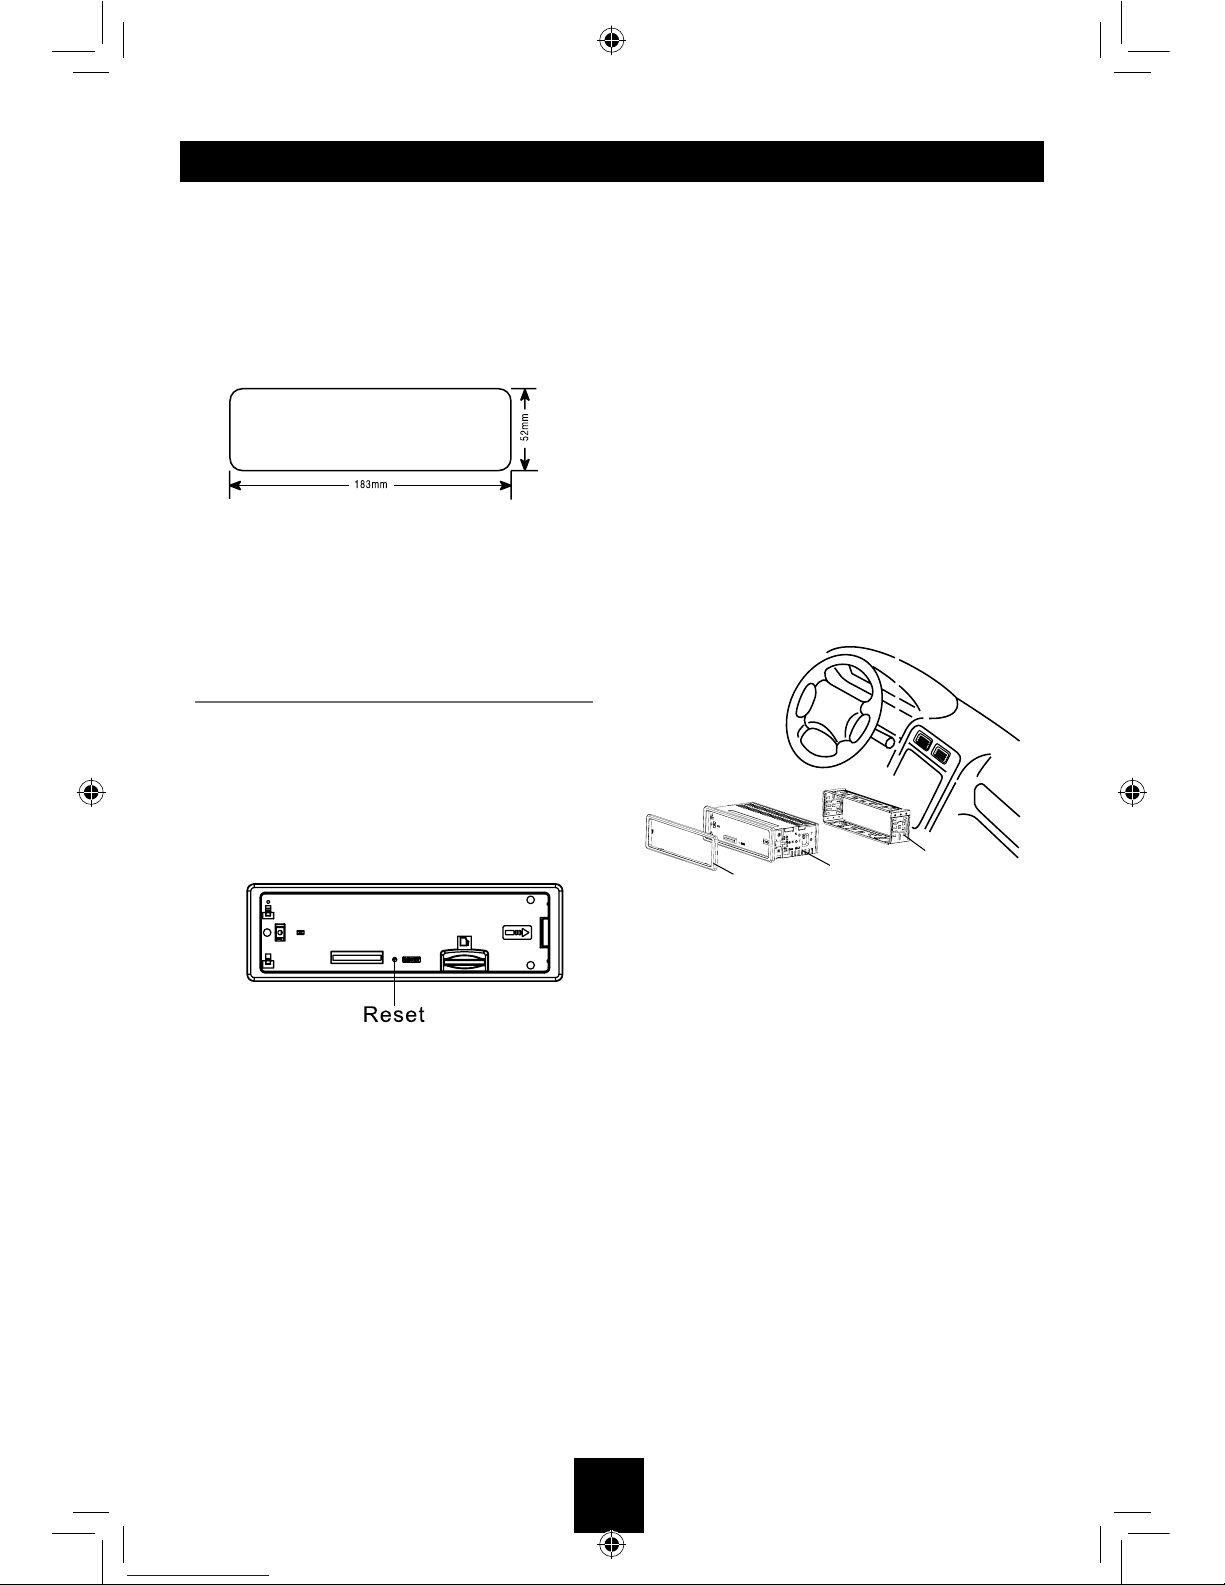
INSTALLATION GUIDE
Installation Opening
This unit can be installed in any dashboard
having an opening as shown below. The
dashboard should be 4.75mm - 5.56mm thick
in order to be able to support the unit.
If the opening is too small, carefully cut or le
as necessary until the sleeve easily slides into
the opening. Do not force the sleeve into the
opening or cause it to bend or bow. Check for
sufcient space behind the dashboard for the
unit chassis.
Reset
Press the RESET button with a pointed object
to reset the unit to the original status.
Note: Press the RESET button will erase the
clock setting and stored stations.
Installation Procedures
1. If relevant, remove any other audio system
from the car.
2. Insert the mounting sleeve into the
dashboard. Fix it firmly in place by folding
down the metal tabs.
3. Perform the required electrical connections.
4. Then check that everything works before
installing the main unit.
5. Remove the two screws on the top of the
unit, otherwise, the unit will not work.
6. Install the car radio in the dashboard using
the supplied screws (M5x6mm).
7. Attach the outer trim frame.
If you are not sure how to install this unit
correctly, contact a qualied technician.
Mounting sleeve
Main unit
Trim plate

15
TROUBLESHOOTING
If you suspect something is wrong, immediately switch power off. Immediately stop using it and
call the store where you purchased it. Never try to repair the unit yourself because it is dangerous
to do so.
Problem Possible cause Solution
General
The unit will not switch
on.
Car ignition is not on.
Cable is not properly
connected.
Fuse is burnt.
Turn your car key in the ignition.
Check cable connection.
Replace fuse with a new fuse of the
same capacity.
No sound Volume is set at minimum or
the mute function is on.
Check the volume or switch the mute
function off.
The unit or screen does
not function normally. The unit system is unstable. Press the RESET button.
TUNER mode
Unable to receive
stations.
The antenna is not connected
properly. Connect the antenna properly.
Poor quality reception of
radio station.
The antenna is not fully
extended or it is broken.
Fully extend the antenna and if
broken, replace it with a new one.
Preset stations are lost. The battery cable is not
properly connected.
Connect the permanent live on the
unit to the permanent live on the
vehicle.
USB/SD/MMC mode
Unable to insert USB
device or SD/MMC card.
The memory card or USB
device has been inserted the
wrong way round.
Insert it the other way around.
The USB device or SD/
MMC card cannot be
read.
NTFS format is not supported.
Check that the USB/SD/MMC file
system is in FAT or FAT32 format.
Due to different formats, some models
of USB storage devices or MP3
players may not be read.

16
SPECIFICATIONS
General
Power supply: 12VDC (11V-16V), Test voltage 14.4V, negative ground
Maximum power output: 40W x 4 channels
Continuous power output: 20W x 4 channels (4 10% T.H.D.)
Suitable speaker impedance: 4-8ohm
Pre-Amp output voltage: 2.0V (Play mode: 1KHz, 0dB, 10K load)
Fuse: 15A
Dimensions (WxHxD): 188 x 58 x 98mm
Weight: 0.52kg
Aux-in level: 500mV
FM Stereo Radio
Frequency range: 87.5-107.9MHz
Usable sensitivity: 8dBμ
Frequency response: 30Hz-15KHz
Stereo separation: 30dB(1KHz)
Image response ratio: 50dB
IF response ratio: 70dB
Signal/noise ratio: >55dB
AM(MW) Radio
Frequency range 530-1710KHz
Usable sensitivity (S/N=20dB) 30dBμ
Components
Mounting sleeve 1
Machine screws M5x6 mm 4
Wire connector 1
Trim plate 1
Removal key 2
Operating Instructions 1
Remote control unit 1
Note:
Specications and the design are subject to change without notice due to improvements.

Limited Warranty
BRAVO VIEW warrants this product (including any accessory and/or cable) against defects in material or workmanship as
follows:
1-Year Parts & Labor
BRAVO VIEW stands behind all our products with 1-year parts and labor for from your date of purchase.
All BRAVO VIEW products are covered for a period of one year from the date of purchase against defects in materials and
workmanship. The warranty is for repair or replacement at the sole discretion of the selling dealer.
If we choose to replace your product, we may replace it with a new or reconditioned unit of the same or similar design. The
customer is responsible for a processing fee in the amount of $20.00 payable to BRAVO VIEW to cover return shipping and
handling. Warranty service is not offered outside the continental United States.
This warranty does not cover customer misuse, improper installation, poor signal (including any “noise”), cosmetic damage,
damage due by accident, abuse, negligence, commercial use, and improper operation.
Proof of Purchase in the form of a copy of a bill of sale or copy of receipted invoice, which shows clearly the sale of the unit, is
required.
RepairorReplacementasprovidedunderthiswarrantyistheexclusiveremedyoftheconsumer.BravoViewTechnologyshallnotbeliableforany
incidentalorconsequentialdamageforbreachofanyexpressorimpliedwarrantyonthisproduct.InnoeventshallBravoViewTechnologybeliableforany
incidentalorconsequentialdamagewhatsoeverarisingoutoftheuseorinabilitytousetheproduct.UndernocircumstanceshallBravoViewTechnology’s
liabilityexceedthepurchasepricepaidfortheproduct.Excepttotheextentprohibitedbyapplicablelaw,anyimpliedwarrantyormerchantabilityorfitness
foraparticularpurposeonthisproductislimitedindurationtothedurationofthiswarranty.
WarrantyRequest:
1. Sendanemailor writetoourcustomer servicedepartment[email protected], pleaseprovide the following
informationalongwithacopyofyourSALESRECEIPT.
a. Name:
b. EmailAddress:
c. PhoneNumber:
d. ShippingAddress:
e. PurchaseDate:
f. PurchasedFrom:
g. SerialNumber:
h. ModelNumber:
i. DefectiveIssue:
2. Ifdeterminedthattheitemiswarrantable,BravoViewwillissueaRA#andprovideanaddresstomailtheunitbackto.
3. Bravo View is not responsible for articles lost or stolen during shipping. IT IS ADVISABLE TO SHIP THE UNIT IN A
METHODINWHICHYOUCANTRACKTHEPACKAGE,ANDPOSSIBLYINSURETHEPACKAGE.BravoViewdoesnotcover
theexpenseofmailingtheunitbacktous.
4. OnceBravoViewreceivesandvalidatestheunittoensureitiswithinwarranty,BravoViewwillreplacetheunit,fixthe
unit,orofferasubstituteoftheunitifareplacementisnotavailable.BravoViewmaysendarefurbishedunitback.
To obtain warranty service, you must contact Bravo View for a Return Authorization Number (RA#).
909-334-4795 or visit www.bravoview.com

PN: 12707500xxxx
Table of contents
Other Bravo Car Receiver manuals


Popular Car Receiver manuals by other brands


Pioneer
Pioneer DEH-P7800MP installation manual

Pioneer
Pioneer DVH-330UB quick start guide

Mercedes-Benz
Mercedes-Benz B6 782 70 51 owner's manual

Blaupunkt
Blaupunkt Atlanta 110 Operating and installation instructions

Onkyo
Onkyo CS-245BT instruction manual

MAC Audio
MAC Audio PRO FLAT 2.20 Owner's manual/warranty document