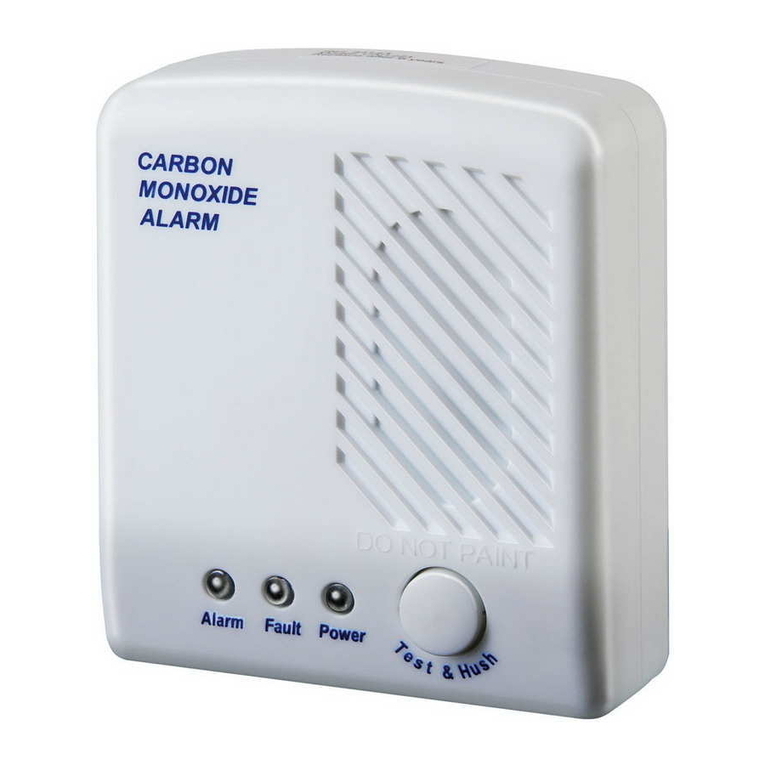
brennenstuhl BCN 1221 Manual

Be ienungsanleitung ...................... 2
Directions for use.......................... 19
Mo e ’emploi ................................ 35
Han lei ing ...................................... 52
Istruzioni per l’uso ........................ 69
Bruksanvisning .............................. 86
Manual e instrucciones .......... 101
Instrukcja obsługi ...................... 118
CO-Mel er
CO etector
BCN 1221

19
Operating Instructions
Battery-Powere
CO-Detector BCN 1221
Important:
Rea these operating instructions an keep
them. Make note of an follow the safety notices.
Table of Contents
Battery Powered Carbon Monoxide (CO) Detector
1. Intro uction ............................................................20
2. Package contents ..................................................20
3. Technical ata ........................................................21
4. Operation an Mounting ......................................23
4.1 Selection of the Mounting Site ....................23
4.2 Locations to avoi ..........................................24
4.3 Installation an Set-Up ................................25
4.4 A itional Functions ......................................28
4.5 What to o in case of alarm..........................30
4.6 Function check/-test ......................................32
5. Maintenance ............................................................32
6. Disposal ....................................................................33
7. Guarantee ................................................................34

1. Intro uction
These operatin instructions must be read com-
pletely and carefully. They are a component of
your newly purchased, battery-operated, carbon
monoxide detector and contain important infor-
mation concernin its operation and maintenance.
In the followin , it will be referred to only as the
detector. All safety notices are to be observed in
the use of this product. If you have any questions
concernin the use of this product, contact your
dealer or our service office. These operatin in-
structions are to be kept and must if necessary be
passed on to third parties.
2.Package contents
Immediately after unpackin the contents of your
detector’s packa e must be checked for complete-
ness. Also check the detector itself for proper con-
dition.
1 x CO- etector BCN 1221
1 x 9 Volt block battery
2 x screws
2 x anchor bolts
1 x operating instructions
20
Operating Instructions BCN 1221

3. Technical ata
The CO-detector is calibrated so that it sounds in
response to the followin CO-values, in compliance
with EN 50291:2001.
CO concentration No alarm Alarm
in the air before before
30 ppm 120 min. -
50 ppm 60 min. 90 min.
100 ppm 10 min. 40 min.
300 ppm - 3 min.
Protection class: IP 20
Power : 9 Volt DC alkaline battery
(IEC 6LR61) or MN1604
Max. current: < 40 mA (alarm)
Sound level of si nal: 85 dB (1 m distance)
Battery life: Min. 1 year
ATTENTION:
IMPORTANT!
THIS IS NOT A SMOKE ALARM! This CO-detector
was developed to detect carbon monoxide comin
from ANY combustion source. It was NOT
developed to detect smoke, fire or other ases.
21
BCN 1221 Operating Instructions

WARNING!
This detector is only intended for use in dry
rooms. Use outdoors or in moisture-prone rooms
is not permitted. In order to assure the protective
function of the detector, the LED POWER must be
checked at re ular intervals (see the table Alarm
Si nals and LED-Display). Cover the detector dur-
in remodellin work but remember to remove the
coverin after the remodellin is complete (exces-
sive paint fumes, solvents, cleanin solutions, etc.
can dama e or impair the sensor). The CO-detec-
tor is no substitute for re ular maintenance of
heatin plants or havin the chimney swept.
WARNING!
THIS DETECTOR CANNOT PROTECT PEOPLE
FROM THE ACUTE EFFECTS OF EXPOSURE TO
CARBON MONOXIDE. IT WILL NOT COMPLETELY
PROTECT PERSONS WITH SPECIFIC DISEASES. IN
CASE OF DOUBT, CONSULT A PHYSICIAN.
22
Operating Instructions BCN 1221

4.Operation an Mounting
In this chapter, the basic functions of the detector
are explained. Read throu h this chapter carefully
so that you understand and can use all functions.
4.1 Selection of the Mountin Site
WHERE SHOULD THE CO-DETECTOR BE
INSTALLED
●Minimum protection (every floor, every sleepin
area)
●Maximum protection (all rooms except kitchen
and bathroom)
• A detector should be installed on every floor of
the house, preferably in every room.
• The CO-detector is also suitable for boots and
recreational vehicles.
23
BCN 1221 Operating Instructions
edroom
edroom ed -
room
kitchen/living- and
dining room

The density of carbon monoxide is close to that of
air (0.96716) at a room temperature of 20ºC.
It disperses in the air easily, like perfume, evenly in
all directions. However, carbon dioxide is heavier
than air at 0ºC (density of 1.250).
This characteristic makes it possible to install
the etector anywhere in a room or hallway.
Important: The CO-detector should be located
so that you can hear it when sleepin .
WARNING! The detector does not work
without a power supply. The CO-detector is an
early warnin detector!! Please do not paint over
the detector.
4.2 Locations to avoid
• Within 1.5m of any combustion plant or fire
place that runs on as.
• Locations with hi h concentrations of dust,
dirt or oils/ rease.
• In moisture prone rooms or rooms with hi h
humidity. Install the detector at least 3 m from
bathrooms.
• In very cold or hot locations, where the temper-
ature can drop below -10ºC or rise above 40ºC.
• Humidity of under 30% or over 90% relative
humidity
24
Operating Instructions BCN 1221

• In direct sunli ht, directly over a sink or cookin
device.
• Behind curtains, drapes, furniture or locations
where there is no air circulation.
• In unheated basement rooms and ara es.
• In locations where the detector could be
exposed to chemical solvents or cleaners.
• Near ventilation openin s, exhaust pipes and
chimneys.
• Near heaters or cookin equipment of any kind.
• In the vicinity of ceilin fans, heatin vents, air
conditioners and fresh air vents.
4.3 Installation and Set-Up
INSTALLATION:
1. Loosen the mountin plate by pressin it up-
wards and then mount the plate on the wall or
ceilin with the enclosed screws.
2. Connect the battery with the plus
pole and minus pole in the
correct position and close the
battery cover. Then han the CO-
detector in place and secure it as
shown.
3. Test the detector by pressin the test button
and holdin it in for a few seconds.
25
BCN 1221 Operating Instructions

The CO-detector should be installed by a
professional.
After the battery has been installed, the reen
LED “POWER” will blink 1x reen once for indica-
tion. Wait about 1 minute until the detector has set
itself up. Then test the detector by pressin the
“test and hush” button and holdin it until you
hear a series of 4 peeps. The red LED “ALARM”
will blink. Release the button and the siren will fall
silent immediately.
Inspect and test the detector after installation.
Make sure that you can clearly hear the alarm in
your sleepin quarters.
26
Operating Instructions BCN 1221

ALARM SIGNAL & LED- DISPLAY
Note: ■ ■ ■ means “peep, peep, peep”
27
BCN 1221 Operating Instructions
Detektor function Green
Energy dis lay
Power
Red
Alarm signal
Alarm
Yellow
Fault signal
Fault
Alarm Sond
Normal operation Blinks once per
Minute
- - -
Alarm condition -4 peeps +
links
-■ ■ ■ ■ - 1s -
■ ■ ■ ■ - 1s -
■ ■ ■ ■ …
Mute function (Hush)
under alarm and alarm
conditions
- 4 links - -
Pre-alarm signal CO
Level (40 ppm or
higher concentration
detected)
- Single link
every 8 se-
cond until
Alarm
- -
Memory function
shows that the alarm
was active for some
reason (not from test
utton)
- - - ■ -- 8s --
■ -- 8s -- ■
1 peep every 8 se-
conds.Press ut-
ton once to return
to normal mode
Empty attery –
warning - - 1 peep + link
per minute
■ - 1 min -
■ - 1 min -
■ …
Sensor fault - - 2 peeps + links
every 8 seconds
■ ■ - 8s -
■ ■ - 8s -
■ ■ - 8s - …
Warning: End of
sensor’s operational
lifetime
- 3 peeps + links
every minute
■ ■ ■ - 1 min -
■ ■ ■ - 1 min -
■ ■ ■ …

4.4 Additional Functions
The CO-detector is provided with the followin
additional user-friendly functions:
Alarm function:
This function is used to turn off the alarm for
4 minutes.
Press the “Test/Hush” button on the alarm.
If the CO-concentration reaches 200 ppm (parts
per million), the alarm will reactivate. The detector
returns to normal function automatically in
4 minutes.
If the concentration increases durin the mute
function, the function is overridden and the
detector sounds.
ATTENTION: If the CO-concentration is at
200 ppm, the mute function cannot be activated.
Pre- Alarm- Warning:
If the detector detects a CO- concentration of
reater than 40 ppm, the red LED will blink every
8 seconds until the alarm sounds.
Memory function:
If the detector sounds the alarm due to excessive
CO-concentration (except for the test button), the
memory function in the detector is activated and
28
Operating Instructions BCN 1221

will be stored for 12 hours. The indication that an
alarm incident has occurred and is recorded in the
memory function is iven by a short peep every
8 seconds. The user can reset/deactivate the
memory function by pressin the test button until
an alarm sounds.
Self iagnosis:
Automatic sensor testin every 8 seconds for
optimal alarm readiness.
Empty battery warning:
If the battery output decreases, the detector will
emit 2 peeps. The LED FAULT will blink every
8 seconds.
Fault warning:
If the detector detects a fault it will emit 2 peeps.
The yellow LED FAULT will blink every 8 seconds.
Warning at the en of the alarm’s operational
lifetime:
If the CO-detector reaches the end of its opera-
tional lifetime, it will emit 3 peeps. The yellow LED
FAULT will blink once per minute.
When this happens, the detector must be replaced.
29
BCN 1221 Operating Instructions

4.5 What to do in case of alarm
NEVER IGNORE THE CO-ALARM
CO is called the »silent killer« because it is an
invisible, odourless and tasteless as. It arises
from the incomplete combustion of fossil fuels.
Amon these fuels are: wood, coal, wood charcoal,
oil, natural as, asoline, kerosine and propane.
Many cases of observed CO-poisonin show that
the victims do notice that they feel unwell, but are
so disoriented that they are not able to save
themselves.
CO-poisonin produces flu-like symptoms such as
headaches, ti htness in the chest, verti o, tired-
ness, confusion and difficulty breathin . Since CO-
poisonin drives up the victim’s blood pressure,
the victim’s skin can take on pink or red tones.
1. If the CO-detector oes off or you suspect a as
leak, never i nore it!
2. Get out into fresh air immediately or open all
doors and windows so that the CO can disperse.
3.
Call the fire department from outside the buildin .
4. Make sure that EVERYONE has left the buildin .
5. Wait at an open window or outside the buildin
until the emer ency services arrive.
30
Operating Instructions BCN 1221

6. Consult a qualified technician to localise the CO
source.
Extreme CO-concentrations can cause
permanent injury, lead to impairment or death.
COMMON RISKS WHICH CAN LEAD TO
CO-POISONING
• Technical problems with the device, caused by a
fault, inadequate maintenance or care.
• Defective chimney or ventilation shafts.
• Incorrect airflow, a so-called back drau ht.
• Incorrect installation of a furnace.
• Chimney of the wron size, etc.
• Garden rills, used outside.
31
BCN 1221 Operating Instructions

4.6 Function check/-test
Important: The function test must be performed
weekly.
Check to make sure that the reen LED blinks at
one-minute intervals. This assures that the
detector is operationally ready.
If the reen LED does not blink every minute or
the detector does not react to the test button:
1. Replace the battery.
2. Make sure the battery is installed correctly.
3. Make sure that the detector is properly cleaned.
4. Check the detector for obvious dama e.
If the detector still doesn’t work, it must be
replaced immediately. Do not attempt to repair it
yourself. This would cancel the uarantee.
Note: In normal testin mode the cut-off for the
warnin si nal is not active.
5. Maintenance
The detector may not be exposed to water or dust.
•
Test it with the test button at least once per week.
• Vacuum the openin s on the detector with a
vacuum cleaner.
32
Operating Instructions BCN 1221

• Wipe off the alarm’s surface with a damp cloth.
• Never use cleanin solutions, since
this can dama e the sensor.
• Test the alarm after cleanin .
• Check to see if the reen LED “POW-
ER” blinks about once per minute.
The battery should last for over a year.
About one month before the battery is completely
dischar ed, the alarm will emit a short si nal and
the red LED will blink once per minute. This is the
si nal that the battery must be replaced. Durin
this period the alarm will function normally.
Always test the alarm after replacin the battery.
Replace the batteries with types GP1604A,
Duracell MN1604, Ener izer 522, Eveready 1222
and Ultralife U9VL-J.
WARNING: The battery should be replaced by a
trained professional.
6. Disposal
When this product has reached the end of its
operational lifetime, it cannot be disposed of
in the re ular household waste. This product
must be taken to a collection site for the process-
in of electrical and electronic devices for dispos-
al. Inquire with your city or municipal overnment
33
BCN 1221 Operating Instructions

about options for the environmentally sound and
proper disposal of the product.
7. Guarantee
We rant a 3 year uarantee on this article.
Repairs must be done by authorised dealers.
Dama es from improper use, disre ardin the
operatin instructions and parts subject to wear
are excluded from the uarantee.
34
Operating Instructions BCN 1221
Other manuals for BCN 1221
3
Table of contents
Other brennenstuhl Gas Detector manuals