Brentwood Appliances TS-1210S Quick guide

PERSIAN RICE COOKER
COCINA DE ARROZ PERSA / CUISEUR DE RIZ PERSAN
ITEM NO.: TS-1210S (10 CUPS), TS-1216 (16 CUPS)
AND TS-1020S (20 CUPS)
Operating and Safety Instructions
FOR INDOOR HOUSEHOLD USE ONLY
Instrucciones de Operación y Seguridad
SOLO PARA USO DOMESTICO
Consignes de Sécurité et de Fonctionnement
POUR USAGE DOMESTIQUE INTÉRIEUR SEULEMENT

2
IMPORTANT SAFEGUARDS
When using this or any other electrical appliance, always follow these basic
safety precautions, especially when children are present.
READ ALL INSTRUCTIONS BEFORE USE
WARNING-- To reduce the risk of fire, electric shock, serious personal injury and property
damage please note the following:
•This product is not intended for use by children. Keep the product out of the reach of
children and pets. Extra caution is necessary when using this appliance near children.
•Always ensure the product is unplugged from the electrical outlet and allowed to cool
before assembling, disassembling, relocating, or cleaning it.
•Do not leave the product unattended while it is in use. Always unplug the product from
the electrical outlet when not in use.
•Do not immerse the Base, Power Cord, or Plug of this product in or expose the Power Cord
or Plug to water or other liquids.
•Donottouch hot surfaces.Useprotective ovenmittsor glovesto avoidburns or personalinjury.
•Take proper precautions to prevent burns, fire, or personal or property damage as this
appliance generates heat and steam during use.
•Do not use attachments not recommended or sold by the product manufacturer.
•Donotplaceonornear a hotgas orelectricburner, ina heated oven,or other heatedsurfaces.
•Do not operate the product empty. Use extreme caution when moving an appliance
containing hot food, water, or other liquids.
•Use the product in a well-ventilated area. Keep at least 4-6 inches of space on all sides of
the product to allow adequate air circulation.
•Use appliance on a table or flat surface. Keep the product away from curtains, wall
coverings, clothing, dishtowels, or other flammable materials.
•Do not plug or unplug the product from the electrical outlet with a wet hand.
•This product isintended solely fornon-commercial,non-industrial, household use incookingof
foodforhumanconsumption; donot use the product outdoors or foranyother purpose.
•Do not let cord hang over edge of table or counter where it may be tripped over or pulled.
Do not allow cord to touch hot surfaces.
•Do not operate the product if it has a damaged or cut Power Cord or plug, if wires are
exposed, if it malfunctions, if it is dropped or damaged, or is exposed to water.
•This appliance has no user-serviceable parts. Do not attempt to examine orrepair this
appliance yourself. Please review the Warranty Policy on Page 6.
•Do not put any stress on the power cord where it connects to the product, as the power
cord could fray and break.
SPECIAL INSTRUCTIONS: A short power supply cord is provided to reduce the risk
of becoming entangled in or tripping over a longer cord. An extension cord is not
recommendedfor use with this product, but if one must be used:
3
−The marked electrical rating must be at least as great as that of the product.
−Arrange the extension cord so that it will not drape over the countertop or
tabletop where it can be tripped over or pulled.
WARNING: This product is equipped with a polarized plug (one blade is wider than
the other blade) to reduce the risk of electrical shock. This is a safety feature. The plug will fit into
a polarized outlet only one way. If you are unable to insert the plug into the electrical outlet, try
reversing the plug. If the plug still does not fit, contact a qualified electrician. Never use the plug
with an extensioncord unlessyoucanfully insert the plug into the extension cord. Donotalter the
plug. Donotattempttodefeatthesafety purpose of thepolarizedplug.
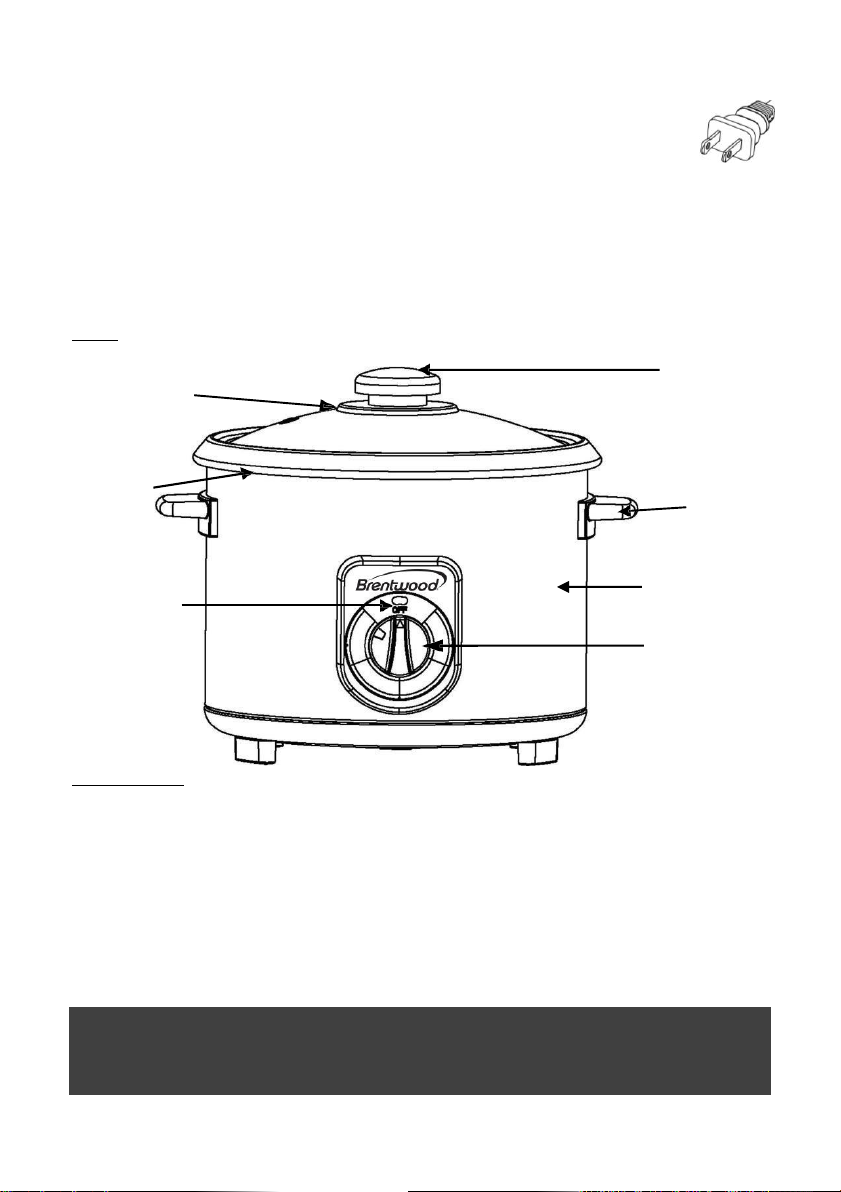
Parts:
BeforeFirstUse
IMPORTANT: Please check all packaging materialcarefully for accessoriesbeforediscarding.
WARNING: DONOTPLACE ANYPART OF THE PRODUCTINA DISHWASHER.
1. Placethe Non-StickInner Pot into theRiceCooker.Pour 2cups of water into theNon-StickInner
Pot andthenandthen coverwiththe Lid.
2. Plug the product intoan electricaloutlet,andthen push the switch down to “Cook”.
Attention: First use may cause a slight odor or small smoking upon heating, it is normal. This is a
result of the heating element chemical reaction. It quickly goes away.
3. After 20min., pull theswitch up, andthenunplug the productfrom theelectricaloutlet.
4. Allowtheproduct to coolthenpour the water fromthe Liner,rinseanddry thoroughly.
SAVE THESE INSTRUCTIONS
FOR FUTURE REFERENCE
Cool Touch Knob
Cool Touch
Handles
Cool Touch Body
Power Switch
Power Indicator
Light
Inner Pot
Non-Stick
Tempered
Glass Lid with
Vent

4
Using Your Rice Cooker:
WARNING: Avoid contact with Hot parts.
ATTENTION: Do not use the product to cook raw whole meats (e.g. roasts, steaks, etc.), whole
chickens or other poultry, whole fish, or ground meats. Cook ground meats separately.
1. Using the measuring cup, measure rice and in a separate bowl rinse rice until water is
relatively clear. Add rice to the Non-Stick Inner Pot. Then add the amountof water needed
to cook the rice. Use the chart provided. Adjust the amount of ingredients to your personal
taste. CAUTION: Do not overfill the product or operate it when empty.
2. Put water, rice, and table salt into the pan according to the following standard. Smooth the
surface of rice in the pan by scoop etc. So that it becomes flat and level. Note
(Recommended proportions).
3. Place the pan inside the cooker and cover with the lid. You may need to turn the pan
slightly right and left to make sure it is in the proper position.
4. Plug the product into an electrical outlet, and then push the switch down to “Cook”. The
indicator will light up when it is cooking.NOTE: If the button is difficult to press down, the
inner pot may not be inserted correctly, or the appliance may need to cool down.
5. When heating is complete, the switch will pop up. You can then leave Rice covered for at
least 15 minutes to steam the rice. The degree in brown of the cooked rice is related to
the rice quality and the anticipate setting. Remove the lid and then remove the pan by
using a piece of cloth or a mitten. Place the pan upside-down on the plate, remove the
pan, and the cooked rice willremain in a molded shape.
6. Once finished, unplug the product. Remember to grasp the plug not the cord when
unplugging.
WARNING: Always unplug the product from the electrical outlet when it is not in use or
when left unattended. Keep body, pan and lid clean after every use.
NOTICE: Do not touch the ventilating hole while cooking or cooling as the steam is very hot
and can burn.
Note: The WARM setting will keep the contents warm.
Note: Cooking Time Per Cups of Rice (Estimated based upon preference of rice crust.)
1 Cup –15-60 Min.
2-4 Cups –20-60 Min.
Cups of Raw Rice
Amount of Water
to Add
Makes Cups of Cooked
Rice
Table salt
2 Cups
2-3 Cups
4 Cups
1-1/2tsps
4 Cups
4-5 Cups
8 Cups
2tsps
5 Cups
5-6 Cups
10 Cups
2tsps
8 Cups
9-10 Cups
16 Cups
3tsps
10 Cups
11-12 Cups
20 Cups
4tsps

5
5-10 Cups –30-60 Min.
Cleaning Your Rice Cooker:
WARNING: Always unplug the product and allow it to cool before cleaning or storing.
NOTICE: To avoid damaging the product, do not pour cold water into the Non-Stick Inner Pot
after use and do not use abrasive cleaners/pads to clean any partof the product.
•Remove the Inner Pot and Lid from the Cooker. Wash these in warm soapy water. Do not
use a scouring pad as this may damage the Non-Stick of the Inner Pot.
•Clean the outside of the Cooker with a clean damp cloth. Do not submerge any part of the
cooker in water.
•You can also wipe the heating plate on the inside of the cooker with a damp cloth making
sure to dry completely before re-using.
•Dry all parts thoroughly before storing or using again.
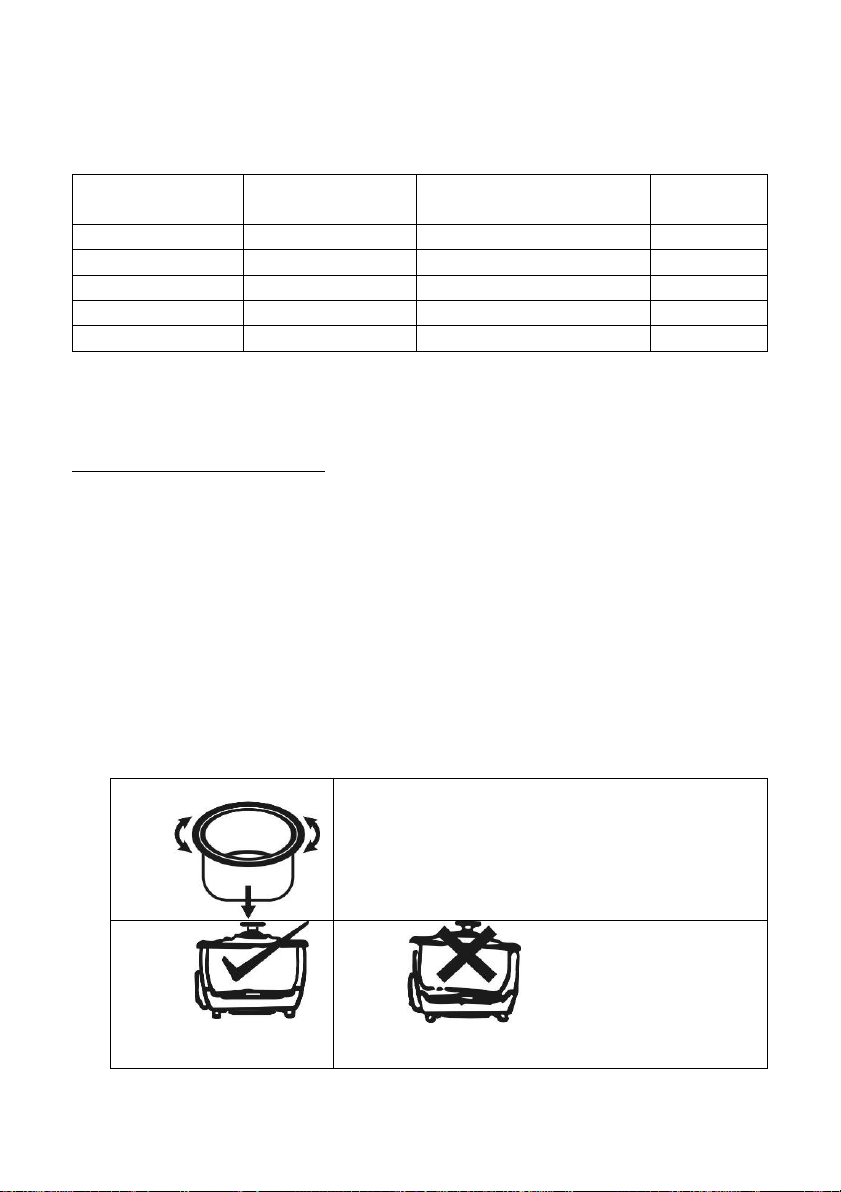
CAUTION
BEFORE STARTING TO COOK, CLEAN THE
BOTTOM OF THE INNER POT AND THE SURFACE
OF THE HEATER PLATE, THEN TURN THE INNER
POT CLOCKWISE AND ANTI - CLOCKWISE SOTHAT
IT SITS PROPERLY ONTO THE HEATER PLATE
INSIDE THE RICE COOKER. OTHERWISE, THE RICE
COOKER WILL NOT WORK OR WILL BEDAMAGED.

6
ONE YEAR LIMITED WARRANTY
Write down the following information about your appliance to better help you
obtain assistance or service if you ever need it.
CUSTOMER RECORD
Date of Purchase______________ Store/Dealer___________________________
Model/Item No: _______________________________
THIS WARRANTY APPLIES TO PRODUCTS PURCHASED AND USED IN THE U.S. ONLY.
This is the only express warranty for this product and is in lieu of any other warranty
or condition. This product is warranted to be free from defects in material and
workmanship for a period of one (1) year from the date of original purchase. During
this period, your exclusive remedy is repair or replacement of this product, at our
option; however, you are responsible for all costs associated with returning the
product to us and our returning a product or component under this warranty to you. If
the product or component is no longer available, we will replace with a similar one of
equal or greater value. This warranty does not cover glass, filters, wear from normal
use, use not in conformity with the printed directions, or damage to the product
resulting from accident, alteration, abuse, or misuse.
THIS WARRANTY EXTENDS ONLY TO THE ORIGINAL CONSUMER PURCHASER. KEEP
THE ORIGINAL SALES RECEIPT, AS PROOF OF PURCHASE IS REQUIRED TO MAKE A
WARRANTY CLAIM.
This warranty is void if the product is used for other than single-family household use
or subjected to any voltage and waveform other than what is specified on the rating
label (E.G., 120V~60Hz). We exclude all claims for special, incidental, and
consequential damages caused by breach of express or implied warranty. All liability is
limited to the amount of the purchase price. Every implied warranty, including any
statutory warranty or condition of merchantability or fitness for a particular purpose,
is disclaimed except to the extent prohibited by law, in which case such warranty or
condition is limited to the duration of this written warranty. This warranty gives you
specific legal rights. You may have other legal rights that vary depending on where you
live. Some states do not allow limitations on implied warranties or special, incidental,
or consequential damages, so the foregoing limitations may not apply to you. To make
a warranty claim do not return this appliance to the store.
TO OBTAIN WARRANTY SERVICE AND/OR TROUBLESHOOTING INFORMATION:
Call Customer Service at 1-888-903-0060 in the U.S.
Monday through Friday: 9:00am –5:00pm PST.
Email: warranty@brentwoodus.com
Go online at www.brentwoodus.com

7
PRECAUCIONES IMPORTANTES
Al usar este o cualquier otro electrodoméstico, siga las precauciones básicas de
seguridad, especialmente cuando niños están presentes.
LEA TODAS LAS INSTRUCTIONES ANTES DE USAR
ADVERTENCIA-Para reducir el riesgo de incendio, descarga eléctrica, lesiones personales
graves y daños a la propiedad, por favor tenga en cuenta lo siguiente:
•Este producto no estádestinadopara su uso por los niños. Mantenga el producto fuera del
alcance de los niños y las mascotas. Precaución adicional es necesario cuando se utiliza este
aparato cerca de niños.
•Asegúrese siempre de que el producto está desenchufado de la toma de corriente y se deje
enfriar antes de montar, desmontar, trasladar o limpiar.
•No deje el producto desatendido mientras está en uso. Siempre desenchufe el producto de
la toma de corriente cuando no esté en uso.
•No sumerja la base, el cable de alimentación o elenchufe de este producto ni exponga el
cable o el enchufe al agua u otros líquidos.
•No utilice accesorios no recomendados o vendidos por el fabricante del producto.
•No coloque electrodoméstico sobre o cerca de una hornilla de gas o eléctrica, en un horno
caliente, u otras superficies calientes.
•Tenga mucho cuidado cuando mueva un aparato que contiene alimentos, agua u otros líquidos.
•Utilice el producto en unárea bien ventilada. Mantenga por lo menos 4-6 pulgadas de
espacio en todos los lados del producto para permitir lacirculación de aire adecuada.
•Utilizar aparato sobre una mesa o superficie plana. Mantenga el producto lejos de cortinas,
revestimientos deparedes, ropa,paños de cocina, uotros materiales inflamables.
•No enchufe ni desenchufe el producto de la toma de corriente con las manos mojadas.
•Este producto está destinado exclusivamente para el uso no comercial, no industrial, hogar
de cocción de los alimentos para el consumo humano, no use el producto en exteriores o
para cualquier otro propósito.
•No permita que el cable cuelgue del borde de la mesa o mostrador donde se puede tropezar.
No permita que el cable toque superficies calientes.
•No utilice el producto si tiene un cable de alimentación dañado o cortado o el enchufe, si los
cables están expuestos, en casode mal funcionamiento, si se ha caído o dañado, o si la
armadura del motor se ha caídoo este expuestos alagua.
•Este aparato no tiene piezas que el usuario pueda reparar. No intente examinar o reparar
este aparato usted mismo. Revise la política de garantía en la página 6.
•No ponga presión sobre el cable de alimentación que se conecta al producto, ya que el cable
de alimentación podría desgaste y se rompa.
•No ponga líquidos o ingredientes directamente en la base, solo en la olla de cerámica.
8
INSTRUCCIONES ESPECIALES: Un cable desuministro eléctricocortopara reducir el
riesgo deenredarseo tropezarse conun cablemáslargo.Uncabledeextensiónno serecomienda
parasu uso con este producto,pero sisedebeutilizar:
−El voltaje eléctricodebeseralmenostan grande como la delproducto
−Organice el cable de extensión de manera que no cuelgue del mostrador o de la mesa donde
alguien sepueda tropezar.
ADVERTENCIA: Este producto está equipado con un enchufe polarizado (una pata es
más ancha que la otra) para reducir el riesgo de descarga eléctrica. Esta es una
característica de seguridad. El enchufe encajará en un tomacorriente polarizado de una sola
manera. Si no puede insertar el enchufe en la toma de corriente,intente invertir elenchufe. Siaún
así no encaja, comuníquese con un electricista calificado. No utilice nunca el enchufe con un cable
de extensión a menos que pueda insertar completamente el enchufe enel cable de extensión. No
altere elenchufe.Nointenteanularlacaracterísticade seguridaddelenchufepolarizado.
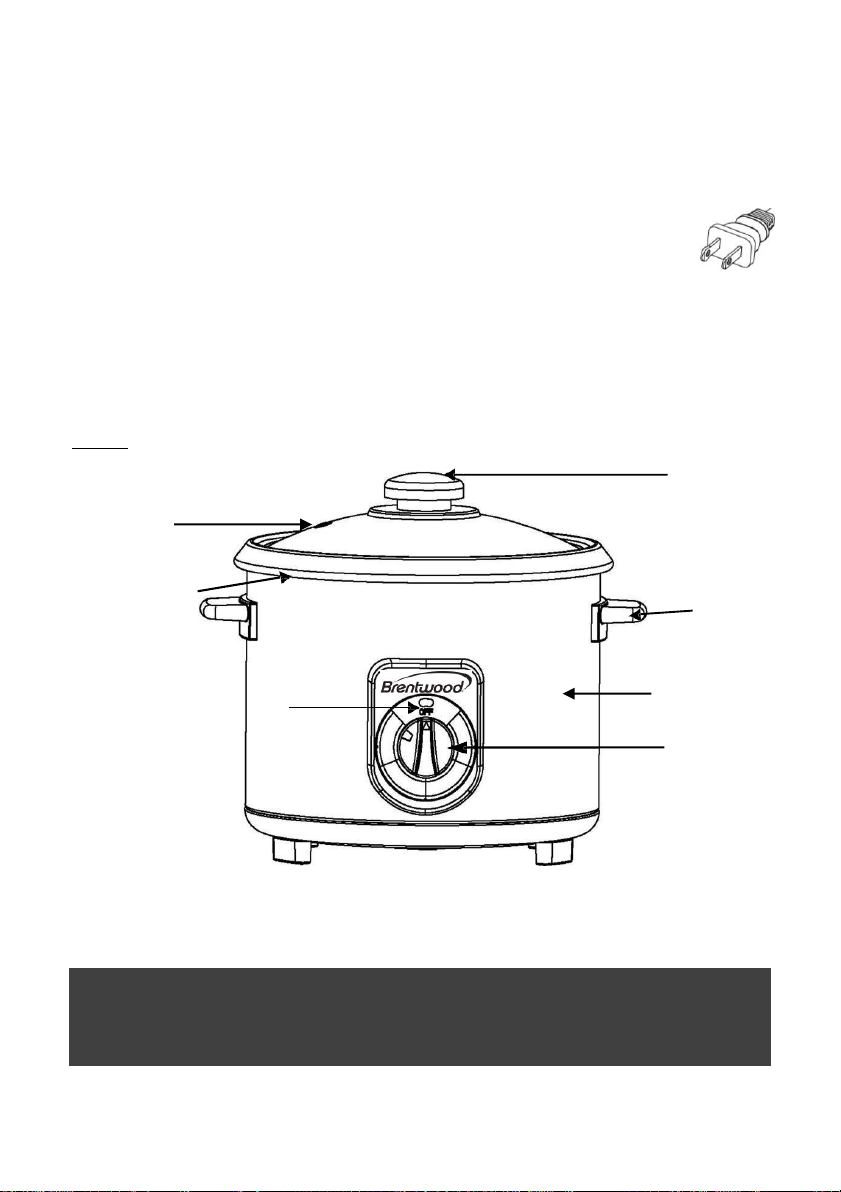
Partes:
GUARDE ESTAS INSTRUCCIONES
COMO REFERENCIA
Olla interior
antiadherente
Tapa de Vidrio
Templado con
Agujero de Vapor
Tapa Frias al
Contacto
Manijas
Frias al
Contacto
Cuerpo Fresco
al Tacto
Interruptor de
Encendido
Luz Indicadora de
Encendido

9
Antes del primer uso
IMPORTANTE: Por favor, compruebe cuidadosamente todo el material de embalaje en busca
de accesorios antes de desecharlo.
ADVERTENCIA: NO COLOQUE NINGUNA PARTE DEL PRODUCTO EN EL LAVAVAJILLAS.
1. Coloque la olla interior antiadherente en la cocina de arroz. 2. Vierta 2 tazas de agua en la
Olla Interior Antiadherentey luego, cúbrala conla Tapa.
2. Enchufe el producto en una toma de corriente eléctrica, y luego presione el interruptor
hasta "Cook".
Atención: El primer uso puede causar un ligero olor o un pequeño humo al calentarlo, es
normal.Esto es el resultadode la reacción química del elemento calefactor. Se desvanece
rápidamente.
3. Después de 20 minutos, tire del interruptor hacia arriba, y luego desenchufe el producto de
la toma decorriente.
4. Deje que el producto se enfríe y luego vierta el agua del revestimiento, enjuague y seque
completamente.
Uso de su cocina de arroz:
ADVERTENCIA: Evite el contacto con las partes calientes.
ATENCIÓN: No utilice el producto para cocinar carnes enteras crudas (por ejemplo, asados,
filetes, etc.), pollos enteros u otras aves de corral, pescado entero o carnes molidas. Cocine
las carnes molidas por separado.
1. Usando la taza de medir, mida el arroz y en un tazón separado enjuague el arroz hasta
que el agua esté relativamente clara. 2. Añada el arroz a la olla interior antiadherente.
Luego agregue la cantidad de agua necesaria para cocinar el arroz. Use la tabla que se
proporciona. Ajuste la cantidad de ingredientes a su gusto personal. PRECAUCIÓN: No
llene demasiado el producto ni lo haga funcionar cuando esté vacío.
2. Ponga agua, arroz y sal de mesa en la olla de acuerdo con el siguiente estándar. Alise la
superficie del arroz en la sartén con una cuchara, etc. Para que quede plana y nivelada.
Nota (Proporciones recomendadas).
3. Coloque la olla en el interior de la cocina y cúbrala con la tapa. Es posible que tenga que
girar el sartén ligeramente a la derecha y a la izquierda para asegurarte de que está en la
posición correcta.
4. Enchufe el producto en una toma de corriente eléctrica y luego presione el interruptor
hasta "Cook". El indicador se encenderá cuando esté cocinando. NOTA: Si el botón es
difícil de presionar, es posible que la olla interna no esté insertada correctamente, o que
el aparato necesite enfriarse.
5. Cuando se complete el calentamiento, el interruptor aparecerá. Entonces podrá dejar el
arroz cubierto durante almenos 15 minutos para que se cocine al vapor. El grado en
marrón del arroz cocido estárelacionado con la calidad del arroz y el ajuste anticipado.
Retire la tapa y luegoretire la cacerola con un pedazo de tela o un guante. Ponga el
sartén al revés en el plato, retire la sartén y el arroz cocido permanecerá en una forma
moldeada.

10
6. Una vez terminado, desenchufe el producto. Recuerde que debe agarrar el enchufe y no
el cable cuando lo desenchufe.
ADVERTENCIA: Siempre desenchufe el producto de la toma de corriente cuando no esté en
uso o cuando se deje desatendido. Mantenga el cuerpo, la bandeja y la tapa limpios después
de cada uso.
AVISO: No toque el orificio de ventilación mientras se cocina o se enfría,ya que el vapor está
muy caliente y puede quemarse.
Nota: El ajuste de CALOR mantendrá el contenido caliente.
Nota: Tiempo de cocción por taza de arroz (dependiendo de la preferencia de la corteza de
arroz.)
1 Tazas - 15 -60 Min.
2-4 Tazas –20-60 Min.
5-10 Tazas - 30-60 Min.
Limpieza de su cocina de arroz:
ADVERTENCIA: Siempre desenchufe el producto y deje que se enfríe antes de limpiarlo o
guardarlo.
AVISO: Para evitar dañar el producto, no vierta agua fría en la olla interior antiadherente
después de su uso y no utilice limpiadores/almohadillas abrasivas para limpiar ninguna parte
del producto.
•Retire la olla interior y la tapa de la cocina. Lávelos en agua jabonosa tibia. No utilice un
estropajo, ya que puede dañar el antiadherente de la olla interior.
•Limpie el exterior de la Olla con un paño limpioy húmedo. No sumerja ninguna parte de la
cocina en agua.
•También puede limpiar la placa calefactora en el interior de la cocina con un paño húmedo
asegurándose de que se seca completamente antes de volver a utilizarla.
•Seque bien todas las piezas antes de guardarlas o usarlas de nuevo.
Tazas de Arroz
Crudo
Cantidad de Agua a
Añadir
Hace Tazas de Arroz
Cocido
Sal de Mesa
2 Tazas
2-3 Tazas
4 Tazas
1-1/2 cda
4 Tazas
4-5 Tazas
8 Tazas
2 cda
5 Tazas
5-6 Tazas
10 Tazas
2 cda
8 Tazas
9-10 Tazas
16 Tazas
3 cda
10 Tazas
11-12 Tazas
20 Tazas
4 cda

11
PRECAUCIÓN
ANTES DE EMPEZAR A COCINAR, LIMPIE EL
FONDO DE LA OLLA INTERIOR Y LA SUPERFICIE
DE LA PLACA CALENTADORA, LUEGO GIRE LA
OLLA INTERIOR EN EL SENTIDO DE LAS AGUJAS
DEL RELOJ Y EN SENTIDO CONTRARIO PARA QUE
SE ASIENTE CORRECTAMENTE EN LA PLACA
CALENTADORA DENTRO DE LA ARROCERA. DE
LO CONTRARIO, LA ARROCERA NO FUNCIONARÁ
O SE DAÑARÁ.

12
IMPORTANTES MESURES DE SÉCURITÉ
Lorsque vous utilisez cet appareil ou tout autre appareil électrique, suivez toujours
ces précautions de base, surtout en présence d’enfants.
LISEZ TOUTES LES INSTRUCTIONS AVANT USAGE
AVERTISSEMENT –- Pour réduire le risque d’incendie, d’électrocution, de blessures
graves ou de dommages matériels, veuillez noter ce qui suit:
•Ce produit n’est pas destiné àêtre utilisépardesenfants.Gardez-le horsdeportéedes enfants
etdesanimaux. Redoublezde prudencelorsquevous utilisezcet appareil à proximité d’enfants.
•Assurez-vous que l’appareil est débranché de la prise électrique et laissez-le refroidir avant de
l’assembler,le démonter, le déplacer oule nettoyer.
•Ne laissez pas le produit sans surveillance lorsqu’il est en fonction. Débranchez-le toujours s’il
n’est pas utilisé.
•N’immergez pas la base de l’appareil, le cordon d’alimentation ou la fiche et n’exposez pas le
cordon ou la fiche à l’eau ou tout autre liquide.
•N’utilisez pas d’accessoires qui ne sont pas recommandés ou vendus par le fabricant.
•Ne placez pas l’appareil sur ou près d’un brûleur à gaz ou électrique, dans un four chaud ou
sur toute autre surface chaude.
•Soyez extrêmement prudent lorsque vous déplacez un appareil contenant de l’eau ou tout
autre liquide chaud.
•Utilisez ce produit dans un endroit bien aéré. Gardez au moins 4 à 6 pouces d’espace tout
autour de l’appareil afin de permettre une circulation d’air adéquate.
•Utilisez l’appareil sur une surface plane ou une table. Gardez l’appareil éloigné des rideaux,
tentures, vêtements, torchons ou autres matériaux inflammables.
•Ne branchez ni ne débranchez le produit avec les mains mouillées.
•Ce produit n’est pas destiné à un usage commercialou industriel, mais uniquement à un
usage domestique pourla consommation d’aliments. N’utilisez pas l’appareil à l’extérieur ou
à d’autres fins que celles prévues.
•Ne faites pas fonctionner l’appareil sans aliments à l’intérieur.
•Ne laissez pas le cordon pendre d’une table ou d’un comptoir où l’on pourrait s’y suspendre
ou trébucher.Évitez que le cordon touche les surfaces chaudes.
•Ne faites pas fonctionner l’appareil si le cordon d’alimentation ou la fiche sont endommagés
ou coupés, si les fils sont à découvert, s’il fonctionne mal, s’il a subi une chute ou est
endommagé, ou si le boîtier dumoteur est tombé par terre ou a été exposé à l’eau.
•Cet appareilne comporte aucune pièce réparable par l'utilisateur. N'essayez pas d'examiner
ou de réparer cet appareil vous-même. Veuillez consulter la politique de garantie à la page 6.
•N’exercez aucune pression sur le cordon d’alimentation là où il se connecte à l’appareil, car il
pourrait s’effilocher ou se briser.

13
RECOMMANDATIONS ADDITIONNELLES: Un court cordon d’alimentation est
fourni afin deréduire les risques de s’enchevêtrer ou de trébucherdans un cordonpluslong.
L’utilisation d’une rallonge n’est pas recommandée avecce produit,mais sielledoitêtre utilisée:
−La puissance nominaleindiquéesur lacorde doit êtreau moinsaussi grande que celle de
l’appareil.
−Installer la rallonge de façon à ce qu’ellenepende pasducomptoir ou de la table où l’on
pourrait s’y accrocher ou trébucher.
AVERTISSEMENT: Cet appareil est muni d'une fiche d’alimentation polarisée (une
broche estplus large que l'autre). Ils'agit làd'une mesurede sécurité. Pourréduire le
risque d’électrocution, la fiche doit être insérée d’une seule façon dans une prise de courant
polarisée. Si le branchement n’est pas complet, inversez la fiche. Si la fiche ne s’insère toujours pas,
contactez un électricien qualifié. N'utilisez jamais la fiche avec une rallonge, à moins de pouvoir
l’insérer parfaitement dans la rallonge. Ne tentez pas de modifier la fiche polarisée et respectez à
lalettre cettemesuredesécurité.
Les Piéces:
CONSERVEZ CES INSTRUCTIONS
À TITRE DE RÉFÉRENCE
Avant la première utilisation
IMPORTANT: Veuillez vérifier soigneusement tous les matériaux d'emballage pour les
accessoires avant de les jeter.
AVERTISSEMENT : NE METTEZ AUCUNE PARTIE DU PRODUIT DANS UN LAVE-VAISSELLE.
Pot intérieur
antiadhésif
Couvercle en verre
trempé avec évent
Bouton
Cool Touch
Des
poignées
au toucher
cool
Corps froid
Interrupteur
d'alimentation
Cooking Lumière de cuisson

14
1. Placez le pot intérieur antiadhésif dans le cuiseur à riz. Versez 2 tasses d'eau dans le pot
intérieur antiadhésif, puis recouvrez le pot avec le couvercle.
2. Branchez le produit sur une prise électrique, puis appuyez sur l'interrupteur pour le mettre
en position "Cook".
Attention : La première utilisation peut provoquer une légère odeur ou un petit fumage lors du
chauffage,c'est normal. Ceci est le résultatde la réaction chimique de l'élémentchauffant. Elle
disparaîtrapidement.
3. Au bout de 20 minutes, tirez l'interrupteur vers le haut, puis débranchez le produit de la
prise électrique.
4. Laissez le produitrefroidir, puisversez l'eau du Liner, rincez et séchez soigneusement.
Utilisation de votre Cuiseur à Riz:
ADVERTENCIA: Évitez tout contact avec les parties chaudes.
ATTENTION: Ne pas utiliser le produit pour cuire des viandes entières crues (par exemple,
des rôtis, des steaks, etc.), des poulets entiers ou d'autres volailles, des poissons entiers ou
des viandes hachées. Cuire les viandes hachées séparément.
1. À l'aide de la tasse à mesurer, mesurez le riz et, dans un bol séparé, rincez le riz jusqu'à ce
que l'eau soit relativement claire. Ajoutez le riz dans la marmite intérieure antiadhésive.
Ajoutez ensuite la quantité d'eau nécessaire à la cuisson du riz. Utilisez le tableau fourni.
Adaptez la quantité d'ingrédients à votre goût personnel. ATTENTION : Ne remplissez pas
trop le produit et ne lefaites pas fonctionner lorsqu'il est vide.
2. Mettez l'eau, le riz et le sel de table dans la casserole selon la norme suivante. Lissez la
surface du riz dans la casserole à l'aide d'une cuillère, etc. pour qu'elle devienne plane et
régulière. Remarque (proportions recommandées).
3. Placez la casserole à l'intérieur de la cuisinière et couvrez avec le couvercle. Vous devrez
peut-être tourner légèrement la poêle à droite et à gauche pour vous assurer qu'elle est
bien positionnée.
4. Branchez le produit sur une prise électrique, puis appuyez sur l'interrupteur pour le
mettre en position "Cook". Levoyant s'allumera pendant la cuisson. REMARQUE : Si le
bouton est difficile à enfoncer, il se peut que la casserole intérieure ne soit pas
correctement insérée ou que l'appareil ait besoin de refroidir.
5. Lorsque le chauffage est terminé, l'interrupteur s'allume. Vous pouvez alors laisser le riz
couvert pendant au moins 15 minutes pour le faire cuire à la vapeur. Le degré de
brunissement du riz cuit est lié à la qualité du riz et au réglage de l'anticipation. Enlevez le
couvercle puis retirez la casserole à l'aide d'un morceau de tissu ou d'une mitaine. Placez
la casserole à l'envers sur l'assiette, retirez la casserole, et le riz cuitrestera dans une
forme moulée.
6. Une fois terminé, débranchez le produit. N'oubliez pas de saisir la fiche et non le cordon
lors de la déconnexion.
AVERTISSEMENT: Débranchez toujours l'appareil de la prise électrique lorsqu'il n'est pas
utilisé ou lorsqu'il est laissé sans surveillance. Gardez le corps, la cuve et le couvercle propres
après chaque utilisation.
15
AVERTISSEMENT: Ne touchez pas l'orifice de ventilation pendant la cuisson ou le
refroidissement car lavapeur est très chaude et peut brûler.
Remarque: le réglage WARM permet de garder le contenu chaud.
Note : Temps de cuisson par tasse de riz (estimation)
1 tasse –15-60 min. / 2-4 tasses –20-60 min. / 5-10 tasses - 30-60 min.
Nettoyage de votre cuiseur de riz:
AVERTISSEMENT: Débranchez toujours le produit et laissez-le refroidir avant de le nettoyer
ou de le ranger.
AVERTISSEMENT: Pour éviter d'endommager le produit, ne versez pas d'eau froide dans le
pot intérieur antiadhésif après utilisation et n'utilisez pas de nettoyeurs/tampons abrasifs
pour nettoyer une partie du produit.
•Retirez le pot intérieur et le couvercle de la cuisinière. Lavez-les à l'eau chaude savonneuse.
N'utilisez pas de tampon à récurer, car cela pourrait endommager l'antiadhésif du pot intérieur.
•Nettoyez l'extérieur de la cocotte avec un chiffon propre et humide.Ne plongez aucune partie de
la cocotte dans l'eau.
•Vous pouvez également essuyer la plaque chauffante de l'intérieur de la cocotte avec un chiffon
humide en veillant à ce qu'elle sèche complètement avant de la réutiliser.
•Séchez bien toutes les pièces avant de les ranger ou de les réutiliser.
ATTENTION
AVANTDE COMMENCER LA CUISSON, NETTOYEZLE FONDDU POT
INTÉRIEUR ET LA SURFACE DE LA PLAQUE CHAUFFANTE, PUIS TOURNEZ
LE POT INTÉRIEUR DANS LE SENS DES AIGUILLES D'UNE MONTRE ET
DANS LE SENS INVERSE POUR QU'ILREPOSE CORRECTEMENT SUR LA
PLAQUE CHAUFFANTE À L'INTÉRIEUR DU CUISEUR À RIZ. SINON, LE
CUISEUR À RIZNEFONCTIONNERA PAS OUSERA ENDOMMAGÉ.
Tasses de riz cru
Quantité d'eau à
ajouter
Fait des tasses de riz cuit
Sel de table
2 Coupes
2-3 Coupes
4 Coupes
1-1/2tsps
4 Coupes
4-5 Coupes
8 Coupes
2tsps
5 Coupes
5-6 Coupes
10 Coupes
2tsps
8 Coupes
9 -10 Coupes
16 Coupes
3tsps
10 Coupes
11-12 Coupes
20 Coupes
4tsps

16
This manual suits for next models
2
Table of contents
Languages:
Other Brentwood Appliances Rice Cooker manuals


Popular Rice Cooker manuals by other brands


Mitsubishi Electric
Mitsubishi Electric NJ-EE107H instruction manual

Yum Asia
Yum Asia Bonsai YUM BN02 manual

SQ Professional
SQ Professional Lustro Series instruction manual

Philips
Philips HD4779/77 quick start guide

G&K
G&K RICE CHEF MINI instruction manual

Black & Decker
Black & Decker RC4500 User instructions


