Brentwood Appliances TS-1320S Quick guide

© 2021 Brentwood Appliances, Inc.
MULTI RICE COOKER
ARROCERA ELÉCTRICA MULTIUSOS
CUISEUR DE RIZ MULTIFONCTION
ITEM NO.: TS-1320S
Operating and Safety Instructions
FOR INDOOR HOUSEHOLD USE ONLY
Instrucciones de Operación y Seguridad
SOLO PARA USO DOMESTICO
Consignes de Sécurité et de Fonctionnement
POUR USAGE DOMESTIQUE INTÉRIEUR SEULEMENT

2
IMPORTANT SAFEGUARDS
When using this or any other electrical appliance, always follow these basic
safety precautions, especially when children are present.
READ ALL INSTRUCTIONS BEFORE USE
WARNING-- To reduce the risk of fire, electric shock, serious personal injury and property
damage please note the following:
•This product is not intended for use by children. Keep the product out of the reach of
children and pets. Extra caution is necessary when using this appliance near children.
•Always ensure the product is unplugged from the electricaloutlet and allowed to cool
before assembling, disassembling, relocating, or cleaning it.
•Do not leave the product unattended while it is in use. Always unplug the product from
the electrical outlet when not in use.
•Do not immerse the Base, Power Cord, or Plug of this product in or expose the Power Cord
or Plug to water or other liquids.
•Donot touch hotsurfaces.Use protective oven mitts or glovestoavoidburnsor personal injury.
•Take proper precautions to prevent burns, fire, or personal or property damage as this
appliance generates heat and steam during use.
•Do not use attachments not recommended nor sold by the product manufacturer.
•Donotplaceon or near ahot gas or electric burner, in aheated oven, orother heatedsurfaces.
•Do not operate the product empty. Use extreme caution when moving an appliance
containing hot food, water, or other liquids.
•Use the product in a well-ventilated area. Keep at least 4-6 inches of space on all sides of
the product to allow adequate air circulation.
•Use appliance on a table or flat surface. Keep the product away from curtains, wall
coverings, clothing, dishtowels, or other flammable materials.
•Do not plug or unplug the product from the electrical outlet with a wet hand.
•Thisproduct is intendedsolelyfornon-commercial, non-industrial, household useincooking of
foodfor humanconsumption; do notusethe productoutdoors or forany other purpose.
•Do not letcord hang over edge of table or counter where it may be tripped over or pulled.
•Do not allow cord to touch hot surfaces.
•Do not operate the product if it has a damaged or cut Power Cord or plug, if wires are
exposed, if it malfunctions, if it is dropped or damaged, or is exposed to water.
•This product has no user-serviceable parts. Do not attempt to examine or repair this
productyourself. Please review warranty on Page 11.
•Do not put any stress on the power cord where it connects to the product, as the power
cord could fray and break.
SPECIAL INSTRUCTIONS: A short power supply cord is provided to reduce the risk
of becoming entangled in or tripping over a longer cord. An extension cord is not
recommended for use with this product, but if one must be used:
−The marked electrical rating must be at least as great as that of the product.
3
−Arrange the extension cord so that it will not drape over the countertop or
tabletop where it can be tripped over or pulled.
WARNING: This product is equipped with a polarized plug (one blade is wider than
the other blade) to reduce the risk of electrical shock. This is a safety feature. The plug will fit into
a polarized outlet only one way. If you are unable to insert the plug into the electrical outlet, try
reversing the plug. If the plug still does not fit, contact a qualified electrician. Never use the plug
withanextensioncord unless you can fully insertthe pluginto theextension cord. Donotalterthe
plug. Donotattempttodefeat thesafety purpose of thepolarizedplug.
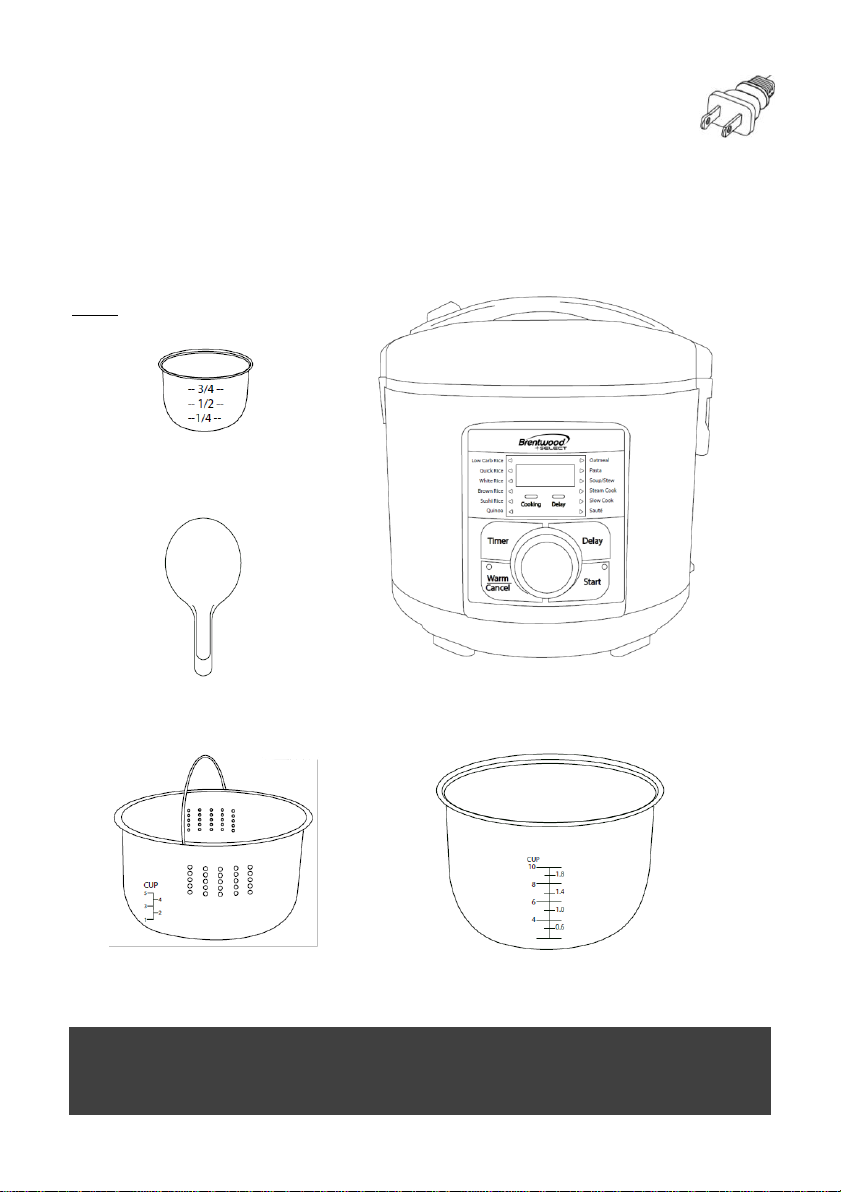
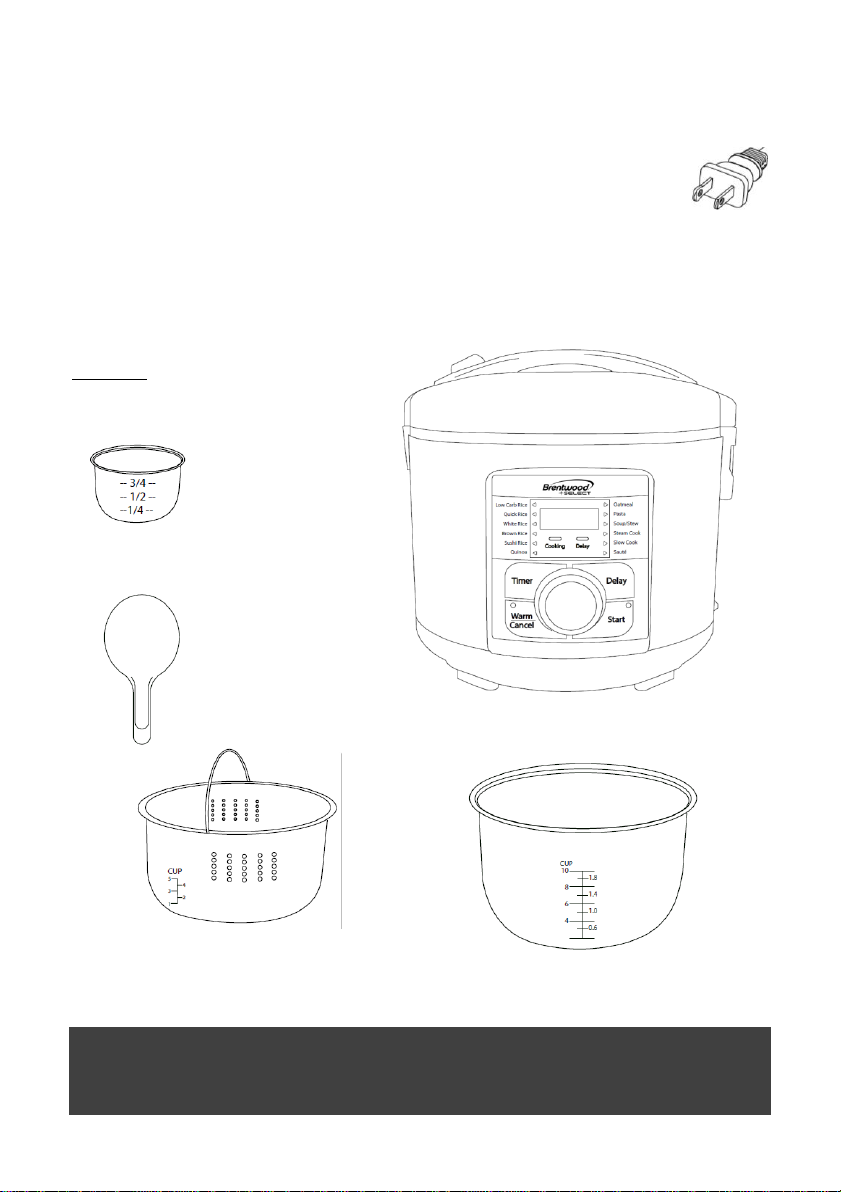
Parts:
SAVE THESE INSTRUCTIONS
FOR FUTURE REFERENCE
Non-Stick Inner Pot
Spatula
Multi Rice Cooker
Measuring Cup
Stainless Steel Low Carb Rice
Steamer Basket
4
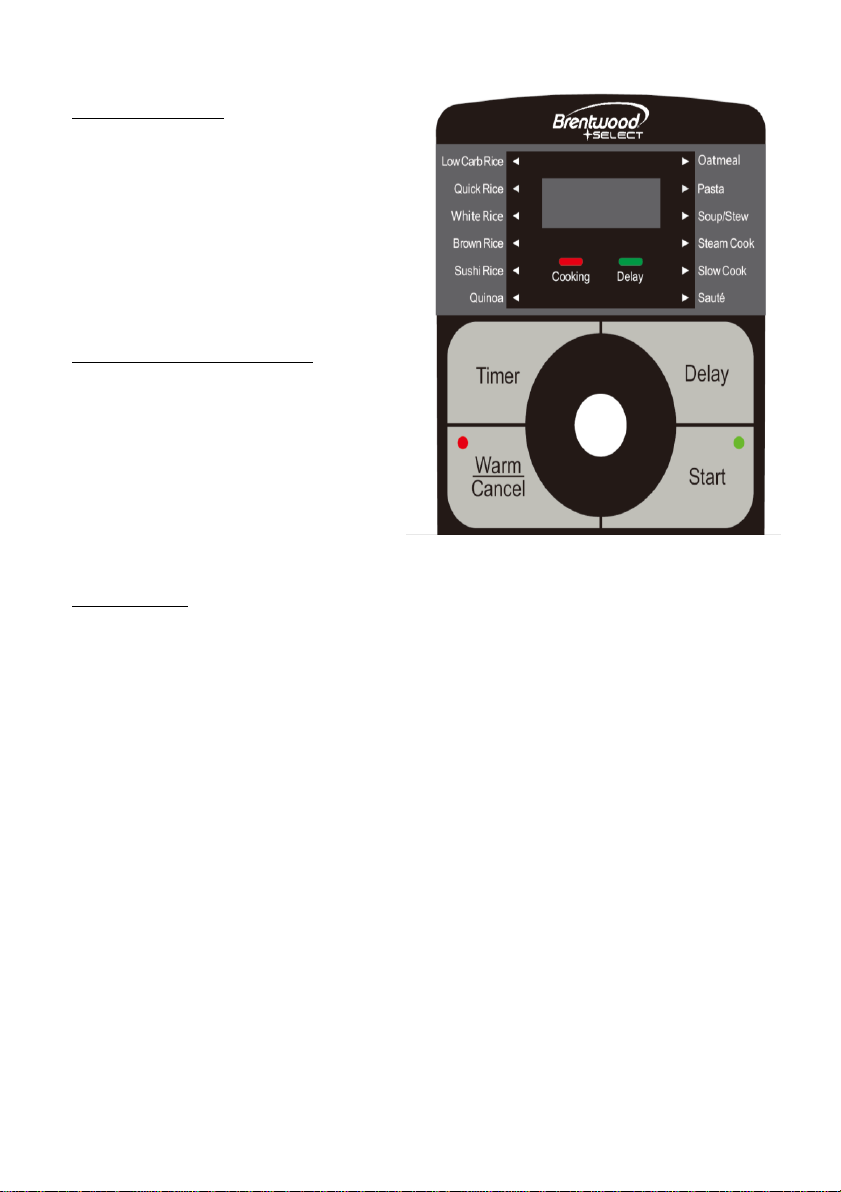
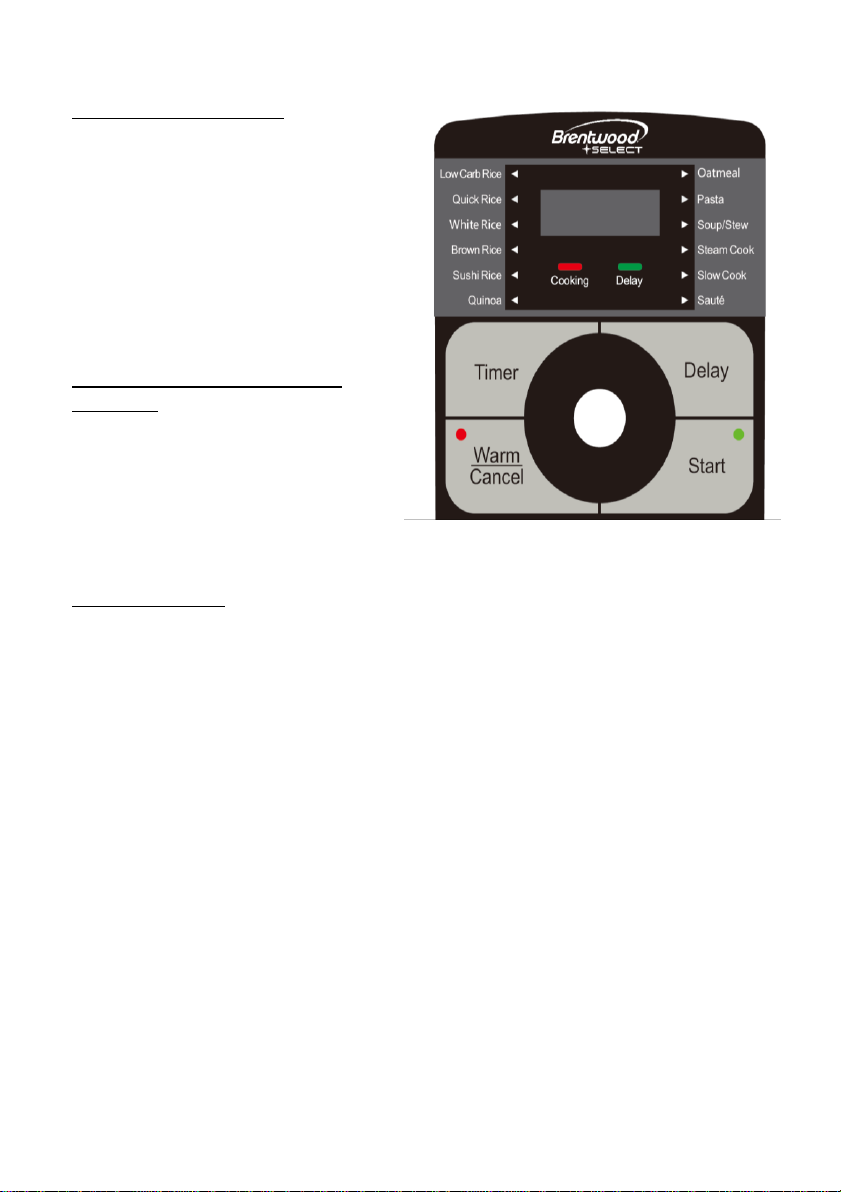
PANEL FUNCTIONS:
Choice of the following Preset features:
Low Carb Rice, Quick Rice, White Rice,
Brown Rice, Sushi Rice, Quinoa,
Oatmeal, Pasta, Soup/Stew, Steam
Cook, Slow Cook, Sauté, Timer,
Warm/Cancel, Delay and Start.
CONTROL KNOB FUNCTIONS:
Soft Button Choices:
Timer
Delay
Warm/Cancel
Start
BeforeFirst Use
IMPORTANT: Please check allpackaging materialcarefully foraccessoriesbeforediscarding.
NOTICE: Do not touch the ventilating hole as the steam is very hot and can scald.
Attention: First use maycause a slight odor or small smoking upon heating, it is normal. This is a
result of the heating element chemical reaction. It quickly goes away.
1. Rinseallaccessorieswith warmtap water andasoftsponge.
2. PlacetheInnerPotintotheRiceCooker. Pour in2cupsofwaterandsecurewithlid closed.
3. Plugtheproductintoanelectricaloutlet,and thensteam for2-3minutes.
4. Waituntilmachinebeeps andturnsoff;unplugtheproductfromthe electrical outlet.
5. Allow theproducttocoolbeforehandling. Use cooking mittenstoremovetheinner pot;pour
thewaterout, rinseand machine isready to useordrythoroughlyandstoreaway.

5
CONTROL KNOB FUNCTIONS:
Functions
Low Carb Rice
Quick Rice
White Rice
Brown Rice
Default Time
00:30 Minutes
00:35 Minutes
00:45 Minutes
01:00 Hour
Temperature
-
-
-
-
Time Range
20-40 Minutes
-
-
-
Time
Intervals
(Min./Hrs.)
5 Minutes
-
-
-
Has Delay
Time
Yes
Yes
Yes
Yes
Functions
Sushi Rice
Quinoa
Oatmeal
Pasta
Default Time
00:40 Minutes
00:10 Minutes
00:15 Minutes
00:10
Minutes
Temperature
-
-
-
212F°
Time Range
-
5 Minutes –
3 Hours
5 Minutes –
3 Hours
1-60
Minutes
Time
Intervals
(Min./Hrs.)
-
1 Minute
15 Minutes
30 Minutes
1 Minute
15 Minutes
30 Minutes
1 Minute
Has Delay
Time
Yes
Yes
Yes
No
Functions
Soup/Stew
Steam Cook
Slow Cook
Sauté
Default Time
00:45 Minutes
00:05 Minutes
04:00 Hours
00:15
Minutes
Temperature
212F°
212F°
208F°
150-356F°
Time Range
5 Minutes –
5 Hours
1-60 Minutes
1-14 Hours
1-30
Minutes
Time
Intervals
(Min./Hrs.)
1 Minute
15 Minutes
30 Minutes
1 Minute
30 Minutes
1 Hour
1 Minute
Has Delay
Time
Yes
No
Yes
No

6
HOW TO USE:
NOTICE: Do not touch the ventilating hole as the steam is very hot and can scald.
Cooking Ordinary Rice:
1. Use the provided measuring cup and add rice to the inner cooking pot.
2. Rinse rice to remove excess starch and drain.
3. Fill the inner cooking pot with water to the line which matches the number of
cups of rice being cooked.
4. Place the inner cooking pot into the rice cooker.
5. Close the lid securely.
6. Plug the cord into an available outlet.
7. Switch the panel control knob to select ‘White Rice’cooking function.
8. After confirming the function, press ‘Start’to cook.
Cooking Low Carb Rice:
1. Add rice to the Stainless Steel (SS) Low Carb Rice Steamer Basket.
2. Place the SS Basket into the inner cooking pot.
3. Add water to the SS Basket with water to the line which matches the number of
cups of rice being cooked. (Example: to cook 5 cups of low carb rice, fill the SS
Basket up to the 5 Cup mark with water.) For ordinary rice capacity in
comparison to Low Carb Rice, see ‘Capacity Table’ below.
CAPACITY TABLE –LOW CARB RICE REFERENCE
Traditional White Rice
Low Carb Rice
5 Cup
1.5 Cup
7 Cup
3 Cup
8 Cup
4 Cup
10 Cup
5 Cup
HowtoAdjust CookingTime
1. You can manually adjust the preset time for the following Preset Dishes: Low
Carb Rice, Quinoa, Hot Cereals (Oatmeal), Pasta, Sauté, Steam Cook, Time can be
manually adjusted.
2. Choose the Preset Dish you wish to make.
3. Press ‘Timer’ and now turn the control knob clockwise or counterclockwise, to
increase/decrease the cooking time.
How to Use ‘Delay Function’
1. The following dishes can use the ‘Delay’ feature:
White Rice
Quick Rice
Brown Rice
Low Carb Rice
Sushi Rice
Hot Cereal
Quinoa
Soup Stew
Slow Cook

7
2. Once you have chosen the dish you are preparing, press the ‘Delay’ button, use
the knob to select the delay time, LED display will flash <00:00>.
3. Switch the control knob to adjust the time between 0 to 24 hours. Depending on
the delay time you need. (Note: when the ‘Delay’ time is used for hours
between 0 to 10, the LED time feature increases by 30 min. When choosing the
‘Delay’ time between 10 to 24 hours, the LED time feature increases by one hour
each time.)
4. Choose your delay time and press ‘Start’, the digital display will countdown from
the time selected.
5. Once the delayed time has been reached, it will beep once before it starts to
cook.
How to Use ‘Warm/Cancel’
1. Press ‘Warm’button, it runs into keep warm mode, digital display will show
‘00:00’, it counts clockwise, the longest keep warm time is 12 hours.
2. Press ‘Cancel’ button at any cooking mode, it beeps one time, and stops cooking,
it shifts into active mode. Active mode is when the machine is ready for next
command.
How to ‘Steam’
The cooking time of vegetables is determined by the amount of water added, softness and size of
vegetables.
FRESH vegetables should be washed before cooking. The chart will help guide time needed to
cook vegetablesand water to add.
1. Place the water amount you desire in the inner pot.
2. Close lid and Select Steam Cook and press start.
3. Place food to steam on the Steamer Basket and set aside.
4. Steam default is set for 1 min. but can be adjusted up to 1 hour max.
5. Machine will beep when it has reached boiling. Then will begin the 1 min timer.
6. Using caution from steam, to avoid escaping steam, open the lid.
7. Place the Steam Basket of food on top of inner pot of hot boiling water.
8. Close lid securely.
9. Machine will beep and turn off when 1 min. has been reached.
10. Using caution from steam, open the lid to check food periodically for doneness.
11. If done, using caution from steam, use oven mitts remove Steam Basket from
Inner Pot.
12. Unplug the machine from the outlet when done.

8
Cleaning Your :
WARNING: Always unplug the product and allow it to cool before cleaning or storing.
NOTICE: To avoid damaging the product, do not pour cold water into the Non-Stick Inner Pot
after use and do not use abrasive cleaners/pads to clean any part of the product.
•Remove the Inner Pot and Lid from the Cooker. Wash these in warm soapy water. Do not
use a scouring pad as this may damage the Non-Stick of the Inner Pot.
•Clean the outside of the Cooker with a clean damp cloth. Do not submerge any part of the
cooker in water.
•You can also wipe the heating plate on the inside of the cooker with a damp cloth making
sure to dry completely before re-using.
•Dry all parts thoroughly before storing or using again.
RecipeIdeas:
Not all multi-rice cookers are the same, please experiment with the timing.
Brown Rice Pilaf
Function: Brown Rice
Ingredients
1 Cup Brown Rice
1 Yellow onion, diced
2 1/4 cups water or stock
1/4 cup sliced almonds,
toasted
Chopped flat leaf parsley for
garnish
Kosher Salt and black pepper
for taste
*Always unplug your Multi
Rice Cooker when not in use.
Directions
In the bowl of your rice cooker add the brown rice,
diced onion, and water (or stock, if desired). Plug
in your Multi Rice Cooker and turn knob to the
desired setting ‘Brown Rice’, default is <01:00>
hour, and press ‘Start’.
After 30-40 minutes check rice for doneness. With
cooking mitts and caution of steam, open lid and
check rice. When rice has finished cooking to your
likeness, fluff with a fork, season with salt and
pepper and transfer to a serving bowl. Top with
toasted sliced almonds and parsley.
Vegetable
Water (Cups)
Cooking Minutes
Eggplant
1 ½
20
Zucchini
½
10
Peas
½
10
Cauliflower
1
15
Green Beans
1
15
Corn
1
15
Asparagus
½
10
Spinach
½
10
Cabbage
½
10
Carrots
1
15

9
Mediterranean-Style Steamed Salmon with Lemon and Fresh Herbs
Function: Steam
Serves: 4
Ingredients
1-Yellow onion, halved and
sliced
4-Green onions (spring
onions), trimmed and sliced
lengthwise, divided
1-lb Skin-on salmon fillet
(suggestion: wild Alaskan), cut
into 4 portions
Kosher salt
1 Tsp ground Coriander
1-Tsp ground Cumin
1/2-Tsp Aleppo Pepper
4/5-Garlic cloves, chopped
Extra Virgin Olive Oil
Fresh Parsley (approx. 28g)
1-Lemon, thinly sliced
1/2-Cup White Wine (or broth)
*Always unplug your Multi
Rice Cooker when not in use.
Directions
Place the sliced yellow onions and some of the
green onions on the bottom of the Non-Stick Inner
Pot. Arrange salmon, skin-side down, on top.
Season with kosher salt and black pepper.
In a small bowl, mix the coriander, cumin, and
Aleppo pepper. Coat top of salmon with the spice
mixture. Drizzle with a little bit of extra virgin olive
oil.
Add garlic, parsley, and the remaining green
onions on top of the salmon (arrange so that
everything is spread evenly over the salmon
portions.) Arrange lemon slices on top.
Add another drizzle of extra virgin olive oil, then
pour the white wine (or broth).
Plug in your Multi Rice Cooker and turn the knob
to the desired setting, ‘Steam’ the default is
<00:01> minute, to add time press ‘Time’ to adjust
and turn knob clockwise to set for <00:10>
minutes. Press ‘Start’ (DO NOT UNCOVER). Once
the time is reached machine will beep and switch
to active mode <- - - ->. With Caution of steam,
check for doneness. If more time is needed repeat
and set timer for an additional 1-5 minutes,
depending on your preference of doneness. When
done, let sit with lid closed for 5 minutes
undisturbed. Using cooking mitts, open lid and
with a spatula, spoon out your fish with lemon and
herbs and place on a plate and enjoy over rice!
Always unplug your Multi Rice Cooker when not in
use.

10
Balsamic Honey Glazed Chicken Sauté
Function: Sauté
Serves: 4
Ingredients
4-Fresh Boneless Skinless
Chicken Breasts
2-Tbsp Olive Oil
1/4-Cup Balsamic Vinegar
1-Tsp Garlic (minced)
1/2-Tsp Salt
1/4-Tsp Black Pepper
1/2-Cup Chicken Stock
2-Tbsp Honey
*Always unplug your Multi
Rice Cooker when not in
use.
Directions
Season the chicken with salt and pepper.
Plug in your Multi Rice Cooker place the ‘Non-Stick
Inner Pot’ into your Multi Rice Cooker and turn the
knob to the desired setting, ‘Sauté’, the default is
<00:15> minutes. If you need more time, press
‘Timer’ and add more time by going clockwise, press
‘Start’ when ready.
Using cooking mitts and caution of heat: In the non-
stick Inner Pot, heat oil and sauté the chicken for 3-4
minutes on each side until lightly golden. Remove
the chicken from the inner pot, place in a bowl and
cover to keep warm.
In a glass measuring cup or small bowl, combine the
chicken stock, balsamic vinegar, and honey. Stir to
dissolve the honey. Add the garlic to the inner pot
and sauté for 30 seconds. Stir in the chicken stock
mixture and bring to a boil. Add chicken back to the
inner pot, cook for 3 to 5 minutes until the chicken is
cooked through. The chicken is done when it feels
firm to the touch and a meat thermometer inserted
in the center reaches 170°F.
Once the time is reached machine will beep and
switch to active mode <- - - ->. If more time is
needed repeat and set timer for an additional 1-5
minutes, depending on your preference of doneness.
When done, serve each piece of Balsamic Honey
Glazed Chicken with a drizzle of glaze. Tip: Serve over
rice or with sauteed vegetables. Enjoy!

11
ONE YEAR LIMITED WARRANTY
Write down the following information about your appliance to better help you
obtain assistance or service if you ever need it.
CUSTOMER RECORD
Date of Purchase______________ Store/Dealer___________________________
Model/Item No: _______________________________
THIS WARRANTY APPLIES TO PRODUCTS PURCHASED AND USED IN THE CONTINENTAL
U.S. AND CANADA ONLY. This is the only express warranty for this product and is in
lieu of any other warranty or condition. This product is warranted to be free from
defects in material and workmanship for a period of one (1) year from the date of
original purchase. During this period, your exclusive remedy is repair or replacement
of this product, at our option; however, you are responsible for all costs associated
with returning the product to us and our returning a product or component under this
warranty to you. If the product or component is no longer available, we will replace
with a similar one of equal or greater value. This warranty does not cover glass, filters,
wear from normal use, use not in conformity with the printed directions, or damage
to the product resulting from accident, alteration, abuse, or misuse.
THIS WARRANTY EXTENDS ONLY TO THE ORIGINAL CONSUMER PURCHASER. KEEP
THE ORIGINAL SALES RECEIPT, AS PROOF OF PURCHASE IS REQUIRED TO MAKE A
WARRANTY CLAIM.
This warranty is void if the product is used for other than single-family household use
or subjected to any voltage and waveform other than what is specified on the rating
label (E.G., 120V~60Hz). We exclude all claims for special, incidental, and
consequential damages caused by breach of express or implied warranty. All liability is
limited to the amount of the purchase price. Every implied warranty, including any
statutory warranty or condition of merchantability or fitness for a particular purpose,
is disclaimed except to the extent prohibited by law, in which case such warranty or
condition is limited to the duration of this written warranty. This warranty gives you
specific legal rights. You may have other legal rights that vary depending on where you
live. Some states do not allow limitations on implied warranties or special, incidental,
or consequential damages, so the foregoing limitations may not apply to you. To make
a warranty claim do not return this appliance to the store.
TO OBTAIN WARRANTY SERVICE AND/OR TROUBLESHOOTING INFORMATION:
Call Customer Service at 1-888-903-0060 in the U.S.
Monday through Friday: 9:00 am –5:00 pm PT
U.S. Customers Please Email: warranty@brentwoodus.com
Canadian Customers Please Email: Canada.warranty@brentwoodus.com
Go online at www.brentwoodus.com

12
PRECAUCIONES IMPORTANTES
Al usar este o cualquier otro electrodoméstico, siga las precauciones básicas de
seguridad,especialmente cuando niños están presentes.
LEA TODAS LAS INSTRUCTIONES ANTES DE USAR
ADVERTENCIA-Para reducir el riesgo de incendio, choque eléctrico, lesiones personales
graves y daños a la propiedad, por favor tenga en cuenta lo siguiente:
•Este producto no está destinadopara su uso por los niños. Mantenga el producto fuera del
alcance de los niños y lasmascotas. Precaución adicional es necesario cuando se utiliza este
aparato cerca de niños.
•Asegúrese siempre de que el producto está desenchufado de la toma de corriente y se deja
enfriar antes de montar, desmontar, trasladar o limpiar.
•No deje el producto desatendido mientras está en uso. Siempre desenchufe el producto de
la toma de corriente cuando no esté en uso.
•No sumerja la base, el cable de alimentación o el enchufe de este producto ni exponga el
cable de alimentación o el enchufe alagua u otros líquidos.
•No toque las superficies calientes.Utilice guantes deprotección para evitar quemaduras o
lesiones personales.
•Tome las precauciones adecuadas para evitar quemaduras, incendios o daños personales o
materiales, yaque este aparato genera calor y vapor durante suuso.
•No utilice accesoriosno recomendados nivendidos por el fabricante del producto.
•No lo coloque sobre o cerca de un quemador de gaso eléctrico caliente, en un horno
caliente o en otras superficies calientes.
•No utilice el producto vacío. Extreme las precauciones al mover un aparato que contenga
alimentos calientes, agua u otros líquidos.
•Utilice el producto en un área bien ventilada. Mantenga un espacio de al menos 4-6 pulgadas
en todos los lados del producto para permitir una adecuada circulación de aire.
•Utilice el aparato sobre unamesa o superficie plana. Mantenga el producto alejado de
cortinas, revestimientos de pared, ropa, paños de cocina u otros materiales inflamables.
•No enchufe o desenchufe el producto de la toma de corriente con las manos mojadas.
•Este producto estádestinado exclusivamente a un uso doméstico,no comercial y no
industrial, para la cocción de alimentos para el consumo humano; no utilice el producto al
aire libre ni para ningún otro fin.
•No deje que el cable cuelgue del borde de la mesa o de la encimera donde pueda tropezar o
ser arrastrado.
•No permita que el cable entre en contacto con superficies calientes.
•No utilice el producto si el cablede alimentación o el enchufeestándañados o cortados, si los
cables están expuestos, si funciona mal, sise cae ose daña, o si está expuesto al agua.
•Este producto no tiene piezas que el usuario pueda reparar.No intente examinar o reparar
este producto usted mismo. Consulte la garantía en la página 11.

13
•No ejerza ninguna presión sobre el cable de alimentación donde se conecta al producto, ya
que el cable de alimentación podría deshilacharse y romperse.
INSTRUCCIONES ESPECIALES: Uncabledesuministroeléctricocortoparareducirel
riesgo de enredarse otropezarseconuncablemás largo.Uncabledeextensión no se recomienda
parasuusocon esteproducto,pero si se debe utilizar:
−El voltaje eléctrico debeser almenostangrandecomo la delproducto
−Organice el cable de extensión de manera que no cuelgue del mostrador o de la mesa donde
alguiensepuedatropezar con él ni tirar.
ADVERTENCIA: Este producto está equipado con un enchufe polarizado (una pata es
más ancha que la otra) para reducir el riesgo de descarga eléctrica. Esta es una
característica de seguridad. El enchufe encajará en un tomacorriente polarizado de una sola
manera. Si no puede insertar el enchufe en la toma de corriente, intente invertir el enchufe. Si aún
así no encaja, comuníquese con un electricista calificado. No utilice nunca el enchufe con un cable
de extensión a menos que pueda insertar completamente elenchufe en el cable de extensión. No
altere elenchufe.Nointente anularla característica de seguridaddelenchufepolarizado.
Partes:
GUARDE ESTAS INSTRUCCIONES
COMO REFERENCIA
Olla Interior
Antiadherente
Espátulala
Olla
Arrocera
Múltiple
Taza de Medir
Canasta de
Cocción de
Arroz Bajo
Carbohidrato
de Acero
Inoxidable
14
DESCRIPCIÓN DEL PANEL:
Elección de las siguientes funciones
preestablecidas: Arroz bajo en
carbohidratos, Arroz rápido, Arroz
blanco, Arroz integral, Arroz para
sushi, Quinoa, Avena, Pasta,
Sopa/guiso, Cocción al vapor, Cocción
lenta, Salteado, Temporizador,
Calentar/Cancelar, Retraso e Inicio.
FUNCIONES DE LOS MANDOS DE
CONTROL:
Opciones de botones suaves:
Temporizador
Retraso
Calentar/Cancelar
Inicio
Antes delprimeruso
IMPORTANTE:Por favor,compruebecuidadosamentetodo el material de embalajede los
accesorios antes de desecharlo.
AVISO: No toqueelorificio deventilación,yaque el vaporestá muycalienteypuedeprovocar
quemaduras.
Atención: El primeruso puede causar un ligero olor o una pequeñahumareda al calentarse, es
normal. Es el resultadode la reacción química del elemento calefactor. Desaparece rápidamente.
1. Enjuaguetodos losaccesoriosconaguatibiadel grifo yuna esponjasuave.
2. Coloque la olla interioren laarrocera.Vierta 2tazasdeaguayasegureconlatapa cerrada.
3. Enchufeelproductoenunatomadecorrienteeléctricay,acontinuación,cocinealvapor
durante2-3 minutos.
4. Esperehastaque lamáquinaemitaunpitidoyseapague;desenchufeelproductodela
tomade corriente.
5. Dejeque el productose enfríeantesdemanipularlo. 6. Utiliceunasmanoplasde cocina
para retirarelrecipienteinterior;vierta elagua, aclárelo yla máquinaestará listaparasu
uso, oséquelo bieny guárdelo.

15
FUNCIONES CON EL MANDO DE CONTROL:
Funciones
Bajo
Carbohidratos
Arroz
Arroz Rapido
Arroz Blanco
Arroz Integral
Tiempo
Defecto
00:30 Minutos
00:35 Minutos
00:45 Minutos
01:00 Hour
Temperatura
-
-
-
-
Rango de
Tiempo
20-40 Minutos
-
-
-
Intervalos de
Tiempo
(Min./Hrs.)
5 Minutos
-
-
-
Tiempo
Retardo
Yes
Yes
Yes
Yes
Funciones
Arroz de Sushi
Quinoa
Avena
Pasta
Tiempo
Defecto
00:40 Minutos
00:10 Minutos
00:15 Minutos
00:10 Minutos
Temperatura
-
-
-
100°C
Rango de
Tiempo
-
5 Minutos–
3 Horas
5 Minutos–
3 Horas
1-60 Minutos
Intervalos de
Tiempo
(Min./Hrs.)
-
1 Minuto
15 Minutos
30 Minutos
1 Minuto
15 Minutos
30 Minutos
1 Minuto
Tiempo
Retardo
Yes
Yes
Yes
No
Funciones
Sopa/Estofado
Cocinar al
Vapor
Cocinar a
Fuego Lento
Sopa/Hervir
Tiempo
Defecto
00:45 Minutos
00:05 Minutos
04:00 Horas
00:15 Minutos
Temperatura
100C°
100C°
97C°
65-180C°
Rango de
Tiempo
5 Minutos –
5 Horas
1-60 Minutos
1-14 Horas
1-30 Minutos
Intervalos de
Tiempo
(Min./Hrs.)
1 Minuto
15 Minutos
30 Minutos
1 Minuto
30 Minutos 1
Hora
1 Minuto
Tiempo
Retardo
Yes
No
Yes
No

16
CÓMO USARLO:
AVISO: No toque el orificio de ventilación ya que el vapor está muy caliente y puede
escaldar.
Cocinar arroz ordinario:
1. Utilice el vaso medidor suministrado y añada el arroz a la olla interior.
2. Enjuague el arroz para eliminar el exceso de almidón y escúrralo.
3. Llene la olla interior de cocción con agua hasta la línea que coincida con el
número de tazas de arroz que se está cocinando.
4. Coloque la olla de cocción interior en la arrocera.
5. Cierre bien la tapa.
6. Enchufe el cable en una toma de corriente disponible.
7. Cambie el mando de control del panel para seleccionar la función de cocción
'Arroz blanco’.
8. Tras confirmar la función, pulse ‘Inicio’para cocinar.
Cocinar el arroz bajo:
1. Añada el arroz a la cesta de cocción de arroz Bajo Carbohidrato de acero
inoxidable (SS).
2. Coloque la Cesta SS en la olla de cocción interior.
3. Añada agua a la cesta de acero inoxidable hasta la línea que corresponda al
número de tazas de arroz que vaya a cocinar. (Ejemplo: para cocinar 5 tazas de
arroz bajo en carbohidratos, llene la Cesta SS hasta la marca de 5 tazas con agua).
Para conocer la capacidad del arroz ordinario en comparación con el arroz bajo
en carbohidratos, consulte la ‘Tabla de capacidad’más abajo.
TABLA DE CAPACIDAD - REFERENCIA DE ARROZ BAJO EN CARBOHIDRATOS
Arroz Blanco Tradicional
Arroz Bajo en Carbohidratos
5 Taza
1.5 Taza
7 Taza
3 Taza
8 Taza
4 Taza
10 Taza
5 Taza
Cómo ajustar el tiempo de cocción
1. Puede ajustar manualmente el tiempo preestablecido para los siguientes platos
preestablecidos: Arroz Bajo Carbohidrato, Quinoa, Cereales Calientes (Avena),
Pasta, Salteado, Cocción al Vapor, El tiempo se puede ajustar manualmente.
2. Elija el Plato Preestablecido que desea hacer.
3. Presione 'Timer' y ahora gire el mando de control en el sentido de las agujas del
reloj o en sentido contrario, para aumentar/disminuir el tiempo de cocción.

17
Cómo utilizar la ‘Función de Retardo’
1. Los siguientes platos pueden utilizar la función 'Delay':
Arroz Blanco
Arroz Rápido
Arroz Integral
Arroz Low Carb
Arroz Sushi
Cereal Caliente
Sopa de Quinoa
Guiso de Sopa
Cocción Lenta
2. Una vez que haya elegido el plato que está preparando, pulse el botón 'Retraso',
utilice el mando para seleccionar el tiempo de retraso, la pantalla LED parpadeará
<00:00>.
3. Con el mando de control, ajuste el tiempo entre 0 y 24 horas. Dependiendo del
tiempo de retardo que necesite. (Nota: cuando el tiempo de 'Retraso' se utiliza
para horas entre 0 y 10, la función de tiempo del LED aumenta en 30 min.
Cuando se elige el tiempo de 'Retraso' entre 10 y 24 horas, la función de tiempo
del LED aumenta en una hora cada vez).
4. Elija su tiempo de retardo y presione 'Start', la pantalla digital hará una cuenta
regresiva desde el tiempo seleccionado.
5. Una vez alcanzado el tiempo de retardo, emitirá un pitido antes de empezar a
cocinar.
Cómo utilizar 'Calentar/Cancelar'
1. Pulse el botón ‘Warm’ (Calentar), el aparato pasará al modo de mantenimiento
del calor, la pantalla digital mostrará <00:00>, y contará en el sentido de las
agujas del reloj, el tiempo de mantenimiento del calor más largo es de 12 horas.
2. Pulse el botón ‘Cancelar’ en cualquier modo de cocción, emitirá un pitido y dejará
de cocinar, pasando al modo activo. El modo activo es cuando la máquina está
lista para la siguiente orden.
Cómo cocinar al ‘Vapor’
El tiempo de cocción de las verduras viene determinado por la cantidad de agua añadida, la
blandura y el tamaño de lasverduras.
Las verduras FRESCAS deben lavarse antes de cocinarlas. La tabla ayudará a orientar el tiempo
necesariopara cocinarlas verdurasyelagua quesedebeañadir.
1. Coloque la cantidad de agua que desee en la olla interior.
2. Cierre la tapa y seleccione Cocinar al vapor y pulse Inicio.
3. Coloque los alimentos a cocer al vapor en la canasta de cocción al vapor y
apártelos.
4. El vapor por defecto está configurado para 1 minuto, pero se puede ajustar hasta
1 hora como máximo.

18
5. La máquina emitirá un pitido cuando haya alcanzado la ebullición. Entonces
comenzará el temporizador de 1 minuto.
6. Con precaución por el vapor, para evitar la salida del vapor, abre la tapa.
7. Coloque la Canasta de Vapor de los alimentos sobre la olla interior de agua
caliente hirviendo.
8. Cierre bien la tapa.
9. La máquina emitirá un pitido y se apagará cuando se haya alcanzado 1 minuto.
10. Teniendo cuidado con el vapor, abra la tapa para comprobar periódicamente el
estado de los alimentos.
11. Si está hecho, teniendo precaución con el vapor, utilice guantes de cocina y
retire la canasta de vapor de la olla interior.
12. Desenchufe el aparato de la toma de corriente cuando haya terminado.
Veuillez consulter les idées de recettes à la page 8.
No todas las cocinas de arroz múltiple son iguales, por favor experimente con los tiempos.
Limpieza de su Olla Arrocera Múltiple:
ADVERTENCIA: Desenchufe siempre el producto y deje que se enfríe antes de limpiarlo o
guardarlo.
AVISO: Para evitar dañar el producto, no vierta agua fría en la olla interior antiadherente
después de su uso y no utilice limpiadores/almohadillas abrasivas para limpiar cualquier
parte del producto.Remove - Retire la olla interior y la tapa de la olla. Lávelos con agua tibiay
jabón. No utilice un estropajo,ya que podría dañar el antiadherente de la olla interior.
•Limpie el exterior de la olla con un paño limpio y húmedo. No sumerja ninguna parte de
la olla en agua.
•También puede limpiar la placa calefactora del interior de la olla con un paño húmedo
asegurándose de secarla completamente antes de volver a utilizarla.
•Seque bien todas las piezas antes de guardarlas o utilizarlas de nuevo.
Vegetales
Agua (Tazas)
Minutos de Cocción
Berenjena
1 ½
20
Calabacín
½
10
Guisantes
½
10
Coliflor
1
15
Judías
verdes
1
15
Maíz
1
15
Espárragos
½
10
Espinacas
½
10
Coles
½
10
Zanahorias
1
15

19
IMPORTANTES MESURES DE SÉCURITÉ
Lorsque vous utilisez cet appareil ou tout autre appareil électrique, suivez toujours
ces précautions de base, surtout en présence d’enfants.
LISEZ TOUTES LES INSTRUCTIONS AVANT USAGE
AVERTISSEMENT –- Pour réduire le risque d’incendie, d’électrocution, de blessures
graves ou de dommages matériels,veuillez noter ce quisuit:
•Ce produit n’est pas destiné à être utilisé par des enfants. Gardez-le hors de portée desenfants
etdes animaux.Redoublez de prudence lorsque vous utilisez cet appareil à proximité d’enfants.
•Assurez-vous que l’appareil est débranché de la prise électrique et laissez-le refroidir avant de
l’assembler, le démonter, le déplacer ou le nettoyer.
•Ne laissez pas le produit sans surveillance lorsqu’il est en fonction. Débranchez-le toujours s’il
n’est pas utilisé.
•N’immergez pas la base de l’appareil, le cordon d’alimentation ou la fiche et n’exposez pas le
cordon ou la fiche à l’eau ou tout autre liquide.
•N’utilisez pas d’accessoires qui ne sont pas recommandés ou vendus par le fabricant.
•Ne placez pas l’appareil sur ou près d’un brûleur à gaz ou électrique, dans un four chaud ou
sur toute autre surface chaude.
•Soyez extrêmement prudent lorsque vous déplacez un appareil contenant de l’eau ou tout
autre liquide chaud.
•Utilisez ce produit dans un endroit bien aéré. Gardez au moins 4 à 6 pouces d’espace tout
autour de l’appareil afin de permettre une circulation d’air adéquate.
•Utilisez l’appareil sur une surface plane ou une table. Gardez l’appareil éloigné des rideaux,
tentures, vêtements, torchons ou autres matériaux inflammables.
•Ne branchez ni ne débranchez le produit avec les mains mouillées.
•Ce produit n’est pas destiné à un usage commercial ou industriel, mais uniquement à un
usage domestique pour la consommation d’aliments. N’utilisez pas l’appareil à l’extérieur ou
à d’autres fins que celles prévues.
•Ne faites pas fonctionner l’appareil sans aliments à l’intérieur.
•Ne laissez pas le cordon pendre d’une table ou d’un comptoir où l’on pourrait s’y suspendre
ou trébucher.Évitez que le cordon touche les surfaces chaudes.
•Ne faites pas fonctionner l’appareil si le cordon d’alimentation ou la fiche sont endommagés
ou coupés, si les fils sont à découvert, s’il fonctionne mal, s’il a subi une chute ou est
endommagé, ou si le boîtier du moteur est tombé par terre ou a été exposé à l’eau.
•Ce produit ne contient aucune pièce réparable par l’utilisateur. Ne tentez pas d’examiner ou
de réparer ceproduit vous-même. Veuillez consulter la politique de garantie Page 11.
•N’exercez aucune pression sur le cordon d’alimentation là où il se connecte à l’appareil, car il
pourrait s’effilocher ou se briser.
RECOMMANDATIONS ADDITIONNELLES : Un court cordon d’alimentation est
fourni afin de réduire les risques de s’enchevêtrer ou de trébucher dans un cordon plus long.
L’utilisation d’une rallonge n’est pas recommandée avec ce produit, mais si elle doit être utilisée :
20
−La puissance nominale indiquée surlacordedoit êtreau moins aussi grandeque celle de
l’appareil;
−Installer la rallonge de façon à ce qu’elle ne pende pas du comptoir ou de la table où l’on
pourrait s’y accrocher ou trébucher.
AVERTISSEMENT: Cet appareil est muni d'une fiche d’alimentation polarisée (une
broche estpluslarge que l'autre).Il s'agitlàd'unemesure de sécurité. Pourréduirele
risque d’électrocution, la fiche doit être insérée d’une seule façon dans une prise de courant
polarisée. Si le branchement n’est pas complet, inversez la fiche. Si la fiche ne s’insère toujours pas,
contactez un électricien qualifié. N'utilisez jamais la fiche avec une rallonge, à moins de pouvoir
l’insérer parfaitement dans la rallonge. Ne tentez pas de modifier la fiche polarisée et respectez à
lalettre cette mesuredesécurité.
Les Piéces:
CONSERVEZ CES INSTRUCTIONS
À TITRE DE RÉFÉRENCE
Pot Intérieur Antiadhésif
Spatule
Cuiseur à riz Multiple
Tasse à
Mesurer
Panier à Vapeur pour Riz à Faible
Teneur en Glucides en Acier
Inoxydable
Table of contents
Languages:
Other Brentwood Appliances Rice Cooker manuals


Popular Rice Cooker manuals by other brands


Cater Chef
Cater Chef *688.087 instruction manual

Rosewill
Rosewill RHRC-17001 user manual

Elite Professional
Elite Professional B701T instruction manual

EMtronics
EMtronics EMRCBL1 user manual

Zojirushi
Zojirushi NS-PC10 operating instructions

Farberware
Farberware FSRC140 SPECIAL SELECT Use and care instructions


