Brentwood TS-239BK Quick guide

WAFFLE MAKER
WAFLERA / GAUFRIER
Model No.: TS-239BK & TS-239BL
Operating and Safety Instructions
Instrucciones de Operación y Seguridad
Consignes de sécurité et de fonctionnement
-FOR INDOOR HOUSEHOLD USE ONLY-
-SOLO PARA USO DOMESTICO-
-POUR USAGE DOMESTIQUE INTÉRIEUR SEULEMENT-

2
IMPORTANT SAFEGUARDS
When using this or any other electrical appliance, always follow these basic safety
precautions, especially when children are present.
READ ALL INSTRUCTIONS BEFORE USE
WARNING-To reduce the risk of fire, electric shock, serious personal injury and property
damage please note the following:
•This appliance is not intended for use by children. Keep the appliance out of the reach of
children and pets. Extra caution is necessary when using this appliance near children.
•Always ensure the product is unplugged from the electrical outlet and allowed to cool
before assembling, disassembling, relocating, or cleaning.
•Do not leave the appliance unattended while it is in use. Always unplug the appliance from
the electrical outlet when not in use.
•Do not immerse or expose the Base, Power Cord, or Plug of this appliance in water or
other liquids.
•Do not touch hot surfaces. Use protective oven mitts or gloves when removing the Lid or
handling hot containers to avoid burns or personal injury.
•This appliance generates heat and steam during use. Please take the proper precautions to
avoid burns, fire, and personal or property damage.
•Do not use attachments not recommended or sold by the Manufacturer.
•Do not place appliance on or near a hot gas or electric burner, in a heated oven, or other
heated surfaces.
•Use extreme caution when moving an appliance containing food or liquids.
•Use the product in a well-ventilated area. Keep at least 4-6 inches of space on all sides of
the product to allow adequate air circulation.
•Use appliance on a table or sturdy flat surface. Keep the appliance away from curtains, wall
coverings, clothing, dishtowels, or other flammable materials.
•Do not plug or unplug the appliance from the electrical outlet with a wet hand.
•This appliance is intended solely for non-commercial, non-industrial, household use in cooking
of food for human consumption; do not use the product outdoors or for any other purpose.
•Do not operate the appliance empty.
•Do not let cord hang over edge of table or counter where it may be tripped over or pulled.
Do not allow cord to touch hot surfaces.
•Do not operate the appliance if it has a damaged power cord or plug, if wires are exposed, if it
malfunctions, if it is dropped or damaged, or if the motor housing is dropped in or exposed to
water.
•This appliance has no user-serviceable parts. Do not attempt to examine or repair this
appliance yourself. Only qualified service personnel should perform any servicing.
•Do not put any stress on the power cord where it connects to the appliance, as the power
cord could fray and break.
•This appliance does not have an “OFF” feature, to shut off please disconnect from power supply.

3
SPECIAL INSTRUCTIONS: A short power supply cord is provided to reduce the risk of
becoming entangled in or tripping over a longer cord. An extension cord is not recommended for
use with this product, but if one must be used:
−The marked electrical rating must be at least as great as that of the product.
−Arrange the extension cord so that it will not drape over the countertop or tabletop
where it can be tripped over or pulled.
WARNING: This product is equipped with a polarized plug (one blade is wider than the other
blade) to reduce the risk of electrical shock. This is a safety feature. The plug will fit into a
polarized outlet only one way. If you are unable to insert the plug into the electrical outlet, try
reversing the plug. If the plug still does not fit, contact a qualified electrician. Never use the
plug with an extension cord unless you can fully insert the plug into the extension cord. Do
not alter the plug. Do not attempt to defeat the safety purpose of the polarized plug.
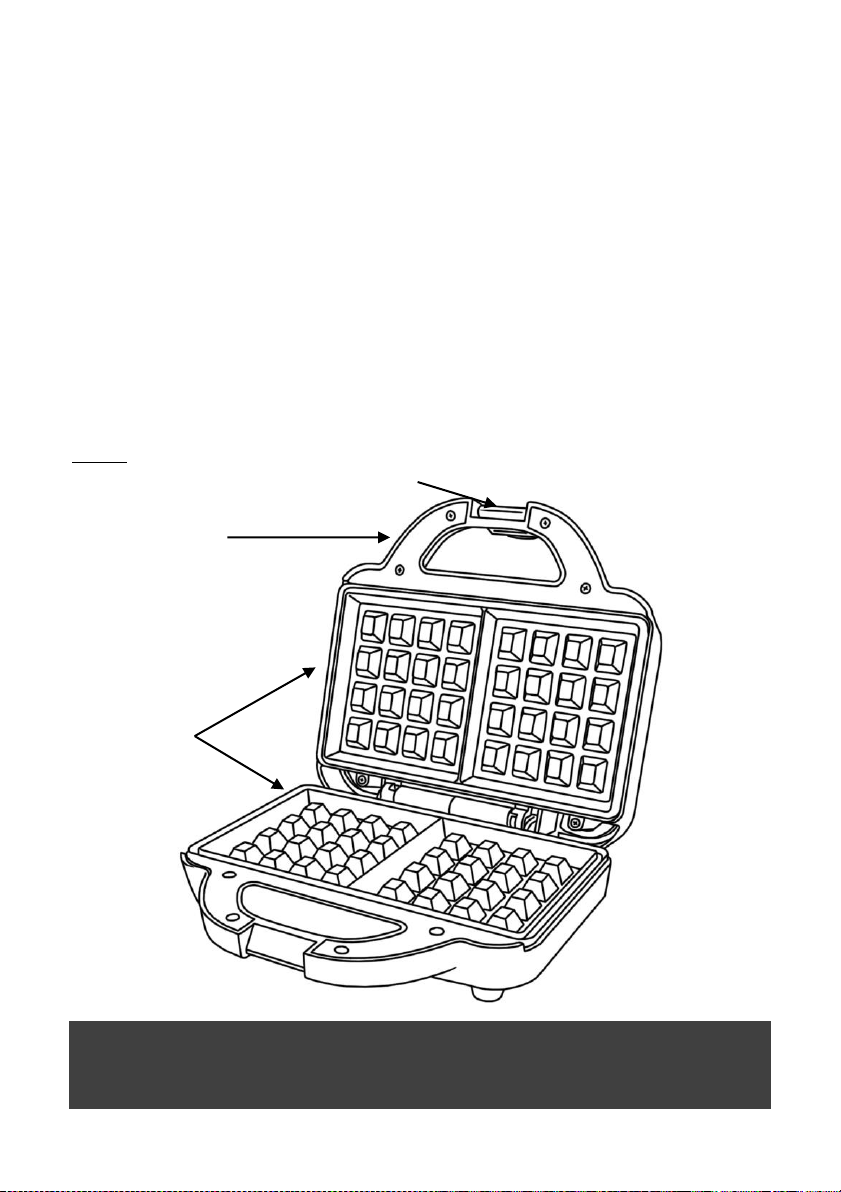
Parts:
SAVE THESE INSTRUCTIONS
FOR FUTURE REFERENCE
Lid
Non-Skid
Feet
Non-Stick
Cooking Plates
Secure Lock Clasp

4
Before First Use
IMPORTANT: Please check all packaging material carefully before discarding as there may be
accessory parts contained within the packaging material.
Before your first use wipe down all surfaces with a damp cloth and then dry.
Using Your Waffle Maker:
WARNING: Avoid contact with hot parts.
1. Place your waffle maker on a sturdy and clean flat surface.
2. You can lightly coat the non-stick cooking plates with a small amount of vegetable oil. You
can use a lightly coated paper towel or pastry brush. This helps to prolong the life of your
non-stick.
3. Plug the product into a standard 120-volt AC electrical outlet and preheat the appliance by
closing the lid. The red power light will come on to indicate the appliance is preheating.
Preheat your appliance for a minimum of 3 minutes. The green ready light will come on to
indicate it is ready to cook.
Attention: First use may cause a slight odor or small smoking upon heating, it is normal. This
is a result of the heating element chemical reaction. It quickly goes away.
4. While the appliance preheats you can prepare the batter for your Waffle Maker.
5. Once the green ready light has come on raise the lid using an oven mitt to prevent any
burns. Fill each of the wells with your prepared mixture.
CAUTION: Do not overfill the product or operate it when empty.
6. Close the lid using the oven mitt and secure lock clasp in position.
NOTE: Steam may be released from the appliance during cooking. Only handle the appliance
using kitchen gloves to avoid burns.
7. Cooking time generally ranges from 5-7 minutes and can vary depending on ingredients
and consistency of your batter.
8. Once your Waffles have finished cooking raise the lid with the oven mitt. Remove the
Waffles using a plastic or wooden spoon, do not use metal utensils as they may scratch
and damage the non-stick cooking surface.
9. If you are cooking more than one batch of Waffles in a session, after the first batch lower
the lid to maintain the heat level until its ready to cook the next batch.
10. As soon as you are finished cooking your batch of Waffles, unplug the appliance and allow
it to cool.
Cleaning Your Waffle Maker:
WARNING: Always unplug the product and allow it to cool before cleaning or storing.
NOTICE: Never immerse the waffle maker, plug or cord in water or any other liquid.
•Make sure the appliance is completely cooled before handling.
•Clean the upper and lower non-stick plates using a damp nonabrasive cloth.
•Exterior of waffle maker can be cleaned with a damp cloth as well.
•Dry all parts thoroughly before storing or using again.
•Wrap the cord in the cord storage below the appliance. Store in a cool, dry place. Away
from reach of children.

5
Buttermilk Waffle Recipe
Ingredients:
2 Cups Shifted Flour
2 tbsp white sugar
2 tsp baking powder
1 tsp baking soda
1/2 tsp salt
2 cups low-fat buttermilk
1/3 Cup Melted Butter
2 large eggs, lightly beaten
1 tsps Vanilla Extract
Directions:
1. Whisk flour, sugar, baking powder, baking soda, and salt together in a bowl until
evenly combined. Whisk buttermilk and butter together in a separate bowl; add
eggs. Stir buttermilk mixture into flour mixture until just combined and batter is
slightly lumpy; add vanilla extract.
2. Preheat a waffle maker according to instructions.
3. Pour enough batter into the preheated waffle maker. Cook according to
instructions.
Chocolate Waffle Recipe
Ingredients:
2 Cups Shifted Flour
1/4 cup Cocoa powder
1/4 tsp baking soda
1 1/2 tsp baking powder
2 tbsp Sugar
1/2 tsp salt
2 large eggs
1 3/4 cups low-fat buttermilk
6 tbsp Melted Butter
1/3 cup mini chocolate chips
optional
Directions:
1. Shift the flour with all the dry ingredients.
2. In a separate bowl beat the egg, add the buttermilk and melted butter. Combine
the liquid with the dry ingredients with a few swift strokes. Add chocolate chips if
you are using them.
3. Cook them in your waffle maker, as you normally do.
4. These waffles aren't super that sweet, which is a good thing.
5. Serve with warm maple syrup and berries!
(Add a scoop of ice cream for a fun dessert. Or serve with crushed berries and
homemade whipped cream as a special breakfast!)
Hint:
You can make any recipe a bit better for you by switching to Whole Wheat Flour, using
an alternative baking sugar and always using low fat milk!

6
ONE YEAR LIMITED WARRANTY
Write down the following information about your appliance to better help you
obtain assistance or service if you ever need it.
CUSTOMER RECORD
Date of Purchase______________ Store/Dealer___________________________
Model/Item No: _______________________________
THIS WARRANTY APPLIES TO PRODUCTS PURCHASED AND USED IN THE U.S. ONLY. This
is the only express warranty for this product and is in lieu of any other warranty or
condition. This product is warranted to be free from defects in material and
workmanship for a period of one (1) year from the date of original purchase. During
this period, your exclusive remedy is repair or replacement of this product, at our
option; however, you are responsible for all costs associated with returning the
product to us and our returning a product or component under this warranty to you. If
the product or component is no longer available, we will replace with a similar one of
equal or greater value. This warranty does not cover glass, filters, wear from normal
use, use not in conformity with the printed directions, or damage to the product
resulting from accident, alteration, abuse, or misuse.
THIS WARRANTY EXTENDS ONLY TO THE ORIGINAL CONSUMER PURCHASER. KEEP
THE ORIGINAL SALES RECEIPT, AS PROOF OF PURCHASE IS REQUIRED TO MAKE A
WARRANTY CLAIM.
This warranty is void if the product is used for other than single-family household use
or subjected to any voltage and waveform other that a specified on the rating label
(E.G., 120V~60Hz). We exclude all claims for special, incidental, and consequential
damages caused by breach of express or implied warranty. All liability is limited to the
amount of the purchase price. Every implied warranty, including any statutory
warranty or condition of merchantability or fitness for a particular purpose, is
disclaimed except to the extent prohibited by law, in which case such warranty or
condition is limited to the duration of this written warranty. This warranty gives you
specific legal rights. You may have other legal rights that vary depending on where you
live. Some states do not allow limitations on implied warranties or special, incidental,
or consequential damages, so the foregoing limitations may not apply to you. To make
a warranty claim do not return this appliance to the store.
TO OBTAIN WARRANTY SERVICE AND/OR TROUBLESHOOTING INFORMATION:
Call Customer Service at 1-888-903-0060 in the U.S.
Monday through Friday: 9:00am –5:00pm PST.
Email at info@brentwoodus.com
Go online at www.brentwoodus.com

7
MEDIDAS DE SEGURIDAD IMPORTANTES
Al usar este o cualquier otro electrodoméstico, siga las precauciones básicas de seguridad,
especialmente cuando niños están presentes.
LEA TODAS LAS INSTRUCTIONES
ANTES DE USAR
ADVERTENCIA-Para reducir el riesgo de incendio, choque eléctrico, lesiones personales
graves y daños a la propiedad, por favor tenga en cuenta lo siguiente:
•Este producto no está destinado para su uso por los niños. Mantenga el producto fuera del
alcance de los niños y las mascotas. Precaución adicional es necesario cuando se utiliza
este aparato cerca de niños.
•Asegúrese siempre de que el producto está desenchufado de la toma de corriente y se
deja enfriar antes de montar, desmontar, trasladar o limpiar.
•No deje el producto desatendido mientras está en uso. Siempre desenchufe el producto de
la toma de corriente cuando no esté en uso.
•No sumerja la base, el cable de alimentación o el enchufe de este producto ni exponga el
cable o el enchufe al agua u otros líquidos.
•No utilice accesorios no recomendados o vendidos por el fabricante del producto.
•No coloque electrodoméstico sobre o cerca de una hornilla de gas o eléctrica, en un horno
caliente, u otras superficies calientes.
•Tenga mucho cuidado cuando mueva un aparato que contiene alimentos, agua u otros líquidos.
•Utilice el producto en un área bien ventilada. Mantenga por lo menos 4-6 pulgadas de
espacio en todos los lados del producto para permitir la circulación de aire adecuada.
•Utilizar aparato sobre una mesa o superficie plana. Mantenga el producto lejos de cortinas,
revestimientos de paredes, ropa, paños de cocina, u otros materiales inflamables.
•No enchufe ni desenchufe el producto de la toma de corriente con las manos mojadas.
•Este producto está destinado exclusivamente para el uso no comercial, no industrial, hogar de
cocción de los alimentos para el consumo humano, no use el producto en exteriores o para
cualquier otro propósito.
•No utilice el producto vacío.
•No permita que el cable cuelgue del borde de la mesa o mostrador donde se puede
tropezar con él ni tirar. No permita que el cable toque superficies calientes.
•No utilice el producto si tiene un cable de alimentación dañado o cortado o el enchufe, si
los cables están expuestos, en caso de mal funcionamiento, si se ha caído o dañado, o si la
armadura del motor se ha caído o este expuesto al agua.
•Este producto no tiene piezas que el usuario pueda reparar. No trate de examinar o
reparar este producto usted mismo.
•No ponga presión sobre el cable de alimentación que se conecta al producto, ya que el
cable de alimentación podría desgaste y se rompa.
•Esta waflera no tiene función de apagado. Para apagar por completo, desconéctelo de la red
8
INSTRUCCIONES ESPECIALES:
Un cable de suministro eléctrico corto para reducir el riesgo de enredarse o tropezarse con
un cable más largo. Un cable de extensión no se recomienda para su uso con este producto,
pero si se debe utilizar:
−El voltaje eléctrico debe ser al menos tan grande como la del producto
−Organice el cable de extensión de manera que no cuelgue del mostrador o de la mesa
donde alguien se pueda tropezar con él ni tirar.
ADVERTENCIA: Este producto está equipado con un enchufe polarizado (una pata es más ancha
que la otra) para reducir el riesgo de descarga eléctrica. Esta es una característica de seguridad . El
enchufe encajará en un tomacorriente polarizado de una sola manera. Si no puede insertar el
enchufe en la toma de corriente , intente invertir el enchufe. Si aún así no encaja, comuníquese
con un electricista calificado. No utilice nunca el enchufe con un cable de extensión a menos que
pueda insertar completamente el enchufe en el cable de extensión. No altere el enchufe. No
intente anular la característica de seguridad del enchufe polarizado.
Partes:
GUARDE ESTAS INSTRUCCIONES
COMO REFERENCIA
Lid
Non-Stick
Cooking Plates
Secure Lock Clasp

9
Antes del Primer Uso:
IMPORTANTE: Por favor, revise todo el material de empaque con cuidado antes de tirar ya
que puede haber partes accesorias contenidas en el material de empaque.
Antes de su primer uso, limpie las superficies con un paño húmedo y seque bien.
Como Usar su Waflera:
ADVERTENCIA: Evite el contacto con partes calientes.
1. Coloque la waflera sobre una superficie limpia y plana. Conecte el producto a una toma de
corriente de 120 vatios estándar y precaliente el aparato con la tapa cerrada.
2. Puede cubrir ligeramente los platos de cocción antiadherentes usando una toalla de papel
ligeramente cubierta con aceite vegetal o una brocha de pastelería con aceite. Esto ayuda
a prolongar la vida de la superficie antiadherente.
Atención: El primer uso puede causar un ligero olor o pequeño humo ya que el aparato se
caliente. Esto es normal y es resultado de la reacción química de calentamiento.
Rápidamente se va.
3. Cuando su waflera está en funcionamiento la luz roja (calentamiento) se enciende para
indicar que la waflera se está calentando. Precalentamiento dura aproximadamente 3
minutos. La luz verde indicara que está listo para cocinar.
4. Mientras que su waflera está precalentando, puede preparar la masa para sus wafles.
5. Ya que la luz de calentamiento este encendida, levante la tapa usando un guante de cocina
para evitar quemaduras.
6. Llene cada uno de los pozos de cocina antiadherente con su mezcla preparada. Cierre la
tapa con el guante de cocina y baje el cierre de bloqueo en su posición
NOTA: Vapor puede salir de la waflera durante uso. Use guantes para evitar quemaduras.
7. El tiempo de cocción varía entre 5-7 minutos y puede cariar dependiendo en los
ingredientes y consistencia de su masa.
8. Una vez sus wafles han terminado de cocinar, levante la tapa con el guante de cocina.
Retire los wafles utilizando una cuchara de plástico o madera para no dañar la superficie
de cocción antiadherente.
9. Si usted está cocinando más de un lote de wafles en una sesión,después de que el primer lote,
baje la tapa para mantener el nivel de calor hasta que de Nuevo este listo para cocinar. Después
que termine desconecte la waflera de la toma de corriente y deje que se enfrié.
Como Limpiar su Waflera:
ADVERTENCIA: Siempre desconecte el producto y deje que se enfríe antes de limpiarlo o
guardarlo.
NOTA: Nunca sumerja la waflera, cuerda, o enchufe en agua u otro líquido.
•Desconecte la waflera de la toma de corriente.
•Asegúrese de que la waflera se haya enfriado completamente antes de tocar o limpiar.
•Limpie los platos antiadherentes con un paño húmedo y jabón no abrasivo.
•El exterior de la waflera puede ser limpiada con un paño húmedo también.
•Enrolle el cable por debajo de la waflera.
•Guarde el aparato en un lugar fresco y seco, lejos de los niños y las o los lugares que puede
representar una amenaza.

10
IMPORTANTES MESURES DE SÉCURITÉ
Lorsque vous utilisez cet appareil ou tout autre appareil électrique, suivez
toujours ces précautions de base, surtout en présence d’enfants.
LISEZ TOUTES LES INSTRUCTIONS AVANT USAGE
AVERTISSEMENT -- Pour réduire le risque d’incendie, d’électrocution, de blessures
graves ou de dommages matériels, veuillez noter ce qui suit:
•Ce produit n’est pas destiné à être utilisé par des enfants. Gardez-le hors de portée des
enfants et des animaux. Redoublez de prudence lorsque vous utilisez cet appareil à
proximité d’enfants.
•Assurez-vous que l’appareil est débranché de la prise électrique et laissez-le refroidir avant
de l’assemblée, le démonter, le déplacer ou le nettoyer.
•Ne laissez pas le produit sans surveillance lorsqu’il est en fonction. Débranchez-le toujours
s’il n’est pas utilisé.
•N’immergez pas la base de l’appareil, le cordon d’alimentation ou la fiche et n’exposez pas
le cordon ou la fiche à l’eau ou tout autre liquide.
•N’utilisez pas d’accessoires qui ne sont pas recommandés ou vendus par le fabricant.
•Ne placez pas l’appareil sur ou près d’un brûleur à gaz ou électrique, dans un four chaud
ou sur toute autre surface chaude.
•Soyez extrêmement prudent lorsque vous déplacez un appareil contenant de l’eau ou tout
autre liquide chaud.
•Utilisez ce produit dans un endroit bien aéré. Gardez au moins 4 à 6 pouces d’espace tout
autour de l’appareil afin de permettre une circulation d’air adéquate.
•Utilisez l’appareil sur une surface plane ou une table. Gardez l’appareil éloigné des rideaux,
tentures, vêtements, torchons ou autres matériaux inflammables.
•Ne branchez ni ne débranchez le produit avec les mains mouillées.
•Ce produit n’est pas destiné à un usage commercial ou industriel, mais uniquement à un
usage domestique pour la consommation d’aliments. N’utilisez pas l’appareil à l’extérieur
ou à d’autres fins que celles prévues.
•Ne faites pas fonctionner l’appareil sans aliments à l’intérieur.
•Ne laissez pas le cordon pendre d’une table ou d’un comptoir où l’on pourrait s’y
suspendre ou trébucher. Évitez que le cordon touche les surfaces chaudes.
•Ne faites pas fonctionner l’appareil si le cordon d’alimentation ou la fiche sont endommagés ou
coupés, si les fils sont à découvert, s’il fonctionne mal, s’il a subi une chute ou est endommagé,
ou si le boîtier du moteur est tombé par terre ou a été exposé à l’eau.
•Ce produit ne contient aucune pièce réparable par l’utilisateur. Ne tentez pas d’examiner
ou de réparer ce produit vous-même.
•Cet appareil n’est pas muni d’une fonction d’arrêt (‘’OFF’’). Pour l’éteindre, veuillez le
débrancher de la prise murale.
RECOMMANDATIONS ADDITIONNELLES : Un court cordon d’alimentation est
fourni afin de réduire les risques de s’enchevêtrer ou de trébucher dans un cordon

11
plus long. L’utilisation d’une rallonge n’est pas recommandée avec ce produit, mais si
elle doit être utilisée :
−La puissance nominale indiquée sur la corde doit être au moins aussi grande que
celle de l’appareil;
−Installer la rallonge de façon à ce qu’elle ne pende pas du comptoir ou de la table
où l’on pourrait s’y accrocher ou trébucher.
AVERTISSEMENT: Cet appareil est muni d'une fiche d’alimentation polarisée (une
broche est plus large que l'autre). Il s'agit là d'une mesure de sécurité. Pour réduire le
risque d’électrocution, la fiche doit être insérée d’une seule façon dans une prise de
courant polarisée. Si le branchement n’est pas complet, inversez la fiche. Si la fiche ne
s’insère toujours pas, contactez un électricien qualifié. N'utilisez jamais la fiche avec
une rallonge, à moins de pouvoir l’insérer parfaitement dans la rallonge. Ne tentez pas
de modifier la fiche polarisée et respectez à la lettre cette mesure de sécurité.
Pièces:
CONSERVEZ CES INSTRUCTIONS
À TITRE DE RÉFÉRENCE
Lid
Non-Skid
Feet
Non-Stick
Cooking Plates
Secure Lock Clasp

12
Utilisation de Votre Gaufrier:
IMPORTANT: Vérifiez attentivement tout le matériel d’emballage avant de le jeter, car
certains accessoires peuvent être restés à l’intérieur.
1. Avant usage, essuyez toutes les surfaces avec un chiffon humide et séchez correctement.
2. Installez l’appareil sur un plan de travail sec, convenable et de niveau, à proximité d’une
prise électrique.
AVERTISSEMENT: Évitez de toucher les surfaces chaudes.
3. La surface de cuisson antiadhésive devrait être légèrement enduite d’un peu d’huile végétale.
*Cela devrait être fait périodiquement afin de préserver la surface antiadhésive.
4. Branchez l’appareildans une prise électrique CA standard de 120 volts et préchauffez-le en
fermant le couvercle. Lorsque l’appareil est mis sous tension, le voyant rouge s’allume pour
indiquer que l’appareilpréchauffe. Le voyant vert s’allumera lorsque le gaufrier sera prêt à cuire.
Attention: Une légère odeur ou un peu de fumée peuvent se dégager de l’appareil lors de la
première utilisation. Cela est normal et est causé par la réaction chimique de l’élément
chauffant. Le tout se résorbera rapidement.
5. Alors que l’appareil chauffe, vous pouvez préparer votre pâte à gaufres.
6. Une fois que le voyant vert sera allumé, soulevez le couvercle à l’aide d’un gant de cuisine
pour éviter de vous brûler. Remplissez chaque moule du gaufrier de votre préparation.
Attention:Ne remplissez pas trop l’appareil et ne le faites pas fonctionner s’il est vide.
7. Refermez le couvercle en utilisant un gant de cuisine et assurez-vous que le fermoir de
sécurité est verrouillé.
REMARQUE: La vapeur peut être libérée par l’appareil pendant la cuisson. Pour votre sécurité,
évitez tout contact avec la vapeur, car elle est très chaude et peut causer des brûlures.
8. Le temps de cuisson dure en général de 5 à 7 minutes, mais peut varier en fonction des
ingrédients et de la consistance de la pâte.
9. Une fois la cuisson terminée, soulevez le couvercle avec un gant de cuisine. Retirez les gaufres à
l’aide d’une cuillère en bois ou en plastique. N’utilisez pas d’ustensiles en métal, car ils peuvent
égratigner et endommager la surface de cuisson antiadhésive.
10. Si vous faites cuire plusieurs portions de gaufres à la fois, gardez le couvercle abaissé
entre chaque addition pour maintenir le niveau de chaleur jusqu’à la prochaine portion.
11. Dès que vous aurez terminé la cuisson de vos gaufres, débranchez l’appareil et laissez-le
refroidir.
Nettoyage de Votre Gaufrier:
AVERTISSEMENT : Débranchez toujours l’appareil et laissez-le refroidir avant de le nettoyer
ou le ranger.
AVIS : Ne plongez jamais le gaufrier, fiche ou le cordon dans l’eau o tout autre liquide.
•Assurez-vous que l’appareil est parfaitement refroidi avant de le manipuler ou le nettoyer.
•Nettoyez les surfaces antiadhésives supérieure et inférieure avec un chiffon humide et non
abrasif et séchez soigneusement.
•Essuyez l'extérieur de l'appareil avec un chiffon doux et humide et séchez-le.
•Enroulez le cordon dans son logement sous l'appareil. Conservez dans un endroit frais et
sec. Loin des enfants.
This manual suits for next models
1
Table of contents
Languages:
Other Brentwood Waffle Maker manuals


