Breuer CESKA SIDE CHAIR User manual

BREUER CHAIR COMPANY
BREUER CESCA SIDE CHAIR, BREUER CESCA
COUNTER / BAR STOOL
ASSEMBLY MANUAL
http://breuer.show/warranty
REGISTER YOUR NEW CHAIR/S AT
FOR MISSING ITEMS/HARDWARE OR ANY PRODUCT-RELATED
ISSUES DO NOT RETURN TO THE STORE OR RETAILER.
PLEASE CALL 855-789-0501 OR
EMAIL [email protected]

Wicker / Cane Furniture Care:
2
1
6
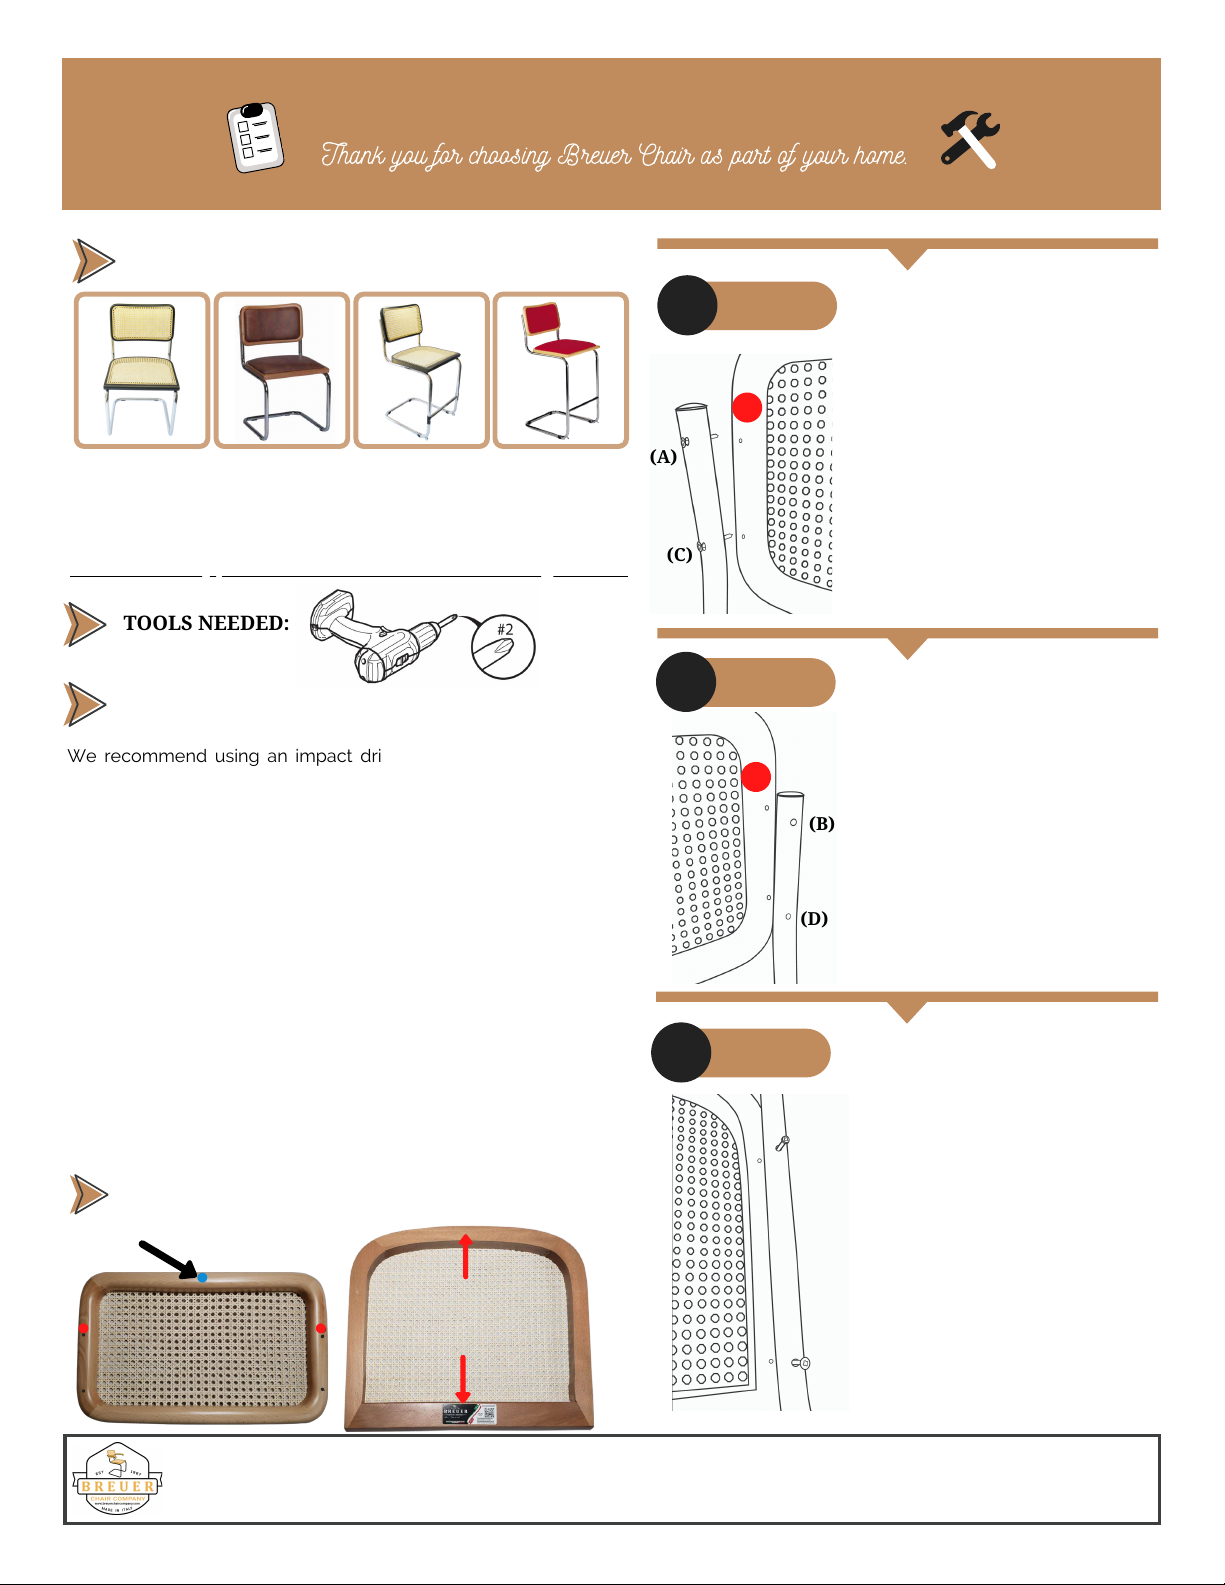
USE & CARE INSTRUCTIONS
Please read use & care instructions in its entirety prior to assembling and utilizing your Breuer Chair Company
Furniture.
KEEPING YOUR FURNITURE BEAUTIFUL
Quality furniture is a significant investment expected to last for years on end.
To maintain its beauty and help it last, furniture needs the right care. No finish
is totally indestructible. But with regular care, the finish will last much longer,
providing years of enjoyment to you.
TIPS TO PROTECT & CARE FOR YOUR FURNITURE
Do not use any chemicals such as windex, softscrub, fantastic to clean this
product.
Keep cane chairs and furniture away from extreme heat situations and
areas with low humidity. These conditions could cause the cane to dry out
and become brittle and break. Also, direct sunlight and heater ducts are areas
to be avoided. Consider using a whole room humidifier in the winter which can
be especially helpful to keep the air moist and not too dry.
Placing your furniture in direct sunlight will cause changes to the wood finish
and cane over time. Exposure to direct sunlight will, over time, dry out and
discolor your cane furniture—and drying out is what will lead to tears and
breakage in the construction. Instead, you want to keep it moisturized. If your
home has low humidity, you can give the cane a monthly spritz with an oil- or
glycerin-based soap that's been diluted in water to work some moisture into
the surface. Dilute Murphy's Oil Soap in a spray bottle of water and spritz the
chair seat and back and underside before wiping clean with a rag.
Using a high-oil content furniture polish product when you dust helps to keep
the cane supple, too. Lemon oil, orange oil, or mineral oil (use sparingly)
applied to both the top and bottom of the cane seat a few times a year is
usually sufficient.
Keep cane seats clean, free of dust, dirt, and grime. Regular cleaning is
recommended. To remove dirt and debris, vacuum with a dust-brush
attachment or use a dry paintbrush. Clean with a mild soap solution. Scrub,
and rinse. Avoid using too much water, which can weaken the fibers. Avoid
sitting on the cane when still damp, which can cause the cane to sag. Please
always cover the furniture when not in use, and store it properly during
inclement weather and the winter/rainy seasons.
Clean grimy or dirty cane seats with a wood soap such as Murphy’s Oil Soap
or a mild detergent in warm water, using a soft cloth or perhaps a soft bristle
brush. Take care not to damage the wood surface with the water. Rinse well
and then let the seat dry naturally on a warm, windy day to eliminate the
possibility of mold and mildew setting in which will damage and stain the
cane. Do not sit on the seat for at least 48 hours otherwise, the cane will
stretch out of shape.
Use a chair pad or cushion on cane seats. To prolong the life of your caned
seat, the use of a chair pad or cushion is encouraged. This especially pertains
to large chairs with a seat diameter of greater than 14 inches. A chair pad or
cushion will distribute the weight evenly and take the pressure off the
individual strands of the cane, thus making them last longer.
Distribute body weight evenly on the cane seat. A cane seat is intended to
take the evenly distributed weight of the person sitting on it, not
concentrated weight, like a knee or foot. So NEVER kneel on a cane seat or
use it as a ladder or step stool. Doing so will cause the cane strands to break
and the seat will need to be rewoven or replaced prematurely.
Eliminate mold and mildew on your cane seats. If you notice mold or
mildew growing on your cane furniture, use a strong solution of bleach or
hydrogen peroxide in warm soapy water to clean. Or use the hydrogen
peroxide on a q-tip swab to remove if there are only a few tiny spots.
Then rinse well and dry outdoors in the sunshine on a warm, windy day. Be
careful not to spill the bleach solution on any surrounding wooden frame
parts and wipe off any wooden surfaces immediately. Take the
precautions mentioned in this tip sheet to maintain moderate humidity so
as not to attract mold and mildew.
Cane furniture storage and usage tips. Do not store or use a cane or
wicker furniture in high humidity areas or in wet areas where mold and
mildew can present a problem.
Places to avoid are: basements, crawl spaces, up next to a wall, or on the
porch pushed up next to the wall of the house where the furniture does
not get adequate air circulation.
4
3
Is your cane seat sagging? Cane has natural elastic properties but
eventually, the caned seat will begin to sag with heavy or prolonged use. It
is important to tighten the cane or it will begin to wear and break along the
inside edge of the seat frame, on both of the side rails, and front and back
edges.
Cane seats that are not too badly stretched or that are free of broken
strands, can be revived by turning the chair upside-down and applying a
warm, wet cloth to the underside of the cane seat. Let the cloth and cane
dry naturally overnight.
Remove the cloth the next morning and turn the chair upright and don’t let
anyone sit on it for at least 48 hours. This treatment will dry and shrink the
cane again, tightening it up in the process, taking the pressure off the
inside wooden edges. An alternative solution would be to use a spray
water bottle and spritz the seat thoroughly with warm water. Then let the
seat dry overnight and as it dries the cane will shrink and pull tightly once
again.
Don’t allow anyone to sit on the chair seat for at least 48 hours until it’s
completely dry. This tightening process is most effective when used
regularly within the first five years and won’t work at all if there are several
broken strands. Using this preventative method three or four times a year
should be sufficient to help prolong the life of your cane seat chair for
many years.
5
7
Wood Furniture Care:
Chrome Metal Furniture Care:
Chair Caps:
We recommend dusting frequently with a clean, soft, dry, lint-free cloth.
Clean the surface by rubbing in the direction of the grain. We recommend
polishing your furniture approximately every six months, using a clean, soft,
lint-free cloth and rubbing the polish in the direction of the grain. Guardsman
furniture polish or any furniture polish that doesn't contain silicone is
recommended.
We recommend using a dishwashing liquid and a soft rag to clean your
chrome. After washing your chrome, use a soft rag to dry it. Your chrome
will stay beautiful for a very long time by simply keeping it clean. Stick with
soap and water. If you notice any discolorations or changes in the finish we
recommend polishing the chrome finish with a soft cloth and noxon
chrome polish to revitalize the chrome to like new condition.
Using protective felt pads on-top of nylon caps will help ensure your floor
is protected and ensure the caps last for many years to come. Be sure to
clean floors frequently from any debris to prevent scratching of floor
surface.
www.breuerchaircompany.com
PAGE 1

Terms of use
Exclusive Obligation
www.breuerchaircompany.com
PAGE 2
TERMS OF USE, WARRANTY &
LIABILITY WAIVER
WARNING
Do not stand on this product or sit in front of the seat. Never over lean
on the backrest of the chair or force the chair to recline. The chair must
be used properly as intended by adults only. Not intended for children
or use with any child seats or booster seats.
Breuer Chair Company, a Horizon Trading Company of NY Inc.
company, offers its products with the terms, conditions, and notices as
follows:
This product is offered to you conditioned upon your acceptance
without modification of the terms, conditions, and notices contained.
This product has been designed for the specific use of applications.
This product may not be used for unlawful purposes and that use is
expressly prohibited under the terms and conditions of its use.
Use limitation
You may not copy, distribute, transmit, display, perform, reproduce,
publish, license, create derivative works from, transfer, or sell, any
information, from the Breuer Chair Company website or its products.
Limited Manufacturer Warranty
This product is warranted for 1 year only on frame and wood
construction against any manufactured defect from the date of
purchase. Cane, cushions are under no circumstance covered under
this warranty along with wear and tear, accidental or incidental
damages from use. (Proof of purchase along with images will be
required as well as the warranty registration at
https://www.breuerchaircompany.com/warranty at the time of
purchase).
Guarantees
No guarantees are given or implied to the product efficiency, product
performance, and production or its improvement.
Limitation of Liability
In no event shall Breuer Chair Company be liable for any direct,
indirect, punitive, incidental, special consequential damages, to
property or life, whatsoever arising out of or connected with the use or
misuse of its products.
Other Statements
Breuer Chair Company employees, representatives, or third party
websites/retailers or resellers, ORAL OR OTHER WRITTEN
STATEMENTS, DO NOT CONSTITUTE WARRANTIES, shall not be
relied upon by Buyer, and is not part of the contract for sale or this
limited warranty.
Entire Obligation
The TERM OF USE, WARRANTY, AND DISCLAIMER document state
the entire obligation of Breuer Chair Company with respect to the
products. If any part of this disclaimer is determined to be invalid,
void, unenforceable or illegal, including, but not limited to the
warranty disclaimers and liability disclaimers and liability limitations
set forth above, then the invalid or unenforceable provision will be
deemed superseded by a valid, enforceable provision that most
closely matches the intent of the original provision and the remainder
of the agreement shall remain in full force and effects.
General
This disclaimer statement is governed by the laws of The United
States and the State of New York. You hereby consent to the
exclusive jurisdiction and venue of the Courts of New York, in all
disputes arising out of or relating to the use of this product. Use of
this product is unauthorized in any jurisdiction that does not give
effect to all provisions of these terms and conditions, including
without limitation this paragraph.
Modification of Terms and Conditions
Breuer Chair Company and its parent company Horizon Trading
Company of NY Inc. reserves the right to change the terms,
conditions, and notices under which their products are offered.

1STEP 1
2STEP 2
3STEP 3
1) Side Chair with Cane Insert
2) Side Chair with Wood Trim and Cushion Insert
3) Counter Stool / Bar Stool with Cane Insert
4) Counter Stool / Bar Stool with Wood Trim and Cushion Insert
NOTE: Assembly process is the same with all four configurations.
Place your seat upside down on a
flat surface (edge of a table or
counter). Position your side chair
frame over the marked indentations.
Note: Bevel edge of seat with
authenticity / branding sticker is
the front of seat. The front of the
seat is the flat end with the bevel
edge. Start on right side and attach
the two screws and then move to the
left side. One the left side assistance
will be needed in flexing the frame
(sometimes with force) to center
over marked indentations while
assembly person #1 is ready with
screws. Tighten all screws until the
metal frame is touching the wood.
Please locate top of backrest and
position the backrest facing up. You
will see color codes on screw (A)
which will match the color code on
the back of the frame to verify the
backrest is positioned correctly.
Place the backrest against the
frame, screw in the top hole first (A)
and then the bottom hole (C). (Do not
tighten the screws until both screws
are in halfway).
Once tightened move to the other
side to attach the two remaining
screws. First start with top (B) and
than move to the bottom (D). Note:
Assembly person no. 2 will need to
help to pull/adjust and flex the top
two metal back posts of chair frame
towards each other as needed.
Tighten all screws until the metal
frame is touching the wood.
(Caution : Do not over tighten screws)
THIS ASSEMBLY IS FOR:
www.breuerchaircompany.com
PAGE 3
BREUER CHAIR ASSEMBLY INSTRUCTION
Thank
you
for
choosing
Breuer
Chair
as
part
of
your
home
.
TOOLS NEEDED:
(A)
(C)
(B)
(D)
We recommend using an impact driver handgun power tool. If
using a drill/driver gun please set the torque to the lowest
setting and increase torque as needed. (2 person assembly
recommended). When attaching the seat and back you will need
to use your body weight to get the screw into the seat and back.
The wood used is commercial grade solid Italian beech wood
which is a very dense wood that does not want to accept the
screw. There are no pre-drilled holes on the seat and no need to
make pre-drilled holes. There are markers of where the screws
need to go and simply go right into the wood at those marker
points. Hand assembly with a Philips screwdriver is possible
although it will require more time and pressure/force to get the
screws attached. Save all packaging until assembly is completed.
When assembling your chair ALWAYS INSTALL THE BACK FIRST
before installing the seat.
BEFORE BEGINNING ASSEMBLY:
ACTUAL BACK AND SEAT:
(Blue Dot) Top of Backrest
Front of the Seat
Back of the Seat
(A) (B)
(D)(C)
This manual suits for next models
2
Other Breuer Indoor Furnishing manuals
Popular Indoor Furnishing manuals by other brands

Williams-Sonoma
Williams-Sonoma COOPER KITCHEN ISLAND DOUBLE quick start guide

Kave Home
Kave Home ABILEN manual

Mocka
Mocka Livi Bench Seat Assembly instructions

fantastic furniture
fantastic furniture Executive quick start guide

Furinno
Furinno 10002 Assembly instruction

Seconique Furniture
Seconique Furniture NOVA 3 Bed quick start guide

emob
emob Elvis Sofa Table CT 15035-S5V Assembly instruction

kingsley-bate
kingsley-bate LO32 Assembly instructions

CB2
CB2 CROSSROADS Assembly instructions

Bensons for Beds
Bensons for Beds PENELOPE STK770619 Assembly instructions

Croydex
Croydex WS010522 instructions

Pelton & Crane
Pelton & Crane CF36 installation instructions