Breville vtp141 User manual

™
®
meat grinder

2
product safety
IMPORTANT SAFETY INSTRUCTIONS. READ CAREFULLY AND KEEP FOR FUTURE
REFERENCE
This appliance can be used by children aged from 8 years
and above and persons with reduced physical, sensory or
mental capabilities or lack of experience and knowledge if
they have been given supervision or instruction concerning
use of the appliance in a safe way and understand the hazards
involved. Children shall not play with the appliance. Cleaning
and user maintenance shall not be made by children without
supervision.
Always disconnect the appliance from the mains supply socket
if it is left unattended and before assembling, disassembling or
cleaning.
If the supply cord is damaged, it must be replaced by the
manufacturer, its service agent or similarly qualied persons in
order to avoid a hazard.
!Never use this appliance for anything other than its intended use. This appliance is for
household use only. Do not use this appliance outdoors.
!Always ensure that hands are dry before handling the plug or switching on the
appliance.
!Always use the appliance on a stable, secure, dry and level surface.
!Make sure that all attachments are securely and correctly tted before operating the
appliance. Never use accessories/attachment not recommended by the manufacturer.
!The cutter has very sharp edges. Take care when handling or cleaning it.
!Allow moving parts to come to a stop before changing or cleaning accessories.
!Never place your hand or utensils other than the food pusher down the food chute
whilst it is in operation, always switch off and unplug rst.
!Never attempt to remove or replace any attachment whilst the appliance is in
operation.
!Never attempt to grind bones or other hard items.
!Never let the power cord hang over the edge of a worktop, touch hot surfaces or
become knotted, trapped or pinched.
!Do not use the appliance if it has been dropped or if there are any visible signs of
damage.
!Never immerse any part of the appliance or power cord and plug in water or any other
liquid.
!This appliance must not be placed on or near any potentially hot surfaces (such as a
gas or electric hob).

3
before using your meat grinder
The cutter is very sharp. To prevent injury, exercise caution when assembling,
disassembling and cleaning the cutter.
Do not immerse the grinder motor unit in water or any other liquid.
Do not use harsh abrasives, chemicals or oven cleaners.
• Always unplug from the mains supply when not in use, before inserting or removing
parts, and before cleaning.
• Clean the exterior surface with a damp cloth and then polish with a soft dry cloth. Do
not use steel wool pads or harsh/abrasive cleaners.
• Wash the food pusher, feed tray, grinder head, securing ring, grinding plates, cutter,
feed screw and sausage nozzle in warm, soapy water. Rinse and dry all parts
thoroughly.
• Apply a light coating of vegetable oil to the grinding plate, cutting blade and feed
screw before use.

4
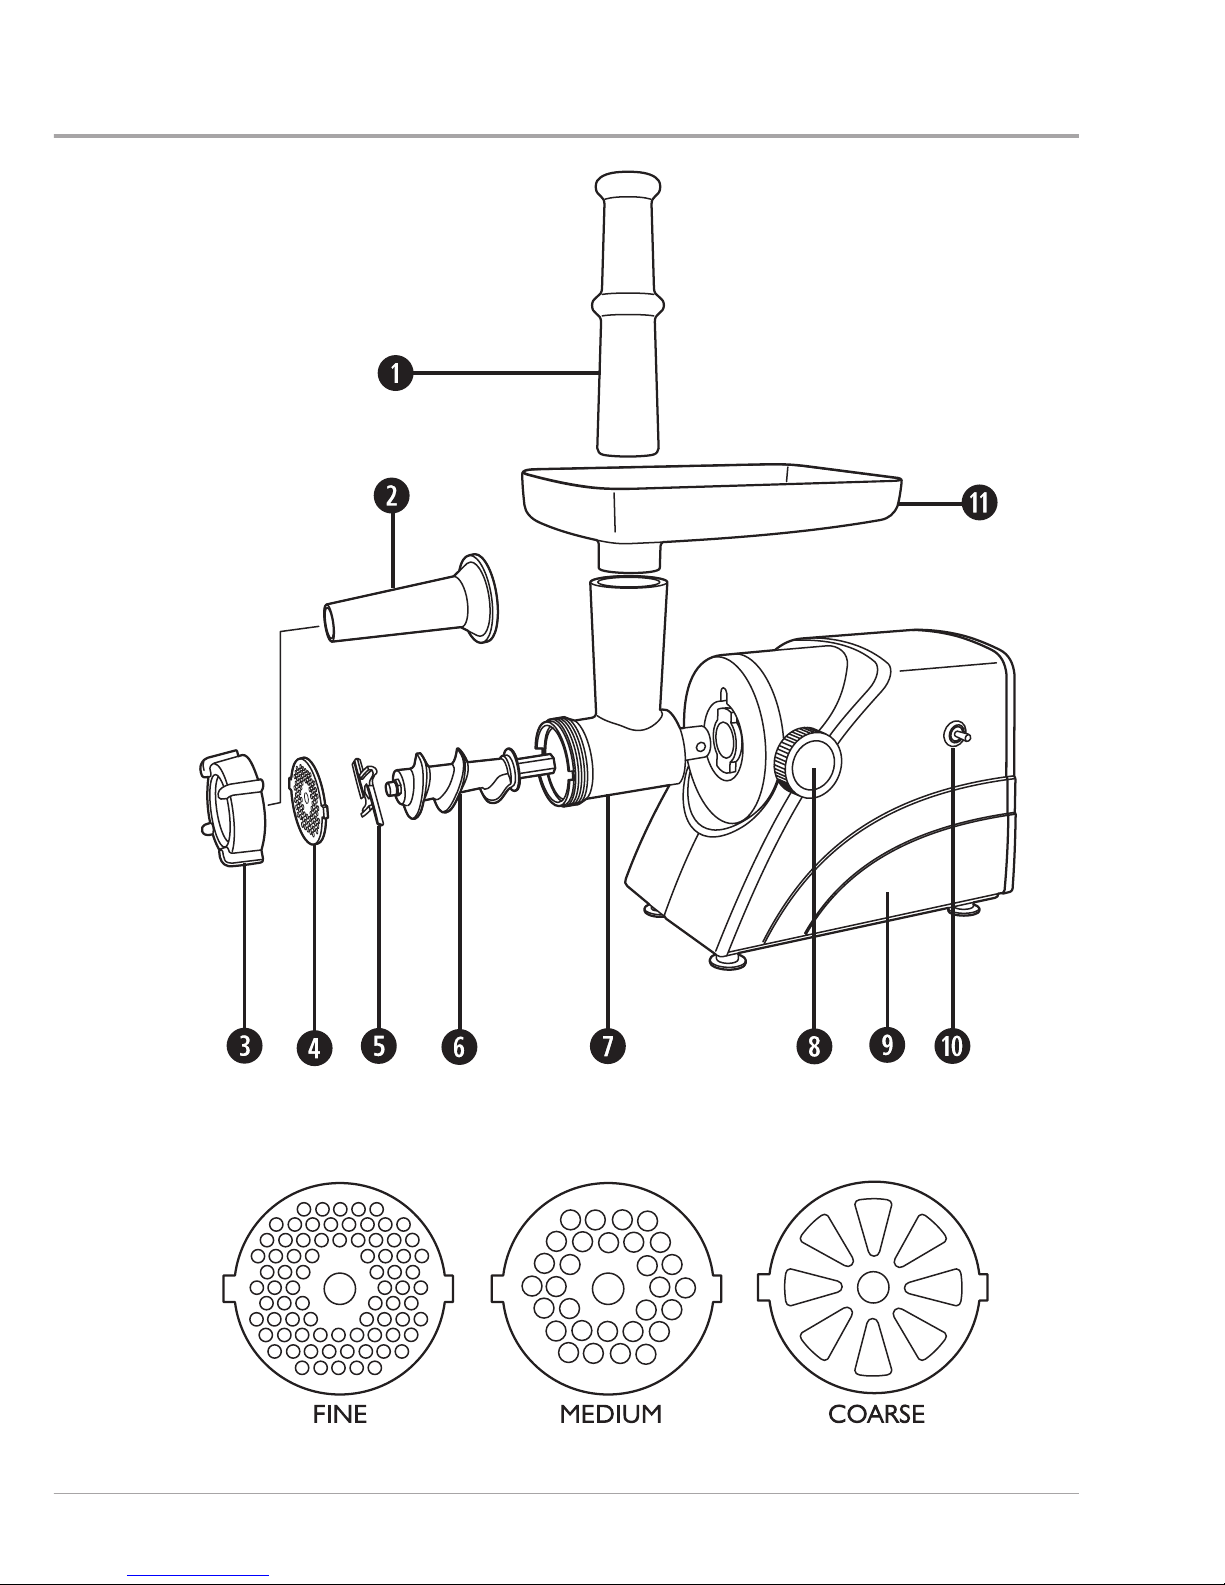
features
1. Food pusher *
To safely push food into your meat grinder.
2. 30mm sausage nozzle *
Used when making sausages.
3. Securing ring
Fits over the end of the grinding head to secure the internal components.
4. Grinding plate
The interchangeable cutting plates supplied give you three grinding sizes—ne,
medium and coarse.
Fine – for nely ground texture, such as for spreads, patés, baby food, and
hamburgers.
Medium – for ground meat to use in various recipes.
Coarse – for a coarsely ground texture, such as when grinding beef for chilli, or for
nuts and vegetables.
5. Cutting blade
6. Feed screw
Feeds the ingredients through the cutter and grinding plate.
7. Grinding head
8. Locking knob
Securely locks the grinding head to the grinder body.
9. Grinder body
Houses the powerful 550W motor.
10. On/off/reverse switch
11. Feed tray
* Dishwasher safe
5
Due to our policy of continuous improvement, the actual product may differ slightly from the one illustrated in these instructions.

6
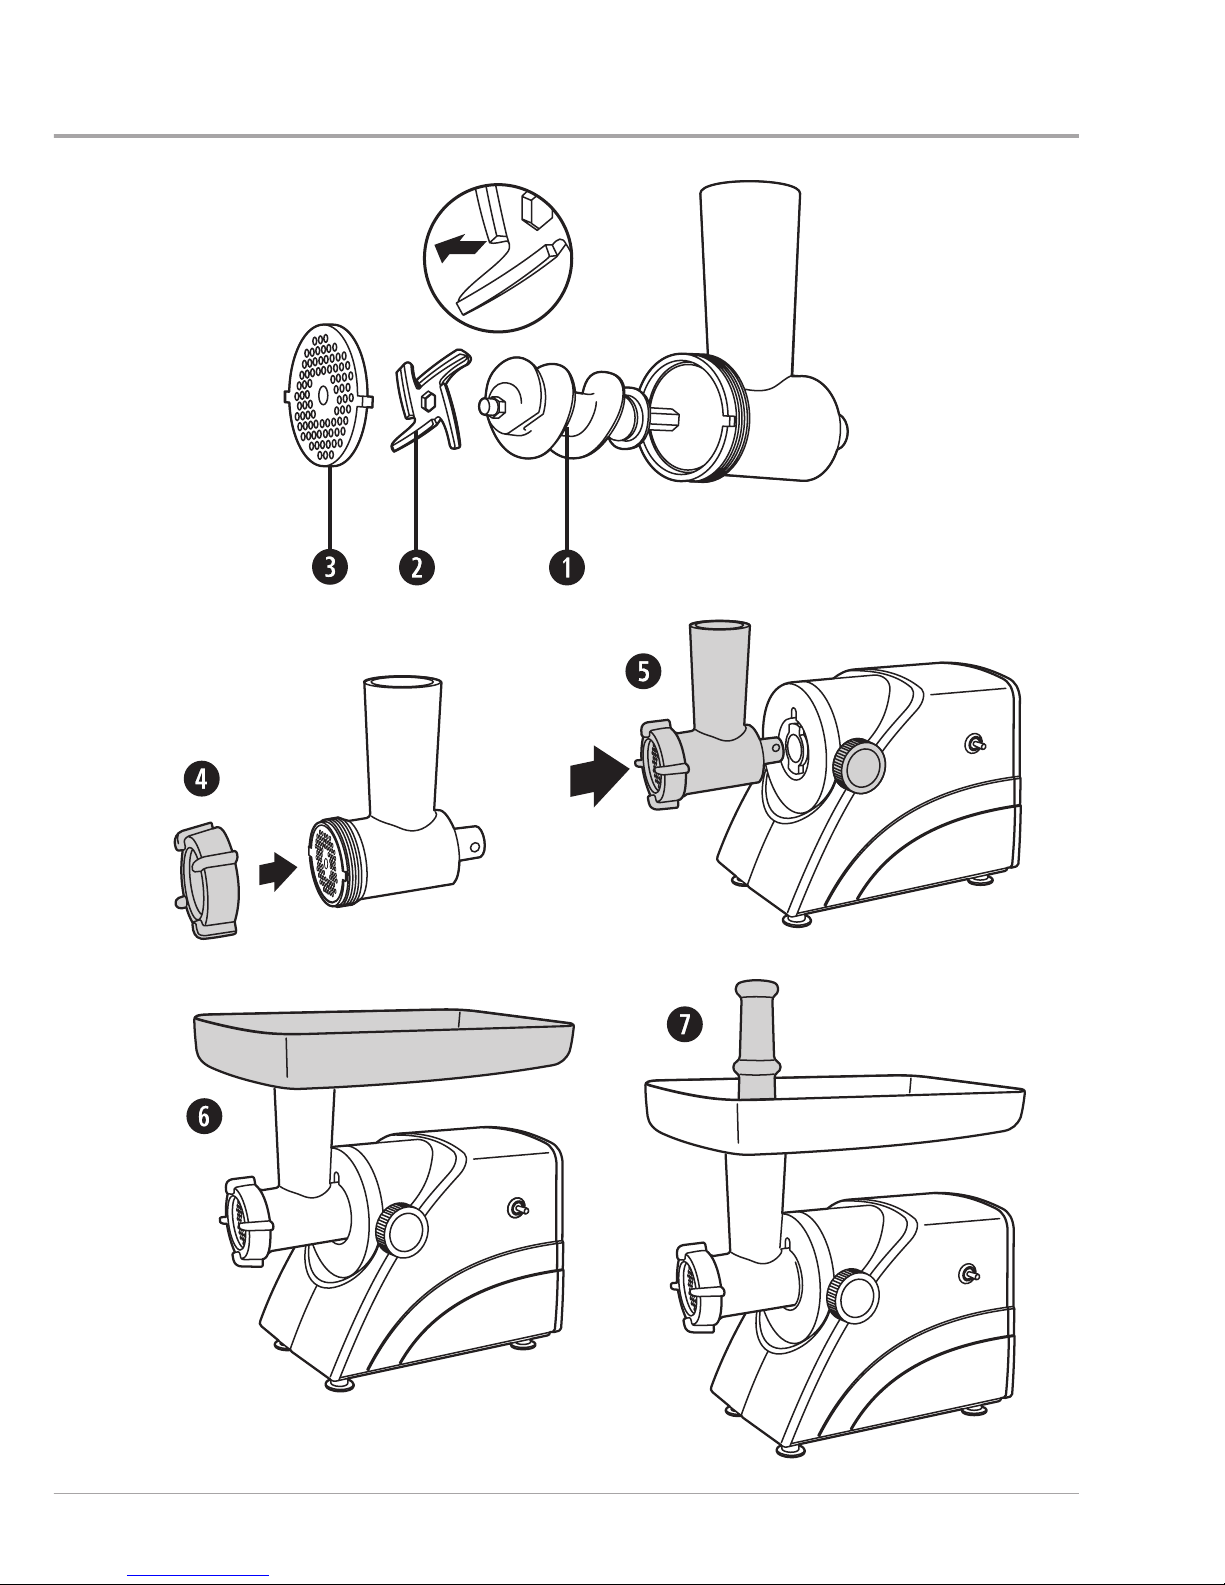
assembling
Always make sure the appliance is switched off and unplugged from the mains
supply before assembling or disassembling.
1. Apply a light coating of vegetable oil to the grinding plate, cutting blade and feed
screw before use.
2. Insert the shaft of the feed screw into the grinding head.
3. Position the hexagonal hole in the cutter onto the hexagonal end of the feed screw.
The cutter has a rounded side and a sharpened side. The sharpened side must face
outwards (away from the feed screw and towards the cutting plate).
4. Position the desired grinding plate onto the feed screw spindle. Locate the lugs on
either side of the grinding plate into the two slots of the grinding head.
5. Screw the securing ring rmly onto the grinding head.
6. Loosen the locking knob and insert the assembled grinding head into the motor unit
opening. You may need to rotate it slightly until it is seated correctly within the motor
unit. Tighten the locking knob securely.
7. Slot the feed tray into the grinding head.
8. Insert the food pusher into the opening of the grinding head.
Your meat grinder is now assembled and ready for use.
7

8
using your meat grinder
Always make sure the appliance is switched off and unplugged from the mains
supply socket before assembling or disassembling. Never attempt to grind bones
or other hard items
1. Ensure that your meat grinder has been assembled correctly and check that the on/
off reverse switch is in the off position. Plug your meat grinder in to the mains supply
socket.
2. If necessary, cut the food into pieces that will t easily into the feed head and place it
onto the feed tray. Make sure that meat does not contain any bones.
3. Place a suitable container under the grinder to catch the minced food.
4. Switch on the grinder by setting the switch to the on position.
5. Use the food pusher to gently push the food into the feed tube.
Never feed food into the appliance by hand. ALWAYS use the food pusher.
Important notes
• When your meat grinder is operated for the rst time, there may be a slight odour.
This represents no danger to the user and does not indicate a defect in your meat
grinder. The odour will soon disappear.
• The grinder must ALWAYS be switched on before adding food.
• If the motor slows or stops, this may be due to jammed food. Immediately switch
the grinder off, then set the switch to the reverse position to push the food in the
opposite direction.
• If this does not cure the problem, switch off the grinder and disconnect it from the
mains supply. Disassemble the grinding head and clean the internal parts.

9

10
using your meat grinder
Making sausages
For sausages, you will need casings (either natural or synthetic). For beginners, we
recommend that you use 30mm Hog casing. Meats must be ground and seasoned before
making into sausages. Always keep the meat in the fridge until you are ready to use it.
1. Insert the shaft of the feed screw into the grinding head.
2. Position the hexagonal hole in the cutter onto the hexagonal end of the feed screw.
The cutter has a rounded side and a sharpened side. The sharpened side must face
outwards (away from the feed screw).
3. Position the coarse grinding plate onto the feed screw spindle. Locate the lugs on
either side of the cutting plate into the two slots of the grinding head.
4. Insert the sausage nozzle through the securing ring and screw the securing ring onto
the grinding head.
5. Loosen the locking knob and insert the grinding head into the motor unit opening. You
may need to rotate it slightly until it is seated fully in the motor unit. Tighten the locking
knob securely.
6. Slot the feed tray into the grinding head.
7. Insert the food pusher into the opening of the grinding head.
To stuff the casings, rst cut the casings into approximately 60cm/122cm (2 or 3 foot)
lengths. Prick the casing with a pin to allow air to escape while stufng. Gather all of the
casing over the sausage nozzle except for the last four inches. Place the ground and
seasoned meat into the grinder.
Stuff the casing loosely as some casings will expand during cooking. As the casings
begin to ll, tie securely at the end. Distribute the meat through the casing and twist into
links as it lls to obtain the desired size and shape.
Pork shoulder is good to use because of its ideal proportions of fat and lean. Salt may
affect the avour of sausages stored for long periods in the freezer. If salt is added, plan
to use the sausages within a short time. Without salt, they may be stored in your freezer
for up to 2-3 months.
Look out for special offers on meat at your local supermarket and make larger quantities
of sausages and burgers when available.
Specialist sausage spices, perfect for homemade recipes are available to order online,
add these to your raw meat before grinding. Why not make your own favourite sausage
recipes by trying these out.
When making sausages it’s difcult to check whether the seasoning is sufcient to your
taste. Why not try frying, then tasting a little of the mixture before stufng into casings,
this way you can adjust the seasoning to suit.
Homemade sausages freeze beautifully, wrap in pairs and freeze until required.
Hog casings used to make sausages can be ordered from a number of online retailers.
The sausage making nozzle supplied with your meat grinder is suitable for all 30mm
casings.

11

12
• Raw meat will lose less juice if thoroughly chilled before grinding. Very cold meat will
also grind more easily and cleanly.
• When grinding larger quantities, the fat from meats can build up inside the grinding
head, reducing its efciency. If this occurs, switch off and unplug your meat grinder
then disassemble and wash the affected parts in hot soapy water and reassemble.
• Make sure the food is free of bone, tough tendons, nut shells, etc. before grinding.
• You can season meat while grinding (by sprinkling onto the meat chunks) or after
grinding (by mixing it into the meat). When grinding meat for making into sausages, it
is best to add the seasoning to the meat before you grind it to ensure it is thoroughly
mixed through the meat.
• When making burgers experiment with different herbs, spices and rubs. All add
delicious avour, especially when cooked on a BBQ.
• Adding a small amount of home produced raw sausage meat to your raw burgers
gives great avour and helps the meat stay beautifully moist when cooked.
• Shaping burgers is if you moisten your hands with a little cold water beforehand.
• Refrigerate ground meats immediately and cook within 24 hours for better food safety.
• After grinding meat, you can help to clean the feed screw prior to washing by grinding
a slice of stale bread.
• ALWAYS wash the grinder thoroughly after grinding raw meat and before using your
grinder again.
• Bread crumbs are best made using dry or toasted bread. Make sure all parts of the
grinder are free of moisture before starting.
• Many differenct meats can be used for making sausages such as pork, beef, lamb,
venison, pheasant and duck. Try using sh, seafoods and of course vegetarian
sausages.
• By making your own sausages at home you can ensure that only the best ingredients
and spices are used, as well as controlling the fat content.
• Sausages with a low amount of fat can taste dry. Adding fruits such as chopped apple
or raisins will add moisture back. Alternatively, try onions and mushrooms.
tips for using your meat grinder

13
care and cleaning
The cutting blade is very sharp. To prevent injury, exercise caution when
assembling, disassembling and cleaning the cutting blade.
Do not immerse the grinder motor unit in water or any other liquid.
Do not use harsh abrasives, chemicals or oven cleaners.
• Always unplug from the mains supply when not in use, before inserting or removing
parts, and before cleaning.
• Clean the exterior surface with a damp cloth and then polish with a soft dry cloth. Do
not use steel wool pads or harsh/abrasive cleaners.
• Wash the food pusher, feed tray, grinder head, securing ring, feed screw and sausage
nozzle in warm, soapy water. Rinse and dry all parts thoroughly.
• The food pusher and sausage nozzle can be washed in a dishwasher.
IMPORTANT
• After use, wash the cutting blade and grinding plates in warm soapy water then dry
them thoroughly.
• Coat the cutting blade and grinding plates in vegetable cooking oil to protect them
during storage.
• The next time you use your meat grinder, wash the old vegetable cooking oil off the
cutting blade and grinding plates using warm soapy water. Rinse then dry them.
Remember to apply a light coating of vegetable oil to the grinding plate, cutting blade
and feed screw before use.

14
recipes
Traditional Pork Sausages
Makes 8+ good sized sausages, depending on the size
• 1 kg lean Pork shoulder (or a combination of shoulder with some tenderloin)
• 500g Pork Belly or Pork fat, depending on taste
• 2 tsp salt
• ½ tsp ground black pepper
• 2 tbsp dried sage
• 40g dried breadcrumbs
• 2 egg yolks
• Approx 91cm of hog casings
1. Process the pork and fat through the coarse grinding plate. Repeat using either the
ne or medium grinding plate depending on the texture required.
2. Combine the ground pork with the rest of the ingredients. Cover and refrigerate for 1
hour.
3. Assemble the grinder with the sausage making attachment and make the sausages,
twisting them off at approximate 15cm links.
4. Cover and refrigerate until required.
Pork and Apple Variation – Halve the above quantities. Add 2 tablespoons of apple
sauce along with a large apple (approx 200g) peeled, cored and nely diced. Mix into the
sausage mixture before stufng into the casings.
Traditional Lincolnshire Style Sausages
Makes 8+ good sized sausages, depending on the size
• 800g lean pork shoulder
• 500g Pork belly
• 2-3 tsp salt
• 2-3 tsp black pepper
• 2 tbsp chopped fresh sage
• 150g dried breadcrumbs
• Splash water
• Approx 91cm of hog casings
5. Process the pork and fat through the coarse grinding plate. Repeat using either the
ne or medium grinding plate depending on the texture required.
6. Combine the ground pork with the rest of the ingredients. Cover and refrigerate for 1
hour.
7. Assemble the grinder with the sausage making attachment and make the sausages,
twisting them off at approximate 15cm links.
8. Cover and refrigerate until required

15
Merguez Sausage
Makes 8+ good sized sausages, depending on the size
Merguez sausage is a spicy lamb or beef sausage with various spices and harissa
powder originally from North Africa. This recipe benets from marinating the lamb and fat
for 24 hours beforehand).
• 1kg lamb shoulder, removed of gristle, diced
• 300g lamb, beef, or pork fat, diced
• 3 cloves garlic
• 15-20g harissa spice, depending on taste
• 40 ml cold water
• 1 tsp whole cumin seeds
• 1 tsp coriander seeds
• 1 tsp fennel seeds
• 1 tbsp paprika
• 1 tbsp salt
• Lamb casings, soaked in warm water for 30 minutes prior to use
1. Heat a small frying pan over a medium heat until hot. Toast the cumin, coriander and
fennel seeds until fragrant (approx 2 minutes).
2. Transfer the spices to a spice mill or pestle and mortar and grind to a ne powder.
Mix in the paprika, harissa and salt.
3. Place the lamb and fat in a large bowl. Add in spice mixture and garlic. Mix well to
combine. Cover and place in the refrigerator.
4. Process the lamb and fat through the coarse grinding plate. Repeat using either the
ne or medium grinding plate depending on the texture required.
5. Add the water and mix well (the sausage mixture should be a little sticky).
6. Assemble the grinder with the sausage making attachment and make the sausages,
twisting them off at approximate 15cm links.
7. Cover and refrigerate until required.

16
recipes
Tuscan Style Italian Sausage
Makes 8+ good sized sausages, depending on the size This recipe benets from
marinating the pork and fat 24 hours beforehand.
• 1.75kg pork shoulder
• 450g pork fat
• 2 tbsp salt
• 2 tbsp caster sugar
• 1 ½ tsp coarsely ground black pepper
• 3 cloves garlic, nely sliced
• 1 tsp ground mace
• ½ tsp ground coriander
• ¼ tsp ground cayenne pepper
• 125ml cold water
• Approx 91cm hog casings
1. Using a spice grinder, food processor, or pestle and mortar, grind the salt, black
pepper and sugar until ne. In a large bowl, mix together the pork shoulder, fat, garlic,
mace, coriander, cayenne and ice water. Mix in the salt, pepper and sugar. Cover and
refrigerate (preferably overnight).
2. Process the mixture through the coarse grinding plate.
3. Mix well together.
4. Assemble the grinder with the sausage making attachment and make the sausages,
twisting them off at approximate 15cm links.
5. Cover and refrigerate until required.
Homemade Beef Burgers
All of our burger recipes are for 4 people. However if you double the recipe whilst you
have your meat grinder out you can freeze the leftovers for a later date.
Ask your butcher for chuck steak with the fat. You need a ratio of roughly 20% fat to 80%
steak for great tasting burgers.
• 500g Chuck steak
• 1 medium onion, very nely chopped
• 1 large handful of dried breadcrumbs
• ½tsp freshly ground black pepper
• 1 tbsp Worcestershire sauce
• Salt, to taste
• 4 burger buns, shredded lettuce, sliced tomatoes, gherkins, mayonnaise and ketchup.
1. Grind the chuck steak using the coarse grinding plate. Repeat using the medium
grinding plate depending on the texture required. Cover and refrigerate.

17
2. Pour a splash of oil into a suitable frying pan. Heat until hot then gently sauté the
onion without colouring for approx 5 minutes until softened. Set aside to cool.
3. Place all the burger ingredients into a mixing bowl and use your hands to combine the
mixture. Divide the mixture into four equally sized balls.
4. Shape the balls into round patties. Cover and allow to rest for about 1 hour in the
refrigerator.
5. To cook, grill, griddle, BBQ or shallow fry in a little vegetable oil for approx 12-20
minutes. Turn over half way through cooking to ensure your burger is nicely browned
and evenly cooked.
6. Serve hot on toasted burgers buns with a selection of the above accompaniments.
7. Delicious with spicy wedges or shoestring fries.
Gourmet Steak Burgers
• 800g Rump Steak
• 1 large onion, nely diced
• Salt and pepper
• 8 slices of smoked back bacon, grilled until crispy
• Sliced cheese of your choice
• Ketchup/mayonnaise
• 4 seeded buns
1. Grind the chuck steak using the coarse grinding plate. Repeat using the medium
grinding plate depending on the texture required. Cover and refrigerate.
2. Pour a splash of oil into a suitable frying pan. Heat until hot then gently sauté the
onion without colouring for approx 5 minutes until softened. Set aside to cool.
3. Place all the burger ingredients into a mixing bowl and use your hands to combine the
mixture. Divide the mixture into four equally sized balls.
4. Shape the balls into round patties. Cover and allow to rest for about 1 hour in the
refrigerator.
5. To cook, grill, griddle, BBQ or shallow fry in a little vegetable oil for approx 12-20
minutes. Turn over half way through cooking to ensure your burger is nicely browned
and evenly cooked.
6. Set aside on a warmed plate, cover with foil and allow to rest for 5 minutes.
7. Assemble the burgers placing the bacon on top of the burger, adding the sliced
cheese and sauce of your choice. Serve in the warmed or toasted burger buns.

18
recipes
Lemon and Thyme Turkey Burgers
• 500g turkey leg steaks, ground using the medium grinding plate
• Vegetable oil
• 1 onion, nely diced
• zest 1 lemon
• 2 tsp fresh thyme leaves or 1 tsp dried leaves
• 1 tbsp chopped parsley
• Salt and pepper
• Burger buns, sliced tomato, lemon mayonnaise, sweet chilli sauce and rocket leaves
1. Pour a splash of oil into a suitable frying pan. Heat until hot and gently sauté the onion
without colouring for approximately 5 minutes until softened. Set aside to cool.
2. Place the minced turkey, onion, lemon zest, thyme and parsley, salt and pepper into a
suitable mixing bowl. Use your hands to combine the mixture. Divide the mixture into
four equal sized balls.
3. Shape the balls into round patties. Cover and allow to rest for about 1 hour in the
refrigerator.
4. Heat a large frying pan over a medium heat. Brush the burgers with a little olive oil
and cook for about 15 minutes until golden brown and the juices run clear.
5. Serve in toasted burger buns with sliced tomato and rocket. Top with mayonnaise and
a spoonful of sweet chilli sauce.
Pork Meatballs in a Tomato and Chorizo Sauce
Serves 6
For the tomato sauce
• 1 kg Vine tomatoes, stalks removed, cross cut in the bottom of each using a sharp
knife
• 50ml olive oil
• 4 large shallots, peeled, nely chopped
• 4 garlic cloves, nely chopped
• 1 tbsp tomato puree
• A sprig of fresh thyme, leaves only
For the meatballs
• 2 tbsp olive oil
• 1 head of fennel, sliced
• 2 carrots, peeled, diced
• 1 red pepper, sliced

19
• 3 garlic cloves, peeled, nely chopped
• 1 onion, peeled, diced
• 1 red chilli, seeds removed and nely chopped. Alternatively use dried chilli akes
• 175ml red wine
• 1½ tsp smoked paprika
• 750g ground pork mince, use either the medium or ne grinding plate
• 1 tsp crushed fennel seeds
• 2 tsp ground cumin
• Salt and pepper
• 1 large chorizo, sliced
• 1 x 400g canned white beans (such as butter beans or haricot beans), drained, rinsed
1. Prepare the tomato sauce. Bring a pan of water to the boil. Lower the tomatoes into
the boiling water and boil for ten seconds. Remove them from the pan using a slotted
spoon and immediately plunge them into a bowl of ice-cold water.
2. When the tomatoes have cooled, peel and discard the skins. Halve the tomatoes and
discard the seeds (alternatively, freeze the seeds and use them for making stocks and
sauces). Chop the tomatoes using a knife or a food processor.
3. Heat half of the olive oil in a saucepan over a medium heat. Add the shallots, thyme
leaves and garlic and fry for 2-3 minutes, or until softened but not coloured.
4. Add the remaining olive oil and the chopped tomato pulp and then stir well to
combine.
5. Cover the saucepan with a lid and reduce the heat to its lowest setting. Cook gently
for at least an hour, or until the sauce has thickened.
6. When the mixture has cooked and thickened, set aside.
7. To make the meatballs, use your hands to mix together the pork mince, crushed
fennel seeds, ground cumin, and a touch of salt and pepper.
8. Take small pieces of the mixture roughly the size of a golf ball and roll into rounds.
Cover and refrigerate.
9. Heat 1 tablespoon of olive oil in a medium sized frying pan. Add the fennel, carrots,
pepper, garlic, onion and chilli and stir fry over a medium heat until softened but not
coloured. Sprinkle the paprika over the top.
10. Add the red wine and bring to a simmer. Pour in the tomato sauce and continue
simmering, until the sauce has reduced and thickened.
11. Brown the meatballs in a separate pan. You can do this in batches.
12. Add the browned meatballs and chorizo to the tomato sauce and stir well to combine.
13. Continue simmering for 30 minutes.
14. Stir in the white beans and heat for a further 2-3 minutes.
15. Serve with some freshly cooked pasta, dust with grated parmesan and scatter with
torn basil leaves.

20
connection to the mains supply
If the plug is not suitable for the socket outlets in your home, it can be removed and
replaced by a plug of the correct type.
If the fuse in a moulded plug needs to be changed, the fuse cover must be retted. The
appliance must not be used without the fuse cover tted.
If the plug is unsuitable, it should be dismantled and removed from the supply cord and
an appropriate plug tted as detailed. If you remove the plug it must not be connected to
a 13 amp socket and the plug must be disposed of immediately.
If the terminals in the plug are not marked or if you are unsure about the installation of the
plug please contact a qualied electrician.
This symbol indicates that this unit is a Class II appliance and therefore an earth
connection is not required.
Do Not Connect
Mains Wires Here
Blue
(Neutral)
Brown
(Live)
Fuse
Ensure that the outer sheath of
the cable is firmly held by the cord grip
Plug should be ASTA approved to BS1363
Fuse should be ASTA
approved to BS1362
5A
Table of contents
Other Breville Meat Grinder manuals


