K. LCD screen.
L. START/CANCEL button.
Note: If not in use, the LCD screen will illuminate for
10 minutes before entering standby mode. Press the START/
CANCEL button on the control panel to re-activate any of
the functions.
M. FUNCTION dial.
N. TEMPERATURE dial (also toast & bagel browning
control dial)
O. TIME dial (also toast & bagel slice selection / pizza size
selection dial)
P. CONVECTION button - uses fan assistance for faster,
more even & energy efficient cooking.
Q. TEMPERATURE CONVERSION button - converts the
preset Fahrenheit reading to Celsius.
R. FROZEN FOODS button - adds the recommended
additional time to defrost then cook frozen foods.
TOAST FUNCTION: Evenly toasts bread so it’s crisp and crunchy on the outside, while soft and moist on the inside.
Rack Position: Middle
Optional Settings: FROZEN FOODS button.
Note: During the toasting cycle, condensation may form on the oven door and steam may be emitted. This is normal - caused by the moisture
content of the bread. Freshly baked and frozen breads generally produce more condensation.
BAGEL FUNCTION: Crisps the insides of your cut bagel while only lightly toasting the outside.
Rack Position: Middle
Optional Settings: FROZEN FOODS button.
Note: Slice each bagel into two equal halves. The inside (cut side) of the bagel must always face upwards towards the top heating elements - so
the cut side becomes crisp while the crust is only lightly toasted.
BAKE FUNCTION: Bakes cakes, muffins, brownies and pastries evenly throughout. Also is ideal for cooking pre-packaged frozen
meals including lasagna and pot pies.
Rack Position: Bottom
Optional Settings: CONVECTION button TEMPERATURE CONVERSION button FROZEN FOODS button
ROAST FUNCTION: Cooks a variety of meats and poultry that are tender and juicy inside and roasted to perfection outside.
Rack Position: Bottom
Optional Settings: CONVECTION button TEMPERATURE CONVERSION button.
BROIL FUNCTION: Ideal for open sandwiches, small cuts of meat, poultry, fish, sausages and vegetables. Broiling can also be used to
brown the tops of casseroles and gratins.
Rack Position: Top
Optional Settings: TEMPERATURE CONVERSION button.
Note: There are three broiling temperature settings - 500°F (HIGH), 400°F (MEDIUM), 300°F (LOW). This determines how quickly the tops of your
food brown - depending on the food, quantity and your personal taste.
Note: When broiling, the Breville enamel broil rack must be inserted into the Breville baking pan. When assembled together, the broil rack
is designed to drain grease and fats away from meats for healthier cooking. The baking pan collects these pan drippings and helps prevent
spattering. Depending on the food being broiled, it may be necessary to turn food over half way through the cooking time to achieve even
cooking and browning.
PIZZA FUNCTION: Melts and browns cheese and toppings, while crisping the pizza crust.
Rack Position: Middle
Optional Settings: CONVECTION button TEMPERATURE CONVERSION button FROZEN FOODS button
Note: If cooking a frozen pizza, ensure to remove all packaging (including the metal foil pizza pan that may be provided) before placing the pizza
in the oven. If cooking a fresh pizza or using a pizza stone, see Page 32 of the Instruction Book.
COOKIE FUNCTION: Ideal for baking homemade or commercially prepared cookies and ready-to-bake crescent rolls, cinnamon
scrolls, biscuits and strudels.
Rack Position: Middle
Optional Settings: CONVECTION button TEMPERATURE CONVERSION button FROZEN FOODS button
REHEAT FUNCTION: Ideal for reheating leftovers without browning the top.
Rack Position: Bottom
Optional Settings: CONVECTION button TEMPERATURE CONVERSION button
WARM FUNCTION: Maintains hot foods at the recommended temperature to prevent bacterial growth (160°F or above).
Rack Position: Bottom
Optional Settings: CONVECTION button TEMPERATURE CONVERSION button
the Breville baking pan and broil rack
(see Page 25 of the Instruction Book for
recommended cookware types and sizes).
Note: Some functions feature a preheating cycle. When
the START/CANCEL button is pressed, the LCD screen
will indicate a blinking ‘PREHEATING’. Only place food
inside the oven once the LCD screen no longer blinks
‘PREHEATING’ and the temperature alert has sounded.
Close the oven door.6.
Press the START/CANCEL button. The button 7.
surround will illuminate red and the oven alert
will sound.
The timer will be displayed and begin to count 8.
down. The cooking temperature and time can be
adjusted during the cooking cycle.
At the end of the cooking cycle, the oven alert will 9.
sound and the START/CANCEL button surround
will cease to illuminate.
Note: The cooking cycle can be stopped at any time by
pressing the START/CANCEL button.This will cancel the
cycle and the button surround illumination will go out.
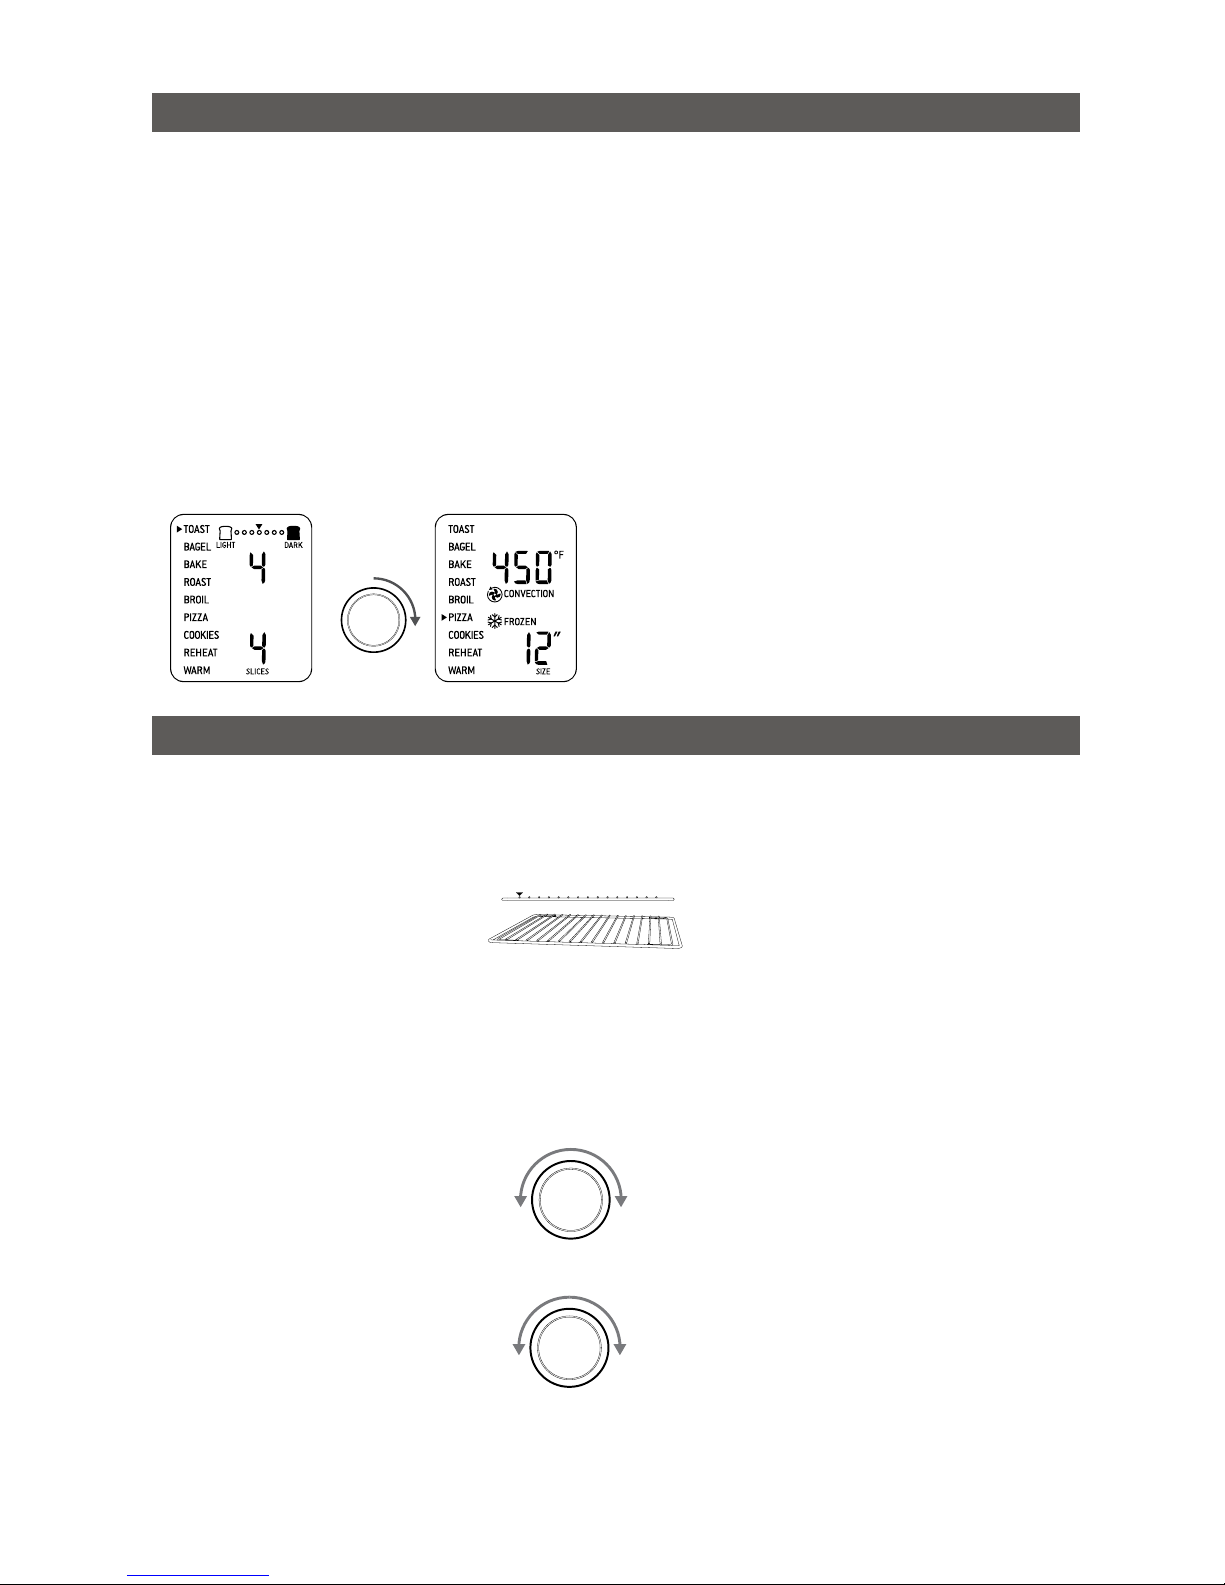
Insert the wire rack into the recommended 1.
rack height position. These are conveniently
printed on the right hand side of the oven
door’s glass window. The wire rack should
be positioned with the spokes facing
upwards.
Turn the FUNCTION dial until the indicator 2.
on the LCD screen reaches the desired
setting.
The 3. top figure on the LCD screen indicates
the preset cooking temperature (or on
the toast and bagel function, the browning
shade). Turn the TEMPERATURE dial to the
left to reduce the temperature, or to the
right to increase the temperature.
The 4. bottom figure on the LCD screen
indicates the preset cooking time (or on
the toast, bagel and pizza functions, the
number of slices). Turn the TIME dial to the
left to reduce the cooking time, or to the
right to increase the cooking time.
Center the food on the wire rack - either 5.
placing directly on the rack or positioned on
Place the oven on a flat, dry surface. Ensure there is 4" of 1.
clear space on both sides of the appliance, there are no items
on top, and the crumb tray has been inserted.
Unwind the power cord and insert the power plug into a wall 2.
outlet.
The oven alert will sound and the LCD screen will illuminate. 3.
The function options will appear with an indicator on the
preset TOAST function.
Turn the FUNCTION dial to the right until the indicator reaches 4.
the PIZZA function. The LCD screen will indicate the preset
PIZZA setting.
Press the START/CANCEL button. The button surround will 5.
illuminate red and the oven alert will sound.
The LCD screen will indicate a blinking ‘PREHEATING’. Once 6.
the oven has reached the set temperature, the temperature
alert will sound.
The timer will be displayed and automatically begin to count 7.
down in one minute increments.
At the end of the cooking cycle, the oven alert will 8.
sound and the START/CANCEL button surround will
cease to illuminate.
The oven is now ready to use.9.
Note: When the oven is turned on for the first time, it may emit
vapors. This is due to the protective substances on the heating
elements. It is safe and not detrimental to the performance of
the oven.
The Smart OvenTM
QUICK START GUIDE
KNOW YOUR BREVILLE SMART OVENTM
For full details refer to the instruction book | breville.com | Issue 2/08
For full details refer to the instruction book | breville.com | Issue 2/08
For full details refer to the instruction book | breville.com | Issue 2/08
OPERATING YOUR BREVILLE SMART OVENTM
PREPARING THE OVEN (A ONE-TIME PROCESS)
The Breville Smart Oven™ features Element IQ™ - a cooking technology that adjusts the power of the heating elements to cook food
more evenly and quickly. Each of the oven’s functions are preset with our recommended settings, however we suggest experimenting
with these depending on the recipe, amount of food and your personal taste. Your customized setting will remain in the memory of the
oven until changed or the oven is unplugged from the wall outlet.
Remove any packing material, promotional stickers and tape from the oven. Wipe the oven interior with a soft damp sponge and
wash all accessories in warm soapy water. Allow all surfaces to dry thoroughly before use.
A. 12" x 12" enamel broil rack.
B. 12" x 12" enamel baking pan.
C. 13" non-stick pizza pan.
D. Door handle.
The outer surface of the oven, including the oven door, is hot
during and after operation. Always use insulated oven mitts
when inserting, removing or handling items from the oven.
E. Ribbed plate warming tray (see Page 43 of the Instruction
Book for details).
F. Top rack height position.
G. Middle rack height position.
Note: When the wire rack is inserted into this position, the
Magnetic Auto-Eject Rack ejects the wire rack halfway out of
the oven for easy removal of hot items. Always open the door
slowly to prevent the wire rack from ejecting too quickly.
H. Bottom rack height position.
I. Wire rack.
J. Crumb tray.
M
O
N
J
K
L
Q
P
R
A
B
C
E
F
HII
J
D
D
F
H
G
G
E
M
O
N
K
L
Q
P
R
A
B
C
E
F
HII
J
K
L
D
D
F
H
G
G
E
The outer surface of the oven, including the oven door, is hot
during and after operation. Always use insulated oven mitts
when inserting, removing or handling items from the oven.
Note: When the wire rack is inserted into this position, the
Magnetic Auto-Eject Rack ejects the wire rack halfway out of
the oven for easy removal of hot items. Always open the door
slowly to prevent the wire rack from ejecting too quickly.
ROTATE
FUNCTION
DIAL
REDUCE
TEMPERATURE
INCREASE
TEMPERATURE
ROTATE
DIAL
REDUCE
TIME
INCREASE
TIME
ROTATE
DIAL
In order to remove any protective substances on the heating elements, it is necessary to run the oven empty for 15 minutes. Ensure
the area is well ventilated as the oven may emit vapors. These are safe and not detrimental to the performance of the oven.


