Brightlink HDMI1616 User manual

User Manual
——————————————
HDMI Matrix ---HDMI1616
Dear Customer
Thank you for purchasing this product. For optimum performance and safety, please read these
instructions carefully before connecting, operating or adjusting this product. Please keep this manual for
future reference.

Production Specification
2
Table of Contents
!
Important Safety Instructions ................................................................................................... 3
Introduction .............................................................................................................................. 4
Overview ............................................................................................................................... 4
Features ................................................................................................................................ 4
Package Contents .................................................................................................................. 4
Hardware Installation ............................................................................................................ 4
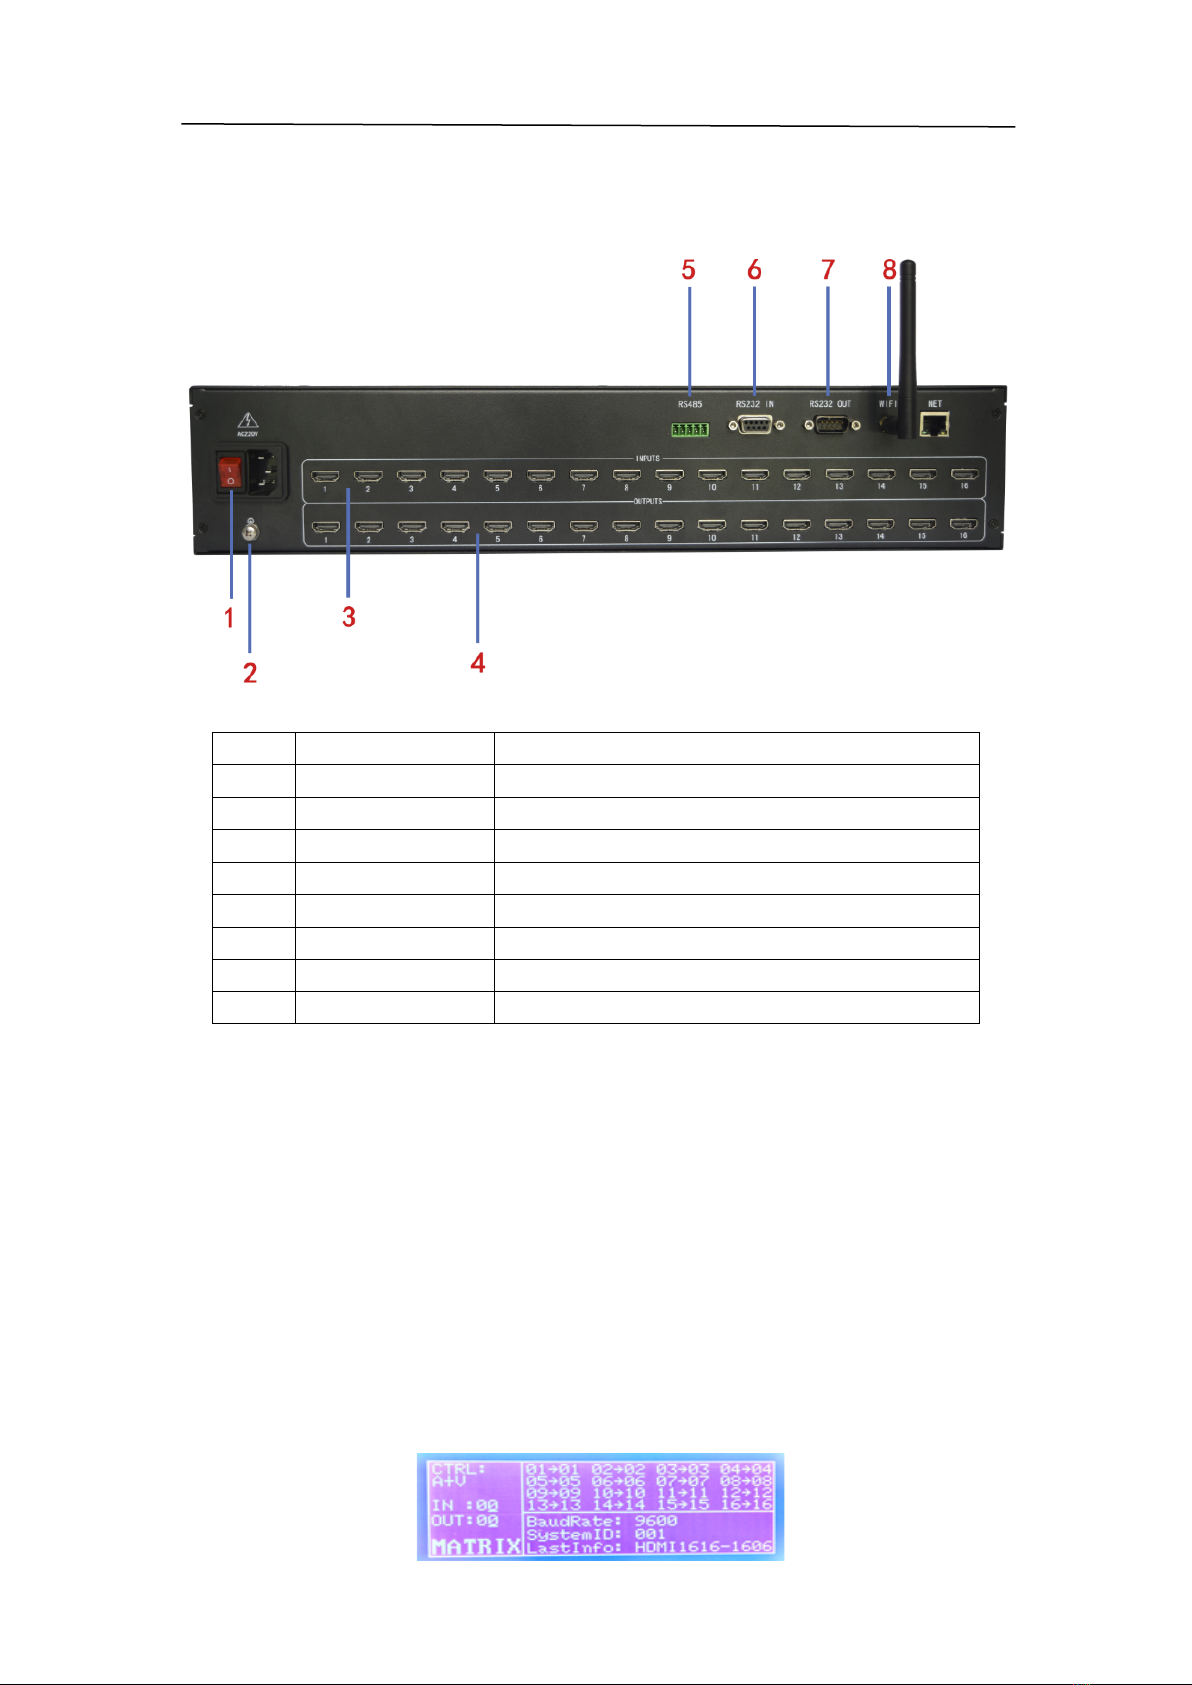
Product Appearance ................................................................................................................. 5
Front Panel Overview ............................................................................................................ 5
Rear Overview ....................................................................................................................... 6
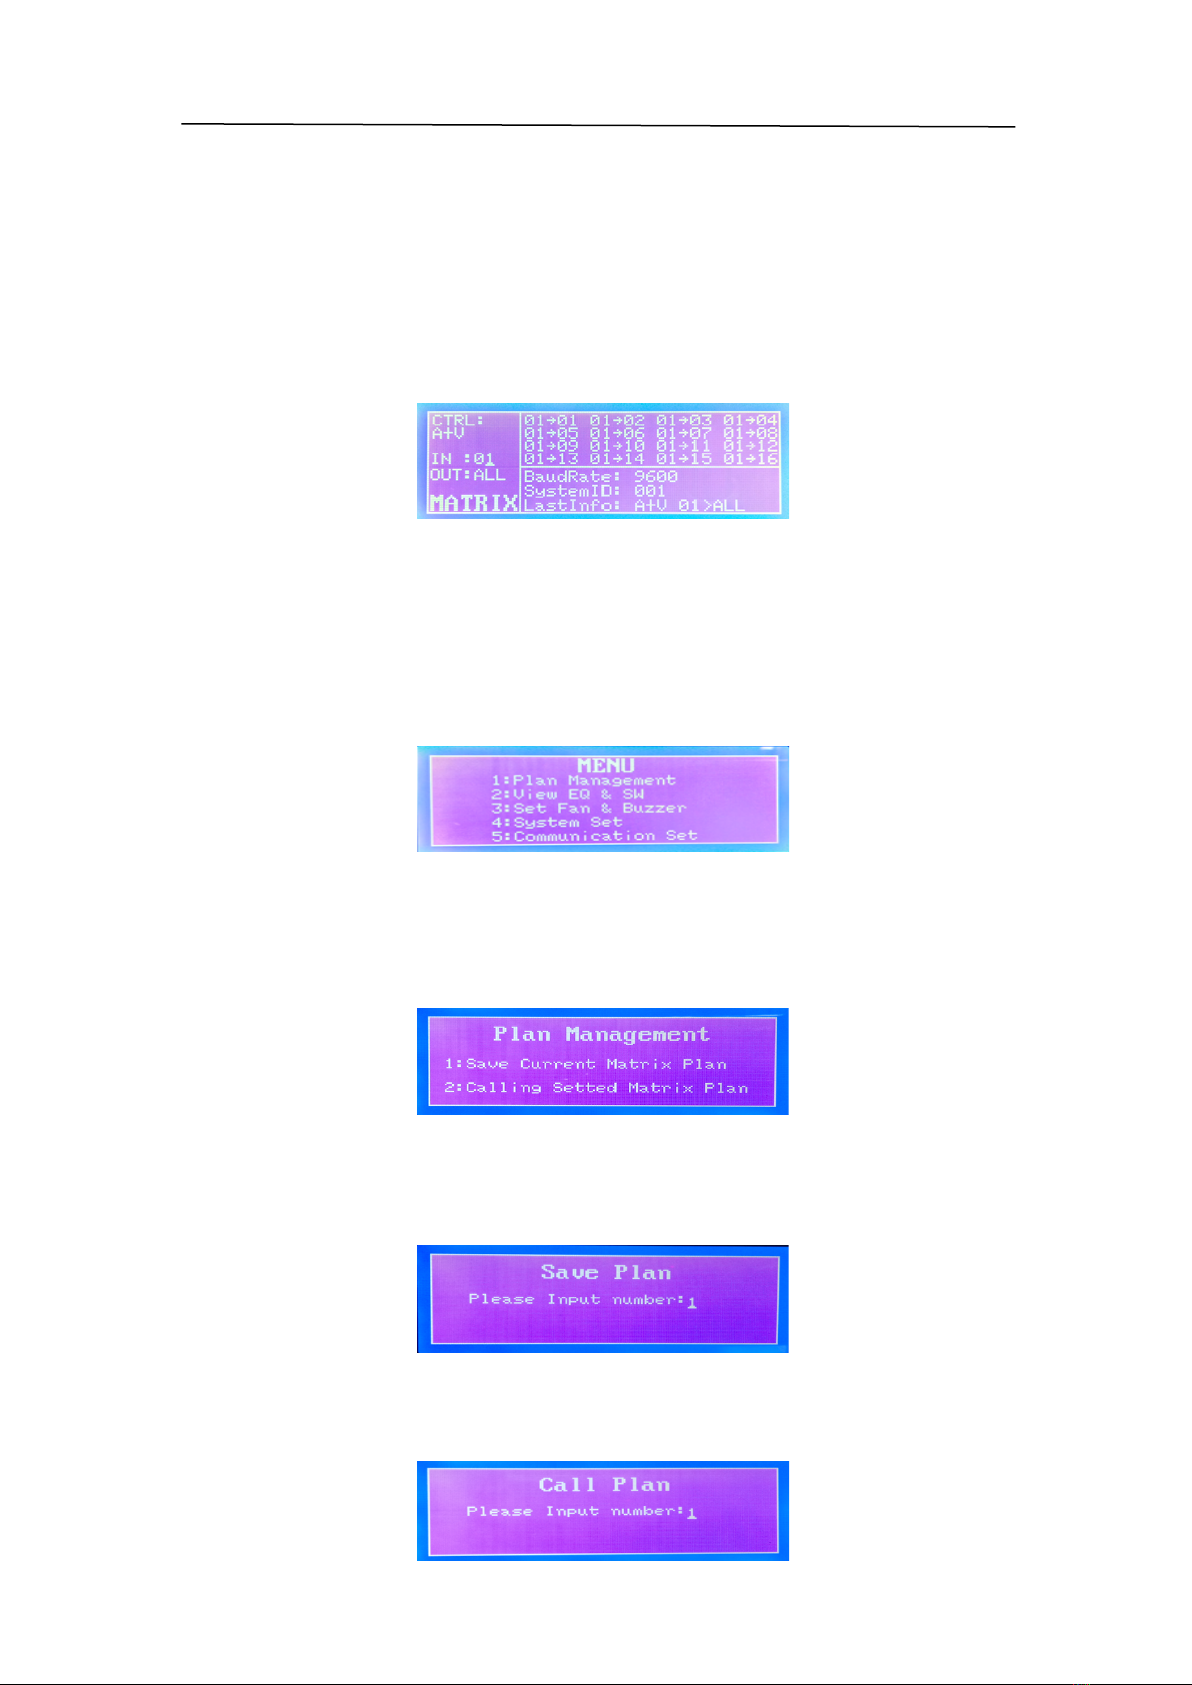
Display and Menu ..................................................................................................................... 6
Display Description ................................................................................................................ 6
Switch MENU ........................................................................................................................ 7
Menu Description .................................................................................................................. 7
Remote Controller ..................................................................................................................... 9
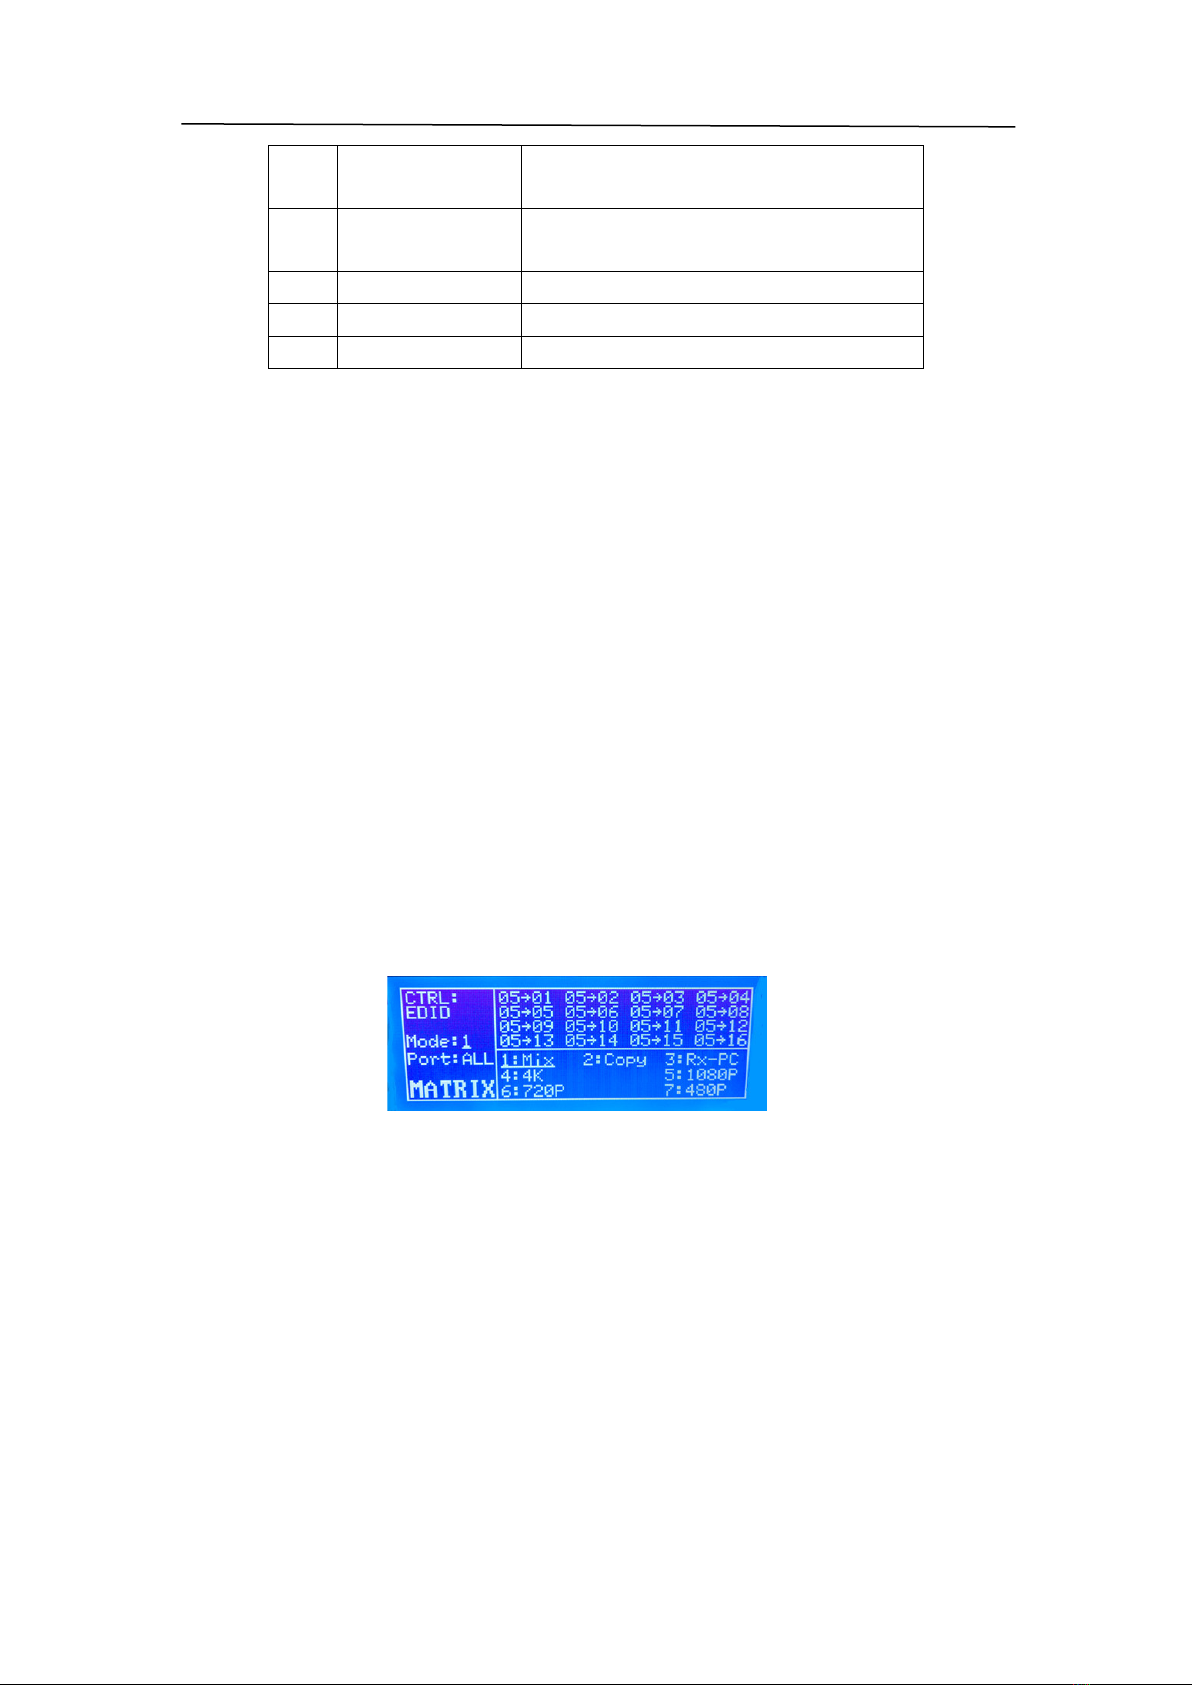
EDID Operation ....................................................................................................................... 10
Serial control protocol ............................................................................................................. 11
RS-485 communication port ............................................................................................... 11
RS-232 communication port and connection method ........................................................ 11
Product Specifications ............................................................................................................. 13
Without electricity .............................................................................................................. 14
No image ............................................................................................................................. 14
Image blurred ...................................................................................................................... 14

Production Specification
3
Important Safety Instructions
◆Make sure that all devices you will be connecting up are properly grounded.
◆Make sure that the power to all the devices you will be connecting up has been turned off.
◆Do not place other objects on the cable.
◆Risk of electrical shock, do not open.
◆To avoid damaging the product, do not dismantle it by yourself, the device should be repaired and
maintained by the professional and qualified personnel in the designated service center.
◆Do not place any object into the opening of the casing, otherwise, it might cause voltage or short
circuit incident.
◆The installation site must be well ventilated. Ensure that air vents on the equipment are not blocked.

Production Specification
4
Introduction
Overview'
HD1616 is an 16-by-16 HDMI matrix. It allows any of the sixteen Input HDMI Channels to be routed
to any of the sixteen Output HDMI Channels. Users can choose several different ways to control the
matrix: by using front panel buttons、RS232、RS485、PC software control and remote control. HDMI
Matrix offers solutions for home, office, digital entertainment center, control center, conference room,
school and corporate training environments.
Features'
◆HDMI 1.3 compliant
◆HDCP compliant. Input decryption, output is not encrypted
◆Allows up to eight HDMI audio/video devices to be independently switched to sixteen HDMI monitors,
HDTV’s or projectors
◆The sixteen output channels could show the same or different source simultaneously no matter the
source is HDCP or not
◆Reading and saving EDID function from displays
◆Supports high definition resolutions including: 1080p@60Hz, 1080i, 720p and other standard video
formats
◆Switching modes: front panel buttons、RS232、RS485、IR、PC software control
Package'Contents'
Name
Amount
Main Unit
1
IR Remote Control
1
Power Cord
1
Serial Port Line
1
Inspect Certificate
1
Guarantee Card
1
Hardware'Installation'
1. Connect HDMI source (such as a PC with HDMI port) to the HDMI1616.
2. Connect HDMI sink to HDMI1616.
3. Power on all the devices.

Production Specification
5
4. Use the remote to control the matrix, or using front panel, PC software control、RS485、WIFI(Option)
and RS232 to control.
Product Appearance
Front'Panel'Overview'
Pic 1
No.
Item
Description
1
LCD Screen
display the current status and Input-to-Output
display relationships
2
Power State
Power LED Light
3
IR Sensor
IR Signal reception
4
Input Channel
0-9、LOCK(Disable)
5
Output Channel
0-9、ALL
6
Control Button
MENU、CTRL、ENTER、ESC

Production Specification
6
Rear'Overview'
Pic 2
No.
Item
Description
1
Power
Turns on/off the device
2
Ground
Connect to the Ground
3
Input Channel
Connect to the source
4
Output Channel
Connect to the sink
5
RS485
RS485 port, control the matrix
6
RS232-IN(Female)
Female(Connected to the computer, control the matrix)
7
RS232-OUT(Male)
Male
8
Wi-Fi
Optional(1080p no WIFI)
Display and Menu
Display'Description'
IN: input port, OUT: output port. As shown in the following figure, the signal indicating that the input
port is output is output to all the output ports, that is, 1-1、2-2、3-3、4-4、5-5、6-6、7-7、8-8、9-9、
10-10、11-11、12-12、13-13、14-14、15-15、16-16.

Production Specification
7
Pic 3
Switch'MENU' '
As shown in the following figure, it means that the input port 1 switches to output 1 port.
Pic 4
Menu'Description'
Press the MENU button on the front panel, the main menu will appear, including five submenus.
Pic 5
1. Plan Management
To save / open the switching scheme, press 1 to select the submenu. As shown below:
Pic 6
1)、Press 1 to select the save plan, enter the program number (input area button), press
the ENTER key to confirm. As shown below:
Pic 7
2)、Press 2 to open the saved program, enter the saved program number (input area
button), press the ENTER key to confirm. As shown below:

Production Specification
8
Pic 8
2. View EQ&SW
Unused for Matrix16*16
3. Set FAN &Buzzer
Unused for Matrix16*16
4. System Set
System reset and display off time setting, press 4 to select the submenu, as shown
below
Pic 9
1)、 Press 0 to enter the factory settings interface, as shown below
Pic10
2)、 Choose the LCD display off time: 1: 10s; 2: 20s; 3: 30s; 4: 40s; 5: 50s; 6: 60s . Press
the ENTER key to confirm.
5. communication
Press 5 to enter the submenu, as shown below:
Pic 11
1)、ID Code mode set, reserved, do not use this feature
Single matrix does not use this function. Multi-matrix splicing control using this function
2)、Select the 2 key on the input field to enter the baud rate setting interface as shown
in the following figure: 1 means 4800.2 means 9600. 3 means 19200.4 means 38400.5
indicates 115200. The baud rate is best to default factory settings data, do not change.

Production Specification
9
Pic 12
3)、IP Address is not available, need to have hardware available
Remote Controller
Pic 13
Item
Button
Function
1
POWER
Turns on/off the display screen
2
LOCK
Disable
3
CTRL
Disable
4
SAVE
Save current Matrix plan
5
LOAD
Calling set Matrix plan
6
ALL
Select all the output ports to be configured
simultaneously with the same setting
7
OFF
Disable
8
BUZZER
Disable
9
RESET
Factory Reset
10
FAN1
Disable
11
FAN2
Disable
12
FAN3
Disable
13
FAN4
Disable

Production Specification
10
14
OUTPUT BUTTON
selecting the numbered output port to be
configured
15
INPUT BUTTON
selecting the numbered input port to be
configured
16
ENTER
Confirm your operation
17
ESC
Cancel the last operation
18
MENU
The menu key contains 5 submenus
EDID Operation
The matrix has two ways to read the EDID. The factory default setting automatic read mode.
Automatically'read'EDID.'
When the matrix output port is connected to the display device, the matrix will automatically read the
output device connected to the display device EDID information, and then integrated all the equipment
EDID information, combined with a most suitable EDID sent to the input. As long as the output port has
a plug action, the matrix will be based on the latest EDID information re-combination.
Manually'read'EDID' '
Press CTRL key for a long time to enter CTRL EDID mode. As shown below: There are 7 ways to
choose EDID
Pic 14
When the matrix enters the CTRL EDID mode, The 7 digits corresponding to EDID correspond to 7
EDID modes respectively, and can be selected in the input key bar. PORT corresponding numbers
that need to set the input port, and can be selected in the output key bar. Each input can choose
the same or choose different EDID mode. After selecting PORT and EDID mode, press ENTER to
confirm the selection.
Now began to introduce seven kinds of EDID mode settings:
1)、Mix mode
Press the input bar 1, then select automatic read EDID mode.
2)、 Copy mode
Press the input bar 2, then select Copy mode. In this way, the matrix reads the EDID information of the
devices connected to a single output port to the matrix, not combined. By default, the first output port
to read, read a valid EDID information so far.

Production Specification
11
3)、 Rx-PC mode
Press the input bar 3, then select Rx-PC mode. EDID information at this time by the PC-side host
software specified( Specific steps see PC software instructions).
4)、 4K mode
Press the input bar 4, then select 4K mode.
5)、 1080P mode
Press the input bar 5, then select 1080P mode.
6)、 720P mode
Press the input bar 6, then select 720P mode.
7)、 480P mode
Press the input bar 7, then select 480P mode.
Serial control protocol
RS-485'communication'port'
RS485 interface line order from left to right for RS485A(+)、RS485B(-)、GND as shown below:
Pic 15
RS-232'communication'port'and'connection'method'
This series of products provide two serial ports:RS-232-in and RS-232-out (see pic 16). Input port
connects with PC, output port connects with other devices. Our matrix can cascade with multiple
devices. Signal input from RS-232-in, output RS-232-out to other devices, please see pic 17 and 18.
Pic 16

Production Specification
12
Pic 17
Pic 18
RS-232 port IN (D-SUB9F) functional description
Pin
Functional
1
--
2
TXD
3
RXD
4
-
-
5
GND
6
--
7
--
8
--
9
--
RS-232 port OUT (D-SUB9M) functional description
Pin
Functional
1
--
2
---(RXD)
3
TXD
4
--
5
GND
6
--
7
--
8
--
9
--

Production Specification
13
Matrix is compatible with these protocols:
Product Specifications
Specification
Parameter
Input
Interface:Type-A-type HDMI Female
Minimum Level:0.5Vp-p
Maximum Level:1.0Vp-p
Differential Impedance:100Ω
Return Loss:-30db@5MHz
Output
Interface:HDMI A-type(19 pin) Female
Input Level:0.7Vp-p
Differential Impedance:100Ω
Return Loss:-30db@5MHz
DC Compensation:5mV(Max)
Signal Type
HDMI1.4 specification HDMI-A all-digital T.M.D.S. signal
Protocol
Support HDMI1.4 Protocol,compatible with DVI1.0 Protocol
Bandwidth
340MHz
Video Format Supported
3840 x 2160P/1080P/1080i/720P/576P/480P/576i/480i
Serial interface
RS232,9-pin female D-type connector, Ports 2, 3 and 5 are directly
connected
protocol
Example
*IXOY(!
*I01O02(!
1 input>>2 output
*I01ONN(!
1 input>> ALL output
XVY.
01V02.
1 input>>2 output
01VNN.
1 input>> ALL output
*Y<X!
*02<01!
1 input>>2 output
*NN<01!
1 input>> ALL output
X*Y!
01*02!
1 input>>2 output
01*NN!
1 input>> ALL output
X*Y%
01*02%
1 input>>2 output
01*NN%
1 input>> ALL output
<X,Y,V>
<1,2,V>
1 input>>2 output
<1,NN,V>
1 input>> ALL output
XVY%
01V02%
1 input>>2 output
01VNN%
1 input>> ALL output
X,Y,V
1,2,V
1 input>>2 output
1,NN,V
1 input>> ALL output

Production Specification
14
Serial port parameters: 9600bps, 8-bit data, 1 start bit, 1 stop bit,
no check, no flow control
Control Method
Panel Button、RS232、Remote Controller、PC software control
Power Supply
ACIN 176V-264V
Power Consumption
30~50W
Operation Temperature
0℃~45℃
Relative Humidity
10%―90%
ESD Protection
Human-body Model: ±8kV(Air-gap discharge)/±4kV(Contact
discharge)
Trouble shooting
Without'electricity'
1.Check that the AC power cord is plugged into an electrical outlet and that the switch is on.
No'image'
1. Verify that the input source is powered on and connected to the HDMI1616 matrix switcher.
2. To confirm whether the display device is turned on and connected with the HDMI1616 matrix
switch intact.
3. Check the system connection status.
4. Check the cable is intact.
5. Check the infrared remote control or key switch is correct.
6. Wire quality (HDMI cable requirements in line with HDMI 1.4 standard).
Image'blurred'
1. Re-plug the connector to prevent the socket interface is bad.
2. Wire quality (HDMI cable requirements in line with HDMI 1.4 standard).
Table of contents
Other Brightlink Matrix Switcher manuals
Popular Matrix Switcher manuals by other brands

Agilent Technologies
Agilent Technologies E1468A user manual

Matrix Switch Corporation
Matrix Switch Corporation MSC-TXD71L product manual

Savant
Savant SLN-44VLC4K-00 Quick reference guide

Kramer
Kramer VS-42HN user manual

Matrix Switch Corporation
Matrix Switch Corporation MSC-XA3232L product manual

AUDAC
AUDAC R2 user manual

Taiden
Taiden TMX Series Installation and operation manual

Factor Electronics
Factor Electronics HDBaseT-4x4Matrix instructions

Clare Controls
Clare Controls CM-MT4410-BT-70 manual

TESmart
TESmart HMA0808A1U user manual

ATZ
ATZ HDMI-V2-42SMPR manual

Optimus
Optimus MX-88 Installation and operating instructions