manuals.online logo
Brands
  1. Home
  2. •
  3. Brands
  4. •
  5. BriksMax
  6. •
  7. Lighting Equipment
  8. •
  9. BriksMax 42093 User manual

BriksMax 42093 User manual

Chevrolet Corvette ZR1 # 42093 Lighting Kit
Package contents:
4 x 15cm Multi Colour Slow Flashing Lights
4 x 15cm Red Dot Lights
2 x 30cm White Dot Lights
1 x Warm White Strip Light
1 x 15cm Connecting Cables
1 x 12-port Expansion Boards
1 x Flat Battery Pack
Extra LEGO pieces
Note:
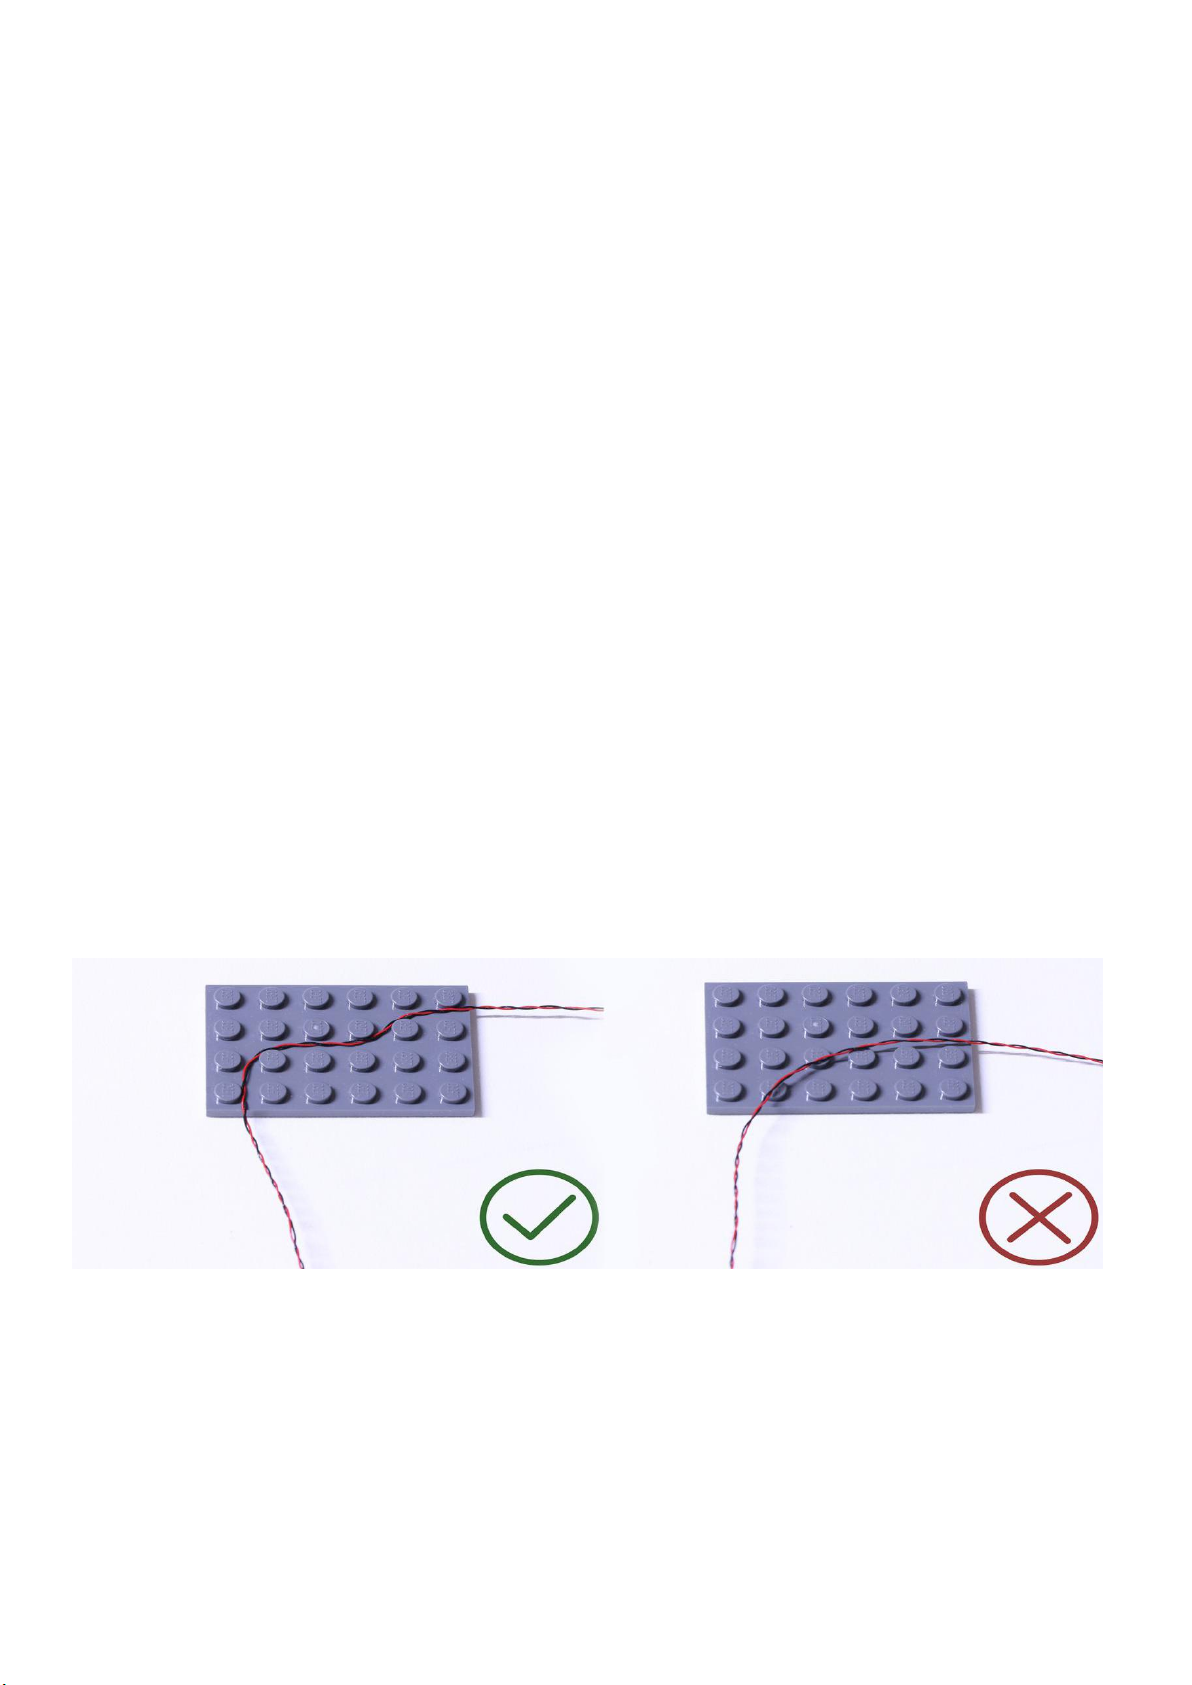
Place wires on the surface or under the LEGO building blocks.
The wire can be place between the building blocks or under the block, but they should be placed
between the studs correctly.
Insert the connectors to the ports.
Be careful when you are operating, there’s only one correct way to insert, make sure the expansion
board is upward, find the soldered “=” sign on the left of the port. When you are inserting, the side
which the wires can be seen should be faced to the “=” sign and if you feel hard to insert, please stop,
and don’t force it, for that may result in bent pins inside the port or overheating of the expansion
board.
At this point, use the tweezers to straighten the bent
pins.
When installing dot lights, make sure they are correctly placed (Yellow LED package is exposed). You
can put they either on the top of the studs or between studs.
Connecting cable connectors to Strip Lights
Take extra care when inserting connectors to ports on the Strip Lights.
Connectors can be inserted only one way. With the Strip Light facing up,
ensure the side of the connector with the wires exposed is facing down. If a
plug won’t fit easily into a port connector, don’t force it. Doing so will damage
the plug and the connector.
Finally, please pay attention to the positive and negative terminals of the
battery when installing the battery case.
Start from installing the headlights of the car
Take 2 white 30cm dot lights, remove the following trans pieces from the head
Continue to remove the following pieces
Thread a dot light through the cross hole, with lighting part facing up, bend the light to
secure it to the hole beside.
Reconnect the trans piece before reconnecting the headlight
Repeat the previous steps to install lights for the other headlight
Lift the roof as per below
Thread the cable of the lights through the cabin
Pull it out from the hole under the door, continue to thread it through the following hole
Thread it through the back of the chair as per below
Take a 12-port expansion board, stick it to the following place by using the adhesive squares
Connect the cables of the lights to the expansion board. Tuck excess cable around it
Similarly, place the other cable of headlight, and connect it to the expansion board
Take a warm white strip light, a 15cm connecting cable, connect the cable to one port on
the strip light. Stick the strip light to the roof as per below
You can using the tapes to help to secure the cable
Take the flat battery pack, connect it to the expansion board, turn the power on to test
the current
Turn the car to its back, we’ll install the taillights now
Take 2 red 15cm dot lights, remove the red and black piece from the back of the car
With lighting part facing up, secure the light to the space between the 2 studs, connect
the trans red piece over
Install the other light as we did before. Group the 2 cables together
Remove the orange piece underneath, reconnect the taillights
Thread the cables of the lights through the gap at the back of the car as per below
Connect them to the expansion board to see if the lights are working OK
Take another 2 red 15cm dot lights to install the taillight at the other side
Take 4 multi-colour 15cm slow flashing lights, remove the following gray piece
Thread the cable of one light through the hole on the piece, pull the cable out from the
other side till the light is placed inside the hole.
Repeat the steps above to install the other 3 lights, group the 4 cables together
Take 4 trans 1x1 round plates, connect them as per below
Thread the cables of the lights the following space and connect them to the expansion board
Reconnect the pieces we removed from the back of the car, reconnect the roof. Secure the
battery pack beside the expansion board
This completes installation of this LED Lighting Kit. ENJOY!

Popular Lighting Equipment manuals by other brands

DOTLUX LIGTHSHOWERevo user manual

DOTLUX

DOTLUX LIGTHSHOWERevo user manual

Armacost Lighting RibbonFlex PRO manual

Armacost Lighting

Armacost Lighting RibbonFlex PRO manual

Chroma Inspire CHINHLRGBW32E user manual

Chroma

Chroma Inspire CHINHLRGBW32E user manual

American DJ Electra 250 User instruction

American DJ

American DJ Electra 250 User instruction

Sanlight Q1W DIM Operation manual

Sanlight

Sanlight Q1W DIM Operation manual

Conrad 11 61 14 operating instructions

Conrad

Conrad 11 61 14 operating instructions

Fiap Quell Active manual

Fiap

Fiap Quell Active manual

STEINEL L 30 S Operation manual

STEINEL

STEINEL L 30 S Operation manual

Luraco L1004B-KP-V3 user manual

Luraco

Luraco L1004B-KP-V3 user manual

Lightolier Lytespan 9376 specification

Lightolier

Lightolier Lytespan 9376 specification

Techni-Lux DL-PAR46RGB/B manual

Techni-Lux

Techni-Lux DL-PAR46RGB/B manual

Chauvet Professional ROGUEOUTCAST2HYBRID Quick reference guide

Chauvet Professional

Chauvet Professional ROGUEOUTCAST2HYBRID Quick reference guide

Xoop Lighting EL100 USER MANUAL & DATASHEET

Xoop Lighting

Xoop Lighting EL100 USER MANUAL & DATASHEET

Chroma Color Split CHCS2 user manual

Chroma

Chroma Color Split CHCS2 user manual

Clevertronics L10 Lifelight Pro LWPLIFE-PRO-WM Series Installation & maintenance instructions

Clevertronics

Clevertronics L10 Lifelight Pro LWPLIFE-PRO-WM Series Installation & maintenance instructions

IMMAX NEO LITE 07908L quick start guide

IMMAX

IMMAX NEO LITE 07908L quick start guide

Chauvet SlimBANK TRI-18 user manual

Chauvet

Chauvet SlimBANK TRI-18 user manual

DreamLED SCL-200 user manual

DreamLED

DreamLED SCL-200 user manual

manuals.online logo
manuals.online logoBrands
  • About & Mission
  • Contact us
  • Privacy Policy
  • Terms and Conditions

Copyright 2025 Manuals.Online. All Rights Reserved.