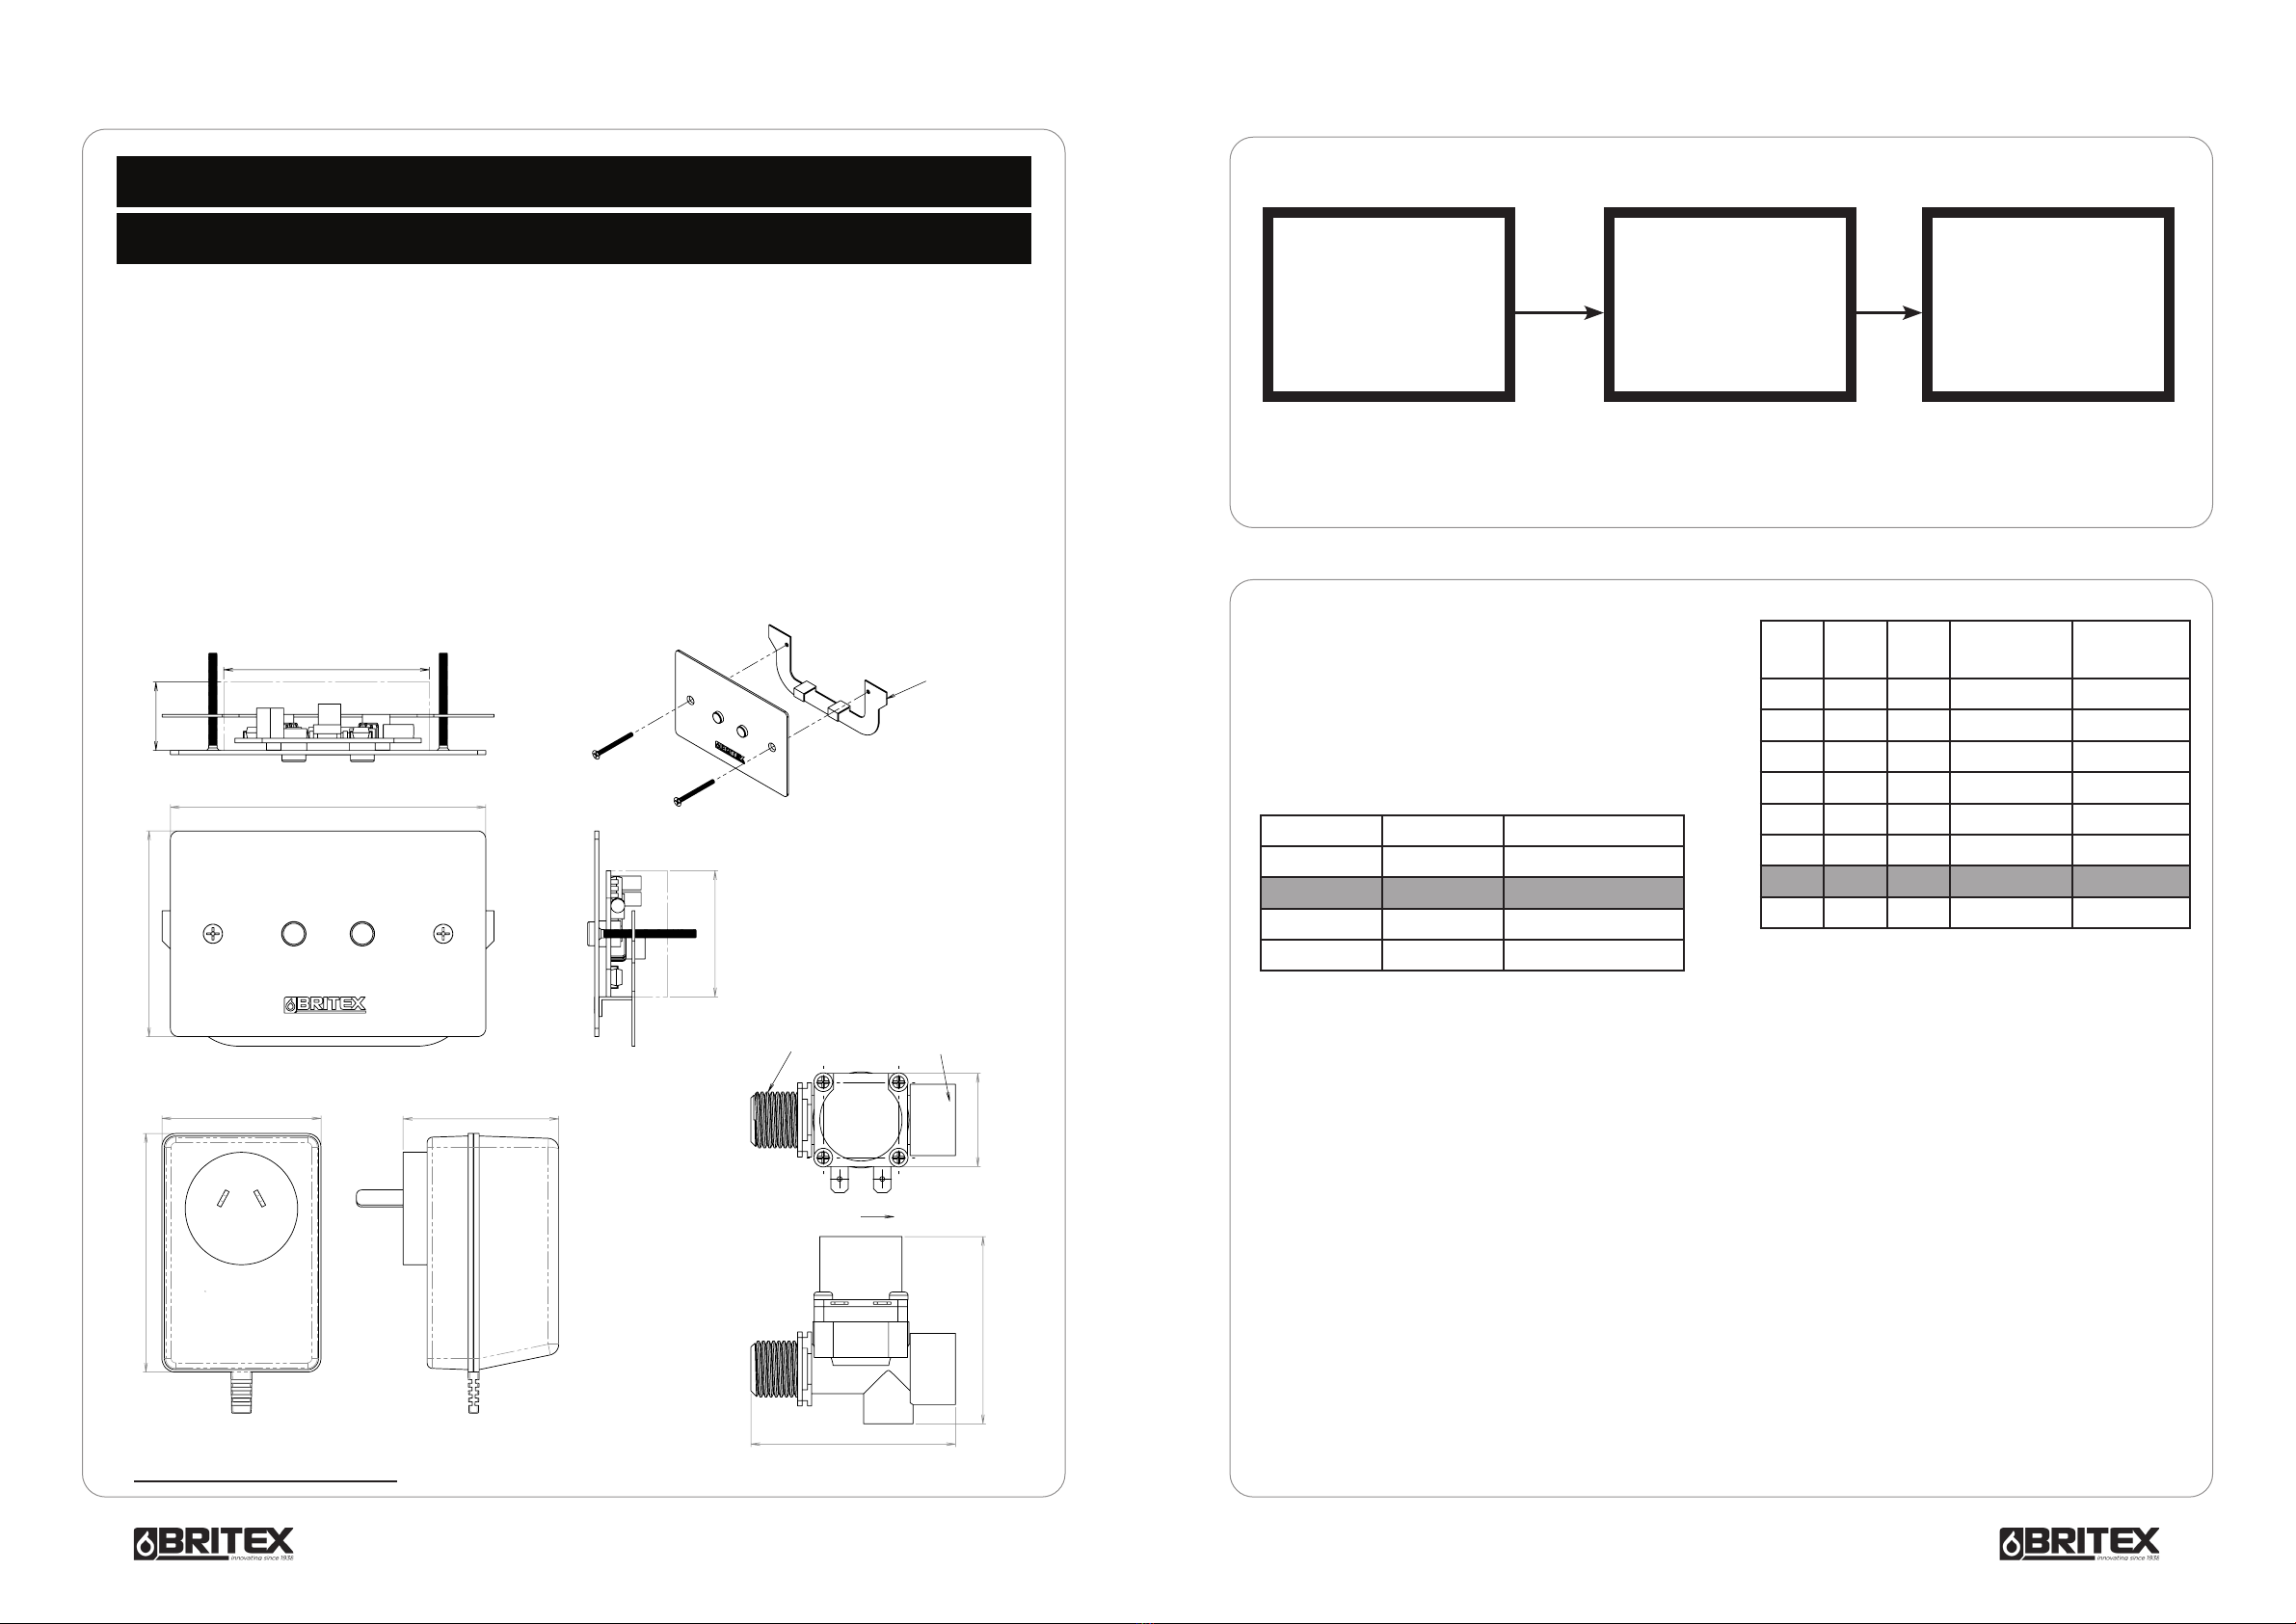
manuals.online logo
Brands
  1. Home
  2. •
  3. Brands
  4. •
  5. Britex
  6. •
  7. Accessories
  8. •
  9. Britex AESW User manual

Britex AESW User manual

AESW
Wall Mounted Sensor*
(as provided with TW-WMS)
Installation
and Cleaning
Guide
MELBOURNE
Britex Place Mirra Crt
Bundoora VIC 3083
t(03) 9466 9000
evic@britex.com.au
SYDNEY
16 Northumberland Drv
Taren Point NSW 2229
t(02) 9531 2100
ensw@britex.com.au
PERTH
Unit 1/8 Principal Link
Malaga WA 6090
t(08) 9249 5464
ewa@britex.com.au
BRISBANE
19 Manilla St
East Brisbane QLD 4169
t(07) 3363 2400
eqld@britex.com.au
ADELAIDE
The Britex Group
SA State Office
t1300 764 744
esa@britex.com.au
Care and MaintenanceTrouble Shooting Guide
Stainless steel products should be kept clean at all
times. The secret to stainless steel’s ability to maintain
a high quality finish and promises of a long life
expectancy is the invisible chromium-oxide film that
sits on the surface and protects the steel beneath.
To maintain this film it is essential that the surface
remains clean and in constant contact with oxygen.
If this film is penetrated (either by abrasion or
chemically) and dirt, liquid, grime contaminants embed
themselves in these micro chasms for an extended
period of time, the chromiumoxide film will not be
able to regenerate and the steel below will eventually
become damaged and discoloured.
What we recommend for general cleaning and
maintenance:
Cleaning Materials:
• A soft cloth
• A soft-bristled brush
• A natural or artificial sponge
Cleaning Solutions:
• Hand washing soap / soft water solution
• Mild soap / soft water solution
• White vinegar / soft water solution
It is recommended that general cleaning of stainless
steel surfaces be carried out weekly, or as soon as
a build up of surface media has been observed. To
clean, simply wash stainless steel surfaces with, warm,
diluted, mild soapy water using a cloth or soft bristled
brush. Once all dirt, oil and grime is removed, rinse
thoroughly with clean water and wipe dry
Do NOT – use a metal brush or steel wool to clean
stainless steel. Ever. These tools will scratch the surface
as well as potentially leave behind steel fragments that
can go rusty and cause the stainless to discolour.
Using these materials will void the warranty.
Do NOT – use scourers of any kind that have previously
been used on ordinary steel. Microscopic steel fibers
transferred onto stainless steel can cause considerable
damage to the surface and will void the warranty.
Do NOT – use abrasive cleaning brushes, pads or agents
on highly polished finishes
Do NOT use harsh cleaners that contain powerful acidic
or alkaline chemicals such as hydrochloric acid and
sodium hydroxide that will damage the surface.
Any water coming into contact with stainless steel,
particularly cleaning solutions, should have zero
chloride content as even minute amounts can cause
damage. Using these cleaners will void any product
warranty.
Do NOT – use chlorinated sanitizers, cleansers or
bleach of any kind. Using these substances will void
the warranty. Despite some cleaners displaying the
text, ‘Suitable for Toilets and Urinals’ this is more likely
in reference to ceramic /vitreous China products and
use of these cleaners can damage stainless steel and
will void the warranty.
Do NOT – use brick cleaning liquids that contain
hydrochloric acid anywhere near stainless. If cement
needs to be removed from stainless (before it sets),
a mixture of hot water and 25% vinegar or 10%
phosphoric acid can be effective. Once cleaned,
the surface should then be neutralised with dilute
ammonia or sodium bicarbonate then rinsed and dried.
Australia’s Finest Stainless | britex.com.au
4
*Please note this item is
pre-programmed to trip and
run setting as per these notes.
Wave on/ Wave off models are
special order.
PLEASE NOTE: A SERVICE CHARGE WILL
BE MADE IF A SERVICE CALL IS REQUIRED
TO ATTEND TO A FAULTY OR CARELESS
INSTALLATION .
FOLLOW THIS PROCEDURE CAREFULLY.
Once it is established that the unit has not been
damaged at installation, first, turn the power to the
unit off & then back on.
In the event that on site trouble shooting does not clear
or rectify any problems that you are experiencing, then
it may be necessary to return the unit for appraisal and
corrective action. Feedback from the field is important
to enable us to improve and refine the product.
Once you have an understanding of what the problem is,
contact your distributor or Trade Store to enable a quick
resolve of these issues.
All parts are proudly manufactured and assembled in
Australia and distributed by the Britex Group.
A. If there is no flow when a hand is
waved past close to the sensor lens;
I. Check the power point is good and that the power
is on.
II. Check the water supply cock/s is on.
III. Place the palm of your hand directly in front &
parallel to the front face of the sensor, about 10 cm
away. Move your hand slowly towards the sensor,
keeping the palm of the hand flat, directly in front
& parallel to the front face of the sensor. If the unit
fails to oeprate even when brought up onto the sensor
replace the sensor unit.
IV. Replace the Power Pack (Power pack failures are
rare).
A. Occasionally;
I. The sensor may have become insensitive and be
difficult to operate. If it will operate when a flat surface
eg. white paper is passed very close to it, directly in
front and parallel with the lenses, but not a moving
hand, then replace the sensor unit.
A. If the unit appears stuck on and
water runs continuously where it has
not been activated by passing the hand
to wave it on and will not turn off by
waving your hand past the lens;
I. Turn the power off.
If water continues to flow then the solenoid valve is
at fault. It may be installed around the wrong way or
have debris under the seat. Check that the valve is
installed correctly for supply. If OK, consider taking
the valve apart & check for debris under the plunger
& diaphragm etc. Contact your distributor for advice.
Or If flow stops, check the sensor unit.
Q. Does the water flow at all?
About
A wall mounted, sensor operated trip and run hands free tap or wave on/wave off that is
installed onto sinks and basins. Available with spout (TW-WMSXXX) or as is (AESW).
The Britex Sensor flow electronic tap is a wall mounted, sensor operated hands free tap that
is installed onto sinks & basins. It operates by sensing an object, usually a hand, passing within
around 7cm of the front of the sensor unit. It uses a beam of invisible infra red light which, if
reflected from an object back to the sensor, will operate the unit.
The wall mounted plastic sensor kit consists of a sensor unit similar in appearance to a normal
power point (115W x 75H x25D), a solenoic valve and a plug pack. The stainless steel sensor has
the electronics mounted to stainless steel plate most installation problems are
caused through damaging the unit at installation time or the selection of an inappropriate
installation location, so select the location carefully and take care with the installation.
Australia’s Finest Stainless | britex.com.au
1
Fig 1: AESW Product Diagram
Functions of the switches
Australia’s Finest Stainless | britex.com.au 2
115
75
50 Min Clearance
75 Minimum Clearance
25 Min
Plaster Wall Bracket
34
1/2" BSP
1/2" BSP
Socket
68
75
58
87
240v 50Hz
57
Flow
115
75
50 Min Clearance
75 Minimum Clearance
25 Min
Plaster Wall Bracket
34
1/2" BSP
1/2" BSP
Socket
68
75
58
87
240v 50Hz
57
Flow
115
75
50 Min Clearance
75 Minimum Clearance
25 Min
Plaster Wall Bracket
34
1/2" BSP
1/2" BSP
Socket
68
75
58
87
240v 50Hz
57
Flow
Please note this item is pre programmed to trip and run setting
as per these notes. Wave on/ Wave off models are special order.
The unit can be conveniently viewed as shown here:
The function block is programmed to operate as a hands in front, trip & run ( or a special order:
wave on, wave off type) hands free tap. The unit has on the printed circuit assemble 6 miniature
switches. Setting these switches determines the type of operation the tap takes on.
I R
Proximity
Detector
Programmable
Function Block
Solenoid Valve
Control Block
Switch 1 & 2. These switches directly effect the power
of the IR Led & therefore the sensing range of the unit.
ATTENTION: THIS UNIT IS PRESET TO
MEDIUM LOW SENSITIVITY TO RUN
FOR 12 SECONDS. DO NOT ATTEMPT TO
CHANGE SETTINGS WITHOUT READING
AND FULLY UNDERSTANDING THESE
INSTRUCTIONS
* Setting Pre-selected
Switch 3. This switch selects the type of operation
the unit takes on when configured as a wall mounted
sensor tap i.e. Sw6 is set to off. Sw3 Off means the
unit will operate as a Wave On, Wave Off unit, Sw On
means the unit will operate as a Trip & Run unit. Please
note that this only holds true if Sw6 is set to off.
Switches 4 & 5. These switches select one of four
pre-set dead man timeout periods for the units,
depending if it is operating as a Trip & Run or
Wave On, Wave Off unit, that is, how long the trap
will continue to run if held in the operated state,
e.g. not waved off & left running.
* Setting Pre-selected
Switch 6. Closing this switch causes the unit to operate
as a hands in front type unit. Sw3, together with Sw4
& Sw5 then serve only to select the dead man time
out period of the tap as detailed above eg. all 3 switches
closed give a time of 15 secs, all open 30 secs, etc.
Once Sw6 is closed, Sw3 does not change the
operation of the tap.
Pipe Flush Option:
Units may be optionally programmed to provide a pipe
flush option. This allows a tap to run for an extended
pre-programmed period, up to 255 seconds to flush pipes
etc. If available this function is called up by waving a hand
past the units 4 times at 1 second intervals, within a 5
second period.
Flexibility: This is a much more flexible & capable design
able to cater within reason with requests for special
operating requirements & features.
Electrical Specifications:
Supply voltage 24VACStandby power consumption,
solenoid valve not operated: 150mWatts
Power Consumption: Depends on the solenoid valve
connected to the unit up to 16watts
Solenoid valve: 24VAC up to 16watts
Sw1 Sw2 Sensing Range
Off Off Low
On* Off* Medium Low*
Off On Medium High
On On High
Sw3 Sw4 Sw5 Sw6 Wave
On/Off
Trip & Run
Off Off Off 30 Sec N/A
Off Off On 45 Sec N/A
Off On Off 60 Sec N/A
Off On On 75 Sec N/A
On Off Off OFF 6 Sec
On Off On OFF 9 Sec
On* On* Off* OFF* 12 Sec*
On On On OFF 15 Sec
These times are:

Popular Accessories manuals by other brands

Dometic CFX3 Series Short Operating Manual

Dometic

Dometic CFX3 Series Short Operating Manual

Infineon TLE5501 Series user manual

Infineon

Infineon TLE5501 Series user manual

YAK-POWER YPLEDK-B4 installation instructions

YAK-POWER

YAK-POWER YPLEDK-B4 installation instructions

Nice elero Aero-868 AC operating instructions

Nice

Nice elero Aero-868 AC operating instructions

Wolf Garten SENSO instruction manual

Wolf Garten

Wolf Garten SENSO instruction manual

ScentAir WHISPER PRO user manual

ScentAir

ScentAir WHISPER PRO user manual

IFM OGD582 operating instructions

IFM

IFM OGD582 operating instructions

ATEN VS92A Specifications

ATEN

ATEN VS92A Specifications

wtw visoturb 700 iq operating manual

wtw

wtw visoturb 700 iq operating manual

Hytronik HIM39/RF Installation and instruction manual

Hytronik

Hytronik HIM39/RF Installation and instruction manual

Eaton xComfort CSEZ-01/14 Aassembly Instructions

Eaton

Eaton xComfort CSEZ-01/14 Aassembly Instructions

Hioki 9279 instruction manual

Hioki

Hioki 9279 instruction manual

Novalynx 200-WS-02 Series user manual

Novalynx

Novalynx 200-WS-02 Series user manual

Baumer SmartReflect FNDK 14G6902/S14/IO quick start guide

Baumer

Baumer SmartReflect FNDK 14G6902/S14/IO quick start guide

AJAX Systems Socket user manual

AJAX Systems

AJAX Systems Socket user manual

Jupiter Avionics JA72-006 Installation and operating manual

Jupiter Avionics

Jupiter Avionics JA72-006 Installation and operating manual

Mr Safe KB-350 user manual

Mr Safe

Mr Safe KB-350 user manual

Carefree ALTITUDE Service manual

Carefree

Carefree ALTITUDE Service manual

manuals.online logo
manuals.online logoBrands
  • About & Mission
  • Contact us
  • Privacy Policy
  • Terms and Conditions

Copyright 2025 Manuals.Online. All Rights Reserved.