Broadway Limited Paragon 2 Series User manual

1
Paragon 2
Operator’s Manual
Paragon 2
Steam Locomotives
06/23/14
Important Notice:
This product is not recommended for children
under 14 years of age.
Broadway Limited locomotives
manufactured under US Patent
No. 7,749,040 and RE38,660 under
license from Real Rails, Inc. Other

2
Broadway Limited Imports
Table of Contents:
DC Operation..............................................................................3
DCC Operation ........................................................................ 10
DCC Programming Quick Reference & Tips..................... 24
Throughout the manual we will use “DC” to refer to
operation using a traditional DC power supply and “DCC”
to refer to operation with a NMRA compliant Digital
Command Control system. Almost every operational
feature of this locomotive can be congured to suit your
personal taste by setting conguration variables (CV’s).
Many of these apply to DC and to DCC operation. See
the list of conguration variables in this manual and the
Paragon 2 Technical Reference Manual available at www.
broadway-limited.com for more information.
Connecting Locomotive and Tender
Before you can operate your new steam engine, you must
connect the locomotive and tender. First, locate the short
“tether” cable protruding from the front of the tender.
Next, locate the matching socket located under the cab
on the rear of your locomotive. Notice whether the pins
are located at the top or bottom of the socket. Also
notice the location of the holes on the end of the tether
cable. Using your nger, small pliers, or tweezers, rmly
insert the tether cable into the socket on the rear of your
locomotive. If you do not insert this completely, you will
have continuous problems with intermittent power pick-
up. If your locomotive is making sound, but is not moving,
your tether cable is not rmly seated in the socket.
insert tether image
here

3
Paragon 2
Smoke
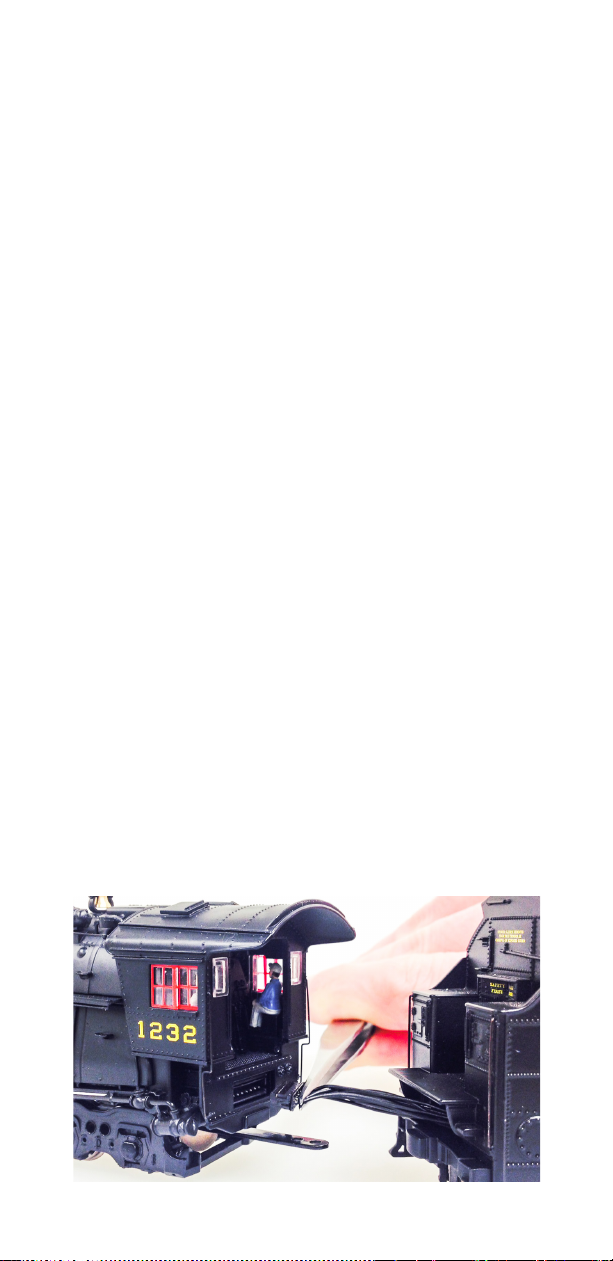
If your engine is equipped with a smoke generator, DO
NOT OPERATE THE SMOKE UNIT WITHOUT SMOKE FLUID.
Doing so will damage the engine. The smoke unit heater
can be physically turned off using the switch located
beneath the cab (or behind the smokebox door on some
models). If the switch is on, the smoke can be turned
on and off using the AUX button on the DC Master or F7
on your DCC controller. Before using, add 6-8 drops of
uid to the smoke unit using the small plastic funnel that
came with your locomotive. Drop the uid directly into
the locomotive’s smokestack. If the smoke unit is hot,
do not lower the funnel too far into the smokestack as
you could accidentally contact the heating element. If you
melt plastic onto the heating element, your locomotive
will not be able to produce smoke. Whenever the smoke
starts to look thin, add another 3-4 drops (enough for 15-
20 minutes run time). There are 2 CV’s used to adjust the
smoke output by controlling the heat. CV236 controls the
level while moving, and CV 237 controls the level at idle.
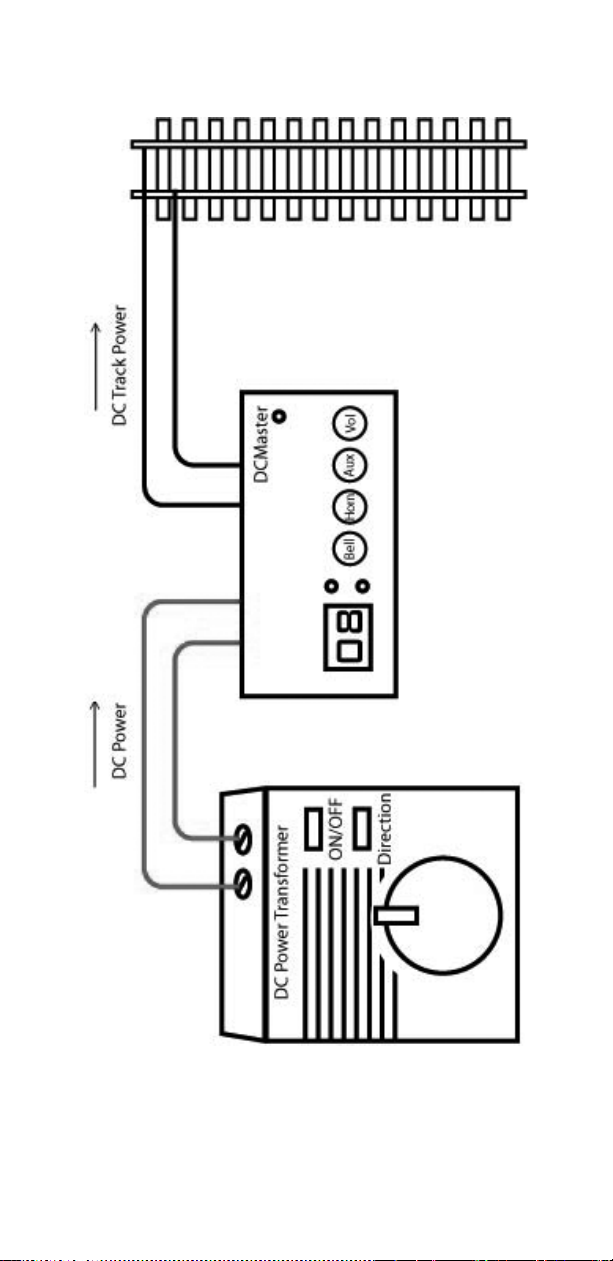
Operation with a DC Power Pack
Your Paragon 2 Steam locomotive is ready-to-run. Simply
place the locomotive on a track powered by any DC power
pack with a variable output up to 16 volts DC. As you
increase the track voltage, the sound system will begin
functioning at around 7 volts DC. If you increase track
power slowly, you will hear the sound of a steam locomotive
starting. As you slowly increase track voltage, the engine
will start to move. There are a number of sounds the
locomotive will produce automatically to simulate the
sound of a full-size steam locomotive.
If you do not use DCC, the DC Master Analog Control
Module (BLI stk# 1011 or PCM stk# 1001), is required for
activation of the whistle, bell and some other sounds, and
to control the volume. It can also program CV’s without
a DCC system. The DC Master is shown in gure 1,
connected between the power pack and the track.
Figure 1 on following page.

4
Broadway Limited Imports
Figure 1.

5
Paragon 2
Manually Activated Sounds
Whistle Plays when the “horn” button on the
DC Master is pressed. The Paragon
2 whistle is highly playable. A quick
press and release plays a short
whistle blast. Holding down longer
and releasing produces a long
whistle blast. Holding the horn active
for a long blast, releasing quickly and
pressing again, then releasing, plays
an alternative whistle ending. This
ending is unique for each locomotive.
There are 3 whistles, selected by
setting CV224 to 0, 1, or 2. The
whistle can be set to automatically
play warning blasts when the loco
starts and stops by setting CV 227 to
6. Set CV 227 back to 2 to turn off.
Bell The bell turns on when the “bell”
button on the DC Master is pressed.
It turns off when the “bell” button on
the DC Master is pressed a second
time. The interval between bell rings
can be adjusted by setting CV180. A
lower number is faster.
Air Pump Press the “AUX” button on the
DCMaster while the locomotive is
stopped.
Smoke If your model is equipped with a
smoke unit, it can be turned on/off
using a manual toggle switch that
is located either inside the smoke
box door on the boiler front or on
the underside of the locomotive
body. Important: Do not operate the
smoke unit without smoke uid, or
it will be damaged.

6
Broadway Limited Imports
Automatically Activated Sounds
Startup The sound of a steam locomotive
starting is heard when the track
power is turned on.
Shutdown The sound of a steam locomotive
being turned off is heard when track
power is lowered to about 5 volts.
Brake Set Plays automatically when the
locomotive shuts down.
Brake Release Plays automatically when the
locomotive starts up.
Brake Squeal Plays automatically when the
locomotive is slowed quickly.
Steam Chuff The sound of steam chuffs is
automatically played when the
engine moves. The intensity of the
steam chuff is related to how hard
the engine is working. When the
engine is under a heavy load, the
chuff sound will be much sharper,
and the smoke output will increase.
When the load is reduced, the chuff
sound will be softer and the smoke
output reduced.
Randomly Activated Sounds
The following sounds will be heard when the locomotive
is running or sitting at idle. Various other random sounds
may play if appropriate for each locomotive.
Air Pump
Blower
Coal shovel or auger
Injector
Steam Cock
Blow Down
Pop-off Valve

7
Paragon 2
Volume/Mute
To mute the sounds, press the “Vol” button once. To turn
the sounds back on, press the “Vol” button once. Horn
and bell still work when the other sounds are muted.
Your Paragon 2 locomotive’s sound system has 8 volume
levels that can be set from the DCMaster. At startup, it
is at the loudest setting. To lower the volume, press the
“Vol” button on the DCMaster two times quickly (like
double-clicking a mouse button on a PC). The volume will
decrease 1 level each time you do this. When the lowest
level is reached the volume will start to increase with
subsequent double-clicks of the button until the highest
volume level is reached, at which point the locomotive
brake sound will play to signal maximum volume.
Tip: To make the locomotive always start at a lower
volume, set CV 133 to some number lower than 128. 0 is
off, 128 is max.
Tip: The volume of many sound features can be set
independent of the overall volume by setting CV’s 135
through 158 with the DC Master. See the next section.
Setting Conguration Variables (CV’s) without
DCC
Your Paragon 2 locomotive’s sound system is highly
congurable even without DCC by using the DCMaster.
Most of the locomotive’s functions are controlled by
setting Conguration Variables (CV’s). To change a CV:
1. Place the locomotive on the track with track
power off. Hold down both the “Aux” and Vol”
buttons on the DCMaster while turning track
power on to maximum voltage. The locomotive
will not move. The display on the DCMaster will
read “E01.”
2. Press the bell(-) button or horn(+) button to scroll
past E15, then to the CV numbers which range
from 1-255 (There is no ‘E’ in front of the CV
numbers.) Stop at the one you want to change
and press the “Vol” button.

8
Broadway Limited Imports
3. Use the bell(-) button or horn(+) button to scroll
to the new value, then press “Vol” to accept.
The locomotive will make a ‘beep’ sound to
acknowledge. It will not beep if the CV was
already set to the number entered.
4. Turn off track power to nish programming.
Tip: The locomotive you are setting should be the only DC
Master compatible locomotive on the track. Otherwise all
locomotives on the track will have their CV’s reset.
Changing the function of the AUX button.
The AUX button can be made to do other functions by
changing CV222 with the DC Master. Select the desired
function from the table on pages 17-18 and enter it into
CV222. See page 11 for a listing of the functions and their
descriptions.
Commonly used DC settings are shown below:
# Name Description Usual
values
Factory
Setting
CV8 Master Reset Setting CV8 to 8 resets everything to
factory settings. 8 38
CV131
Sound Unit
Startup
voltage
A lower number causes the sounds
to start at a lower track voltage. 0-255 178
CV132
Sound Unit
Shutdown
voltage
A lower number causes the sounds
to shut down at a lower track
voltage.
0-255 62
CV135 Whistle
Volume higher number is louder. 0-255 128
CV136 Bell Volume higher number is louder. 0-255 128
CV137
Steam
Background
Volume
higher number is louder. 0-255 128
CV138 Whistle 2
Volume higher number is louder. 0-255 128
CV139 Coupler Slack
Volume higher number is louder. 0-255 128
CV140 Coupler
Volume higher number is louder. 0-255 128
CV141 Uncouple
Volume higher number is louder. 0-255 128
CV142 Wheel Flange
Volume higher number is louder. 0-255 128
CV143 Air Pump
Volume higher number is louder. 0-255 128
CV144 Blow Down
Volume higher number is louder. 0-255 128
CV145 Steam Cock
Volume higher number is louder. 0-255 128
CV146 Brake Set
Volume higher number is louder. 0-255 128
CV147
Brake
Release
Volume
higher number is louder. 0-255 128
CV148 Pop Off Valve
Volume higher number is louder. 0-255 128
CV149 Blower
Volume higher number is louder. 0-255 128
CV150 Dynamo
Volume higher number is louder. 0-255 128

9
Paragon 2
CV151 Brake Squeal
Volume higher number is louder. 0-255 128
CV152
Coal Auger/
Shovel
Volume
higher number is louder. 0-255 128
CV153 Water Fill
Volume higher number is louder. 0-255 128
CV154 Water Injector
Volume higher number is louder. 0-255 128
CV155 Chuff Volume higher number is louder. 0-255 128
CV156
Passenger
/Freight
Volume
higher number is louder. 0-255 128
CV157
Maintenance/
Radio comm.
volume
higher number is louder. 0-255 128
CV158
City/Farm/
Industrial/
Lumber
Volume
higher number is louder. 0-255 128
CV180 Bell Ring
Interval
Increasing increases the time
between bell rings 0-255 40 (varies)
CV184 DC Brake
Control
Increase to play the brake sound
more frequently 0-255 20
CV188 Pitch Shift Change to alter pitch of all sounds.
Makes 2 locomotives sound different 0-255 128
CV222
Analog AUX
Select for
DCMaster
Selects which function is controlled
by the Aux button. see p. 23 5
CV 224 Horn Select Selects one of 3 horns 0,1,2 0
CV 227
Forward/
Reverse
Warning
Set to 6 to turn on automatic horn
toot when starting. Set to 2 to
turn off.
2,6 2
CV230 DC Easy
Consist
Set consist position as front, middle
or rear locomotive. Rear locomotive
is facing rear. 0=single locomotive
1=front locomotive 2=middle eng.
3=rear locomotive
0-3 0
CV236
Smoke unit
heat level
when moving
Set to higher level to increase smoke
while moving. 0-90 80
Cv237
Smoke unit
heat level
when stopped
Set to higher level to increase smoke
while stopped. 0-50 50
CV245
Enable
Alternate
Horn Ending
16=disable
17=enable 16,17 17
CV248 Start Up
Delay
Delays motor start to let engine start
up sounds nish before moving.
Each number is 0.1 seconds.
0-255 20
CV251
Enhanced DC
Motor Control
Vmax
Voltage at which 100% of track
power is sent to motor. (Must be
greater than Vmin)
0-255 120
CV252
Enhanced DC
Motor Control
Vmin
Track voltage at which motor will
start moving.
A Lower Value = Lower Start Voltage
0-255 92
Consists
Paragon 2 locomotives can be set to run in a DC consist with
each other by setting CV 230 to 1,2, or 3, which designates
the locomotive as front, middle or rear facing rear
locomotive, respectively. The rear loco facing backwards
since railroads commonly run the rear loco in reverse. This
automatically sets the lights, bell and horn to respond
appropriately. To break the consist, simply program zero
into CV230. (To make the rear facing loco forward facing,
Set CV230 to 3, then change CV229 to 1 to enable the
rear light.)

10
Broadway Limited Imports
BLI’s Paragon 2 Locomotives are programmed from the
factory to start-up just like the prototype, utilizing a realistic
motor start-up delay that lets the steam engine starting
sounds nish before the train moves. To minimize this
delay and allow the locomotive to start moving instantly,
decrease CV 248 to a value of 0 using the DC Master (See
Page 6 of this manual).
Paragon 2 locomotives start moving at a higher track
voltage than non-sound locomotives. This is done to allow
the sound system to start working before the locomotives
moves. As a result, it is difcult to consist a sound
locomotive with a non sound locomotive in DC operation.
DCC Operation
Paragon 2 Locomotives come equipped with an integral
DCC decoder. It automatically detects if you are using a
DCC system and responds appropriately.
FACTORY DEFAULT ADDRESS = 3.
To Reset, set CV8 = 8.
When programming on the main line in Operations Mode,
the locomotive will beep to indicate when a CV is changed.
It will not beep if the same number is programmed into a
CV. It will not beep on the program track.
DCC Programming
To change the engine ID, rst, make sure you can run
the locomotive as engine #3 and blow the horn. Then,
reprogram the engine ID on the main track or the program
track following the procedure for your DCC system. (Note:
Lenz systems do not allow changing address on the main
line. Use the program track. See page 24.)
Steam Engine Function Key Denitions
Paragon 2 locomotives have the ability to use dozens of
functions. If your DCC system does not support this many
functions, the function you want to use can be assigned

11
Paragon 2
to the function keys available on your DCC system. The
default function keys are listed below. To change the
assignments, see page 16.
Function Key Description
F0 Front Light/Rear Light
F1 Bell
F2 Whistle
F3 Coupler Slack/Couple
F4 Air Pump
F5 When stopped: Blow Down
When Moving: Increase Chuff
Intensity
F6 When stopped: Water Fill
When Moving: Decrease Chuff
Intensity
F7 Smoke On/Off (if equipped)
F8 Volume/Mute
F9 Startup / Shutdown Engine
F10 Coal Shovel or Auger
F11 Water Injectors
F12 Brake Set/ Brake Release
When Moving: Brake Squeal
F13 Grade Crossing Horn
F14 Passenger Announcements
F15 Freight Announcements
F16 Maintenance Sounds
F17 Radio Sounds
F18 City background sounds
F19 Farm background sounds
F20 Industrial Background Sounds
F21 Lumber Background Sounds
F22 Toggle to second horn
F23 Mars Light on/off
F24
F25
F26 Play recorded macro
F27 Record Start/Stop
F28 Brake Squeal
Front and Rear Light (F0)
Pressing F0 turns the front and rear light on and off. The
light intensity can be adjusted with CV 231.

12
Broadway Limited Imports
Bell (F1)
Pressing F1 turns on the bell. Most controllers allow
the bell to stay on until the F1 is pressed a second time.
Lower CV 180 to speed up the bell.
Whistle (F2)
Pressing F2 activates the Whistle. The Paragon 2 whistle
is highly playable. A quick press and release plays a short
whistle blast while holding down and releasing produces
a long whistle blast. Holding the whistle button for a long
blast, releasing quickly and pressing again, then releasing,
plays an alternative whistle ending. This ending is unique
for each locomotive.
There are 3 whistles, selected by setting CV 224 to 0,1, or
2. There is an alternate whistle, which can be toggled in
place of the main horn by pressing F22.
Some DCC controllers, including Digitrax DT400 and NCE
Procab, have the ability to “quill” the whistle. This model
is equipped with a variable “analog” whistle function that
will operate if your system is capable of sending the signal.
See P. 22.
The whistle can be set to automatically play warning blasts
when the loco starts and stops by setting CV 227 to 6. Set
CV 227 back to 2 to turn off.
Coupler (F3)
Pressing F3 when the locomotive is moving causes a
coupling sound effect to play. The effect simulates two
cars coupling. The sound of the slack between the cars
being removed may be simulated by pressing F3 when the
locomotive is stopped. This action arms the sound, making
it ready to play. The actual slack sound effect plays when
the engine starts moving.
Air Pump (F4)
Pressing F4 activates the air pump. Pressing F4 once the
air pump is active shuts the air pump off.

13
Paragon 2
Blow Down/Increase Chuff Magnitude (F5)
The blow down sound effect may be activated by pressing
F5 when the engine is stopped. Pressing F5 when the
engine is moving increases the chuff volume with each
press. CV204 (Chuff Magnitude Increment) dictates the
magnitude of change per F5 press.
Water Fill/Decrease Chuff Magnitude (F6)
The water ll sound effect may be activated when the
engine is stopped. See Water Fill. Pressing F6 when the
engine is moving decreases the chuff volume with each
press. CV205 (Chuff Magnitude Decrement) dictates the
magnitude of change per F6 press.
Smoke (F7)
Pressing F7 will turn on the smoke unit. Pressing F7
again will turn off the smoke unit. The smoke unit output
can be adjusted using CV’s 236 and 237. The smoke
unit should never be operated without uid or it will be
damaged. It can be disabled by turning off the switch
behind the smoke box door.
Master Volume and Mute (F8)
To mute the sounds, press the F8 button once. To turn the
sounds back on, press the F8 button once. Whistle and
bell still work when the other sounds are muted.
There are 8 volume levels that can be set from the DCC
handheld controller. At startup, it is at the loudest setting.
To lower the volume, press the F8 button two times
quickly (like double-clicking a mouse button on your PC).
The volume will decrease one level each time you do this.
When the lowest level is reached the volume will start
to increase with subsequent double-clicks of the button
until the highest volume level is reached, at which point
the locomotive brake sound will play to signal maximum
volume. Tip: To make the locomotive always start at a
lower volume, set CV 133 to some number lower than
128. 0 is off, 128 is max.

14
Broadway Limited Imports
Startup/Shutdown Steam Engine (F9)
The sound system powers up with all sound effects off. The
startup sound effect is played by throttling up or by pressing
F9. If the locomotive is already playing sound effects,
pressing F9 initiates the shutdown locomotive sound effect.
If the engine is not idling, F9 is ignored.
Shovel Coal (F10)
Pressing F10 activates shovel coal sound effect. Once this
effect is active, pressing F10 turns the effect off. This button
should not be pressed on oil burning models.
Injector (F11)
Pressing F11 activates the water injector sound. Once this
effect is active, pressing F11 turns the effect off.
Brake Set and Brake Release (F12)
When the locomotive is at speed step zero, pressing F12
activates the brake set sound effect. When the locomotive
is above speed step zero, pressing F12 activates the brake
release sound effect.
Above speed step 5, F12 plays the brake squeal.
Brake Squeal
A sudden decrease in throttle activates the brake squeal
sound effect. DCC Brake Control (CV185) controls how
sensitive the brakes are to changes in throttle. The
factory value is 20. Increasing this value decreases the
brake sensitivity while decreasing this value increases the
sensitivity. Set to 5 for 28 speed step operation.
Grade Crossing Whistle (F13)
Pressing F13 automatically plays a long-long-short-
long whistle sequence as a warning at grade crossings.

15
Paragon 2
Passenger Sounds (F14)
When stopped, press F14 to play a passenger train
departing message. Do not press this button if you do not
have a passenger train, as this will cause unprototypical
operation. After pressing, other passenger departure
sounds will be heard when the train starts to move. If the
train has been moving for over 30 seconds, pressing F14
will play station arrival messages.
Freight Sounds (F15)
When stopped, press F15 to play a Freight train departing
message. Do not press this button if you do not have a
Freight train, as this will cause unprototypical operation.
After pressing, other Freight departure sounds will be
heard when the train starts to move. If the train has been
moving for over 30 seconds, pressing F15 will play freight
yard arrival messages.
F16 - F21 play one of 4 messages in random order.
F16 is Maintenance Facility Sounds.
F17 is Crew Radio Messages
F18 is radio chatter heard in a city.
F19 is radio chatter heard on a farm.
F20 is industrial sounds.
F21 is lumber mill sounds.
Caution: Do not press these buttons if the corresponding
background sound is not appropriate for your layout.
Whistle Toggle (F22)
Whistle Toggles (F22) between the main and an alternate
whistle. This is useful for locomotives equipped with more
than one whistle/horn.
Mars Light (F23)
Turns on/off the MARS light if the model is so equipped.
Macro Recording (F26 and F27)
When operating in DCC, the operation of the locomotive

16
Broadway Limited Imports
can be recorded and later played back. To use this
function, press F27. (If your DCC system does not have an
F27 key, assign that function to a key you do have using
the directions on page 15.) The front light will ash and
the sound will momentarily stop. Once the sound starts
again, every keystroke will be recorded. Operate the train
as you normally would, being careful not to adjust the
throttle too much, as this uses recording space quickly.
When nished recording, press F27 again to stop recording.
The rear light will ash indicating the recording has been
saved. Be careful not to accidentally hit F27 again, as this
will start recording over your previous recording. If this
happens, interrupt track power before hitting F27 again.
Press F26 to replay. During replay, the DCC controller
cannot control the engine. To interrupt the playback,
either interrupt track power, or press the emergency stop
button.
CV 238 controls the number of times the recording will
repeat, between 1-14 times by setting the value to 64 plus
the number of repeats. Setting CV 238 to 79 makes the
recording repeat indenitely. The timing of the loop can
be shortened by setting CV239. Its range is from 0-255.
Each number shortens the loop by 0.1 seconds.
The engine contains a pre-recorded sequence. To load it,
set CV8 to a value of 10. Then press F26 to play. This
works well for demonstrations and will repeat indenitely
if CV238 = 79.
NOTE: There is a limited amount of recording space
available. If the space is used up, the engine will repeatedly
make a coupler clanking sound to indicate the memory is
full. The engine can run for a long time without using more
space, but changing the throttle uses space quickly. 28
speed step mode is best for recording, since it uses less
space.

17
Paragon 2
Function Key Mapping
Most DCC systems have between 8 and 28 function
buttons. Since the Paragon 2 sound system has more
than 28 functions, the functions can be made to work on
any function button. This is done by entering the value
of the function into the CV associated with the button.
Button CV
F0 CV 33
F1 CV 34
F2 CV 35
F3 CV 36
F4 CV 37
F5 CV 38
F6 CV 39
F7 CV 40
F8 CV 41
F9 CV 42
F10 CV 43
F11 CV 44
F12 CV 45
F13 CV 46
F14 CV 47
F15 CV 48
F16 CV 49
F17 CV 50
F18 CV 51
F19 CV 52
F20 CV 53
F21 CV 54
F22 CV 55
F23 CV 56
F24 CV 57
F25 CV 58
F26 CV 59
F27 CV 60
F28 CV 61

18
Broadway Limited Imports
The table below shows the available functions. To assign
one of these functions to a function button, enter the value
into the CV for the desired function button. For Example, to
assign Grade Crossing to Function 7, enter 30 into CV40.
Description Value
Nothing 0
Headlight & Rear Light on/off 1
Bell on/off 2
Whistle 3
Couple/Uncouple 4
Air Pump 5
Blow Down/Chuff Increase 6
Water Fill/ Chuff Decrease 7
Mars Lights 8
Volume/Mute 9
Startup/Shutdown 10
Coal Auger or Shovel 11
Water Injector 12
Brake 13
Steam Cock 14
Pop Off 15
Wheel Flange 16
Coupler Slack 17
Brake Squeal 18
Horn 2 Toggle 19
Smoke Control 21
Grade Crossing Horn 30
Play Macro 40
Record Macro 41
Passenger Sounds 50
Freight Sounds 51
Maintenance Sounds 52
Radio Chatter 53
City Sounds 54
Farm Sounds 55
Industrial Sounds 56
Lumber Sounds 57

19
Paragon 2
Cab Light on/off 60
Rule 17 dimming 61
The function keys can be mapped to closely match the
functions of several other sound systems by setting CV8
to the manufacturers code for the engine you want to
match.
CV8 = 38 matches F0 - 12 with BLI Blueline Engine
CV8 = 113 matches most QSI equipped engines.
CV8 = 141 matches Sound Traxx Tsunami equipped
engines.
CV Programming
The sound and operation of Paragon 2 locomotives can
be customized by setting a number of conguration
variables (CV’s). A list of DCC settings is shown on page 20.
Broadway Limited Imports recommends programming
your Paragon 2 locomotives on the main track using
Operations Mode programming or using Direct mode or
Paged mode on the programming track.
Reading CV’s
Digitrax and Lenz systems can read Paragon 2 CV’s in any
mode. Most MRC and NCE systems require a programming
track booster to read CV’s, such as the Power Pax by DCC
Specialties. A booster is not required to operate the train
or to program CV’s.
Resetting to Factory Default
The Paragon 2 sound system can be reset to the factory
default by setting CV8 to a value of 8. If this cannot be
accomplished, the system can be manually reset by
holding down the tiny reset button on the sound circuit
board while turning on track power.

20
Broadway Limited Imports
DCC Easy Consist
Start with each engine having a unique address.
You can create a consist by designating each engine as
front, middle, or rear, then setting the consist address.
CV230 designates the position in the consist as follows:
CV230 = 1 for the Front Engine
CV230 = 2 for all Middle Engines
CV230 = 3 for the Rear Engine
Front Engine: Set CV230 = 1. Pick a consist address
between 1 and 127 (10 for example) and program it into
CV19.
Middle Engines: Set CV230 = 2. Set CV19 = consist
address (10 for example). (For a rear facing engine, Set
CV 19 = the consist address plus 128. (138 for example if
the consist address is 10).
Rear Facing Rear Engine: Set CV230 = 3. Set CV 19 = the
consist address plus 128. (138 for example if the consist
address is 10).
Front Facing Rear Engine: Set CV230 = 3. Set CV19 =
Consist Address, then set CV 229=1 to set the lights.
Operate the consist by selecting its address as if it were a
locomotive (Select loco #10 for example).
Note: Setting CV19 to zero removes the engine from the
consist.
Motor Control
The Paragon 2 system features outstanding back EMF
speed control for both DC and DCC use. The back EMF
feature can be turned off by changing CV10 to 0. Change
to 1 to turn back EMF on again.
Table of contents
Other Broadway Limited Toy manuals