manuals.online logo
Brands
  1. Home
  2. •
  3. Brands
  4. •
  5. Broan
  6. •
  7. Fire And Smoke Damper
  8. •
  9. Broan NuTone RDFQL User manual

Broan NuTone RDFQL User manual

RDFQL
Premium
Radiation Damper
INSTALLATION GUIDE
READ AND SAVE THESE INSTRUCTIONS
Installer: leave this guide with homeowner.
Easy installation
Table of Contents
Usage 2
Preparation 2
Installation 3
Service Feature For Fans 4
Warranty 4
© 2014 Broan-NuTone LLC
RDFQL Installation Guide
Page 2
For use with 1, 2, or 3-Hour-Rated Floor-Ceiling and Roof-Ceiling Designs.
Flat Ceiling / Horizontal Mount Only.
For use with the following ventilation fan models:
Broan QTRE080FLT, QTRE110FLT, QTXE080FLT, QTXE110FLT, QTXE110SFLT,
QTRE110FLFT, QTRE080FLFT, QTXE110S
NuTone QTREN080FLT, QTREN110FLT, QTXEN080FLT, QTXEN110FLT,
QTXEN110SFLT, QTREN110FLFT, QTREN080FLFT, QTXEN110S
Usage
Preparation
Lengthen Light and / or Sensor Lead Wires in Fan
These steps are best performed before installing the fan.
Place corrugated under the fan to protect counter tops and
work surface. Follow these steps before installing the radia-
tion damper.
Light and sensor lead wires must be made longer to fit the
radiation damper. You must install the following:
(1) jumper for lighted fan models (included with the radia-
tion damper)
If your fan is equipped with a motion or humidity sensor,
you must purchase jumper kit model RDJUMPQ from your
local Broan-NuTone dealer or distributor. Each kit contains:
(1) jumper for sensor fan models
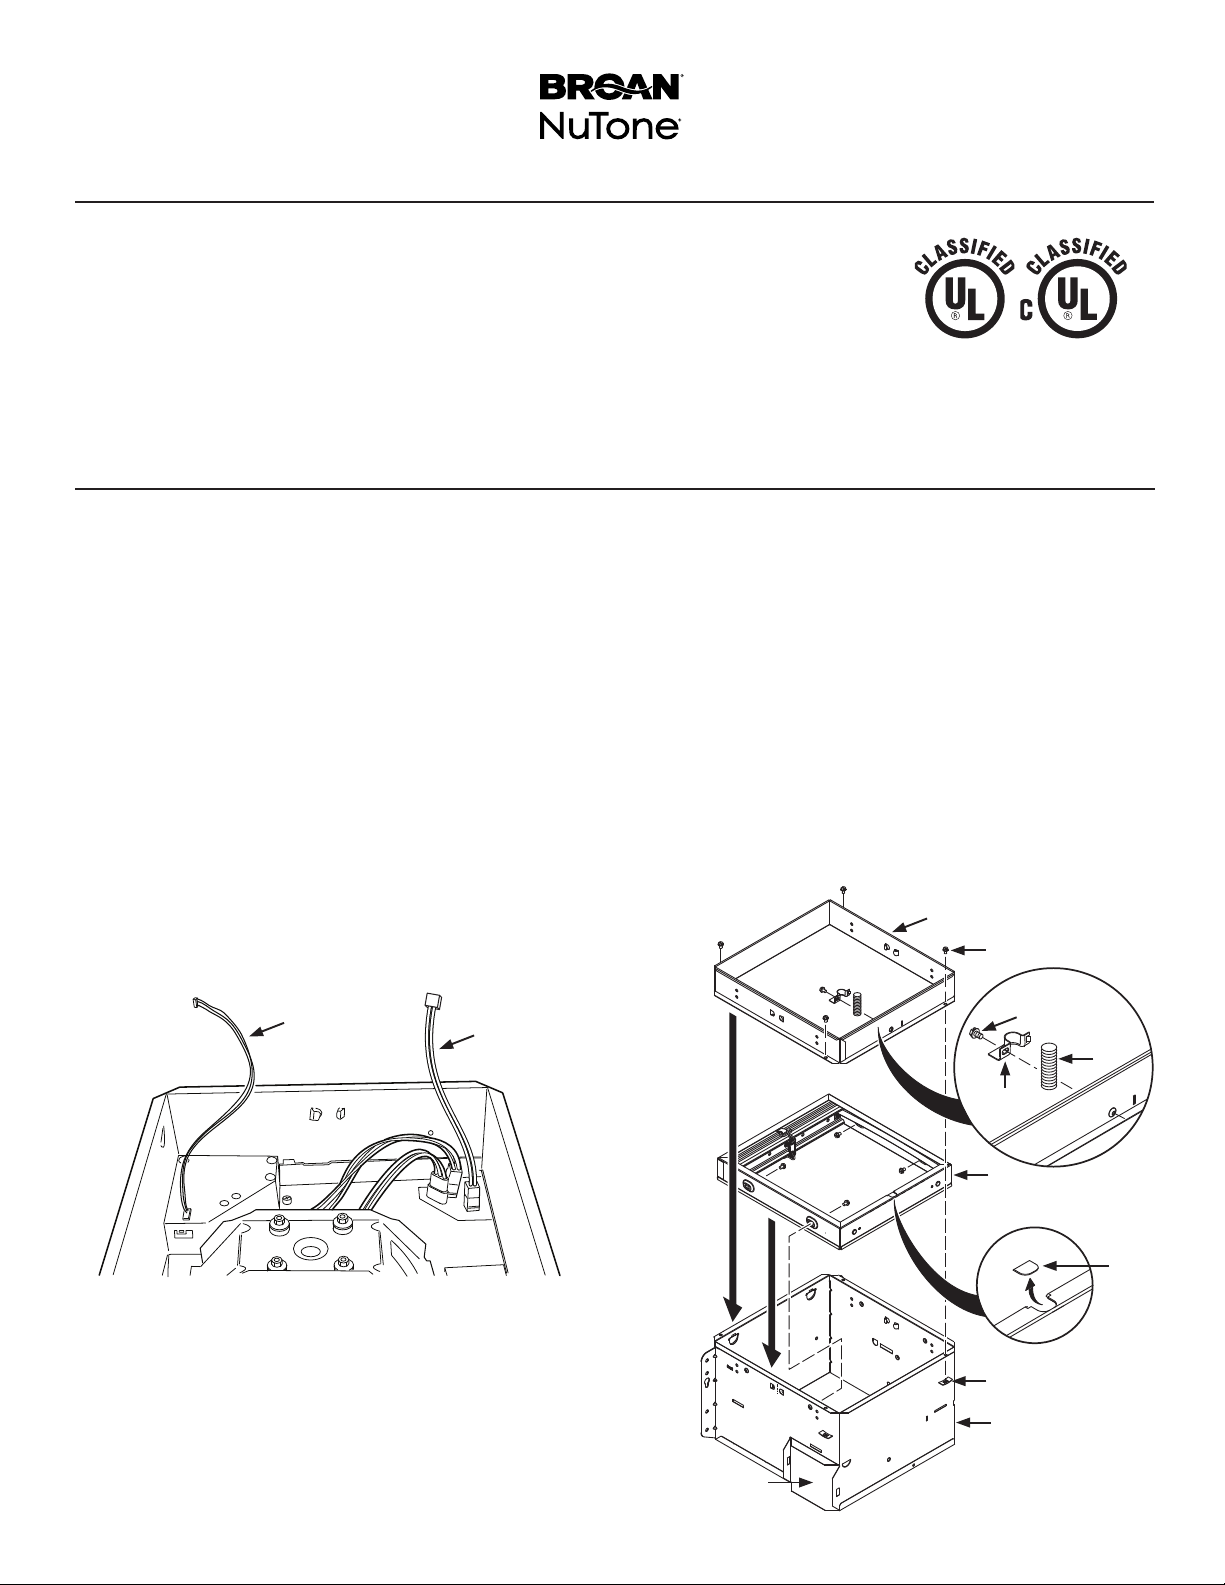
1. Connect one end of the LIGHTING JUMPER (A) (supplied
with radiation damper) to mating connector in the fans wir-
ing box.
2. Connect one end of the SENSOR JUMPER (B) (supplied
with model RDJUMPQ) to mating connector in the fans wir-
ing box.
Attach Damper Assembly to Fan
3. Position RADIATION DAMPER (C) down inside the FAN
HOUSING (D). Align slots in the damper with holes in the
fan housing. NOTE POSITION OF KNOCKOUT (E) RELA-
TIVE TO DUCT CONNECTOR OPENING IN THE FAN.
Secure damper with (4) #8 X 3/8” HEX HEAD SHEET
METAL SCREWS (F) supplied in damper parts bag. Do
not over tighten.
SEE DETAILS ON
UL CLASSIFICATION
MARKING ON PRODUCT
4. Position the RADIATION DAMPER EXTENSION (G) on
top of the fan. Align (4) holes in the extension with holes in
the fan housing.
5. Fasten the damper extension to the fan with supplied (4) #8
X 3/8” HEX HEAD SHEET METAL SCREWS (F) and (4)
SHEET METAL NUTS (H).
6. Route JUMPER(S) (A) (B) towards the KNOCKOUT (E) in
the damper frame. Remove knockout with pliers.
7. Press jumper wires into PLASTIC SPLIT TUBE INSULA-
TOR (I) (supplied in damper parts bag). Push plastic split
tubing into knockout opening.
8. Attach supplied CABLE CLAMP (J) to side of damper
frame. Align tab on cable clamp with mating slot in damper
extension. Secure clamp with supplied #8 SHEET METAL
SCREW (K).
G
D
C
E
F
H
I
J
K
A
B
DUCT
CONNECTOR
OPENING
RDFQL Installation Guide
Page 3
11. If the fan is directly mounted to adjacent ceiling struc-
ture, use #8 (M4) SHEET METAL SCREWS OR ¼”
DIAMETER BOLTS WITH NUTS to fasten SLIDING
HANGER BARS. Sliding hanger bars are provided to
allow for accurate positioning of fan between ceiling
members.
Installation
Leave this mask in place to prevent
construction dust, drywall spray,or paint
from damaging inside of product.
REMOVE MASK BEFORE
INSTALLINGGRILLE.
Laissez ce masque en place pour empêcher
la poussière de construction, le plâtre ou la
peinture, etc. d’endommager
l’intérieur du produit.
ENLEVEZ CE MASQUE AVANT
D’INSTALLERLA GRILLE.
Deje esta cubierta en su lugar para evitar
que polvos de construcción, rocíos de yeso
o pintura dañen el interior del producto.
QUITE LA CUBIERTAANTES
DE INSTALARLA REJILLA.
99352371A
SLIDING HANGER
BARS
#8 (M4) SHEET METAL
SCREWS OR ¼” DIAMETER
BOLTS WITH NUTS
(4)
MASK
MINIMUM 12
GAUGE STEEL
WIRE (3MM)
(4)
Leave this mask in place to prevent
construction dust, drywall spray, or paint
from damaging inside of product.
REMOVE MASK BEFORE
INSTALLING GRILLE.
Laissez ce masque en place pour empêcher
la poussière de construction, le plâtre ou la
peinture, etc. d’endommager
l’intérieur du produit.
ENLEVEZ CE MASQUE AVANT
D’INSTALLER LA GRILLE.
Deje esta cubierta en su lugar para evitar
que polvos de construcción, rocíos de yeso
o pintura dañen el interior del producto.
QUITE LA CUBIERTAANTES
DE INSTALAR LA REJILLA.
99352371A
MASK
Install Fan / Radiation Damper In Ceiling
MAKE SURE FINISHED CEILING IS FLUSH WITH BOTTOM
EDGE OF RADIATION DAMPER EXTENSION (G).
10. If the fan assembly is hung from the structure above, MINI-
MUM 12 GAUGE STEEL WIRE (3MM) must be used to
suspend the fan. Use one wire on each side of fan and
secure to mounting channels as shown.
Preparation
HANGER
BAR (4)
SCREWS (4)
TAB
MOUNTING
CHANNEL (2)
Install Hanger Bar Mounting Channels
9. Fasten mounting channels to the radiation damper exten-
sion using screws (supplied with fan). Make sure tabs face
“up” as shown. Use lower set of holes to mount the fan flush
with bottom of drywall.
RDFQL Installation Guide
Page 4
Service Feature For Fans
If your ventilation fan needs service, the inner damper can be
removed from the outer frame without disturbing the surround-
ing ceiling material.
Remove the grille and disconnect all electrical connections
from the grille.
Remove (4) screws, then lower the inner damper to access
ventilation fan. Replace the inner damper before operating
fan.
Finish Fan Installation
12. Follow instructions packed with the fan to connect duct-
work and electrical wiring.
13. Install corrugated MASK to protect damper and fan from
drywall spray, construction dust, etc.
14. Finish ceiling around damper housing. Ceiling opening
must be no larger than the outside of the radiation damper.
Install Grille
REMOVE THE MASK BEFORE INSTALLING GRILLE OR
OPERATING FAN.
On fan models equipped with light:
15. Attach connector from the LIGHT JUMPER WIRE to mat-
ing connector(s) from the grille.
On fan models equipped with motion or humidity sensor:
16. Carefully remove the wire from the grilles motion or hu-
midity sensor.
1 7. Connect SENSOR JUMPER WIRE into the sensors con-
nector located on the grille.
18. Squeeze GRILLE SPRINGS and slide into tabs on the
radiation damper frame. Push grille until it’s tight against
ceiling surface.
19. Follow instructions packed with the fan to finish the instal-
lation.
GRILLE
GRILLE
SPRING (2)
LIGHT
JUMPER
WIRE
SENSOR JUMPER WIRE
Installation
Looking for home ventilations? Visit our website.

Other Broan Fire And Smoke Damper manuals

Broan MD6T User manual

Broan

Broan MD6T User manual

Broan FRESH IN FIN-6MD User manual

Broan

Broan FRESH IN FIN-6MD User manual

Broan MD6TR User manual

Broan

Broan MD6TR User manual

Broan NuTone RDMWT2 User manual

Broan

Broan NuTone RDMWT2 User manual

Popular Fire And Smoke Damper manuals by other brands

EKOVENT Fire System Pro Commissioning instructions

EKOVENT

EKOVENT Fire System Pro Commissioning instructions

ETS NORD NORDfire manual

ETS NORD

ETS NORD NORDfire manual

Lennox C1DAMP20C-1 installation instructions

Lennox

Lennox C1DAMP20C-1 installation instructions

Mandik FDML manual

Mandik

Mandik FDML manual

BSB FSD-TD Damper Installation, Operating and Maintenance Instructions for the Installer and the User

BSB

BSB FSD-TD Damper Installation, Operating and Maintenance Instructions for the Installer and the User

Greenheck FSDR Series Installation, operation and maintenance

Greenheck

Greenheck FSDR Series Installation, operation and maintenance

KOOLAIR SMLD Mounting instructions

KOOLAIR

KOOLAIR SMLD Mounting instructions

Trox Technik FKRS-EU Installation and operating manual

Trox Technik

Trox Technik FKRS-EU Installation and operating manual

Greenheck ESK-402 Installation, operation and maintenance

Greenheck

Greenheck ESK-402 Installation, operation and maintenance

mercor mcr WIP PRO Series Technical manual

mercor

mercor mcr WIP PRO Series Technical manual

System air FDR-3G KS Series Handbook

System air

System air FDR-3G KS Series Handbook

Rf-t ONE-X CU2/B manual

Rf-t

Rf-t ONE-X CU2/B manual

Ingersoll-Rand ARO SB30 Series Operator's manual

Ingersoll-Rand

Ingersoll-Rand ARO SB30 Series Operator's manual

Vents KP-2 PKP Series user manual

Vents

Vents KP-2 PKP Series user manual

SMAY WKP-P installation manual

SMAY

SMAY WKP-P installation manual

Mandik SEDS-L Technical specifications

Mandik

Mandik SEDS-L Technical specifications

Vents KP Series user manual

Vents

Vents KP Series user manual

Valmet Flowrox Expulse Series Installation, operation and maintenance instructions

Valmet

Valmet Flowrox Expulse Series Installation, operation and maintenance instructions

manuals.online logo
manuals.online logoBrands
  • About & Mission
  • Contact us
  • Privacy Policy
  • Terms and Conditions

Copyright 2025 Manuals.Online. All Rights Reserved.