Brobo PG300 User manual

Precision Drilling Machines Tapping Machines Multi Head Drills Tool Grinders
Machine Vices Special Production Equipment
Accessories Pedestal Grinders Metal Cutting Saws
YOUR BROBO WALDOWN DISTRIBUTOR IS:
PRODUCT AND MAINTENANCE MANUAL
PG300/350 PEDESTAL GRINDER MANUAL
BROBO WALDOWN (AUST) PTY. LTD.
A.C.N. 098 264 316
A.B.N. 42 098 264 316
65-67 Williams Rd, Dandenong, 3175
PO BOX 4274 Dandenong Sth, 3164
Victoria, AUSTRALIA.
Tel: 61 3 9794 8751 Email: info@brobo.com.au
Fax: 61 3 9794 8792 Website: www.brobo.com.au
Certified System
Quality
ISO 9001
8 Fowler Rd, Dandenong, 3175
Ken Bergman & Associates, LLC
KBA SAW
10533 Lorel Ave.
Oak Lawn, IL 60453-5154
www.BroboUSA.com

OPERATING MANUAL FOR PG300/350 PEDESTAL GRINDER
TECHNICAL SPECIFICATION i
CHAPTER 1: Installation of the Machine
1.1 Unpacking and Handling the Machine 1
1.2 Parts Checklist 2
1.3 Minimum Requirements 2
1.4 Anchoring the Grinder Unit 2
1.5 Connection to Power Source 3
CHAPTER 2: Safety and Accident Prevention
2.1 Operation of the Machine 4
2.1.1 Noise Level 4
2.1.2 Power Supply 5
2.2 General Requirements 5
2.3 Advice for the Operator 5
2.4 Machine Safety Devices 6
2.4.1 Reference Standards 6
CHAPTER 3: Main Functions and Operation of the Machine
3.1.1 Safety Eye Shields 7
3.1.2 Emergency Stop Button 7
3.1.3 Toolrest 7
3.1.4 Water Pot 7
3.2 Preparation for Operation 8
3.3 Operation Recommendations 8
CHAPTER 4: Drawings, Layouts, Assembly and Spare Parts
4.1.1 Assembly Drawing (1 of 3) 9
4.1.2 Assembly Drawing (2 of 3) 10
4.1.3 Assembly Drawing (3 of 3) 11
4.1.4 Miscellaneous Part List 12
CHAPTER 5: Maintenance and Selection of Consumables
5.1 Role of the Operator 13
5.2 Maintenance Requirements 13
5.3 General Maintenance of Functioning Components 13
CHAPTER 6: Troubleshoot
6.1 Troubleshooting For Blade and Cutting Problems 15
APPENDIX
i. Hazard/Risk Assessment 16
ii. Warranty 17

TECHNICAL SPECIFICATION
MACHINE
SPECIFICATION
MOTOR RATING
(kW / Hz / V / PH)
WHEEL/BELT
SPECIFICATIONS
WHEEL CENTRE, WHEEL
CENTRE HEIGHT & WHEEL
SPEEDS
PG300
(3220010)
2.2kW op. @ 50Hz,
415V, 3PH
300mm x 50mm width x
31.75mm bore (1¼”)
V-Belt “B” Section –70mm
608mm, R937mm & 2050/2400 RPMs
PG350
(3220020)
2.2kW op. @ 50Hz,
415V, 3PH
300mm x 50mm width x
31.75mm bore (1¼”)
V-Belt “B” Section –70mm
608mm, R937mm & 1770/2070 RPMs
Packed Weight: PG300 – 195 kg
PG350 – 205 kg
i

CHAPTER 1 - Installation of the Machine
1.1 Unpacking and Handling the Machine
Upon receiving the Brobo Waldown PG300/350 Pedestal Grinder, the machine should be sitting in the upright
position before opening the packaging (See Figure 1).
Carefully remove the packaging surrounding the pedestal grinder. Position the grinder to the desired location,
ensuring that a power outlet is available and within reach of the grinder power cord. Loosen the base bolts
restraining the grinder and sling a harness around the body of the unit, while being mindful that equal weight
distribution is required to prevent it from tipping. Raise the pedestal grinder, slide the pallet away from the
machine and re-lower the grinder to the final location.
Prior to powering up the grinder, place the desired wheel/buff mop onto the machine spindles. Note that if the
bore sizes on the grinding wheels and/or buffering mops do not fit the spindle, taper adapters and buff adapters
are readily available for purchase from most hardware and tool outlets.
Once the wheels/buffs are securely fasten to the machine, connect the grinder to the mains electrical supply and
power up the machine.
Figure 1. Shipping of Grinder Unit
PLEASE OBSERVE AND FOLLOW THE INSTALLATION INTRUCTIONS ON PAGE 2
1

WARNING – OPERATING VOLTAGE VARIATION
The pedestal grinder unit has an inbuilt safety electrical system to protect it against voltage
variations. However, for the machine to operate efficiently, ensure that the grinder operates within
±
10% limits of the recommended voltage on the motor.
!"!
!
1.2 Parts Checklist
Along with the grinder unit, check that the following accessories, packed "loose", are included as follows:
A. ACCESSORIES
i. 1 Operation Manual
1.3 Minimum Requirements
For the machine to function correctly, the room in which the grinder unit is to be installed must be in the vicinity of,
and satisfy the following conditions:
240/415V Power Supply
Ambient Temperature:From -10 to + 50 degrees C.
Relative Humidity: Not more than 90%.
Lighting: More than 500 LUX.
1.4 Anchoring the Grinder Unit
Prior to anchoring the grinder unit, take into considerations the requirements mentioned in Section 1.3 and
Section 2.2, and other aspects regarding the usage of the machine such as accessibility to grinder parts and safe
access for the operator.
Figure 2. Anchoring Hole Location
2
FLOOR MOUNTING

VOLTAGE MAIN VOLTAGE
415/240V 3 PH 240V
1.5 Connection to Power Source
Before connecting the machine to the power supply, check that the socket is not connected in series with other
machines. This condition is critical for the ideal operation of the drill (Referring to Figure 3for wiring of “4-CORE”
power supply cable from the machine to a power plug. Check that the spindle rotary direction and change the
phasing if required; clockwise rotation observing top-down on top of the motor pulley.)
Note that single-phase machines are supplied in Australia with 15-amp plug).Furthermore, ensure that all the
electrical leads and cables (including supply leads) are well maintained and should be immediately replaced if
severed, sliced or damaged in any manner.
Figure 3. Connection for “4-CORE” Wire System with Neutral
To connect the machine to the power supply, proceed as follows:
1) Insert the power plug into the socket, while
ensuring that the mains voltage is compatible for
which the grinder is operating at.
2) Inspect that the grinder unit set to OFF position.
3) To prepare the machine for operation, release the STOP/EMERGENCY STOP button by twisting the red
mushroom button. To activate the drill, engage the green START button.
4) If all of the above procedures have been carried out correctly, the grinder should now be operational
The Brobo Waldown PG300/350 Pedestal Grinder is now ready for use. Chapter 3 provides a detailed
description of the various functional features of the grinder and its operating cycle.
3

WARNING – UNAUTHORISED MODIFICATIONS/REPLACEMENTS/USE
The manufacturer declines any responsibility whatsoever, either civil of criminal, in the case of
unauthorised interference or replacement of one or more parts or assemblies on the machine, or if
accessories, tools and consumable materials are used that are different from those recommended
by the manufacturer himself or if the machine is inserted in a plant system and its proper function is
altered.
!"!
!
CHAPTER 2 - Safety and Accident Prevention
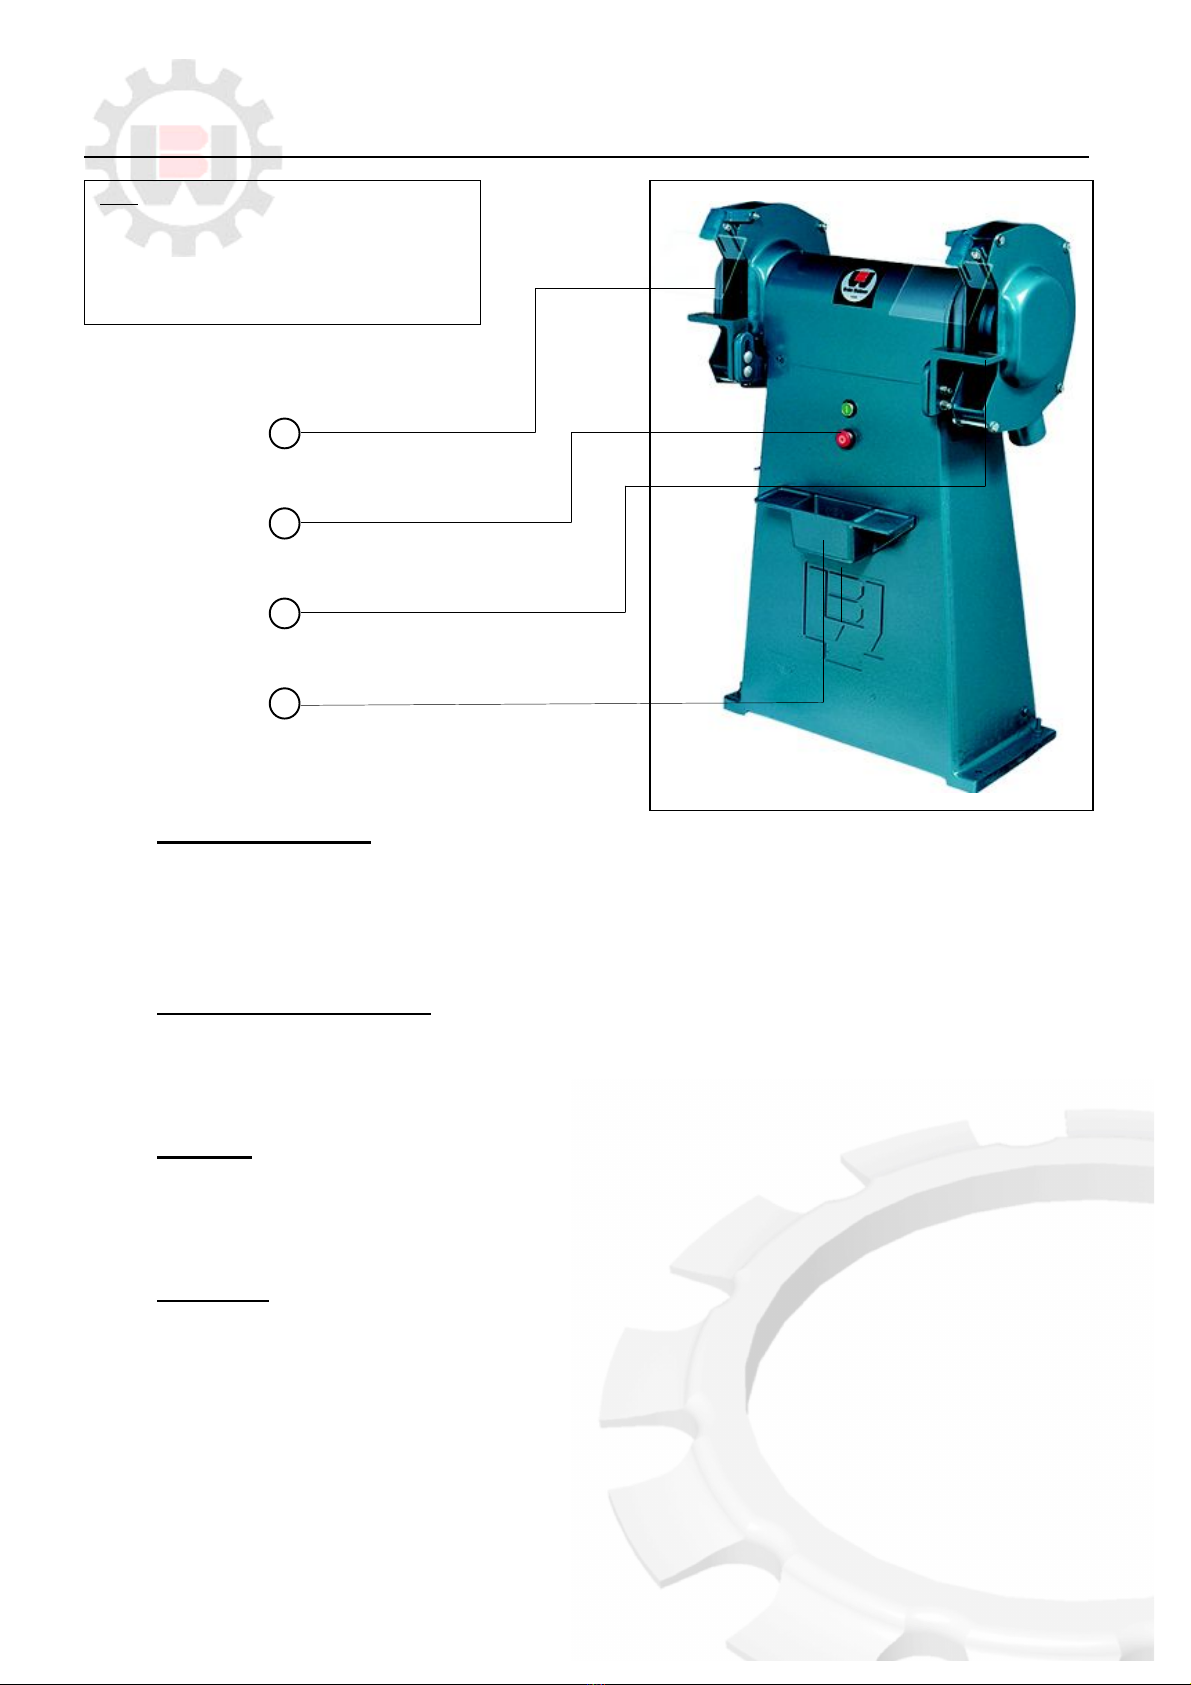
The Brobo Waldown PG300/350 Pedestal Grinder has been designed and manufactured in accordance to
Australian Standards. It is HIGHLY RECOMMENDED that the instructions and warnings contained in this
chapter be carefully followed for correct usage of the machine.
2.1 Operation of the Machine
The Brobo Waldown PG300/350 Pedestal Grinder is specifically design for grinding of various ferrous metal
sections. This machine involves high-speed revolutions; therefore extreme caution is required when
operating the device.
The employer is responsible for instructing the personnel who, in turn, are obliged to inform the operator of any
accident risks, safety devices, noise emission and accident prevention regulations provided for by national and
international laws governing the use of the machine. The operator must be perfectly aware of the position
and functions of all the machine’s controls.
All those concerned must strictly adhere to ALL instructions, warnings and accident prevention
standards in this manual.
The following definitions are those provided for by the EEC DIRECTIVE ON MACHINERY No. 98/37/CE:
Danger Zone - any zone in and/or around a machine in which the presence of a person constitutes a risk
for the safety and health of that person.
Person Exposed - any person finding him or herself, either completely or partly in a danger zone.
Operator -the person or persons given the responsibility of installing, operating, adjusting, maintaining,
cleaning, repairing and transporting the machine.
2.1.1 Noise Level
The noise level of an idling grinder unit has been measured to be below 85 dBA.This complies with the
Australian Occupational Health and Safety (Noise) Regulations 1992.
Please note that peak impulse noise levels will be experienced due to variables including drill characteristics,
type, and condition. This will also vary accordingly depending on the size and type of sample being drilled.
Under these circumstances, management should make available to the operator(s) the appropriate hearing
protection equipment as prescribed under the above stated act.
4

2.1.2 Power Supply
The 415/240V power supply requirements for this machine are of a high level and unauthorised interference and
or inadequate maintenance could result in a situation that could put the operator at risk. A qualified electrical
engineer should be assigned to maintain and repair the system.
2.2 General Requirements
Lighting
Insufficient lighting during the operation of the drill unit would constitute a safety hazard for the people concerned.
For this reason, the user of the machine must provide adequate lighting in the working area to eliminate areas in
shadow, whilst also preventing dazzling illumination sources (reference standard ISO 8995 -2002 ‘Lighting of
Indoor Workplaces’).
Connections
Check that the power supply cables, compressed air supply and/orcoolant system complies with, and are
operating within the acceptable range of the drill capabilities. Faulty, damaged or worn components must be
replaced immediately.
Earthing Systems
The installation of the earthing system must comply with the requirements stated in the IEC Standards Part 195:
Earthing and Protection Against Electric Shocks 1998.
2.3 Advice for the Operator
Protective eyewear or goggles must be worn at all times while attending and operating the
grinder unit.
Ensure that hands and arms are kept clear of the working zone when the machine is
operating.
Do not wear oversize clothing with long sleeves and oversize gloves, bracelets, necklaces or
any other loose object that may become entangled in the machine’s tooling bit during drilling.
Long hair must be tied back or placed in a hair net.
Always disconnect the power supply to the machine before carrying out any maintenance
work or adjustments. This includes cases of abnormal operations of the machine.
Always keep the workplace areaas clean as possible. Remove equipment, tools or any other
objects from the grinding zone.
Support the work piece on both sides of the machine to prevent it falling or jamming during
the grinding cycle.
5
5

Always turn off the machine before carrying out any repair work. Consult the Brobo
Waldown Engineering Department in the country in which the machine was initially purchased.
2.4 Machine Safety Devices
This product and maintenance manual is not purely intended as a guide for the usage, operation and
maintenance of the grinder unit in a strictly production environment; it is instead an instrument to providing
information on how to use the machine correctly and safely. The following standards listed in section 2.4.1, which
are applicable to the Brobo Waldown PG300/350 Pedestal Grinder,are those specified by the EEC Committee
that governs safety of machinery, health and safety at work, personal protection and safeguarding of the work
environment. In addition, the saw also complies with the Australian Standards regarding the safeguarding and
general requirements for electrical equipment.
2.4.1 Reference Standards
MACHINE SAFETY
EEC Directive No. 98/37/CE -Machines Directive
EEC Directive No. 91/368 -94/68 - Amends sections of EEC Directive No. 98/37/CE relating to machine
safety
EEC Directive No. 73/23 - Low Voltage Directive
AS4024.1 -1996 - Safeguarding of Machinery
HEALTH AND SAFETY AT WORK
AS3100 -2002 - General Requirements for Electrical Equipment
Operational Health and Safety (OHS) 1995.81/1995 - Compliance References
EEC Directive No. 80/1107; 83/477; 86/188; 88/188; 88/642 - Protection of workers against risks caused by
exposure to physical, chemical and biological agents in workplace
EEC Directive No. 73/23 and Special EEC Directives No. 89/654;89/655 -Improvements in health and
safety at work
6

CHAPTER 3 - Main Functions and Operation of the Machine
3.1.1 Safety Eye Shields
The reinforced glass safety eye shield serves to protect the user from any debris and particles that might be
dislodged from the grinding process. The bracket mountings also allow the user to adjust the position of the eye
shield to suit various work piece.
3.1.2 Emergency Stop Button
In compliance with Australian Standards and ISO 9001, all Brobo grinding/buffing machiens are now provided
with emergency STOP button for ease of access during emegency.
3.1.3 Toolrest
As implied, the toolrest provides a stable platform in which the user can rest any toolpiece for resharpening. The
height and positon of the toolrest can be moved accordingly via the adjustable bolts provided.
3.1.4 Water Pot
Conveniently located to the machine, water, water-based or oil based lubricants can be placed in the water pot in
which the operator can intermittently dip the workpiece in to cool the grinding surface down. Careful note that
tools or heavy objects should not be rested in or on the water pot for safety concerns that it might be obstucting
the user’s access to the emergency stop button.
2
4
KEY:
1. Safety Eye Shields
2. Emergency STOP Button
3. Toolrest
4. Water Pot
1
3
7

3.2 Preparation for Operation
The following procedure is recommended for the correct grinding using the Brobo Waldown PG300/350
Pedestal Grinder.
PROCEDURE
i) Clean the workpiece to ensure it is free of any grit, swarf or flammable substances. It is highly
recommended that a solvent be used to remove any residue, while ensuring the solvent is inflammable and
non-toxic.
ii) Prior to grinding, clear the work area around the work piece of any sizeable items and tools to minimise the
likelihood of the user getting injured during the grinding operation.
iii) Using the toolrest as a guide, rest the workpiece on the toolrest and manoeuvre it to the desired grinding
position.
iv) Check that the safety eye shield is directly positioned to deflect swarf and any dislodged particles.
v) Turn the machine on. Proceed by slowly easing the workpiece into the grinding wheel. Apply a steady,
even pressure and feed downward towards the wheel.
vi) Once completed, turn the machine off by depressing the stop button.
3.3 Operation Recommendations
To reduce the amount of frictional heat generated between the grinding wheel and workpiece, a light
coating of oil or lubricant can be applied onto the workpiece periodically.
Do not force the workpiece to the grinding/buffing as this not only significantly reduces the lifespan of the
wheel, the workpiece could recoil sharply backwards and injurethe operator.
.
8

CHAPTER 4 - Drawings, Layouts, Assembly and Spare Parts
4.1.1 Assembly Drawing (Sheet 1 of 3)
9

4.1.2 Assembly Drawing (Sheet 2 of 3)
10

4.1.3 Assembly Drawing (Sheet 3 of 3)
11

4.1.4 Miscellaneous Part List
Please find below of most commonly replaced spare parts, aside from those specified on pages 9 -11. These
listed parts draw reference to components found predominantly associated with the Brobo Waldown PG300/350
Pedestal Grinder units. Should you require a spare part that you are not familiar with, or not shown in Chapter 4,
please contact Brobo Group Engineering department.
PART NUMBER
SPARE PART DESCRIPTION
3211140
ISOLATION SWITCH KIT
3211010
EYESHIELD MOUNTING BRACKET & GLASS (2 units required)
3215130
REPLACEMENT EYE SHIELD GLASS (200mm x 150mm)
3201290
L.H TAPERED BUFF ADAPTOR (1 1/4” x 7 TPI)
3201300
R.H TAPERED BUFF ADAPTOR (1 1/4” x 7 TPI)
3201310
L.H TAPERED BUFF ADAPTOR (1 1/2” x 6 TPI)
3201320
R.H TAPERED BUFF ADAPTOR (1 1/2” x 6 TPI)
12

CHAPTER 5 – Maintenance and Selection of Consumables
5.1 Role of the Operator
The person operating and maintaining the Brobo Waldown PG300/350 Pedestal Grinder must familiarise
themselves with these instructions for their own safety and that of others, in addition to safeguarding the
production of the machine. Responsibility must be taken by the user on the general maintenance and up keeping
of the unit as specified in this chapter, with particular emphasis on:
Check to ensure that other operators of the machine always aware of and comply with the relevant safety
instructions and standards as specified in Chapter 2 -Safety and Accident Prevention. Therefore, check
that the safety devices are operational and work perfectly and that personal safety requirements are
complied with.
Ensure that the working cycle is efficient and guarantees maximum productivity, inspect the:
-Functions of the main components of the machine
-Grade of grit on the grinding wheel
-Correct working parameters for the type of material being grounded
Verify that the quality of each ground material meets the requirements and that the final product is free
from any machining defects.
5.2 Maintenance Requirements
All maintenance must be carried out with the power switched off and the machine in emergency stop
condition.
To guarantee perfection operation, all spare parts must be Brobo Group originals.
On completion of maintenance works, ensure that the replaced parts or any tools used have been
removed from the machines before starting it up.
Any behaviour not in accordance with the instructions for using the machine specified in this manual may
create hazards and/or safety risks for the operator.
Therefore, read and follow all the instructions for use and maintenance of the machine and those on the
product itself.
5.3 General Maintenance of Functioning Components
The general maintenance operations that should be carried out regularly are as follows:
i) Keep the area around the grinder free of any tools, loose parts, accumulated swarf and small offcuts by
using compressed air or preferably thread-free cloth.
ii) When applicable, lightly lubricate the spindle shaft bearings with an NLGI 2 extreme pressure grease,
Shell Alvania No.1 grease or equivalent.
iii) Check that the clamping nut and counter plate regularly to ensure its in good condition.Do not over
tighten the nut and counter plate,as this will inadvertently exert tension on the spindle and grinding
wheel.
13

iv) Clean and lubricate any moving joints or sliding surfaces with good quality oil.
v) Clean the grinding machine regularly and keep any unpainted surfaces lightly oiled to protect from rust
and corrosion.
vi) Check that the glass eye shield is in good condition and free of any damage. If a crack is present on the
surface of the glass, immediately replace the eye shield by contacting the Brobo Spare Parts Department.
14

CHAPTER 6 - Troubleshoot
6.1 General Troubleshooting
Below lists of some of the most common problems associated with the Brobo Waldown PG300/350 Pedestal
Grinder and the recommended troubleshooting procedures to undertake to rectify the situation. If the solutions
provided do not resolve the problems, or the problem identified differs from those listed, immediately contact
Brobo Group engineering department.
PROBLEM IDENTIFIED
DIAGNOSIS
SOLUTIONS
Excessive consumption of
grinding wheel/cracking of
grinding wheel
Minimal material removed on
the parent part when fed onto
the grinder wheel
Machine would not operate
Incorrect grade of grit on grinding
wheel for parent material
Excessively feed rate, forcing the
parent material onto the grinding
wheel
Cracking due to sudden force onto
grinding wheel (‘jarring’ of grinding
wheel)
Clogged or worn grinding wheel
Incorrect grade of grit on grinding
wheel for parent material
Broken or worn component
Electrical component worn
Verify that the correct grade of
grinding is suited for the parent
material being ground.
Reduce the feed rate onto the
grinder, else it might cause the
parent material to break and cause
harm to the operator.
Do not abruptly force the parent
material onto the grinding wheel.
Instead, the material should be fed
onto the grinding wheel at a steady
but constant rate.
Replace the grinding wheel.
Verify that the correct grade of
grinding is suited for the parent
material being ground.
All components to the grinder are
sold as spare parts (pending
availability). Please contact your
nearest Brobo distributor or our
Brobo Group head office. Please
visit www.brobo.com.au for more
details.
All electrical components to the
grinder are sold as spare parts
(pending availability). Please
contact your Brobo distributor.
Please also visit www.brobo.com.au
for more details.
15

APPENDIX -RISK/HAZARD ASSESSMENT
Hazard Type
Hazard Identification
Hazard
Assessment
Hazard Management Strategies
(Recommended for the Purchasing / Buyer / User)
Cutting/Severing
Med/High
Keep machine correctly guarded and operational at
all times.
Keep hands clear of rotating spindle/grinding wheel.
Entanglement
Low
Do not wear loose jewellery, clothing or items that
might get caught in the grinder.
Always keep the work area free of unnecessary
objects or tools.
Mechanical
Impact
Low
Wear protective safety glasses when utilising the
grinding machine.
Strongly encouraged that steel-capped safety boots
be worn during operation of grinder machine.
Electrical
Electrocution
Low
Remove the power supply when any maintenance
and/or repairs are to be undertaken.
Power source is to be isolated prior to opening
electrical enclosures.
Noise
-
Low
Under no load testing, the noise level measured is
below 80db (A).
If the noise level becomes too high during a grinding
cycle, stop the process and inspect for problem, if
any are present.
Substance
-
Low
Keep the work area clean and regularly remove
excess coolant, oils and other aggregate.
Hazardous Events
Unexpected Start Up
Low
During a power failure, turn the machine off.
If problem persists, please contact Brobo Group
engineering department.
Additional
Hazards
Operator Error
Low
Ensure grinder wheel, counter plates and locking
nuts are correctly secured.
MACHINE TYPE:
SERIAL NO.:
RECEVING COMPANY: (SAFETY OFFICER)
BROBO WALDOWN (AUST) PTY. LTD.
A.C.N. 098 264 316
A.B.N. 42 098 264 316
8 Fowler Rd, Dandenong, 3175
PO BOX 4274 Dandenong Sth, 3164
Victoria, AUSTRALIA.
Tel: 61 3 9792 9944 Email: info@brobo.com.au
Fax: 61 3 9791 9955 Website: www.brobo.com.au
Quality
Endorsed
Company
ISO 9001 Lic. 10292
Standards Australia
Quality System
16

BroboGroupWarranty
1.1Thesupplierwarrantsthatallgoodssuppliedbyit,shallbefreefromdefectsinmaterialsandworkmanshipforaperiod
oftwentyfour(24)monthsfromthedateofdeliverytotheCustomer.("theWarrantyPeriod"),onthefollowingtermsand
conditions.
1.2TheCustomershallpromptlyprovidewrittenparticularstothesupplieronbecomingawareofanydefectinthegoods
duringtheWarrantyPeriod,andshallprovidetheSupplierwithallnecessaryaccess,facilitiesandinformationtoenablethe
Suppliertoascertainorverifythenatureandthecauseofthedefectandtocarryoutitsobligationsunderthiswarranty.
1.3TheSupplier'sobligationunderthiswarrantyislimitedtorepairsofthedefectgoodsandtheSupplierisunderno
obligationtoreplacethegoodsorrefundthevalueofthegoodstotheCustomer.
1.4Ifthegoodsare,intheopinionoftheSupplier,notdefectiveorifanydefectisattributabletoanyoneormoreofthe
followingcircumstancesthentheSupplierisundernoobligationwhatsoevertotheCustomer:
1.4.1Theuseofthegoodsforapurposeotherthanthatforwhichtheywereintendedtobeused;
1.4.2Therepair,modificationoralterationofthegoodsbyanypersonotherthantheSupplier;
1.4.3Wherethedefecthasarisenduetomisuse,neglectoraccident,howsoeverarising;
1.4.4Wherethedefecthasarisenduetoinstallationofthegoodswhichwere,inthereasonableopinionoftheSupplier,
incorrectlycarriedout
1.4.5Wherethegoodshavenotbeencorrectlystoredormaintained
1.4.6Wherethedefecthasarisenduetonormalwearandtearonthegoods
1.5TheSupplierisundernoobligationunderthiswarrantywheretheCustomerhasfailedtoobservethetermsof
paymentforthegoodsoranyotherobligationimposedbythetermsandconditionsofthiswarranty.
1.6IntheeventthattheSupplierissupplyinggoods,whichhavebeenmanufacturedbythirdparties,theCustomershall
beentitledtothebenefitofanyManufacturer'sWarrantyinrespectofsuchgoods.TheCustomeracknowledgesthatthe
SupplieracceptsnoresponsibilitywhatsoeverforanyManufacturer'sWarrantyoranyclaimhowsoeverarisingfromtheuse
ofthegoods,whethersingularlyorincombinationwithotherproducts.
1.7TheSuppliershallnotbeliableforanyindirectorconsequentiallossesorexpensessufferedbytheCustomer,
howsoevercaused.
1.8Exceptasspecificallysetoutherein,orinwritingbywayofcatalogueorpamphletorotherwiseprovidedbythe
SuppliertotheCustomeranyterm,representation,conditionorwarrantyinrespectofthequality,conditionordescription
ofthegoods,whetherimpliedbystatute,commonlaw,tradeusage,customorotherwise,isherebyexpresslyexcluded.
ThiswarrantyisgivenbyBroboGroupPtyLtd,ABN:42098264316
Address:65‐67WilliamsRd,Dandenong,VIC3175
Ph:0397948751Fax:0397948792
Email:[email protected]
Thiswarrantyisprovidedinadditiontootherrightsandremediesyouhaveunderlaw:Ourgoodscomewithguarantees
whichcannotbeexcludedundertheAustralianConsumerLaw.Youareentitledtoreplacementorrefundforamajor
failureandtocompensationforotherreasonablyforeseeablelossordamage.Youarealsoentitledtohavethegoods
repairedorreplacedifthegoodsfailtobeofacceptablequalityandthefailuredoesnotamounttoamajorfailure.
8 Fowler Rd, Dandenong, 3175
This manual suits for next models
3
Table of contents
Other Brobo Grinder manuals
Popular Grinder manuals by other brands

Grizzly
Grizzly H8124 instruction manual

G.B.C
G.B.C G300 instruction manual

Hitachi
Hitachi G 12SA2 Instruction and safety manual

Bosch
Bosch GWS 18 V-LI Original instructions

Racine Railroad Products
Racine Railroad Products 910106 Operating and maintenance manual

Hitachi
Hitachi G 10SR2 Handling instructions