Brod & Taylor FP-101 Quick guide

Instructions & Recipes
Model FP-101
For your safety, read this instruction manual before using product.
www.brodandtaylor.com
Folding Proofer

Page 2
Accomplished cooks know that the secret to many kitchen processes —
from rising bread to making yogurt to tempering chocolate for dessert to
making healthy probiotic foods — is accurate, reliable low temperature
control. That’s why professionals invest thousands of dollars in space-
consuming commercial proofing ovens, tempering machines, and com-
mercial fermenters. Until now, there has been no comparable product for
home kitchens. Professional bakers have the ability to control fermentation
temperatures to produce the best flavors in their loaves. Now you have
the same reliability and control as the pros with a counter top Proofer that
folds flat for storage. The Folding Proofer makes wholesome bread baking
easier than ever with an optimal proofing environment plus easy storage.
Set the digital temperature control lower for a long, slow rise or
pre-fermentation. Turn up the heat to give yeast a boost on a cold day,
ferment sourdough or rye at warm temperatures, or for refrigerated dough.
A large window provides a view of the spacious interior where a bowl or
two full-sized loaves fit easily. No need to cover the dough as the included
water tray keeps humidity at an optimum level.
Also use this multi-functional kitchen appliance to make yogurt and creme
fraiche, melt and hold tempered chocolate, soften butter, and aid other low
temperature kitchen processes.
Congratulations on your purchase of a
Brød & Taylor Folding Proofer!
Yogurt
Easily make
up to 2 gallons/8 litres
Chocolate
and more
No-hassle melting
Bread
Ideal environment for
fermenting and rising

Page 3
IMPORTANT
SAFEGUARDS
When using electrical appliances,
basic safety precautions should
always be followed including the
following:
1. Read all instructions.
2. Do not touch hot surfaces. Use
handles or knobs.
3. To protect against electrical
shock do not immerse cord, plugs,
or main housing in water or other
liquid.
4. Close supervision is necessary
when appliance is used by or near
children.
5. Unplug from outlet when not in
use and before cleaning. Allow to
cool before putting on or taking off
parts.
6. Do not operate any appliance
with a damaged cord or plug or
after the appliance malfunctions or
has been damaged in any manner.
Return appliance to the nearest au-
thorized service facility for exami-
nation, repair, or adjustment.
7. The use of accessory attach-
ments not recommended by the
appliance manufacturer may cause
injuries.
8. Do not use outdoors.
9. Do not let cord hang over edge
of table or counter, or touch hot
surfaces.
10.Do not place on or near a
hot gas or electric burner, or in a
heated oven.
11. Extreme caution must be used
when moving an appliance contain-
ing hot oil or other hot liquids.
12.Always attach plug to appliance
first, then plug cord into the wall
outlet. To disconnect, set control
to “Off”, then remove plug from wall
outlet.
13.Do not use appliance for other
than intended use.
14.This appliance is for household
use only.
15.Do not store any materials,
other than manufacturer’s recom-
mended accessories, in the Proofer
when not in use.
16.This appliance is not intended
for use by persons (including chil-
dren) with reduced physical, senso-
ry or mental capabilities, or lack of
experience and knowledge, unless
they have been given supervision
or instruction concerning use of the
appliance by a person responsible
for their safety.
17.Children should be supervised
to ensure that they do not play with
the appliance.
18.If the supply cord is damaged, it
must be replaced by the manufac-
turer, its service agent or similarly
qualified persons in order to avoid
a hazard.
Page 4
SAVE THESE
INSTRUCTIONS
Please read and keep these in-
structions to obtain the best results
from your Folding Proofer.
SPECIAL
CORDSET
INSTRUCTIONS
A short power supply cord is pro-
vided to reduce the risks resulting
from becoming entangled in
or tripping over a longer cord.
Longer extension cords are avail-
able and may be used if care is
exercised in their use. If a long
extension cord is used, the marked
electrical rating of the extension
cord must be at least as great as
the electrical rating of the
appliance and the longer cord
should be arranged so that it will
not drape over the countertop or
tabletop where it can be pulled on
by children or tripped over uninten-
tionally.
NOTICE
This appliance is for household
use only. Use on Alternate Current
(50/60 Hertz) only with voltage as
indicated on the manufacturer type
plate. This appliance has a polar-
ized plug (one blade is wider than
the other). As a safety feature, this
plug will fit in a polarized outlet only
one way. If the plug does not fit
fully in the outlet, reverse the plug.
If it still does not fit, contact a quali-
fied electrician. Do not attempt to
modify the plug in any way.
USE WITH AC
INVERTERS
Exercise caution when using this
appliance with DC to AC inverters.
Inverters may be used to convert
DC power to AC in RVs, boats
and solar power installations.
Inexpensive or older inverters may
use a technology described as
“modified sine-wave” AC power.
This type of inverter should not
be used and may damage this
appliance. Contact a qualified
electrician if you have questions
about your inverter.
FOR
HOUSEHOLD
USE ONLY
NOT INTENDED FOR
COMMERCIAL USE

Page 5
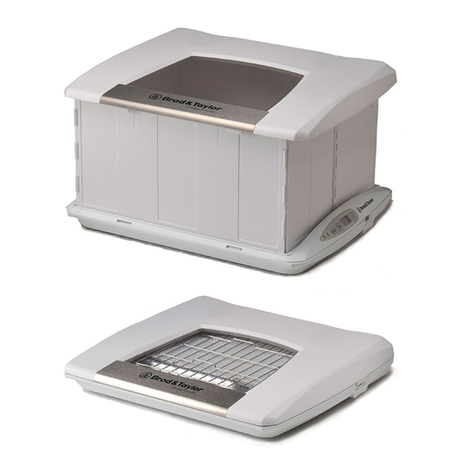
Features
1. Lid
2. Expanding box section
3. Base
4. Control Panel
5. Power cord receptacle
6. Clear window
Accessories
Wire Rack
Water Tray
Power Cord
Control Panel
7. Heating Indicator
8. Power Indicator
9. ON/OFF button
10. Temperature DOWN
Press and hold 3 seconds to
scroll numbers quickly.
11. Temperature Display
12. Temperature UP
Press and hold 3 seconds to
scroll numbers quickly.
1
4
6
5
2
3
85 F
ON
OFF
POWER
HEAT
HEATING POWER OFF DOWN UP
ON
9
8
7
10 1211
NOTE: The display may be configured to display in °F or
°C. To switch between modes, press and hold both the “UP”
button and the “DOWN” button for two seconds.

Page 6
GENERAL OPERATING
INSTRUCTIONS
Set Up
Open the lid by lifting the front edge of the Proofer. Allow the lid to rest in
a vertical position. Remove the wire rack, power cord and water tray. Lift
the expanding box section from the front edge, fold it open and fit into the
base.
Place the water tray into the center of the heating plate. Place the wire
rack into the enclosure with feet down. Lift the lid straight up from the
rear hinges and place onto the top of the expanded box. Lower the lid to
a closed position. Plug the power cord into the Proofer and then into an
appropriate receptacle.
Pre-Heat
For best results, the Proofer should be pre-heated for 5-10 minutes.
Operation
Plug the Proofer in. Press the ON/OFF button once and ensure that
the POWER light is illuminated. Depress the UP or DOWN buttons
to adjust to the desired temperature. Press and hold either the UP or
DOWN button for three seconds to quickly scroll through the temperature
settings.
The HEATING light will illuminate indicating that the heat plate is warming
up. When the Proofer reaches its temperature set point the HEATING
light will go off. It is normal for the HEATING light to flash on and off as
the Proofer maintains its temperature during use.

Page 7
Select Celsius or Fahrenheit
The display on the control panel indicates the temperature set point.
The display may be configured to display in °F or °C. To switch between
modes, press and hold both the “Temperature UP” button and the
“Temperature DOWN” button for two seconds.
Humidity Control
The Proofer may be operated in a dry or humid condition. To create a
humid condition in the Proofer, pour approximately ¼ cup (50ml) of water
into the water tray. DO NOT overfill the tray. For best results, warm or hot
tap water may be used.
Prepare for storage
If the Proofer is ON, press the ON/OFF button once to turn the Proofer
off. Ensure that the green POWER light is not on. Remove the lid and rest
it in the rear hinges in an upright position. Unplug power cord from the
wall receptacle and the Proofer.
NOTE: The power cord must be unplugged before folding the Proofer and
closing the lid.
If the Proofer is warm, let it sit with the lid removed until the heating plate
reaches room temperature. Remove the wire rack. Carefully remove the
water tray, dispose of remaining water and set aside. If necessary wipe
surfaces of the Proofer with a damp cloth to remove any water residue.
Make sure the Proofer is dry before folding for storage. Lift the expanding
box section slightly from the front, then fold by pushing gently in on the
sides and folding the unit towards the back. Lower the folded section into
the base. Place the water tray into the front section of the base. Orient
the wire rack with feet up and place it on the base. Remove the power
cord from the Proofer, fold and place on the rear section of the wire rack.
Lower the lid closed and press on the front to ensure that the latch is
engaged.
Power cord
in rear
Rack up-
side down
(feet up)

Page 8
CLEANING AND USER
MAINTENANCE
1. This appliance is virtually maintenance free, no lubrication is needed.
If the cord or the appliance is damaged or does not operate properly, re-
turn it to service for repair. This appliance has no user serviceable parts.
No repairs should be attempted by the user.
2. Always disconnect from the socket and completely cool down before
cleaning.
3. Do not leave water in the water tray for long periods. Wait until the
heating plate has cooled before emptying the tray.
4. If necessary, wipe the housing and metal heating plate with a damp
cloth or moistened with a mild detergent solution. Do not use chemical or
abrasive cleaners, polishers, etc. Do not immerse the appliance in water
or place it under running water.
5. Wash all removable parts and accessories with care in warm soapy
water if necessary, or simply wipe with a soft cloth moistened with a mild
detergent solution.
6. After cleaning, wait until completely dry and cooled down before fold-
ing up the appliance for storage. The wire rack, water tray and detachable
power cord can be put inside for self-storage.

Page 9
PRECAUTIONS IMPORTANTES
Lorsque vous utilisez des appareils électriques, des précautions de base
doivent toujours être prises, y compris celles qui suivent :
1. Veuillez lire toutes les instructions
2. Evitez de toucher aux surfaces chaudes. Utilisez des poignées ou des
boutons
3. Afin d’éviter tout risque de choc électrique, ne plongez pas le cordon,
la fiche d’alimentation ou le boîtier principal dans de l’eau ou tout autre
liquide.
4. Une surveillance étroite est nécessaire lorsque l’appareil est utilisé par
ou à proximité d’enfants.
5. Débranchez l’appareil de la prise en dehors des périodes d’utilisation
et avant le nettoyage. Laissez refroidir avant d’installer ou de retirer des
pièces.
6. N’utilisez pas l’appareil avec un cordon ou une fiche d’alimentation
défectueux ou si vous constatez que l’appareil ne fonctionne pas cor-
rectement ou s’il présente des détériorations quelconques. Retournez
l’appareil au service après vente agréé le plus proche de votre domicile
pour vérification, réparation ou réglage.
7. L’utilisation d’accessoires non recommandés par le constructeur de
l’appareil peut causer des blessures.
8. Ne pas utiliser en plein air.
9. Ne laissez pas le cordon d’alimentation pendre au bord d’une table ou
d’un comptoir ou toucher une surface chaude.
10.Ne placez pas l’appareil sur ou à côté d’un brûleur à gaz, d’une
plaque électrique ou dans un four chaud
11. Faîtes preuve d’une extrême précaution lorsque vous déplacez un ap-
pareil contenant de l’huile chaude ou d’autres liquides chauds.
12.Toujours branchez l’appareil en premier, ensuite raccordez-le à la
prise murale. Pour déconnecter l’appareil, éteignez-le en appuyant sur
‘Off’, puis débranchez le cordon de la prise murale
13.N’utilisez pas l’appareil à des fins autres que celles pour lesquelles il
a été conçu
14.Cet appareil est uniquement conçu pour un usage domestique.
15.Quand l’étuve n’est pas utilisée, n’y rangez pas de matériels autres
que les accessoires recommandés par le constructeur.
16.Cet appareil n’est pas destiné à être utilisé par des personnes (y com-
pris des enfants) avec les capacités physiques, sensorielles ou mentales
sont réduites ni par ceux qui manquent de l’expérience et de connais-
sances, à moins qu’elles ne soient surveillées ou qu’elles n’aient été

Page 10
données des instructions par celui qui est responsable de leur sécurité.
17.Les enfants doivent être surveillés afin d’assurer qu’ils ne jouent pas
avec l’appareil.
18.Si le cordon d’alimentation est endommagé, il doit être remplacé par
le fabricant, par son agent de service ou par une personne également
qualifiée afin d’éviter un danger.
CONSERVER CES INSTRUCTIONS
Veuillez lire et conserver ces instructions afin d’obtenir les meilleurs résul-
tats de votre étuve à pain repliable.
INSTRUCTIONS SPECIALES
RELATIVES AU CORDON
D’ALIMENTATION
Un cordon d’alimentation court est fourni dans le but de réduire les ris-
ques d’enchevêtrement ou de trébuchement.
Des rallonges sont disponibles et peuvent être utilisées toutes les précau-
tions nécessaires sont prises pendant leur utilisation. En cas d’utilisation
d’une rallonge, la puissance électrique indiquée sur la rallonge doit être
au moins aussi élevée que la puissance de l’appareil et la rallonge doit
être disposée de manière à ne pas reposer sur le comptoir ou sur la table
où elle peut être tirée par des enfants ou faire trébucher involontairement.
NOTICE
Cet appareil est uniquement conçu pour un usage domestique. Utilisez
sur un courant Alternatif (50/60 Hertz) seulement avec un voltage com-
me celle sur la plaque signalétique du fabricant. Cet appareil est muni
d’une fiche d’alimentation polarisée (une lame est plus large que l’autre).
Comme dispositif de sécurité, cette fiche ne peut s’insérer dans une prise
polarisée que d’une seule façon. Si la fiche ne s’insère pas entièrement
dans la prise, inversez la prise. Si la fiche ne peut toujours pas être in-
sérée, consultez un électricien qualifié. Ne tentez pas de modifier la prise
d’une quelconque façon.
A USAGE DOMESTIQUE
SEULEMENT
NON DESTINE A UN USAGE COMMERCIAL

Page 11
Panneau de
Commande
7. Indicateur de chauffage
8. Indicateur de puissance
9. Bouton ON/OFF
10. Diminuer (down)
11. Affichage de la température
12. Augmenter (up)
Caractéristiques
1. Couvercle
2. Expansion caisson
3. Base
4. Panneau de commande
5. Prise d’alimentation
6. Fenêtre transparente
1
4
6
5
2
3
85 F
ON
OFF
POWER
HEAT
HEATING POWER OFF DOWN UP
ON
9
8
7
10 1211
NOTE: L’affichage peut être configuré en °F ou
°C. Pour changer de mode, maintenez appuyer
les deux boutons « Temperature up » and «
Temperature down » pendant deux secondes.
Accessoires
Grille
Bac à eau
Cordon d’alimentation

Page 12
INSTRUCTIONS GENERALES
D’OPERATION
Installation
Ouvrir le couvercle en soulevant le bord avant de l’étuve. Faîtes en sorte
que le couvercle garde une position verticale. Retirez la grille, le cordon
d’alimentation et le bac à eau. Soulever la section expansion du caisson
depuis le bord avant, dépliez-le et rentrez-le dans la base.
Placez le bac à eau au centre de la plaque chauffante. Placez la grille
dans l’enceinte. Soulevez le couvercle vers le haut depuis les charnières
arrière et placez-le sur les charnières broches au niveau du sommet
arrière des côtés. Abaissez le couvercle à la position la plus serrée.
Branchez le cordon d’alimentation dans le four et ensuite dans une prise
appropriée.
Préchauffer
Pour de meilleurs résultats, vous devriez préchauffer votre four pendant 5
à 10 minutes avant de l’utiliser pour la pâte levée.
Fonctionnement
Branchez l’étuve. Appuyez une fois sur le bouton ON /OFF et assurez-
vous que la touche POWER soit bien éclairée. Appuyez sur les boutons
UP ou DOWN pour ajuster à la température désirée.Appuyez et
maintenez enfoncé soit le bouton HAUT ou BAS pendant trois secondes
pour faire défiler rapidement les réglages de température.
La touche HEATING s’éclairera pour indiquer que la plaque chauffante se
réchauffe. Lorsque le four atteint sa température de consigne, la touche
HEATING s’éteint. Il est normal que la touche HEATING s’allume ou
s’éteigne alors que le four maintient sa température pendant l’utilisation.

Page 13
Sélectionner Celsius ou Fahrenheit
L’affichage sur le panneau de contrôle indique la température de
consigne. L’affichage peut être configuré en °F ou °C. Pour changer de
mode, maintenez appuyer les deux boutons « Temperature up » and «
Temperature down » pendant deux secondes.
Contrôle d’humidité
L’étuve peut être utilisée dans des conditions sèches ou humides. Pour
créer une atmosphère humide dans l’étuve, versez environ ¼ de tasse
(50ml) d’eau dans le bac à eau. NE PAS faire déborder le bac. Pour
obtenir de meilleurs résultats, l’eau chaude ou tiède du robinet peut être
utilisée.
Préparer pour le rangement
Si l’étuve est allumée (ON), appuyer une fois sur le bouton ON/OFF pour
l’éteindre. Assurez-vous que la lumière verte du bouton POWER soit
partie. Enlevez le couvercle et posez –le sur les charnières-arrières en
position verticale. Débranchez le cordon d’alimentation de la prise murale
et de l’étuve.
NOTE : le cordon d’alimentation doit être enlevé avant de plier le four et
de fermer le couvercle.
Si l’étuve est chaude, laissez la reposer sans le couvercle jusqu’à ce
que la plaque chauffante atteigne la température ambiante. Enlevez la
grille. Enlevez avec précaution le bac à eau, disposez de l’eau restante
et mettre de côté. Si nécessaire, essuyez les surfaces de l’étuve avec
un chiffon humide pour enlever tout résidu de nourriture.Assurez-vous
que l’étuve soit sèche avant de procéder. Soulevez le caisson expansion
légèrement depuis l’avant, ensuite pliez en appuyant doucement sur les
cotés et en pliant le tout vers l’arrière.
cordon
d’alimentation
à l’arrière
grill à
l’envers

Page 14
Rabaissez la partie ainsi pliée dans la base. Placez le bac à eau dans la
partie avant de la base. Tournez la grille à l’envers et placez-le dans la
base. Enlevez le cordon d’alimentation de l’étuve, pliez et placez-le sur
l’arriére de la grille. Rabattez le couvercle fermé sur le devant pour être
sûr que le verrou est engagé.
NETTOYAGE ET MANUEL
D’ENTRETIEN DE L’UTILISATEUR
1. Cet appareil ne nécessite pratiquement pas d’entretien, aucun huilage
n’est nécessaire. Si le cordon de l’appareil est endommagé ou ne
fonctionne pas correctement, retournez-le au service après vente
pour réparation. Cet appareil n’a pas de pièces réparables pour
utilisateur. Aucune réparation ne devrait être effectuée par l’utilisateur.
2. Toujours déconnectez de la prise et laissez refroidir avant de nettoyer
3. Ne laissez pas d’eau dans le bac à eau pendant de longues périodes.
Attendez que la plaque chauffante ait refroidi avant de vider le bac.
4. Essuyer le caisson principal et la plaque chauffante en métal avec
un chiffon humide ou humidifié avec une solution détergente.
N’utilisez pas de nettoyants ou polisseurs chimiques ou abrasifs,
etc. N’immergez pas l’appareil dans de l’eau ni le placez sous l’eau
courante.
5. Nettoyez toutes les parties et accessoires amovibles avec précaution
dans une eau savonneuse chaude si nécessaire, ou essuyez
simplement avec un chiffon doux humidifié avec une légère solution
détergente.
6. Après le nettoyage, attendez que tout soit complètement sec et
refroidi avant de plier l’appareil pour le rangement. La grille et le
cordon d’alimentation détachable peuvent être rangés dedans.

Page 15
RECIPES
General Guidelines 16
Rustic Pizza Crust 17
Golden Three-Wheat Boule 20
Cranberry Pecan Boule 24
Country Wheat Sandwich Bread 26
Brød & Taylor Sourdough 27
Yogurt, Custard Style & Greek 30
Strawberry Frozen Yogurt 32
Yogurt, Lactose-Free 34
Yogurt-Making Notes 37
Tempering Chocolate 39

Page 16
General Guidelines for Rising and
Fermenting Bread Dough in the Proofer
Prepare the Proofer. For bread dough, the Proofer should always have
the water tray filled one-third to one-half full with clean water, and the
tray should be placed in the center of the warming plate. The wire rack
goes on top of the water tray. With the sides in place and the lid on top,
set the thermostat and allow the Proofer 5-10 minutes to come up to
temperature.
Selecting a Temperature. There is a range of temperatures that work
well for bread dough, and if the recipe or book you are using specifies a
temperature, consider using that.
Sourdough often benefits from fermenting at a temperature of
80-85F/27-30C in order to give the wild yeast a boost.
Commercial yeast is more vigorous, so doughs made with it
benefit from a lower temperature that promotes flavor development,
75-78F/24-26C.
Rye flour has weaker gluten and higher enzyme activity, so higher
Proofer temperatures are appropriate (80-85F/27-30C) to shorten
fermentation time and keep the enzymes from degrading the dough
too quickly.
Cold dough that has been retarded in the refrigerator often needs an
extra hour (or more) per pound/500g of dough added to its rising time
to allow the dough to come up to temperature. Ideally, frozen dough
should be thawed in the refrigerator before proofing.
In a hurry? Mix the dough with lukewarm (90-100F/32-38C) water
and ferment at up to 85F/30C. However, we do not recommend going
over that temperature as the yeast can produce off flavors.
Covering the Dough. Most doughs and shaped loaves will not need to
be covered while in the Proofer, as the water tray will provide the ideal
humidity to keep the dough from forming a crust. However, if using the
Proofer for an extended fermentation, such as an overnight (12 hours)
biga or pre-ferment, it is safest to cover the bowl or container.

Page 17
Rustic Pizza Crust
This easy recipe is our favorite pizza crust. The soft dough is a pleasure
to work with and forms a nicely raised border with a crisp crust and open
crumb. The dough can be mixed any time the day before, or on the
morning of making the pizzas. Mix the night before, then divide and proof
the next day after lunch.
Makes about 15 oz of dough, enough for two 10-12 inch thin crust pizzas.
Pizza Dough Volume Grams Ounces Baker’s
Percentage
Unbleached AP flour* 2 cups,
spooned 234 g 8.25 oz 92.9%
Whole wheat flour 2 Tblsp 18 g 0.65 oz 7.1%
Water, ice cold 3/4 cup 179 g 6.30 oz 71.0%
Instant yeast 1/2 tsp 1.6 g 0.6%
Salt, preferably sea salt 1 tsp 5.6 g 2.2%
Olive oil, for kneading and coaƟng containers
Semolina, for coaƟng the underside of the pizza (opƟonal)
*Preferably an unbleached all-purpose flour with 10-10.5% protein and
containing malted barley flour, such as Gold Medal Unbleached AP or
Hecker’s Unbleached AP.
Equipment: Brød & Taylor Proofer, pizza stone.
Mix Ingredients. Before measuring the water, add ice and allow to chill.
While the water is chilling, mix the dry ingredients in a medium bowl,
being careful to put the yeast and salt in separate areas of the bowl.
Whisk or stir until well combined. Measure or weigh the chilled water, add
to dry mixture and mix with a spoon until all the flour is moistened but the
dough is still rough and shaggy. Cover and place in the refrigerator for 20
minutes to hydrate the flour and begin chilling the dough.
Develop Structure. Lightly oil a clean bowl, your hands, and the
kneading surface with olive oil. Turn the dough out and stretch into a
rectangle. Fold the rectangle like a business letter, then rotate the dough
and stretch and fold again, so that all four sides of the dough have been
folded to the center. Do this a second time, stretching the dough and
folding all four sides to the center. The dough should feel noticeably
firmer and smoother.

Page 18
Retard the Dough. Place the dough in the oiled bowl and turn it over
so that it is lightly coated with oil. Cover and chill in the refrigerator for at
least six hours, or up to 30 hours.
Choose a Timetable. From the chart below, choose a fermentation
temperature and its corresponding time to remove the dough from the
refrigerator. For example, if you would like to bake the pizzas at 6pm,
then setting the Proofer to 75F/24C would mean taking the dough out of
the refrigerator 4.5 hours ahead of baking, at about 1:30pm.
Proofer
Temperature
Approximate Time
in Proofer
When to Take the Dough
out of the Refrigerator
70F 4 hrs 30 min 5 hrs 30 min before baking
75F 3 hrs 20 min 4 hrs 20 min before baking
80F 2 hrs 30 min 3 hrs 30 min before baking
85F 2 hrs 10 min 3 hrs 10 min before baking
85F, Quick Pizza
VariaƟon 1 hr 10 min no refrigerator Ɵme
Pre-shape the Pizzas. Set up the Proofer with water in the tray and
the rack in place. Set the thermostat and allow the Proofer to come to
temperature.
Remove the dough from the refrigerator, scrape it out onto a lightly oiled
surface and cut it into two pieces with a sharp knife. Shape each piece
into a ball by drawing all the edges up, then pressing seams gently to
close. Place the dough balls seam side down in a lightly oiled container,
such as a 9×13”/23x33cm pan, or put each ball into a bowl.
Proof the Pre-shaped Crusts. Set the container(s) with the dough
balls in the Proofer and allow the dough to relax and ferment until about
doubled in size. A gentle poke with your finger should produce an indent
that remains. If the dough was mixed with ice water and thoroughly
chilled, it should generally follow the guidelines listed below.
Preheat the Oven. One hour before baking, place a pizza stone in the
lower third of the oven and preheat to 500F/260C. The goal is for the
underside of the crust to be crisp and browned at the same time that
the topping ingredients are cooked. If the pizzas are done on top but
not browned enough underneath, next time move the stone to a lower
position. And if they are getting too done on the bottom before the tops
are finished, move the stone to a higher rack.
Shape the Crusts. Sprinkle semolina over a 12”/30cm round piece of
parchment, leaving the outer portion of the circle bare. Even though it

Page 19
isn’t necessary for creating a non-stick surface, we use a little semolina
with parchment because it creates a crisp and delicious crust. If shaping
on a peel, use a more generous layer of semolina so the pizza won’t
stick. Shaping on parchment is easier than a peel, because the dough
will stick to the parchment and not spring back when stretched, yet once
the pizza is baked for a minute or so, the non-stick properties of the
parchment kick in and the pizza slides off the paper effortlessly.
Keep the crust not being worked on covered. Place a dough ball seam
side down in the semolina, and with oiled fingertips tap the dough down
to form a disc. Gently stretch the dough into shape, leaving a thicker rim
at the edge and focus on stretching rather than pressing down. This can
be done either by stretching with oiled fingers from the top of the dough,
or by sliding the underside of the dough over the backs of floured hands
and stretching gently from side to side. When finished, cover with an
inverted pan or bowl and work on the other pizza.
Top and Bake the Pizzas. If desired, cover the crusts and allow to proof
for 30 minutes on the counter in order to create the most open crumb
possible in the border of the pizzas (this is optional, but is built into the
timetable). If the pizzas were shaped on a peel, it is best to omit the 30-
min rise to help avoid sticking to the peel. Add toppings and bake on the
pizza stone for 8-10 minutes, using a peel or the back of a sheet pan to
transfer the pizzas to the oven. About half way through the baking, rotate
the pizzas to promote even browning and slide out the parchment so the
pizza finishes baking directly on the stone.
Variation- Quick Pizza Crust
This method creates a warmer dough that is ready to bake in just two
hours. The flavor is still good, though not as rich and fully developed as
the mix-ahead version. With flavorful toppings the pizzas are delicious.
Use the same ingredients and procedure as above, except use lukewarm
(100F/38C) water. Let rest at room temperature for only ten minutes, and
omit the refrigerator time. Directly after stretching and folding the dough,
divide it in half, round into balls and transfer to a pan or bowls. Proof the
pre-shaped crusts at 85F/29C for about one hour and ten minutes, then
shape and bake.
If the optional 30 minute rise after the crust is stretched to its final shape
is omitted, the pizzas can be ready to bake about two hours after mixing
the dough.

Page 20
Golden Three-Wheat Boule
This bread has a beautiful golden crumb, a sweet, complex aroma and a
rustic crust. Bread flour from hard red winter wheat forms the backbone
of the bread, while durum wheat and whole grain “white” wheat contribute
wonderful flavor. We use KingArthur®whole grain flour made from
white wheat, which has a sweeter, less bitter bran layer than traditional
red wheat. The flour is sifted to remove the larger bran flakes, creating
a high-extraction flour that won’t compromise the bread’s structure like
whole grain flour can. The bran is then used to coat the outside of the
boule, creating a textured, rustic crust. This bread is equally at home
with olive oil or butter and pairs wonderfully with soups or roasts. It’s also
great with Manchego cheese or for making Panini.
Plan Ahead: The poolish needs to ferment for 12 hours (overnight)
before mixing the dough.
Poolish Volume Grams Ounces
Unbleached flour with about 12% protein,
such as King Arthur All-Purpose or Gold
Medal BeƩer for Bread
5/8 cup,
spooned 79 g 2.8 oz
Semolina (coarse durum) flour 1/4 cup,
spooned 39 g 1.4 oz
Instant yeast 1/16 tsp
Water, ice cold 1/2 cup 118 g 4.2 oz
Equipment: Fine strainer or sifter, Brød & Taylor Proofer. A mixer with a
bread hook is convenient for kneading, and a Dutch oven works well to
create a steam chamber for the bread as it bakes.
Mix and Ferment the Poolish. Before weighing or measuring the water,
add ice cubes and allow to chill. (Ice water helps produce a predictable,
consistent fermentation, and also allows the pre-ferment to spend a
controlled amount of time moving through cooler temperatures to promote
enzyme activity and flavor development.) Set up the Proofer with the
water tray in the middle of the warming plate and fill the tray half full with
water. Put the rack in place and the lid on, then set the thermostat to
75F/24C and allow it to warm.
If you don’t have a 1/16 tsp measuring spoon, pour out 1/8 teaspoon of
instant yeast onto a clean surface or plate, forming a little mound. With a
table knife, divide the mound into two equal portions. Add one portion to
the poolish flours and reserve the other for the main dough.
Other manuals for FP-101
4
Table of contents
Other Brod & Taylor Kitchen Appliance manuals

Brod & Taylor
Brod & Taylor FP-101 Quick guide

Brod & Taylor
Brod & Taylor FP-201 Quick guide

Brod & Taylor
Brod & Taylor SAHARA DR-710 User manual

Brod & Taylor
Brod & Taylor FP-101 Quick guide

Brod & Taylor
Brod & Taylor FP-105 User manual

Brod & Taylor
Brod & Taylor FP-101 Quick guide

Brod & Taylor
Brod & Taylor FP-101 User manual

Brod & Taylor
Brod & Taylor SAHARA DR-710 User manual