Brother BAS H series User manual
BAS H Series
Programmer
Please read this manual before using the machine.
Please keep this manual within easy reach for quick reference.
INSTRUCTION MANUAL

i
Thank you very much for buying a BROTHER sewing machine. Before using your new machine, please
read the safety instructions below and the explanations given in the instruction manual.
With industrial sewing machines, it is normal to carry out work while positioned directly in front of moving
parts such as the needle and thread take-up lever, and consequently there is always a danger of injury that
can be caused by these parts. Follow the instructions from training personnel and instructors regarding
safe and correct operation before operating the machine so that you will know how to use it correctly.
ii
SAFETY INSTRUCTIONS
[1] Safety indications and their meanings
This instruction manual and the indications and symbols that are used on the machine itself are provided in order to
ensure safe operation of this machine and to prevent accidents and injury to yourself or other people.
The meanings of these indications and symbols are given below.
Indications
WARNING The instructions which follow this term indicate situations where failure to follow the
instructions could result in death or serious injury.
CAUTION The instructions which follow this term indicate situations where failure to follow the
instructions may result in minor or moderate injury.
Symbols
・・・・・・ This symbol ( ) indicates something that you should be careful of. The picture inside the triangle
indicates the nature of the caution that must be taken.
(For example, the symbol at left means “beware of injury”.)
・・・・・・ This symbol ( ) indicates something that you must not do.
・・・・・・ This symbol ( ) indicates something that you must do. The picture inside the circle indicates the
nature of the thing that must be done.
(For example, the symbol at left means “you must make the ground connection”.)
iii
BAS H series, Programmer
[2] Notes on safety
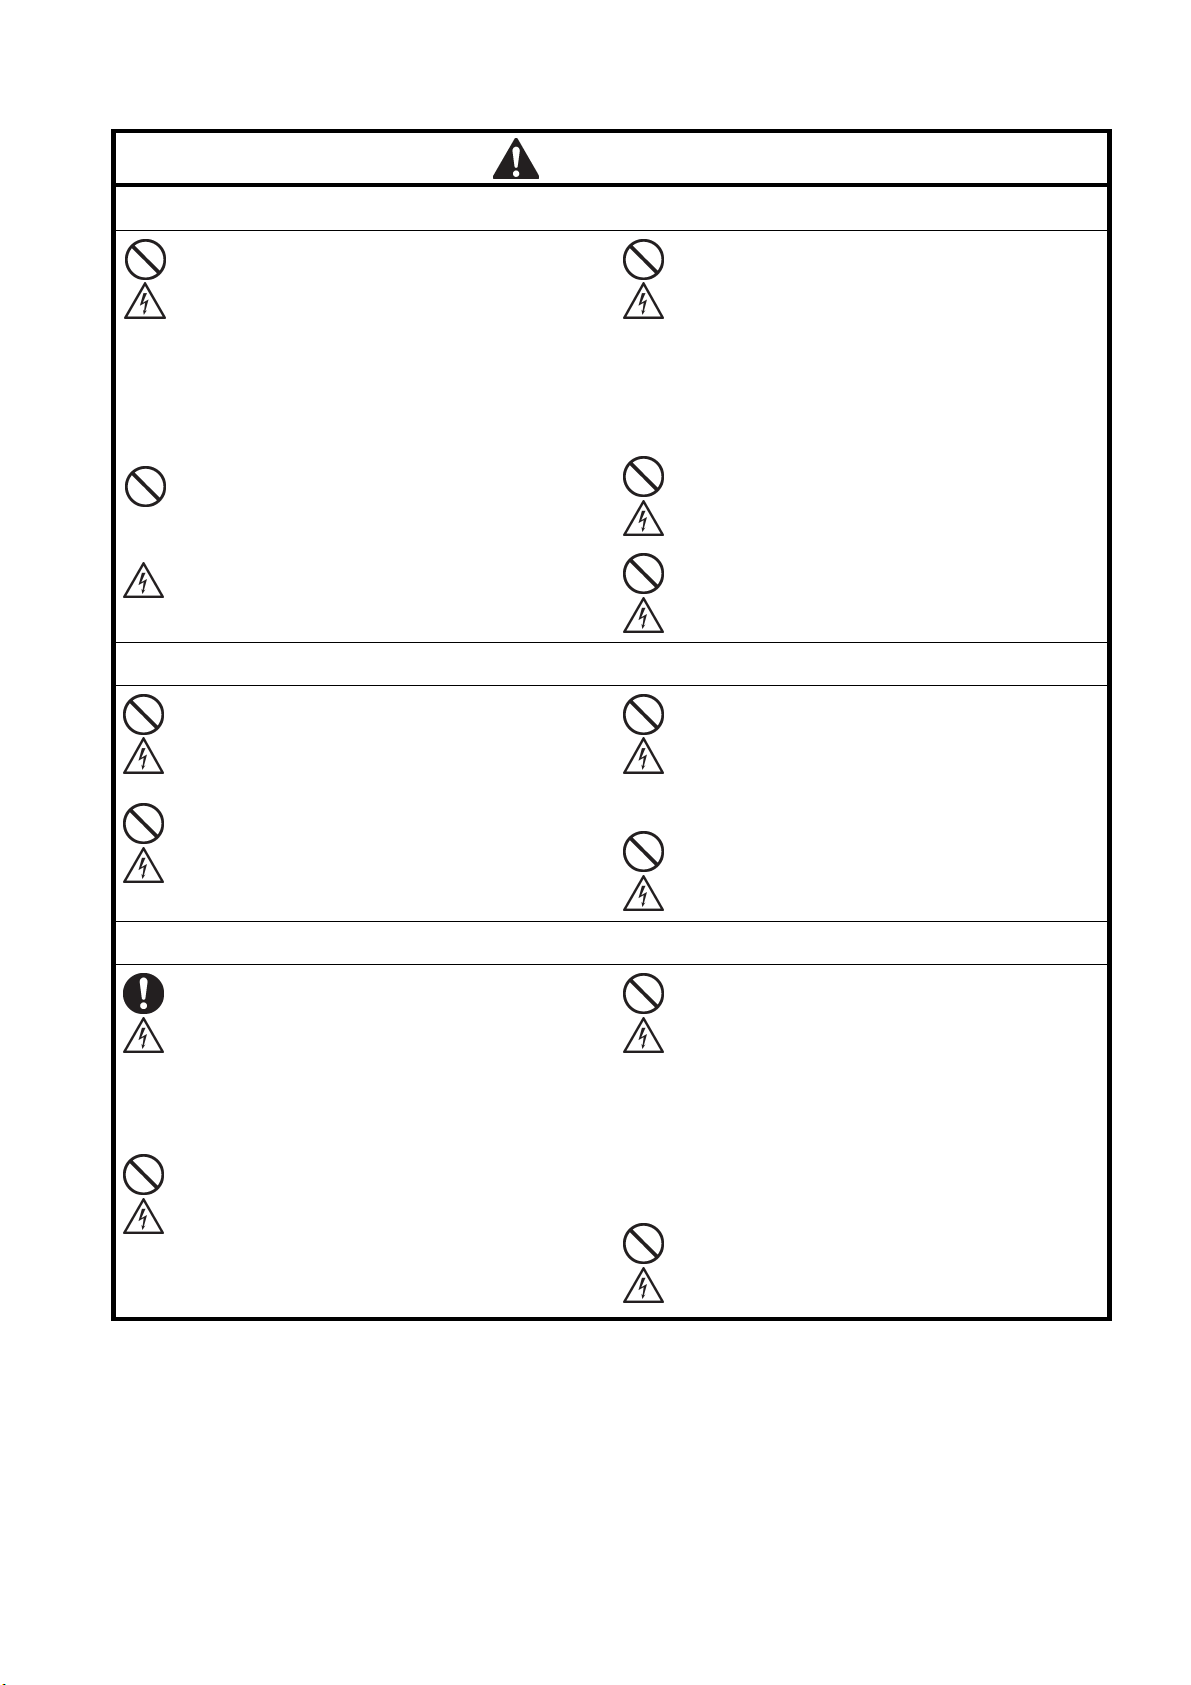
WARNING
Basic precautions
Do not disassemble or modify the programmer,
otherwise it may cause fire or electric shocks or
problems with correct operation.
Ask the place of purchase or a qualified technician to
carry out any internal inspections, adjustments or
repairs that may be required.
(Any problems with correct operation that occur as a
result of the customer attempting to disassemble or
modify the programmer will not be covered by the
warranty.)
The bag that the programmer came in should be
kept out of the reach of children or disposed of
safely. Young children may risk suffocation if they
place it over their head while playing with it.
Do not handle the programmer or connector for the
sewing machine or the AC adapter with wet hands,
otherwise it may cause electric shocks.
If the programmer is subjected to a strong force
such as by being dropped or stepped on, it may
become damaged.
If you continue to use the programmer while it is
damaged, it may result in fire or electric shocks. If
the programmer becomes damaged, immediately
disconnect it from the sewing machine (or
disconnect the AC adapter from the wall outlet) and
contact the place of purchase or a qualified
technician.
Do not insert objects such as screwdrivers into the
AC adapter jack or the memory media slot,
otherwise it may cause fire or electric shocks or
problems with correct operation.
Disconnect the AC adapter from the wall outlet
before disconnecting the AC adapter plug from the
programmer, otherwise it may cause electric shocks
or problems with correct operation.
Installation
Do not use any AC adapter other than the one from
Brother, otherwise it may cause fire or electric
shocks or problems with correct operation.
When using the AC adapter, do not use any voltage
other than the specified voltage, otherwise it may
cause fire or electric shocks or problems with correct
operation.
Do not damage or process the connection cable for
the sewing machine or the AC adapter cable, or
place heavy objects such as furniture on top of them
or bend or pull them with excessive force, otherwise
it may cause fire or electric shocks or problems with
correct operation.
Be sure to use an AC adapter that complies with the
safety standards in the country of use, otherwise it
may cause fire or electric shocks or problems with
correct operation.
During use
If a foreign object gets inside the programmer,
immediately disconnect it from the sewing machine
(or disconnect the AC adapter from the wall outlet)
and contact the place of purchase or a qualified
technician. If you continue to use the programmer
while there is a foreign object inside it, may result in
fire or electric shocks or problems with correct
operation.
Do not allow water or oil to get onto the programmer,
otherwise it may cause fire or electric shocks or
problems with correct operation.
If any liquids get onto the programmer, immediately
disconnect it from the sewing machine (or
disconnect the AC adapter from the contact the
place of purchase or a qualified wall outlet) and
technician.
Do not use the programmer if a problem is noticed
such as smoke or a bad odor coming from the
programmer, otherwise it may cause fire or electric
shocks or problems with correct operation.
Immediately disconnect the programmer from the
sewing machine (or disconnect the AC adapter from
the wall outlet) and contact the place of purchase or
a qualified technician.
(The programmer must never be repaired by the
customer, as it can be extremely dangerous to do
so.)
Do not insert objects such as screwdrivers into the
SD card slot or the USB media port.
Otherwise it may cause fire or electric shocks or
problems with correct operation.

iv
BAS H series, Programmer
CAUTION
Environmental requirements
Use the programmer and the sewing machine in an
area which is free from sources of strong electrical
noise such as electrical line noise or static electric
noise.
Sources of strong electrical noise may cause
problems with correct operation of the programmer
and the sewing machine.
The ambient temperature should be within the
range of 5°C to 35°C during use and storage.
Temperatures which are lower or higher than this
may cause problems with correct operation of the
programmer and the sewing machine.
Any fluctuations in the power supply voltage should
be within ±10% of the rated voltage for the machine.
Voltage fluctuations which are greater than this may
cause problems with correct operation of the
programmer and the sewing machine.
The relative humidity should be within the range of
45% to 85% during use and storage, and no dew
formation should occur in any devices.
Excessively dry or humid environments and dew
formation may cause problems with correct
operation of the programmer and the sewing
machine.
The power supply capacity should be greater than
the requirements for the equipment’s power
consumption.
Insufficient power supply capacity may cause
problems with correct operation of the programmer
and the sewing machine.
In the event of an electrical storm, turn off the power
and disconnect the power cord from the wall outlet.
Lightning may cause problems with correct
operation of the programmer and the sewing
machine.
Installation
Do not place the programmer on unstable surfaces
such as unsteady tables or high shelves, otherwise
it may tip over or fall down and cause injury.
Do not place heavy objects on top of the
programmer, otherwise it may become unbalanced
and tip over or fall down and cause injury.
Turn off the power switch before connecting and
disconnecting the connector for the sewing
machine, otherwise it may damage the programmer
and the control box.
Be sure to disconnect the connector for the sewing
machine when using the AC adapter, otherwise it
may cause problems with correct operation of the
programmer.
During use
The programmer and the sewing machine should
only be used by operators who have received
proper training.
Be sure to wear protective goggles when using the
sewing machine.
If goggles are not worn, there is the danger that if a
needle breaks, parts of the broken needle may
enter your eyes and injury may result.
If a problem occurs with the operation of the
programmer or the sewing machine, contact the
place of purchase or a qualified technician.

BAS H series, Programmer
Contents
Chapter 1
Read Me ··································· 1
Contents and usage ·····························2
Chapter 2
Setting Up Your Programmer········· 3
Part names and functions·······················4
Features ·····················································5
Stitch length·············································5
Stitch count ·············································5
Basic operation ··································5
When using the programmer alone ··················6
Precautions on disassembly, assembly, and part
replacement ·············································6
Handling media··································7
Using SD cards and USB media ·····················7
Chapter 3
Programming Patterns ················· 9
Foreword ······································· 10
Keys to be used······································· 10
About the programming screen····················· 11
Description of icons·································· 12
Programming procedure······················ 16
Creating programs ···························· 22
Creating a line ········································ 22
Creating a curve ······································ 22
Creating an arc········································ 23
Creating a rectangle·································· 23
Creating a circle ······································ 24
Creating a semicircle ································ 25
Creating an ellipse ··································· 25
Creating needle drop data ··························· 26
Creating feed data ···································· 26
Creating basting data ································ 26
Editing programs (Editing outlines) ········ 29
Deleting an outline ··································· 29
Moving an outline···································· 29
Copying an outline ··································· 30
Rotating an outline ··································· 30
Moving an outline symmetrically ·················· 31
Copying an outline symmetrically ················· 32
Moving an outline by an offset ····················· 33
Copying an outline by an offset ···················· 33
Resizing an outline··································· 34
Changing the line type of an outline ··············· 35
Adding and deleting backtack stitches for an
outline ················································· 35
Switching the sewing start and end points for
outlines ················································ 36
Changing the connection method for outlines ···· 36
Combining outlines ·································· 37
Changing the sewing order for an outline········· 37
Editing programs
(Editing outline component points) ·········38
Deleting an outline component point ·············· 38
Moving an outline component point ···············39
Adding an outline component point················40
Changing curve shapes ······························ 40
Changing the attributes of outline component
points··················································· 41
Separating an outline at a component point ······· 41
Editing programs (Editing sewing points)···42
Deleting a sewing point······························42
Moving a sewing point·······························43
Adding a sewing point ······························· 44
Changing the attributes of sewing points··········45
Separating an outline at a sewing point············ 46
Setting bar tacking at a sewing point··············· 46
Adding and deleting codes at sewing points ······ 47
Editing end codes····································· 47
List of code settings ··································48
Checking programs····························49
Checking each stitch ·································49
Moving to the start position ·························49
Measuring distances·································· 50
Programming example ························51
Programming for each stitch ························51
Pattern with lines ·····································52
Pattern with curves ···································53
Double stitch and multiple stitch ···················54
Continuous sewing with the work clamp in
position after thread trimming (feed) ··············55
Basting ·················································56
Symmetrical pattern ··································57
Programming while entering splits in different
patterns················································· 58
Zigzag stitch··········································· 59
Example of modified program ···············60
Resizing a pattern····································· 61
Modifying a part of pattern·························· 62
Deleting the first stitch to change the sewing
start point to the second stitch ······················63
Moving the sewing start point ······················64
Adding a new sewing start point before the first
stitch···················································· 65
Adding an escape point before the sewing start
point ···················································· 66
Modifying a pattern by moving a component
point ···················································· 67
Modifying a pattern by adding a component
point ···················································· 68
Modifying a pattern by deleting a component
point ····················································69
Moving the pattern in parallel·······················70
Deleting a part of data during programming ······71
Moving a part of a continuous program in
parallel ·················································72
Moving a part of a continuous program in
parallel partially ······································73
Inserting a straight line into a pattern ·············· 74

BAS H series, Programmer
Chapter 4
Extended Option Output
(PROGRAM)···························· 77
Foreword ······································· 78
Function of the extended option output ··········· 78
Description of icons·································· 78
Setting extended option output ·············· 80
Opening the extended option output setting
screen ·················································· 80
Setting details of the extended option output ····· 80
Setting enabling conditions ························· 81
Saving extended option output ····················· 81
Saving with a different filename ··················· 82
Loading extended option output which has been
created ················································· 83
Deleting extended option output ··················· 83
Applying extended option output to the
sewing machine ································ 84
Applying extended option output to the sewing
machine················································ 84
Displaying extended option output ················ 84
Initializing extended option output ················ 84
Table of condition number··················· 85
Mode for operating the sewing machine ·········· 85
Standard input ········································ 85
Standard output······································· 85
External input of the extended option ············· 86
Extended option output······························ 86
Table of extended option input ····················· 87
Table of extended option output···················· 88
Examples of the extended option output ·········· 89
Use of extended option output (Basics) ···· 92
Necessary items ······································ 92
Simplified examples of the extended option
output ·················································· 92
Use of extended option output
(Application) ··································· 98
Necessary items (other than for Basics) ··········· 98
Limitations of extended option output············· 98
Examples of option outputs (Application) ········ 99
How to create programs ····························104
Use of extended option output
(Reference material) ·························106
Parts for the extended option ······················106
Circuit diagram of the checking board ···········107
Block diagram ·······································109
Chapter 5
File Manager Functions ············· 111
Foreword······································ 112
Tasks that can be carried out using the
File Manager ········································ 112
Description of icons ································ 112
Displaying file lists·························· 115
Checking file information ························· 115
Changing the content display method to list
format or icon format ······························ 115
Sorting the display (applying sorting
conditions)··········································· 116
File operations ······························· 117
Deleting files and folders·························· 117
Copying files and folders ·························· 118
Moving files and folders··························· 119
Changing the names of files and folders········· 120
Creating folders····································· 121
File operations using storage media······· 122
Importing files from storage media into the panel
internal memory ···································· 122
Exporting files from the panel internal memory to
storage media ······································· 122
Formatting media··································· 123
Chapter 6
Setting Functions ····················· 125
Setting the programming functions ······· 126
Setting the display··························· 127
Setting the date and time···················· 128
List of time zone settings·························· 129
Setting the language ························· 130
Setting the sound····························· 130
Checking information ······················· 131
Viewing information ······························ 131
Updating the software······················· 132
Checking the software license ············· 132


Chapter 1
Read Me

CHAPTER 1 READ ME
2BAS H series, Programmer
C
Co
on
nt
te
en
nt
ts
s
a
an
nd
d
u
us
sa
ag
ge
e
This document is organized as follows.
Chapter 1 Read Me
Describes general precautions.
Chapter 2 Setting Up Your Programmer
Describes how to set up your programmer and its basic operations.
Chapter 3 Programming Patterns
Describes how to create programs with icons.
Chapter 4 Extended Option Output
Describes how to set the extended option output.
Chapter 5 File Manager Functions
Describes how to check, copy, move, and change program data.
Chapter 6 Setting Functions
Describes how to display program of the sewing machine.

Chapter 2
Setting Up Your Programmer
CHAPTER 2 SETTING UP YOUR PROGRAMMER
4BAS H series, Programmer
P
Pa
ar
rt
t
n
na
am
me
es
s
a
an
nd
d
f
fu
un
nc
ct
ti
io
on
ns
s
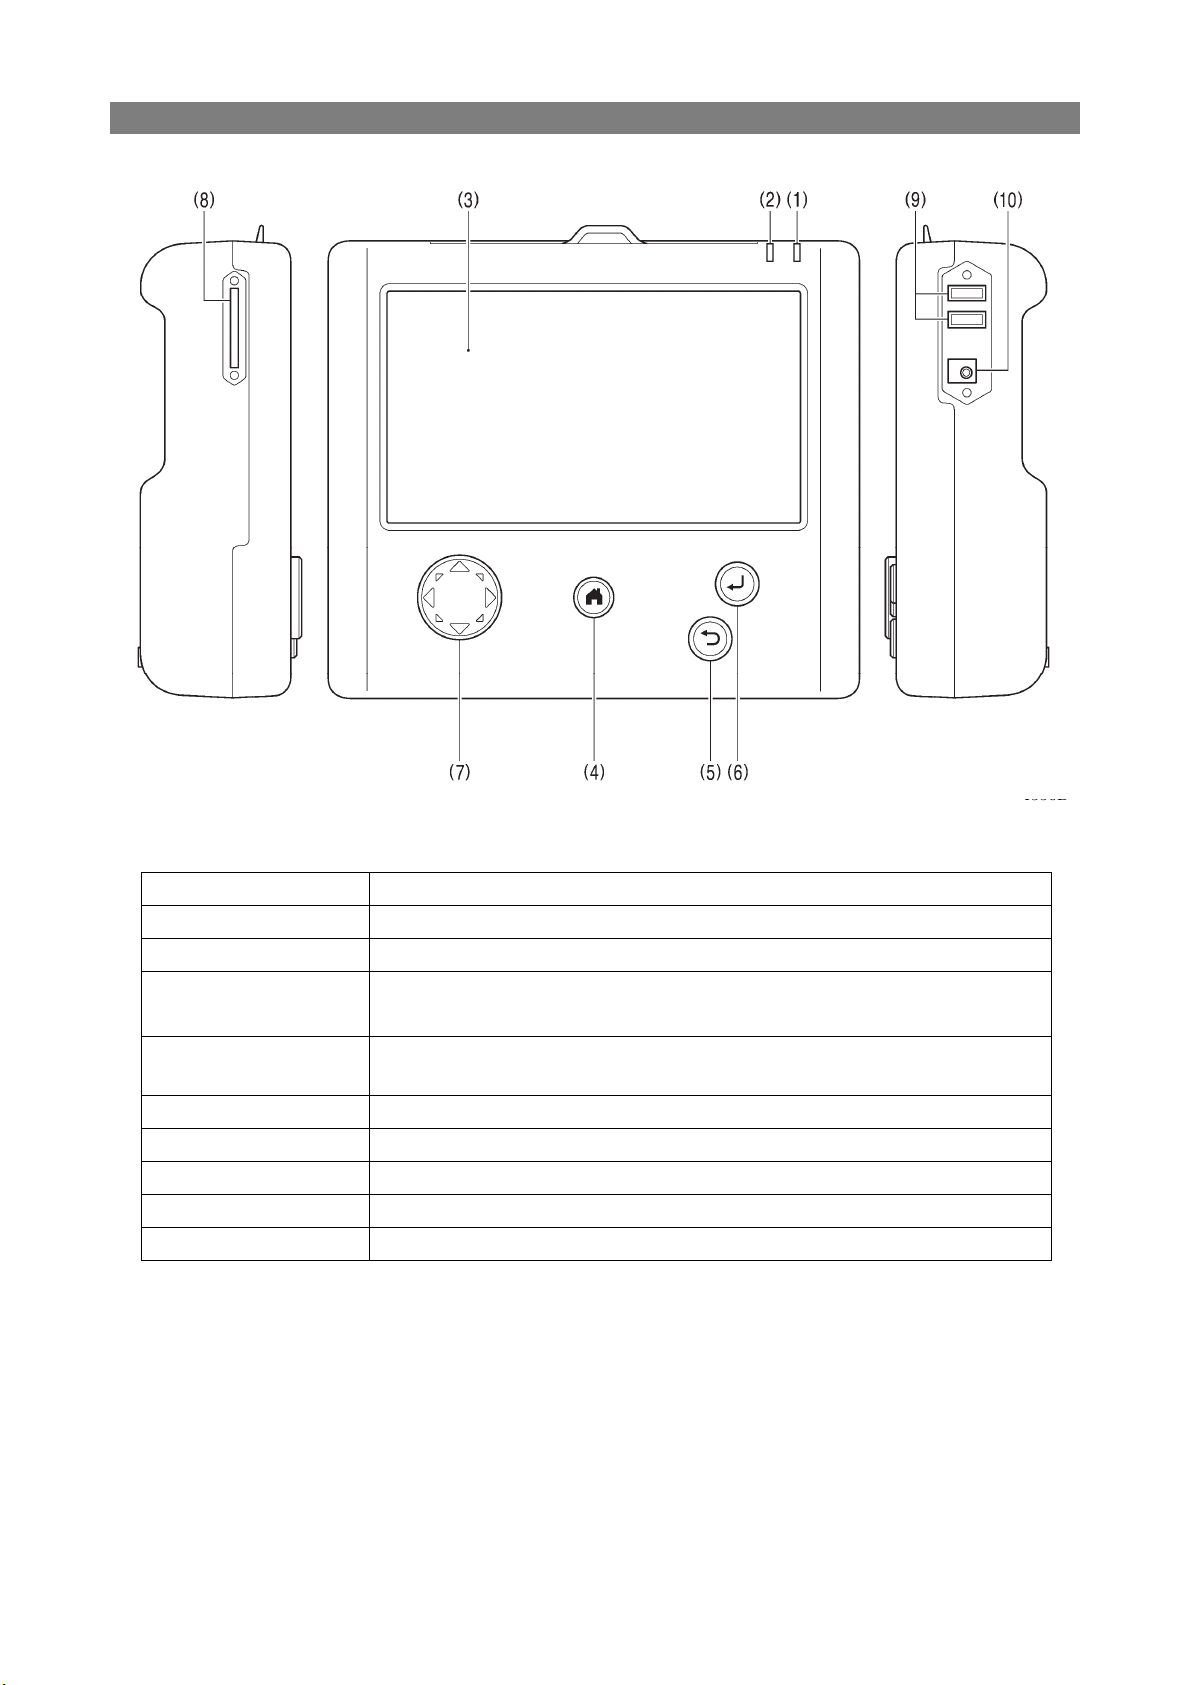
(1) Power indicator Illuminates when the power is turned on.
(2) Caution indicator Illuminates when an error occurs.
(3) LCD/touch panel This displays messages and touch keys (icons).
(4) HOME key This key is used to return to the home screen.
At the home screen, hold down (for 2 seconds or more) to switch to sleep mode*.
(5) BACK key This key is used for operations such as returning to the previous step and
canceling settings.
(6) ENTER key This key is used for operations such as confirming settings.
(7) JOG key This key is used when programming sewing data.
(8) SD card slot Insert an SD card.
(9) USB port×2 Connect a device such as USB media.
(10) AC adapter jack Connect an AC adapter.
* The screen will turn off and the sewing machine cannot be operated. Press the home key once more to cancel
sleep mode.
4336B

CHAPTER 2 SETTING UP YOUR PROGRAMMER
BAS H series, Programmer 5
F
Fe
ea
at
tu
ur
re
es
s
Stitch length
Setting is possible within a range of 0.3 to 12.7 m (0.3 to 20.0 mm for the BAS-360H, BAS-365H, BAS-370H and
BAS-375H).
Stitch count
A single program can contain a maximum of 20,000 stitches (100,000 stitches for the BAS-360H, BAS-365H,
BAS-370H and BAS-375H). (The sewing machine can hold 999 patterns, and the storage media can hold as many
patterns as the upper limit of the media's storage capacity allows. However, if there are some patterns which have a
large number of stitches in each program, the number of patterns which can be stored may be less.)
B
Ba
as
si
ic
c
o
op
pe
er
ra
at
ti
io
on
n
WARNING
Do not handle the programmer or connector for the
sewing machine or the AC adapter with wet hands,
otherwise it may cause electric shocks.
Do not insert objects such as screwdrivers into the
AC adapter jack or the memory media slot, otherwise
it may cause fire or electric shocks or problems with
correct operation.
Do not use any AC adapter other than the one from
Brother, otherwise it may cause fire or electric
shocks or problems with correct operation.
When using the AC adapter, do not use any voltage
other than the specified voltage, otherwise it may
cause fire or electric shocks or problems with correct
operation.
If a foreign object gets inside the programmer,
immediately disconnect it from the sewing machine
(or disconnect the AC adapter from the wall outlet)
and contact the place of purchase or a qualified
technician. If you continue to use the programmer
while there is a foreign object inside it, may result in
fire or electric shocks or problems with correct
operation.
Disconnect the AC adapter from the wall outlet
before disconnecting the AC adapter plug from the
programmer, otherwise it may cause electric shocks
or problems with correct operation.
Do not damage or process the connection cable for
the sewing machine or the AC adapter cable, or
place heavy objects such as furniture on top of them
or bend or pull them with excessive force, otherwise
it may cause fire or electric shocks or problems with
correct operation.
Do not use the programmer if a problem is noticed
such as smoke or a bad odor coming from the
programmer, otherwise it may cause fire or electric
shocks or problems with correct operation.
Immediately disconnect the programmer from the
sewing machine (or disconnect the AC adapter from
the wall outlet) and contact the place of purchase or
a qualified technician.
(The programmer must never be repaired by the
customer, as it can be extremely dangerous to do
so.)
CAUTION
Do not place the programmer on unstable surfaces
such as unsteady tables or high shelves, otherwise it
may tip over or fall down and cause injury.
Do not place heavy objects on top of the
programmer, otherwise it may become unbalanced
and tip over or fall down and cause injury.
The programmer and the sewing machine should
only be used by operators who have received proper
training.
Turn off the power switch before connecting and
disconnecting the connector for the sewing
machine, otherwise it may damage the programmer
and the control box.
Be sure to disconnect the connector for the sewing
machine when using the AC adapter, otherwise it
may cause problems with correct operation of the
programmer.
CHAPTER 2 SETTING UP YOUR PROGRAMMER
6BAS H series, Programmer
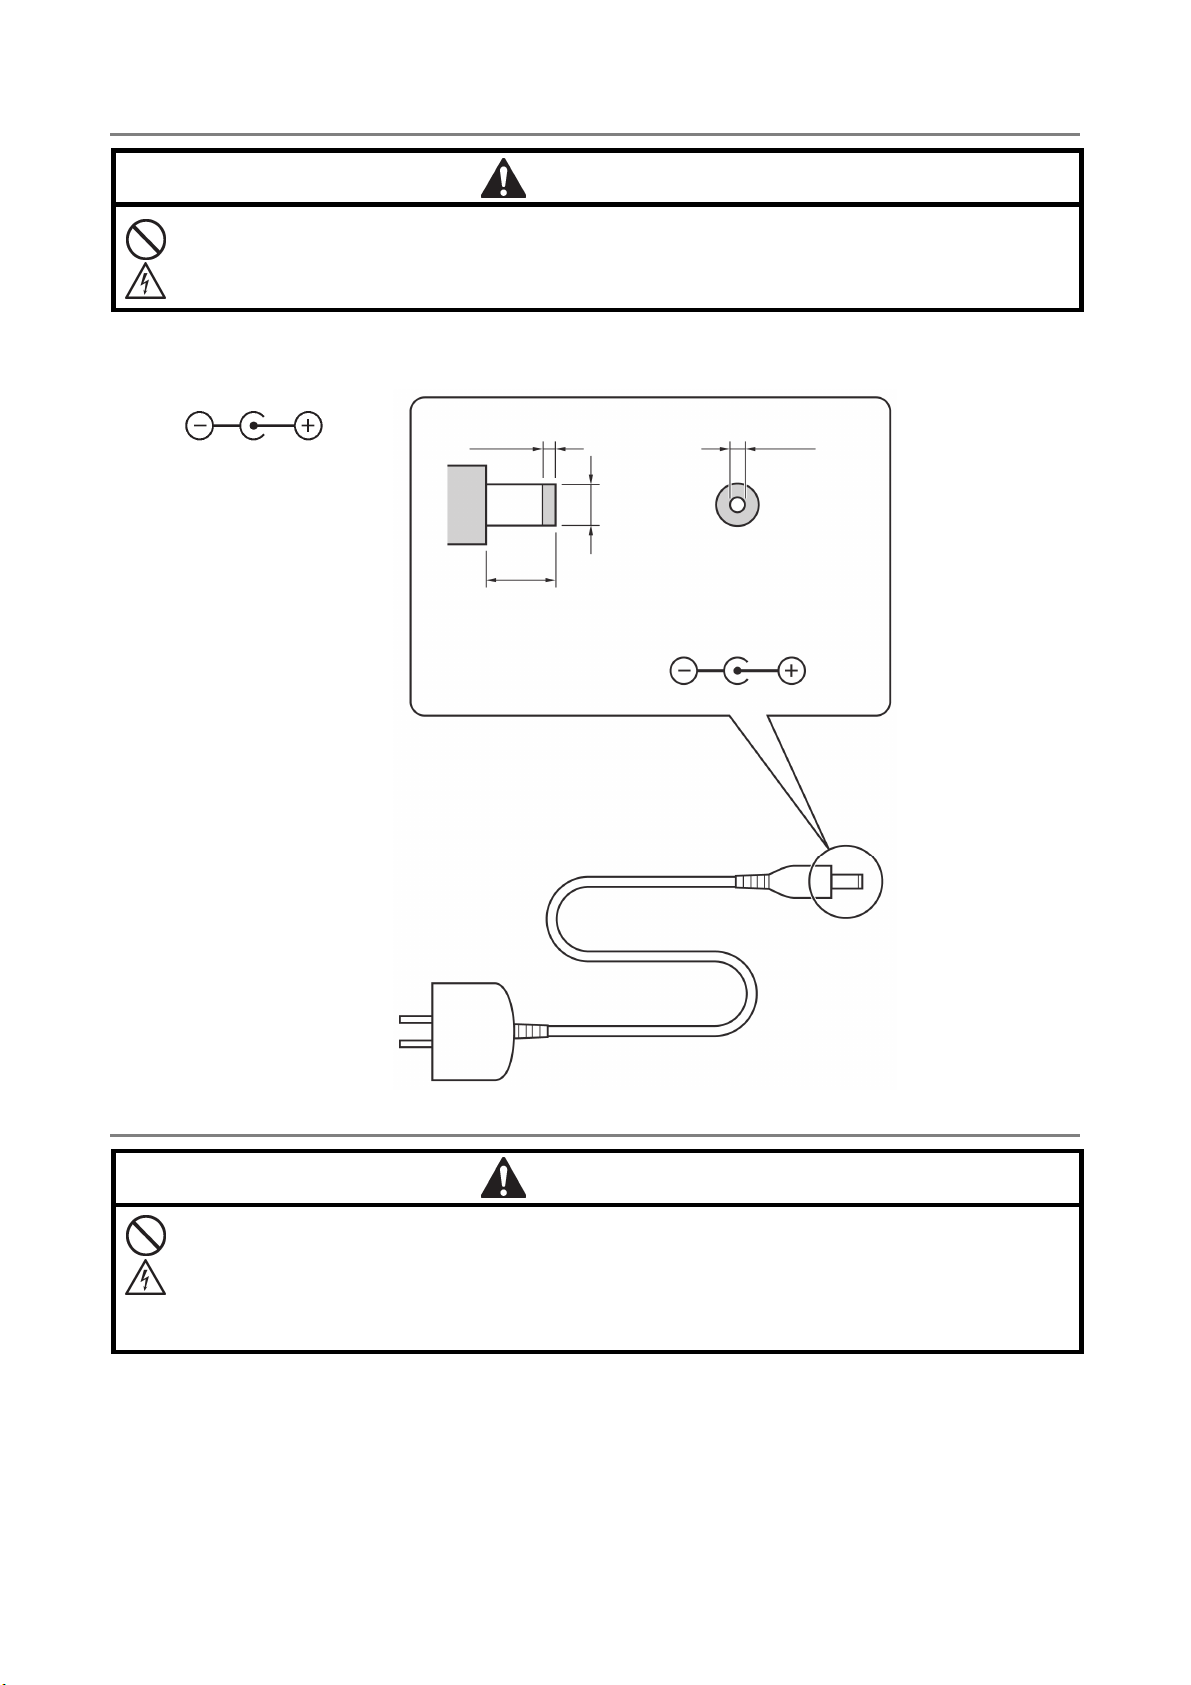
When using the programmer alone
WARNING
Be sure to use an AC adapter that complies with the safety standards in the country of use.
Otherwise, it may cause fire or electric shocks or problems with correct operation.
Purchase an AC adaptor conforming to the specifications below.
OUTPUT: 24 VDC, 0.5A
Polarity:
3670B
3671B
Precautions on disassembly, assembly, and part replacement
WARNING
Do not disassemble or modify the programmer, otherwise it may cause fire or electric shocks or problems with
correct operation.
Ask the place of purchase or a qualified technician to carry out any internal inspections, adjustments or repairs
that may be required.
(Any problems with correct operation that occur as a result of the customer attempting to disassemble or modify
the programmer will not be covered by the warranty.)
・For preventing the internal wiring from being damaged, considerable care must be taken when assembling and
disassembling the case.
・For preventing the internal wiring from getting caught in the case or other parts, care must be taken when
assembling the case.
・Be sure to use a torque of 0.5 N/m when tightening screws.
Using excessive torque may damage the case.
OUTPUT
DC24V
0.5A
Φ2.1mm
Φ5.5mm
1.5mm
9.5mm

CHAPTER 2 SETTING UP YOUR PROGRAMMER
BAS H series, Programmer 7
H
Ha
an
nd
dl
li
in
ng
g
m
me
ed
di
ia
a
WARNING
Do not insert objects such as screwdrivers into the SD card slot or the USB media port.
Otherwise it may cause fire or electric shocks or problems with correct operation.
Using SD cards and USB media
Configuration of SD card and USB media folders
Data type Folder name File name
Control program ¥BROTHER¥ISM¥ISMSYS¥
ISM19MN.BVP, ISM21MN.BVP,
ISM25MN.BVP, ISM26MN.BVP (Main
control program)
ISM19MT.BVP (Motor control program)
ISM23PL.BVP (Panel control program)
Sewing data
¥BROTHER¥ISM¥ISMDH**¥
¥BROTHER¥ISM¥ISMDI**¥
(For BAS-360H, BAS-365H, BAS-370H and
BAS-375H)
* "**" represents the value for memory
switch No. 752. If you would like to
keep additional sewing data for
different sewing machines on a single
SD card, change the folder name.
ISMS0***.SEW
ISMS0***.EMB
* ‘***’ represents the sewing data number.
Memory switch Same as above memorysw.db
Parameter Same as above userparam.db
Cycle program Same as above ISMCYC**.SEW
* ‘***’ represents the sewing data number.
Extended option
programs
Same as above ISMSEQ**.SEQ
* ‘***’ represents the sewing data number.
Error log ¥BROTHER¥ISM¥ISMLDT¥ Stores the files which relate to error logs.
Notes on handling SD cards and USB media
・ Do not insert any objects into the card slot and the USB media port other than SD cards or USB media.
Otherwise, damage to the product may occur.
・ Do not remove the power plug or insert or remove an SD card or USB media while data reading or
writing operations are in progress. Otherwise the data may become corrupted or the SD card or USB
media may become damaged.
・ If the data cannot be recognized, return the data to the device which recorded it or some other similar
device to check if the SD card or USB media is damaged or not.
・ The data on the SD card or USB media may become lost or corrupted due to some malfunction or
accident. It is recommended that you make backups of important data.
* Company names and product names appearing in this manual are trademarks or registered trademarks of
the respective owners.
* This product is compatible with media that has been formatted using the FAT16/32 method. Media that
has been formatted using other formatting methods cannot be used.

CHAPTER 2 SETTING UP YOUR PROGRAMMER
8BAS H series, Programmer
Inserting SD cards and USB media
1. Open the media slot cover.
2. Insert the SD card or USB media into the SD card slot or USB media port of the programmer.
The programmer is compatible with the following SD cards and USB media.
Type Setting location
・SD cards (maximum capacity 2 GB)
・SDHC cards (maximum capacity 32 GB)
・USB media (maximum capacity 32 GB)
When removing SD cards and USB media
Check that reading or writing has finished, and then simply remove the storage device.
If the programmer is connected to a PC, first wait until the SD card or the USB media is no longer being accessed by
the PC, and then remove the SD card or USB media.
3597B
3594B 4290B

Chapter 3
Programming Patterns

CHAPTER 3 PROGRAMMING PATTERNS
10
BAS H series, Programmer
Foreword
While being operated by the programmer, a number of icons are displayed on the screen which illustrate its operations
and functions.
This chapter describes the procedure for programming with icons.
Keys to be used
Below is an explanation of the keys which are used when programming.
Press this to move the cursor
around within the preview, etc.
Press this to return
to the Home screen.
Press this to return to the
p
revious step.
Press this to confirm
outlines and settings.

CHAPTER 3 PROGRAMMING PATTERNS
BAS H series, Programmer
11
About the programming screen
At the Home screen, touch to display the programming screen.
* When "Starting extended option editing directly" in "Programmer" is set to "ON", touch in the Home screen
to display the extended option output setting screen. Follow the procedure below to display the programmer screen
from the extended option output setting screen. Refer to Chapter 6 for details on changing the setting.
1. At the extended option output setting screen, touch .
2. A dialog box will be displayed for you to select the type of file to create.
3. Select "New Sewing Program", and then touch .
Shows the difference between the
current cursor position the position
at the previous step.
Shows an image of the
p
rogram.
Shows the current
number of needle
p
ositions and the
total number of
stitches.
Shows the size of the
p
rogram.
Switches the mode.
Shows icons which can
be used in the various
modes.
Sets the values used by
the various functions.
Used to delete all programs
and to save and load
p
rograms.
Use to redo and restore
programs
Use to display and
change program
zoom ratio and zoom
p
osition
CHAPTER 3 PROGRAMMING PATTERNS
12
BAS H series, Programmer
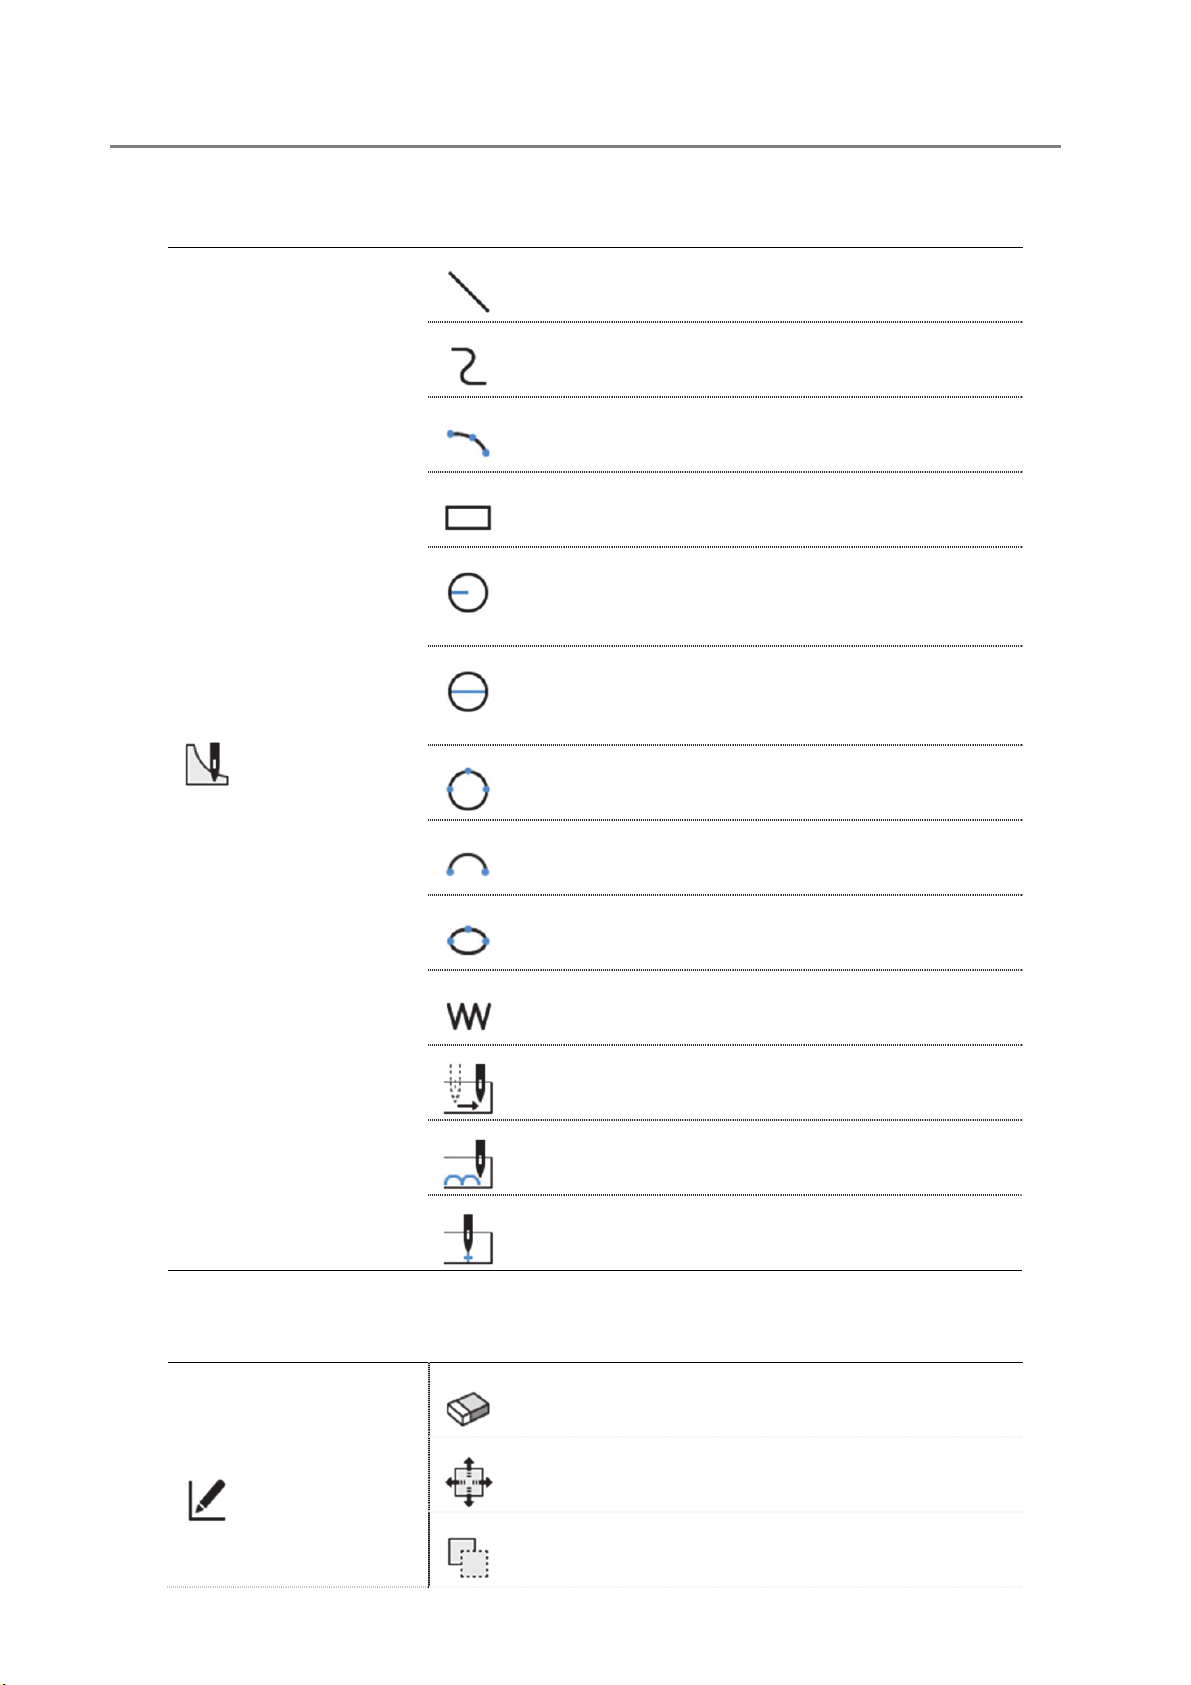
Description of icons
Programming
Creating data
Creating a line
Creating a curve
Creating an arc
Creating a rectangle
Creating a circle of the specified radius(clockwise or
counterclockwise)
Creating a circle of the specified diameter(clockwise or
counterclockwise)
Creating a circle by specifying three points
Creating a semicircle
Creating an ellipse
Creating needle drop data
Creating feed data
Creating basting data
Specifying the sewing start point
Editing programs
Editing outlines
Deleting an outline
Moving an outline
Copying an outline
Other manuals for BAS H series
2
This manual suits for next models
4
Table of contents
Popular Motherboard manuals by other brands


Gan Systems
Gan Systems GS-EVB-HBDB-IMS Technical manual

DFI
DFI CB60-BX user manual

VIA Technologies
VIA Technologies EX10000EG - VIA EPIA Motherboard user manual

Digilent
Digilent Cora Z7 Reference manual

Boardcon Embedded Design
Boardcon Embedded Design EM3568-AV CAM user manual

Infineon
Infineon TriBoard TC3X4L user manual


