Brother HD-390I Assembly instructions

MODEL: HD-390I
Professional Analogue Multimeter
With robust Holster & reliable Protection
Operator’s Instruction Manual
READ AND UNDERSTAND THIS
MANUAL BEFORE USING THE
INSTRUMENT
Failure to understand and comply with the
WARING and operating Instructions can
result in serious or fatal injuries and /or
property damage.

BRIEF INTRODUCTION
This Multimeter is an accurate,safe,battery operated,rear
tilt-stand,easy to operate handheld instrument with robust
protective holster alongside and the adjustable back tilt device
with hook-up design. It can offer accurate,reliable measurements
of DCV & +/-DCV,ACV RMS & Peak-to-Peak,DC Current,
Resistance with very high sensitive quality movement,mirrored
Aluminum dial plate,double-sided glass-epoxy PCB and
good-designed circuit etc.; and more it checks Diode,LED,
Transistor,Decibels,AC live wire,Infrared signal,Circuit
Continuity via Buzzer and Capacitance. It has the perfect full
overload & mis-used protection via two Fuses,Oxide Varactor &
Diodes. It is an ideal instrument for indoor use in the laboratory,
school, workshop, hobby and home applications.
SPECIFICATIONS
Safety Category: IEC61010-1,CAT II 1000V,CAT III 500V and
Pollution Degree 2.
Common Environment: 23C5C,less than 75% RH.
Temperature Ranges:
0C to 40C,32 F to 104 F for operating condition.
-10 C to 50C,14 F to 122F for storage condition.
Humidity Scope: Operating condition less than 90% RH.
Storage condition: less than 80% RH.
Size: 163(W) x 115(D) x 42(H) MM
Weight: 380g approx. (including batteries 3pcs)
Accessories: One set of safety Test Leads 1000V/10A type;
Two Spare Fuses: 0.5A/250V(Φ5x20mm) & 10A/250V(Φ6x32mm).

1
Test
Functions
Range
Accuracy
Remarks
DC V
0-0.1-2.5-10-50-
250-1000V
3% FSD.
4% FSD.
For 1000V
Input Impendence:
20KΩ/V Overload
Protection: Max.
1000V AC/DC
BUT 0.1V/2.5V/10V
250V Max.
Null DCV
±-5V,±25V
5% FSD.
Input Impedance: 40KΩ/V
Overload 1000V Max.
AC Vrms
0-10-50-250V
-1000V
4% FSD.
5% FSD.
For 1000V
Input Impendence:
9KΩ/V Overload
Protection: Max.
1000V AC/DC
But 10V/50V only
250V Max. Band
width: 20 ~10K Hz
AC Vp-p
0-28(10)-70x2(5
0)-700(250)
-2800V(1000)
Note: at AC50V
range,the Vp-p
real reading must
be doubled.
5% FSD.
Input Impendence:
9KΩ/V Overload
Protection: Max.
2800V peak-to-peak
But 10V/50V only
700Vp-p Max. Band
width: 20 ~10K Hz
DC mA
0-0.05-2.5-25
-250 mA,10A
3% FSD.
4% FSD.
at 10A
range
Drop Voltage: 250 mV
Overload protected by
Fuses 0.5A/250V &
10A / 250V at 10A
range,and Oxide
Varactor.<250V AC/
DC(5s). Max. test time
1min. for 10A.
Ω
X 1: 0.2 ~ 2KΩ
Midscale at 20Ω
X 10: 2 ~ 20KΩ
Midscale at200Ω
X 100: 20 ~
200KΩ Midscale
at 2000Ω
X1K: 200~ 2MΩ
4% of
ARC of
Scale
Length
Overload protected by
the Oxide Varactor &
Fuse <250V AC/DC
(5s).

2
Midscale at 0KΩ
X10K: 2K~20MΩ
Midscale at
200KΩ
Capacitan
ce (uF)
2,000uF(C)
Approx.
Value
Use the R x 1K range
Infrared
Check
IR Data
90±15°, < 50cm
The LED Red Light can be lit and
flashing if remote control works well
AC Live
AC Live
The LED Red Light can be flashing if
the connected test lead contacts Live
wire or Live terminal of outlet.
Transistor
Check
hFE: 0-1000 via
special hFE
socket
Approx.
Value
At Ω X 10 Range
LED
Check
via special hFE
socket
Approx.
Value
At Ω X 10 Range
Decibel
-20 dB ~ + 62 dB
(0dB=1mW at
600Ω)
Approx.
Value
At ACV ranges
Continuity
Check
Beeper
sounds <
200 Ohm
approx..
Overload protected by
Fuse & Oxide
Varactor .<250V
AC/DC(5s).
POWER
Source
Internal Battery: R03, AAA,1.5V x2pcs; and 6F22,
NEDA1604,9V x1pc.
NOTE1: The extra indication error will occur as per the waveforms of
measured ACV/ACA other than the sine wave. Its readings of rms value may
be lower or higher than the actual root-mean-square value.
NOTE2: For 10A range,the big current loaded Max. 1min. with 5 min pause
for next testing.
NOTE3: For Diode test,Max. 15 µA in the x10k range; and Max. 0.15 mA in
the x1k range; and Max. 1.5 mA in the x100 range; and Max. 15 mA in the
x10 range; and Max. 150 mA in the x1 range.

3
Scale/Value Readings Reference Table on Dial Plate
Test Function
Range
Scale/Value for reading
Multiplied
Resistance(Ω)
×1
×10
×100
×1K
×10K
1st Blue ΩLine
×1
×10
×100
×1000
×10000
DC Volt(V)
DC 0.1V
2.5V
10V
50V
250V
1000V
2nd Black Line V.A
Value 10(50/10)
250
10(50/10)
50(50/10)
250
10(50/10)
×0.01
×0.01
×1
×1
×1
×100
Null DC Volt(V)
DC ±25V
±5V
2nd Black Line V.A +/-DCV
-Red / +Blue Value
-25, -15, -5, 0, +5,+15,+25
-5, -3, -1, 0, +1, +3, +5
×1
×1
DC Current
(A)
DC 50μA
2.5mA
25mA
2nd Black Line V.A
Value 10(50/10)
250
250
×1
×0.01
×0.1

4
250mA
10A
250
10(50/10)
×1
×1
AC Vrms
AC 10V
50V
250V
1000V
2nd Black Line V.A
Value 10(50/10)
50(50/10)
250
10(50/10)
×1
×1
×1
×100
AC Vp-p
AC 10V
50V
250V
1000V
3rd Red Scale Line
Value 28
70
70
28
×1
×2
×10
×100
Capacitance
C(uF)
(Rx1k)
4th Black Scale Line
1 ~ 2,000 uF
x1
Transistor hFE
Ω×10
5th Blue Line IC/IB 0-1000
×1
Diode
Ω×10K
×1K
×100
×10
×1
6
th
Black Line
LI 0~15μA/mA
6th Black Line LV 0~3V
μA×1
μA×10
μA×100
mA×1
mA×10
Decibel
AC 10V
50V
250V
1000V
7th Red Scale Line
Value -20dB ~ +22dB
X1
X1+14dB
X1+28dB
X1+40dB
CALIBRATION
Ohms Zero Adjustor located at the right side of the panel,
adjusting the meter pointer to the Zero mark on the right side
of Ohm scale of the meter dial when the test leads are touched
together at any Ωrange.
Mechanical Adjustor Screw: located right below the center of
the meter dial to set pointer to Zero mark at the left side of the
scale.
(-) Jack: Plug-in connector at the lower left on the panel for

5
Black,negative test lead.
(+) Jack: Plug-in connector at the lower right on the panel for
Red,positive test lead.
OPERATING INSTRUCTIONS
CAUTION
When making voltage or current measurements,develop the
habit of turning off all power to the circuit under test. Connect
the test leads at the desired points in the circuit,and then turn
on the power while taking readings. Turn off the power before
disconnecting the test leads from the circuit.
INTERNAL BATTERY CHECK
To check the battery condition,insert the black test lead into
the (-) jack. Set the range switch to the R X1 range position and
short the ends of the two sides of the test leads. If the pointer
can not be brought to the zero mark,replace the 1.5V cells or
9V cell. (See battery replacement.)
BEFORE OPERATING
1. Set the range switch to the proper position before making
any measurement.
2. Never apply more voltage or current than the rated value in
every position.
3. When the voltage or current to be measured it not known,
always start with the highest range.
4. If meter indication is in the lower half of the scale and falls
within the range of a lower scale,reset selector switch to the
lower range for greatest accuracy.
5. If the meter won’t work at all,check the fuse located on the
PCB. If it’s blown,replace it. (See fuse replacement.)
6. Avoid placing the meter where extreme shock or continuous
vibration is encountered and do not store in excessively hot

6
or damp places. Although very rugged,the meter is a
sensitive measuring device and should be handled carefully
& properly.
7. Do not check resistance,transistor,diode,LED,or
capacitance when live voltage or current input across the
circuit.
8. When the meter is not in use,keep the selector switch to
the “OFF” range position,this provides direct short across
meter movement for minimum needle bounce when
transporting meter.
9. If you should accidentally apply excessive voltage or current
on a certain range,disconnect the leads from the circuit as
quickly as possible,check instrument operation on that
range by applying peoper input. If the meter does not operate
peoperly,check fuse. If it is blown replace it. (See fuse
replacement.)
OPERATION PROCEDURES
DC Voltage Measurement
WARNING: WITH EXTREME CARE WHEN MAKING
MEASUREMENTS FOR HUGE VOLTAGE. DO NOT TOUCH
TERMINAL OR PROBE ENDS.
1. Set the selector switch to the appropriate DCV range to be
used.
2. Connect the BLACK test lead to the “-COM” jack and the RED
test lead to the “+” jack.
3. If you know the polarity of the circuit to be tested,connect the
black probe to the negative side.
4. If you don’t know the polarity,connect the probes to opposite
sides of the circuit and watch the pointer. If it goes to the left,
reverse the probes. The RED probe will be connected to the
positive.

7
5. Check the needle position and get the reading on the 2nd V.A
scale below.
Null DCV (Central Zero) Measurement
At these two ranges,it can automatically judge the polarity of
circuit as the pointer can move to the center line and become a
Null meter.
1. Set the selector switch to the DCV ±5V or 25V range.
2. Connect the BLACK test lead to the “-COM” jack and the RED
test lead to the Red “+” jack.
3. Set the Zero Ω adjustor to place the pointer exactly to the
Central Zero position if need.
4. Connect the test leads across the circuit or load under
measurement.
5. Take the readings on the 2nd Black V.A. scale line as per the
Red/Blue ±values(-25/5,-15/3,-5/1; 0; +5/1,+15/3,+25/5).
NOTE: If the needle failed to be set at Central Zero position,the
power of 9V battery may be weak and should be replaced by
new one for normal working.
AC Voltage Measurement
WARNING: WITH EXTREME CARE WHEN MAKING
MEASUREMENTS FOR HUGE VOLTAGE. DO NOT TOUCH
TERMINAL OR PROBE ENDS.
AC Vrms:
1. Set the selector switch to the appropriate ACV range to be used
and connect the test leads across the circuit or load under
measurement. (Polarity of the test probes is unimportant on
ACV test.)
2. Connect the BLACK test lead to the “-COM” jack and the RED
test lead to the“+” jack.
3. Check the needle position and the get the reading on the 2nd
Black V.A scales.

8
AC Vp-p:
1. Set the selector switch to the appropriate Red ACV range in the
parentheses (28,70x2,700,2800); and connect the test
leads across the circuit or load under measurement. (Polarity of
the test probes is unimportant.)
2. Connect the BLACK test lead to the “-COM” jack and the RED
test lead to the“+” jack.
3. Check the needle position and the get the reading on the
special 3rd Red ACVp-p scale.
NOTE: at AC50V(70x2) range,the actual Vp-p value must be
multiplied by twice the reading at scale.
DC Current Measurement
WARNING: DO NOT APPLY VOLTAGE TO MEASURING
TERMINAL WHILE RANGE SWITCH IS IN CURRENT
POSITION. DO NOT ATTEMPT TO MEASURE AC CURRENT.
1. Set the selector switch to the appropriate DC mA range to be
used and connect the test leads in series with the circuit or the
load under measurement. If the pointer deflects to the left,
reverse the probes.
2. Connect the BLACK test lead to the “-COM” jack and the RED
test lead to the Red “+” jack for Current at/less than 0.25A. For
large current max. 10A,move the red test lead to the Red
“10A” jack.
3. Check the needle position and the get the reading on V.A scale.
Note:
Excessive current input across mA range will blow the fuse
that must be replaced by a same fuse rating 0.5A/250V or
10A/250V. The max. testing time shall be not more than 1min.
for big current load.
The Maximum terminal voltage drop is 250mV except for the
10A range.

9
Note: If connected incorrectly with the voltage at these
ranges,quickly remove the test leads from the circuit as to
avoid damage to this tester.
(This tester can afford the voltage <250V DC/AC rms. for the
period of 5 seconds max.)
Resistance Measurement
WARNING: DO NOT APPLY VOLTAGE TO MEASURING
TERMINAL WHILE RANGE SWITCH IS IN OHM POSITION.
1. Set the selector switch to the appropriate Ωrange to be used.
2. Connect the BLACK test lead to the “-COM” jack and the RED
test lead to the Red “+” jack.
3. Short the leads by touching the probes together. Pointer should
read zero at the right hand end of the upper most scale,if it
doesn’t,use the Ohm adjust knob on the right hand of the
panel to line up the pointer with zero. (If pointer can’t be brought
to zero,replace battery.)
4. Connect the test leads across the resistance to be measured.
5. Take reading on the top “Ω” scale and multiply it by the
multiplication factor indicated by the selector switch.
6. If there is little or no pointer movement from the left side of the
scale,reset the selector switch to higher range. The effective
reading scope on an Ohm meter scale is within the area of
between 25 degree of Arc left side to the Midscale and 25
degree right side to the Midscale.
Note: If connected incorrectly with the voltage,quickly
remove the test leads from the circuit as to avoid damage to
this tester. (This tester can afford the voltage <250V DC/AC
rms. for the period of 5 seconds max.)
Diode Measurement
1. Set the selector switch to the appropriate Ωrange to be used.

10
NOTE: To test the diode while current below 0.060 mA at X 10K
range; current below 0.15 mA at X 1K range; current below 1.5
mA at X 100 range; current below 15 mA at X 10 range; current
below 150 mA at X 1 range.
2. For IF (forward current) test,put the BLACK test lead to the
“-COM” jack and the RED test lead to the Red “+” jack. And
then connect the Black probe to the Positive terminal of the
Diode,the Red probe to the Negative terminal of the Diode.
For IR (reverse current) test,reverse the connection.
3. Read the value IF or IR of the diode on the LI scale.
4. Read the linear (forward voltage) VF of the diode on the LV
scale.
Continuity Buzzer Test
WARNING: DO NOT APPLY VOLTAGE TO MEASURING
TERMINAL WHILE RANGE SWITCH IS IN OHM POSITION.
Set the selector switch to the BUZZ range. Connect the test leads
to two points of circuit. If the resistance is lower than 200 Ohm
approx.,the Beeper sounds.
Note: Battery voltage is sufficient for Buzzer operation as long as
the Zero Ohm pointer can be adjusted to the Zero scale place.
Note: If connected incorrectly with the voltage,quickly
remove the test leads from the circuit as to avoid damage to
this tester..
(This tester can afford the voltage <250V DC/AC rms. for the
period of 5 seconds max.).
Transistor hFE and LED Test
1. Set the selector switch to the R X 10 range.
FOR Measuring Transistor hFE
2. Take note the type of transistor “PNP” or “NPN” and then insert
the transistor terminals of the Emitter,Base and Collector

11
separately into the proper holes of the socket on the front panel.
3. Read the approximate hFE Value directly at the hFE scale.
Note: Current 10μA. VCE 2.8V.
4. When the Base terminal cut,the value of Leak is Iceo for
Transistor.
FOR Measuring LED: Insert the transistor terminals directly into
the “+” and “-” holes of the socket on the front panel. And then
check if the LED under testing is lighting.
IR Data(Infrared Signal) Check
This function is used to check if the remote control can yield the
Infrared signal normally.
Firstly set the rotary switch to the measuring range “IR Data”. And
then take the remote control in vertical place(Within 90°±15°)
nearby the LED lighting on the dial panel of the tester. Push any
button on the remote control and then see the indication case of
LED lighting. If this Red LED light gets flashing,it means the
remote control is working well. Otherwise,it means the remote
control might have the problem accordingly.
Note: The distance shall be less than 50cm between meter to the
remote control.
AC Live Check
This function is used to check and identify the AC Live polarity of
wires or outlets.
1. Set the selector switch to the range AC Live.
2. Connect one test probe to the “+” jack of this tester
3. Take this test lead’s tip to contact the terminal of wire or outlet
4. Then see the indication case of Red LED lighting. If this Red
LED light is lit,it means the contacted wire or end of outlet is
Live line. Otherwise,it should be the Zero line or Ground wire.
Decibels Measurement

12
1. Set the selector switch to AC 10V range.
2. Connect the BLACK test lead to the “-COM” jack and the
RED test lead to the Red “+” jack.
3. Connect the test leads to the measuring circuit specially in
series with a 0.047μF/400V Metalized Polyester Capacitor.
And then read the bottom Red dB scale.
4. For more dB scope,change the selector switch to the others
of ACV ranges and make the same actions. Add the
appropriate number of dB scale reading as noted on the
chart below.
NOTE: For absolute dB measurements,circuit impedance
must be 600 Ohm. 0 dB = 1mw dissipated in a 600 Ohm
impedance (equivalent to 0.755V across 600 Ohm)
ACV RANGE
ADD dB Number
50
14
250
28
1000
40
Capacitance Measurement
WARNING: DO NOT APPLY VOLTAGE TO MEASURING
TERMINAL WHILE MAKING ANY CAPACITANCE
MEASUREMENTS.
BEFORE TESTING ANY CAPACITORS,DISCHARGE THE
CAPACITOR COMPLETELY.
1) Set the selector switch to the R X 1K range.
2) Connect the BLACK test lead to the “-COM” jack and the
RED test lead to the Red “+” jack.
3) Connect the test leads to the capacitor to be measured
(Note the polarity of capacitor).
4) Watch the needle deflection to the right topside,and read
the Red C2000uF scale on the Dial.

13
Troubleshooting
Nevertheless,problems or malfunctions may occur.
For this reason,the following is a description of how you can
eliminate possible malfunctions yourself:
Error
Possible cause
The multimeter does
not work.
Are the batteries exhausted? Or the
inner batteries bad contacted?
Check the status of the batteries and
if the fuse 0.5A is good or contacted
well.
No measurements
possible via V/mA
socket.
Is the fuse defective? Check the fuse
0.5A (fuse replacement)
No measurements
possible via 10A
socket.
Is the fuse defective? Check the fuse
10A (fuse replacement)
No change in
measured values.
Have you selected the right
measuring sockets? Is the measuring
range/mode correct (AC/DC)?
Faulty measuring
results are displayed.
Has null balancing of the display or a
0 Ohm calibration for the resistance
measurement been carried out? Is
the batteries not properly assembled
in?
14
MAINTENANCE
Replacement for Battery and/or Fuse should only be done
after the test leads have been disconnected and POWER
OFF.
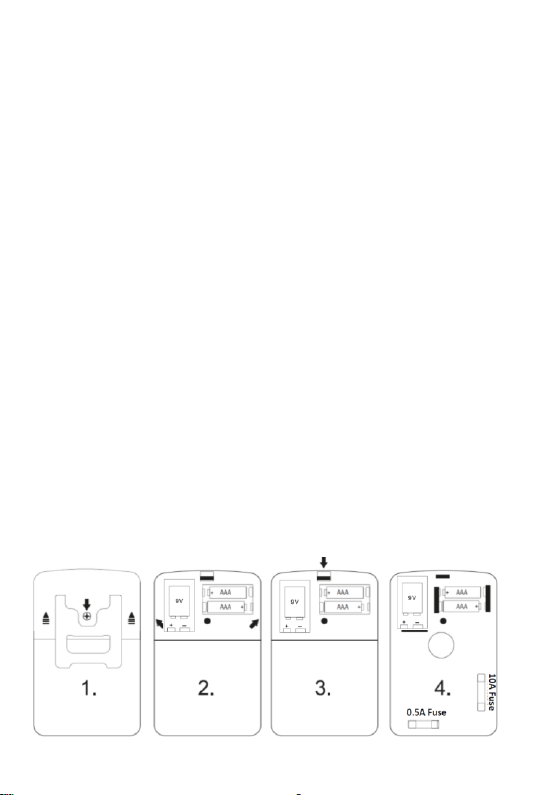
1. Battery Replacement
1). Note the condition of the batteries using the procedure
described above,if the battery needs to be replaced,
remove the screw and open the upper cover of the battery
cabinet on the rear case.
2). Take off the spent batteries and replace them with a
battery of the same type. Observing polarity as indicated
battery polarity marking on the bottom of the battery
compartments.
3). Replace the battery cabinet cover and tighten the screw.
2. Fuse Replacement
1). When the fuse needs replacement,use only UL-Listed
0.5A/250V fuse or 10A/250V fuse identical in physical size
to the original type Φ5 x 20 mm 0.5A/250V; or Φ6 x 32
mm 10A/250V.
2). Disassemble the side Holsters,and take off the screw,
then open the whole rear case. Remove the old fuse from
its holder; install the new fuse into it.
3). Replace the rear cover & Holsters,and tighten the screw.
Table of contents


