BRS 5 STAGE RO/DI SYSTEM User manual
Video Set-up and Install Instructions: brs.li/howtoro
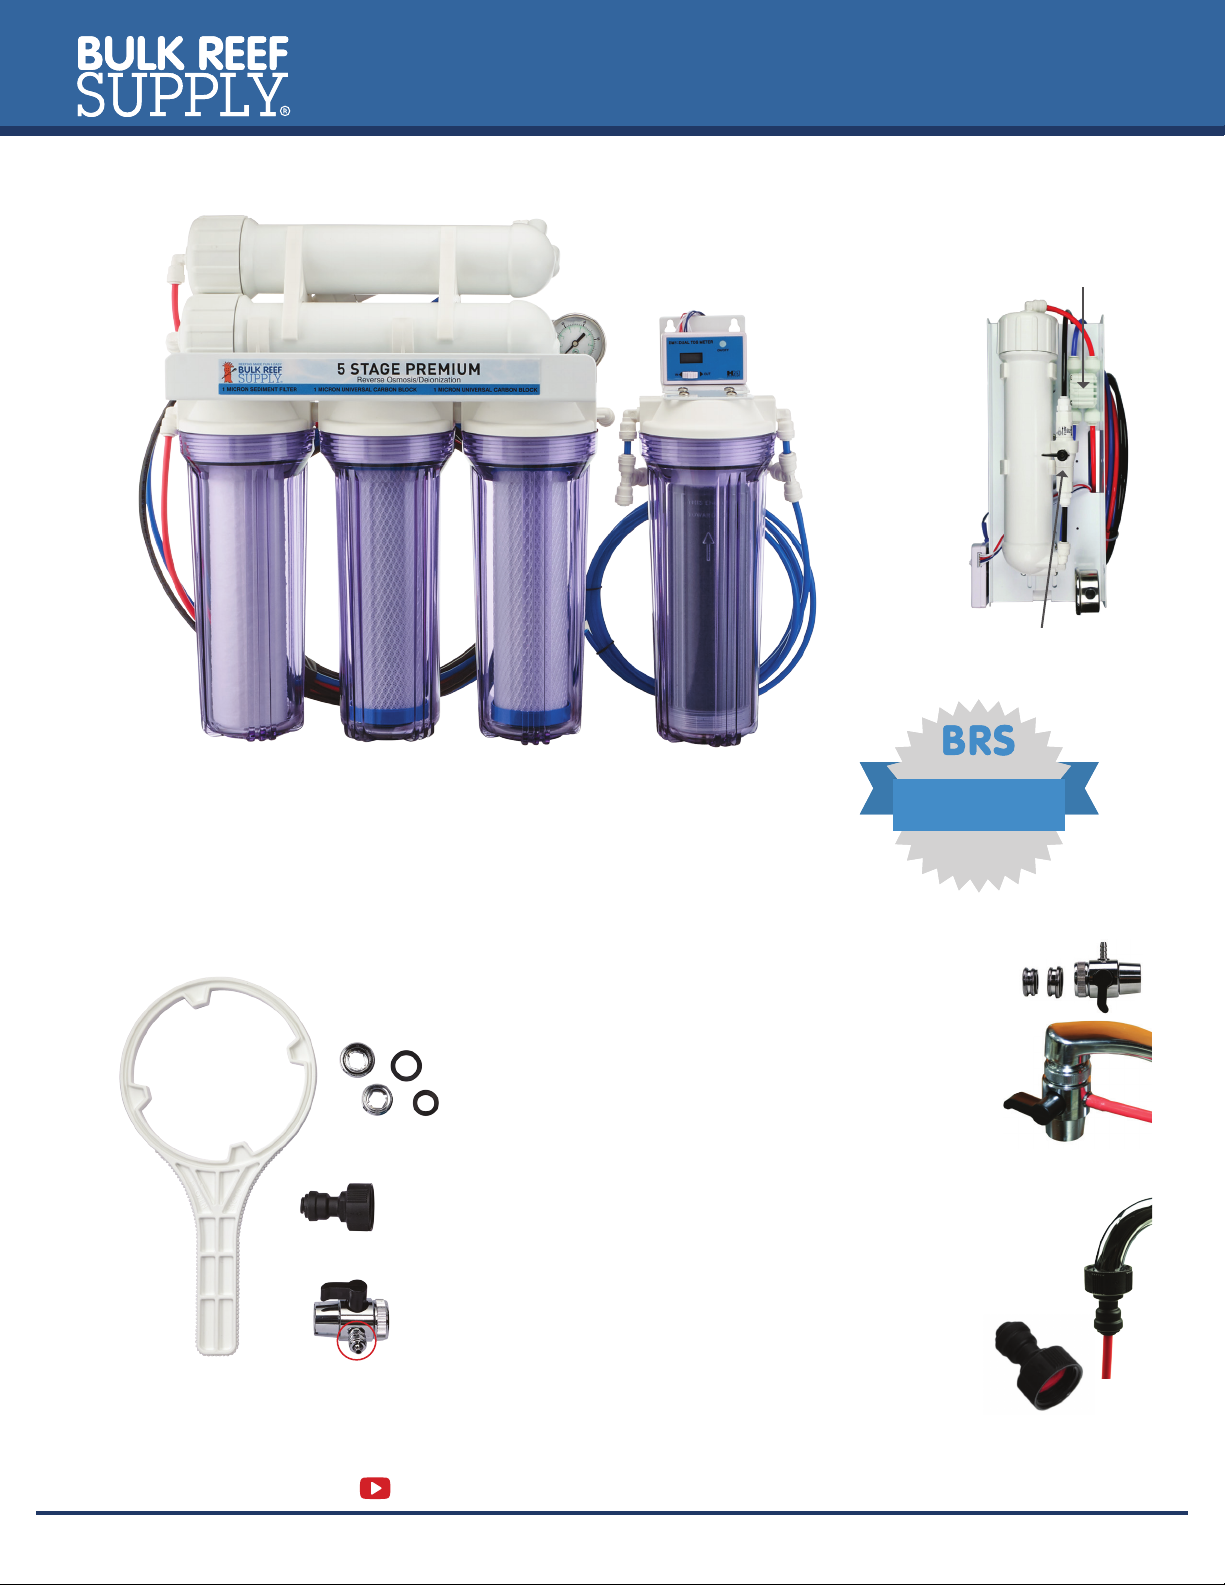
5 STAGE RO/DI SYSTEM
PREMIUM • PLUS • WATER SAVER
PARTS KIT
LIFETIME
WARRANTY
LIMITED
FAUCET DIVERTER VALVE ADAPTER
• Easy installation, attaches to the
majority of kitchen faucets. Adapter
ring included for faucets the valve
does not fit. Non-permanent.
• Built in valve switches water flow
between faucet use and RO system.
GARDEN HOSE/UTILITY SINK ADAPTER
• Provides a quick, non-permanent connection
to a hose, laundry sink faucet, or fittings
with similar threads.
• Provides a quick connect fitting for
the RO/DI tubing.
Double
O-Ring
Mur-Lok
Fittings
Color Changing
DI Resin
Red Input,
Black Waste
Water, Blue
Product Water
Membrane
& Housing
GE ROSave.Z 1 Micron
RO Sediment Filter BRS 1 Micron Universal
Carbon Blocks
Glycerin Filled
Pressure Gauge
(Plus Systems Only)
TDS Meter
(Plus Systems Only)
Water Saver Upgrade
(Water Saver System Only)
Auto Shut
Off Valve
Flush Kit/Flow Restrictor
(Flush Kit on Plus Systems Only)
Filter
Wrench
Faucet
Diverter
Valve
Faucet Diverter
Adapter Kit
Garden Hose/
Utility Sink Adapter
Compression
Nut

SYSTEM SET-UP
PUSH CONNECT FITTINGS
It may be necessary to connect or remove RO tubing from fittings. Illustrations below show how to perform these actions.
TURN WATER SUPPLY OFF AT CONNECTION POINT
Hot water should never be used with the RO system as it can damage the RO membrane and may also contain
additional contaminants from the heater. For this reason, only the cold water supply should be used.
CHOOSE APPROPRIATE SOURCE WATER ADAPTER FROM PARTS KIT
Faucet Diverter Valve Adapter
1. Remove the compression nut and slide over red tubing
2. Connect red tube to barbed connection on faucet adapter, and thread the compression nut
back onto the faucet adapter
3. Ensure rubber gasket is seated inside of the female faucet threads of the valve body.
4. Thread the adapter onto the faucet threads of the water source.
*It may be necessary to use one of the included thread adapter rings, depending on your faucet type.
Garden Hose/Utility Sink Adapter
1. Thread the fitting onto the garden hose threads of the water source
2. Insert the red RO tubing firmly into the push connect fitting of the adapter
INSTALL RO SYSTEM
RED Tubing = Input from home water line | BLACK Tubing = Waste water | BLUE Tubing = Purified product water
1. Attach home water source to RED line of the RO system using any of the included source water adapters.
2. Direct BLUE line to a suitable collection/storage container. This is the output line for the purified/filtered water.
3. Guide BLACK line down a drain. This is referred to as waste or brine water and should be discarded.
PRIME RO SYSTEM
The RO/DI unit must be run for a minimum of 1 hour before using product water. Ensure that all fittings and hoses are
correctly hooked up. This process should be repeated any time membranes are replaced.
1. Turn on household water supply
2. Allow the system to run for at least 1-2 hours and discard all water produced. Fine particles from the carbon block(s)
as well as preservatives from the RO membrane may be released during this time. This is a good time to check all
fittings and connections for leaks.
3. Your system is now ready for use. During the first 24 hours of operation the TDS may be higher than normal as fine
particles and other manufacturing preservatives are released from the filters.
FOR OPTIMAL RESULTS
Water Pressure
Minimum operating water pressure is 50psi for 75/100 GPD systems and 65psi for 150/200 GPD water saver systems.
If operating pressure is below the recommended threshold, a reduction in water production and a lower rejection rate
may be experienced. Consider adding a booster pump kit to increase performance. Ratio of product to waste water will
vary based on pressure and system configuration. Typical product/waste ratio is 1:3 for 75/100 GPD systems and 1:1.5
for 150/200 GPD Water Saver Systems.
Membrane Flush
Plus Systems include an integrated membrane flush valve. Flushing the membrane for 1-2 minutes before and after each
use is recommend and may extend the useful life of the membrane. If water production needs are infrequent (less than
every two weeks), it is still advisable to operate the unit periodically to flush the system of stagnant water.
2
3
4
5
1
Remove Push Connect Tubing
Hold round retention ring tightly against
fitting then pull tubing away while
twisting. Tubing should slowly release.
Connect Push Connect Tubing
Firmly push one end of tube into fitting.
It’s important to push tubing all the
way into fitting for a complete seal.
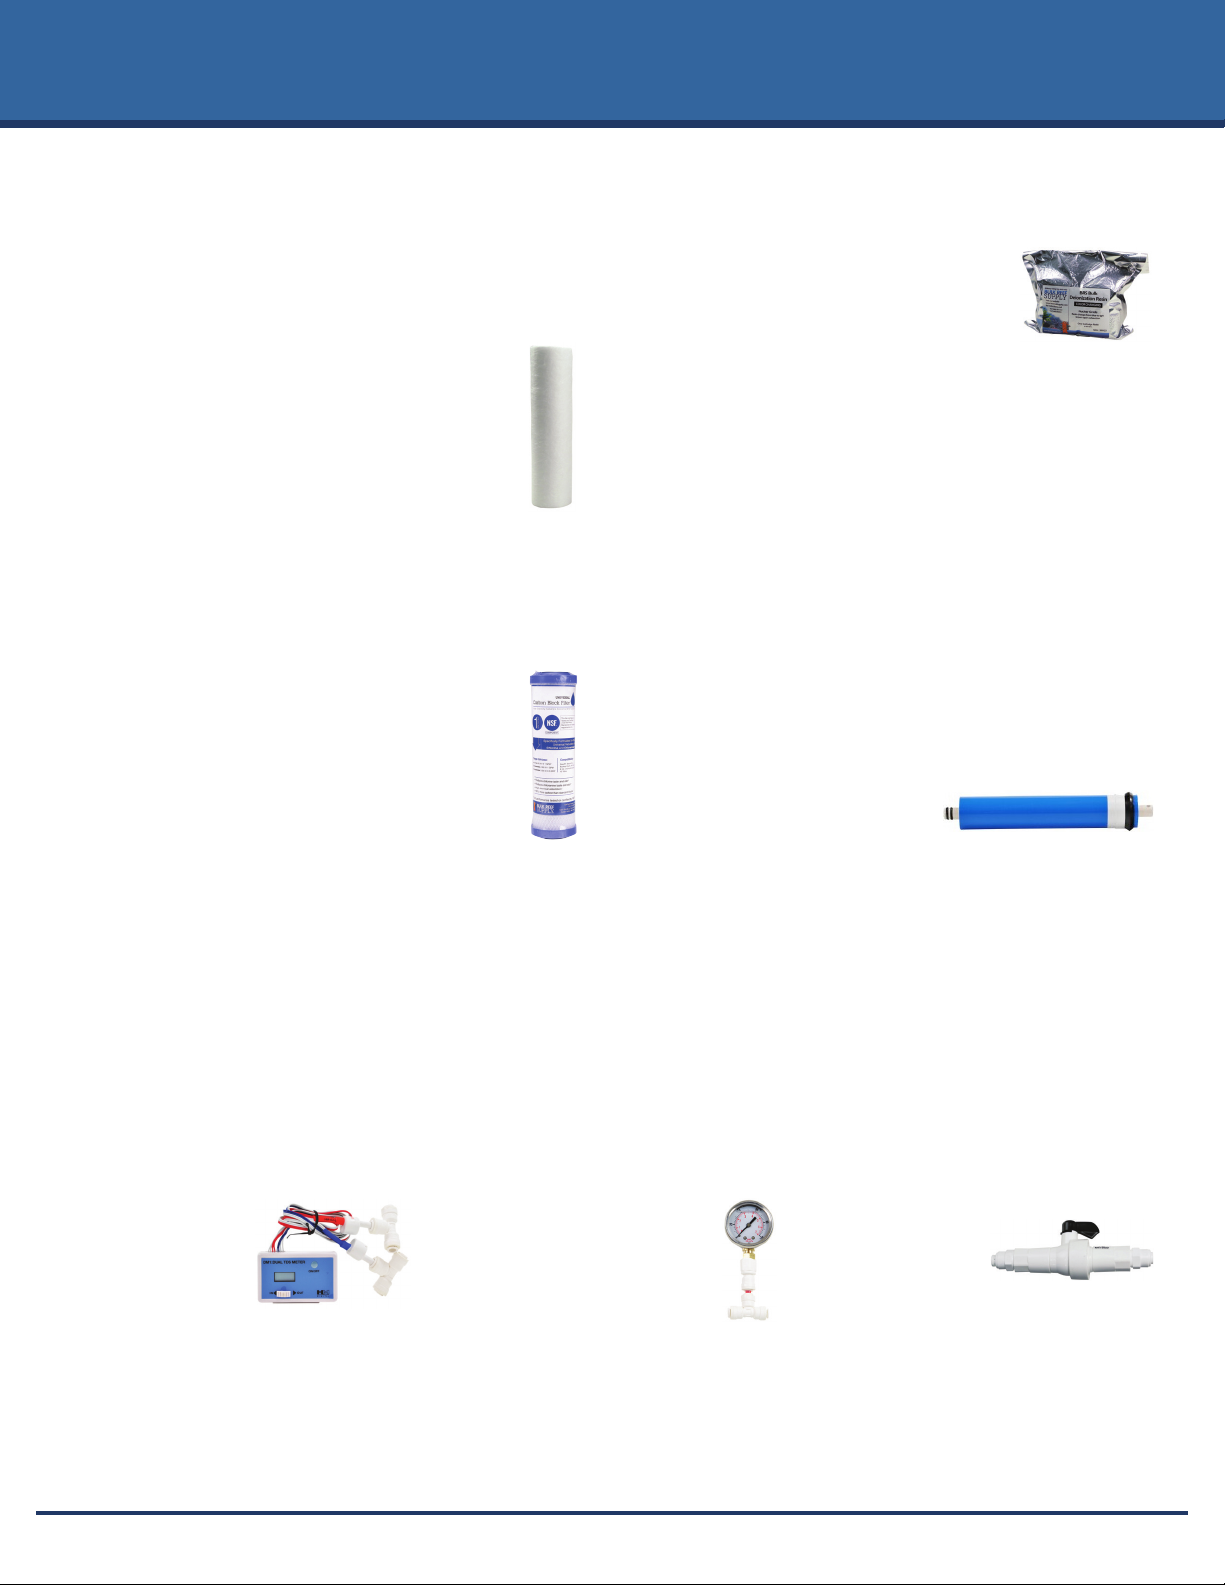
MAINTENANCE & UPGRADES
COLOR CHANGING DI RESIN
DI resin removes the majority of elements
that passed through the RO membrane and
is the final water polish. It’s color indicating
and turns from blue/black to golden brown
from the bottom up as it depletes. Replace when cartridge
nears complete color change (approximately 90%). Using
DI Resin to complete exhaustion can lead to increased TDS
in product water. The color change is an indicator of the
depletion of DI resin and certain water parameters could
interfere with the color changing process.
A TDS meter is a more accurate measurement of DI resin
performance and should be used to identify when the resin
needs to be replaced. If the system has a TDS meter, use it
to confirm the DI resin cartridge has been exhausted. “Out”
monitors DI resin performance and if it measures anything
higher than zero, it’s time to replace the resin. Remove the
cartridge from the RO canister and discard the exhausted
resin. Reload the cartridge with fresh DI resin.
Color Changing DI Resin (SKU 200123)
RO MEMBRANE
The RO membrane is located in
the white cylinder on top of the filter/RO system and should
be replaced approximately every three years or when the
TDS reading from the membrane product line begins to rise.
75 GPD System: Dow FilmTec 75 GPD (SKU 200051)
100 GPD System: Dow FilmTec 100 GPD (SKU 200133)
150 GPD System: Dow FilmTec 75 GPD (SKU 200051 x 2)
200 GPD System: Dow FilmTec 100 GPD (SKU 200133 x 2)
CARBON BLOCK
BRS Universal Carbon Blocks were developed to
be the best industry solution for chloramine and
chlorine removal, as well as well water treatment.
The 1 micron block represents the latest in carbon
technology with increased surface area, volume of
carbon and catalytic sites within the carbon’s pore
network. Increased volume and surface area can
provide chloramine removal from source water up to 3,500
gallons, and chlorine removal from up to 35,000 gallons of
water. Replace every six months or as needed based on
chlorine break-through. The periodic use of a chlorine test
is recommended.
BRS 1 Micron Universal Carbon Block (SKU 208657)
SEDIMENT FILTER
Sediment filters should be changed when clogged
with dirt and sediment. Identify when it’s exhausted
by monitoring the water pressure feeding the
membrane. As the filter gets clogged, it reduces the
pressure feeding the membrane and reduces system
performance.
For systems that don’t include a pressure gauge,
change every six months, or when the filter is visibly dirty
and there is a noticeable drop in water production.
GE ROSave.Z 1 Micron Depth Sediment Filter (SKU 200058)
FILTER MAINTENANCE
Filter life depends on many different factors including the volume of water production and quality of the source water.
REPLACEMENT FILTER KIT
5 Stage RO/DI Replacement Filter Kit (SKU 208877)
TDS METER
Verify the purity of
water, and measure
membrane and DI
resin performance
through the measurement of total
dissolved solids (TDS) of the water at
specific points in the RO/DI System.
Dual Inline TDS Meter DM-1
(SKU 200031)
PRESSURE GAUGE
This handy gauge provides
visibility of one of the most
critical components of RO
membrane performance. It is
important to maintain proper
operating pressure, and a drop in
pressure can indicate that it’s time to
change out clogged filters.
Oil Filled Pressure Gauge
(SKU 200215)
MEMBRANE FLUSH VALVE
The Membrane Flush Valve
has an integrated
flow restrictor
with a bypass valve and provides a
convenient way to manually flush the
membrane. Regular use helps to rinse
the membrane of impurity buildup and
may extend the life of the membrane.
550mL Membrane Flush Kit
(SKU 208852)
PLUS SYSTEM FEATURES
Get the most out of your RO/DI system and keep tabs on filter performance with these helpful features.

Q: Is it normal for the DI stage to not fill completely with water?
A: Yes, air gets trapped in the top of the canister and has no way to escape. This does not interfere with system
performance, but if desired open the canister slightly while the unit is running to allow the air to escape. Re-tighten
the canister when the water reaches the top.
Q: Is it normal for TDS to be higher when the system is first turned on?
A: Yes, this is called “TDS creep” and is normal on all RO systems. Allow the RO system to run for 10 minutes before testing TDS.
Q: Is it okay to leave water in the canisters between uses?
A: Yes, it is advised to keep them wet between uses, and store in a cool, dark location away from environmental extremes.
Exposure to sunlight or freezing can cause damage to the filters and canisters and should be avoided.
Q: How often should I use the flush kit?
A: We suggest flushing the membrane for a few minutes before and after use. There is an auto flush kit available for
a more automated solution. (SKU 200209 or 200208)
Q: My pressure gauge reads less than 50 psi, do I need a booster pump?
A: The membrane will not perform “optimally” below recommended pressure, but the reduced performance may not be
substantial enough to warrant a booster pump. As it approaches 35 psi the performance drop will become significant
and you will likely want to purchase a booster pump. (SKU 200216)
Q: What is a normal TDS reading?
A: TDS from most tap water will be in the 100-300 range but many sources can be well over 500. Normal product water
from RO membrane will be around 98% of tap water’s TDS under optimal conditions. Tap water with a TDS of 300 should
be around six coming out of the membrane. Product water emitted from the DI resin canister should be zero. Operate the
system for ten minutes prior to testing for TDS, readings will always be higher when the system is turned on initially.
Q: My DI resin seems to be depleting quickly, what’s wrong?
A: Usable lifespan of the DI resin cartridge will vary widely. Feeding the resin from the RO membrane with one TDS will have
approximately five times the usable life as feeding it with five TDS. Outside of that, carbon dioxide in your water supply or
a poorly performing RO membrane are the biggest causes of early DI exhaustion.
Q: I know I have good pressure, but all of the water is rushing down the drain and
I’m barely getting any product water; what’s going on?
A: It’s not uncommon to accidentally leave the flush valve in the open/flush position. For
normal water production, the valve should be the closed/perpendicular position, as
illustrated. Only during membrane flush should the valve be parallel with the line.
Q: My system doesn’t seem to be making a lot of water, what’s wrong?
A: Keep in mind that 75 GPD is approximately three gallons an hour. The flow will be slow and close to a constant
trickle. If it is slower than that, it’s almost always because the flush kit is open or the home’s water pressure is low
and there is insufficient pressure feeding the membrane.
Q: Can I reduce the amount of waste water my system produces?
A: The waste water is a critical component of a properly functioning RO system. The best way to reduce the volume of
waste water to product water ratio is to install a second membrane* in series which will effectively cut this ratio in half.
(*150 GPD Water Saver Upgrade Kit, SKU 200432 or 200 GPD Water Saver Upgrade Kit, SKU 211528)
Email: support@bulkreefsupply.com Live Chat: bulkreefsupply.com
Phone: 763-432-9691
FREQUENTLY ASKED QUESTIONS


