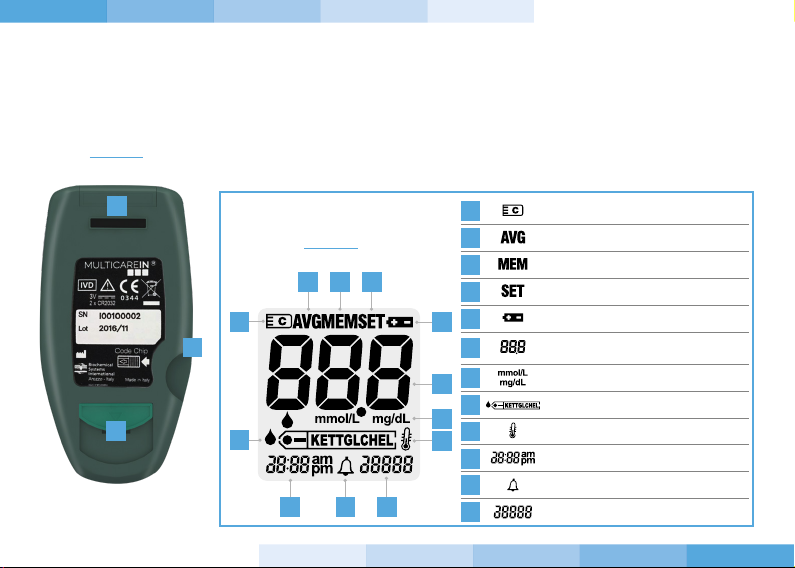
BSi MULTICAREIN User manual

MULTIPARAMETER DIAGNOSTIC
DEVICE
USER’S MANUAL

4 Introduction
4 The MULTICAREIN system
5 Informations about MULTICAREIN system line
6 The device
7 The display
8 The measurement
8 Insertion of the data-chip
10 How to obtain a drop of blood
11 Application of the blood
11 Procedure to test glucose
12 Procedure to test cholesterol
13 Procedure to test triglycerides
14 Warnings
15 The strips
16 Control solutions
17 Memory functions
INDEX

18 General settings
18 Changing the settings
20 Setting the acoustic signal
20 Setting the alarms
21 Enabling data transfer to a computer
22 Maintenance and storage conditions
22 Care and maintenance
23 Storage and measuring conditions
24 Error messages
27 Replacing the batteries
28 Warranty
30 Technical features
31 Symbols

4
Thank you for choosing MULTICAREIN system. MULTICAREIN is a new system, suitable for the
monitoring of glucose, cholesterol and triglycerides in the blood*.
MULTICAREIN uses two dierent technologies:
• Amperometric, with MULTICAREIN glucose strips.
• Reflectometric, with MULTICAREIN cholesterol and triglycerides strips.
Self-testing of glucose, cholesterol and triglycerides could be helpful, but any treatment has to be
anyway agreed with the physician.
THE MULTICAREIN SYSTEM
INTRODUCTION
*CAUTION
The system is calibrated for the use of capillary blood; for the use of
venous blood (only possible with cholesterol and triglycerides strips)
contact the Customer Service for the correct calibration.

5
The MULTICAREIN system line includes:
• MULTICAREIN device
• MULTICAREIN strips
• Lancing device
• Sterile lancets
• MULTICAREIN control solutions
• MULTICAREIN data manager software
• MULTICAREIN mobile app. and cloud (only for bluetooth MULTICAREIN**)
Read carefully the instructions for use of the MULTICAREIN strips that you are using and read the
instructions for use of the lancing device contained in the MULTICAREIN meter box.
INFORMATIONS ABOUT MULTICAREIN SYSTEM LINE
GLUCOSE
STRIP
TRIGLYCERIDES
STRIP
CHOLESTEROL
STRIP
**Bluetooth represents an optional

6
THE DEVICE
1. Display: shows test results, error messages and results stored in memory.
2. Power button, press this button to:
a. switch-on or switch-o the device;
b. enter the SETTINGS (SET) when the device is on;
c. confirm the SETTINGS.
3. “+” button, press this button to:
a. enter the MEMORY of the device;
b. recall results stored in the MEMORY of the device;
c. change parameters and values while setting.
4. “-” button, press this button to:
a. enter the MEMORY of the device;
b. recall results stored in the MEMORY of the device;
c. change parameters and values while setting;
d. delete the test results.
5. Test strip slot: insert the test strip here. When the test strip is inserted, the
device will turn on automatically.
6. PC connector:
a. Connector to transfer data from the device to a computer.
b. Connection with Biosys device.
7. Cover: open this part for cleaning the optical window.
6
1
4 2 3
7
5
FRONT

7
8.
Battery housing: sliding cover for batteries replacement.
9.
Data-chip slot: insert the data-chip here.
10.
Strip ejector: slide it to dispose of the used strip.
THE DISPLAY
BACK
8
9
10
1
8
234
5
6
7
9
121110
Data-chip symbol.
1
Average results symbol
2
Memory mode symbol
3
Settings mode symbol
4
Low battery warning
5
Result or error messages
6
Unit of measurement
7
Test analytes
8
Temperature symbol
9
Time
10
Acoustic alarm
11
Date (month, day and year)
12

8
The MULTICAREIN device uses a data-chip which is contained
in the strips box.
It is necessary to change the data-chip in the following situations:
a. When you want to change analyte.
b. Before using a new strips box.
How to insert the data-chip
1. Remove the data-chip from the strips box.
2. Insert the data-chip in the slot placed on the lateral side of the device.
3. Gently press the data-chip up to the complete insertion.
INSERTION OF THE DATA-CHIP
When you switch on the device check always that the date (month, day and year) and time are correctly
set to obtain accurate results (see page 18).
THE MEASUREMENT

9
4. Press the power button and check if the code
shown on the display matches the one printed on
the label vial of the strips.
5. If the data-chip is not inserted, it is not possible to
perform the measurement.
6. Analytes:
=
TGL
TRIGLYCERIDES
=
CH
CHOLESTEROL
GLUCOSE
GLC EL
=

10
HOW TO OBTAIN A DROP OF BLOOD
To perform a measurement with MULTICAREIN system, it is necessary to collect a drop of capillary blood
according to the following procedure:
1. Wash the hands with soap and hot water to increase the blood flow at the fingertips to ease the blood
collection. Dry well the hands and check that the finger to be pricked is completely dried. Do not apply
disinfectant or beauty cream before the finger pricking.
2. Prepare the lancing device that is inside the MULTICAREIN meter box by inserting a sterile lancet. Use a
new and not damaged lancet, for each prick and use the lancing device only on yourself.
3. Before the inserting, check if the lancet and the
protective cap are intact. Only an intact protective cap
can guarantee a sterile lancet. Keep the protective cap to
seal the lancet after use.
Read carefully the instructions for use of the lancing
device contained in the device kit.

11
APPLICATION OF THE BLOOD
PROCEDURE TO TEST GLUCOSE
Read carefully the instructions for use of the strips that you want to use to perform the measurement.
1. Press the power button after inserting the data-chip. The code of the data-chip
that appears on the display has to match the one printed on the strips vial. If it
doesn’t match please contact the Customer Service.
2. Wash your hands and dry them thoroughly.
3. Take out a strip from the vial and insert it in the device, with the printed or
coloured part facing up. You will hear a click and the device will emit an
acoustic signal (“beep”).
3a. Perform the finger pricking with the lancing device and a sterile
lancet. Apply a drop of blood on the side of the strip that comes out
of the device. Let the strip aspirate the blood until to see the moving
segments on the display and you will hear an acoustic signal (“beep”).
If the blood volume is not enough the measurement does not start.

12
PROCEDURE TO TEST CHOLESTEROL
3.b.1. Sit down for one minute with the arm along the body. Massage the finger to
be pricked to increase the blood flow. After inserting the strip, for cholesterol
test, “F” (female) on the left and “M” (male) on the right will appear on the
display. Press the corresponding button “-” or “+” to select the gender. After
about two seconds, “A” (before meal) on the left and “P” (after meal) on the right
will appear on the display. Press the corresponding button “-” or “+” to select
the nutritional state. The selected letter will be shown for two seconds on the
display. After that, the blinking drop will appear on the display, indicating that
the meter is ready to receive the blood. Execute the puncture of the finger by
using the lancing device and a sterile lancet. Remove the first drop with a sterile
gauze and gently press the finger to obtain the second drop. Apply the blood on
the white circular area of the strip coming out from the meter. Wait until moving
segments will appear on the display and until to hear an acoustic signal (“beep”).

13
PROCEDURE TO TEST TRIGLYCERIDES
3.b.2. Sit down for one minute with the arm along the body. Massage the finger to
be pricked to increase the blood flow. After inserting the strip, the code of the
data-chip and the blinking drop will appear on the display, indicating that the
meter is ready to receive the blood. Perform the finger pricking by using the
lancing device and a sterile lancet. Remove the first drop with a sterile gauze
and gently press the finger to obtain the second drop. Apply the blood on the
white circular area of the strip coming out from the meter. Wait until moving
segments will appear on the display and until to hear an acoustic signal
(“beep”).
4. Wait for the result, which will be displayed and stored in the memory of the device
automatically (refer to the instructions for use of the strips that you are using to
know the reading time).
5. Use the ejector on the back side of the device to remove the used strip, pointing
the device down.

14
If you get results which do not correspond to your feelings, run a check of the MULTICAREIN device and
contact your physician. If you get extreme results, too high (Hi) or too low (Lo), contact your physician
immediately.
When the measurement is finished, it is possible to switch o the MULTICAREIN device. The device will
switch o automatically after 60 seconds if it is not used for other operations.
The last measured value, along with date and time, will be saved in position 1 in the memory of the
device. The values previously measured will be saved in position 2, 3 etc. starting from the most recent.
How to recall from the memory a measured value and how to erase memorized values is described on
page 17.
The used strips and materials have to be properly disposed, avoiding contamination. The device has to be
disposed following the electric and electronic waste law.
In laboratories and hospitals, the procedures of biological safety must be
followed when handling potentially infected material, in particular when
measurements are performed on dierent patients.
To avoid infections, clean the device regularly and dispose of the used
strips in a way that there is no risk of infections for other people.
WARNINGS

15
MULTICAREIN STRIPS
The correct use of MULTICAREIN strips is very important to obtain accurate results.
Therefore it is important to keep in mind the following points:
• The strips are sensitive to light and humidity, store them only in their original vial.
• Keep the vial away from direct sunlight. Store it at temperatures between 5-30°C (41-86°F).
• Use the strip immediately after removing from the vial and close the vial immediately with its cap.
• The strips must not be used after the expiry date.
• Write down the date of the first opening on the vial: the strips must be used within 90 days after
the vial has been opened.
• Do not use damaged strips.
• Read carefully the instructions for use contained in the strips box.
• Perform measurements only with original MULTICAREIN strips.
• For using venous blood with cholesterol and triglycerides strips,
please contact the Customer Service.
THE STRIPS

16
Read carefully the instructions for use of the control solutions that you are using.
It is possible to check the proper working of MULTICAREIN device by using the MULTICAREIN control
solutions. The control solutions can be purchased as a separate accessory through specialized retailers.
The control solution is applied on the strips just like blood. When the test is performed with the control
solutions, the result must fall within the range printed on the strips vial label that you are using. Write
down the date of the first opening on the vial of the control solution. The control solutions must be used
within 90 days from the first opening. Do not use control solutions after the expiration date.
You should perform a control solutions test when:
• Suspecting a possible defect of the MULTICAREIN device.
• Suspecting the possibility of a malfunction or wrong measurement.
The result obtained with the control solutions must be deleted by the memory of the device in order to
not interfere with the average calculation of the results, in particular with the average of the glycemia.
MULTICAREIN CONTROL SOLUTIONS
CONTROL SOLUTIONS

17
MEMORY FUNCTIONS
The MULTICAREIN device stores up to 500 test results for all analytes, letting you review them from the
most recent 1 to the oldest 500.
To recall memory data it is necessary to
insert the data-chip of the analyte you want
to recall the memories.
1. After turning on the device press and release the button “-” or “+”, the device will enter the MEMORY and
the average of the results (AVG) will be displayed.
2. Hold on the button “+” the number 1 will be displayed which refers to the most recent result. When you
release the button, the stored result will be displayed.
3. Pressing again the button “+”, the number 2 will be displayed.
4. Press the button “-” together with the power button for half second to delete a single stored result; after
deleting a single result “deL” will be displayed.
5. Press the button “-” together with the power button for 5 seconds to delete all results stored in
memory; After deleting all results “Clr” will be displayed.

18
1. With the device on, press the power button for 3 seconds to enter
the setting (SET).
2. Press and release the “-” or “+” button until reaching the correct
month. Confirm the setting by pressing and releasing the power
button.
3. Press and release the “-” or “+” button until reaching the correct day.
Confirm the setting by pressing and releasing the power button.
4. Press and release the “-” or “+” button to modify the date format
(mm-dd) or (dd-mm). Confirm the wanted format by pressing and
releasing the power button.
5. Press and release the “-” or “+” button to modify the year, until
reaching the correct year. Confirm the setting by pressing and
releasing the power button.
6. Press and release the “-” or “+” button until reaching the correct
hour. Confirm the setting by pressing and releasing the power
button.
CHANGING THE SETTINGS
GENERAL SETTINGS

19
7. Press and release the “-” or “+” button until reaching correct
minutes. Confirm the setting by pressing and releasing the power
button.
8. Press and release the “-” or “+” button to modify the time format
12h or 24h. Confirm the wanted format pressing and releasing the
power button.
9. Press and release the “-” or “+” button to modify the unit of
measurement, mg/dL or mmol/L. Confirm the wanted unit of
measurement by pressing and releasing the power button.
10. Press and release the “-” or “+” button to modify the number
of days you want the average of results (0,7,14,21,28 days - “0”
means that the device will not show any average when recalling
the memories. Confirm the setting by pressing and releasing the
power button.
IMPORTANT
When replacing the batteries, the setting of the device will end with
step 10 described above. Otherwise the setting of the device will
continue with the following steps.

20
11. Press and release the “-” or “+” button to enable or disable the
acoustic signal. Confirm the setting by pressing and releasing
the power button.
12. Press and release the “-” or “+” button to select
first the hour and then the minutes of the first
alarm. It is possible to set 4 alarms. The alarms
are not activated if they are all set on12.00am
or 0.00.
SETTING THE ACOUSTIC SIGNAL
SETTING THE ALARMS
Table of contents
Other BSi Blood Glucose Meter manuals