manuals.online logo
Brands
  1. Home
  2. •
  3. Brands
  4. •
  5. BT DieselWorks
  6. •
  7. Automobile Accessories
  8. •
  9. BT DieselWorks AutoSync G2 User manual

BT DieselWorks AutoSync G2 User manual

Page | 1
BT DieselWorks AutoSync G2 – Installation guide
THESE INSTRUCTIONS ARE ONLY FOR THE NEW AutoSync “G2”
Requires IO4/IO5/IO6 radios (check glovebox RPO sticker)
Does not work on IO3, IOB, IOR, IOT (or any of the T1xx new body style pickups)
2014-2018 Silverado/Sierra 1500 pickup
2015-2019 Silverado/Sierra 2500-3500 pickup
2015-2020 Tahoe/Yukon/Suburban/Escalade SUV
2015-2018 Colorado/Canyon pickup
And many other 2014ish-2019ish GM cars with IO4/IO5/IO6 radio
Thank you for purchasing the BT DieselWorks AutoSync. The AutoSync is a patent-pending revolutionary
new easy-to-install module that adds many enhanced functional and comfort features to many GM late
model vehicles. Please be sure to also follow the quick-start guide on the ‘AutoSync installation guides’
page on our website. It is VERY important to register your AutoSync and pair it to your WiFi as soon as
possible to validate warranty and receive the latest firmware updates and new feature additions.
I know these instructions are long/boring, but PLEASE try to at least glance over every page
first. 95% of tech support email/questions we get are simply due to misunderstanding/not
reading the instructions.

NOTE: 2017+ vehicles have several feature limitations and also require one additional minor wiring
change under the dash at the Serial Data Gateway module connector. Please see the additional 2017+
supplement document instructions on our website on how to perform this wiring change/pin swap.
NOTE: We now offer a plug-and-play SDGM bypass harness to make the installation extremely easy on
2017+ vehicles. This harness installs in less than 2 minutes and negates the need to do the old
wiring/pin swap. The wiring/pin swap can be tricky, and the pins are quite fragile…the SDGM harness
is less than $10 and will potentially save huge headaches:
https://www.btdieselworks.com/collections/autosync/products/2017-sdgm-bypass-harness
Page | 2
INDEX
Introduction…….Page 1
Installation/basic operation…….Page 3-4
ECM Tune switching (diesel), AFM disable setting (gas), Strobe Lights Mode…….Page 5
Work Lights Mode, Viewing live engine data, view backup camera…….Page 6-7
High Idle Mode, read/clear DTCs (trouble codes), view live Vehicle Dynamics data…….Page 8
Launch Control Mode (2014-2016 only)…….Page 9
0-60mph performance timer, Vehicle Setup submenu…….Page 10
Vehicle Setup submenu cont. (new keyfob learn, TPMS programming, TPMS disable, OnStar/DEF reset,
manual DPF regen, Fuel System Tests/balance rates, transmission learn functions)…….Page 11
AutoSync settings submenu (camera settings, TC lockup controller settings, SecurIdle)…….Page 12
AutoSync settings submenu cont. (DRL settings, Fog light w/high beam, strobe lights pattern, reverse
work lights)…….Page 13
AutoSync settings submenu cont. (Engine data read mode, Auto nighttime Work Lights), torque
converter lockup controller enable/disable, BCM tuning/other module programming…….Page 14
Other hidden AutoSync features (remote keyfob windows control, DVD/Video-In-Motion override,
HMI/radio VIN clear/reset…….Page 15
Other hidden AutoSync features cont. (HVAC forced recirculation mode), EFILive / EZ Lynk DSP/SOTF
tune switching installation guide…….Page 16
AutoSync automatic firmware update info, AutoSync [in-truck] WiFi setup instructions…….Page 17-18
AutoSync offboard update/WiFi setup instructions (if your truck is parked out of WiFi range) ….Page 19
Page | 3
On the AutoSync, there two momentary push-buttons on the side of the module marked “A” and “B”
(not normally used), and two status LEDs. The AutoSync must remain plugged in at all times for features
to work. You can use AutoSync with an OBD port splitter (to use simultaneously with another scan tool,
Edge Insight, EZ Lynk, etc), however compatibility is NOT guaranteed unless you use the BT
DieselWorks OBD splitter, available at our website. AutoSync will not drain your battery when left
plugged in with the vehicle off, and it will not cause any harm if you unplug/plug-in AutoSync while the
vehicle is running.
Installing the AutoSync is as simple as plugging it into your truck’s OBD port, located under the dash. Be
sure the ignition is OFF when first installing the AutoSync. The AutoSync will NOT void any powertrain or
bumper-to-bumper warranties, and is completely undetectable by the dealer. As soon as the AutoSync is
unplugged, all traces/footprints are removed. The LED shows AutoSync system status at a glance: BLUE-
AutoSync is powered up, and vehicle CAN bus activity is being detected. GREEN- AutoSync is powered
up, CAN bus is active, and engine is running. The green LED can also mean the AutoSync is in WiFi search
mode, but has not yet connected to a valid WiFi network. If the LED does not turn on when plugged in,
that means there is no power at the OBD port…check the “DLC/DSM” fuse. If the OBD port confirmed
has power, try plugging the AutoSync into USB power (phone charger works fine). If the LED still does
not light up when plugged into USB power, the AutoSync is damaged/defective.
NOTE: AutoSync data display is default set to US/SAE units, if you wish to see data in metric units,
simply use the factory Driver Info Center (DIC) controls to set the vehicles units to “metric”. The
AutoSync will detect this change directly from the vehicles Body Control Module and automatically
reconfigure itself to metric units.
Page | 4
To activate/display the AutoSync main menu with the key on, engine NOT
running, press the cruise control “CANCEL” button on the steering wheel.
To activate/display the AutoSync main menu with the engine running, press the
rear defrost button 4 times in a row (4 times within ~4 seconds).
To step “back” a menu page at any time, press the “< BACK” button on the radio controls, OR press the
“

” icon at the top left of the screen. To exit the AutoSync menu at any time, press the “home” button
on the radio controls, OR press the “Exit” icon at the top right of the screen.
The AutoSync main menu will appear, as shown below, with the back/exit/home buttons circled:
Page | 5
Diesel vehicles: This ECM tune switching menu is found on AutoSync main menu, page 1. This menu
allows you to control EFILive DSP or EZ Lynk SOTF tune level. Simply tap whichever tune you want to
switch to, and the DSP/SOTF mode will immediately be changed. The currently selected tune will be
highlighted with a “( )” around the number, as shown in the picture below.
NOTE: requires additional AutoSync DSP/SOTF tune control wiring kit, sold separately. See page 17 of
this instruction manual for the AutoSync DSP/SOTF wire kit installation guide.
Gas vehicles: The icon that shows “ECM Tune Switching” in the picture below only shows on diesel
vehicles. When AutoSync is plugged into a gas vehicle, this icon will be replaced with “AFM:
Enabled/Disabled”. To disable the Active Fuel Management mode on your gas vehicle, set this to
“DISABLED”. This setting will be remembered permanently, you do NOT have to set AFM to disable
every time you drive the vehicle.
Strobe Lights – Found on page 1 of the AutoSync main menu. This activates exterior strobe light mode.
This will rapidly flash all exterior lighting (headlights, front turn signals, rear turn signals, CHMSL, reverse
lights, fog lights) in an alternating pattern. CHECK LOCAL LAWS regarding use of this feature! In most
areas, using vehicle lighting in this manner on public roadways is considered ‘impersonating a police
officer’. 2017+ vehicles, this feature usually only works with key on, engine off. If the engine is running
and you try to turn the strobe lights on, the button will say “Strobe Lights: Not Avail.”
We have recently developed a custom unlock method to allow strobes (and
work lights) with engine running on 2017+ vehicles! Currently, it is required to
have purchased our BCM tuning to gain access to this unlock method.
Page | 6
Work Lights – Found on page 1 of the AutoSync main menu. This activates exterior work light mode.
Work light mode manually turns on all cargo/bed lighting, as well as reverse lights. This feature is useful
for illuminating the rear of the vehicle at night, hooking up trailers at night, checking on cargo, etc.
2017+ vehicles have the same limitations as mentioned above for the strobe lights feature. The special
BCM unlock procedure mentioned above will allow work lights with engine running on 2017+.
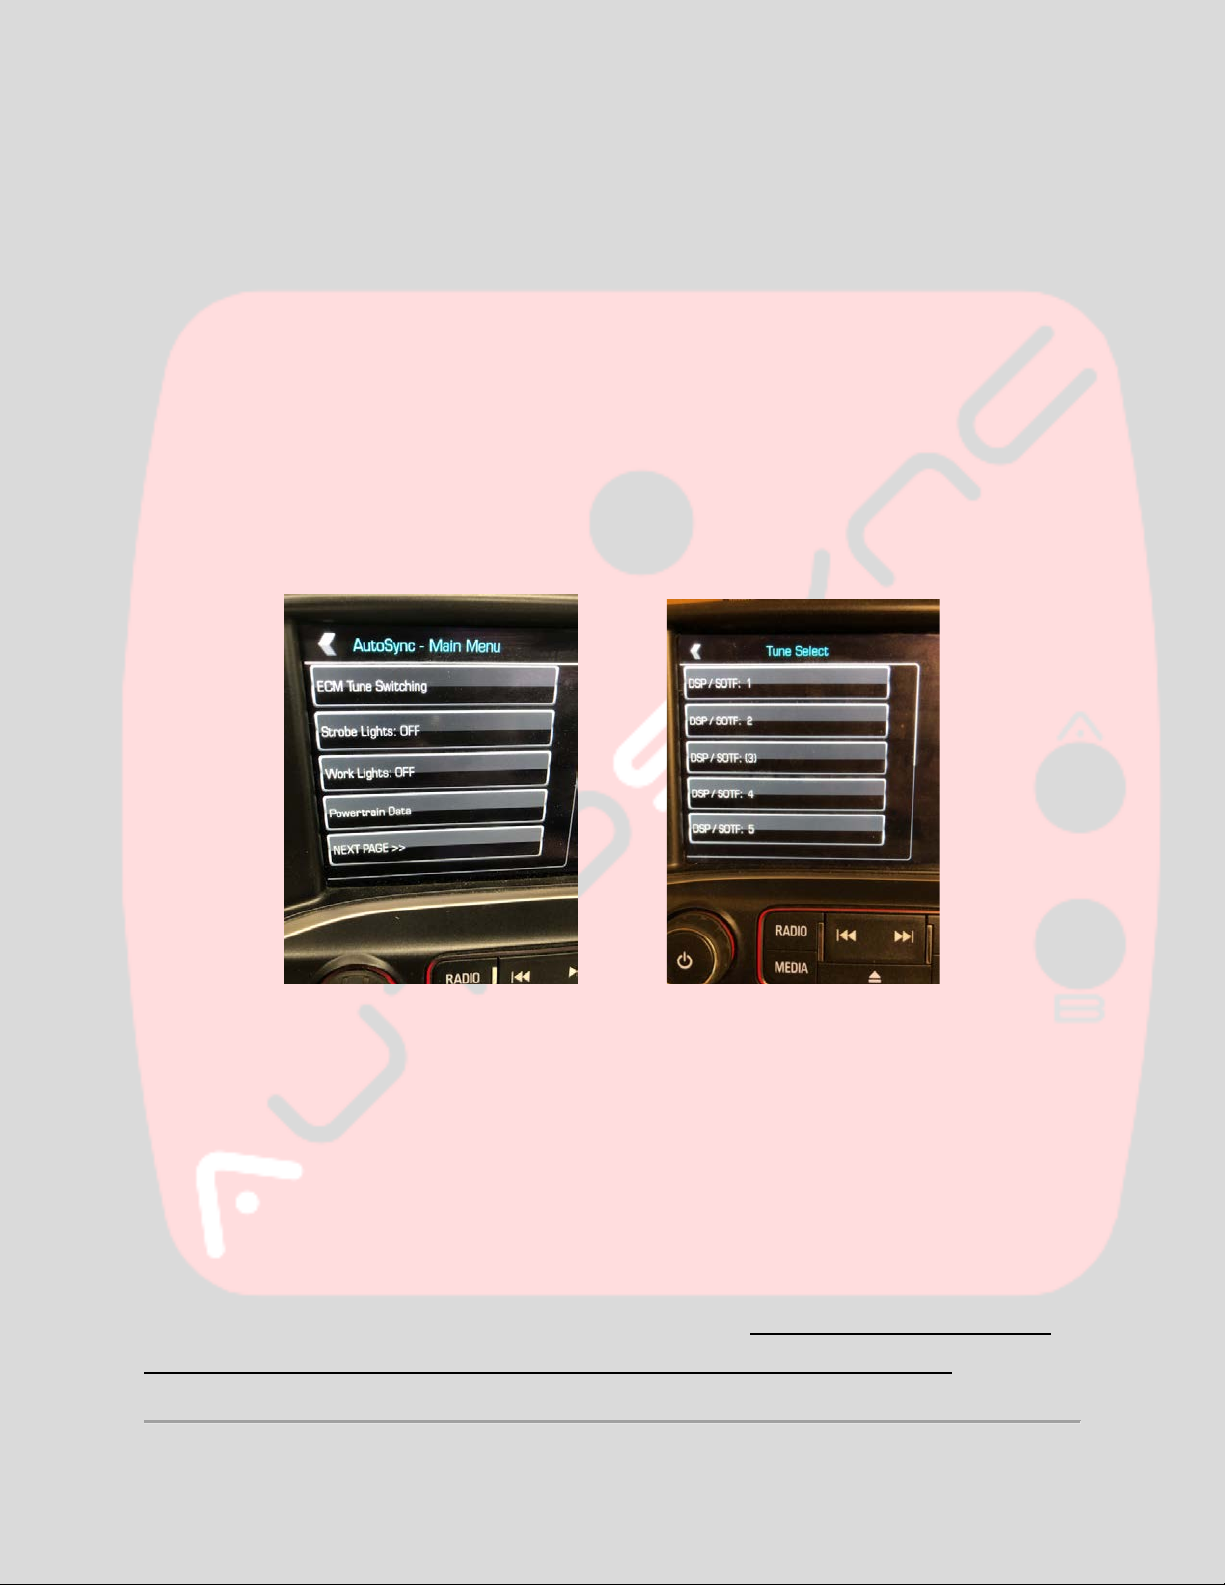
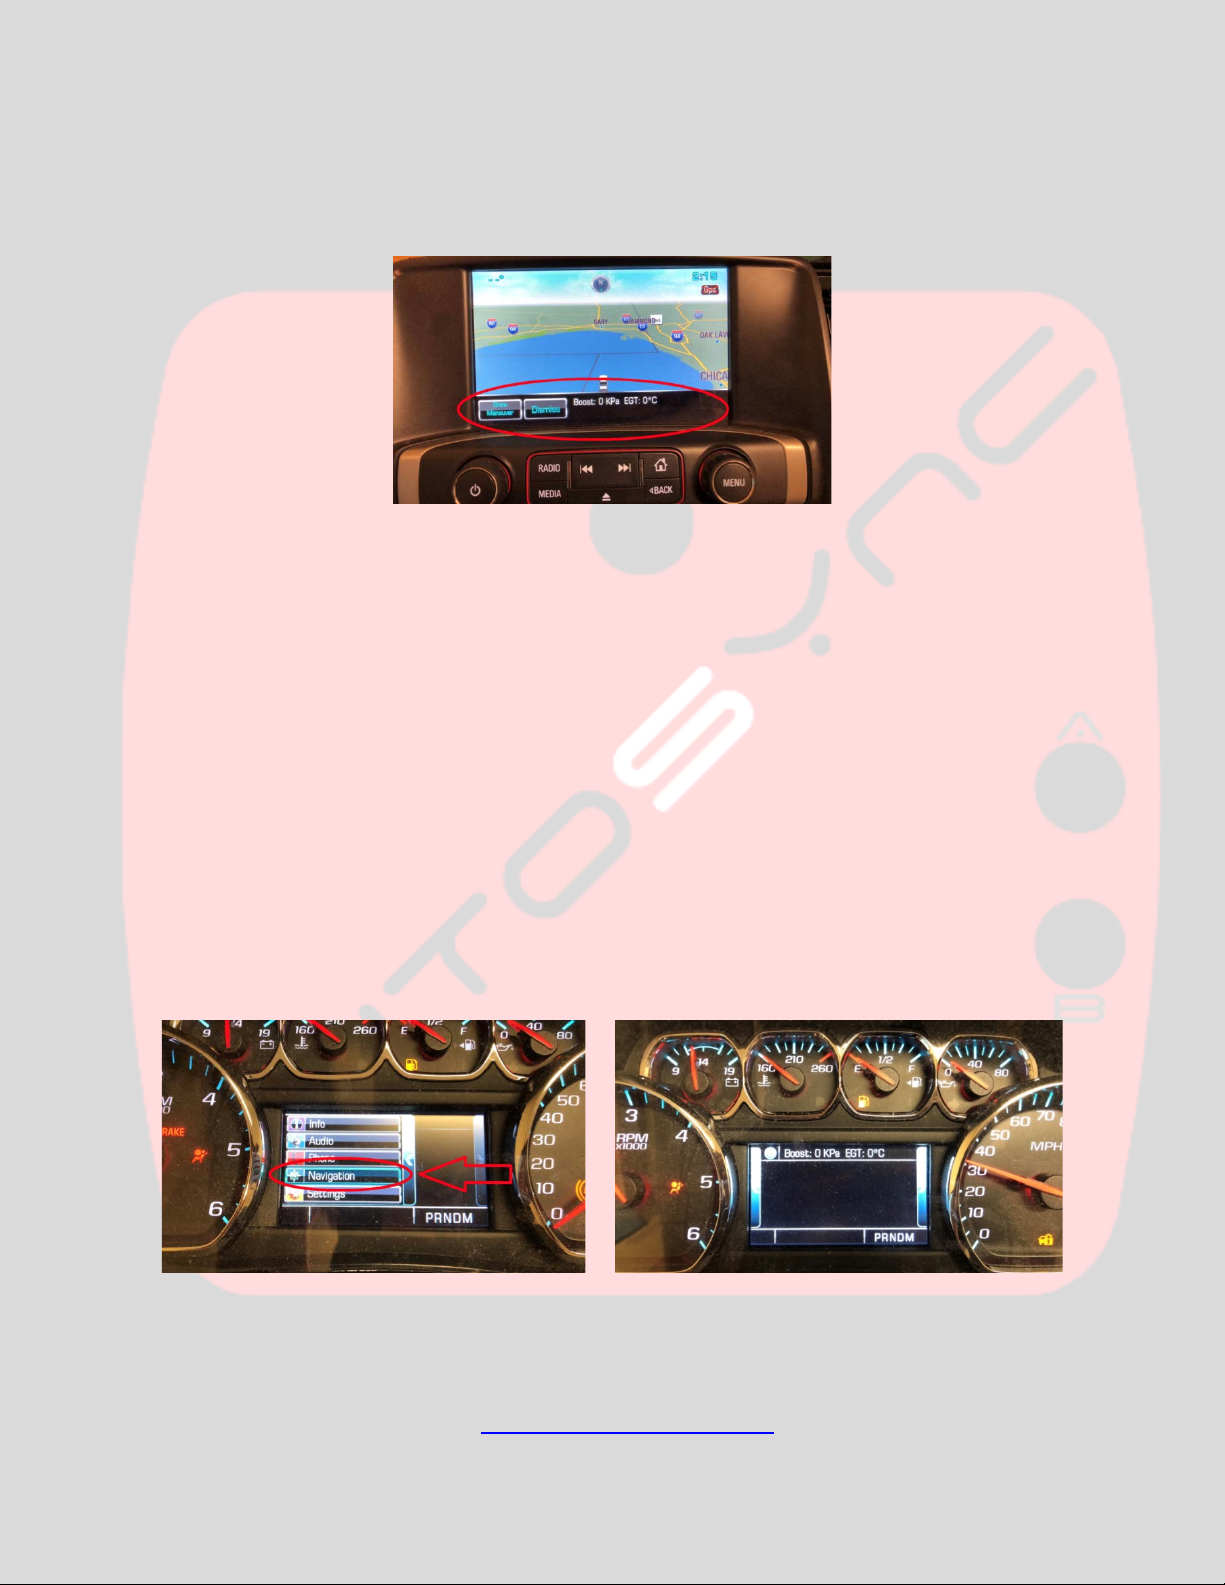
Powertrain Data – Found on page 1 of the AutoSync main menu. The powertrain data page displays live
engine/transmission data, as shown below.
Diesel PIDs include boost, EGT, coolant temp (ECT), oil pressure, current gear, torque converter clutch
(TCC) locked/unlocked, DSP/SOTF tune, turbocharger vane position, actual fuel rail pressure (aFRP),
desired fuel rail pressure (dFRP), main injection fuel rate, main injection timing.
Gasoline PIDs include spark advance, knock retard, MAF, MAP, engine load, coolant temp (ECT), oil
pressure, current gear, torque converter clutch (TCC) locked/unlocked.
NOTE:the “EGT” reading is derived from the factory “EGT-1” sensor, located in the factory downpipe at
the outlet of the turbocharger (LML) or “EGR-1” in the manifold (L5P). If this sensor is unplugged or
removed due to an aftermarket downpipe, EGT will not display correctly and will default to “1832*F”.
If your truck is ‘deleted’, you can extend the factory sensor wiring and re-locate the factory EGT-1 sensor
to the exhaust manifold for a more accurate “pre-turbo” reading.
There are two additional icons/buttons on the bottom of the Powertrain Data screen.
The “RECORDS” icon will display a page that shows the peak recorded values for each PID. These PID
peak records are stored permanently even if the AutoSync is unplugged. To clear/reset the PID peak
records, press the “ERASE” icon on the bottom of the “engine data records” page.
Page | 7
The “Minimize” icon will shrink the live engine data display to a small bar along the bottom of the
screen. This is helpful for keeping essential data at a glance, while still being able to view the navigation
map, radio controls, etc.
Due to the smaller size of the “minimized” view, only two PIDs are able to be displayed at once in this
mode. To cycle through the pages of minimized data display, press the drivers door lock button. To
switch back to the engine data full page, press the “Show Maneuver” icon.
Another great feature of the “minimized” mode, is that this minimized data is also mirrored on the
Driver Info Center (DIC) display in the instrument cluster, for easy/quick viewing without having to look
over at the radio/navigation screen. To view the engine data in the DIC, use the steering wheel DIC
controls to switch to the “NAVIGATION” page in the DIC, as shown below (non-Denali shown, Denali
instrument cluster is similar/works the same way). NOTE: DIC data display is only available when the
“minimized” engine data view is active. To fully hide the minimized data view on the radio/nav screen,
while still keeping the DIC data display active, press the “Dismiss” icon on the radio/nav screen, shown
above. Press “Show Maneuver” to return to the full engine data page (this will simultaneously cancel
the DIC engine data display, as explained above).
If the minimized view on the radio/nav screen has been “dismissed” or accidentally cleared, simply
press the rear defrost button 4 times to re-enter the AutoSync main menu.
View Rear Camera – This is found on page 2 of the AutoSync main menu. Press this icon to momentarily
switch to the backup camera display. The backup camera will display for roughly 5 seconds, and then
automatically return back to the AutoSync menu. Requires camera wiring mod or harness purchase.
Video explaining tailgate wiring mod: https://youtu.be/nB-QMF7z_WY
Page | 8
https://harnessdr.com/product/2016-2019-silverado-sierra-reverse-camera-adapter-harness/
NOTE: If you have not done the wiring modification correctly, the radio screen will be blank and/or
say “service rear vision system” if you use the AutoSync to manually turn the backup camera on while
driving. CHECK THE HARNESS MODIFICATIONS BEFORE EMAILING ME SAYING “HEY, THE BACKUP
CAMERA OR TURN SIGNAL CAMERA FUNCTION DOESN’T WORK!”
High Idle – This is found on page 2 of the AutoSync main menu. When the vehicle is in park with foot off
brake pedal, press this button to turn on the manual high idle function. Once the high idle mode is on,
you can adjust the engine RPM up/down (roughly 1000-2000rpm) using the cruise control +/- buttons.
NOTE: There is also a high idle shortcut to activate the mode without having to go into the AutoSync
menu. When the engine is idling in park, foot off brake, press and hold the cruise SET button for a
second or so. You will hear a chime and high idle will engage. To cancel high idle, press the brake pedal.
NOTE: on 2011-2016 LML, the high idle might take up to 15 seconds to engage and reach full RPM.
Current DTCs – This is found on page 2 of the AutoSync main menu. This function will read/display the
current/history Diagnostic Trouble Codes. The AutoSync is unique in that it will read codes from EVERY
module in the vehicle! The only other tools on the market that will read all codes in every module cost
thousands of dollars...Edge, Ez Lynk, and other competitors only read basic engine/transmission DTCs!
The DTCs are displayed in a numbered list with module, DTC, and status (current/history). Current
means that the fault currently exists. History means that the fault is not currently present, but has
occurred momentarily at least once in the past 50 ignition cycles. If there are more than 6 current DTCs,
press the “Next Page” button to scroll. “Clear DTCs” will clear all current/history DTCs from all modules.
Vehicle Dynamics Data – This is found on page 2 of the AutoSync main menu. This displays live chassis-
dynamics data from the stability control and traction control systems. Vehicle dynamics PIDs include:
Longitudinal acceleration (forward/backward Y-axis G-force), Lateral acceleration (side-to-side X-axis G-
Page | 9
force). Oversteer/understeer (if the vehicle is steady on its driver-intended path, if there is adverse yaw
creating an oversteer-fishtailing event, or an understeer-‘plowing’ event). Yaw rate (yaw/Z-axis rotation
rate). TCS torque request (engine torque as requested by the traction control system, during wheel-slip,
you will see this PID showing that TCS is requesting torque reduction). Brake apply pressure (how much
brake fluid pressure is being applied to the brake calipers, whether it be by the driver pressing the brake
pedal, or the ABS module applying brake pressure during a TCS/ESC event).
In similar fashion to the engine data display page, the vehicle dynamics page also records peak records
that can be recalled by pressing the “RECORDS” icon, and cleared by pressing the “RESET” icon on the
vehicle dynamics records page
Launch Control – This is found on page 3 of the AutoSync main menu. This does not work on 2017+
vehicles, sorry. This exclusive feature uses the ABS module to act as a ‘smart’ line-lock/automatic launch
control feature. The vehicle should be in 4-wheel-drive, and have the brake pedal firmly applied before
activating. Follow the on-screen instructions, and when you are ready to activate it, press the cruise
control “SET” button.
You will hear the ABS motor run for ~2 seconds and feel some vibration in the brake pedal and you
may see an ABS warning light; this is normal.
When the ABS motor stops running, the launch control braking is fully charged. An on-screen
countdown (5, 4, 3, 2, 1) will display, and you can release the brake pedal and bring the engine RPM’s up
to ~2200rpm. When the countdown hits 0, the ABS module will immediately dump brake pressure and
launch the truck.
You can also manually release brake pressure and force-launch the truck at any time during
the countdown by pressing the cruise control “RESUME” button.
NOTE: It is strongly advisable to NOT use launch control repeatedly, and you should allow
several minutes’ cool-down time for the ABS pump motor and ABS solenoids between launch
Page | 10
control events. Repeatedly/continuously using launch control MAY cause premature wear on
the ABS pump motor and solenoid valves.
Performance Timer – This feature is found on AutoSync main menu, page 3. This function allows the
user to measure the vehicles 0-60mph time. Follow the on-screen instructions to use the feature. If the
vehicle is moving, the status will show “NOT READY”. When the vehicle is completely stopped and the
timer is ready to begin, the status will show “READY”. As soon as the vehicle starts moving, the timer
will begin counting and the status will show “RUNNING”. When the vehicle hits 60mph, the status will
show “COMPLETE”, and the 0-60mph time will be displayed on the screen. The AutoSync will
automatically store the fastest time, and this time will be saved even if the AutoSync is unplugged. If a
faster 0-60mph time is accomplished, the AutoSync will automatically update the saved “Best time”. To
clear the “best time” records and reset the value to the default max time (65.54 seconds, computer
nerds will get this, ha), press the “Clear Records” icon.
NOTE: This test will only be accurate if your tire size is set correctly! If you have larger-than-stock tires
and your ECM tune/speedometer has not been corrected for the larger size tires, this 0-60mph time
will be inaccurate. Using GPS, verify that your speedometer is correct to ensure accurate results.
Vehicle Setup – This is a sub-menu found on page 3 of the AutoSync main menu. This sub-menu
contains several vehicle-related setup and configuration options:
-Learn new keyfobs (only for vehicles with keyed ignition, does not work on push-button-start vehicles)
Page | 11
-TPMS warning threshold programming, or disable TPMS completely.
-OnStar/DEF Reset. This will reset the OnStar remote vehicle speed limiting function, and also clear any
nuisance “Service Emissions System” messages that are stuck in the DIC and cant be cleared with scan
tools. NOTE: Obviously this wont work on a stock vehicle. This will only clear/reset the warning
messages after your vehicle has been tuned/deleted.
-Fuel System Tests. This menu displays injector balance rates on diesel vehicles. Balance rates should
only be checked at idle, with the engine warmed up to temperature. In the Fuel System Tests page,
there is a “Pump Test” icon. This will run a test on the high pressure injection pump by ramping up fuel
rail pressure while verifying that the injection pump can properly build maximum fuel rail pressure. This
test is ONLY FOR BASIC REFERENCE. If the test fails, you must properly diagnose the fuel system
further with a dealer scan tool before throwing parts at the truck. A failure could simply be the result
of a clogged fuel filter. Do not contact us if the test fails, we cannot remotely diagnose your fuel
system issues.
-DPF Regen. This is a feature to force manual regeneration mode for the Diesel Particulate Filter. There
are two modes, stationary and mobile. NOTE: Stationary DPF regen will be very loud and ‘scary’.
-Transmission Learn Functions. This is only for vehicles with the Allison transmission. It has not been
tested on other transmissions. The transmission must be warmed up before doing these procedures.This
function will perform the Allison transmission TAPS reset and Allison transmission fast learn procedures.
TAPS reset clears the adaptive shifting values, and fast learn performs a complete clutch fill and release
timing/volume learn procedure.
TAPS reset can be used if the transmission is shifting harshly after drastically changing ECM tuning, or
otherwise increasing the engine power level.
Fast learn should ONLY be used once upon initial installation of a new or rebuilt transmission. Fast learn
is a three-stage dynamic process that will take several minutes and require the driver to shift the
transmission between forward/reverse while the TCM applies clutches and measures fill/apply times.
When fast learn is initiated, the radio screen will show further instructions on how to complete the
Fast Learn process (shift to drive, shift to reverse, etc).
Do NOT use TAPS reset or Fast Learn without first consulting your tuner or transmission builder!
AutoSync Info – This is found on page 3 of the AutoSync main menu. This page lists the AutoSync’s
currently installed firmware version, firmware build/date, serial number, flash memory storage size (4
megabytes, 8MB, 16MB), the vehicle platform it is currently plugged into, and RAM utilization stats.
The “Firmware Update” button (only visible key on engine off, see page 17 for more info)will initiate a
firmware update procedure, and (if purchased), the BCM tune file download procedure. Obviously the
Page | 12
AutoSync must be within range of your WiFi network for this to work and the AutoSync WiFi must be
configured manually. If you cannot park your truck within WiFi range, use the “offboard” update
procedure, explained in the separate AutoSync Quick-Start guide. You only have to do the AutoSync WiFi
setup (with your phone) once; the AutoSync saves your WiFi info.
The “WiFi: xxxx” button (only visible key on engine off) selects whether the AutoSync uses your
home/manually setup WiFi network/password credentials or the vehicle’s built in OnStar 4G LTE
hotspot. If you have a valid OnStar WiFi hotspot plan, you can press this icon and the AutoSync will then
automatically use/connect to the vehicle hotspot WiFi.
AutoSync Settings – This is a sub-menu found on page 4 of the AutoSync main menu. This sub-menu
contains several vehicle-related setup and configuration options:
-Camera Settings. This page is to enable/disable the turn signal camera feature (automatically peek at
backup camera for a customizable duration of time when a turn signal is activated) and adjust the
associated turn signal camera settings.
-TC Lockup Config. This page is to configure the settings of the AutoSync’s built in torque converter
lockup controller. Here you can adjust the RPM, vehicle speed, and minimum gear that must be met in
order for the AutoSync to automatically command torque converter lockup. You can also configure the
lockup controller enable/disable status to save across ignition cycles here. (if you have the lockup
controller turned on/armed and shut the truck off, the lockup controller will automatically re-enable
next time you start the vehicle).
-SecurIdle. This is a feature that will lock the shifter in park if the vehicle is running and has been locked
using the keyfob.You can use this as a security feature if your truck is left idling, to deter driveaway
theft if someone breaks into the truck while it is idling unattended. You can use an extra keyfob, or put
your keyfob on a quick-release to lock the truck with the engine running. NOTE: This is not fool-proof;
the AutoSync must remain plugged in for this to function. If you unplug the AutoSync with SecurIdle
Page | 13
engaged, SecurIdle will disable/shifter will unlock within 5 seconds. NOTE: Just as with the strobe
lights feature, this requires the BCM unlock to work on 2017+ vehicles. See top of page 6 for details!
-DRL override. If you have purchased BCM tuning add-on, do not touch this and be sure its set to stock.
If you have a 2014-2016 truck and want to manually adjust the Daytime Running Lights, you can use this
option. Stock, Fog lights, fog lights w/LED, disabled, disabled w/LED. The “w/LED” descriptor denotes
whether your truck has factory separate LED DRL’s, or just uses the low beam headlights as DRL’s.
For example: All GMC pickups (except base models) have the separate LED DRL’s, 2016-2018 half ton
Chevrolet pickups have LED DRL’s, and all fully loaded Tahoe/Suburban/Yukon/Escalade SUV’s have LED
DRL’s. All 2014-2015 Chevrolet pickup trucks do not have LED DRL’s, and 2015-2019 Chevrolet HD
pickups do not have LED DRL’s. Select “w/LED” if your truck has factory LED DRL’s.
However there may be some exceptions where you would want to use a different setting than described
above. For example if you have a GMC with factory LED DRL’s and you want to have the fog lights AND
the factory LED’s both be on during DRL operation, select the “fog lights” option, NOT the “fog lights
w/LED” option.
If there is a problem with the truck’s factory Ambient Light Sensor (the little bubble on the center dash
near the windshield that senses how light/dark it is), the menu button will say “ALS Invalid!”. When
there is a problem with the truck’s ALS, the AutoSync will disable its DRL features as a safety precaution.
NOTE: your truck’s ALS wiring and all other BCM wiring MUST BE STOCK!!!! DO NOT WIRE IN ANY
RESISTORS OR “ALL 6 ON HIGH” DIODES OR CUT ANY WIRES GOING TO THE ALS!
NOTE: This feature is somewhat of a dirty workaround “hack”. There may be some circumstances
when the DRL’s default back on for a few seconds, and the AutoSync must remain plugged in. The
proper way to permanently adjust DRL’s is with our custom BCM tuning add-on!
-Fog Lights w/ High Beam. If you have purchased BCM tuning add-on, do not touch this and be sure its
set to off. If you have a 2014-2016 truck and want to allow fog lights with high beams, you can use this
option. NOTE: This feature is somewhat of a dirty workaround “hack”. There may be some
circumstances when the fog lights turn off for few seconds, the fog light indicator will not work
properly when on high beams, and the AutoSync must remain plugged in. The proper way to
permanently allow fog lights on high beams is with our custom BCM tuning add-on!
-Strobe Lights Pattern Config. This setting allows you to select several different patterns for the
AutoSync strobe lights feature. All lights, all lights except headlights, rear lights only, rear lights only
except reverse lights.
-Reverse Work Lights. This feature will make the AutoSync automatically turn on the cargo/bed lamps
when the vehicle is shifted into reverse, for additional illumination while backing up at night. NOTE: Just
as with the strobe lights feature, this requires the BCM unlock to work on 2017+ vehicles. See top of
page 6 for details!
Page | 14
-Engine Data Acquisition mode. There are two different methods of polling the ECM to read live data.
Dynamic is preferred because it allows faster data reading/display, however it might have compatibility
issues if you are using the AutoSync on an OBD splitter with another scan tool (Edge CTS, Ez Lynk, Banks
etc). If you are using the AutoSync simultaneously with another scan tool device and the readings on
one or both devices are erratic or corrupted, try switching the Engine Data setting to “Mode-22”.
-Auto Work Lights. This setting adds a feature that will automatically turn on your cargo/bed lights when
you unlock your truck with the keyfob at night. This can be helpful to provided extra exterior
illumination in addition to the vehicle’s factory approach lighting (headlights, reverse lights, etc). NOTE:
Just as with the strobe lights feature, this requires the BCM unlock to work on 2017+ vehicles. See top
of page 6 for details!
TC Lockup Controller –This is found on page 4 of the AutoSync main menu. This menu option is only
visible/accessible with engine running.
The lockup controller has two modes: automatic and manual. Automatic mode will automatically
immediately force lock the torque converter whenever the accelerator pedal is greater than 95%,
vehicle speed is above “X” mph, engine speed is over “X” rpm, and the transmission is in “X” gear.
“X” are user-adjustable variables found in the “AutoSync Settings – TC Lockup Config” menu.
Manual mode allows the user to have full manual control of the torque converter lockup, as long as the
vehicle speed is above 25mph and the brake pedal is NOT applied. When in manual mode, press the
cruise control ON/OFF button to force-lock the converter. Press the cruise control CANCEL button to
force-unlock the converter. If the brake pedal is applied, the lockup controller function is canceled.
To select auto or manual mode:press the “Mode” icon button on the bottom of the screen. The lockup
controller “AUTO” mode can be used any time, on the street or track. The “MANUAL” mode should only
be used on the race track/sled pull track. To disable the lockup controller function, press “off”
NOTE: You can also arm/enable the lockup controller using this shortcut: press/hold the tow/haul
button for several seconds until you hear a chime.
Module Programming – Custom BCM tuning is available as an extra-cost upgrade. BCM tuning can
add/modify hundreds of extra awesome features such as remote start time extend, disable door chime,
disable LED turn signal hyperflash, speed limiter adjust, cargo light while driving, modify door lock
settings, modify night time approach/exit lighting settings, auto headlight settings, wiper settings, etc.
BCM tuning can be purchased here (downloads to AutoSync over WiFi): www.whiteautoandmedia.com
Page | 15
Other Hidden AutoSync Features
Window control – This function allows you to open and close the side windows via remote keyfob. First,
be sure that the “remote window operation” is set to “ON” in the factory radio/nav settings. From the
factory radio home screen, press the settings icon, then “vehicle”, then “remote lock, unlock, start”,
then “remote window operation”, set to ON.
-To open all of the windows while the truck is off, hold the “UNLOCK” button on the remote keyfob.
-To close all of the windows while the truck is off, hold the “LOCK” button on the remote keyfob.
NOTE: sunroof open/close and rear sliding window open/close is NOT supported by remote control
NOTE: Just as with the strobe lights feature, this requires the BCM unlock to work on 2017+ vehicles.
See top of page 6 for details!
Video override – AutoSync can disable the factory video lockout features that prevent use while the
vehicle is not in Park. To activate this, be sure the vehicle is in Drive, and press-hold the cruise control
ON/OFF button for approximately 4 seconds. You will hear a chime and a “Video In motion active!”
message will pop up on the screen for several seconds and then self-clear. The video lockout will then be
disabled. You must re-initiate this override function every time the vehicle is restarted or shifted back
into park. Unfortunately, navigation destination entry function is not able to be overridden by AutoSync.
THIS FUNCTION IS ILLEGAL TO USE ON PUBLIC ROADWAYS. DISTRACTED DRIVING CAN BE DEADLY TO
YOURSELF AND INNOCENT BYSTANDERS!!!!
Radio / HMI VIN clear – AutoSync has the ability to clear and reset the VIN lock on both radios and HMI
modules. This is useful if you are swapping/replacing HMI modules or radios. The dealer cannot clear the
VIN on these modules, this is an AutoSync-exclusive!
When a new radio or HMI module is installed, the radio screen will be black with a “theftlock” message.
To unlock the radio and HMI module, start with the key on engine off, AutoSync plugged in. Press the
accelerator pedal to the floor and hold it. While still holding the accelerator pedal, press and hold the
brake pedal. While holding the brake and accelerator pedal, press and hold the cruise control set/coast
button. Within a second or two, the radio screen will show “NO VIN”. When the radio screen shows “NO
VIN”, release the pedals and cruise control button. The radio will then reset and the normal home
screen will return. Cycle the key OFF for 30 seconds, then cycle the key back on, and the radio/HMI
module will now have your trucks VIN stored.
Page | 16
HVAC Forced Recirculation Mode – From the factory, even when the user presses the “recirculate”
button on the HVAC controls, the recirculation mode door does NOT completely close. When the HVAC
is on recirculate mode, the fresh air door actually only closes about 90%. Roughly 10% of outside air is
still being pulled in. With the HVAC in Auto mode, press the recirculation button on the HVAC controls
(the vehicle with the curved arrow) 4x in a row. You will hear a chime, and might hear a slight change in
the blower motor/airflow sounds. To cancel forced max-recirc, press the “Auto” button on the HVAC.
My best guess on why GM programmed the HVAC this way is to: lessen the chance of CO poisoning (in
the event that exhaust gasses leak into the cabin), to prevent CO2 poisoning (the cabin is sealed
surprisingly tight, with 5+ occupants breathing inside, there is a remote chance CO2 levels could get
high, to prevent the cabin from getting stale/musty, or to improve AC performance. Under many
conditions, if AC is ‘too powerful’ and cools the cabin too quickly, it can cause the AC to short-cycle and
not dehumidify the air properly. This can make the cabin air cold and "swampy“, and even cause the
evaporator to freeze up.
The only time this AutoSync feature should be used is if you are in extremely dusty conditions and need
to completely seal the cabin. I do not recommend using it for an extended period of time. The feature
will default back to off every time you start the truck.
EFILive DSP-5 / EZ Lynk SOTF switching installation (2015-2016 LML only, L5P switchable tuning is
currently in development) – AutoSync enables an alternative to engine tune switching that is much
cleaner and more attractive than the traditional rotary “knob”. The “DSP/SOTF signal” wire is a required
additional accessory (sold separately) in order for the AutoSync to utilize this feature.
https://www.btdieselworks.com/collections/autosync/products/autosync-dsp-sotf-wire
-Unbolt the OBD port from the dash bracket, and remove the top row blue plastic retainer clip using a
small screwdriver or pick. Insert the AutoSync DSP/SOTF wire into pin position 8 (top row, furthest
right…confirm with the small pin location numbers printed on the OBD port connector itself).
-Cut the “SIGNAL” wire going to your existing rotary DSP/SOTF knob switch. Usually this wire color is
purple or yellow, and goes to Pin 11 on the gray ECM “C3” connector. Splice the AutoSync DSP/SOTF
wire to the DSP/SOTF signal wire that you just cut. The ground (usually black) wire going to the old
rotary switch can be cut/taped off/removed. BE SURE TO TRIPLE CHECK WHICH WIRES YOU ARE
WORKING WITH. SPLICING THE AUTOSYNC DSP/SOTF WIRE TO THE “GROUND” WIRE OF THE OLD
ROTARY KNOB SWITCH OR OTHERWISE INSTALLING INCORRECTLY WILL DESTROY THE AUTOSYNC AND
VOID ALL WARRANTIES!
Page | 17
AutoSync automatic OTA firmware update
Occasionally we add new features to the AutoSync or fix minor bugs/glitches that might occur in the
field. Updating the AutoSync is extremely and directly over WiFi, you do not need a PC/laptop.
Firmware updates usually occur automatically in the background whenever the vehicle is within range of
your home WiFi network and has been parked/ignition off for more than several minutes. However you
can also manually trigger a firmware update by going into the AutoSync Info page (main menu, page 3)
with the key on engine off, and press “Firmware Update”.
NOTE: If you have purchased BCM tuning, the BCM tune files are only downloaded when you go into the
AutoSync Info page and manually trigger a firmware update. BCM tune files do NOT get automatically
downloaded when the AutoSync does the automatic firmware update mentioned above.
First, you must create an account on the BT DieselWorks AutoSync firmware update server. Scan the QR
code on the AutoSync with your phone and it will take you to the AutoSync registration page. If you are
registering via a computer, go to autosync.btdieselworks.com (do NOT forget to enter your AutoSync
serial number if doing manual registration via a computer)
NOTE: Be sure that your truck is parked within range of your WiFi router, or inside a garage with WiFi
access. Leaving the vehicles doors/windows OPEN might be needed to ensure that the AutoSync can
pick up a good WiFi signal. If the update procedure fails, or “hangs” more than 3-4 times, the WiFi
signal is probably too weak, and you must use the “offboard” procedure explained on page 19.
NOTE: If your truck has an active OnStar 4G internet WiFi hotspot plan active, the AutoSync can be
configured to automatically connect to your trucks WiFi hotspot to handle the firmware update.
- Ignition is ON, engine OFF. Access the AutoSync menu (press the cruise CANCEL button) and scroll to
PAGE-4. Press “AutoSync Info”.
- NOTE: The following steps must happen within ~60 seconds, otherwise the AutoSync will time out,
exit the setup menu, and you will have to start over again.
- NOTE: If your truck has an active WiFi hotspot internet plan, skip steps 2-5!
1. Press the “FIRMWARE UPDATE” button on the bottom of the radio screen, and then follow the
on-screen instructions.
2. Using your phone, search for available WiFi networks. Within a few seconds, the WiFi network
“AutoSync” should appear. If it does not appear with in 10sec, turn your phone WiFi off for a
second, then on again.
Page | 18
3. Connect to the AutoSync WiFi network. Once your phone is connected, the AutoSync
configuration menu should appear automatically on your phone. If it does not appear within a
few seconds, open your phones web browser and go to the website “10.10.0.1”
4. The AutoSync will then list all of the WiFi networks that are within range. If your WiFi network
does not appear, wait a few seconds. If your WiFi network still does not appear within ~10
seconds, check that your WiFi router is working, and the AutoSync is within range of your router.
NOTE: The AutoSync can only connect to 2.4ghz WiFi networks. 5ghz WiFi is not supported.
5. Click on your home WiFi network name and type in your WiFi router password (note: passwords
are case-sensitive).The AutoSync will now attempt to connect to your WiFi network. If the
connection is successful, your phone will exit the AutoSync configuration menu, and the radio
screen will show “WiFi connection Success. AutoSync will now connect to the internet to check
for new firmware”. If the AutoSync does not connect within 10 seconds, double check that your
WiFi password is correct, unplug the AutoSync, plug it back in and try again. NOTE: You only
have to do this WiFi setup procedure once. The AutoSync will permanently save your WiFi info.
6. Once the AutoSync has connected successfully, within a few seconds, the radio screen will show
“Downloading new firmware! DO NOT DISTURB AUTOSYNC”. The AutoSync is now downloading
the updated firmware from the internet and reprogramming itself. When the firmware
download has completed (it should take less than 30 seconds), the radio screen will show
“Firmware Update Success”. Press the radio home button to reboot and load the new firmware.
If the radio screen shows “Update Failed! Error: xxxxxxx”, exit the AutoSync menu, turn the
ignition OFF, unplug the AutoSync for 10 seconds, plug it back in, and try the update procedure
again. If it still fails after multiple attempts, this is most likely due to a bad internet/WiFi
connection.
7. If update procedure seems to be hanging for more than several minutes, (stuck on “Firmware
download – do not disturb” message), turn the ignition OFF, unplug the AutoSync for 10
seconds, and try update procedure again. If the firmware update screen is “stuck” on the radio
and you cant clear it…unplug the AutoSync, plug it back in, and press the cruise “CANCEL”
button to re-initialize the AutoSync menu.
Page | 19
Alternate “offboard” update method if you cannot
move your truck within range of your WiFi router
1. Be sure you are sitting near your WiFi router. Locate any regular phone charger or power supply,
be sure it is capable of supplying at least 1-amp or 1000mA.Note: if you have also purchased
additional BCM tuning separately, this “offboard update procedure” will also download your
BCM tuning in addition to the latest AutoSync firmware. Any standard USB-C cable will work.
2. Plug the AutoSync into USB power, the LED will turn on , wait roughly 10 seconds. The LEDBLUE
will turn GREEN indicating that the AutoSync is on offboard programming mode and searching
for WiFi.
3. Note: If you have already entered your home network’s WiFi credentials at a previous time,
the LED will only turn GREEN for a second, and then will start flashing alternating RED/,BLUE
indicating it has already connected and is downloading the new firmware…leave it alone! If the
LED just stays GREEN, that means there is no WiFi that has been configured yet (or WiFi is out of
range) and you need to follow steps 2-5 above on page 17-18.
4. Once the AutoSync has successfully connected to your home WiFi network, the LED start
flashing alternating RED/, indicating it has connected and is currently downloading newBLUE
firmware. Once the firmware has finished downloading, the LED may go back to solid blue for a
few seconds, then back to alternating RED/. After that second cycle, the LED should turnBLUE
off completely, indicating that the AutoSync is finished downloading and can be unplugged. The
entire procedure should not take longer than 6 minutes or so. If the firmware update does not
complete within that time, unplug the AutoSync and try the procedure again.
5. If the LED flashes RED only (no blue) or goes solid RED, that means the firmware update has
failed. Double check your WiFi settings, check that your internet connection and WiFi router are
working correctly, unplug the AutoSync and try again.

Popular Automobile Accessories manuals by other brands

Whispbar S11W Fitting instructions

Whispbar

Whispbar S11W Fitting instructions

Durite O-775-4 CCTV Technical specifications

Durite

Durite O-775-4 CCTV Technical specifications

Cruz 924-82 Series Assembly instructions

Cruz

Cruz 924-82 Series Assembly instructions

Dakota Digital UTV- 6120 installation instructions

Dakota Digital

Dakota Digital UTV- 6120 installation instructions

Dynojet Auto Tune user manual

Dynojet

Dynojet Auto Tune user manual

Aries AL233043 installation manual

Aries

Aries AL233043 installation manual

iBeam TE-RM45 user manual

iBeam

iBeam TE-RM45 user manual

Safe Fleet RVS systems RVS-M633 instruction manual

Safe Fleet

Safe Fleet RVS systems RVS-M633 instruction manual

Tessera4x4 SOT-ROLL Series installation manual

Tessera4x4

Tessera4x4 SOT-ROLL Series installation manual

Directed 403.SUBARU11 installation guide

Directed

Directed 403.SUBARU11 installation guide

DV8 OFFROAD MPJL-01 installation manual

DV8 OFFROAD

DV8 OFFROAD MPJL-01 installation manual

Thermo King TriPac EVOLUTION Operator's manual

Thermo King

Thermo King TriPac EVOLUTION Operator's manual

Cequent Draw-Tite 36587 installation instructions

Cequent

Cequent Draw-Tite 36587 installation instructions

Z Automotive Double Bypass installation instructions

Z Automotive

Z Automotive Double Bypass installation instructions

ARB 3432090 Fitting instructions

ARB

ARB 3432090 Fitting instructions

Rugged Ridge 11210.11 manual

Rugged Ridge

Rugged Ridge 11210.11 manual

Prorack K138 Fitting instructions

Prorack

Prorack K138 Fitting instructions

PLX DM-5 quick start guide

PLX

PLX DM-5 quick start guide

manuals.online logo
manuals.online logoBrands
  • About & Mission
  • Contact us
  • Privacy Policy
  • Terms and Conditions

Copyright 2025 Manuals.Online. All Rights Reserved.