Btwin Count 14+ User manual


CONTENTS
COMPUTER AND SENSOR ASSEMBLY................................................................................................................................................................................................3
A WORD FROM THE PRODUCT MANAGER ......................................................................................................................................................................................5
SCREEN LAYOUT........................................................................................................................................................................................................................................5
ICONS USED................................................................................................................................................................................................................................................5
BUTTONS.....................................................................................................................................................................................................................................................5
MENUS..........................................................................................................................................................................................................................................................5
BEFORE YOUR FIRST RIDE (and after changing the battery) ........................................................................................................................................................................6
STARTING A SESSION ..............................................................................................................................................................................................................................8
DURING THE SESSION .............................................................................................................................................................................................................................8
STOPPING A SESSION............................................................................................................................................................................................................................ 10
AFTER A SESSION.................................................................................................................................................................................................................................... 10
OPTION MENU......................................................................................................................................................................................................................................... 12

3
EN
x1 x1 x1 x1 x1x2 x4
kmi
mm
total
mi/h
km/h
0 K
x x
reset
kmtotal
km/h
reset
kmi
mm
total
mi/h
km/h
0 K
x x
reset
kmtotal
km/h
reset
1
1
kmi
mm
total
mi/h
km/h
0K
xx
reset
kmtotal
km/h
reset
kmi
mm
total
mi/h
km/h
0K
xx
reset
kmtotal
km/h
reset
kmi
mm
total
mi/h
km/h
0K
xx
reset
kmtotal
km/h
reset
kmi
mm
total
mi/h
km/h
0 K
x x
reset
kmtotal
km/h
reset
1
kmi
mm
total
mi/h
km/h
0 K
x x
reset
kmtotal
km/h
reset
2
COMPUTER AND SENSOR ASSEMBLY

4
EN
A
B
0.2 in
5 mm max

5
EN
S
B2B1
B2
B2
B2
B1
B1
B1
A WORD FROM THE PRODUCT MANAGER
Thank you for purchasing the COUNT 14+ computer
Equipped with ANT+ technology that guarantees the transmission of data without interference, it can also receive information from several sensors: speed, cadence
(pedaling rate) and heart-rate monitor (optional).
Your COUNT 14+ computer also has a memory that enables you to analyse your performances on the computer itself or your PC using our «Geonaute Software» analysis
software.
Discover all the features of the COUNT 14+ computer in the following pages and enjoy cycling!
SCREEN LAYOUT
Current speed
Active sensor indicator
Mode indicator
Battery indicator
Speed comparer
Display of secondary function (value)
Display of secondary function (name)
PICTOGRAMS USED
Speed/cadence sensor has been enabled.
Heart rate belt has been enabled.
Computer has been hooked up to your PC.
You have enabled the alarm bell for the target zones.
You are conguring the bicycle (display without arrows). When arrows are ashing, you must turn the bicycle wheel.
You are in the REPORT menu.
You are in «speed-distance» mode.
You are in «cadence» mode (pedalling rate).
You are in «time» mode.
You are in «heart rate» mode.
The computer battery is low and must be replaced.
Indicates navigation directions in menus (for OPTION and REPORT menus only).
THE BUTTONS
The COUNT 14+ computer has 3 buttons.
2 buttons just below the screen (buttons B1 and B2) and 1 button on the top of the computer (button S).
The use of these 3 buttons will be explained in the following pages.
THE MENU
The COUNT 14+ main menu comprises 3 menus:
- OPTION: to adjust the settings.
- REPORT: to view the recorded ride data and from which to transfer the data to your PC.
- START: to start a session and view all the functions during your ride.

6
EN
S
B2B1
S
B2B1
S
B2
B1
Français
Espagnol
Italiano
Français
Espagnol
Italiano
Français
Espagnol
Italiano
SSSSS ...
S
B2B1
B2 B2B1 B1
S
S
B2 B2B1 B1
Press on B1 and B2 to switch from one menu to another.
This is indicated with the 2 arrows at the bottom of the screen.
To enter a menu, press on S. This is indicated by displaying «OK» on the screen.
Navigation within each menu will be explained in the corresponding sections.
BEFORE YOUR FIRST RIDE (and after changing the battery)
Before using your computer for the rst time, you will need to congure it. The settings only need to be congured the rst time. These settings are then stored for
subsequent rides.
When you rst remove the computer from its box, the screen is blank. Press on any button to go to the initial settings menu.
Animation 1 sec
UNITS SET
French
Spanish
Italiano
First choose which language the menus are to be displayed in. They are available in 4 languages: English, French, Spanish and Italian.
Press on B1 and B2 to choose your language and conrm by pressing S.. You automatically switch to the following settings menu (UNITS).
In each settings menu, the value to be adjusted ashes. Modify the value by pressing on B1 and B2 and press on S to conrm..
For example the unit settings menu:
The units to be adjusted start to ash and you may change the unit by pressing on B1 or B2.
To select, press on S.. You then come to the next unit to be set.
Again, you select the unit you prefer by pressing on B1 or B2 and conrm this choice by pressing on S..

7
EN
S
Once you have adjusted all the units, you automatically switch to the following setting (GENDER).
You can now adjust all the settings in the same manner. For faster adjustment, you may hold B1 or B2 down, to display the values
more quickly.
Explanation of the various initial settings:
UNITS
Choose your unit system: European (km, kg, cm) or imperial (mi, lbs, inches).
PROFILE
Use these menus to adjust the user prole settings:
- GENDER: user’s gender (male/female)
- AGE: user’s age (10 to 99 years old)
- WEIGHT: user’s weight (30 to 150 kg / 66 to 331 lbs)
- HEIGHT: user’s height (130 to 230 cm/ 51 to 91 inches)
DATE - TIME
To set:
- DATE: the date (day, month, year)
- TYPE OF DISPLAY: 12-hr or 24-hr clock display
- SETTING THE TIME: to adjust the time according to the display chosen
BICYCLE
The following bicycle settings are to be adjusted:
- The name of the bicycle: You may choose between «mountain bike» or «road bike» or give your bicycle another name. It will be used if you add other bicycles
(up to 3) to your COUNT 14+ computer.
- Wheel size: To make it easier to set, the computer suggests a list of 8 predened tyre sizes:
26 X 1.14+5
26 X 1.95
26 X 2.0
26 X 2.1
28 X 1.14+5
24 X 1.14+5
14+00 X 23
14+00 X 25
OTHER
You will nd the size on the side of your tyres. If your tyre size is not on the list, you can enter a specic size by selecting «OTHER» in the list. You must then enter the
circumference of the wheel in mm.
There are 2 methods to work out the circumference:
- 1st method:

8
EN
B2
B2
B2
B1
B1
B1
S
- 2nd method:
STARTING A SESSION
In the main menu, press on B1 or B2 to choose the DEPARTURE menu.
Press on Sto start a session. For 2 seconds, the screen displays the remaining memory time in which to save the values
recorded during the ride (displayed in hh:mm). The screen then automatically switches to the display you will see
throughout the ride.
Comments:
- If there is not sucient memory time to save your entire ride, you may quit the session (press for 2 sec on S) and delete rides from the memory in the REPORT menu.
- Before each ride, your computer searches for the sensors (speed/cadence and the optional heart rate strap if enabled). During this search the values ash on the screen.
- Warning:the computer only detects a sensor when it sends a signal. You must therefore turn the wheels or the crank to enable the speed-cadence sensor and you must
wear the heart rate strap.
- If the computer cannot detect one or more sensors, the screen will display «SENSOR MISSING» for 2 seconds. You may then choose from the following:
- Try again: try again to start the connection procedure again
- Continue : you can still benet from all the computer functions, except the values measured by the sensor.
- New sensor: to hook up a new sensor
The most common reasons for a missing sensor:
- The sensor is not sending out a signal. Turn the rear wheel or the crank for the speed-cadence sensor, or put the heart rate strap on.
- The sensor battery is low: it needs to be replaced. You can check whether the speed-cadence sensor battery is low by pressing on the sensor button: the green light on
the speed sensor no longer lights up.
- The computer and sensors are too far from each other. The sensors must be no more than 3 metres from the computer.
DURING YOUR RIDE
There are several display levels for when you are riding:
Current speed
Active sensor indicator
Mode indicator
Battery indicator
Speed comparer
Display of secondary function (value)
Display of secondary function (name)
The current speed is always displayed at the top of the screen, as is the speed comparer, that shows that you are going faster (upwards arrow) or slower (downwards
arrow) than the average ride speed.
On a second display level you may view a secondary function (value + name). All the functions are organised into 5 modes.

9
EN
B2
B2
B2B2
B2
B1
speed/distance mode
cadence mode
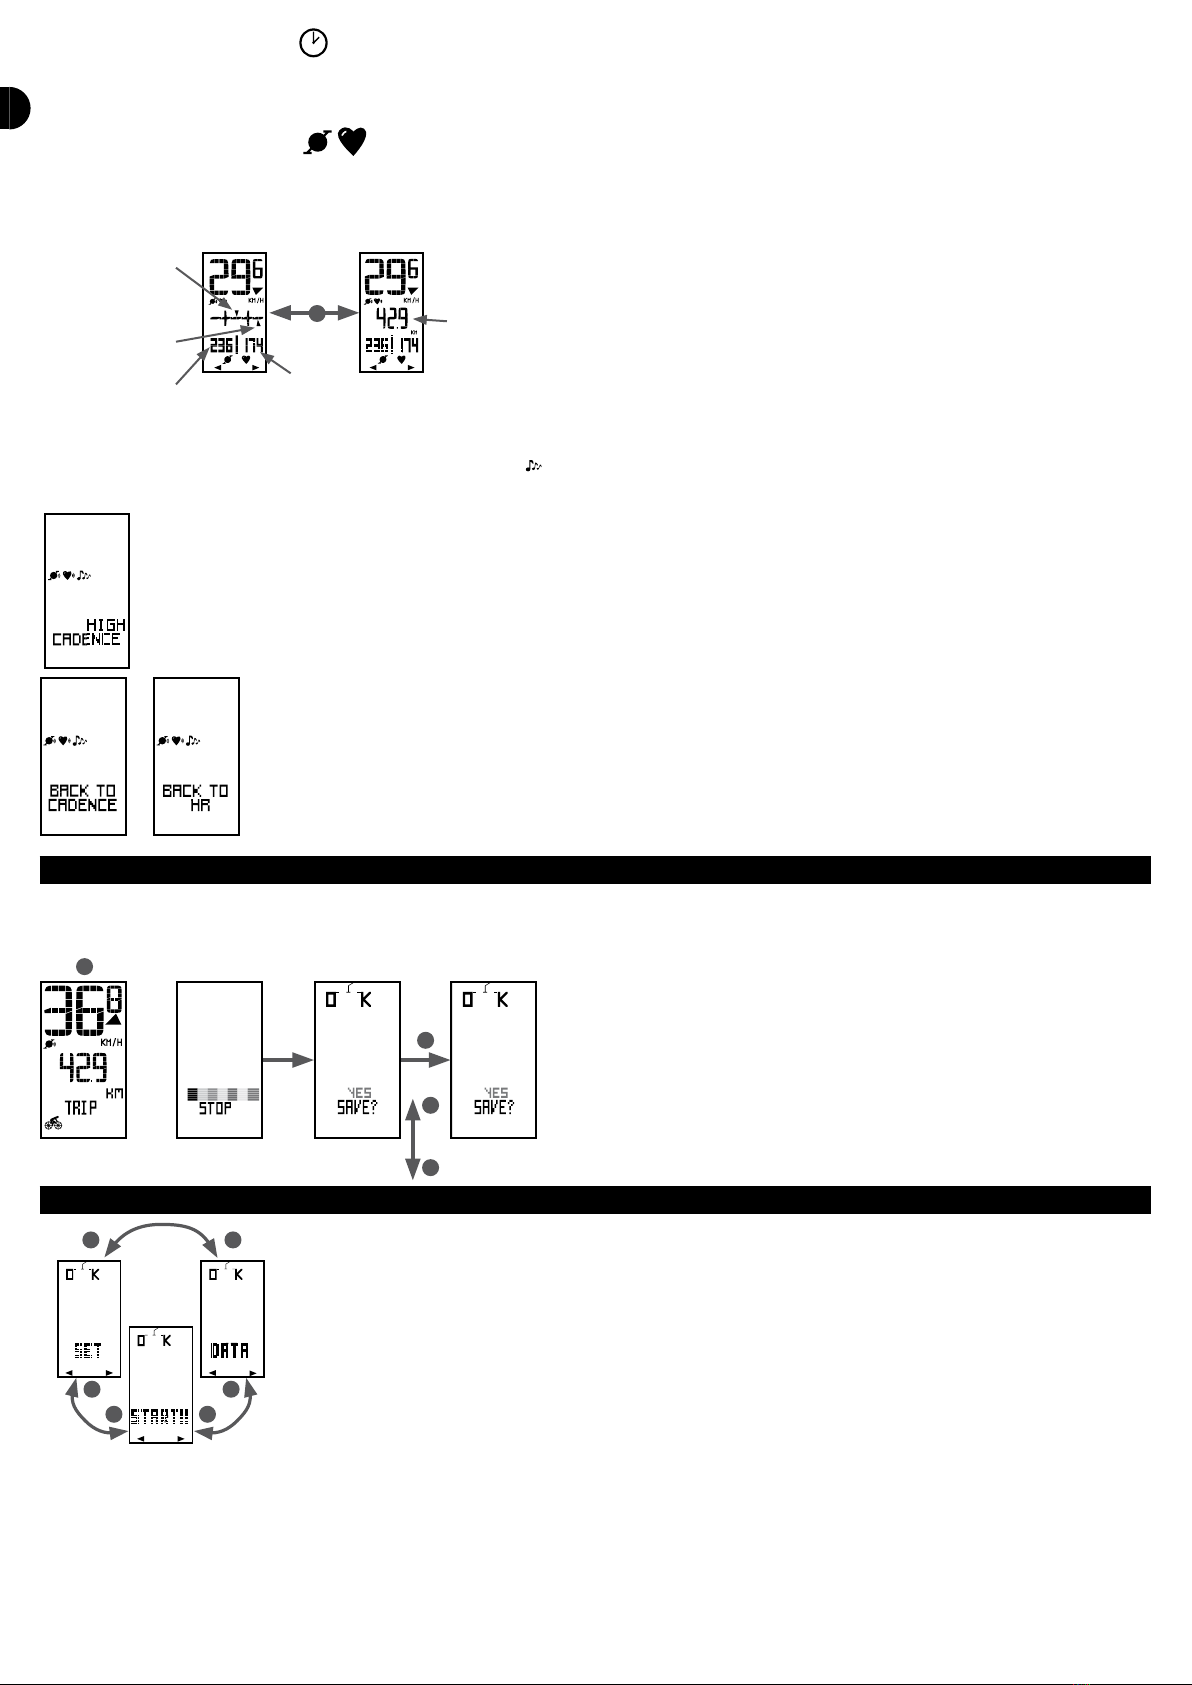
heart rate mode (only if enabled in the menu OPTION, a chest strap is an optional accessory)
time mode
mode double display (only available when in motion, not when stationary, and if the heart rate mode has been enabled in the OPTION menu)
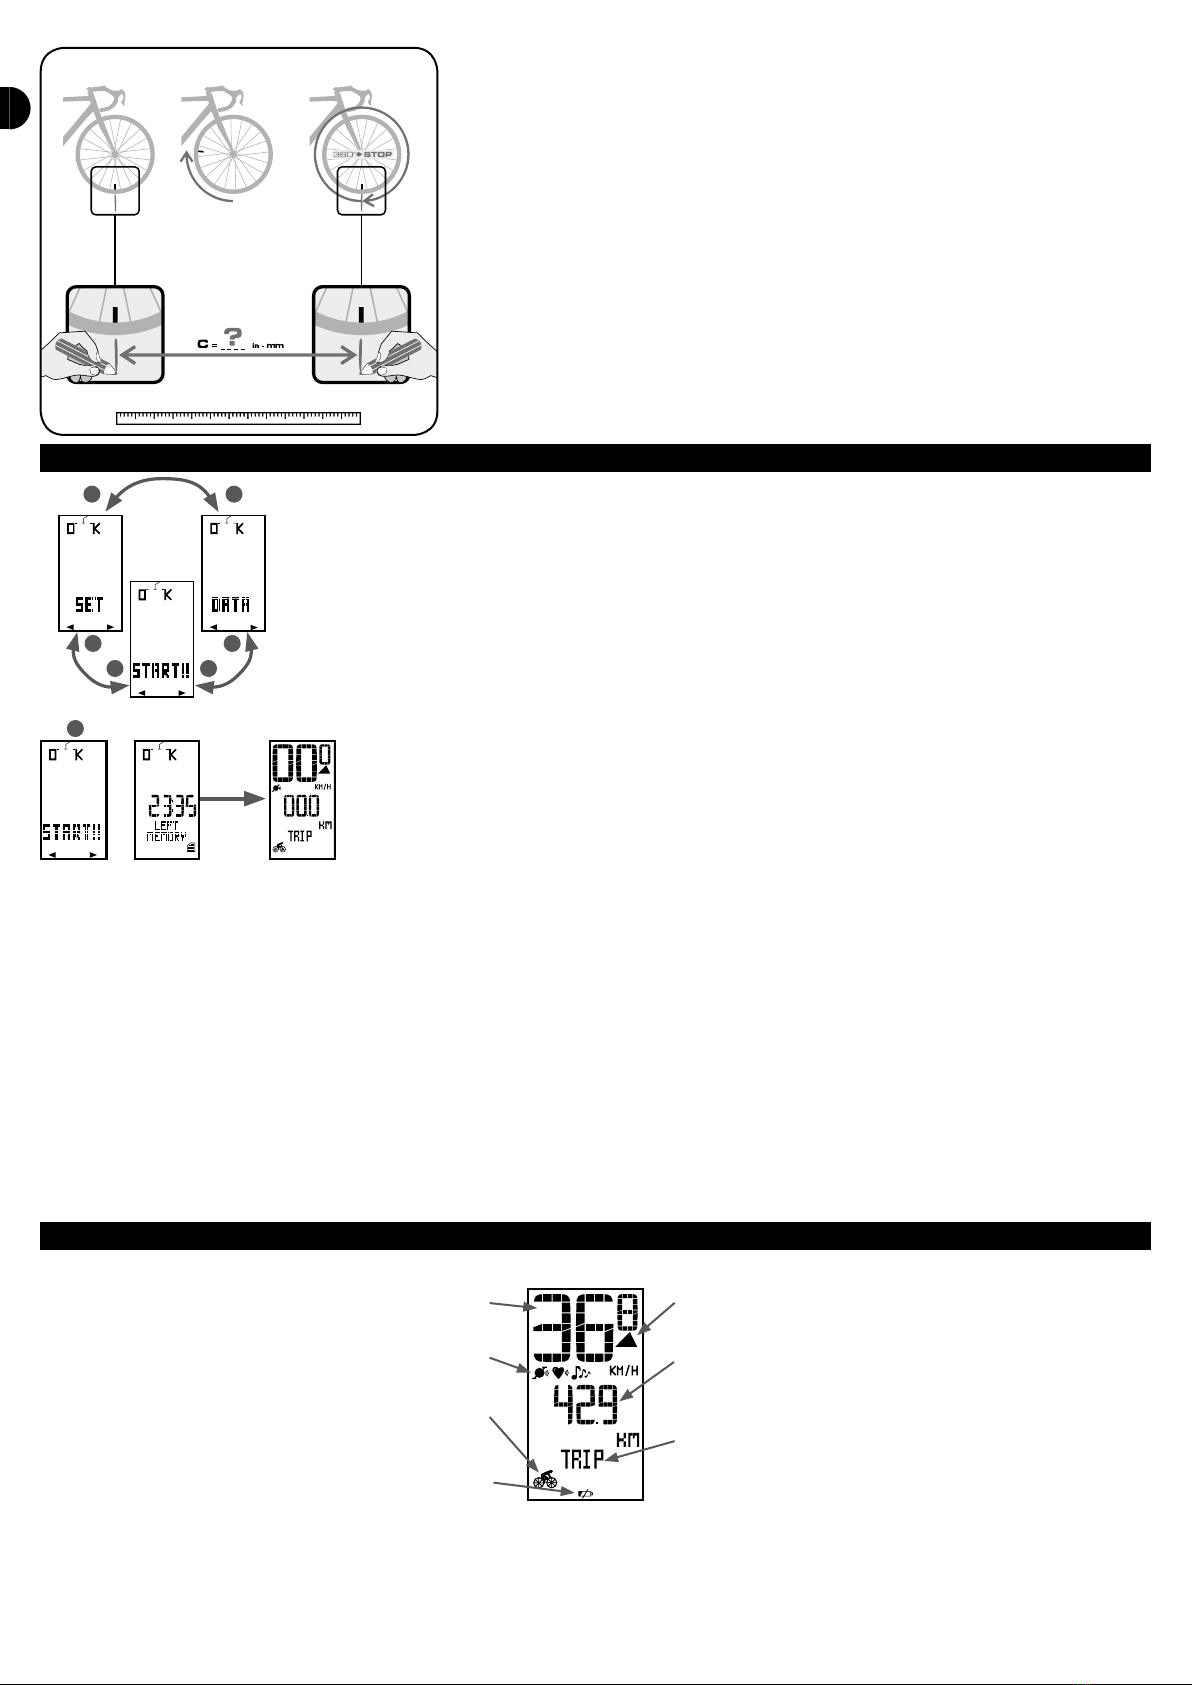
A pictogram at the bottom of the screen indicates your current mode.
To switch from one mode to another, press B1.
To display the functions within each mode (VIEW), press B2. Some functions are only available when stationary to make browsing functions easier while in motion.
OPTIONAL
OPTIONAL
Explanation of the various modes and related functions:
SPEED/DISTANCE MODE
Indicated with the following pictogram:
This mode features the following functions:
- SESSION: the distance covered since the beginning of the ride
- AVERAGE: the speed average during the ride
- MAX: the highest speed reached since the beginning of the ride
- BICYCLE TOTAL*: the total distance covered since installing the computer or replacing the battery
*function only available when stationary.
CADENCE MODE
Indicated by the following pictogram:
Cadence mode features all the functions related to your pedalling rate, expressed as the number of revolutions per minute (RPM). For eective pedalling, a cadence of
around 100 RPM is recommended.
This mode features the following functions:
- AVERAGE: average pedalling rate since the beginning of the ride
- MAX: highest pedalling rate since the beginning of the ride
- TARGET*: graphic view of the cadence target zone, as well as a display of the highest and lowest values limiting the target zone
Highest and lowest cadence limiting the target zone Graphic view of the cadence target zone
Graphic view of your current cadence
- TIME in TARGET**: the time during which the cadence remained within the programmed target zone
-% TARGET**: the % of time during which the cadence remained within the programmed target zone
*function only available if you have set a cadence target zone in the settings menu
**functions only available if you have set a cadence target zone in the settings menu and when stationary
HEART RATE MODE
Indicated by the following pictogram:
This mode is only available if you have enabled it in the OPTION menu. The heart rate strap is an optional accessory.
This mode features all the functions in connection with your heart rate. It can be displayed as the number of heartbeats per minute (BPM) or as a percentage of your
highest heart rate (%HRmax), often used when Training. You may choose this display unit in the OPTION menu.
This mode features the following functions:
- CURRENT: your current heart rate
- AVERAGE: your average heart rate since the beginning of the ride
- TARGET*: graphic view of your heart rate target zone, as well as the highest and lowest values limiting the target zone
- TIME in TARGET**: the time during which the heart rate remained within the programmed target zone
- % TARGET**: the % of time your heart rate remained within the programmed target zone
*function only available if you have set a heart rate target zone in the settings menu
**functions only available if you have set a heart rate target zone in the settings menu and when stationary

10
EN
B2
B2
B2
B2
B1
B1
B1
B2
B1
S
S
TIME MODE
Indicated by the following pictogram:
This mode features the following functions:
- SESSION TIME: time elapsed since the beginning of the ride (this is only measured while in motion, not when stationary).
- TIME: time
DOUBLE DISPLAY MODE
Indicated by the following pictogram:
This mode is only available if you have enabled heart ratemode and when in motion (not when stationary)!
This is a specic mode which simultaneously displays the current cadence and heart rate.
A second reading oers a choice between a graphic view of cadence target and heart rate zones or a partial distance display (distance covered since the beginning of the
ride). Press on the button B2 to switch between these 2 views.
Current heart rate
compared to the
target programmed
Current cadence
compared to the
target programmed
Current cadence Current heart
rate
Partial distance
ALARM BELL
If you have enabled the alarm bell in the OPTION menu (indicated by the pictogram), the computer will emit a 5-second beep three times to alert you to the fact that
you are outside the cadence or heart rate target zone.
The screen will also show whether your cadence or heart rate is too high or too low, for 4 seconds.
When your cadence or heart rate comes back to the target zone, the computer emits a long bip and the screen displays RETURN TO CADENCE or RETURN
HR.
If you want to enable or disable the alarm during your ride, press simultaneously on B1 and B2 for 2 seconds..
QUITTING YOUR SESSION
To quit your session, press on Sfor 2 seconds.
You may now save your ride report or quit without saving. Choose YES or NO by pressing on B1 or B2 and press on S to conrm.
This brings you back to the main menu where you may view your ride report in the REPORT menu.
2 sec.
NO
AFTER A SESSION
After your ride, you may view the report or transfer the data to your PC.
In the main menu, select the REPORT menu by pressing on B1 or B2 and press on Sto conrm.
The REPORT menu features 5 sub-menus:
- VIEW REPORT: to view your ride reports
- DELETE REPORT: to delete reports
- SAMPLE: to set the interval between each sample and thus the memory time available
- QUIT: to quit the REPORT menu and return to main menu

11
EN
B2B2B2
B2
B2 B2
B2
B1B1B1
B1
B1 B1
B1
S
S
S S
S
S
S
B2
B2
B1
B1
S
S
S
To switch from one menu to another use B1 and B2..
To enter a menu, press on S. Use B1 and B2 to navigate within the menu and press on Sto conrm.
Menu explanations:
VIEW REPORT
Use this menu to view the reports from all the
sessions you have saved. They are sorted by session
date and time (time ashes), for example:
To see the details for each session, press on S. You can now see all available data:
- DISTANCE: the distance covered during the ride
- TIME: the time the ride lasted
- AVERAGE KpH: your average speed during the ride
- MAXKpH: your top speed during the ride
- AVERAGE RPM: your average cadence during the ride
- MAX RPM: your top cadence during the ride
- CADENCE IN TARGET: the time the cadence was in the cadence target zone (if target zone set)
- CADENCE %TARGET: the percentage of time the cadence was in the cadence target zone (if target zone set)
- AVERAGE BPM*: your average heart rate during the ride
- MAX BPM*: your top heart rate during the ride
- HR in TARGET*: the time the heart rate was in the heart rate target zone (if target zone set)
- HR % TARGET*: the percentage of time the heart rate was in the heart rate target zone (if target zone set)
- CALORIES*: the theoretical number of kilocalories you burned during the ride
*This data is only available if heart rate mode was enabled in the menu OPTION.
DELETE REPORT
In this menu, you can delete reports to free up memory.
Press on Sto access the menu. The screen will display «DELETE ALL». Press on Sto conrm or press on B1 or B2 to quit
the menu.
SAMPLE
To save all your ride data, the computer takes samples at certain intervals. These intervals will determine the accuracy of the charts on your PC, but also memory capacity.
The shorter the interval, the more accurate the charts, but the shorter the memory. Conversely, the longer the interval the greater the memory capacity, however the
charts will be less accurate.
You may set this interval in the SAMPLE menu. You can choose between 3 intervals:
- 2 seconds: 6 hours of memory
- 5 seconds: 15 hours of memory
- 10 seconds: 30 hours of memory

12
EN
B2 B2
B2
B1 B1
B1
S
SSS
S
S
B2
B2
B2
B1
B1
B1
B2 B2B1 B2B1 B2B1 B2B1 B2B1 B2B1 B2B1 B2B1 B2B1
kmi
mm
total
mi/h
km/h
0 K
x x
reset
kmtotal
km/h
G
e
o
n
a
u
t
e
s
o
f
t
w
a
r
e
c
o
m
p
a
t
i
b
l
e
kmi
mm
total
mi/h
km/h
0 K
x x
reset
kmtotal
km/h
Please note : You may quit the REPORT menu at any time and return to the main menu by pressing on B1 and B2 simultaneously
for 2 seconds. This is a shortcut to avoid having to navigate through to QUIT to quit the menu.
TRANSFERRING DATA TO THE PC
You can transfer your ride data on your COUNT14+ computer to your PC.
This is only possible if you have installedGeonaute Software on your PC. You may download this software free of charge on
www.geonaute.com.
Once the software has been installed, connect the computer with your PC using the cable supplied with the computer.
«PC» appears on the computer screen.
Execute theGeonaute Softwareprogramme, click on «import from the bicycle computer» and follow the instructions. More detailed instructions are
available on the www.geonaute.com website.
MENU OPTION
The third main menu of the COUNT 14+ computer is the OPTION menu, which is used to set your computer’s functions.
In the main menu, select the REPORT menu by pressing on B1 or B2 and press on Sto conrm.
You are in the rst setting menu (CADENCE). To switch between adjustment menus, use B1 and B2. To enter a menu, press on S.

13
EN
S
B2
B2 B2 B2
B1
B1 B1 B1
S
S
To leave the OPTION menu, go to the QUIT screen and conrm with S. You are now returning to the main menu.
At any time, you can leave the OPTION menu by pressing B1 and B2 simultaneously for 2 seconds. This is a shortcut to avoid having to navigate through to QUIT to quit
the menu.
Inside each setting menu, you can navigate between the various settings using B1 and B2. If you want to modify a value,
press Sand the value will begin to ash. You can now modify the value by pressing B1 and B2 and conrm with S. For faster
adjustment, you may hold B1 or B2 down, to display the values more quickly.
To return to the settings menus, go to the QUIT screen and press S.
THE DIFFERENT SETTINGS MENUS
CADENCE
- OFF/ ON TARGET: To activate (ON) or deactivate (OFF) the settings of a cadence target zone.
- MINIMUM TARGET: to set the minimum limit in the cadence target zone.
- MAXIMUM TARGET: to set the maximum limit of your cadence target zone.
- OFF/ON ALARM: To switch the cadence target zone alarm bell on/o.
Please note: you can always switch this alarm bell on/owhen riding by simultaneously pressing B1 and B2 for 2 seconds.
- QUIT: to leave the cadence menu.
HR (heart rate)
- UNITS: to select your heart rate unit. You can choose between BPM (beats per minute) or % MAX HR (% of maximum heart rate). Once you have selected a
unit, the heart rate will always be displayed in that unit.
- AUTO/MANUEL MAXHR (only if you have chosen MAX %HR for a unit): to choose between automatic calculation of your MAX HR (based on your age) or the
manual settings of your MAX HR (if you know it).
- MAXHR (only if you have selected MANUAL in the previous menu): setting MAX HR.
- OFF/ ON TARGET: to activate (ON) or deactivate (OFF) a heart rate target zone.
- MINIMUM TARGET: to set the minimum limit of your heart rate target zone.
- MAXIMUM TARGET: to set the maximum limit of your heart rate target zone.
- OFF/ON ALARM: to switch the heart rate target zone alarm bell on/o.
TIME
- SETTING THE TIME: to set the time.
- DATE: to set the date (day, month, year).
- TYPE OF DISPLAY: 12-hr or 24-hr clock display
PROFILE
- GENDER: user’s gender (male/female)
- AGE: user’s age (10 to 99 years old)
- WEIGHT: user’s weight (30 to 150 kg / 66 to 331 lbs)
- HEIGHT: user’s height (130 to 230 cm/ 51 to 91 inches)
These settings are used for calculating calories.
BICYCLE
- CHANGE BICYCLE: In this menu, you can rst select the bike(s) already set and then change the settings for this(these) bike(s). The following settings are
available.
- SIZE OF WHEEL: to set the wheel size. To make it easier to set, the computer suggests a list of 8 predened tyre sizes:
26 X 1.14+5
26 X 1.95
26 X 2.0
26 X 2.1
28 X 1.14+5
24 X 1.14+5
14+00 X 23
14+00 X 25
OTHER

14
EN
You will nd the size on the side of your tyres. If your tyre size is not on the list, you can enter a specic size by selecting «OTHER» in the list. You must then enter the
circumference of the wheel in mm. There are 2 methods to work out the circumference:
- 1st method:
- 2nd method:
TOTAL KM: to change the total distance already covered.
NEW BICYCLE: to set a new bike. You can set up to 3 bikes, so 3 dierent speed/cadence
sensors.
If you enter the menu (press S), the computer will immediately start to search for the
new sensor (of the new bike). Don’t forget to turn the wheel or the crankarm so that the
sensor sends a signal to the computer. Once the sensor is connected, you can choose a
name for your bike (MTB, ROAD or OTHER). That name is now linked to the sensor.
REMOVE BIKE: to delete a set bike. Press Senter the menu, then select the bike by
pressing B1 and B2 then conrm with S.
LIGHT
Your COUNT14+ computer has a backlit screen. You can switch it on or oin the LIGHT
menu. Press S to enter the menu, then press S a second time to make ON/OFF ash.
Select ON or OFF with B1 and B2 and conrm with S.
Once ON, the light switches on as soon as you press a button. Only activate this option
when necessary as it uses a lot of energy.

15
EN
S
S
S
S
S
S
B2
B1
B2
B1
B2
B1
B2
B1
B2
B1
B2
B1
S
S
S
S
B2
B1 B2
B1
B2
B1 B2
B1
UNITS
Choose your unit system: European (km, kg, cm) or imperial (mi, lbs, inches). Press Sto enter
the menu and press Sa second time to make the unit ash. Select it with B1 and B2 and
conrm with S.
SENSORS
If you have purchased a new optional sensor (heart-rate monitor or speed/cadence sensor)
for your COUNT14+, you will have to pair it with the computer before using it. You must do
this once when the sensor is set up for the rst time.
In the SENSOR menu you can switch a sensor on or oand start a pairing procedure.
HR SENSOR
to switch the heart rate monitor strap on/o. When you switch the sensor o, the computer
will not start a search for a heart rate sensor when you start a session. When you switch the
sensor on, the sensor pairing procedure will start automatically. Warning: The strap will
then send signals to the computer to be identied, you must therefore wear the chest strap
when you start pairing.
SPEED SENSOR
to start a pairing procedure with a new speed cadence sensor. Warning: The sensor must
send a signal to the computer to be identied, you must therefore turn the rear wheel or the
crankarm when you start pairing.
Once the sensor is identied, you can link it to a bike that has already been set in the
BICYCLE menu.
LANGUAGE
This menu enables you to select the language in which the menus are displayed in your
computer. They are available in 4 languages: English, French, Spanish and Italian.

Table of contents
Other Btwin Bicycle Accessories manuals