BTX Gemini X2 User manual

5423-018 REV 1.0
Twin Waveform
Electroporation Systems
USER’S MANUAL

2Publicaon 5423-018 REV 1.0 • www.btxonline.com
Research Only
BTX
84 October Hill Rd
Holliston, MA 01746, USA
Phone: 1-508-893-8999
Fax: 1-800-429-5732
Web: www.btxonline.com
Warranty
BTX warranes the Gemini X2 and BTX Gemini SC Twin Waveform
Electroporaon Systems for a period of two years from the date
of purchase. At its opon, BTX will repair or replace the unit if
it is found to be defecve as to workmanship or materials. This
warranty does not extend to any instrumentaon which has been
(a) subjected to misuse, neglect, accident or abuse, (b) repaired
or altered by anyone other than BTX without BTX express and
prior approval, (c) used in violaon of instrucons furnished
by BTX. This warranty extends only to the original customer
purchaser. IN NO EVENT SHALL BTX BE LIABLE FOR INCIDENTAL OR
CONSEQUENTIAL DAMAGES. Some states do not allow exclusion
or limitaon of incidental or consequenal damages so the above
limitaon or exclusion may not apply to you. THERE ARE NO
IMPLIED WARRANTIES OF MERCHANTABILITY, OR FITNESS FOR
A PARTICULAR USE, OR OF ANY OTHER NATURE. Some states do
not allow this limitaon on an implied warranty, so the above
limitaon may not apply to you. Without liming the generality
of the foregoing, BTX shall not be liable for any claims of any kind
whatsoever, as to the equipment delivered or for non-delivery of
equipment, and whether or not based on negligence. Warranty
is void if the BTX Gemini X2 and BTX Gemini SC instrument is
changed in any way from its original factory design or if repairs
are aempted without wrien authorizaon by BTX. Warranty is
void if parts, connecons or electrodes not manufactured by BTX
are used with the BTX Gemini X2 and BTX Gemini SC instrument.
If a defect arises within the warranty period, promptly contact
BTX, 84 October Hill Road, Building 7, Holliston, Massachuses,
USA 01746-1388 using our toll free number 1-800-272-2775 (US
Only) or 508-893-8999 (E-mail: [email protected]). Goods will
not be accepted for return unless an RMA (Returned Materials
Authorizaon) number has been issued by our customer service
department. The customer is responsible for shipping charges.
Please allow a reasonable period of me for compleon of repairs,
replacement and return. If the unit is replaced, the replacement
unit is covered only for the remainder of the original warranty
period dang from the purchase of the original device. This
warranty gives you specic rights, and you may also have other
rights, which vary from state to state.
Out of Warranty Service
Proceed exactly as for Warranty Service above. If our service
department can assist you by phone or other correspondence, we
will be glad to help at no charge.
Repair service will be billed on the basis of labor and materials.
A complete statement of me spent and materials used will be
supplied. Shipment to BTX should be prepaid. Your bill will include
return shipment freight charges.
Disassembly by the user is prohibited. Service should only be
carried out by experienced BTX technicians.
Repair Facilies and Parts
BTX stocks replacement and repair parts. When ordering, please
describe parts as completely as possible, preferably using our part
numbers. If praccal, enclose a sample photo or drawing.
Cauon Noce
The BTX Gemini X2 and BTX Gemini SC systems are intended for
laboratory use only and can be used in research and development
applicaons. These systems have been designed to meet the
standards for electromagnec compability (EMC) and safety
intended for laboratory equipment applicaons.
This product should not be used in the presence of a ammable
atmosphere such as an anesthec mixture with air, oxygen, or
nitrous oxide.
Warranty Information

3Publicaon 5423-018 REV 1.0 • www.btxonline.com
Please read the following safety precauons to ensure proper
use of your generator. If the equipment is used in a manner not
specied, the protecon provided by the equipment may be
impaired.
To Prevent Hazard or Injury
Use Proper Line Cord
Use only the specied line cord for this product and make sure
line cord is cered for country of use.The operang voltage range
for the BTX Gemini Twin Wave Series is 100–240 vac, 50/60 Hz.
Ground the Product
This product is grounded through the grounding conductor of the
power cord. To avoid electric shock, the grounding conductor must
be connected to earth ground. Before making any connecons
to the input or output terminals of the product, ensure that the
product is properly grounded.
Make Proper Connecons
Make sure all connecons are made properly and securely.
Any signal wire connecons to the unit must be no longer than
three meters.
Observe All Terminal Rangs
Review the operang manual to learn the rangs on all
connecons.
Use Proper Fuse
Use only specied fuses with product.
Avoid Exposed Circuitry
Do not touch any electronic circuitry inside of the product.
Do Not Operate with Suspected Failures
If damage is suspected on or to the product do not operate
the product. Contact qualied service personnel to perform
inspecon.
Orient the Equipment Properly
Do not orient the equipment so that it is dicult to operate the
disconnecon device.
Place Product in Proper Environment
Review the operang manual for guidelines for proper operang
environments.
Observe All Warning Labels on Product
Read all labels on product to ensure proper usage.
Caution Risk of
Electric Shock
Caution Protective Ground
Terminal
High Voltage Risk
These instruments contain a high voltage power supply adjustable
to 3,000 V. High voltage power supplies present a serious risk of
personal injury if not used in accordance with design and/or use
specicaons, if used in applicaons on products for which they
are not intended or designed, or if they are used by untrained or
unqualied personnel.
• The user must read this manual carefully before the
instruments are placed into operaon.
• Removing the cover will void the warranty.
• Do not connect or disconnect the high voltage cable with
the high voltage enabled.
• To connect or disconnect the cable, turn line power o and
unplug line (mains) cord.
• Do not touch the electrode p while the waveforms are
being applied.
If there are any quesons about the operaon of this instrument,
call BTX Customer service at 1-800-272-2775, or 1-508-893-8999.
Cauon Noce
The BTX Gemini Series Twin Waveform Electroporaon Systems
are intended for laboratory use only and can be used in research
and development applicaons. These systems have been designed
to meet the standards for electromagnec compability (EMC)
intended for laboratory equipment applicaons as well as the
applicable safety requirements for electrical equipment for
measurement, control, and laboratory use. The unit itself does
not generate waste, but may be used to treat samples that are
hazardous. Please use appropriate PPE and ensure disposal in
accordance with local regulaons and pracces.
This product should not be used in the presence of a ammable
atmosphere such as an anesthec mixture with air, oxygen, or
nitrous oxide.
Safety Information

4Publicaon 5423-018 REV 1.0 • www.btxonline.com
Thank you for invesng in a Gemini System.
Since its founding in 1983, the main focus of BTX has been in the area of applying
controlled electric elds for genec engineering applicaons. Because of this,
we quickly established a reputaon as the technological leader in the elds of
electroporaon and electrofusion. Our systems have been installed in many
presgious instutes around the globe where they are used successfully for high
eciency transfecon, transformaon and cell fusion applicaons. We oer a
variety of waveforms, electrodes and chamber opons to provide you with the
best tools to achieve your goals.
We are vested in your success. To that end, the BTX technical support team
constantly tracks published literature for any reference to electroporaon and
electrofusion. We extract the pernent experimental condions and yields
from these papers to help us in our eorts to help you. In addion to tracking
publicaons, we are available to you for support at any me for advice in
experimental design, product recommendaons, troubleshoong, and any other
relevant technical advice.
We thank you again for your investment and we look forward to assisng you in
any way we can.
Finally, please read this manual carefully before aempng to operate the
electroporaon system. If you have any quesons about the unit or about
parcular applicaons, please contact us:
BTX
84 October Hill Road
Holliston, MA 01746 USA
Toll Free: 1-800-272-2775
Internaonal Callers: 508-893-8999
Fax: 508-429-5732
Web: www.btxonline.com
Email: [email protected]
For any customers outside the US or Canada, please call your local BTX dealer or
call us directly.
A Message from BTX

5Publicaon 5423-018 REV 1.0 • www.btxonline.com
SUBJECT PAGE #
Warranty Informaon 2
Safety Informaon 3
Introducon 4
Table of Contents 5–6
Product Overview 7
Unpacking the System 8
Touchscreen Buon Reference 9
Soware Setup 10–11
Seng Time/Date 10
Seng Audible Alarm Preferences 10
Seng Backlight Preferences 11
Displaying Device Informaon 11
Preset Protocols 12–14
Using Preset Protocols 12
Customizing a Preset Protocol 13–14
Performing Experiments 15–21
Creang New Protocols 15
Creang an Exponenal Decay Wave Protocol 15–17
Creang a Square Wave Protocol 18–21
Using Specialty Protocols 22–24
Using an HT Plate Handler 22–23
Using Specialty Electrodes 24
Managing Protocols 25–27
Saving a Copy of a Protocol 25
Renaming a Protocol 25
Deleng a Protocol 26
Password Protecng a Protocol 27
Protocol Manager Soware 28–30
Installaon 28
Overview 28
Upload– Generator to PC 28
Download– PC to Generator 29
Upload Log Files 30
Remote Control Soware 31
Generator Specicaons 32–33
Maintenance 34
Upgrading Gemini Series Soware 35–37
USB Virtual Commport Driver Installaon 35–36
Device Updater Program 37
Error Messages & Troubleshoong 38–40
Electroporaon Overview 41
Table of Contents

6Publicaon 5423-018 REV 1.0 • www.btxonline.com
Table of Contents
SUBJECT PAGE #
General Opmizaon Guide for Electroporaon 42
Wave Forms 42
Field Strength 42
Pulse Length 43
Number of Pulses 43
Electroporaon Buer 43
DNA/RNA Concentraons 43
Applicaons 44
Mammalian Cell Transfecon 44
In Vivo, In Utero, In Ovo 44
Bacteria and Yeast Transformaon 44
Plant and Insect Transfecon 44
Electroporaon Buers 45
Ordering Informaon 46–47

7Publicaon 5423-018 REV 1.0 • www.btxonline.com
The BTX Gemini SC is a twin waveform generator incorporang
both square and exponenal decay waves in a single unit.
These waveform combinaons enable researchers to easily
and eciently electroporate eukaryoc and prokaryoc cells in
suspension with one easy-to-use setup. The BTX Gemini SC boasts
a wide range of voltage (10 to 3000 V, 5 V or 10 V increments),
pulse length (50 µs to 5 ms), me constant opons (which include
capacitance choices from 25 to 3275 µF in LV and 10, 25 or 50
µF in HV), mulple pulsing opon with the square waveform and
unparalleled pulse delivery accuracy.
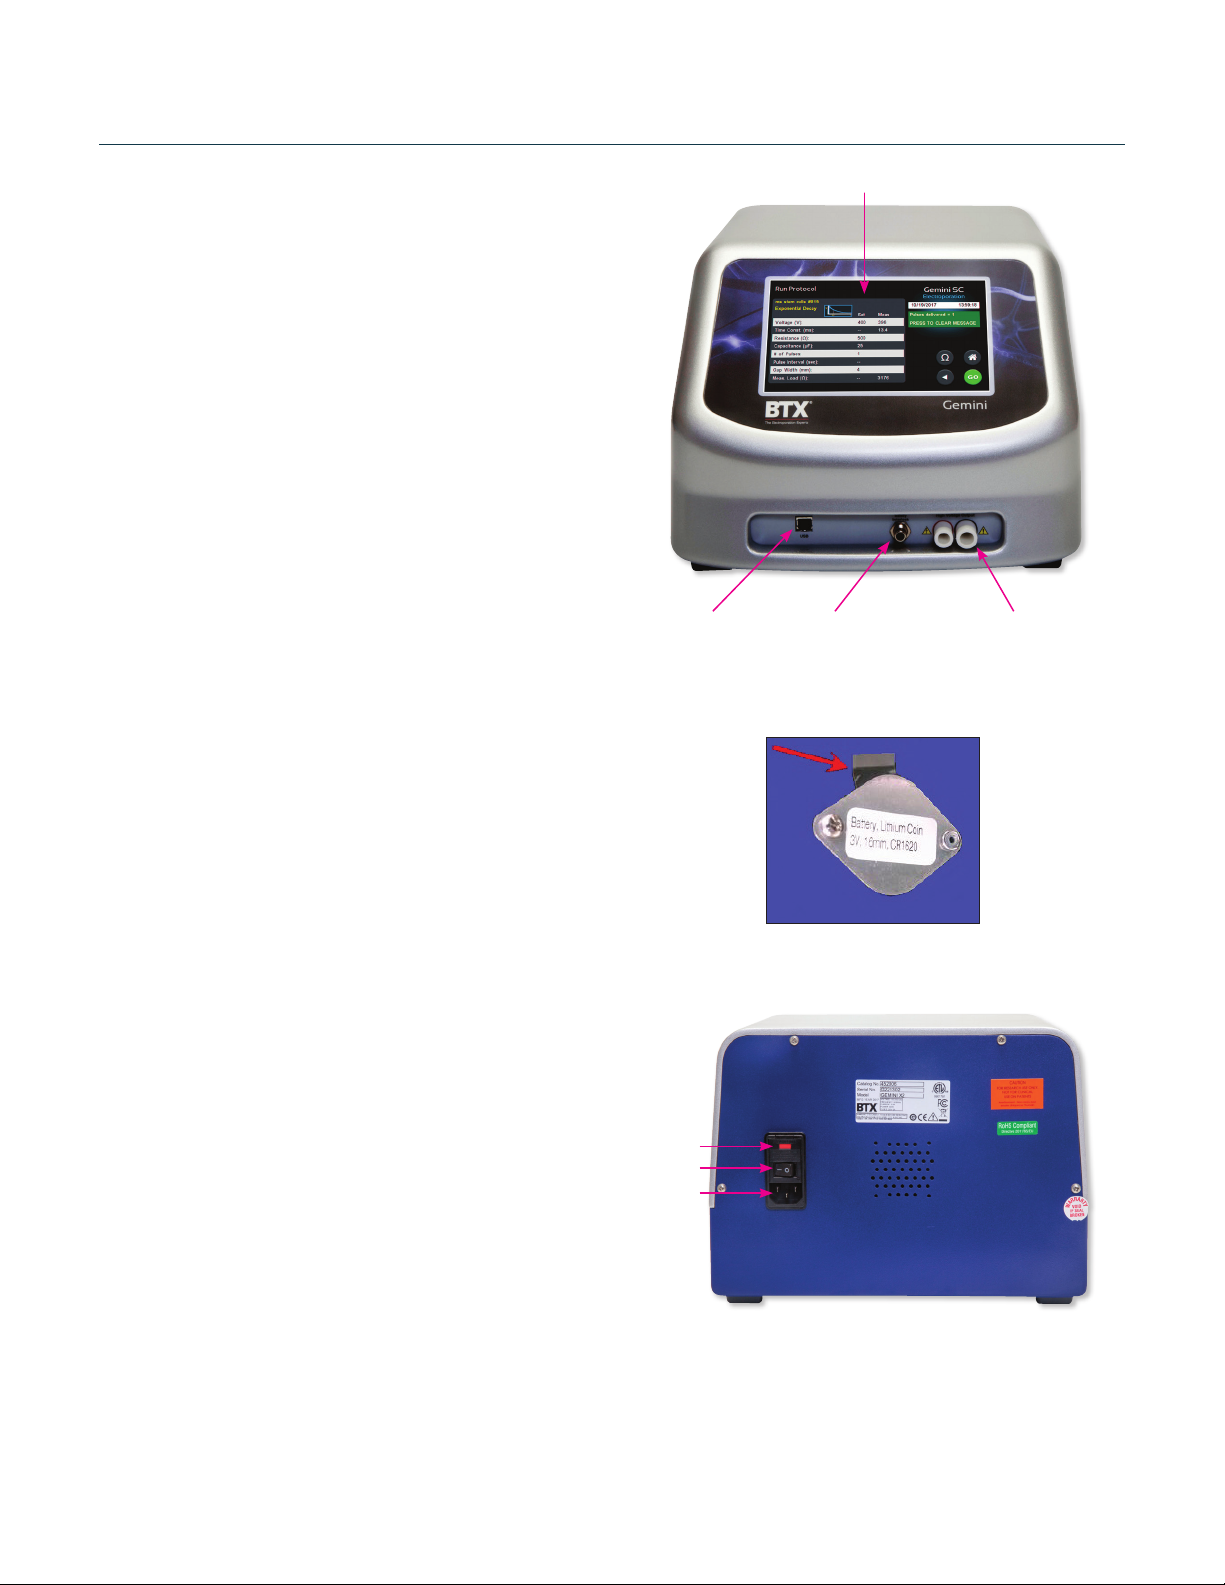
The BTX Gemini SC, with unlimited custom protocol storage,
monitors and displays pre-pulse sample resistance as well as
delivered voltage values. The generator is controlled through a
color LCD touch screen interface. The enhanced safety features
of the BTX Gemini SC protect users as well as precious samples.
The Safety Dome allows researchers to safely work with
electroporaon cuvees, up to two at a me, giving researchers
the ability to experiment on sample volumes from 20 µl up to
800 µl.
This aordable system comes complete with the dual waveform
generator for suspension cell electroporaon, dozens of
preprogrammed protocols for commonly electroporated cells,
Safety Dome, 30 cuvees, cuvee stand, user manual, two-year
warranty, unlimited applicaon support and the same high quality
researchers have come to expect from BTX.
What is the dierence between
the Gemini X2 and the Gemini SC?
The Gemini X2 is designed to give researchers the ulmate control
and exibility in their experiments. It is possible to perform
electroporaon on ssues and organs in vivo, in utero, in ovo and
ex plant, on adherent cells, and on cells in suspension, in either
single cuvees or 96-well plates. It can be controlled remotely via
footswitch or PC, and it oers storage of pulse data. Because of
the Gemini X2 broad range of use, the specicaons are wide-
ranging, making the Gemini X2 the most versale electroporaon
system available today.
The Gemini SC is designed for researchers working to
electroporate cells in suspension in cuvees. This system cannot
accommodate mulple pulsing with the exponenal decay
waveform, remote operaon, specialty electrodes or 96-well
opons. For this reason, some of the specicaons of the Gemini
SC are not as extensive as what is available in the Gemini X2.
The BTX Gemini X2 is a highly advanced twin waveform generator
incorporang both square and exponenal decay waves in a single
unit. The BTX Gemini X2 has been designed with these waveform
combinaons to enable researchers to easily and eciently
electroporate eukaryoc cells and prokaryoc cells in all forms
with one easy-to-use setup.
The BTX Gemini X2, which can be operated via PC or remote
control, boasts a wide range of voltage (5 to 3000 V, 1 or 5 V
increments), pulse length (10 µs to 1s), me constant opons
(which include capacitance choices from 25 to 3275 µF in LV and
10, 25, 35, 50, 60, 75, 85 µF in HV), along with mulple pulsing
opons with both the square waveform and the exponenal decay
waveform, and unparalleled pulse delivery accuracy.
The BTX Gemini X2, with over 1,000 custom protocol storage,
monitors and displays pre-pulse sample resistance as well as
delivered voltage values and records logs of all experiment
parameters internally, which can be downloaded to a computer
for analysis and QC. The generator is controlled through a color
LCD touch screen interface and incorporates USB communicaons.
The pulse can also be acvated by a foot switch. The enhanced
safety features of the BTX Gemini X2 protect users as well
as precious samples. The BTX Gemini X2 is designed to give
researchers the ulmate exibility in their experiments, making it
possible to perform electroporaon on ssues and organs in vivo
(as well as in utero, in ovo, ex plant) on adherent cells, and cells in
suspension in either single cuvees or 96-well plates. The Safety
Dome allows researchers to safely work with electroporaon
cuvees, up to two at a me, giving researchers the ability to
experiment on sample volumes from 20 µl up to 800 µl.
This state-of-the-art system comes complete with the twin
waveform generator for cell electroporaon in all forms, dozens
of preprogrammed protocols for commonly electroporated cells,
Safety Dome, 30 cuvees, cuvee stand, user manual, two-year
warranty, unlimited applicaon support and the same high quality
researchers have come to expect from BTX.
Product Overview
CAUTION: FOR RESEARCH USE ONLY. NOT FOR
CLINICAL OR DIAGNOSTIC USE ON PATIENTS.

8Publicaon 5423-018 REV 1.0 • www.btxonline.com
The shipping carton in which your BTX Gemini Twin Waveform
Electroporaon System is packed has been specically designed
to provide maximum protecon to the instrument during
transportaon and normal handling condions. Upon receipt, the
carton should be examined for any external damage resulng from
shipment.
Open the carton and carefully remove the BTX Gemini Twin
Waveform Electroporator and inspect the unit for any apparent
damage. Save the carton and packing materials for future
transportaon and shipping requirements.
Packing Data
Check the packing slip to ensure that all items ordered and listed
are included in the shipment. Inform BTX immediately if any parts
are missing or damaged.
Power Source
As received, the instrument is ready for use with either 100–240 V
AC, 50/60 HZ.
The power requirements are 350 was. In the USA, the power
cord has a standard three prong plug.
Installaon
Once you have determined that the components of the system
have not sustained any obvious damage in shipment, proceed
with the installaon.
Remove the insulang tab from the baery at the base of the unit.
Place the generator in a locaon that is a dry, level, sturdy surface
free from extremes in ambient temperature, dust or chemical
exposures. Allow the device to equilibrate to room temperature
Unpack the safety dome, cuvee rack and disposable cuvee
chambers. Connect the safety dome, or in the case of the BTX
Gemini X2 system, specialty electrodes or HT plate handler, into
the connectors at the boom right-hand side of front panel.
Connect the mains/power cord to into the back panel at the
boom le.
Power up the system by pushing the rocker switch located on the
back panel at the boom le. The display will ash the BTX logo.
Once the soware inializes, the Main Menu screen will appear.
You are now ready to begin your work. Main Power Switch
Fuse Holder
Universal Power Input
USB Serial Input Footswitch Input
(switch sold
separately)
High Voltage Output
Remove Battery Insulating Tab.
Touchscreen Display
Unpacking the System

9Publicaon 5423-018 REV 1.0 • www.btxonline.com
Accept
Used to accept the parameters/sengs on a screen and
advance to the next screen in the menu, also used in
place of a double tap on various icons.
Back
Used to go back one screen.
Cancel
Used to cancel any changes/entries on a screen and
return to the previous screen in the menu.
Exponenal Decay Wave Indicator
Used to indicate when a protocol ulizes exponenal
decay wave pulses.
File Opons
Access the File Opon menu that is used to save,
rename and delete protocols.
Home/Main Menu
Access Preset Protocols, User Protocols and Sengs.
Page Down
Used to page down in a display list.
Page Up
Used to page up in a display list.
Scroll Down
Used to scroll down in a display list.
Scroll Up
Used to scroll up in a display list.
Pre-Pulse Resistance Measurement
Also referred to as Omega Icon. Used to measure the
resistance of the sample prior to delivering the DC
pulse.
Run Protocol
Used to deliver the pulse protocol to the sample.
Sengs
Also referred to as Gear icon. Access the sengs menu
used to adjust the following parameters: Date and Time,
Audible Alarms, Backlighng, and soware updates.
Displays device informaon.
Stop Protocol
Used during the pulse delivery sequence to stop the
progress of the protocol.
Square Wave Indicator
Used to indicate when a protocol ulizes square
wave pulses.
Protocol Locked
Indicates that changes to the protocol are currently
locked. Press the icon and enter password to unlock the
protocol.
Protocol Unlocked
Indicates that changes to the protocol are currently
unlocked. Pressing the icon twice will allow the user to
password protect the protocol.
Nocaon Box Quick Reference
Informaon / Status Message
Provides informaon or guidance for next steps,
including acceptable ranges for protocol programming.
Warning Message
Requires Nocaon Box tap for acknowledgement
of informaon, but does not prevent operaon of the
system.
Failure Message
Caused by user input error, failure of a protocol, or a
system error. Requires user to correct this issue in order
to complete the operaon.
Touchscreen Icons Reference

10 Publicaon 5423-018 REV 1.0 • www.btxonline.com
Seng Time/Date
Aer inializing, the home screen will appear.
Tap the Gear icon.
Tap Time/Date icon.
Tap Date icon and use the keypad to type the date.
Tap Time icon and use the keypad to type the me.
Tap the Green Check icon to save and return to the sengs
screen.
Seng Audible Alarm Preferences
On the home screen, tap the Gear icon.
Tap Audible Alarms icon.
Select preferred audible alarms by tapping the icons to acvate
or deacvate.
Tap the Green Check icon to save and return to the sengs
screen.
Software Setup
NOTE: You may change the date and me format by tapping icons to
the right of the given values.

11 Publicaon 5423-018 REV 1.0 • www.btxonline.com
Seng Backlight Preferences
On the home screen, tap the Gear icon.
Tap Backlight icon. Tap Device Informaon icon.
Select preferred brightness by tapping the icon indicang
% brightness.
Tap the Green Check icon to save and return to the sengs
screen.
View device informaon.
Tap the Green Check icon to return to the sengs screen.
Displaying Device Informaon
On the home screen, tap the Gear icon.
Software Setup

12 Publicaon 5423-018 REV 1.0 • www.btxonline.com
Using Preset Protocols
On the home screen, tap the Preset Protocols icon.
Double tap desired cell type.
Scroll through available cells.
Tap desired cells.
Using Preset Protocols (connued)
Review parameters.
Tap Omega icon to measure pre-pulse load resistance.
With load measurement OK, press the Green ‘Go’ icon to run
protocol.
Once protocol is complete, data regarding your pulse is displayed
and stored in the systems logs (BTX Gemini X2 only) for future use.
You may connue pulsing, go back to the protocol select screen,
or to the home screen.
Preset Protocols

13 Publicaon 5423-018 REV 1.0 • www.btxonline.com
Customizing a Preset Protocol
On the home screen, tap the Preset Protocols icon.
Double tap desired cell type.
Scroll through available cells.
Tap desired cells.
Tap Folder icon.
Customizing a Preset Protocol (connued)
Use keyboard to name copy of protocol.
Tap the Green Check icon to save.
Tap the Home icon.
On the home screen, tap User Protocols icon.
Preset Protocols

14 Publicaon 5423-018 REV 1.0 • www.btxonline.com
Customizing a Preset Protocol (connued)
Scroll through user protocols to locate the newly saved method.
Double tap the newly saved method.
Tap the parameter(s) requiring customizaon.
Proceed to modify selected parameters.
Tap the Green Check icon to proceed to the run screen.
Preset Protocols

15 Publicaon 5423-018 REV 1.0 • www.btxonline.com
Double tap New Protocol.
Use keyboard to name protocol.
Tap the Green Check icon to save.
Creang New Protocols
On the home screen, tap User Protocols icon.
Creang an Exponenal Decay Wave Protocol
Tap the Exponenal icon.
Tap the Green Check icon to save.
Double tap your newly saved protocol.
Tap the Voltage icon.
Use the numeric keypad to set voltage.
Tap the Green Check icon to save.
Performing Experiments

16 Publicaon 5423-018 REV 1.0 • www.btxonline.com
Tap the Resistance (symbol) icon.
Use the numeric keypad to set resistance value.
Tap the Capacitance (µF) icon.
Tap the Number of Pulses / Pulse Interval icon.
Tap the Number of Pulses icon.
Use the numeric keypad to set the number of pulses.
Creang New Protocols (connued)
Creang an Exponenal Decay Wave Protocol
(connued)
Tap the Resistance / Capacitance icon.
Tap the Pulse Interval (sec) icon.
Use the numeric keypad to set the interval between pulses.
Tap the Green Check icon to save.
Performing Experiments
NOTE: LV and HV mode capacitance values dier. Use the numeric
keypad to set resistance value.
NOTE: The BTX Gemini X2 can perform up to 2 pulses with
Exponenal Decay Wave only if the Resistance > 100 ohms.
NOTE: Intervals must only be set when performing mulple pulsing.

17 Publicaon 5423-018 REV 1.0 • www.btxonline.com
Use the numeric keypad to set the gap between electrodes.
Tap the Green Check icon to save.
Creang New Protocols (connued)
Creang an Exponenal Decay Wave Protocol
(connued)
Tap the Electrode Gap icon.
View your protocol.
To run, tap the Omega icon.
Tap the Green Check icon to proceed to the run screen.
With load measurement OK, press the Green ‘Go’ icon to run
protocol.
Once protocol is complete, data regarding your pulse is displayed
and stored in the systems logs (BTX Gemini X2 only) for future use.
You may connue pulsing, go back to set-up screen, or to the
home screen.
Performing Experiments
NOTE: See the Protocol Manager Soware secon for instrucons on
viewing and downloading log data.

18 Publicaon 5423-018 REV 1.0 • www.btxonline.com
Creang New Protocols (connued)
Creang a Square Wave Protocol
On the home screen, tap User Protocols icon.
Performing Experiments
Double tap New Protocol.
Use keyboard to name protocol.
Tap the Green Check icon to save.

19 Publicaon 5423-018 REV 1.0 • www.btxonline.com
Double tap your newly saved protocol.
Tap the Voltage icon.
Use the numeric keypad to set voltage.
Tap the Green Check icon to save.
Creang New Protocols (connued)
Creang a Square Wave Protocol
Tap the Square Wave icon.
Tap the Green Check icon to save.
Tap the Duraon icon.
Use the numeric keypad to set the pulse length.
Tap the Green Check icon to save.
Performing Experiments

20 Publicaon 5423-018 REV 1.0 • www.btxonline.com
Tap the Number of Pulses icon.
Use the numeric keypad to set the number of pulses.
Creang New Protocols (connued)
Creang a Square Wave Protocol (connued)
Tap the Number of Pulses / Pulse Interval icon.
Tap the Pulse Interval (sec) icon.
Use the numeric keypad to set the pulse interval.
Tap the Green Check icon to save.
Tap the Electrode Gap icon.
Use the numeric keypad to set the gap between electrodes.
Tap the Green Check icon to save.
Tap the Green Check icon to proceed to the run screen.
Performing Experiments
Other manuals for Gemini X2
2
This manual suits for next models
1
Table of contents
Other BTX Measuring Instrument manuals