Bull DuraBull 15910 User manual

Installation Guide
DuraBull 8ft. Myrtle Beach Kitchen
SKU # 15910 (Dune Base w/ Coffee Brown Granite)
SKU# 15911 (Symphony Blue Base w/ Galaxy White Granite)
SKU # 15912 (Charcoal Base w/ Midnight Black Granite)
DuraBull 10ft. Charleston Kitchen
SKU # 15913 (Dune Base w/ Coffee Brown Granite)
SKU# 15914 (Symphony Blue Base w/ Galaxy White Granite)
SKU # 15915 (Charcoal Base w/ Midnight Black Granite)
**Cabinets can only be used with Bull grills**
Applicable Models
Angus #47628/47629
Lonestar #87048/87049
Outlaw #26038/26039
Use of any other grill will void the warranty and cause potential damage to the cabinets.

Page 1
Parts List (8' Myrtle Beach Kitchen)...............................................2
Parts List (10' Charleston Kitchen)................................................3
Tools Required..............................................................................4
Cabinetry Layouts................................................................ .........5
Prepping Cabinets.........................................................................6
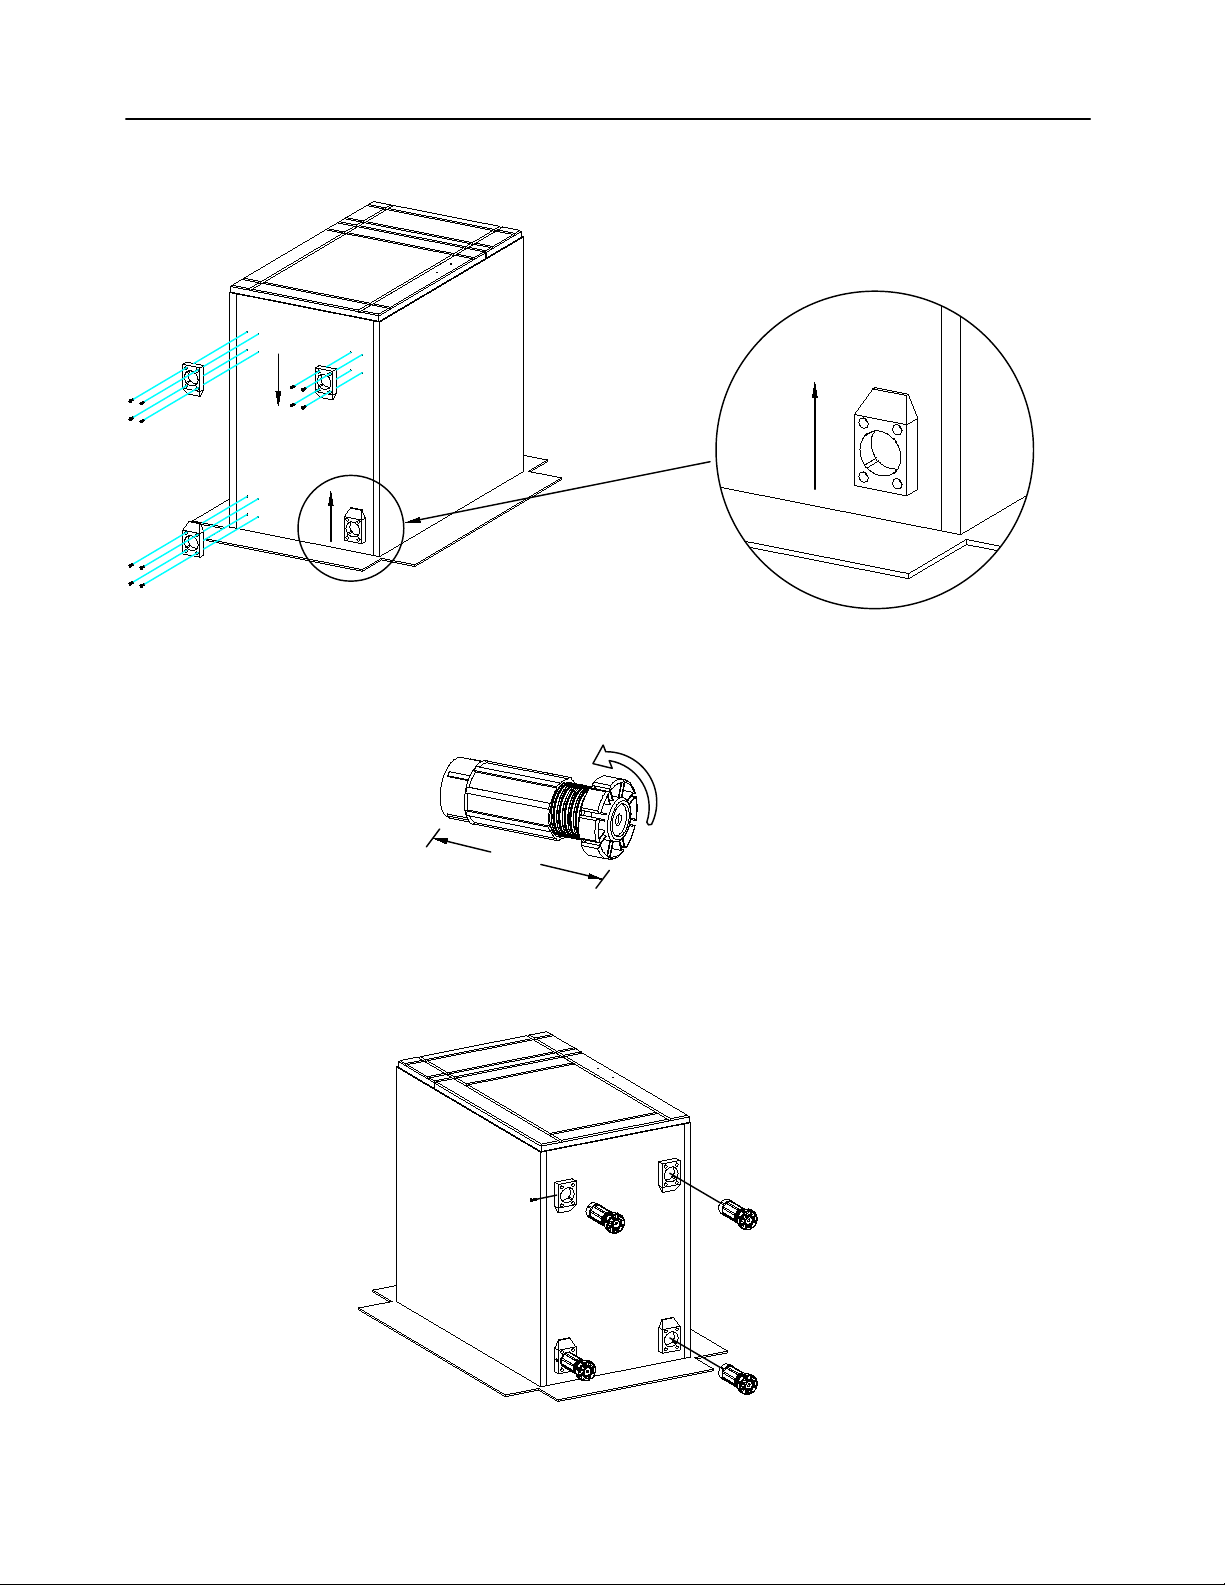
Installing Cabinet Legs..................................................................7
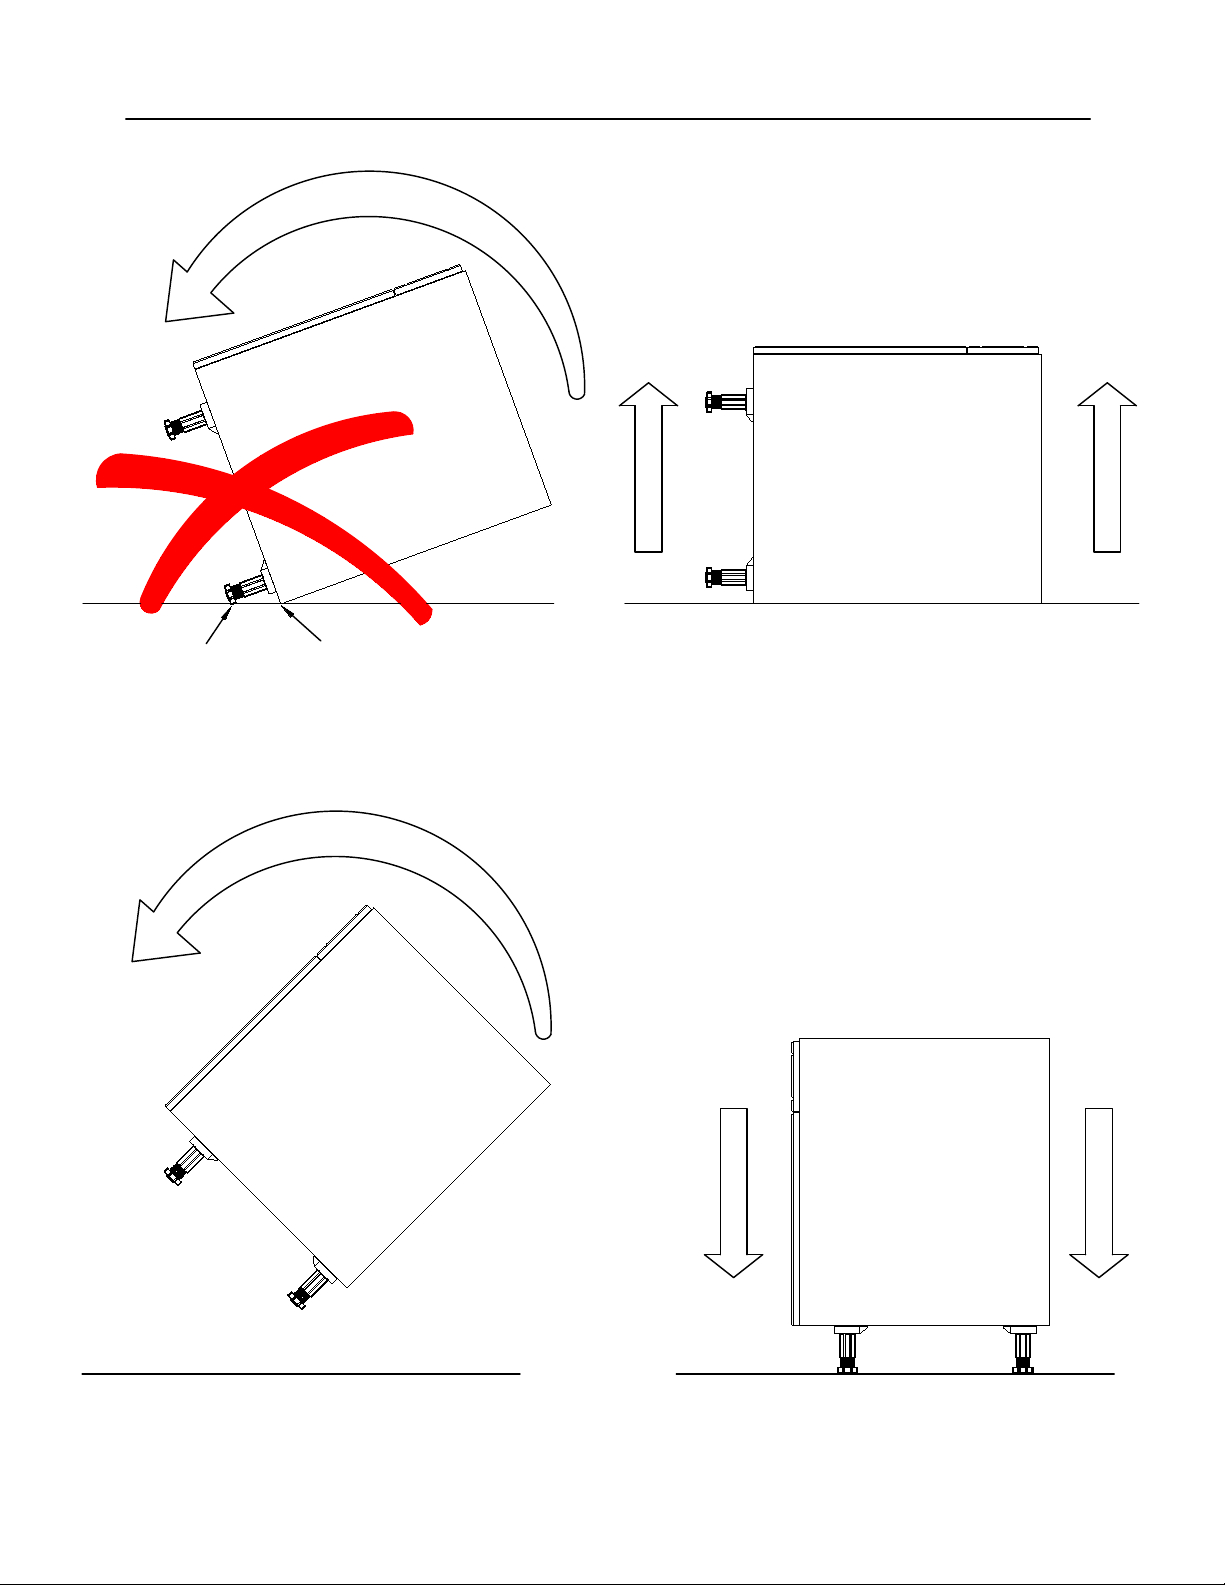
Standing the Cabinets Upright......................................................8
Leveling the Cabinets....................................................................9
Securing the Cabinets Together..................................................10
Adding 24" Spacing For Refrigerator...........................................11
Adding Refrigerator Panel............................................................12
Adding Front Filler Piece..............................................................13
Toe Kick Preparation....................................................................14
Front Toe Kick Preparation & Installation.....................................15
Side Toe Kick Installation.............................................................16
Toe Kick Installation Continued....................................................17
Adding Optional Cabinet Wall Filler Strips...................................18
Handle Installation........................................................................19
Countertop Installation..................................................................20
Adhering the Countertop to the Cabinets.....................................21
Countertop Continued..................................................................22
Grill and Refrigerator Installation..................................................23
Hinge Adjustment.........................................................................24
Cabinet Cleaning and Care..........................................................25
Warranty.......................................................................................26
TABLE OF CONTENTS

Bull SKU#'s
15795 (Charcoal)
15805 (Symphony Blue)
15825 (Dune)
(x10) Screws
(x6) Leg Clips (x6) Leg Clip Bracket
(x2) Leg Base
(x2) Adjustable Leg
(x1) Door Handle
(x2) Screws
per Assembly
(x5) Door Handle Sets
SKU # 15765
(x2) Angle Brackets
1"x30" Vertical Trim (x2)
(x4) Screws
per Assembly
(x1) Filler Strip Bracket
(x2) Screws
per Assembly
(x1) Vertical Trim
Strip Bracket
(x12) 1-1/4" Screws
Colored Calk
SKU #50203 - #103 Cobblestone
#50204 - #4 Bahama Beige
#50210 - #10 Black 3
4" x 3" Double Sided Tape
(x18 Strips)
DuraBull 8ft. Myrtle Beach Kitchen
SKU # 15910 (Dune Base w/ Coffee Brown Granite Kit)
SKU# 15911 (Symphony Blue Base w/ Galaxy White Granite Kit)
SKU # 15912 (Charcoal Base w/ Midnight Black Granite Kit)
Parts List
Identify your model using page 5. Once identified, begin the cabinet layout by referring to the sku #'s.
SKU # 15776 (Coffee Brown Granite)
SKU# 15777 (Galaxy White Granite)
SKU # 15778 (Midnight Black Granite)
SKU # 15779 (Coffee Brown Granite)
SKU# 15780 (Galaxy White Granite)
SKU # 15781 (Midnight Black Granite)
SKU # 15782 (Coffee Brown Granite)
SKU# 15783 (Galaxy White Granite)
SKU # 15784 (Midnight Black Granite)
Bull SKU#'s
15791 (Charcoal)
15801 (Symphony Blue)
15821 (Dune)
Bull SKU#'s
15792 (Charcoal)
15802 (Symphony Blue)
15822 (Dune)
Bull SKU#'s
15793 (Charcoal)
15803 (Symphony Blue)
15823 (Dune)
Bull SKU#'s
15794 (Charcoal)
15804 (Symphony Blue)
15824 (Dune)
7 Leg Kits Required
SKU # 15906
(x4) Angle Brackets
Page 2
Front Filler Piece
Drawer Handle Screw (x2)
SKU# 15908
5" x 53-1/2" Toe Kick 5" x 17-1/2" Toe Kick 5" x 22-3/4" Toe Kick
(Qty. 2)
Bull SKU#'s
14000 (Charcoal)
14001 (Symphony Blue)
14002 (Dune)
Bull SKU#'s
14003 (Charcoal)
14004 (Symphony Blue)
14005 (Dune)
Bull SKU#'s
14006 (Charcoal)
14007 (Symphony Blue)
14008 (Dune)

Parts List
Identify your model using page 5. Once identified, begin the cabinet layout by referring to the sku #'s.
DuraBull 10ft. Charleston Kitchen
SKU # 15913 (Dune Base w/ Coffee Brown Granite kit)
SKU# 15914 (Symphony Blue Base w/ Galaxy White Granite kit)
SKU # 15915 (Charcoal Base w/ Midnight Black Granite kit)
Front Filler Piece
SKU # 15782 (Coffee Brown Granite)
SKU# 15783 (Galaxy White Granite)
SKU # 15784 (Midnight Black Granite)
SKU # 15779 (Coffee Brown Granite)
SKU# 15780 (Galaxy White Granite)
SKU # 15781 (Midnight Black Granite)
SKU # 15782 (Coffee Brown Granite)
SKU# 15783 (Galaxy White Granite)
SKU # 15784 (Midnight Black Granite)
Bull SKU#'s
15831 (Charcoal)
15841 (Symphony Blue)
15861 (Dune)
Bull SKU#'s
15832 (Charcoal)
15842 (Symphony Blue)
15862 (Dune)
Bull SKU#'s
15792 (Charcoal)
15802 (Symphony Blue)
15822 (Dune)
Bull SKU#'s
15793 (Charcoal)
15803 (Symphony Blue)
15823 (Dune)
Bull SKU#'s
15835 (Charcoal)
15845 (Symphony Blue)
15865 (Dune)
Bull SKU#'s
15795 (Charcoal)
15805 (Symphony Blue)
15825 (Dune)
(x10) Screws
(x6) Leg Clips (x6) Leg Clip Bracket
(x2) Leg Base
(x2) Adjustable Leg
(x1) Door Handle
(x2) Screws
per Assembly
(x2) Angle Brackets
1"x30" Vertical Trim (x2)
(x4) Screws
per Assembly
(x1) Filler Strip Bracket
(x2) Screws
per Assembly
(x1) Vertical Trim
Strip Bracket
3
4" x 3" Double Sided Tape
(x18 Strips)
9 Leg Kits Required
SKU # 15906
(x4) Angle Brackets
Page 3
Colored Calk
SKU #50203 - #103 Cobblestone
#50204 - #4 Bahama Beige
#50210 - #10 Black
(x7) Door Handle Sets
SKU # 15765
(x18) 1-1/4" Screws
Drawer Handle Screw (x2)
SKU# 15908
5" x 17-1/2" Toe Kick
5" x 22-3/4" Toe Kick
(Qty. 2)
5" x 77-1/2" Toe Kick
Bull SKU#'s
14009 (Charcoal)
14010 (Symphony Blue)
14011 (Dune)
Bull SKU#'s
14003 (Charcoal)
14004 (Symphony Blue)
14005 (Dune)
Bull SKU#'s
14006 (Charcoal)
14007 (Symphony Blue)
14008 (Dune)

TOOLS REQUIRED FOR INSTALLATION
Page 4
Measuring
Tape Pencil or
Marker
Power Drill
Jig Saw
or
Circular Saw
or
Miter Saw
72" Level
Carpenter
Square
Hole Saw
(x2) C-Clamps
or
Quick Clamps
or
Welding Vise Grip Clamps
Drill driver bits
Philips &
Torque
Minimum 4' level
7/64" Drill
Bits

26
1
Cabinetry Layouts
118 36 24 18
96 Overall Length of Cabinetry
98 Counter Top
29
1
26
1
29
120 Overall Length of Cabinetry
122 Counter Top
21 21 36 24 18
15831
15841
15861
15832
15842
15862
15792
15802
15822
15793
15803
15823
15835
15845
15865
15791
15801
15821
15792
15802
15822
15793
15803
15823
15794
15804
15824
12100
12100
#47628
#47629
DuraBull 8ft. Myrtle Beach Kitchen
SKU # 15910 (Dune Base w/ Coffee Brown Granite kit)
SKU# 15911 (Symphony Blue Base w/ Galaxy White Granite kit)
SKU # 15912 (Charcoal Base w/ Midnight Black Granite kit)
DuraBull 10ft. Charleston Kitchen
SKU # 15913 (Dune Base w/ Coffee Brown Granite kit)
SKU# 15914 (Symphony Blue Base w/ Galaxy White Granite kit)
SKU # 15915 (Charcoal Base w/ Midnight Black Granite kit)
Page 5
#47628
#47629

18"
36"
24"
18"
30"
Page 6
PREPPING CABINETS FOR ASSEMBLY
1. Place cabinets on their backs near the location where they will be installed (leaving the
cardboard underneath the back of the cabinets to protect them from getting scratched)
2. Remove cardboard from the top and sides, leaving the cardboard under the back of the
cabinet
Bottom
Bottom
Bottom
Bottom
Side

5-1/16" to 5-1/8"
Page 7
INSTALLING THE CABINET LEGS
**Turn Counter clockwise to make the legs
longer, and clockwise to make the legs shorter
5. Insert all the legs into the leg bases and screw through the side of the base
into the leg to prevent the leg from moving out of the leg base. Note: There is
not a hole pre-drilled for this. Repeat this for all the cabinets.
6. Once all leg bases and adjustable legs are installed on each cabinet, begin
standing the cabinets up per the instructions on the next page.
3. Screw on the leg bases to the pre-drilled holes with the sloped end
facing to the center of the cabinet.
4. Set the leg length to 5-1/16" to 5-1/8" height. (Keep in mind the toe kick is 5" tall
from the factory. Cabinets are 30" tall and the granite is 3/4" thick). Adjustments
might need to be made later depending on the surface.

STANDING THE CABINETS UPRIGHT
Page 8
TEAM
LIFT
Do not stand the cabinets up by rotating on bottom
edge of the cabinet to the legs. This could damage
both the edge of the cabinet and the legs.
When standing up the cabinets, lift straight up...
Rotate the cabinet 90 degrees... Set the cabinet down gently
**If placing cabinets against a wall, leave 1" in the back for granite overhang. The 1" is required for the
grill cabinet to have proper ventilation. DO NOT PLACE CABINETS AGAINST A WALL. See page 18 for
the wall filler strip installation.**

LEVELING CABINETS
Level left to right Level front to back
Page 9
7. Level one cabinet at a time (Note: The toe kick installed later, is 5" high from
factory. It can be ripped to desired height. Keep this in mind when setting the height
on the legs)
**Counter clockwise raises the cabinet.
Clockwise lowers the cabinet.
With some cabinets you may have to put the level on the outside edge.
8. Place next cabinet against first cabinet, making the height equal and
leveling it together.

SECURING CABINETS TOGETHER
Back of Grill Cabinet
Side of Cabinet
in X-Ray View
1st
2nd
3rd
4th
5th
6th
9. When the cabinets are level with
one another, clamp the cabinets
together using two clamps positioned
per the image.
10. Pre-drill the cabinets in the approximate
locations as shown below. Screw together with
the 1-1/4" cabinet screws.
Page 10

Page 11
ADDING 24" SPACING FOR REFRIGERATOR
12. Add the refrigeration back panel and secure with clamps. Make sure the cabinets are
level and the back panel is flush to the top and back of the cabinets as shown below.
11. Set the trash can cabinet (or the triple drawer cabinet, depending on your model) 24"
from the grill cabinet.

ADDING REFRIGERATOR PANEL
1
2
3
1
2
3
13. Once level and flush to the top and back of the cabinets, pre-drill through the holes on the
refrigerator panel to the cabinets.
14. Using the 1 1/4" screws, screw the panel into the grill cabinet from the top, middle, and bottom.
Page 12

2" x 24" x 3
4"
Refrigerator filler piece
Grill
Cabinet
Trash
Cabinet
Drawer
Front
ADDING FRONT FILLER PIECE
Page 13
15. Install the 24" x 2" x 3/4" filler to the top, between the grill cabinet and the trash can cabinet
(or triple drawer), making sure it is square and flush with top of the cabinets. Use two angle
brackets with the double holes on the backside of the panel to secure the filler to the cabinets.
See image at the bottom of the page.
(x4) Screws
per Assembly
(x1) Filler Strip Bracket
Front Filler Piece
(x2) Angle Brackets
Note: The filler strip should beset back from the drawer, per image below.
Straight Top Down View

TOE KICK PREPARATION & INSTALLATION
17. Lay your front toe kicks face down as shown above. Using a sharpie and a small square, line up the center of the
legs and mark. This will be the placement of the clip mount brackets.
Page 14
14000 (Charcoal)
14001 (Symphony Blue)
14002 (Dune)
14003 (Charcoal)
14004 (Symphony Blue)
14005 (Dune)
DuraBull 8ft. Myrtle Beach Kitchen Only
14003 (Charcoal)
14004 (Symphony Blue)
14005 (Dune)
14009 (Charcoal)
14010 (Symphony Blue)
14011 (Dune)
DuraBull 10ft. Charleston Kitchen Only
Both Ends
14006 (Charcoal)
14007 (Symphony Blue)
14008 (Dune)
5" x 53-1/2" Toe Kick 5" x 17-1/2"
22-3/4"
Both Ends
14006 (Charcoal)
14007 (Symphony Blue)
14008 (Dune)
22-3/4"
5" x 17-1/2"
5" x 77-1/2" Toe Kick
16. Starting with the front toe kicks. Place the precut toe kicks down in front of the cabinets. Note: lay toe
kicks on cardboard to prevent scratching. The 2 front pieces must be flush with the refrigerator opening as
shown (A-A) below, before proceeding to the next step.
16. Starting with the front toe kicks. Place the precut toe kicks down in front of the cabinets. Note: lay toe
kicks on cardboard to prevent scratching. The 2 front pieces must be flush with the refrigerator opening
as shown (B-B) below, before proceeding to the next step.
A-A
B-B
Find your model below

Snap into place.
FRONT TOE KICK PREPARATION & INSTALLATION
Make sure toe kicks are ripped to the desired height before proceeding. Note: Toe kicks are 5" tall to
start.
18. Line up the clip mounts, center of the marked lines and approximately center up and down. (The
mount & clip will hold the toe kick best and straight when it is approximate in the center of the toe kick
marks).
19. Once all clip mounts are screwed into the
toe kick, slide the clips into the center of the
clip mount. Note: This allows room for side to
side adjustment.
20. When all clips are on the clip mounts, line them up with the legs and gently snap in one clip at a
time from right to left or left to right.
Page 15

SIDE TOE KICK INSTALLATION
21. Measure from the inside of the front installed toe
kick to the rear of the cabinet. Note: If you are
installing a rear toe kick you will install the rear toe kick
before measuring this side piece. On the rear toe kick,
measure the inside of both the front and rear.
22. Lay down the side toe kick flush with the
inside front toe kick. Use a sharpie to mark
the center of the legs.
23. Offset front side clip mount by 1/2" either above or below
your front toe kick measurement (This will ensure that the 2 clip
mounts on the leg do not interfere with each other). Screw the
clip mounts to the kick plate.
24. Slide the clips on the
brackets.
25. Snap the kick plate
carefully one side at a
time.
Note: If installing a rear toe kick measure both outside end with the mounts and clips, add 1 1/2" overall.
Page 16

TOE KICK INSTALLATION CONTINUED
Toe Kick
Door
Door
Toe Kick
Refrig.
Back
Panel
After toe kicks are installed, below is how they should look after snapping into place.
Offset on ends Flush at refrigerator opening
Page 17

(x2) Screws
per Assembly
(x1) Vertical Trim
Strip Bracket
(x4) Angle Brackets
1"x30" Vertical Trim (x2)
26. If the cabinets are going to be placed against a wall, the kit comes with (x2) 1" x 30" x
3/4" filler strips. These can be installed on the sides flush with the top. Secure with the
single hole angle brackets, screw them into place as shown.
ADDING OPTIONAL CABINET WALL FILLER STRIPS
Page 18

Page 19
HANDLE INSTALLATION
27. Screw in the door handles using the pre-drilled holes in the doors. The drawer fronts are pre-
drilled, the backs are not. You must use the pre-drilled holes on the fronts to drill out the backs
using a 5/32" drill bit. When the drawer holes are completed, attach the handles.
This manual suits for next models
5
Table of contents
Other Bull Kitchen Appliance manuals