Bulteh 2000 Ekomilk Spectra User manual

Bulteh-2000 ltd.19, Industrial Area
Stara Zagora 6000, Bulgaria
Tel./ Fax:(+359 42) 626019;
Tel. :(+359 42) 620896;
E-mail: [email protected]
Infrared-Ultrasonic Hybrid Milk
Analyzer
USER’S GUIDE
Version 4.1
Revision: 03.01.2023

Contents
1 General information 1
2 Knowing the parts 2
3 Safety measures 3
4 Method of work 4
5 Milk samples requirements 5
6 Cleaning procedure 5
6.1 Infraredmodulecleaning .................................. 6
6.2 Ultrasonicmodulecleaning ................................. 7
6.3 Cleaning before switching off . . . . . . . . . . . . . . . . . . . . . . . . . . . . . . . . 10
6.4 Cleaning after switching on . . . . . . . . . . . . . . . . . . . . . . . . . . . . . . . . . 10
7 Zero procedure 11
8 Milk analysis 12
8.1 Position of components and work . . . . . . . . . . . . . . . . . . . . . . . . . . . . . . 12
8.2 Startmeasurement ..................................... 13
8.3 Testing with reference samples . . . . . . . . . . . . . . . . . . . . . . . . . . . . . . . 16
9 Graphical user interface 16
9.1 Mainmenu.......................................... 16
9.2 Settingsmenu........................................ 16
9.2.1 Calibratetouchscreen................................ 16
9.2.2 Displayparameters ................................. 17
9.2.3 Firmware update/GUI/OS . . . . . . . . . . . . . . . . . . . . . . . . . . . . . 18
9.2.4 InfraredEepromupdate............................... 18
9.2.5 Ultrasound Eeprom update . . . . . . . . . . . . . . . . . . . . . . . . . . . . . 18
9.2.6 Printers ....................................... 19
9.2.7 Licenses ....................................... 19
9.3 Data ............................................. 19
9.3.1 Export Data with USB Flash Drive . . . . . . . . . . . . . . . . . . . . . . . . . 19
9.3.2 ExportDataviaLAN ................................ 19
9.4 Connections ......................................... 22
9.4.1 Wi-Fi......................................... 22
9.4.2 GPRS ........................................ 22
9.4.3 Bluetooth ...................................... 22
9.5 Adminmenu......................................... 26
9.5.1 Calibration...................................... 26
9.5.2 Ultrasoundcorrections ............................... 26
9.5.3 AutoCleaning.................................... 28
9.5.4 Sending results to FTP server . . . . . . . . . . . . . . . . . . . . . . . . . . . 28
9.5.5 Longmeasurement ................................. 29
9.5.6 Inactivitycleaning.................................. 29
9.5.7 Sending results to HTTP server . . . . . . . . . . . . . . . . . . . . . . . . . . 30
9.6 SFTP access to Ekomilk Spectra . . . . . . . . . . . . . . . . . . . . . . . . . . . . . . 30
10 Errors list 32
11 Appendix 1 - Some reason for Ekomilk accuracy and repeatability deviations 33
12 Appendix 2 - Send last result over serial port(Continuous mode) 35
13 Appendix 3 - Troubleshooting 37
13.1 Filter clogging(infrared only) . . . . . . . . . . . . . . . . . . . . . . . . . . . . . . . . 37
13.2 Cuvette clogging(infrared only) . . . . . . . . . . . . . . . . . . . . . . . . . . . . . . . 37
13.3 Sticking of pump’s silicone hose(infrared and ultrasound) . . . . . . . . . . . . . . . . . 40
14 Maintenance 42
15 Guarantee 45

1 General information
Ekomilk Spectra is designed for fast and cost effective control of milk quality - detecting adulterants
(ammonium sulfate, urea, etc.) and milk parameters (Fat, Solids Not Fat, etc.). The mid-infrared
spectral module allows for detection of adulterants and their concentration without the use of chemicals
and the well established ultrasonic module measured the milk parameters. Ekomilk Spectra hybrid
milk analyzer, uses two analytical methods, combined in the convenience of one simple instrument -
infrared spectroscopy in the mid-infrared region, and ultrasonic measurement.
Mid-infrared spectral analysis
Different species in a sample have unique absorption patterns of the infrared light. Based on those
patterns and how pronounced they are, the species (in our case adulterants) and their concentrations
can be identified.
Ultrasonic measurement
Ultrasonic material analysis is based on a simple principle of physics: the motion of any wave will be
affected by the medium through which it travels. Thus, changes in one or more of four easily measurable
parameters associated with the passage of a high frequency sound wave through a material - transit
time, attenuation, scattering and frequency content - can be correlated with parameters in milk.
Why not using only infrared technology for measurement of all parameters?
The short and simple answer is that this will increase the cost for the user 5-15 times without adding
real value for the purpose of the device.
The longer answer is that, to measure all parameters of interest, a much larger portion of the spectrum
needs to be measured and analyzed. However in order to do that either much more sophisticated
mechanics and optics or more sensors are necessary. This will drastically increase the price and also
make the device less suitable for a field instrument.
Application Area:
Dairy farms
Milk collecting points
Dairy industry
Veterinary and dairy laboratories
Key feature:
Fast adulterant detection
Simple and lightweight design
Cost effective
No acids or other chemicals used
Data collection system
Embedded Real time clock
RS 232 and/or USB Interface
USB port with Flash Drive and Numeric keyboard support
LAN connection
Environmental conditions:
Ambient air temperature 15
°
C÷35
°
C
Milk temperature 5
°
C÷35
°
C
Relative humidity 30 % ÷80 %
1

Parameters:
Measuring ranges: Limit of detection:
Fat 0,5 % ÷12 % ±0,1% (abs.)
Solids non fat (SNF) 6 % ÷12% ±0,2% (abs.)
Milk density (CLR) 1,0200 ÷1,0400 g/cm3 ±0,0005 g/cm3 (abs.)
Protein 2 % ÷6 % ±0,2 % (abs.)
Freezing Point 0 ÷-1,000
°
C±0,01
°
C (abs.)
Added Water to Milk 0 % ÷60 % ±5 % (abs.)
Lactose 0,5 % ÷7 % ±0,2 % (abs.)
Specific adulterant detection:
Ammonium sulfate 0,1 % ±0,05 % (abs.)
Urea 0,15 % ±0,05 % (abs.)
Melamine 0,15 % ±0,05 % (abs.)
Nitrates
(ammonium, potassium, sodium, etc.) 0,05 % ±0,03 % (abs.)
Carbonates/Bicarbonates
(ammonium, potassium, etc.) 0,08 % ±0,05 % (abs.)
Added water 20 % ±5 % (abs.)
Synthetic milk
(veg. oil, urea, detergent, water) 20 % ±5 % (abs.)
Sweeteners
(sucrose, maltodextrin) 0,9 % ±0,5 % (abs.)
Non-specific adulterants:
In case the milk has been contaminated with sub-
stantial volume of unknown adulterant the instru-
ment could detect it.
Technical specifications:
Average time per one measuring 45 sec.
Size 380 x 310 x 285 mm
Weight <4,5 kg
Power consumption (avg.) <50 W
AC Power Supply voltage INPUT: 100 - 240VAC +10/-15% 50/60 Hz
2 Knowing the parts
1. Infrared module inlet with
removable filter
2. Ultrasonic module inlet
3. Cuvette (Infrared module)
4. Infrared module outlet
5. Ultrasonic module outlet
6. Infrared module peristaltic pump
7. Ultrasonic module peristaltic pump
8. Touchscreen display
2

Filter
Measuring mug -25 ml.
Cleaning solution mug - 40 ml.
Mug for waste milk
3 Safety measures
1. Read carefully and strictly follow the instructions described in this user’s guide.
2. Under no circumstances you should try to repair Analyzer’s power lead by yourself.
3. EkoZero concentrate liquid, used for the infrared module is a chemical that is considered hazardous
which in case of direct contact may cause severe eye irritation or even serious eye damage. It is
also considered the that liquid has acute oral toxicity.
4. The cleaning set for the ultrasonic module (EkoDay and EkoWeek) contains base and acid, and
is considered to have corrosive behavior. Use protection - gloves and glasses, when preparing the
cleaning solutions with these chemicals and pay more attention when you work with them.
5. Do not eat, drink or smoke when using the concentrates for preparing cleaning and zeroing
solutions (EkoZero, EkoDay, EkoWeek).
6. EkoSpectra Clean is a powder substance, which in case of direct contact can irritate respiratory
organs and eyes.
7. Wear protective gloves/protective clothing/eye protection/face protection.
8. If by accident there is a direct contact the user should take these precautions:
After inhalation: Supply fresh air; consult doctor in case of complaints.
After skin contact: Rinse skin with running water thoroughly.
After eye contact: Rinse opened eye cautiously with water for several minutes. Remove
contact lenses, if present and continue rinsing. Immediately call a poison center or doc-
tor/physician.
After swallowing: Immediately call a poison center or doctor/physician.
3

4 Method of work
1. Place vertically the Analyzer on a table or any other flat surface.
2. Connect the Power Supply (Model AC/DC-CL-DT 12/10) to the power supply outlet ”In 12 V
DC” on the Power Supply Panel and to the mains socket.
Attention: Before start working with the device make sure all the preparation work is
done.
3. Preparation of the EkoZero solution for zero setting and cleaning (Infrared only)
The EkoZero concentrate is a liquid. Before preparing the work solution from the concentrate,
check the shelf life label on the bottle and follow the instructions to prepare the solution. Dissolve
contents - 50 ml in 5 L deionized (or distilled) water or 10 ml in 1 L ( 0,01 %). It’s recommended
to use the EkoZero solution within 2 months from preparation.
NOTE: Store the prepared liquid in a cool place.
4. Place the mugs for cleaning solutions below the pumps of the infrared and ultrasonic modules(see
section 7 for more information ).
5. Check if all measuring parts are in place.
6. Check if the filter is in place and clean it if necessary.
7. Switch on the analyzer.
8. Cleaning procedure after switching on will begin (see more section 6.4).
9. Warming up
From a cool start after switching on the device it will take a few minutes for the modules to warm
up. Status indicator in the top left corner on the main menu shows the progress in percentage.
When the warming up is finished the status indicates ”Ready” (Figure 1).
Figure 1: Status: Ready
10. Clean the two modules (IR with EkoZero solution, US with water).
11. ”Zero Procedure” (for the infrared module) - see more in section 7.
12. Start measurement (IR, US, Combined IR + US)
Explanation: When working with the ultrasound module, it is recommended to pre-fill the system
with milk. This can be done in two ways. The first way is to perform cleaning procedure, but
instead of water/cleaning solution the cleaning is with milk. The second way is to measure a
dummy sample (without considering the reported result). The purpose of these actions is to fill
the system with milk for a more accurate result.
4

13. Instruction for preparing 500 ml EkoSpectra Clean working solution (3.5%), used for cleaning
before switching off:
Take a transparent, non-sparkling 500ml water bottle with deionized water (or distilled water)
and warm it up to about 30-35
°
C. Then pour the 18 grams EkoSpectra Clean package into the
bottle. Stir the mixture up to complete dissolving and then cool it down to 15-25
°
C.
Note: The 3.5% EkoSpectra Clean solution is good for use up to 6 month after preparation if
the container is properly closed after every use. The EkoSpectra Clean solution should be stored
at room temperature. If the solution is stored below 14
°
C, it will become an opaque and white
gel. In that case, before using the solution, please warm up the solution above 30
°
C to become
transparent again.
14. Cleaning
In the end of the working day clean the analyzer well, following the instructions in section 6. After
press turn off button, the procedure of cleaning before switching off will start (see more section
6.3).
5 Milk samples requirements
1. Mix the milk before measurement by shaking it gently 5 times, without making foam and air
bubbles.
2. Before measurement, make sure that the temperature of the milk sample is between 15-25
°
C. When
working with the ultrasonic module the sample temperature should be below 38
°
C, otherwise an
error will occurs - HOT SAMPLE.
3. Put the milk sample in a ultrasonic bath for a few seconds - maximum a minute, according to the
degree of aeration.
6 Cleaning procedure
This section is to give directions for daily and periodical cleaning of milk analyzers Ekomilk in order to
assure their long life and proper functioning. Both modules must be cleaned - infrared and ultrasonic.
The analyzer should not stay for more than 30 minutes with milk.
Attention: It is very important to note here that the cleaning solutions for the infrared and the
ultrasonic modules are different. The cleaning solution for the ultrasonic module can damage the
infrared module. That is why the cleaning is performed in two consecutive steps - first the one module
is cleaned with the respective cleaning solution and then the other module is cleaned. The order of
cleaning is not important.
5

6.1 Infrared module cleaning
Ekomilk Spectra cleaning procedure works on a reversal principle to prevent problems with cuvette
clogging.
NOTE: Instructions for preparing EkoZero solution are on the packaging label of the concentrate, also
described in the section 4.
Clean the infrared module, following the steps below:
the mug for waste milk is placed under the infrared module input.
the mug for cleaning liquid EkoZero is placed under the IR peristaltic pump.
Figure 2: Cleaning
when the <Clean IR>button is pressed - the system will request from the operator to load the
cleaning solution. In the case of infrared module cleaning the cleaning solution is the same as
the zero setting liquid - EkoZero liquid. When finish with loading the cleaning solution and press
”OK” the pump will start rotates in the opposite direction of the measurement. The cleaning
solution passes from right to left and falls into the mug for waste milk.
Figure 3: Clean IR
6

6.2 Ultrasonic module cleaning
Cleaning the ultrasonic module requires more time than cleaning the infrared module because different
solutions are used to maintain the ultrasonic sensor in good condition. The cleaning of the ultrasonic
module is similar to the cleaning of the infrared module:
the mug for waste milk is placed under the ultrasonic module input.
the mug for cleaning solution is placed under the US peristaltic pump.
Figure 4: Cleaning
when the <Clean US>button is pressed, the pump starts to rotate in the opposite direction of
the measurement, the cleaning solution/water passes from right to left and falls into the mug for
waste milk.
* the cleaning solution for the US module cleaning should be considered according to the type of
cleaning (daily or periodic).
Figure 5: Clean US
After cleaning procedure, the ultrasonic module system is filled with air and there should be no
cleaning solution or water residues, the amount of solution/water in the mug for cleaning solution
is adjusted to the pump revolutions, so in the end of the cleaning procedure the mug stays empty
and the pump should suck only air. Do not add extra solution/water in the cleaning solution mug
under the US pump.
7

Methods for daily and periodic clean of the Ekomilk Spectra analyzer’s ultrasonic
module
1. DAILY CLEANING
Daily cleaning is required when:
The interval between two consecutive measurements is more than half of one hour.
The daily job is finished.
1.1. Cleaning out when the interval between two consecutive measurements is more than
half an hour.
Steps:
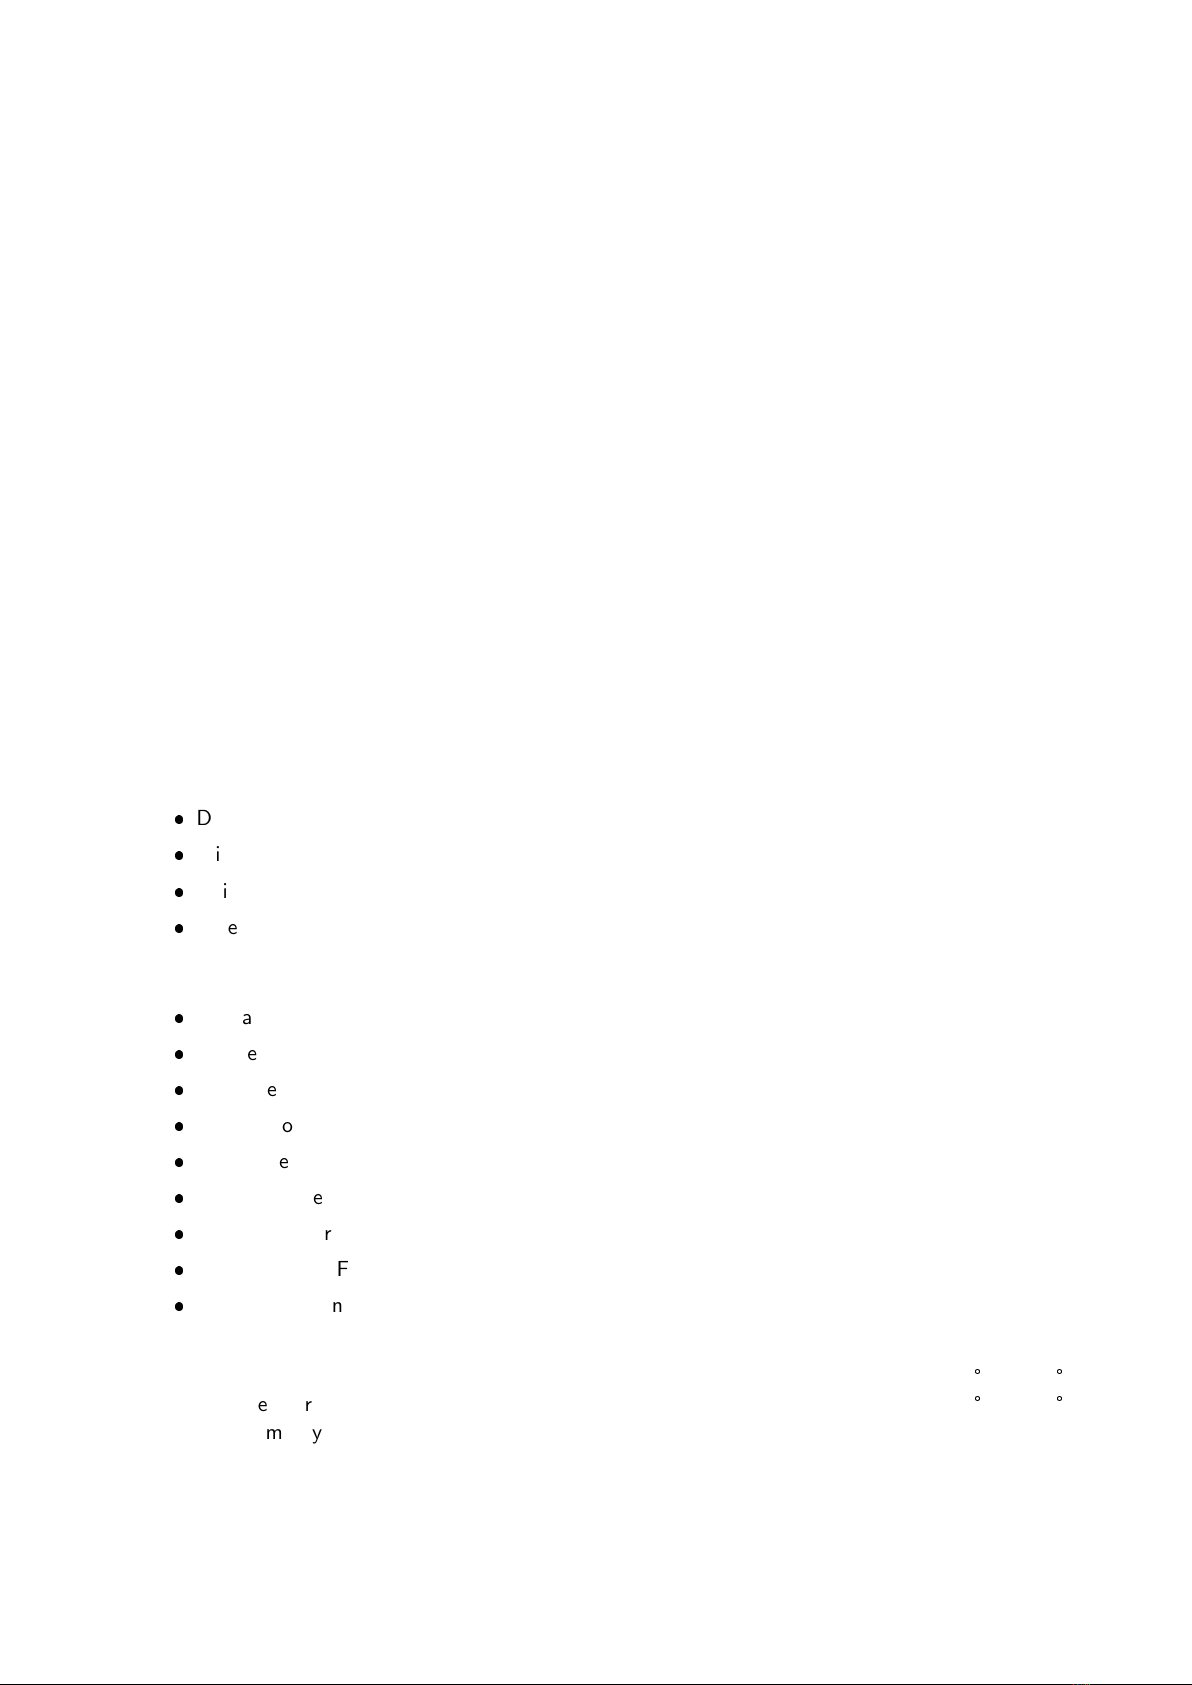
1.1.1. Fill the mug for cleaning solution (below the US peristaltic pump) with clean and warm,
but not hot, water (40
°
C-60
°
C). On the input of the ultrasonic module place the mug
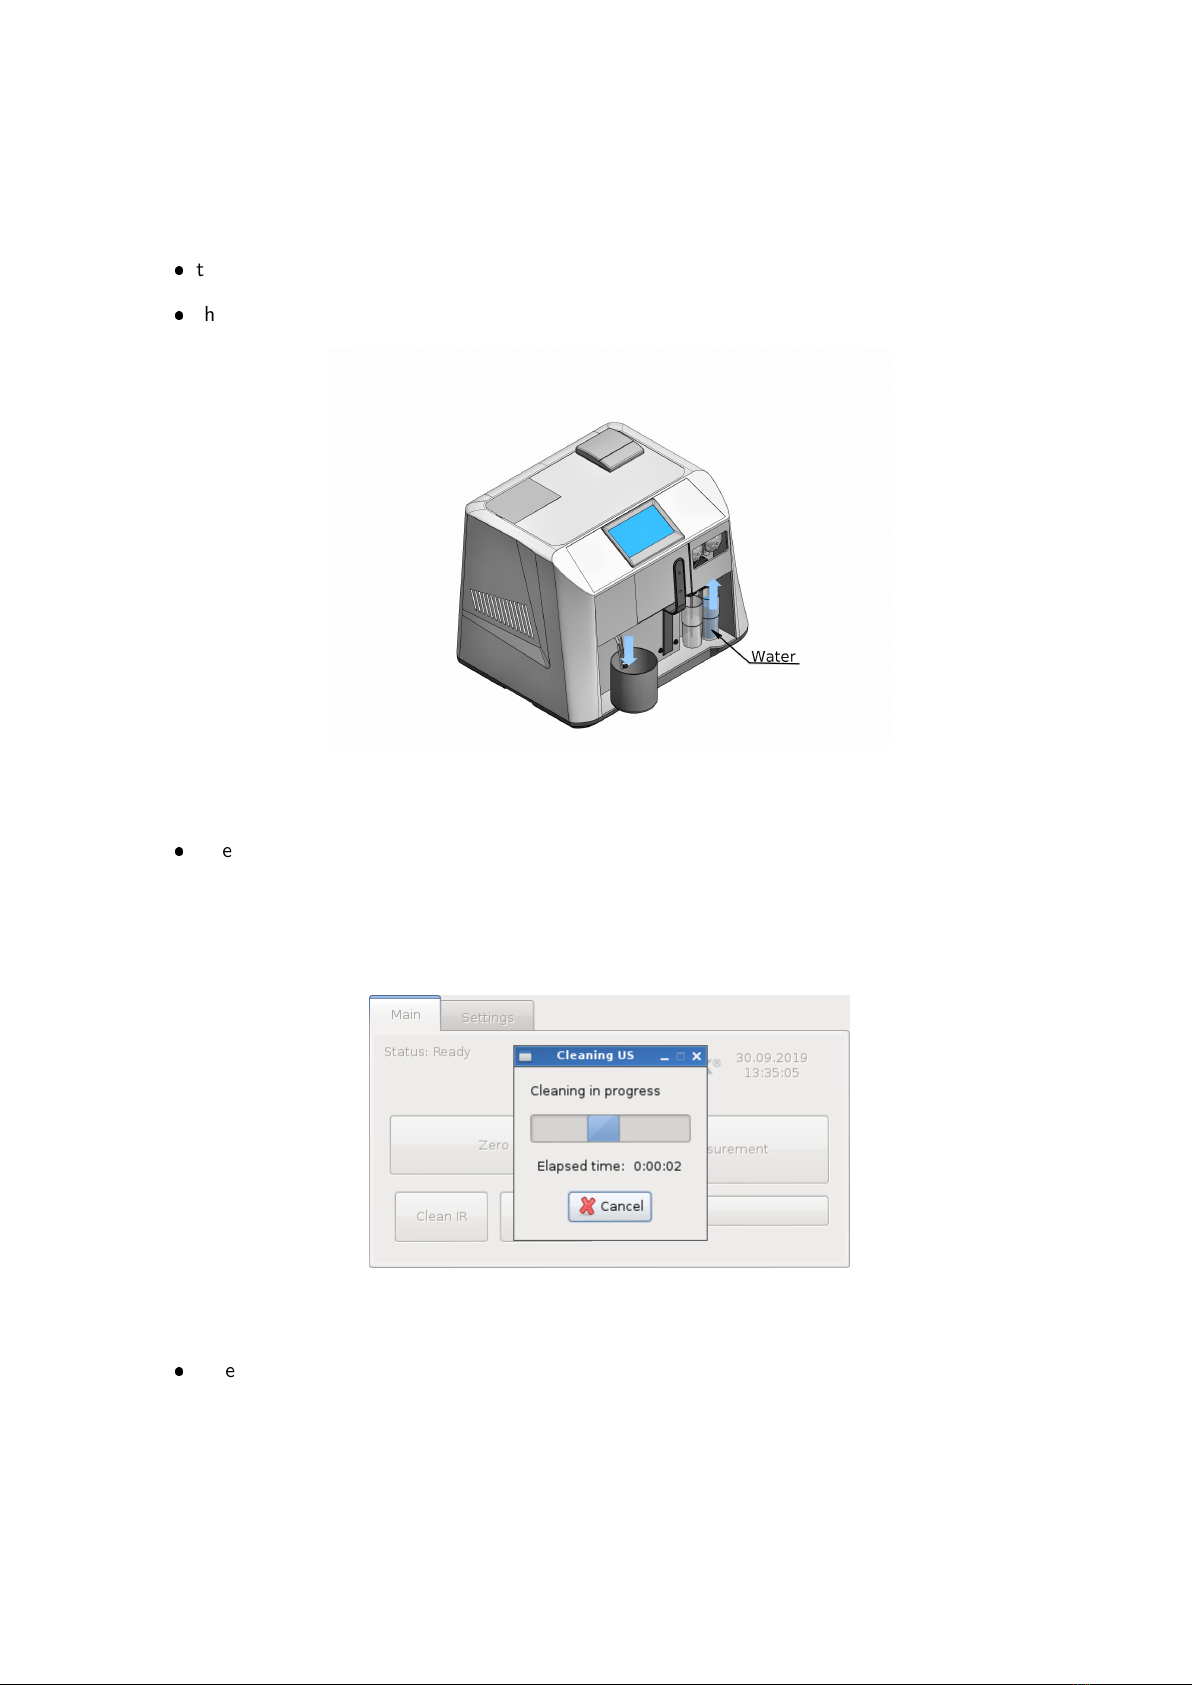
for waste milk, press the button <Cleaning US>, cleaning starts immediately.
1.1.2. Remove the mug and throw away the muddy water. Repeat this procedure several times
until clean water comes out from the Analyzer.
1.2. Cleaning out at the end of a working day.
This procedure prevents formation and collection of fat and ”Milk stone” deposits into the
sensor. Milk stone consists of milk solids, calcium, magnesium, iron, sulfates, etc. Milk and
water mineral deposits become hardened and layered on the sensor and vinyl pipes inner
surfaces, which contact with milk and disturbs the milk analyzer work. Cleaning will be
effective if a reagent which attacks the ”milk stone” is used. We recommend EkoDay to be
used as a daily cleaning solution.
Preparation of EkoDay working solution:
Dissolve 2 g of powder detergent EkoDay in 100 ml distilled or deionized water. The solution
can be used within 7 days after preparation.
Take care this solution does not contact your eyes or skin!
Attention! Use only EkoDay working solution as a cleaning agent. The EkoDay
concentrate can damage your analyzer!
Steps:
1.2.1. First clean the analyzer with pure water as it is described in procedure 1.1. (see above).
Attention! Always clean analyzer with pure water before using the cleaning
agent. Using cleaner EkoDay without first cleaning analyzer for removing the
fats and proteins will result in fixing the ”milk stone” to the surface.
1.2.2. Fill the cleaning solution mug with cleaner EkoDay (25
°
C-40
°
C), place the mug for waste
milk on the input of the US module. Press the button <Cleaning US>, cleaning starts
immediately. Make 5 cycles.
1.2.3. Fill the cleaning solution mug with alkaline clean water, press the button <Cleaning
US>. Make 5 cycles. It’s important to remove all the residues from the cleaning
solution EkoDay!
2. PERIODICAL CLEANING PROCEDURE
To ensure a good work of the Milk Analyzer it is advisory to clean the device at least once a
week strictly performing underwritten procedure. This procedure uses acid cleaner EkoWeek as a
periodical cleaning solution.
Preparation of EkoWeek working solution:
Dissolve 1.8 g of powder detergent EkoWeek in 100 ml distilled or deionized water. The solution
can be used within 30 days after preparation.
8

Take care this solution does not contact your eyes or skin!
Attention! Use only EkoWeek working solution as a cleaning agent. The EkoWeek
concentrate can damage your analyzer!
2.1. Perform the daily cleaning first.
Attention! Make sure that the analyzer is properly cleaned with pure water before
going on to the next item of the procedure. Mixing both cleaning solutions- alkaline
EkoDay and acid EkoWeek will result in forming ”milk stone”.
2.2. Fill the cleaning solution mug with solution of the acid cleaner EkoWeek(25
°
C- 40
°
C), place
the mug for waste milk on the input of the US module. Press the button <Cleaning US>,
cleaning starts immediately. Make 5 cycles.
2.3. Open the top cover by pressing its left side - Figure 6 - step 1.
2.4. Remove the plug as it is shown on the - Figure 6 - step 2.
2.5. Insert the plunger instead of the plug Figure 6 - step 3.
2.6. Fill the measuring mug with clean and warm, but not hot, water (40
°
C- 60
°
C), dip the tube
(sucker) into the water and place the measuring mug on the Ekomilk working surface.
Move up and down the plunger several times. Remove the mug and throw away the water.
Fill the mug with clean and warm water and repeat this step 4-5 times - step 3.
Figure 6: Hand-cleaning
2.7. Take the plunger out of the hole. Wait until all water comes out. Insert the plunger again
and press it to the bottom.
2.8. Remove the measuring mug and move the plunger out. Put the plug firmly and close the
top cover.
2.9. Done.
Note: During the daily and periodic cleaning of the analyzer, it is not desirable to use ”solid”
(high salt) water. The water used for cleaning should be ”soft” (low in salt), and it is best
to use distilled or deionized water.
9

6.3 Cleaning before switching off
When you press the power button to turn off the analyzer, the cleaning procedure will begin:
place cleaning solution mug filled with EkoZero solution under the IR peristaltic pump (figure 2)
place an empty mug for waste milk under the inlet of the infrared module
click ”OK” the displayed window
after procedure finished, remove the mug with EkoZero solution and put another cleaning solution
mug filled with EkoSpectra Clean solution (figure 7).
Figure 7: Clean IR with EkoSpectra Clean solution
when procedure finished, remove mug for waste milk
place measuring mug with clean water under the inlet of the ultrasound module
continue with the procedure
the device will switch off
Note: Please read the instructions that appear on the screen of the device carefully!
6.4 Cleaning after switching on
When turn on the analyzer, the procedure of cleaning will begin:
place an empty mug for waste milk under the inlet of the ultrasonic module
when click ”OK” unloading of the liquid from ultrasound module will begin
after procedure finished, place cleaning solution mug filled with EkoZero solution under the IR
peristaltic pump (figure 2)
remove the milk filter from the infrared module inlet and clean it (section 13.1)
click ”OK” on the displayed window
without displace the mugs, continue with next procedure
cleaning procedure on switching on will be finished successful
place the cleaned milk filter at the inlet of the infrared module
Note: Please read the instructions that appear on the screen of the device carefully!
10

7 Zero procedure
The ”zero procedure” must be performed at the beginning of the working day and on every hour
during the day. This procedure is necessary to account for imperceptible changes in the environmental
conditions of the measurements and their compensation.
Failure to set to zero may adversely affect measurement accuracy. The analyzer automatically warns
of the need to perform a new procedure through the message ”Zero Required!”.
The measuring mug (25ml) is filled with EkoZero solution, the mug for cleaning liquid under the IR
pump is empty (otherwise it will overflow).
Figure 8: Zero
To begin the procedure press the <Zero>button in the main menu(Figure 9). A new window opens
(see Figure 9a) with signalization to load zero solution in the measuring mug. When the solution is
loaded press <OK>. The zero setting starts and a progress bar indicates the state of the procedure
(Figure 9b). After the zero is done successfully, in the right side of the button <Zero>appears a timer,
which indicates the reminding time to the next zero procedure (<Zero 1:00>, Figure 9c), so after 1h
00min the zero will be expired. When this happens the timer disappear and a new zero procedure should
be done.
Note: The first sample after zeroing should be discarded, so we recommend to make two
measurements with the first milk!
(a) Load zero solution (b) Zero (c) Zero 1:00
Figure 9: Zero procedure
11

8 Milk analysis
Since Ekomilk Spectra is a hybrid analyzer using infrared technology for adulterant detection and ul-
trasonic for standard milk parameters measurement, it can make complex measurements using both
modules, or it can be set to only use either the infrared or the ultrasonic module for measurement. So
if there is a problem with one of the modules the analyzer can continue working with the other module.
8.1 Position of components and work
Position when using the infrared module:
place the measuring mug, filled with sample on the Ekomilk Spectra’s working surface.
fill the mug for cleaning solution, under the IR pump with EkoZero solution.
Work of infrared module:
Attention: Before the first measuring, the infrared module is filled with cleaning/zeroing solution -
EkoZero. This is done during cleaning procedure (Clean IR) and zero procedure (see section 6 and
section 7).
When the measurement starts, the infrared module’s peristaltic pump takes a sample of milk (yellow
arrows, figure 10) that pushes the cleaning solution into the mug underneath the infrared pump. The
IR pump rotates normally (from left to right). When the sample is analyzed in the cuvette, the IR
peristaltic pump reverses (from right to left), and pushes back the analyzed milk in the measuring mug,
while at the same time refills the system with cleaning solution EkoZero (blue arrows, figure 10). The
returned milk sample should not be used again, because is mixed with the cleaning solution EkoZero.
Note: During IR measuring the mug for cleaning solution should be always filled with EkoZero
solution, otherwise the IR peristaltic pump will take air, this air will pass into the system, respectively in
the cuvette. When work properly the cleaning solution EkoZero in the mug for cleaning solution should
stay clear, without milk contamination.
Figure 10: Measurement
12

Position when using the ultrasound module:
Ultrasound measurement is similar to infrared. The difference is that the mug for cleaning solution
under the US peristaltic pump should be empty. Here the use of the mug for cleaning solution is for
safety reasons. If there are drops of milk or cleaning solution left in the system, they will fall into the
mug.
Position of the components: (Figure 11)
place the measuring mug, filled with sample on the Ekomilk Spectra’s working surface
place the empty mug for cleaning solution under the US peristaltic pump
Work of ultrasound module:
When initiating a measurement, the peristaltic pump on the ultrasound module takes a sample of milk (a
yellow arrow, Figure 11), which fills the ultrasonic sensor. In the end of the measurement, the peristaltic
pump returns the measured milk in the measuring mug, while the ultrasonic sensor remains filled with
air (blue arrows, Figure 11).
Figure 11: Measurement
8.2 Start measurement
To initiate a measurement press the <Measurement>button from the main menu (Figure 12).
Figure 12: Main menu
13

A new window pops up asking for the measurement configuration (Figure 13). The main thing here
is to select what modules of the hybrid analyzer to be used for the measurement process. To use only
the infrared or the ultrasound the check in the corresponding check box must be ticked. To use both
infrared and ultrasound simultaneously for complex measurement both check boxes should be marked.
Double-check button is available for infrared measurement. His role is to recheck the concentration of
adulterants and show it more accurately. When measuring with the ultrasonic module, the type of milk
must be indicated in advance, which is selected immediately after the type of measurement is selected.
The configuration windows (Figure 13) will appear every time a new measurement is performed. That
can be annoying and unnecessary. To skip this step the ”Remember” check box should be ticked in the
lower right corner of the window.
Figure 13: Measurement configuration
By clicking the <OK>button the measurement starts.
Resetting: In the main menu under <Measuring>button a configuration text should appear in a gray
box. To clear the setting just press the text, in our case <Buffalo><US>. A message asking you to
delete measurement configuration will pop up, Figure 14.
Figure 14: Resetting configuration
After the measurement finishes successfully a window appears with measured milk parameters and
adulterants if any detected (Figure 15, 17). If a substantial volume of unknown adulterant is detected
- you will see ”Abnormal sample”.
Note: If there is more than one adulterant in the milk - as a result will shown is the one
that changes the parameters of the milk the most.
If the adulterant does not indicate what it is (for example - an ammonium compound), you can click
on the yellow rectangle and see the adulterant and the probability of it being present in the current
sample (Figure 18).
14

Figure 15: Measurement with infrared
Figure 16: Measurement with ultrasound
Figure 17: Measurement with infrared and ultrasound
Figure 18: Adulterant and probability
15

8.3 Testing with reference samples
Use the attached adulterants (Urea, Sodium Bicarbonate- 3 gr and 5 gr for 0.3 % and 0.5 % sample
concentration) to check the operation of the device.
Preparation of reference sample:
Add the contents of the package to 1 liter pasteurized milk 3.5 % fat at a constant temperature of 20
°
C and stir until completely dissolved.
Note: The period of using of the sample is up to 12 hours after preparation of the solution. Store the
solution in refrigerator.
9 Graphical user interface
The graphical user interface consists of three principal menus - <Main>,<Settings>,<Admin>and
the operator can switch between them by pressing the respective of the horizontal tabs, Figure 19.
Figure 19: Main menu
9.1 Main menu
The main menu contains the most important and commonly used buttons: <Mesurement>,<Zero>,
<Clean IR>,<Clean US>and measuring configuration.
9.2 Settings menu
This section describes how to configure and use other Ekomilk Spectra options.
9.2.1 Calibrate touchscreen
Settings →System →Touchscreen
To calibrate your touch screen please, follow the instructions that will appear. In case of a mistake, turn
off the device without completing the procedure.
16

9.2.2 Display parameters
Settings →System →Display params.
You can configure result view. You can:
hide ultrasound parameters
hide corrected or raw values of ultrasound parameters
display 1 or 2 decimal places for fat and SNF
display on CLR instead density
display US or IR protein
hide the concentration of adulterant
Figure 20: Configure result view
Clicking the IR tab, displays list of adulterants. This functionality is used to not detect selected adul-
terants.
For example: If the purpose is not detecting melamine adulterant then select it from the menu. Starting
IR module measuring will show ”No adulterants found” result.
17

9.2.3 Firmware update/GUI/OS
On USB flash drive you need to create folder with name ”spectra”. After that open ”spectra” folder
and create folder with name ”fw” and then you need to copy update file(for firmware (.bfu), for GUI/OS
(.zip)) into ”fw” folder. Take the USB flash drive and plug the USB stick in one of the Ekomilk Spectra
USB ports. For Firmware open Settings →Files →System →Infrared →Firmware update or for
GUI/OS Settings →Files →System →GUI/OS →GUI/OS Update. Then select update file and press
”Open”.
9.2.4 Infrared Eeprom update
On USB flash drive you need to create folder with name ”spectra”. After that open ”spectra” folder
and create folder with the device id name (you can see it from: Settings →Sys Info, Figure 21), open
it and create folder with name ”eedata” (for example: spectra/188/eedata) and then you need to copy
eeprom file into ”eedata” folder. Take the USB flash drive and plug the USB stick in one of the Ekomilk
Spectra USB ports. For infrared eeprom update open: Settings →Files →System →IR →EEPROM
write.
Figure 21: Device ID
9.2.5 Ultrasound Eeprom update
Settings →Files →System →US →EEPROM write.
On a flash drive, the US eeprom should be in the ”/spectra/device id” folder (for example: spec-
tra/188/).
18
Other manuals for Ekomilk Spectra
1
Table of contents
Other Bulteh 2000 Measuring Instrument manuals
Popular Measuring Instrument manuals by other brands

MRC
MRC PM-9100 instruction manual

Flexitron
Flexitron webdyn MTX-StarWater manual

RS PRO
RS PRO RS-8880 instruction manual

Keysight Technologies
Keysight Technologies N9010A Series Installation note

PCB Piezotronics
PCB Piezotronics 357A08 Installation and operating manual

Bedfont
Bedfont G210 operating manual