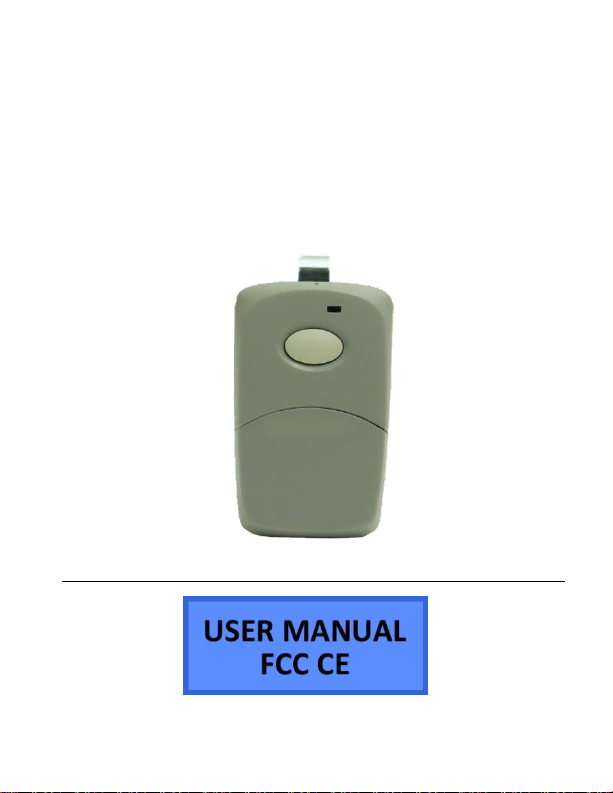
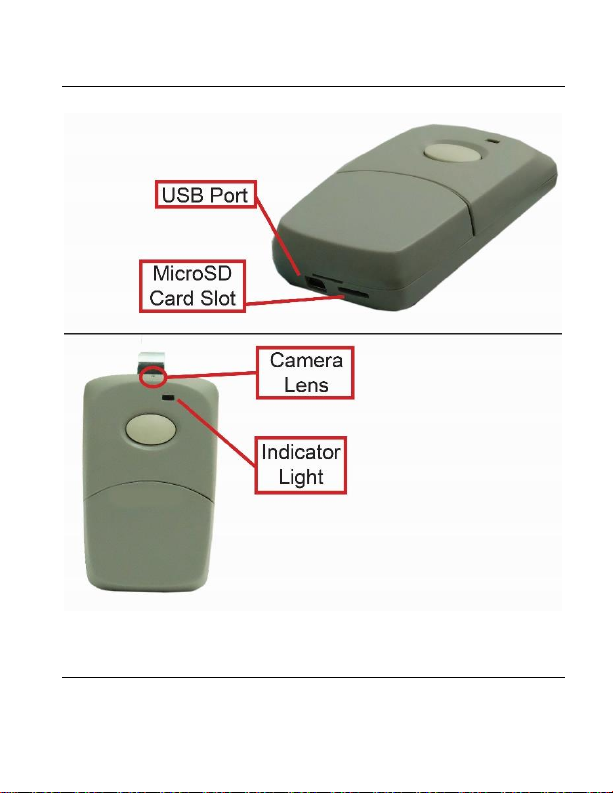
BushBaby BBSGarage User manual

1 Version 2.1
Bush Baby Stealth Garage
Manual
SKU: BBSGarage

2 Version 2.1
THANK YOU FOR PURCHASING THE BBSGARAGE
Please read this manual before operating the
device and keep it handy.
Your purchase should include:
1 x BBSGarage
1 x Remote Control
1 x USB-B Cable
1 x Wall AC Adapter
1 x MicroSD Card Reader
1 x 16GB MicroSD Card
1 x User Manual

3 Version 2.1
GET FAMILIAR WITH YOUR BBSGARAGE

4 Version 2.1

5 Version 2.1
OPERATING THE BBSGARAGE
Note: If you are not located in the US, or if you
intend to use this product anywhere other than the
US, you will need to purchase a converter in order
to use the AC wall plug in and avoid damaging the
product. Because different countries use different
voltages in their electrical wiring, you will need a
converter that adapts to the current in your
particular country.
IMPORTANT WARRANY INFORMATION: If the
warranty sticker on your device has been removed
or tampered with, your lifetime warranty will be
voided. You may be charged fees or denied a
return should this happen.
IMPORTANT NOTICE: Allow the device to charge 6 –
8 hours before using.
CHARGING THE BATTERY
1. Plug the USB into the USB port on the
device (see page 3).

6 Version 2.1
2. Plug the other end of the USB cable into
the AC wall adapter.
3. Wait 6 to 8 hours.
a. The larger the battery capacity, the
longer it takes to charge.
HOW TO TURN ON THE BUSHBABY STEALTH
CAMERA
1. Press the Power Button on the remote
control one time (see page 4). Your device
is on when you see the indicator light turn
on. The device is now in Standby mode.
HOW TO RECORD VIDEO ON THE BUSHBABY
STEALTH CAMERA
1. In standby mode, press the Video button
on the remote control one time (see page
4). The indicator light will flash three times
and then turn off.

7 Version 2.1
a. Videos will be recorded
continuously and saved in 20
minute intervals.
HOW TO SET UP MOTION DETECTION
1. In Standby mode, press the Motion
Detection button one time (see page 4).
The indicator light will flash three times
and then turn off.
2. The unit is now in motion detection mode
and will begin recording video once motion
is detected. There will be no LED indicator
to indicate when motion is detected.
HOW TO STOP RECORDING
1. To stop recording, you will need to press
the same button you used to begin
recording.
a. If you pressed the Video button,
press the Video button once more.

8 Version 2.1
b. If you pressed the Motion button,
press the Motion button once
more.
2. The device will reenter Standby mode
(solid light).
HOW TO TAKE A PICTURE
1. While in Standby mode, press the Picture
Button one time (see page 4). When the
indicator light flashes one time, 1 picture
will be taken accordingly.
2. The device returns to Standby mode once 1
picture has been taken.
MICROSD CARD SLOT
To access the MicroSD Card Slot, you must open
the from the bottom.
3. Gently push the MicroSD Card into the slot.
The gold contacts on the card will be
inserted first, and they should face the
main circuit board. You will feel some

9 Version 2.1
spring resistance before the card clicks in
to place.
a. Never force the card into the Card
Slot under any circumstances.
Otherwise, the Bird House unit or
the MicroSD card itself will be
damaged.
4. To remove the SD card, gently push the
card in so that it clicks. The internal spring
tension will eject the card.
MicroSD cards 65GB and above will require
special formatting to work. The device will not
function with these cards if they are not properly
formatted beforehand.
Visit www.mgidownloads.com/Software and
download the “guiformat.zip” file. Extract the files
and follow the instructions in the “64GB SD Card
Formatting.pdf” document.

10 Version 2.1
IMPORTANT NOTICE: Ensure that the device is off
before inserting the MicroSD card. Otherwise,
potential corruption of the card file(s) may occur.
RETRIEVE THE FILES TO YOUR PC
1. Remove the MicroSD card from your
device and connect it to your computer.
See page 3 to locate the MicroSD card slot
on your device.
2. Locate “Removable Disk” inside the (My)
Computer folder.
AutoPlay Removable Disk > Open folder to
view files

11 Version 2.1
Or…
Go to Start > Computer >
Removable Disk

12 Version 2.1
3. Open the Removable Disk drive.
4. Open the DCIM folder.
5. Open the folder featuring a sequence of
numbers.
6. Double click the file you want to view.
VLC Player is recommended for watching
videos.
If you are having video playback issues such as a
completely black video recording or “squiggly lines”,
we recommend you use VLC media player to play
back the videos. It can be downloaded for free from
www.videolan.org
COPYING AND DELETING YOUR FILES
The video files created are just like any other file
on your computer, and can be managed in the
exact same manner.
To save a file, you would want to select the
file, right click your mouse on the file name,
and then choose “Copy” from the menu.

13 Version 2.1
Next, go the location you want the save the
file to. Right click your mouse, and then
chose “Paste.” This will copy the file to your
computer.
To delete a file, right click your mouse on the
file name and choose “Delete” from the
menu. You can quickly select all of the files
by pressing “CTRL+A” on your keyboard.
If you are using MAC OS X, you must empty
the trashcan after you delete a file. If this is
not done, the SD card will fill with hidden
files and the Bottle will no longer record new
files.
SETTING THE TIME AND DATE ON THE VIDEO
FILES
You will need to remove the MicroSD card from
your device and plug it into your computer using
the SD card reader.
1. Visit http://time.mgidownloads.com

14 Version 2.1
2. Choose “All Bush Baby Stealth” and your
time zone in the dropdowns and click
download.
3. Right click and “cut” the downloaded time
file.
4. Locate “Removable Disk” inside the (My)
Computer folder.
a. Go to Start > Computer >
Removable Disk
5. Open the Removable Disk drive.
6. Right click with your mouse and paste the
downloaded time file.

15 Version 2.1
Alternatively, if you cannot get the above method
to work, do the following:
7. Right click anywhere in the blank white
space.
8. Scroll down to “New”.
9. Click “Text Document”.
10. Rename “New Text Document” as “time”.
The title must be in all lowercase
letters!
Before Step 8

16 Version 2.1
After Step 8
11. Open the text document.
12. Enter the date/time in the following
format:
a. Example:
2016/08/08 15:00:00
13. Save the text document.
14. Safely eject the MicroSD card from your
computer and reinsert it into your device.
Power on the device and begin a test recording to
confirm date/time setting succeeded.
TROUBLESHOOTING

17 Version 2.1
THE DEVICE WON’T TURN ON
Charge the device for at least 6-8 hours
before the first use.
Make all charging cables are securely
connected when charging.
THE DEVICE ISN’T CHARGING
Replace the battery or charging cable.
If you are charging via a wall power source,
you may need to charge via your PC.
MY COMPUTER DOESN’T RECOGNIZE THE DEVICE
Try using a different USB slot on your PC.
THE VIDEO IS UNCLEAR
The device needs charging.
THE INDICATOR LIGHT IS ON, BUT THE CAMERA
WILL NOT RECORD VIDEO OR TAKE PHOTOS
The SD card may be too small.
oInsert SD card between 4GB –
128GB.

18 Version 2.1
You may have a 64GB+ card and need to
format it properly. Visit
www.mgidownloads.com/Software and
download the “guiformat.zip” file. Extract
the files and follow the instructions in the
“64GB SD Card Formatting.pdf” document.
THE INDICATOR LIGHT IS FLASHING RED/BLUE
There is no SD card in the device.
OTHER PROBLEMS
Call our technical support at 770–694–
6921

19 Version 2.1
SPECIFICATIONS
Video Resolution
1920x1080
Video Format
AVI
Frames per Second
30
Vision Angle
75°
Motion Detection
Yes
Lux Rating
1LUX
Water Resistant
No
Battery Life
30 Hours
Type of Memory
External MicroSD Card
Memory Capacity
4GB –128GB
USB Interface
2.0 USB
Player Software
VLC recommended
Operating Systems
Windows XP & Up
Mac OSX 10.5 & Up
Linux

20 Version 2.1
Table of contents
Popular Garage Door Opener manuals by other brands

Genie
Genie INTELLIG 1000 3024 manual

Chamberlain
Chamberlain Power Drive Security+ 7520S owner's manual

Frequenz
Frequenz 400-100 instruction manual

Automatic Technology
Automatic Technology HiRO GDO-12 installation manual

AlluGuard
AlluGuard Qompact Q2R Original operation instructions

LARSON
LARSON ESCAPE 800 installation instructions