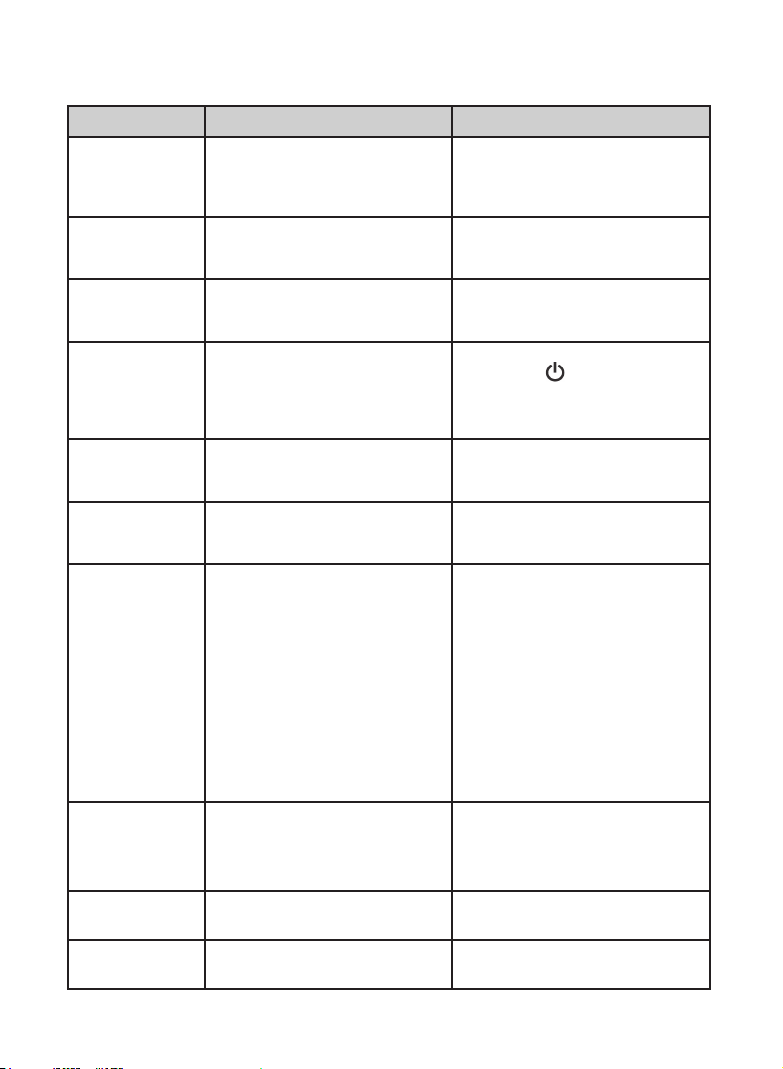
Bushnell TravelTunes 1.0 User manual

TravelTunes™
Portable Speaker System
Instruction Manual
Model #s 940001-940001G-940001AP
Lit# 98-9401/02-07
1.0
TravelTunes 940001G-6LIM rev3.in1 1 2/17/07 3:13:03 PM

4
5
Technical Specications
Speakers: 2 x 2.25” driver w/neodymium magnet
Frequency response: 160Hz~20kHz
Amp:2 x 5 watts per channel (rms)
Power: 8 x “C” batteries or AC adapter (provided)
Remote battery type: 3v lithium CR2025
Operating temperature range (speakers): -25 ~ +60oC
(-13~+140oF), up to 95% humidity
Dimensions 7” (H) x 13.5” (W) x 3.25” (D)
TRAVELTUNES 1.0 FEATURES:
•Engineered for optimal sound quality in the outdoors
• Water resistant 2.25” speakers
• 5 watts per channel amplier w / “Z-Bass” boost
• Extended battery life with 8 “C” cells (not included)
• iPod recharges in dock (when using AC adapter)
• Compatible with all “docking” iPods including Nano and Mini
• 1/8” input jack for other MP3 players including iPod Shufe
• Rubber coated exterior and rugged rubber trim
• Water resistant battery compartment
• Rubber doors protect iPod connector, rear panel jacks, and batteries
• Sturdy metal carry handle/folding stand
• Includes carrying case, AC adapter, remote control,
dock inserts for 3G, 4G and Mini iPods (for 5G video iPods and Nano,
use the dock inserts supplied by Apple with the iPod-see adapter chart)
Remote Control
All brand and/or product names are trademarks of their respective owners.
Specifications are subject to change without prior notice.
PLAY/
PAUSE*
ON/OFF*
PREV* NEXT*
VOLUME: UP
(+)/DOWN(-)
* Docked
iPods
Only
TravelTunes 940001G-6LIM rev3.in5 5 2/17/07 3:13:04 PM

6
7
Fig. 1b-Dock Cover Up,
Dock Insert Adapter Installed
Fig. 1a-Dock
Cover Down
Fig. 2-Rear Panel Jacks
(L>R: AC Adapter In, Headphone
Out, Aux/External Audio In)
Fig. 3a-Remote
battery cover sheet
(remove)
Fig. 3b-
Remote battery
compartment
opened
Fig. 4-Main battery compartment interior
(cover removed)
(Model 940001G only)
Before using the global version
AC adapter, slide the plug
adapter that matches the wall
outlets in your country onto the
AC transformer as shown. To
remove the plug adapter, slide
it off while pressing the release
button as shown.
Press to
Release
Slide On
TravelTunes 940001G-6LIM rev3.in6 6 2/17/07 3:13:05 PM

6
7
SETUp AND opERATIoN
1. Install 8 “C” size alkaline batteries as indicated inside the battery compartment on the back of the
TravelTunes (Fig.4), after pressing the tab at the top of the compartment cover to remove it (be sure
the batteries are all securely in place before replacing the battery compartment cover), or connect the
included AC adapter to the “DC 12v” input jack located behind the rubber strip on the lower right of
the back panel, then plug the AC adapter into a wall outlet. Note that the AC adapter will charge a
docked iPod, but the batteries will not. Make sure the TravelTunes power is off before “docking” an
iPod or making any other connections.
2. The versatile metal handle can be used in the upright position to carry the TravelTunes around, but
should be moved down into the lower position to act as a stand when using the TravelTunes. Be sure
the handle has locked securely into the stand position before proceeding.
3. If you will be using an iPod that has a docking port on the bottom, rst lift the rubber dock connector
cover (Fig 1a) on the TravelTunes up and press it into place in the indented area above the dock
connector cover (Fig.1b). Then snap the plastic docking adapter designed for your model of iPod (see
chart on next page) in place over the TravelTunes dock connector. Then insert the iPod carefully into
the adapter, making sure the connector goes into the docking port on your iPod. If the iPod does not
seem to t, please check to make sure you installed the correct adapter for your model. iPod models
without a docking port (Shuf e, etc.) as well as other MP3 players and audio devices may be used as
well, by connecting their headphone or line out jacks to the “Aux” jack on the back of the TravelTunes,
located behind the rubber strip (Fig 2). This connection can be made with a short male-to-male
1/8”(3.5mm) stereo cable (not included, but provided with many portable audio devices or available
at electronics retailers).
4. Turn on the iPod or connected audio device (if it is not already on), then press the power button
( ) on the top of the TravelTunes. The LED power indicator will come on, and glow green. The LED
will turn red to indicate a low battery condition.
5. Press Play on the iPod or connected device, and adjust the listening level with the volume rocker
switch located next to the power button on top of the TravelTunes. Press and release or hold down the
end of the volume control marked “+” to increase the volume level, and press the end marked “-” to
decrease the volume level. Note that the volume control on the iPod itself is bypassed when docked in
the TravelTunes. As with any speaker system, distortion may occur at very high volumes. If so, reduce
the volume to a lower level. Refer to the “Troubleshooting” section of this manual if you experience
other audio quality problems.
6. The included wireless remote control can be used instead of the controls on the TravelTunes to turn
on the power, raise or lower volume and also play/pause and select the next or previous song on a
docked iPod. The remote uses an infrared beam, and must be pointed towards the sensor behind the
front grille of the TravelTunes to control it. Before using it, pull out the plastic protective battery cover
sheet (Fig 3a) If the remote does not seem to work, please check the following:
( ) on the top of the TravelTunes. The LED power indicator will come on, and glow green. The LED
• Move the remote closer to the TravelTunes and try again (max. range is about 18 ft.)
• Be sure you are not at too much of an angle relative to the front of the TravelTunes
• Make sure the iPod is securely mounted on the dock connector, and the iPod’s display is on
• Open the remote battery compartment by sliding it straight out, and replace the battery with a new
3 volt lithium #CR2025 battery (Fig.3b).
TravelTunes 940001G-6LIM rev3.in7 7 2/17/07 3:13:05 PM

8
9
Model “G”
(Generation)
Intro
Date
Capacity
(GB)
Adapter #
5G iPod w/Video 5 10/12/05 30/60 Inc w iPod
Nano n/a 9/7/05 1/2/4 Inc w iPod
iPod w/Color Display none 2/5/05 20/30 6
“ “ “ 60 7
Shuffle* n/a 1/11/05 512 MB
or 1 GB
n/a
iPod Photo none 10/26/04 40/60 7
iPod w/Click Wheel (inc
U2 Special Edition)
4 7/19/04 20 4
“ “ “ 40 5
Mini (all) 1st or 2nd
Gen Mini
1/6/04 4/6 3
iPod w/Dock connector 3 4/28/03 10/15/20 1
“ “ “ 30/40 2
iPod w/Touch wheel* 2 7/17/02 5/10/20 n/a
iPod w/Scroll wheel* 1 10/23/01 5/10 n/a
Select the correct dock adapter for your model of iPod based on the information in this
chart. e adapter # is printed on each included white plastic adapter. Insert the adapter
into the docking area of the TravelTunes, pressing down carefully until it clicks into place,
with the dock connector projecting through the cutout in the center of the adapter. When
removing or changing dock adapters, you may nd it helpful to use a small at blade
screwdriver inserted in the indent at the back of the adapter to gently pry up the adapter.
* Note that iPod models shaded in gray were not designed with a docking port/connector,
but may be used (as well as other audio devices with headphone jacks) by using a 1/8”
(3.5mm) male-to-male stereo audio cable (not included) to connect their headphone jack
to the “Aux In” jack found on the back of the TravelTunes under the rubber cover strip,
next to the AC adapter input and headphone out jack.
Contact Bushnell Outdoor Products at the URL or customer service phone number
provided on the inside cover of this manual with questions regarding compatibility or
dock adapters for future iPod models not listed above.
DOCK ADAPTER SELECTION CHART
TravelTunes 940001G-6LIM rev3.in8 8 2/17/07 3:13:05 PM

8
9
SYMPTOM POSSIBLE PROBLEM SOLUTION
Power LED not
lit (AC Adapter
operation)
AC adapter isn’t connected to an AC
outlet, or the adapter plug is not inserted
into the DC power jack.
Insert the connector from the AC adapter
into the DC 12v In jack on the back of the
TravelTunes, then plug the adapter into an
AC outlet.
e wall outlet is not working or surge
protector/power strip is not turned on.
Plug another device into the wall outlet
to confirm it works and make sure any
multiple outlet strip being used is turned on.
Power LED not lit
(battery operation)
No batteries are installed, or they are
installed incorrectly.
Install 8 “C” size alkaline batteries in the
direction indicated inside the battery
compartment.
Power LED not
lit (battery or AC
adapter operation)
TravelTunes power not turned on. Turn on the TravelTunes by pushing the
power button ( ) located on top of
the unit. A green LED will illuminate the
power icon on the button when the power
is on.
No sound from
speakers
Volume is set too low. e rocker switch next to the power button
is the volume control, Press the end marked
“+” to increase the volume level.
No sound from
speakers or crackling
or distorted sound
e iPod is not correctly inserted on the
dock connector.
Turn off the iPod, lift it off the dock
connector, reseat it and turn it on again.
No sound from
speakers or crackling
or distorted sound
If using a non-docking type of MP3 player
or other external audio device, it is not
connected properly or there is a problem
with this audio source.
Make sure your external audio device is
connected to the “aux in” jack on the back
of the TravelTunes (not the headphone
jack), using a 1/8”(3.5mm) “male to male”
stereo cable (not included) plugged into
the line out or headphone output of the
audio device. Make sure the audio device
is turned on and playing. Set the volume
on the audio source to mid-level, and start
with the volume set low on the TravelTunes,
gradually increasing it to the desired level. If
sound quality is poor, reduce the volume of
the external audio device.
Distorted sound e TravelTunes volume is set too
high, or batteries are weak.
Reduce the volume by pressing the
“-” end of the volume rocker switch.
Check for low battery condition
(power LED turns red)
Radio interference e TravelTunes is too close to a
radio tower
Relocate the unit to determine if the
interference goes away
Intermittent
buzzing
A GSM type cell phone is nearby Move the unit or the cell phone
further away.
TROUBLESHOOTING
Turn on the TravelTunes by pushing the
power button ( ) located on top of
TravelTunes 940001G-6LIM rev3.in9 9 2/17/07 3:13:06 PM

10
11
ADDITIONAL NOTES
Remote Control Functions:
All recent models of iPod (“Video” and Nano) will respond normally to the included
wireless remote control. However, some of the remote control buttons may not
work with older models of the iPod. For example, the “Play/Pause” and “Next
Track” & “Previous Track” buttons will not control the “3rd generation” iPod (sold
in 2003). e “Power On/Off” button normally turns the iPod on and off, but may
not work or may instead turn off the audio on older iPods. If you have an iPod that
does not respond to the full range of functions on the included remote, make sure
that you are using the newest software version available for your model. Software
updates to your iPod can normally be done by selecting “Update iPod” from the
“File” menu of iTunes on your computer. For a list of all iPod models to date, along
with their current software version, go to:
http://docs.info.apple.com/article.html?artnum=61688
If Your iPod Becomes “Frozen” or Locked Up (Will Not Function):
First, be sure the hold switch has not been set to “lock” on the iPod (a lock icon
appears on its screen). Most “freezes” can be fixed with a simple reset procedure.
e steps vary with the model of iPod. For details, go to:
http://www.apple.com/support/ipod/ or
http://docs.info.apple.com/article.html?artnum=61705
Regarding Battery Disposal:
is product contains a small (non-rechargeable) lithium battery in the remote
control. Lithium batteries should be disposed of by taking them to a household
hazardous waste collection site. Some retailers that sell lithium batteries also provide
a container to collect used batteries for proper disposal.
Batteries not provided with the product should be disposed of following the
recommendations of the battery manufacturer. Contact the battery brand
manufacturer for directions on battery disposal. Always follow state and local
regulations regarding disposal of batteries.
TravelTunes 940001G-6LIM rev3.in10 10 2/17/07 3:13:06 PM
Table of contents