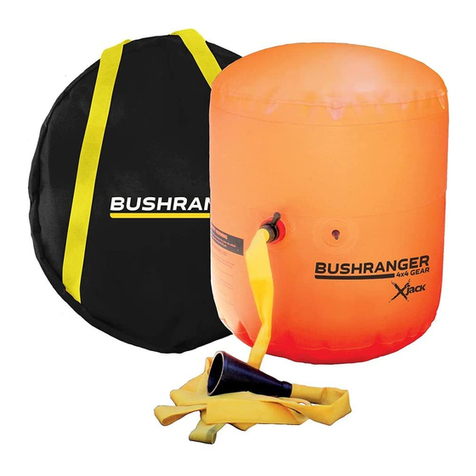
Bushranger II Series Operating manual

4.3 EXHAUST JACK Series II
PRODUCT INFORMATION SHEET
“Don’t go bush without Bushranger 4WD Recovery Gear”
Kingsley Enterprises Pty. Ltd.
Phone: 1800 654 767
www.bushranger.com.au
4.3 EXHAUST JACK
PRODUCT INFORMATION
JULY 2006
Part Number
72X04
Materials
840 Denier Nylon core with PVC coating to both sides
Dimensions
0.085mm thick overall
Capacity
4 tonne - 780mm (30”) lift
Weight
2.6kg
Warranty
1 Year No-Fuss Warranty
Uses the vehicle’s own low pressure exhaust to inflate the Exhaust Jack. Is capable of lifting the
vehicle out of ruts or holes, to change a wheel or to install snow chains. Great for use if you are
stuck in sand, mud, snow or soft ground.
An essential piece of equipment that you should always carry in your vehicle in case of
emergency
Exhaust Jack can also be used on trailers and caravans or farm implements when necessary.
Comes as a complete kit including two protective mats to help prevent puncturing the bag, a
pair of work gloves to keep your hands clean and protected, a puncture repair kit in case the
bag is pierced, laminated operating instructions and a handy carry bag in which to store
everything, ready for use
SPECIFICATIONS
VEHICLE APPLICATIONS
PRODUCT TIPS
…Continued over page

4.3 EXHAUST JACK Series II
PRODUCT INFORMATION SHEET
“Don’t go bush without Bushranger 4WD Recovery Gear”
Kingsley Enterprises Pty. Ltd.
Phone: 1800 654 767
www.bushranger.com.au
4.3 EXHAUST JACK
PRODUCT INFORMATION
JULY 2006
…Continued over page
Never allow any part of your body to be under the vehicle when it is supported only by the
Exhaust Jack
Be aware that vehicle’s exhaust fumes are poisonous if inhaled in large quantities. Therefore
do not use Exhaust Jack in a confined area and always turn off engine when not inflating the
jack
Always chock both front and rear wheels opposite to the side under which the jack is being
used and apply the handbrake
When placing the Exhaust Jack under the vehicle, ensure the bag is away from hot or sharp
underbody parts and clear away sharp sticks or rocks from the ground
It is essential to use the protective mats provided to help prevent puncturing the bag.
Do not over inflate the bag - 90% capacity is ample
Will safely lift your vehicle up out of a rut or bog
in seconds
Simple to use without the risk of damage to your
vehicle as can happen with a high lift jack
Simple to use and highly efficient, with no
complicated moving parts to jam or seize
Reliable one way valve on the end of the hose
The bag will stay inflated for over an hour
Comes as a complete kit
Packs away in its own storage bag, ready to use
Note: Kit includes safety gloves, puncture repair kit, (2) protective mats plus a convenient
carry bag for the complete Exhaust Jack kit
Step 1 Secure your vehicle from rolling
Apply the handbrake
Chock both front & back wheels opposite to the side under which the Jack is being used
Step 2 Prepare the Exhaust Jack
Compress the bag with the top and base on top of each other. (Similar to a crushed soft drink
can.)
Connect the hose to the bag at the one-way valve by turning in a clockwise direction and
tighten
Use the protective mats to help prevent punctures in the bag. The mats can be placed on top
and beneath the bag or if the ground is clear, both mats can be used on the top.
Step 3. Position the Exhaust Jack under the vehicle
Do not locate under fuel tanks or the exhaust system. Select a strong underbody location
capable of supporting half the weight of the vehicle.
Avoid sharp body protrusions, brackets or edges.
FEATURES BENEFITS
SAFETY PRECAUTIONS
FITTING & CARE INSTRUCTIONS (Included in Product Packaging)

4.3 EXHAUST JACK Series II
PRODUCT INFORMATION SHEET
“Don’t go bush without Bushranger 4WD Recovery Gear”
Kingsley Enterprises Pty. Ltd.
Phone: 1800 654 767
www.bushranger.com.au
4.3 EXHAUST JACK
PRODUCT INFORMATION
JULY 2006
…Continued over page
Step 4 Lifting operation (Do not remain in Vehicle)
Firmly secure the rubber cone end of the hose over the vehicle’s exhaust pipe.
Make sure the hose has no kinks.
Make sure the vehicle’s gear box is in neutral or park.
Start the vehicle’s engine and partially inflate the bag then turn off the engine.
Check to see if the protective mats are correctly positioned.
Restart the engine and continue to inflate the bag. If two people are available, one can hold the
cone securely over the exhaust pipe while the other gently revs the engine to speed up the
process.
Do not continue to over inflate the bag once the sidewalls are upright –90% capacity is ample.
Turn off the engine.
Note: If the bag does not achieve an upright position during the inflation process, stop the
operation, and follow Step 5. Reposition the Exhaust Jack then start the engine to repeat the
inflation process
Step 5 Lowering Operation (Do not remain in Vehicle)
Gently lower vehicle by carefully turning the valve anti-clockwise to deflate the bag.
Warranty:
Exhaust Jack is warranted for 12 months from date of purchase against faulty manufacture and
materials.
This warranty does not cover any wear and tear of the product associated with normal use.
Puncture Repair Kit …………………….……….(Part Number: 72X05A)
Protection Mat ……………..………………(Part Number: 72X05B)
Hose (includes end fittings) ……...……………………...(Part Number: 72X05C)
Release Valve Kit ……...……………………...(Part Number: 72X05D)
4” Cone ………………...……..…….(Part Number: 72X05E)
5” Cone (needed for F250 Exhaust Pipe) …………………….....…….(Part Number: 72X05J)
Hose Extension - 1450mm ………………...……..…….(Part Number: 72X05F)
PVC Exhaust Pipe Extension to suit Patrol, 80Srs and 100 Srs Landcruiser
……………………………..(Part Number: 72X05E)
ACCESSORIES / SPARE PARTS
FITTING & CARE INSTRUCTIONS (Continued)

4.3 EXHAUST JACK Series II
PRODUCT INFORMATION SHEET
“Don’t go bush without Bushranger 4WD Recovery Gear”
Kingsley Enterprises Pty. Ltd.
Phone: 1800 654 767
www.bushranger.com.au
4.3 EXHAUST JACK
PRODUCT INFORMATION
JULY 2006
This manual suits for next models
1
Table of contents
Other Bushranger Jack manuals