ButtKicker Gamer BK-GR2 User manual

QUICK START
GUIDE
Contents:
a. ButtKicker Gamer with Easy Clamp™ attachment mechanism
b. 90 watt ButtKicker Power Amplifier BKA-130-C with wired remote
c. 13.5’ cable with quick release connecting ButtKicker Gamer to amplifier
d. RCA and mini “Y” adapters
e. 5’ RCA to RCA cable and 5’ RCA to mini cable
f. Two Velcro® cables ties
Thank you for purchasing
the ButtKicker Gamer.
This guide will help you to quickly set up your new ButtKicker system
with your PC or gaming console.
ButtKicker®Gamer
BK-GR2
b. c.
f.
e.
d.
a.

Attach the ButtKicker Gamer
to your center post chair
1. Raise the pneumatic lift on your chair (make the seat of the chair
higher). Then, push down the sleeve covering the center post to
expose the post. (refer to figure 1)
2. Loosen the knob on the arm of the ButtKicker Gamer and place
the clamp around the post.
3. Tighten the knob and secure the ButtKicker Gamer in place on
the chair seat. (refer to figure 1)
4. Use the supplied Velcro® cable wraps to tie the end of the
ButtKicker Gamer cable to one leg of your seat. (refer to figure 2)
Position the ButtKicker Power Amplifier and
connect to the ButtKicker Gamer
Do not turn on the amplifier until all
of the connections are made!
1. Connect the long quick release cable to the short cable coming
from the ButtKicker Gamer. (refer to large diagram & figure 2b)
[Note that the cables may be disconnected using the quick release
connector at any time if desired. HOWEVER, make sure the
amplifier is turned OFF BEFORE disconnecting the cables.]
2. Connect the long quick release cable to the banana jacks on
the back of the ButtKicker Power Amplifier. (+) connects to the
red terminal, (-) connects to the black terminal.
3. Position the amplifier near the audio source (PC), and accessible
to the user.
4. If desired, plug the included wired ButtKicker Remote into the
serial port on the front of the ButtKicker Power Amplifier.
5. Connect the power cord to the power terminal on the back of the
ButtKicker Power Amplifier and then plug it into a power outlet.
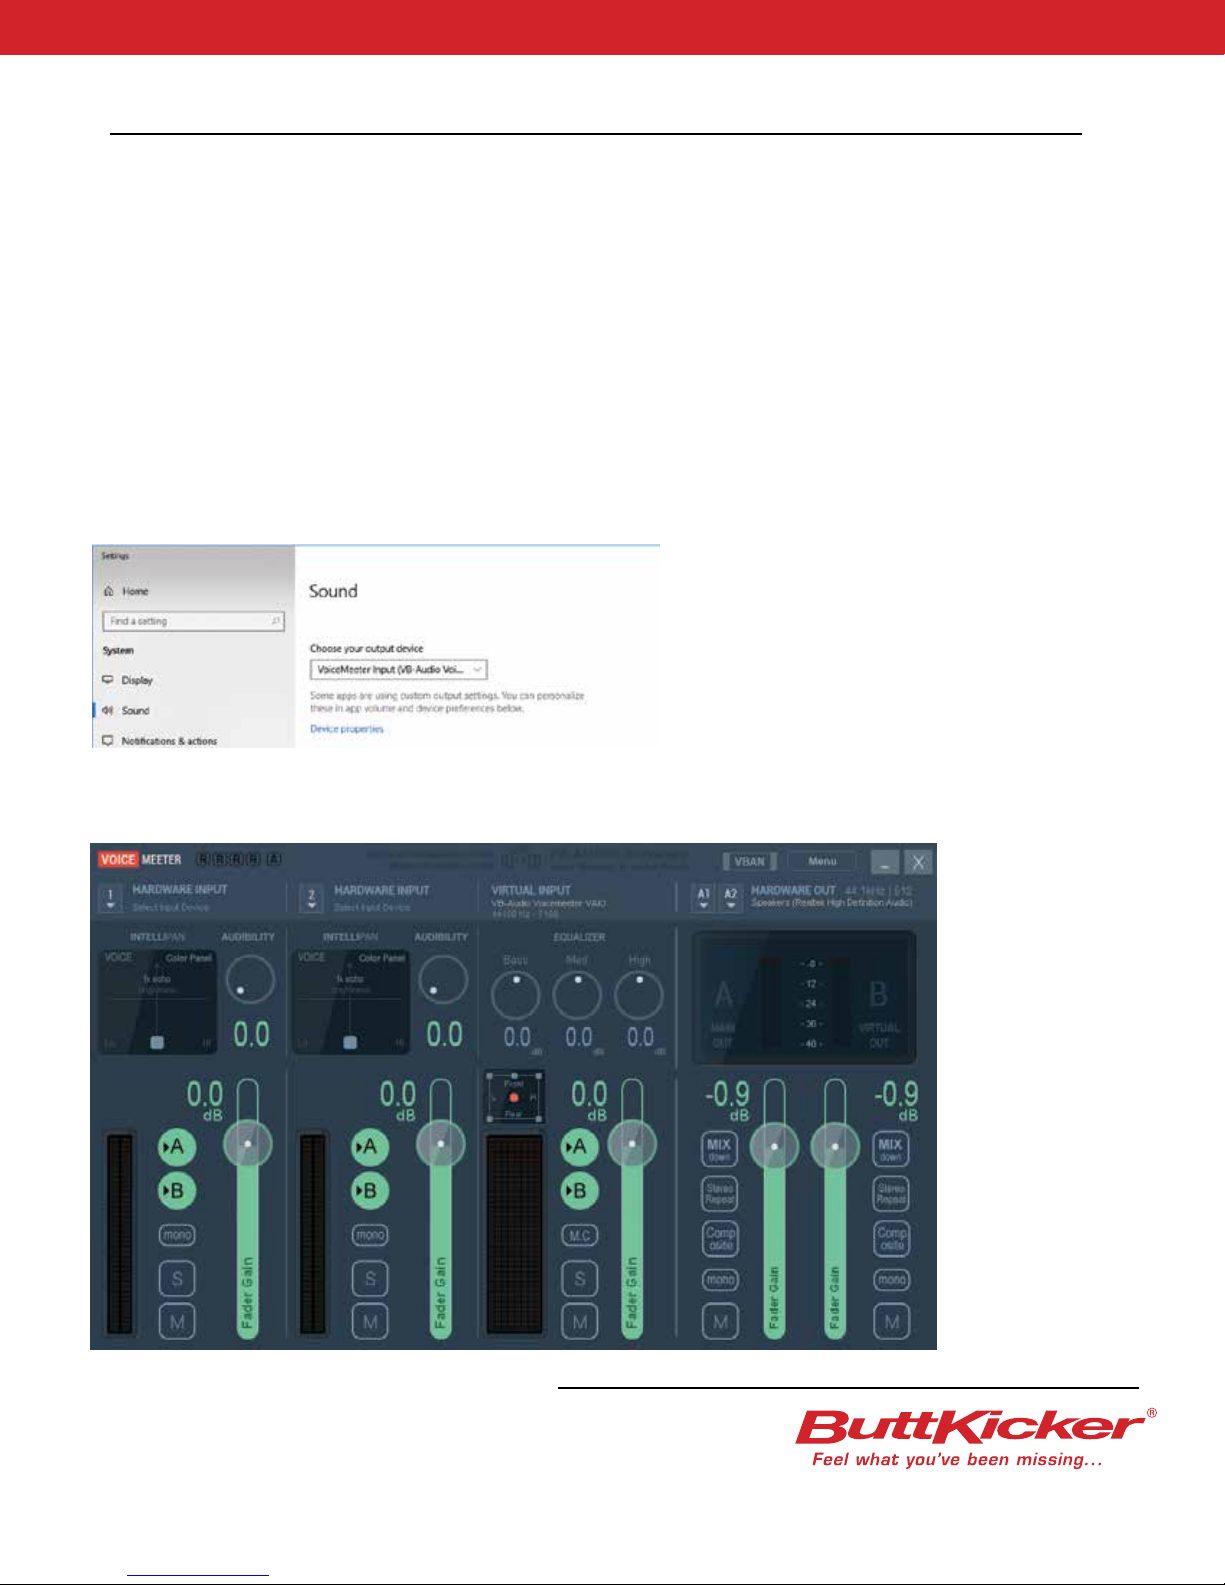
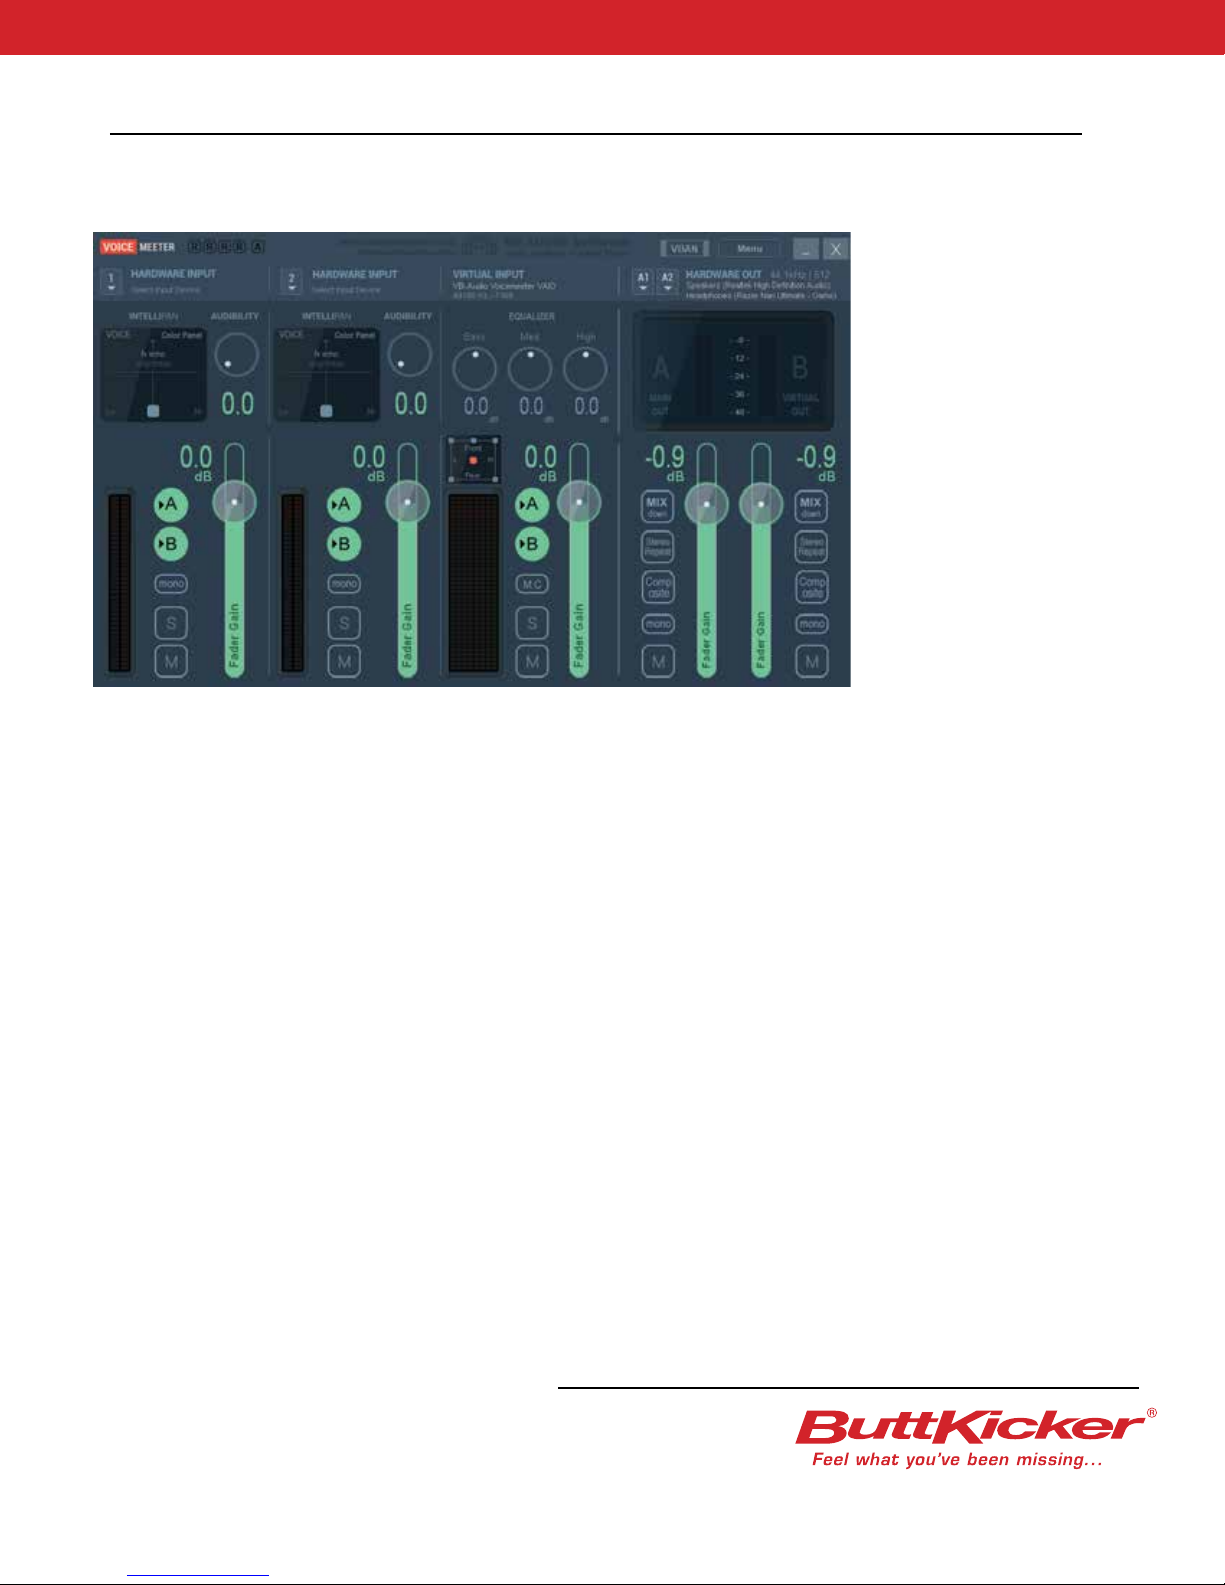
Connecting the Audio Signal from
the PC to the ButtKicker Power Amplifier
For a stereo or 4 channel sound card, insert the mini “Y” adaptor into
the “line out” (usually a green jack). Connect the mini male end of the 5’
mini to the RCA cable to one leg of the mini “Y” adaptor. Then connect
either the red or black RCA male end of this cable to the “line level
input” RCA input (White) on the back of the ButtKicker Power Amplifier.
Connect the signal cable for your speaker system to the other leg of
the mini “Y” adaptor.
For a 5.1 sound card, insert the mini “Y” adaptor into the sub/center
channel (usually an orange jack). Connect the mini male end of the 5’
mini to RCA cable to one leg of the mini “Y” adaptor. Then connect the
red or black RCA male end of this cable to the “line level input” RCA
input (White) on the back of the ButtKicker Power Amplifier.
Connect the signal cable for your speaker system to the other leg of
the mini “Y” adaptor.
For a multi-channel sound card with a digital output and a separate
surround sound system, use the RCA “Y” adaptor to split the “sub out”
output of your surround sound processor. Use the 5’ RCA to RCA cable
to connect one leg of the RCA “Y” adaptor to the “line level input” RCA
input (White) on the back of the ButtKicker Power Amplifier, and connect
the audio cable of your subwoofer to the other leg of the RCA “Y” adaptor.
PC GAMING
START HERE
PLEASE NOTE:
THE QUICK CONNECT CABLE ONLY FITS ONE WAY.
Make sure pins are properly aligned with the large pin
in the large hole and the small pin in the small hole.
Figure 1
Figure 2
Figure 2b

USB Headphones / Audio Devices & VR Headsets
By default, USB headphones disable the physical (analog) outputs on a computer. Using the
freeware program Voicemeeter, http://vb-audio.pagesperso-orange.fr/Voicemeeter/, both
USB headphones and the ButtKicker Gamer2 can be run at the same time. This solution is
also applicable to HDMI/Optical connections from a PC to sound systems, TVs, or other
devices.
Step 1.
Connect the ButtKicker Gamer2 BKA-130-CJ amplifier to the headphone (green jack) output of the PC.
Step 2.
Download and install Voicemeeter from http://vb-audio.pagesperso-orange.fr/Voicemeeter/. Follow the
Voicemeeter installation instructions, you may be required to restart your computer.
Step 3.
Open Windows Sound Settings and set Voicemeeter Input as the Output Device.
Step 4.
Open Voicemeeter, in the top right-hand side of the program menu under “Hardware Output” there are drop
down menus for Output Devices labeled A1 and A2. In A1 choose your computers Speakers Output.

USB Headphones / Audio Devices & VR Headsets - Continued
Step 5.
In A2 select the USB or HDMI device.
Notes:
If there are multiple versions of your devices listed first choose the WDM version. In rare cases you may need
to use the MME version of the device. Please refer to the Voicemeeter manual for additional details on Audio
Driver types and other program features.
Special Note for Oculus Rift, HTC Vive, and Windows Mixed Reality Headset Users:
-If using Steam VR for your headset please follow the audio mirroring instructions found at
https://www.vive.com/us/support/vive/category_howto/hear-from-pc-the-audio-on-vr.html
-If using the Oculus Rift please follow the audio mirroring instructions found at
https://support.oculus.com/155708918506052/
-If using a Windows Mixed Reality headset with Steam VR please follow the audio mirroring instructions found
at https://www.vive.com/us/support/vive/category_howto/hear-from-pc-the-audio-on-vr.html. If using a
Windows Mixed Reality headset without Steam VR please follow the Voicemeeter instructions above.

PC SYSTEM ADJUSTMENT
PLEASE NOTE:
TURN OFF THE AMPLIFIER WHEN NOT IN USE.
1. Turn on the ButtKicker Power Amplifier.
2. Turn on your favorite game, music track, or movie.
3. Adjust the PC volume to your desired level.
4. Adjust your speaker system to a usable listening volume.
5. Adjust the ButtKicker Power Amplifier. See the FAQ
section on the back page for detailed information on
common knob and switch settings.
6. If your chair has levers that rattle, jam foam under the
lever or hang a bean bag on the handle.
7. Enjoy

Attach the ButtKicker Gamer
to your center post chair
1. Raise the pneumatic lift on your chair (make the seat of the chair
higher). Then, push down the sleeve covering the center post to
expose the post. (refer to figure 1)
2. Loosen the knob on the arm of the ButtKicker Gamer and place
the clamp around the post.
3. Tighten the knob and secure the ButtKicker Gamer in place on
the chair seat. (refer to figure 1)
4. Use the supplied Velcro® cable wraps to tie the end of the
ButtKicker Gamer cable to one leg of your seat. (refer to figure 2)
Position the ButtKicker Power Amplifier and
connect to the ButtKicker Gamer
Do not turn on the amplifier until all
of the connections are made!
1. Connect the long quick release cable to the short cable coming
from the ButtKicker Gamer. (refer to large diagram & figure 2b)
[Note that the cables may be disconnected using the quick release
connector at any time if desired. HOWEVER, make sure the
amplifier is turned OFF BEFORE disconnecting the cables.]
2. Connect the long quick release cable to the banana jacks on the
back of the ButtKicker Gamer Amplifier. (+) connects to the red
terminal, (-) connects to the black terminal.
3. Position the amplifier near the audio source and accessible
to the user.
4. If desired, plug the included wired ButtKicker Remote into the
serial port on the front of the ButtKicker Power Amplifier.
5. Connect the power cord to the power terminal on the back of the
ButtKicker Power Amplifier and then plug it into a power outlet.
Connecting the audio signal from the gaming
console to the ButtKicer Power Amplifier
For a gaming console hooked up to a separate surround sound
system, use the RCA “Y” adaptor to split the “sub out” output of your
surround sound processor. Use the 5’ RCA to RCA cable to connect one
leg of the RCA “Y” adaptor to the “line level input” RCA input (White) on
the back of the ButtKicker Power Amplifier, and connect the audio cable
of your subwoofer to the other leg of the RCA “Y” adaptor.
For a gaming console setup without a separate sound system, using
an Optical to Analog RCA Converter (sold separately) connect the Optical
Output (TOSLINK) port of the console to the Optical Input of the Optical to
Analog RCA Converter. Connect either the Left or Right RCA Output of
the Converter to the Input of the ButtKicker Power Amplifier. For
wireless headphones with a base station with an optical output use the
same connection method as above. See the diagram on the next page
for connection details.
Optionally, you can connect directly a console controller/console 3.5mm
(headphone) output using the 3.5mm Y splitter to allow for connection to
wired headphones and the ButtKicker Gamer amplifier.
CONSOLE GAMING
START HERE
PLEASE NOTE:
THE QUICK CONNECT CABLE ONLY FITS ONE WAY.
Make sure pins are properly aligned with the large pin
in the large hole and the small pin in the small hole.
Figure 1
Figure 2
Figure 2b

CONSOLE SYSTEM ADJUSTMENT
PLEASE NOTE:
TURN OFF THE AMPLIFIER WHEN NOT IN USE.
1. Turn on the ButtKicker Power Amplifier.
2. Turn on your gaming console and play your favorite game
or movie.
3. Adjust the ButtKicker Power Amplifier. See the FAQ section
on the back page for detailed information on common knob
and switch settings.
4. If you are using your gaming console through a surround
sound receiver, you may need to adjust the level of the
subwoofer output to give more or less input signal to the
ButtKicker Power Amplifier.
5. If your chair has levers that rattle, jam foam under the lever
or hang a bean bag on the handle.
6. Enjoy!
BUTTKICKER GAMER
CONSOLE GAMING INSTALLATION
Output From Optical (TOSLINK)
On PS4/XBOX ONE / ETC
Connecting to Consoles
If you use a sound system with your console you can easily connect to the RCA subwoofer output of
your sound system following the instructions for Connecting to a Sound System. If you use only TV
speakers with your sound system you can connect to the Optical Output (TOSLINK) of your console
using an Optical to Analog RCA Converter. These instructions are also applicable if you use headphones
that include a base station with an Optical Audio (TOSLINK) Output.
Please note that an HMDI extractor should not be used to connect.
Connect to Optical Input
On Optical to Analog RCA Converter
Connect From Red or White Output on
Converter to INPUT on BKA-130-CJ
Do not use both Red AND White Outputs

Email us at:
The Guitammer Company
1-888-676-2828
9:00 AM - 5:00 PM EST
Visit us on the web at:
TheButtKicker.com
STOP!
If you have questions or need technical support,
please contact The Guitammer Company, not
the store where you purchased the product.
FAQ’s
Q. Everything is hooked up but I’m not getting any output from the ButtKicker® Gamer.
A. Here are a few things to check. Make sure that:
- The ButtKicker Power Amplifier is plugged in and turned on.
- All connections are firmly connected.
- Software is properly installed and functioning.
- Sound is not muted and volume is turned up.
- Your computer’s sound card is turned up enough and the bass setting is set high enough.
Q. How should I set the switches and knobs on the front of the ButtKicker Power Amplifier?
A. The following are general guidelines:
Media Low Cutoff Switch High Cutoff Switch High Cutoff Freq. Knob
Games off on 80 Hz
Music on off disabled by the high cut switch
Movies off on 80 Hz
* Adjust the volume so that the ButtKicker Gamer meets your intensity preference.
Q. I get a lot of extra shaking even when there isn’t any action in the game or movie. How can I get rid of this?
A. The ButtKicker Gamer is reacting to bass in the soundtrack. Turn on the high cut switch and dial the high
cut knob down to a lower frequency. The extra shaking may also be eliminated by turning off the background
music from the in-game settings menu.
Q. MY CHAIR RATTLES!?! How can I fix this problem?
A. The part that most often rattles is the lever that controls the pneumatic lift cylinder and/or tilt control.
The rattle can be eliminated by jamming foam under the lever or by hanging a bean bag on the handle.
Q. What happens to the cables when I twist around in my seat?
A. There is a strain relief already attached to the ButtKicker Gamer cable which will allow you to spin around
without immediately putting strain on the cable. Should the cable get wrapped around the center post more
than just a few times, spin the chair back the other way until the cable is no longer twisted.
Q. At times I use my chair away from my desk, how can I do that with the cable attached?
A. The quick release on the ButtKicker Gamer cable allows the cable to easily disconnect at the base of
the chair without having to remove the ButtKicker Gamer from your chair.
Q. I hear a knocking or banging noise coming from the ButtKicker Gamer?
A. That is the internal piston of the ButtKicker Gamer hitting the inside of the housing. Although this will not
immediately harm the unit, you should turn the volume down (lower) on the ButtKicker Power Amplifier to
avoid this “over driving” of the ButtKicker Gamer.
Visit TheButtKicker.com for more FAQ’s and details on other ButtKicker products and accessories.
Table of contents
Other ButtKicker Amplifier manuals